For the early uniform style (primarily seen in the first two seasons), you’ll need the following pattern pieces:
B1 – Upper front yoke (seasons 1-2)
B2 – Lower front yoke (seasons 1-2)
C1 – Upper back yoke (seasons 1-2)
C2 – Lower back yoke (seasons 1-2)
D1 – Upper right front (front-zipping versions)
D2 – Upper left front (front-zipping versions)
E – Right side front
F – Left side front
G1 – Upper back (front-zipping versions)
H – Right side back
I – Left side back
J1 – Lower right front (front-zipping versions)
J2 – Lower left front (front-zipping versions)
K – Right front pant leg
L – Left front pant leg
M – Right back pant leg
N – Left back pant leg
O – Front sleeve
P – Back sleeve
R – Neckline/yoke trim
S – Lower front pant facing
T1 – Lower pant leg trim (season 1)
T2 – Lower pant leg trim (season 2)
U1 – Shoulder pad (women’s version 1)
U – Shoulder pad (men’s version)
LATER UNIFORM STYLE
For the front-zipping later uniform style, you’ll need the following pattern pieces:
A1 – Collar
B3 – Front yoke (seasons 3-7)
C3 – Back yoke (seasons 3-7)
D1 – Upper right front (front-zipping versions)
D2 – Upper left front (front-zipping versions)
E – Right side front
F – Left side front
G1 – Upper back (front-zipping versions)
H – Right side back
I – Left side back
J1 – Lower right front (front-zipping versions)
J2 – Lower left front (front-zipping versions)
K – Right front pant leg
L – Left front pant leg
M – Right back pant leg
N – Left back pant leg
O – Front sleeve
P – Back sleeve
R – Neckline/yoke trim
S – Lower front pant facing
U1 – Shoulder pad (women’s version 1)
U2 – Shoulder pad (women’s version 2)
U – Shoulder pad (men’s version)
FABRIC CUTTING
There are a few important factors to keep in mind when cutting your fabric.
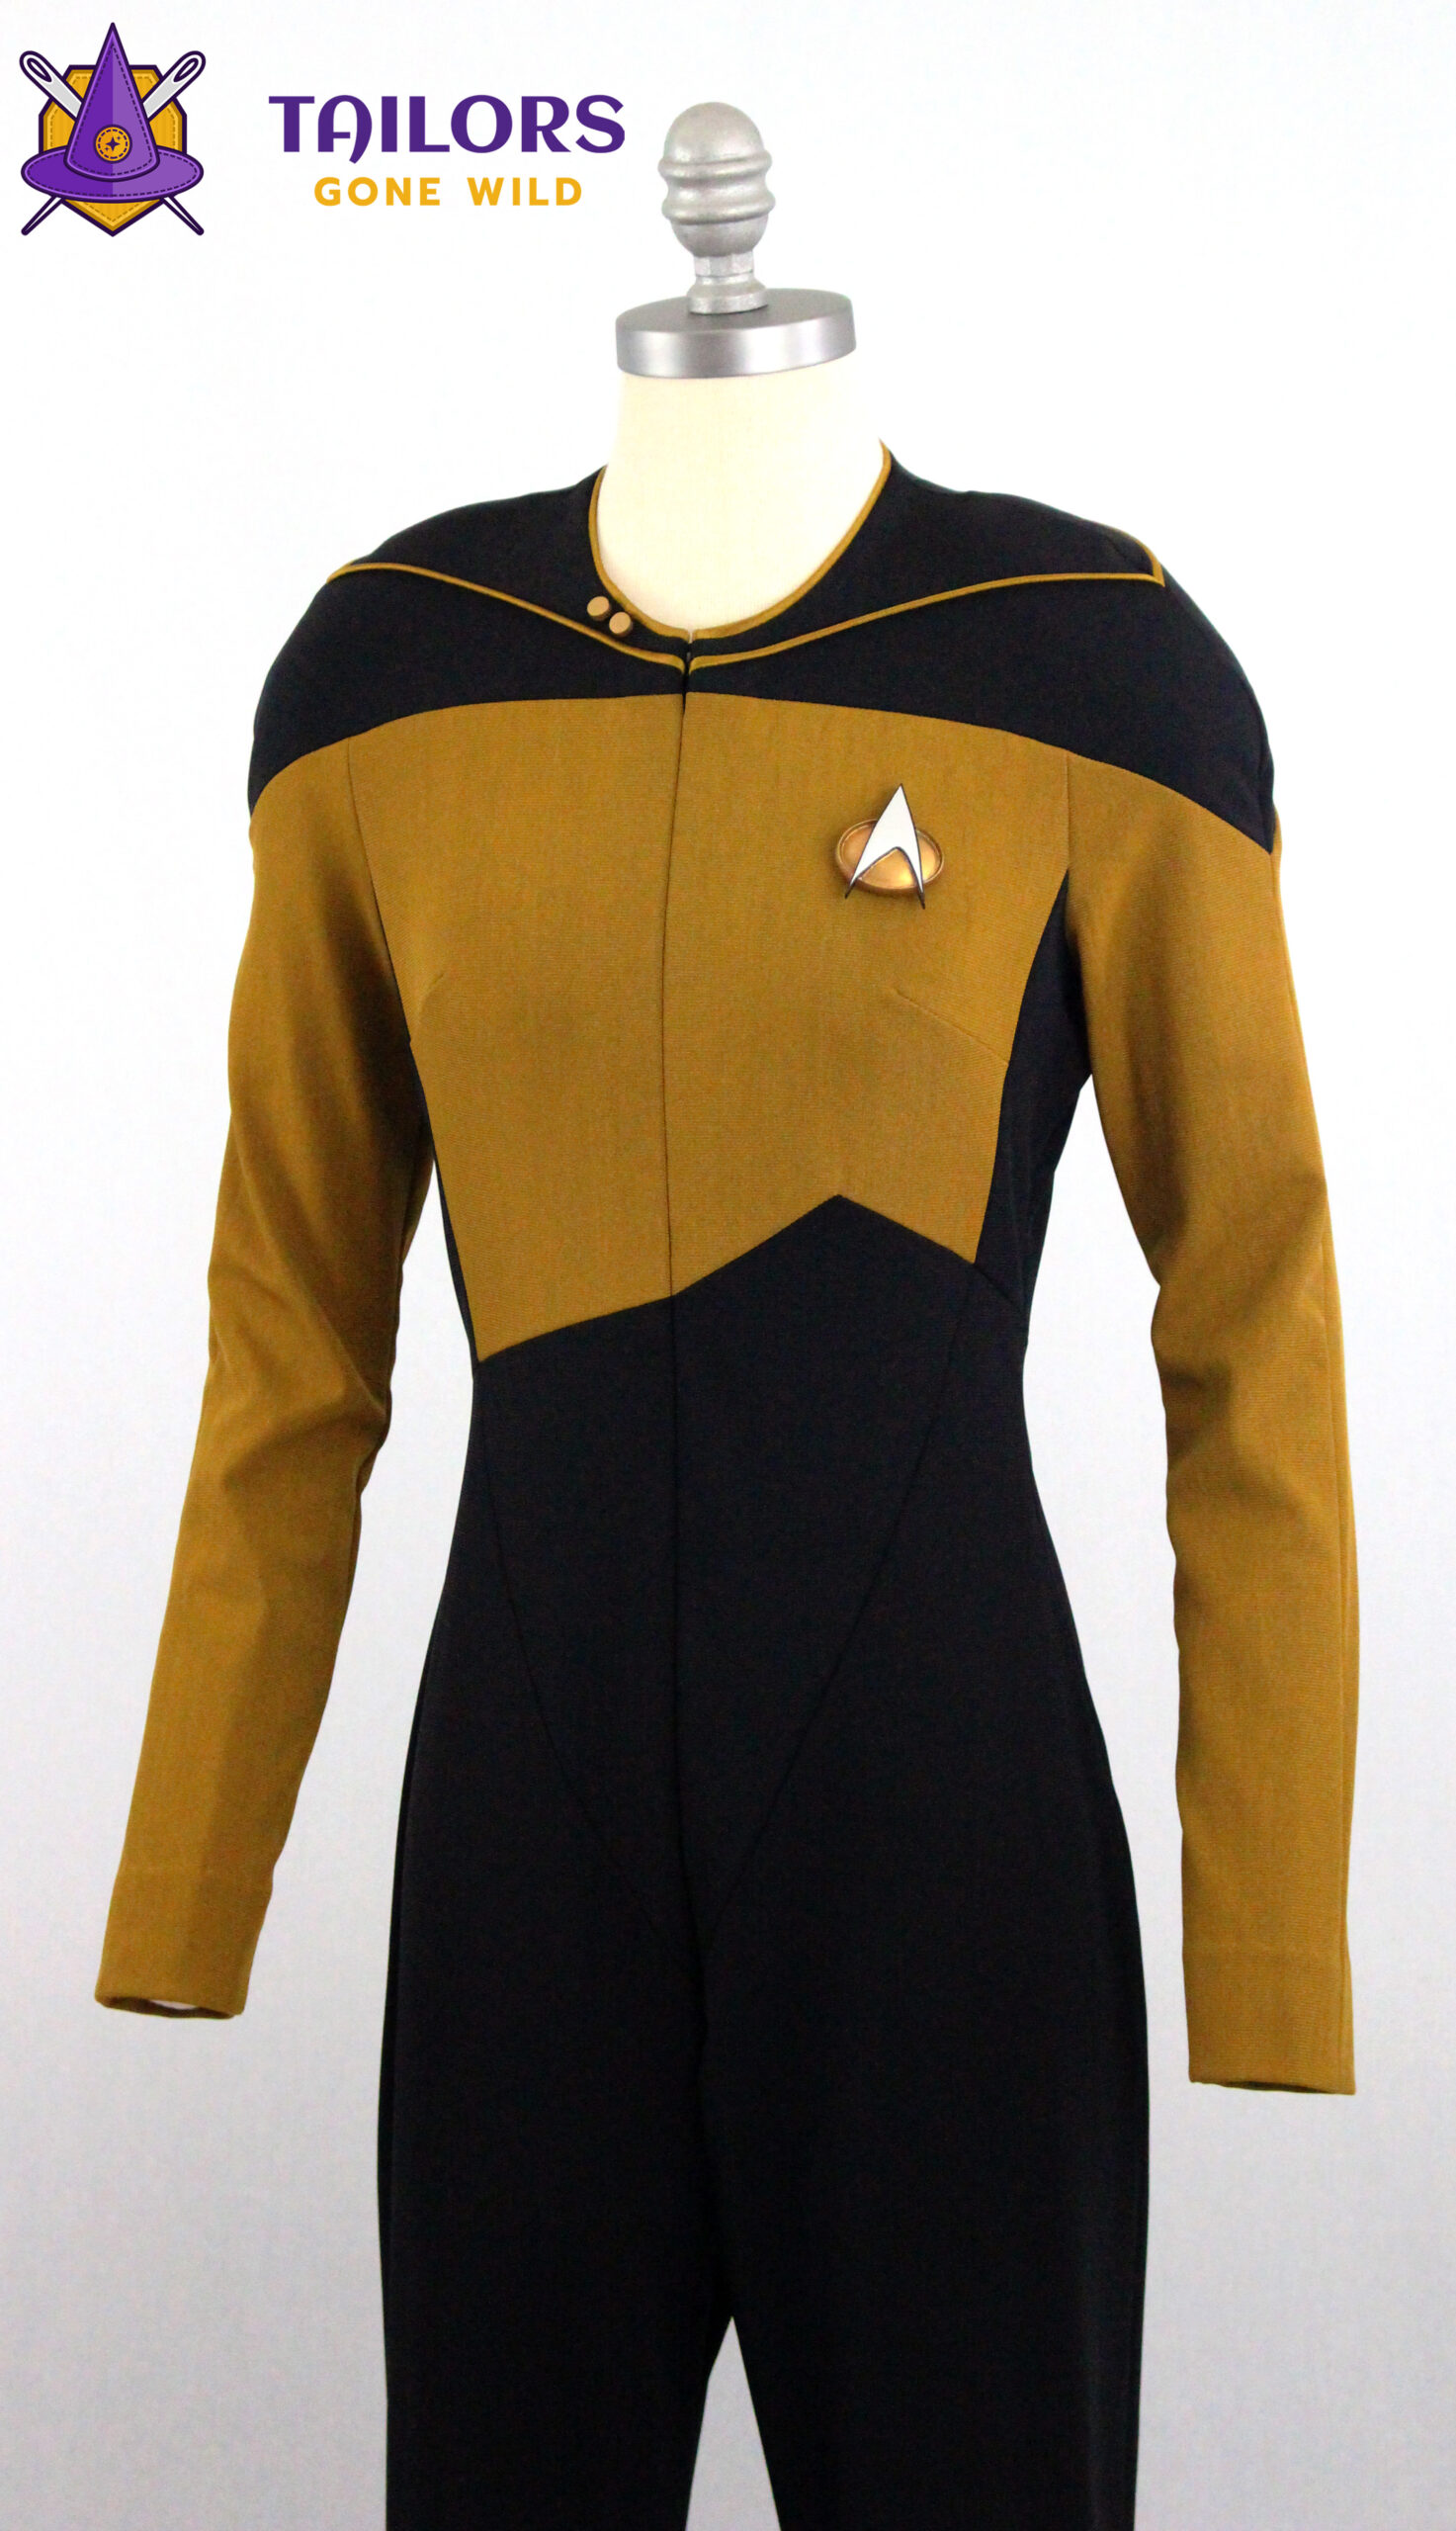
First, remember to cut your fabric using the matte/”dull” (non-shiny) side of the fabric as the “right” side.
With the Tailors Gone Wild TNG jumpsuit patterns, this means cutting your pattern pieces with the fabric “right” (matte/dull) side up and the printed pattern pieces facing upward, as well.
Second, if you’re doing the convenient “cheat” I mentioned and using the same division-colored jumbo spandex for both the body and neckline/yoke/pants trim, remember to cut your piping strips on the bias (i.e. at a 45° angle to the cut edge and/or selvage).
Third, many of the pattern pieces have multiple grain options.
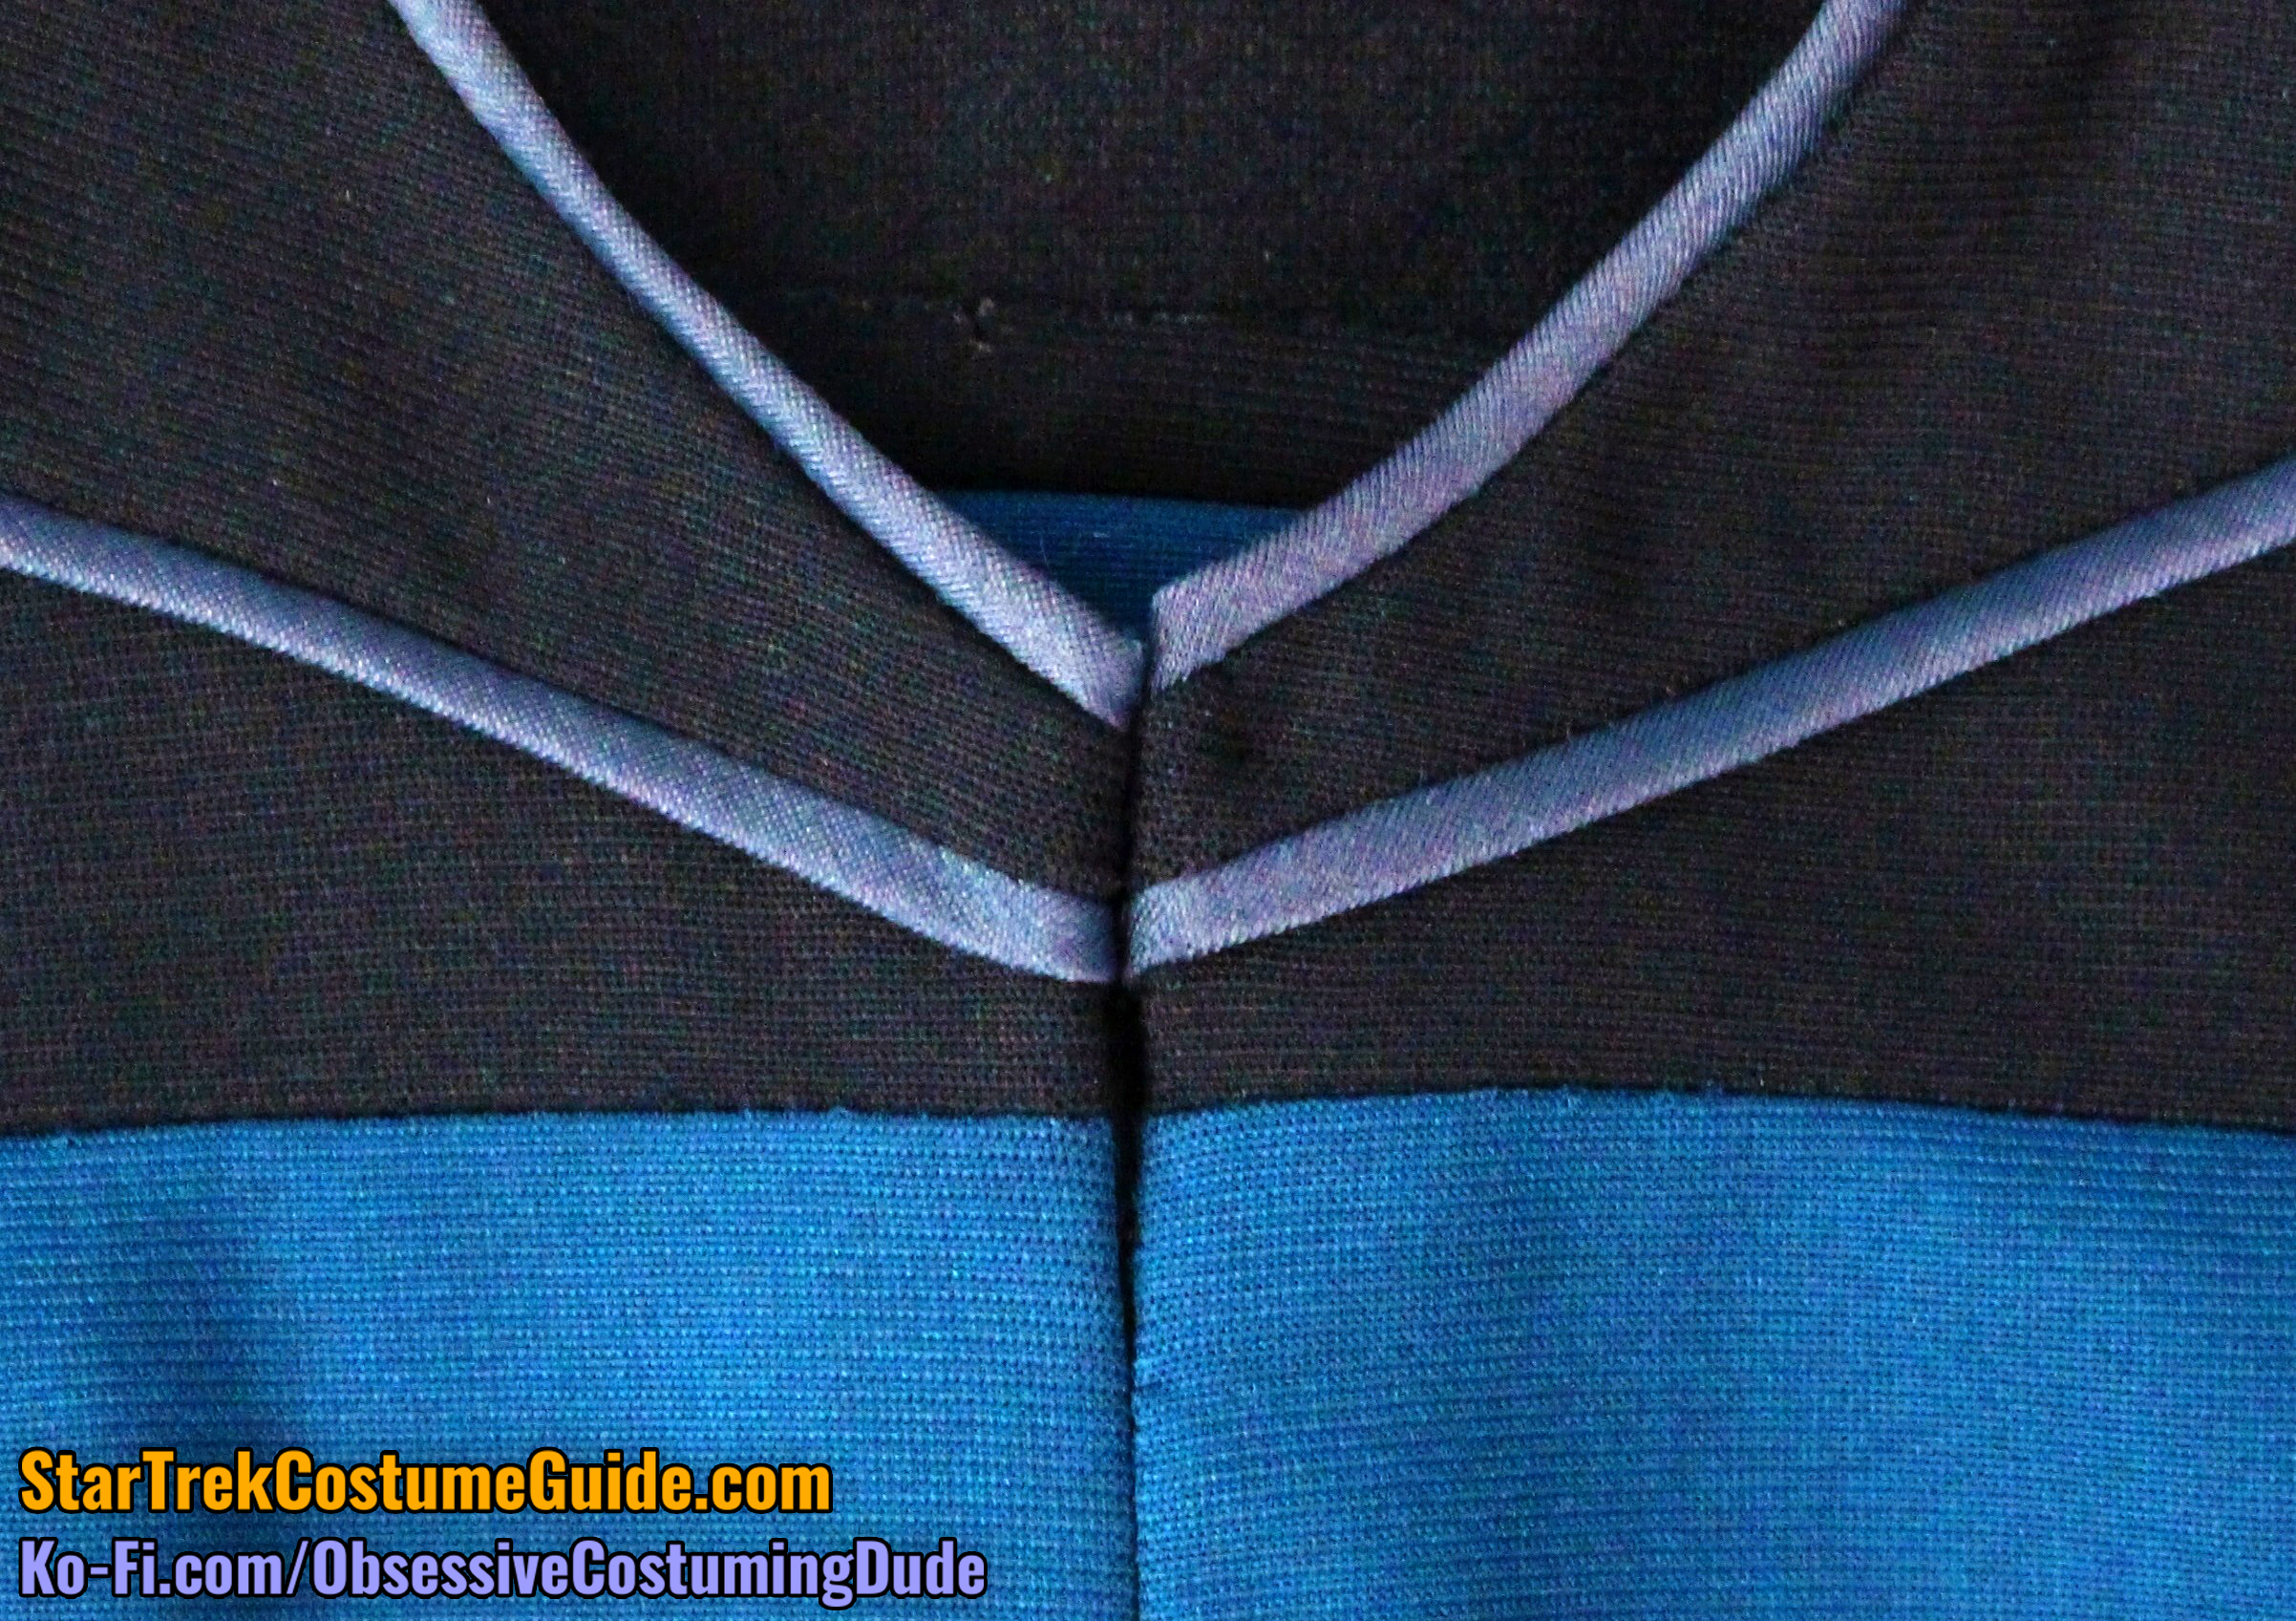
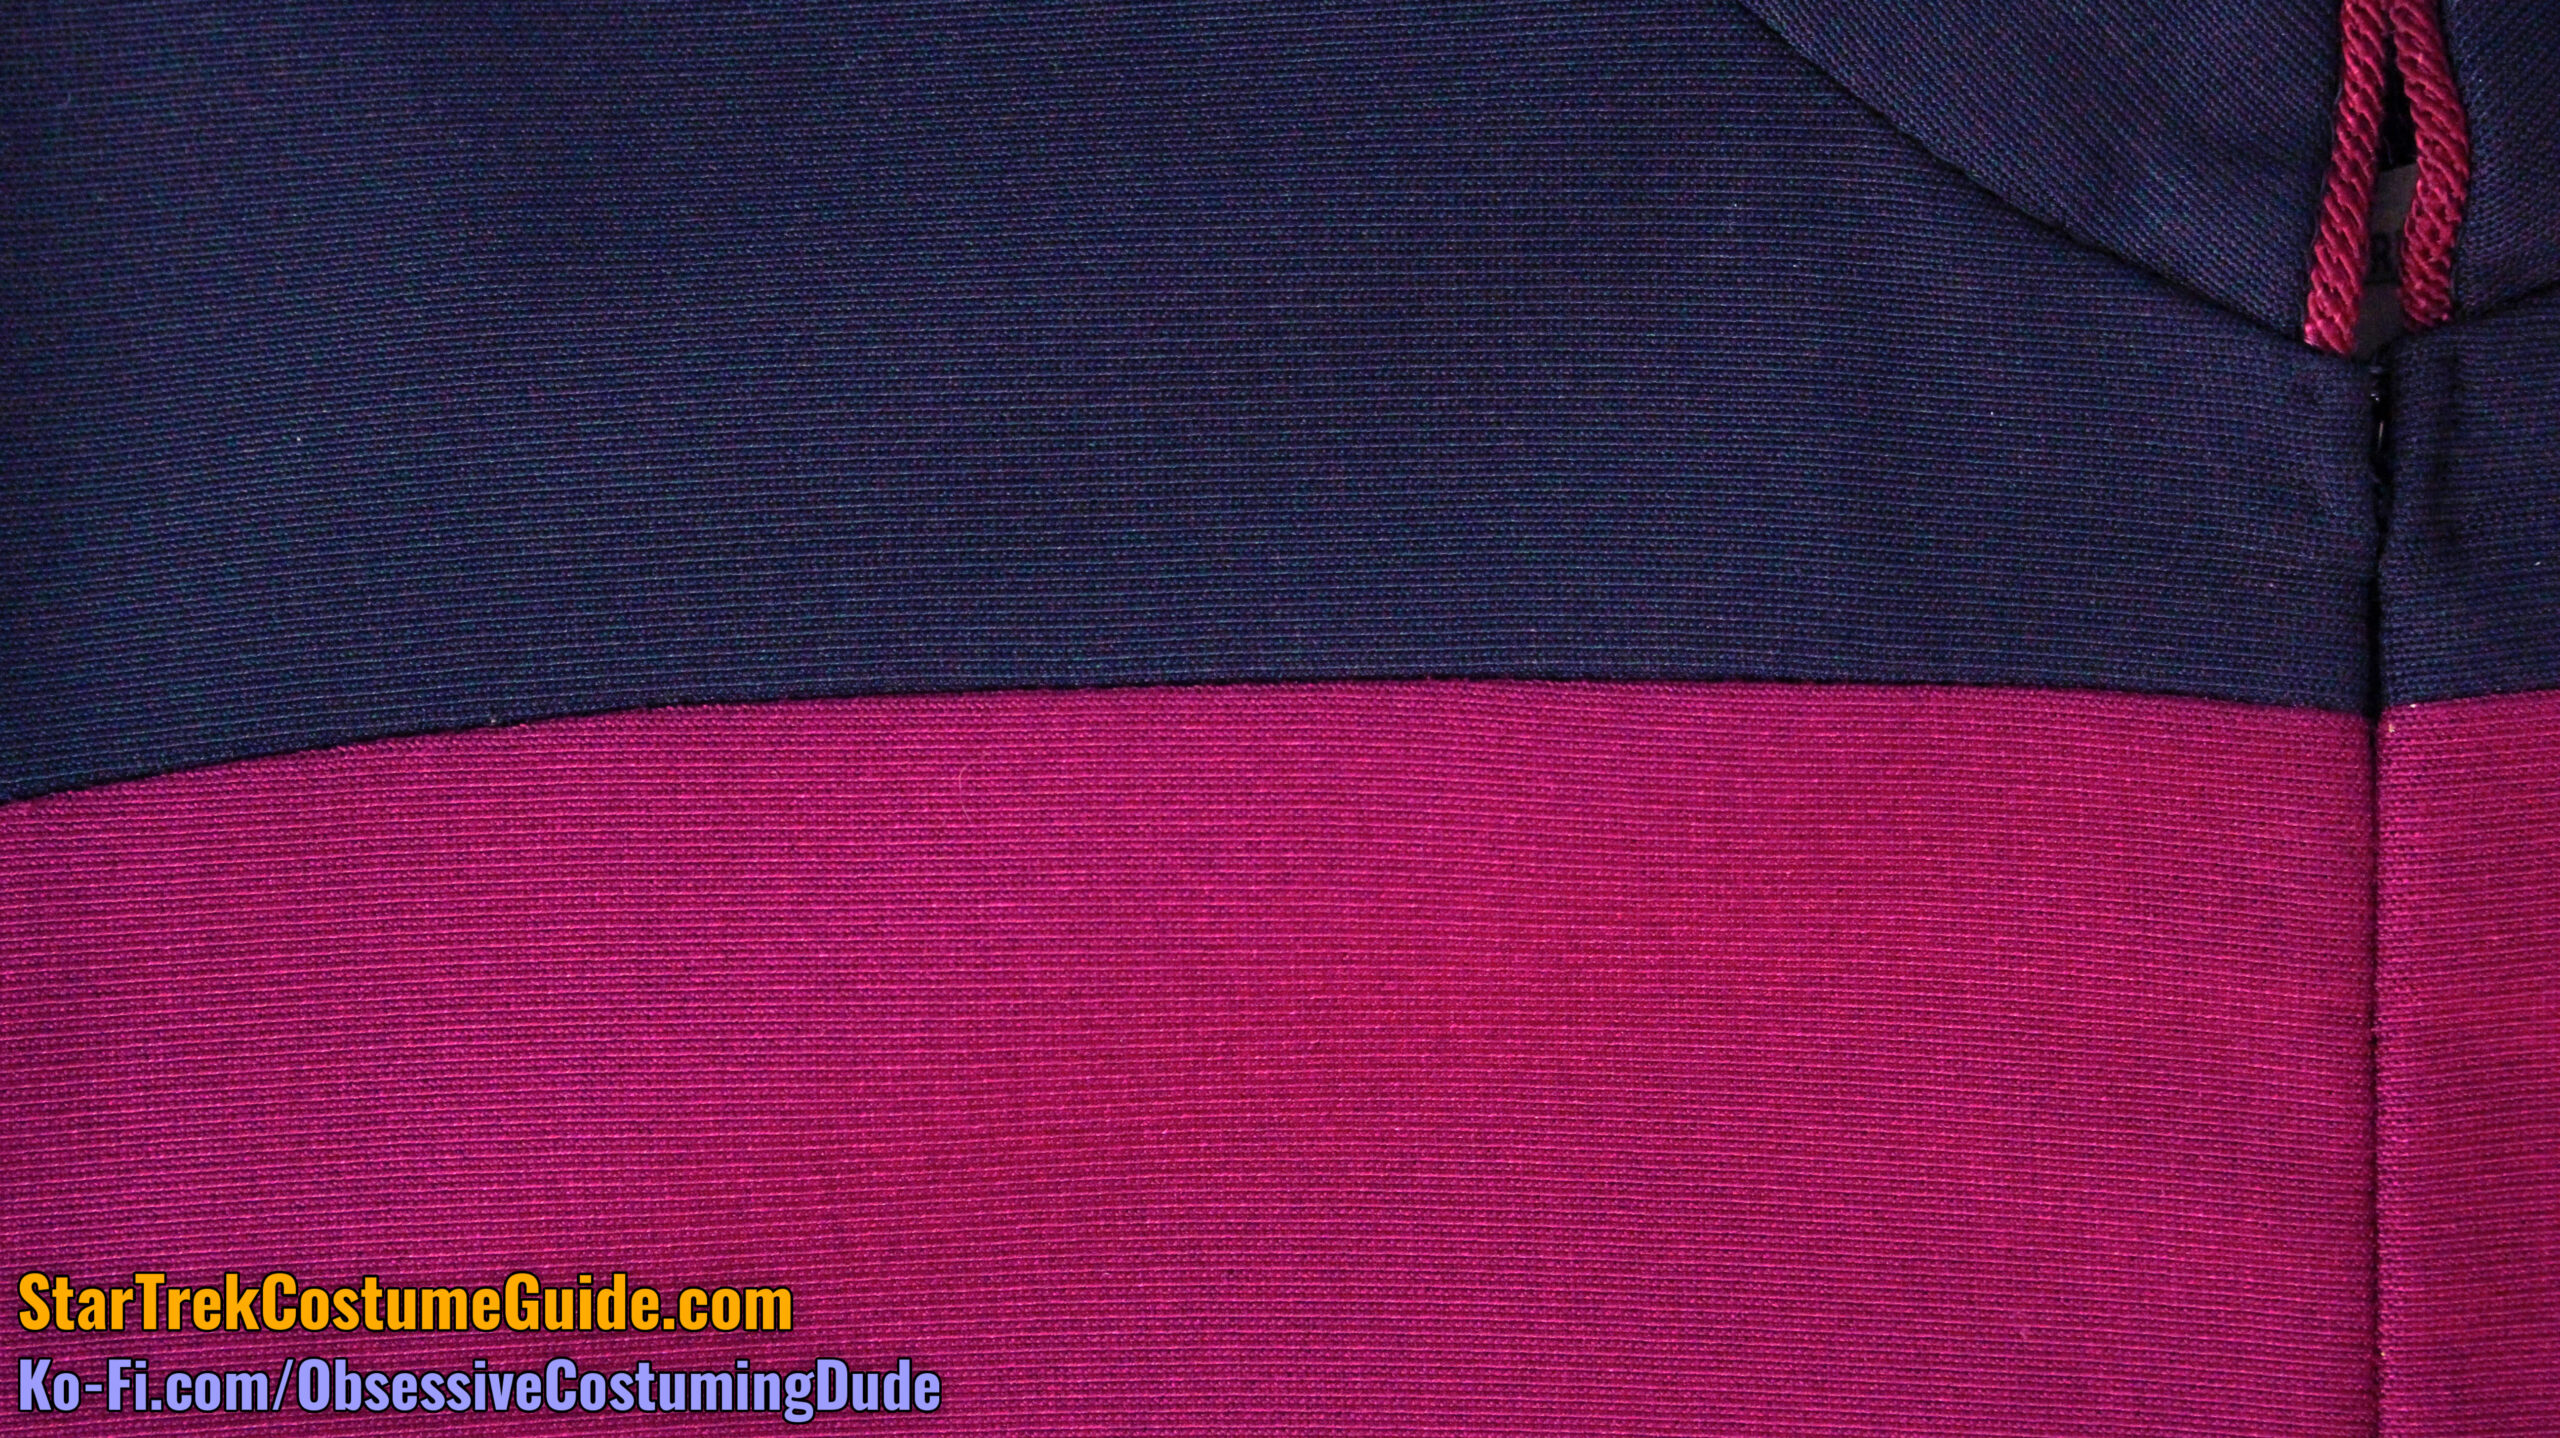
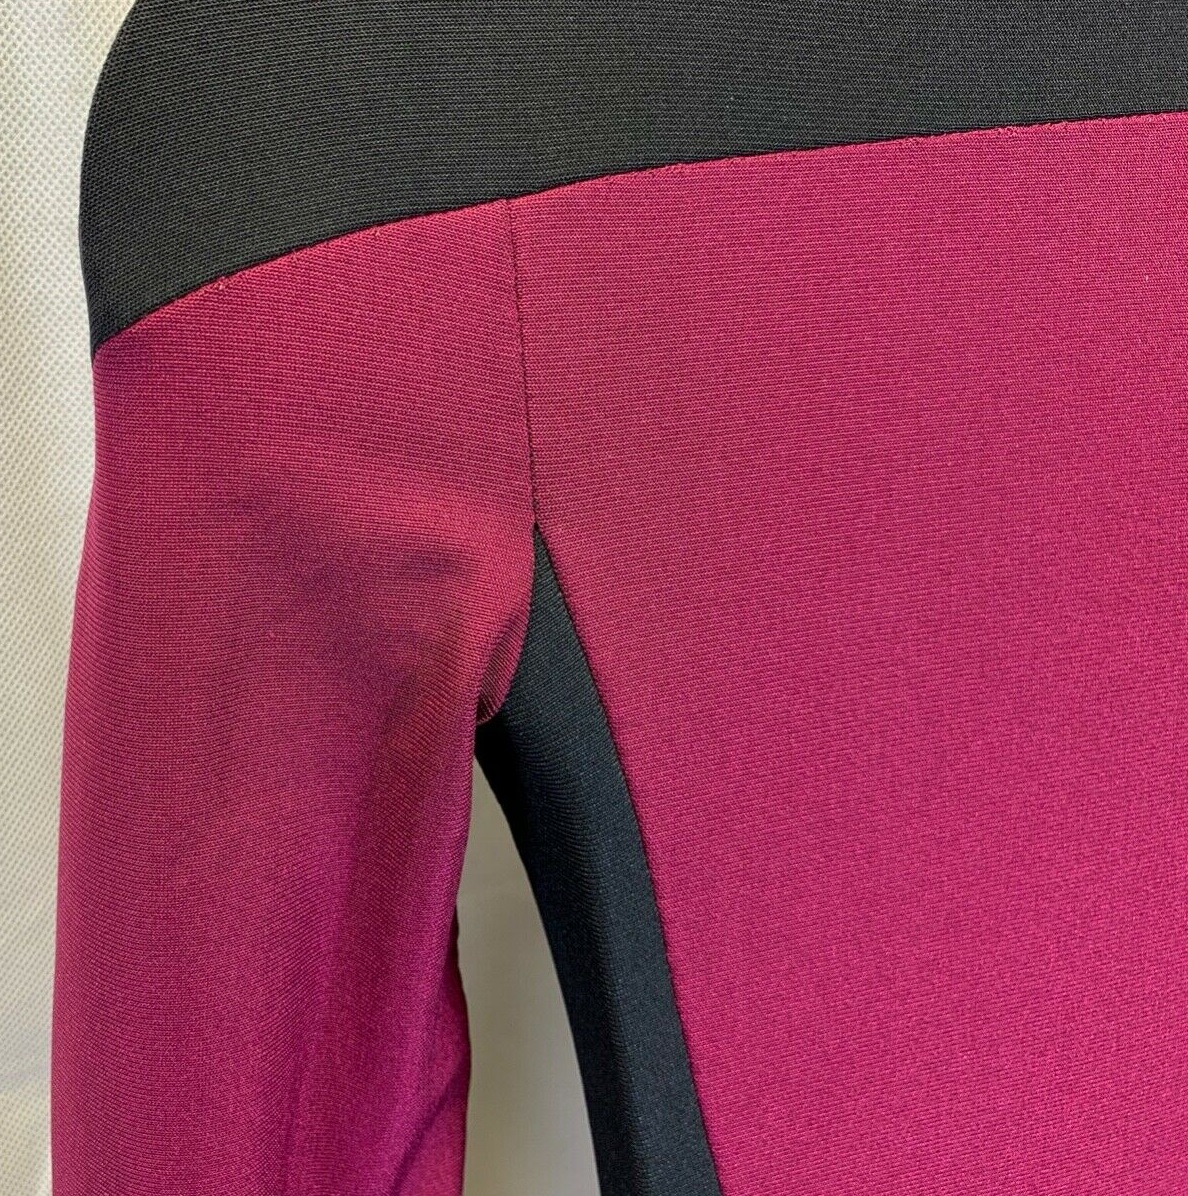
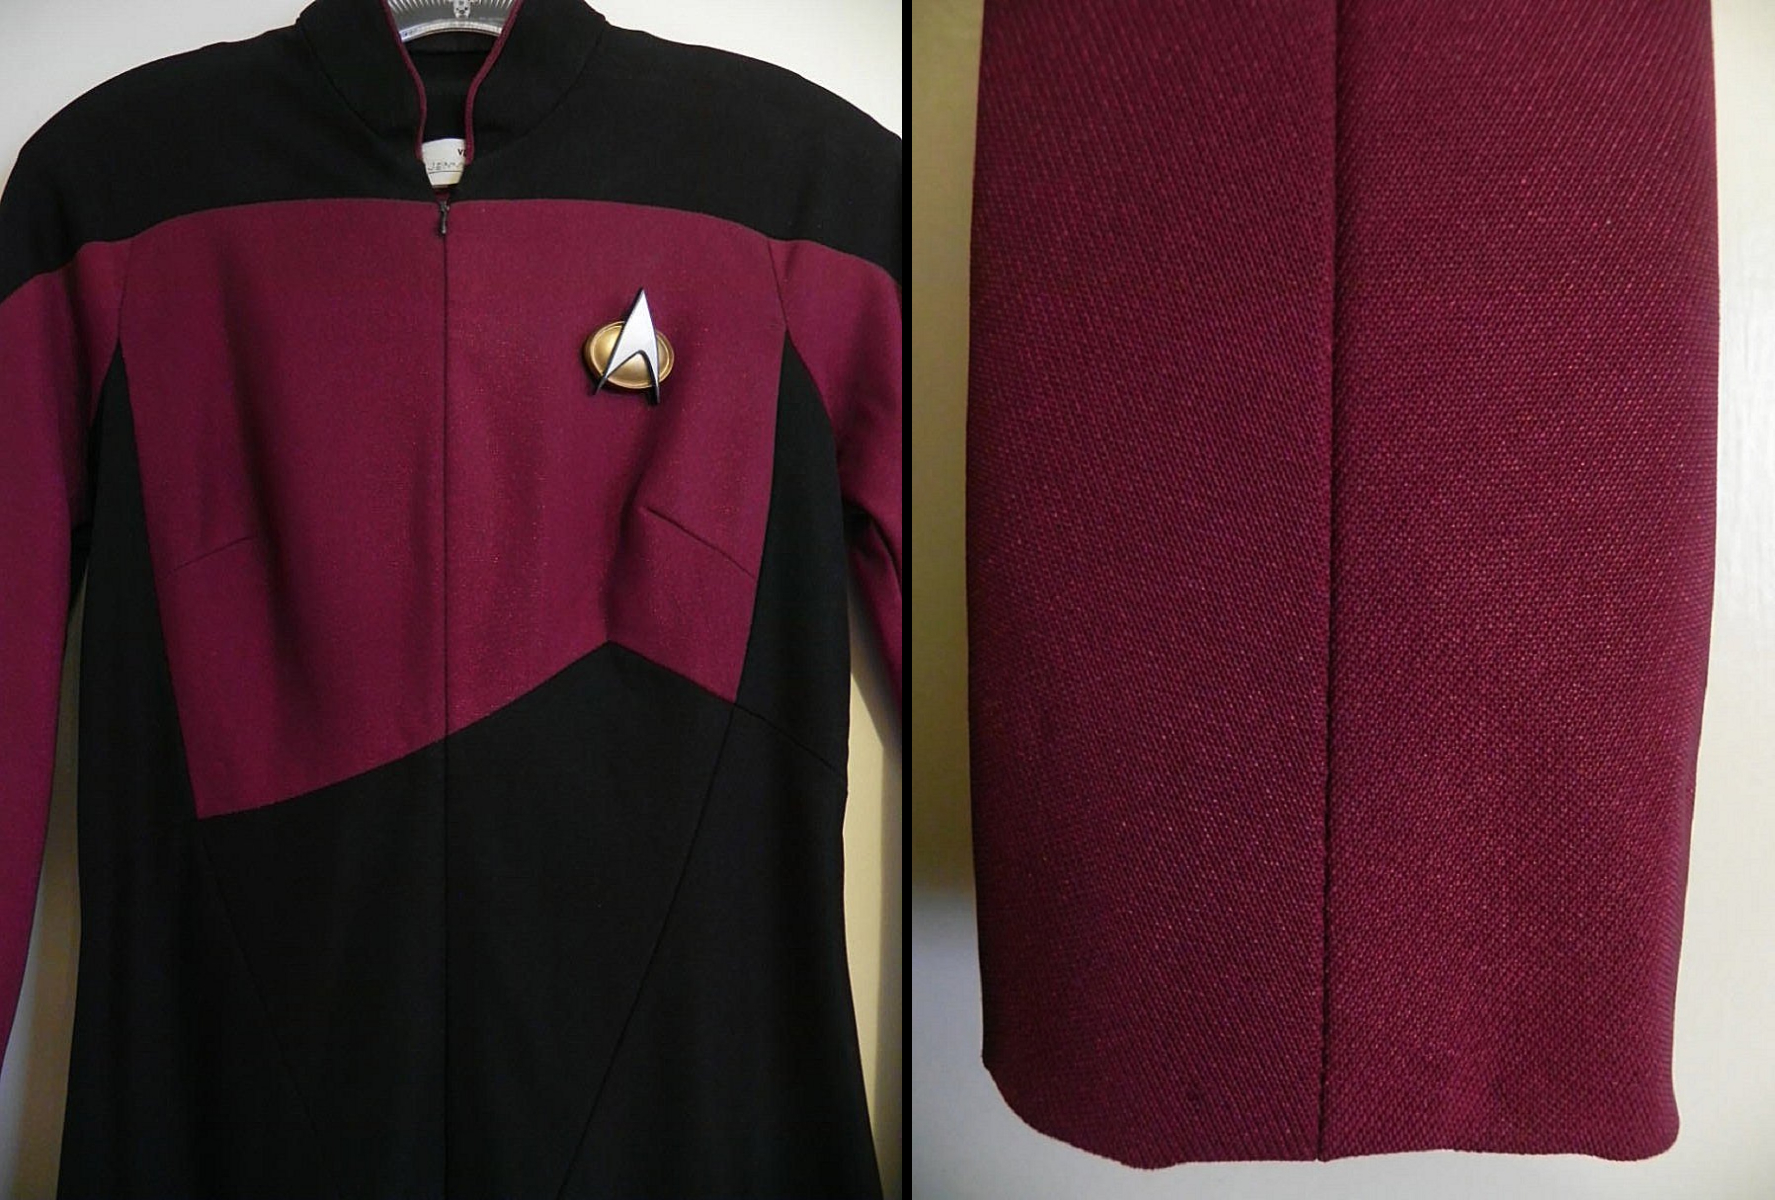
As best I’ve been able to determine, the early TNG jumpsuits were always cut with the jumbo spandex “weave” horizontally, and the stretch oriented vertically.
Here are some detail photos of two uniforms I studied, in which the grain is clearly visible:
Screen-used Tasha Yar TNG jumpsuit
Screen-used Dr. Crusher TNG jumpsuit
Since the jumbo spandex “weave” is perpendicular to the straight grain (selvage), an easy way to orient your pattern pieces is to match the horizontal lengthen/shorten lines to the fabric crossgrain (the jumbo spandex “weave”).
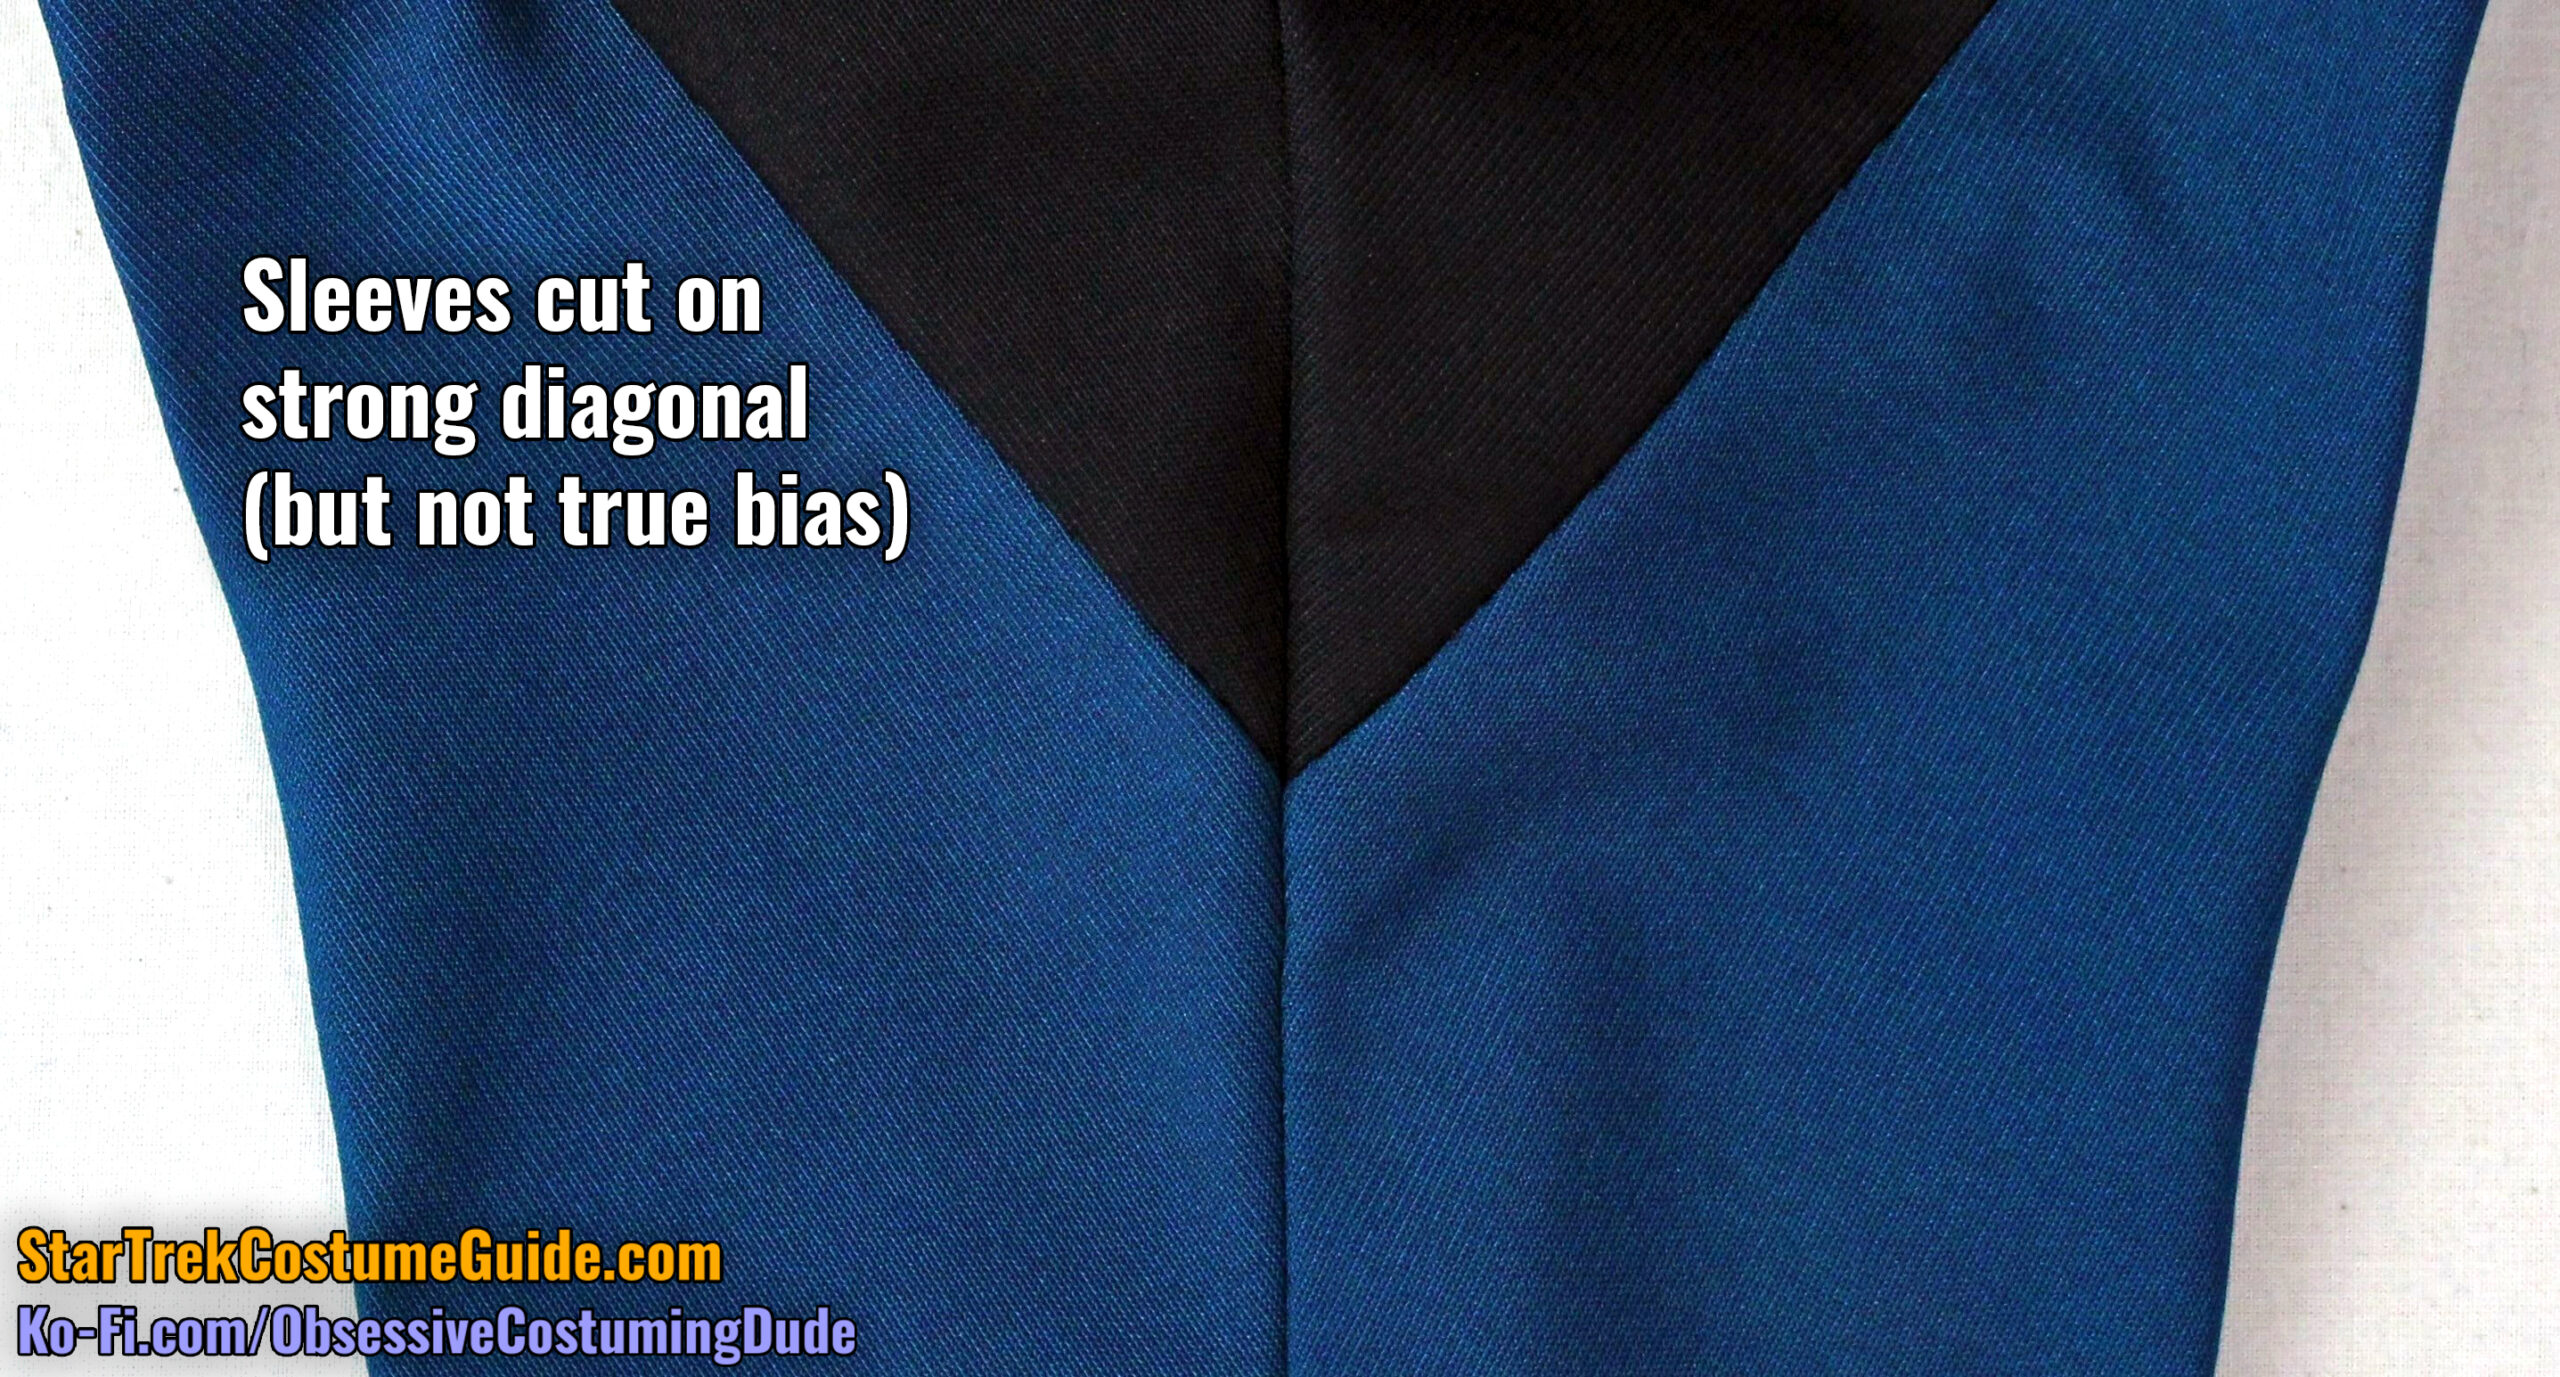
The exceptions were the sleeves, which were sometimes cut on a strong diagonal (but not the true bias).
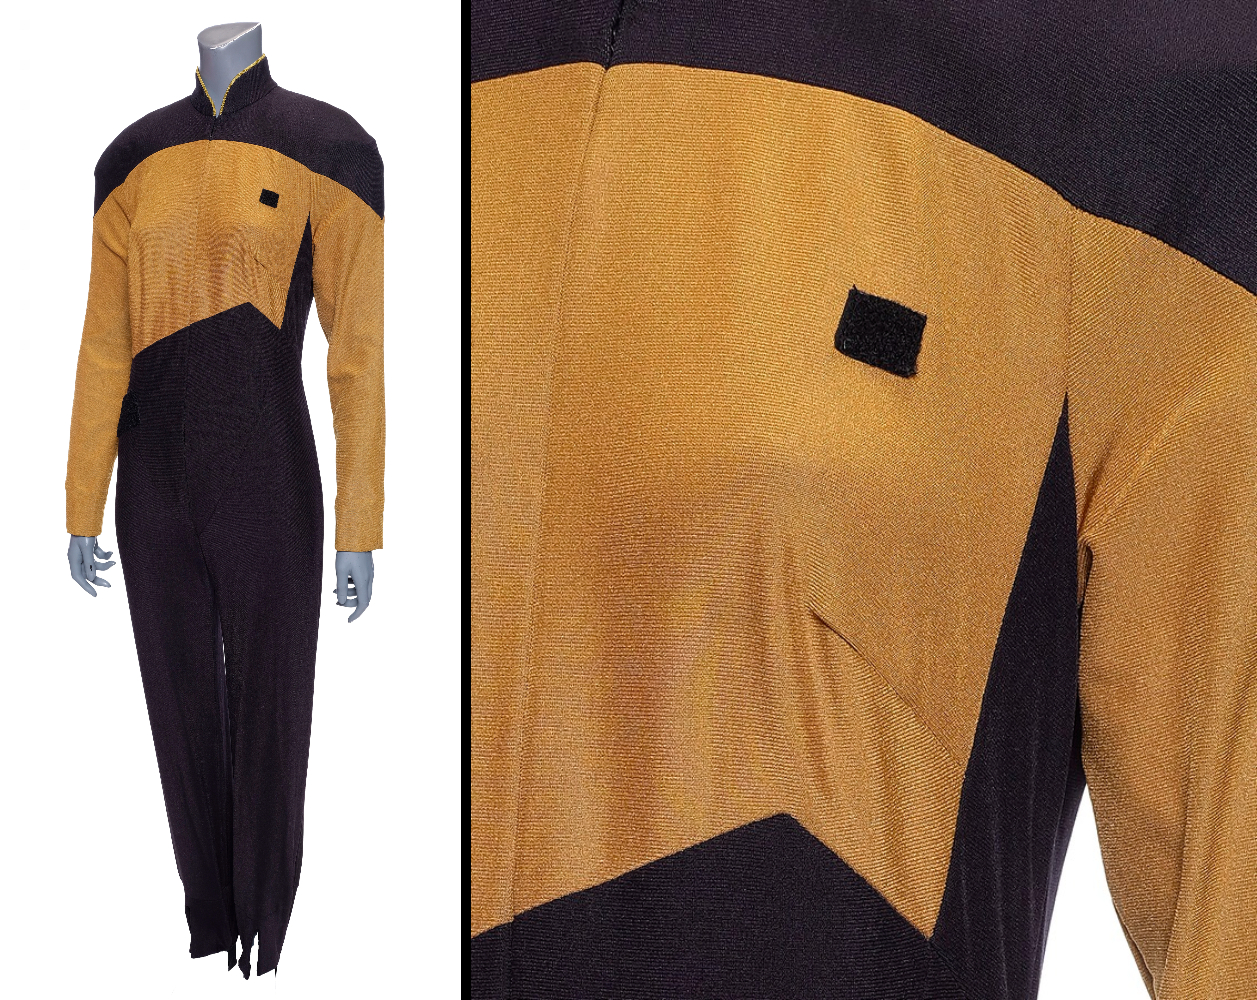
Here are two more detail photos of uniforms I studied, in which the grain is again clearly visible:
Screen-used Dr. Crusher TNG jumpsuit
Screen-used Worf TNG jumpsuit
This diagonal orientation is noted as “grain option 3” on the printed patterns.
As far as I’ve been able to determine, the front-zipping later jumpsuits (primarily seen during seasons 4-7) were always also cut this way, in relation to the fabric grain.
Since many of the initial later-style jumpsuits were probably upgraded from the original uniforms (inherited from the first couple seasons), this does make sense.
But even beyond the season 3 transition, many more uniforms were made from scratch (rather than by modifying existing jumpsuits), and it seems the majority of them continued to be cut in the same manner.
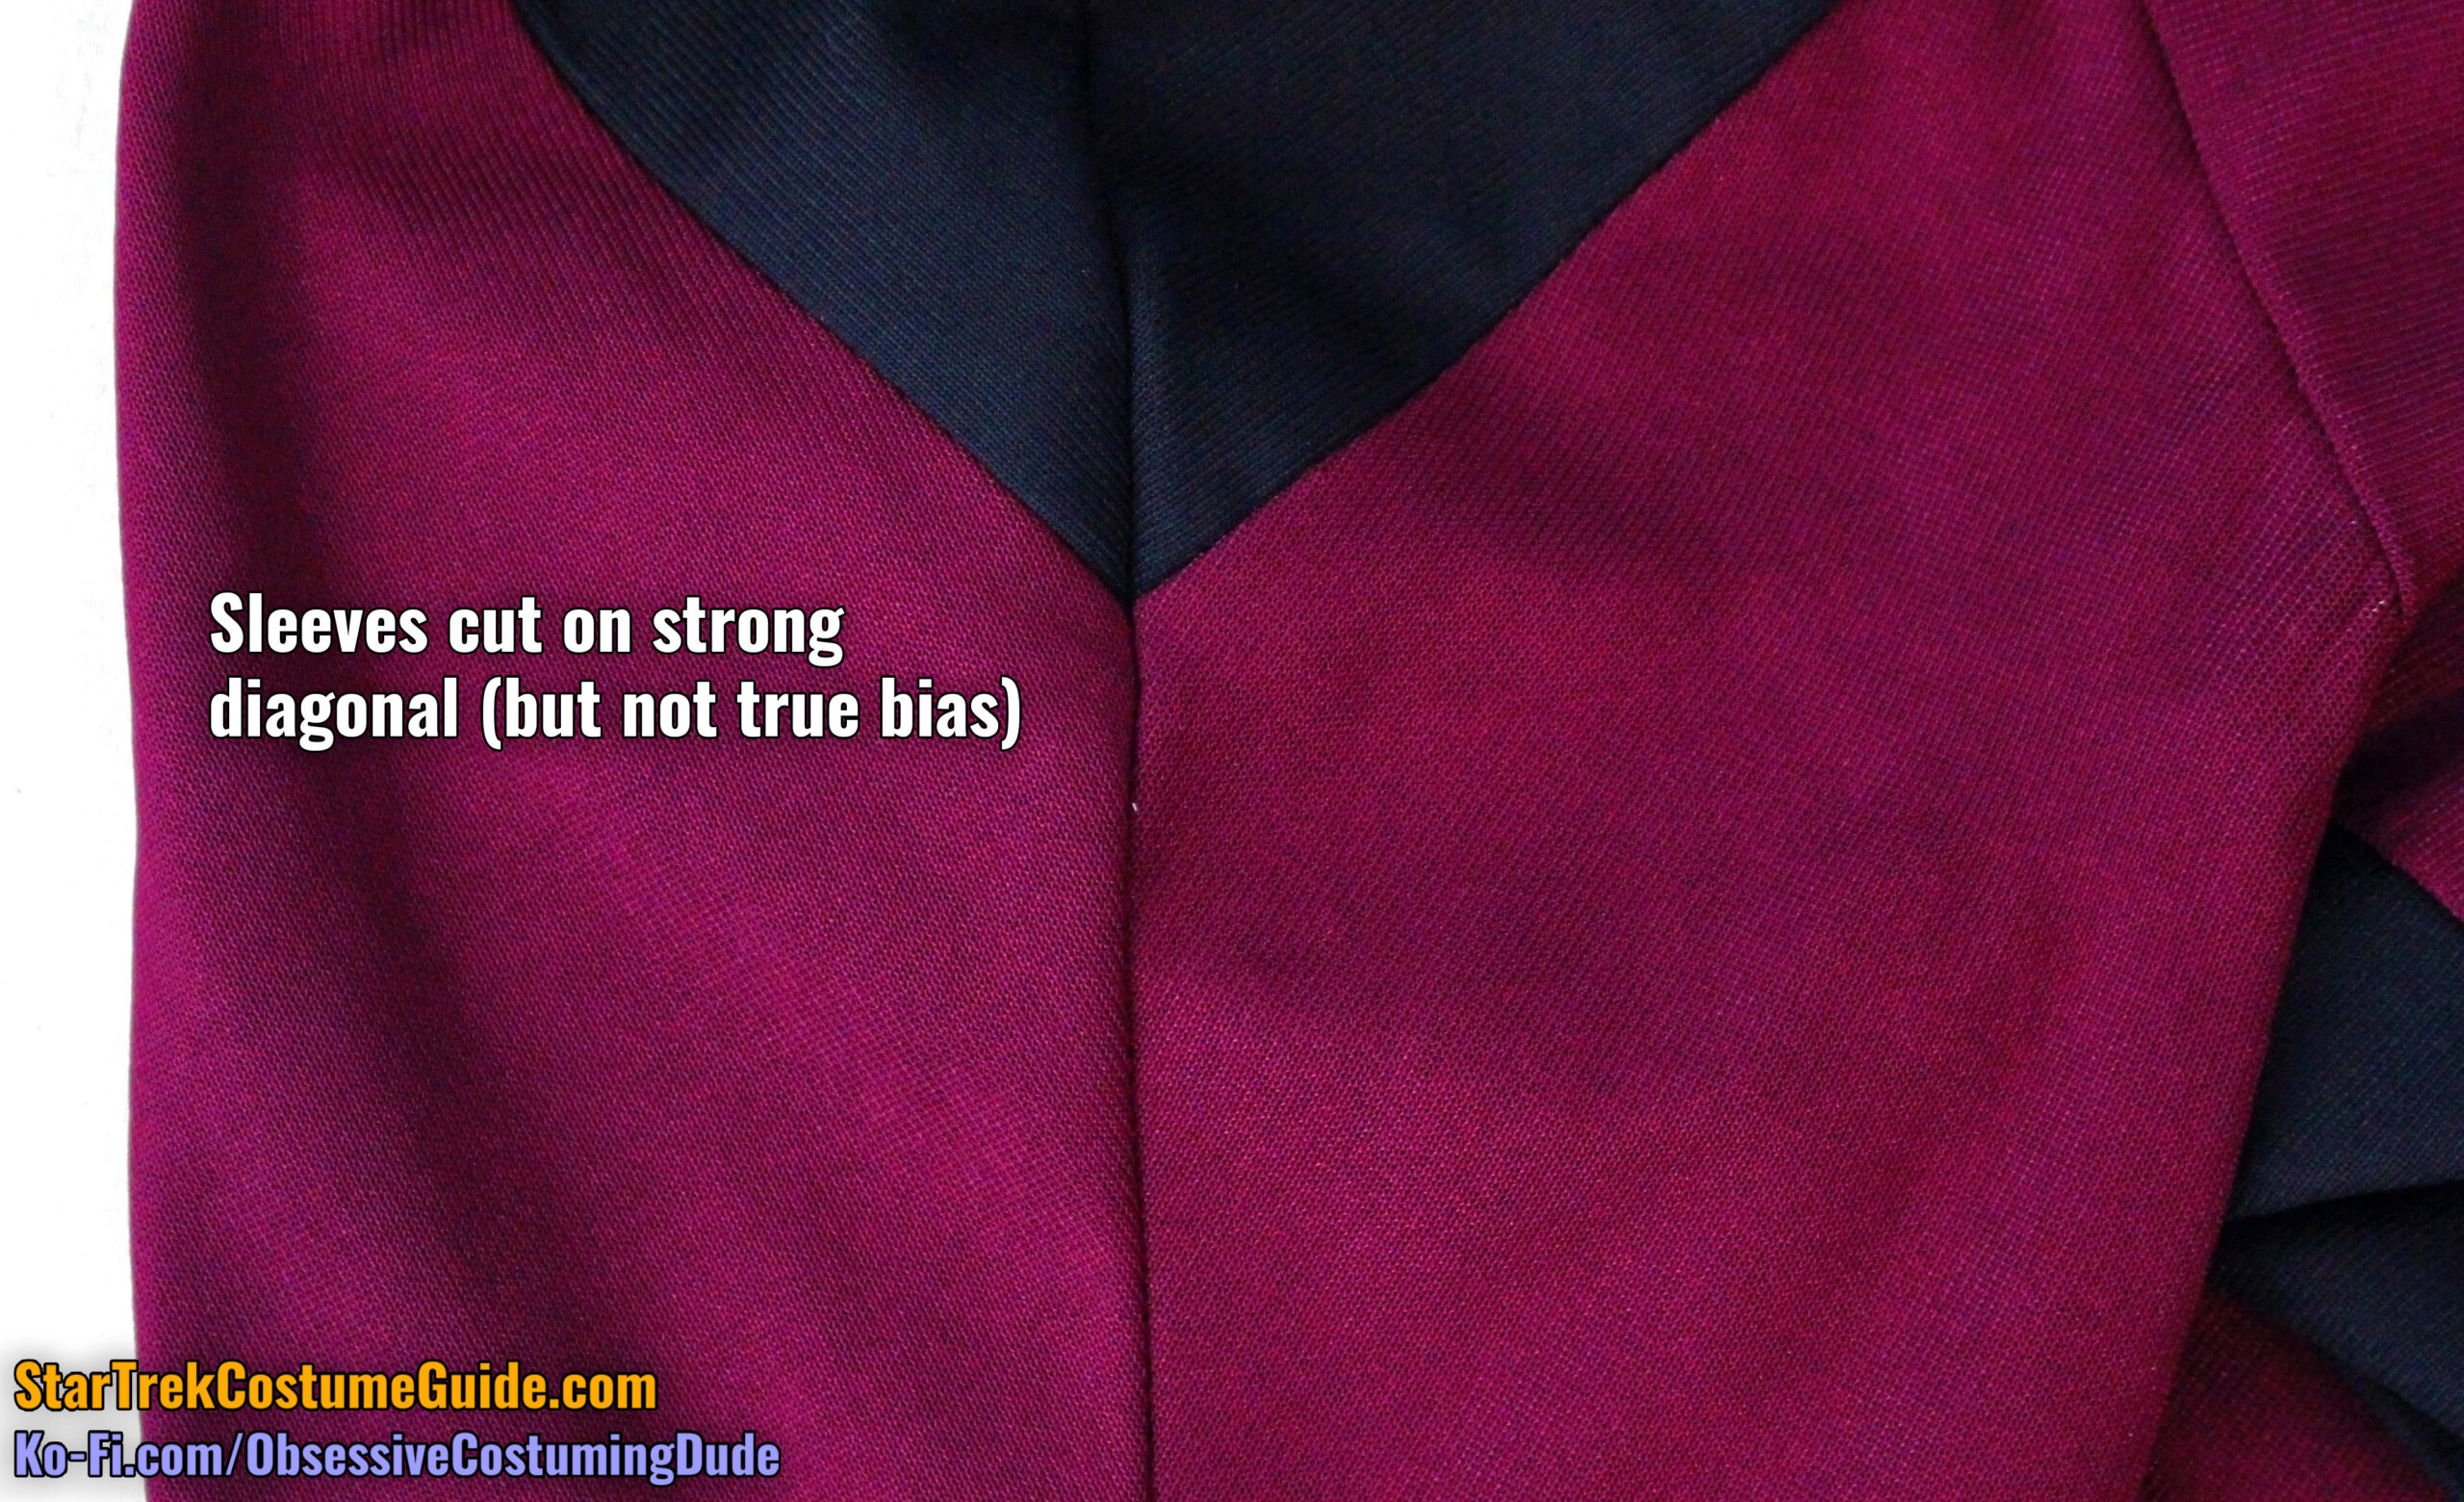
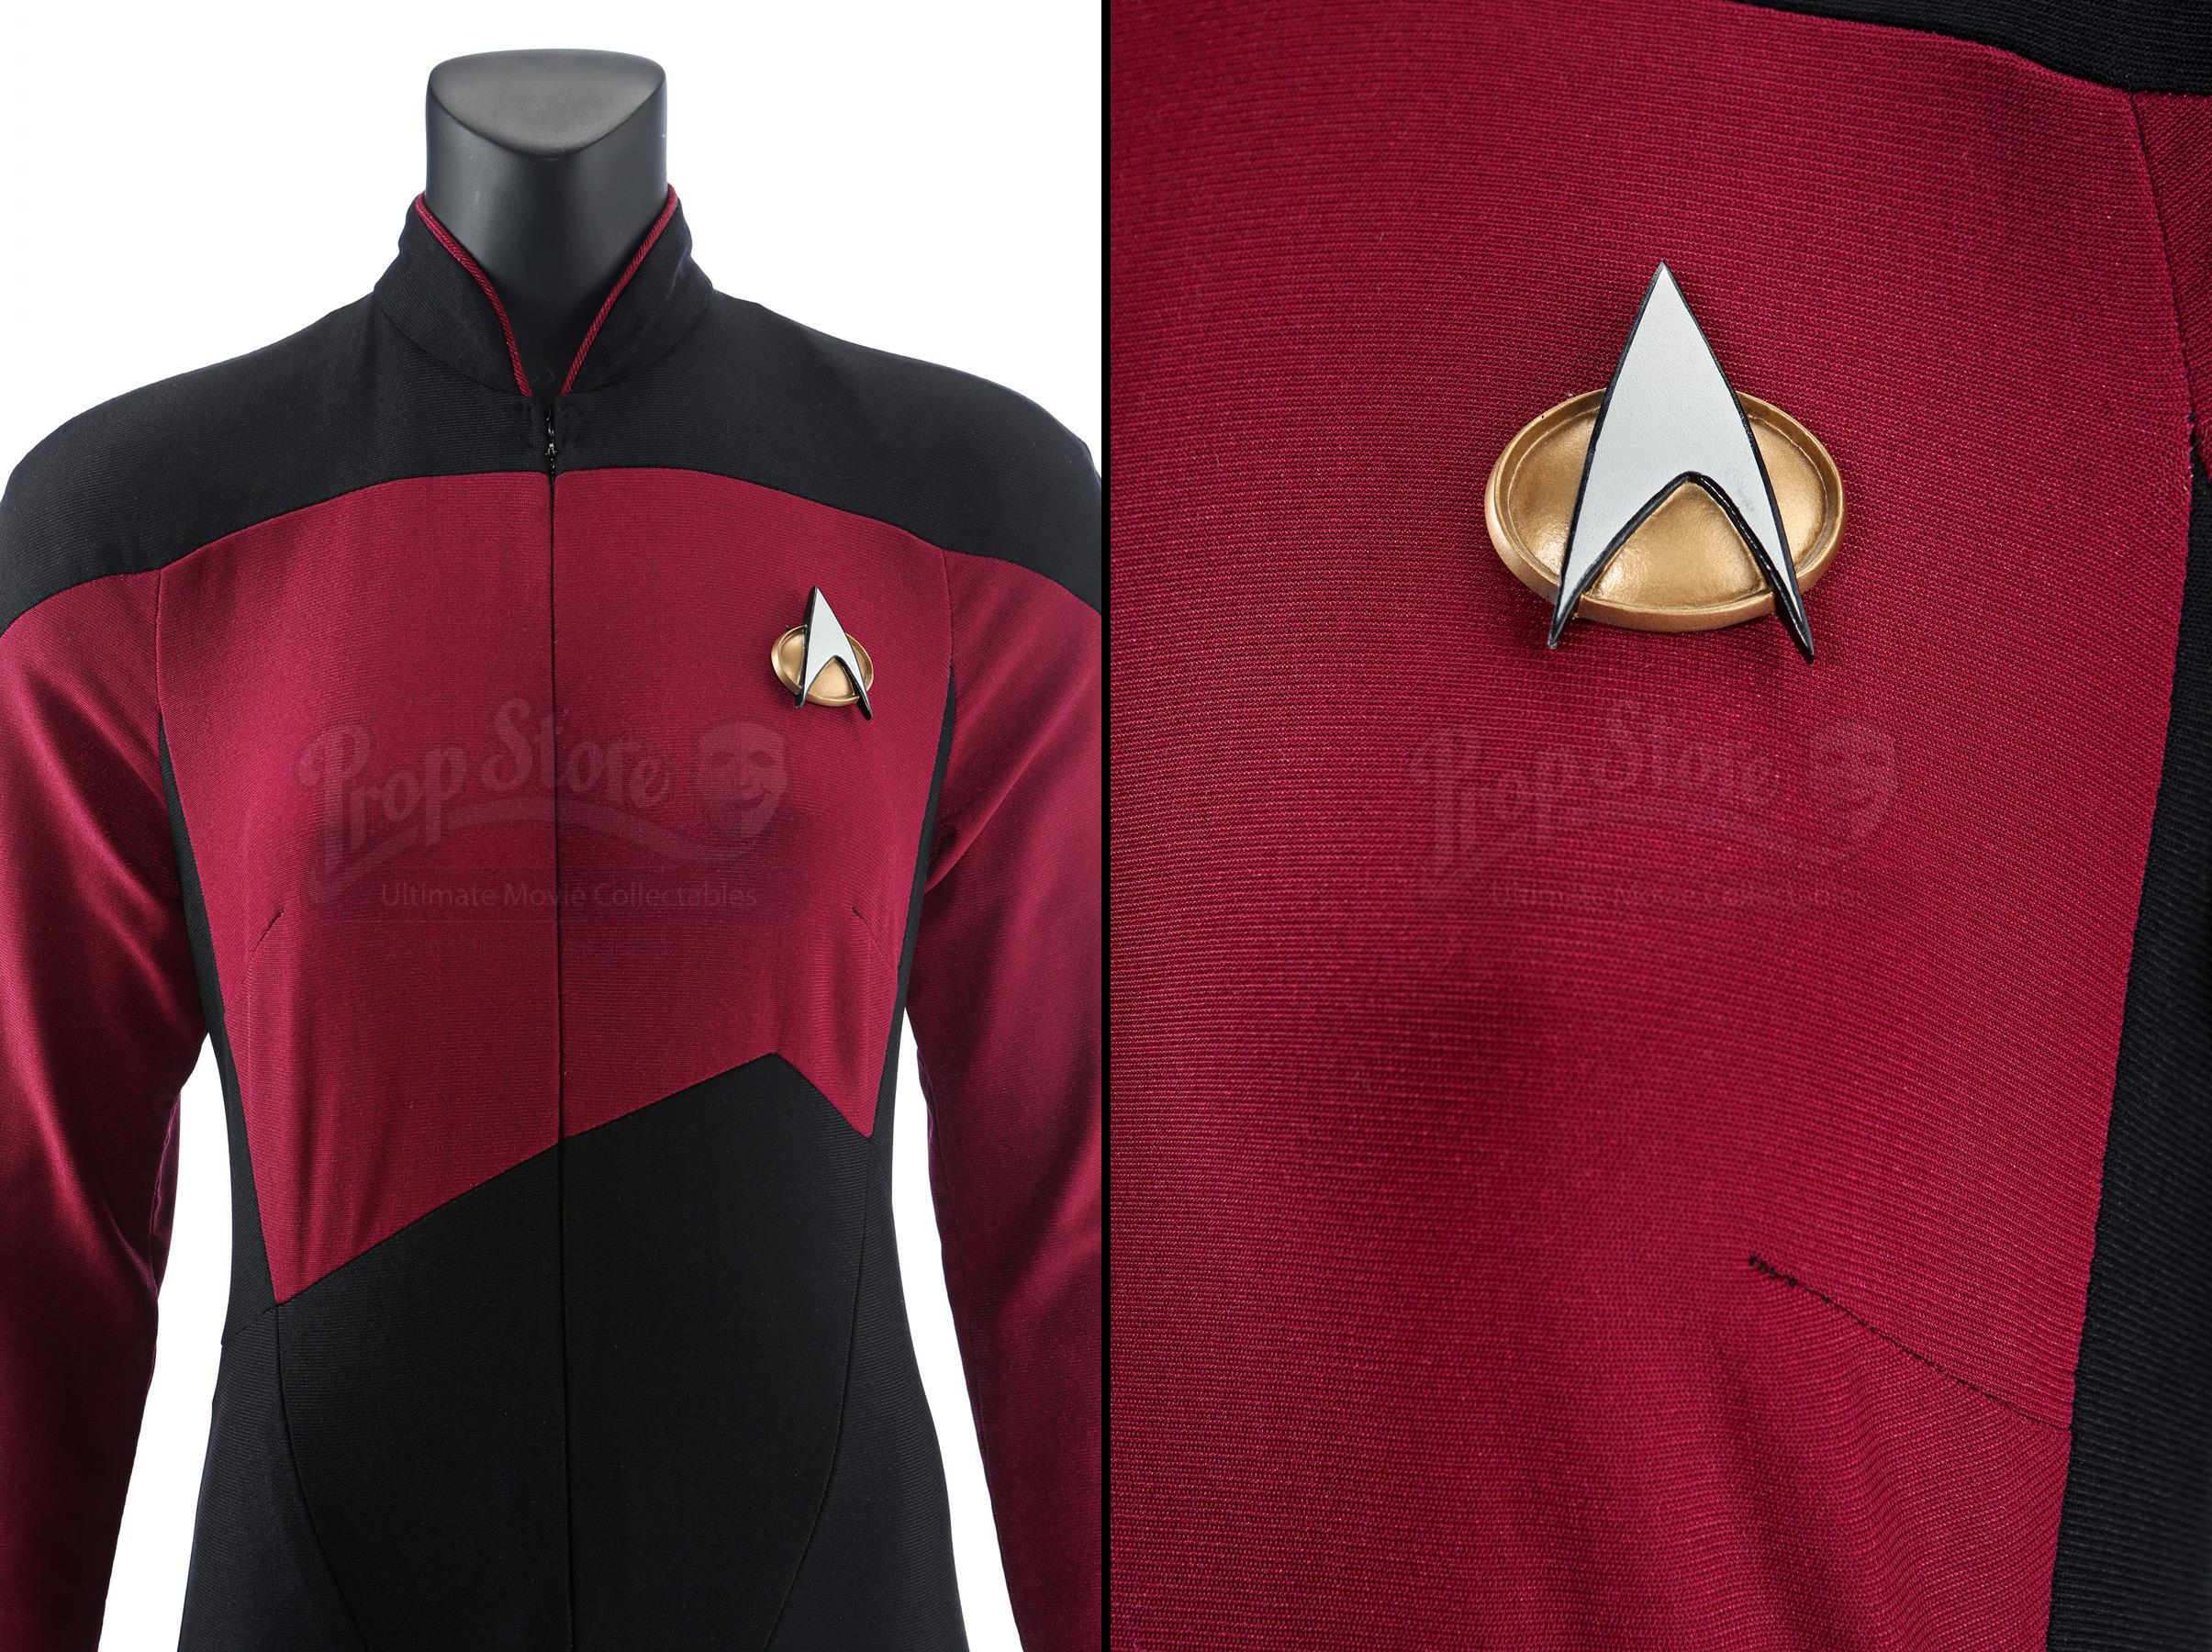
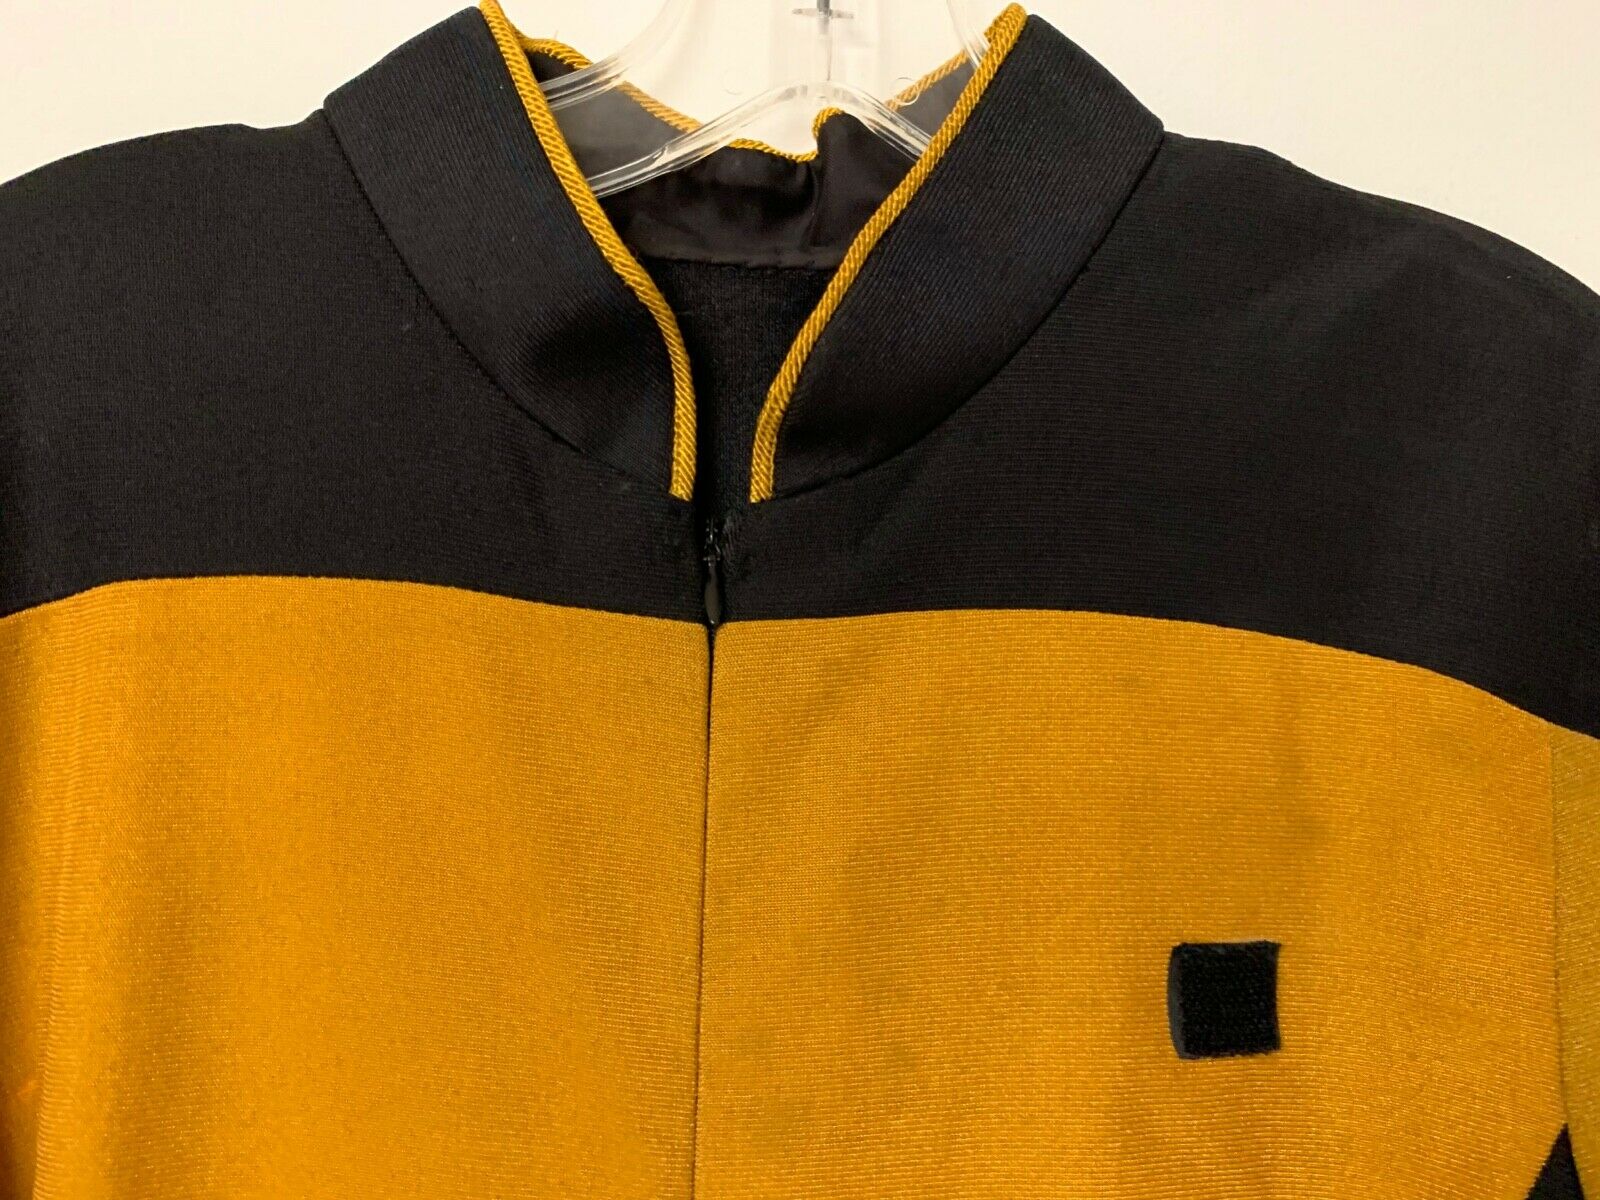
Here’s a detail photo of a front-zipping, later-style TNG jumpsuit I studied, in which the jumbo spandex “weave” is visible:
Screen-used male TNG jumpsuit
And here’s an assortment of close-up auction photos of other front-zipping, later-style TNG jumpsuits:
Like the early jumpsuits, at least some of the later uniforms had sleeves that were cut on a strong diagonal.
While some of these may have been “inherited” diagonally-cut sleeves from early TNG jumpsuits, at least some of the uniforms from the middle/later seasons were intentionally cut that way – as evidenced by the ever-changing fabric colors.
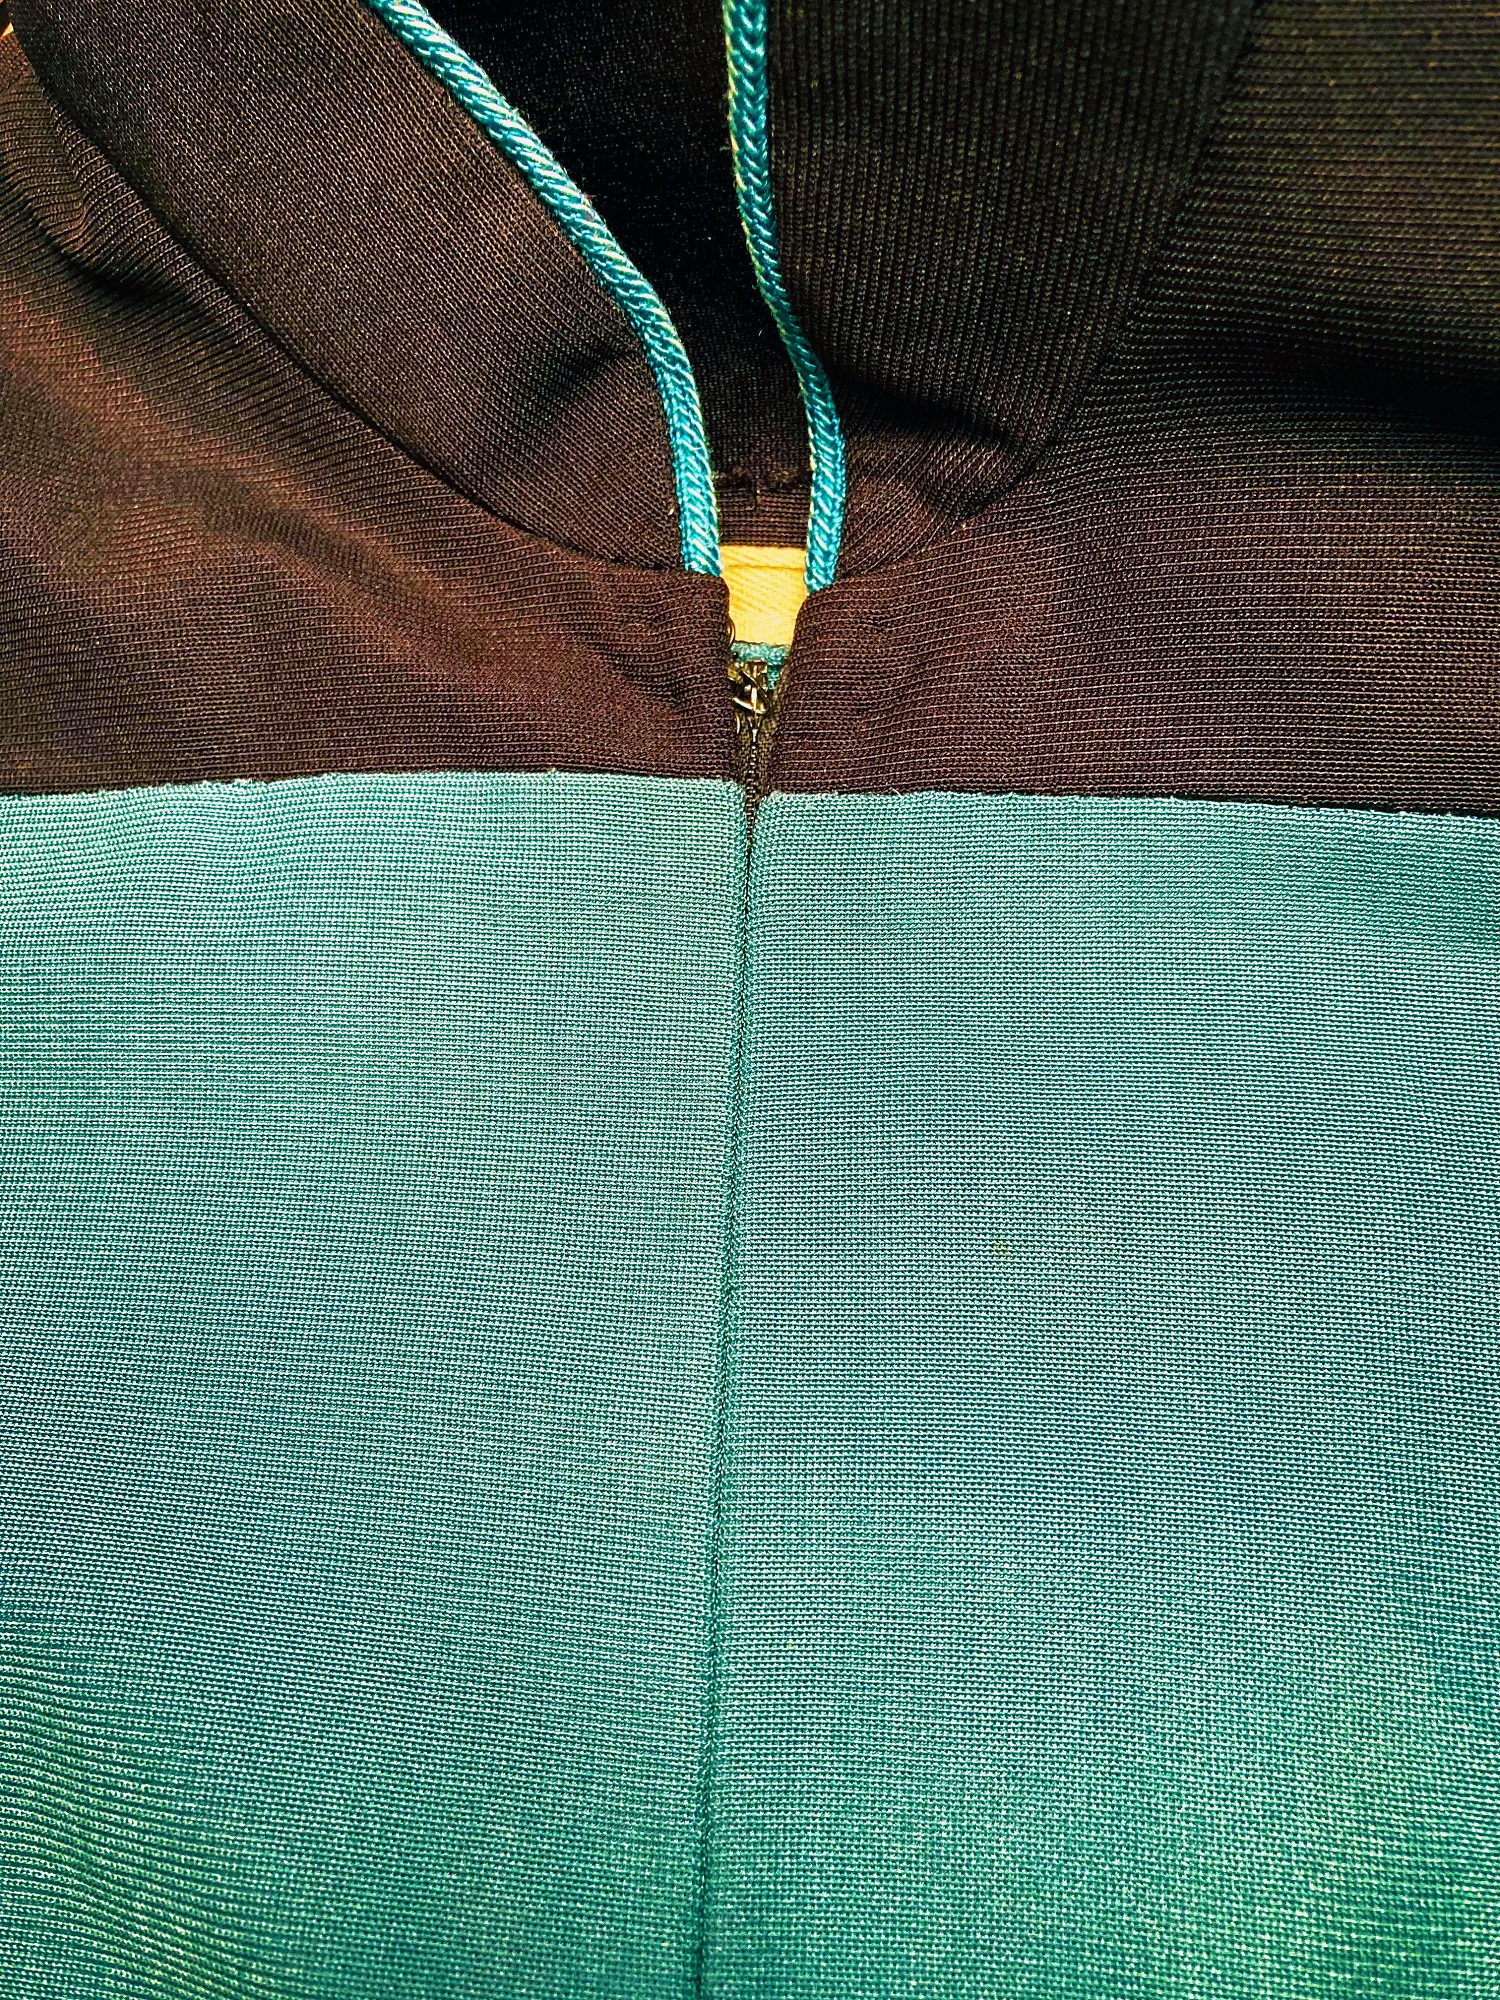
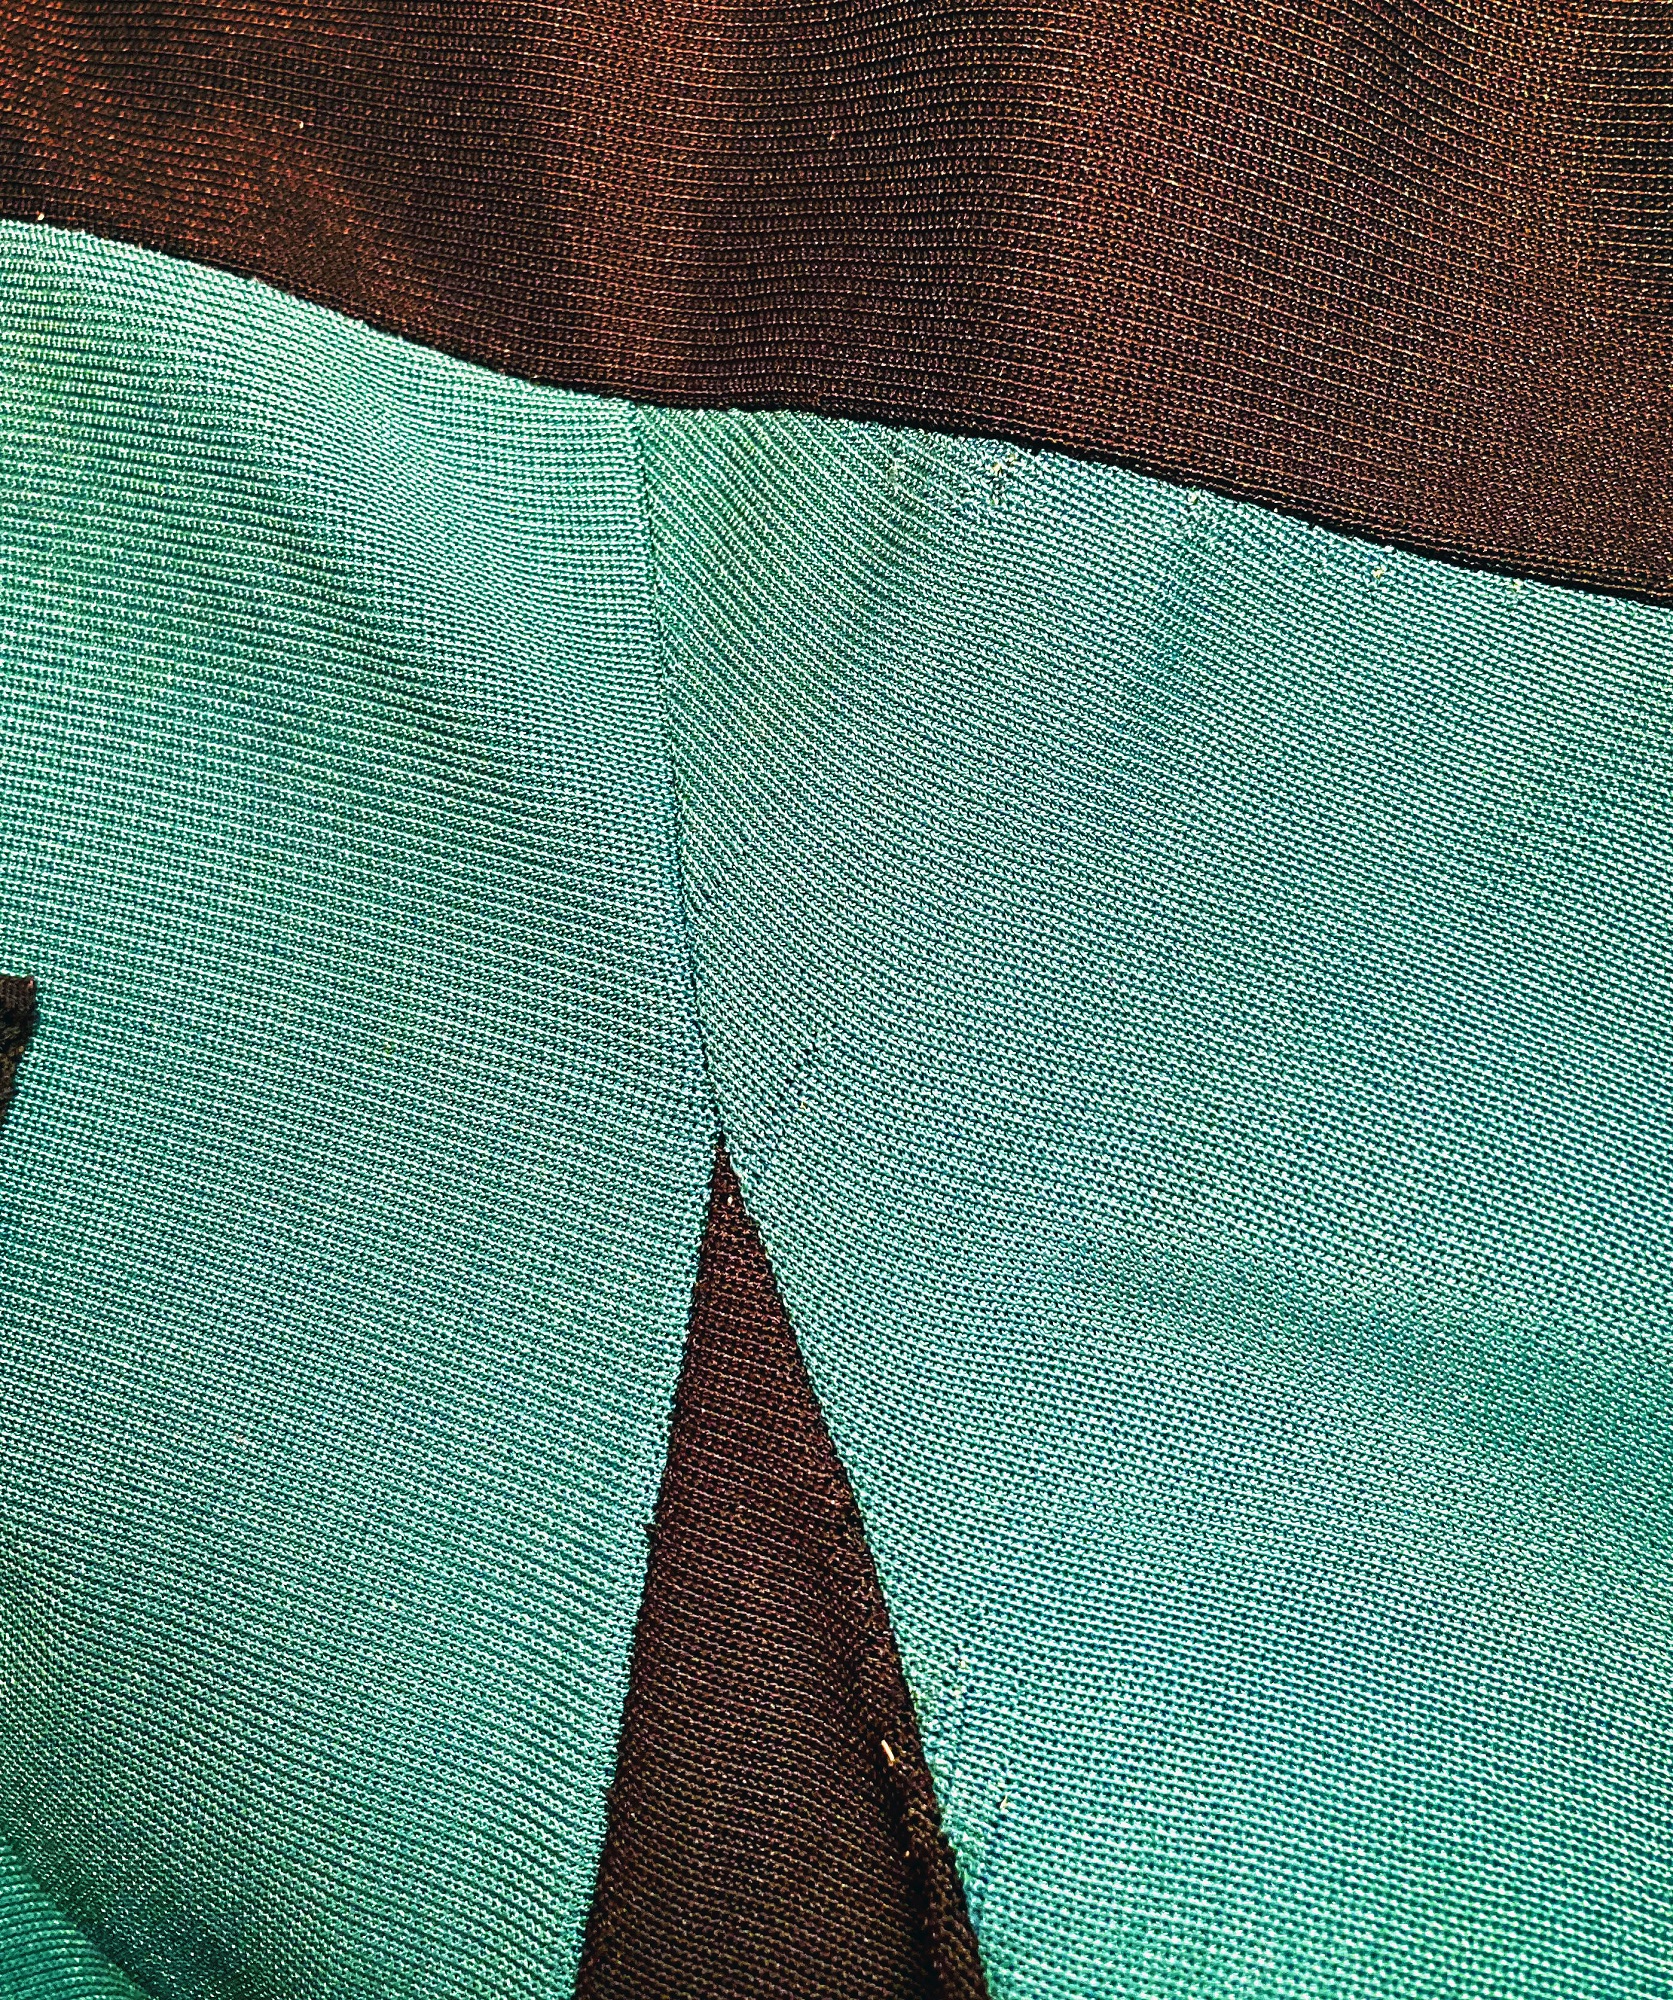
Here are some reference photos of a front-zipping, later-style TNG jumpsuit with diagonally-cut sleeves, provided its owner, Casey Hardy.
Note the lighter teal fabric primarily indicative of the middle seasons of the show (as opposed to the darker, bluish teal from the early seasons).
Here’s another, originally photographed and shared on the “Star Trek Prop, Costume & Auction Authority” blog:
Further examples notwithstanding, as best I can tell, the diagonal sleeves were less common on the later TNG jumpsuits. The majority of later TNG jumpsuits I’ve seen had the sleeves cut on the same grain as the rest of the jumpsuit.
However, I did want to mention these (and their ilk) as an option when cutting your jumpsuit fabric.
Fourth, there are several important dots on the pattern pieces, which indicate where to align specific pieces (and in most cases, where to start and/or stop your stitching).
I suggest marking these dots on your fabric with small “tailor’s tacks.”
And finally, the seam and hem allowances vary (just like the originals), so reference both the printed pattern and the following sewing tutorial while assembling your uniform.
(I did consider “standardizing” all the seam allowances for my patterns, but I ultimately decided to preserve the original allowances, for the sake of authenticity.)
Personally, I like to cut my paper pattern pieces using paper scissors, then trace my pattern pieces onto the fabric using tailor’s chalk.
Now that you’ve gathered your materials, determined your sizing, and cut your pattern pieces, it’s time to actually start making your TNG jumpsuit!
FRONT ASSEMBLIES
For the later uniform style, simply use the front yoke (piece B3) as-is and skip ahead to the next step.
Here’s a quick YouTube video on how to make the early TNG yokes:
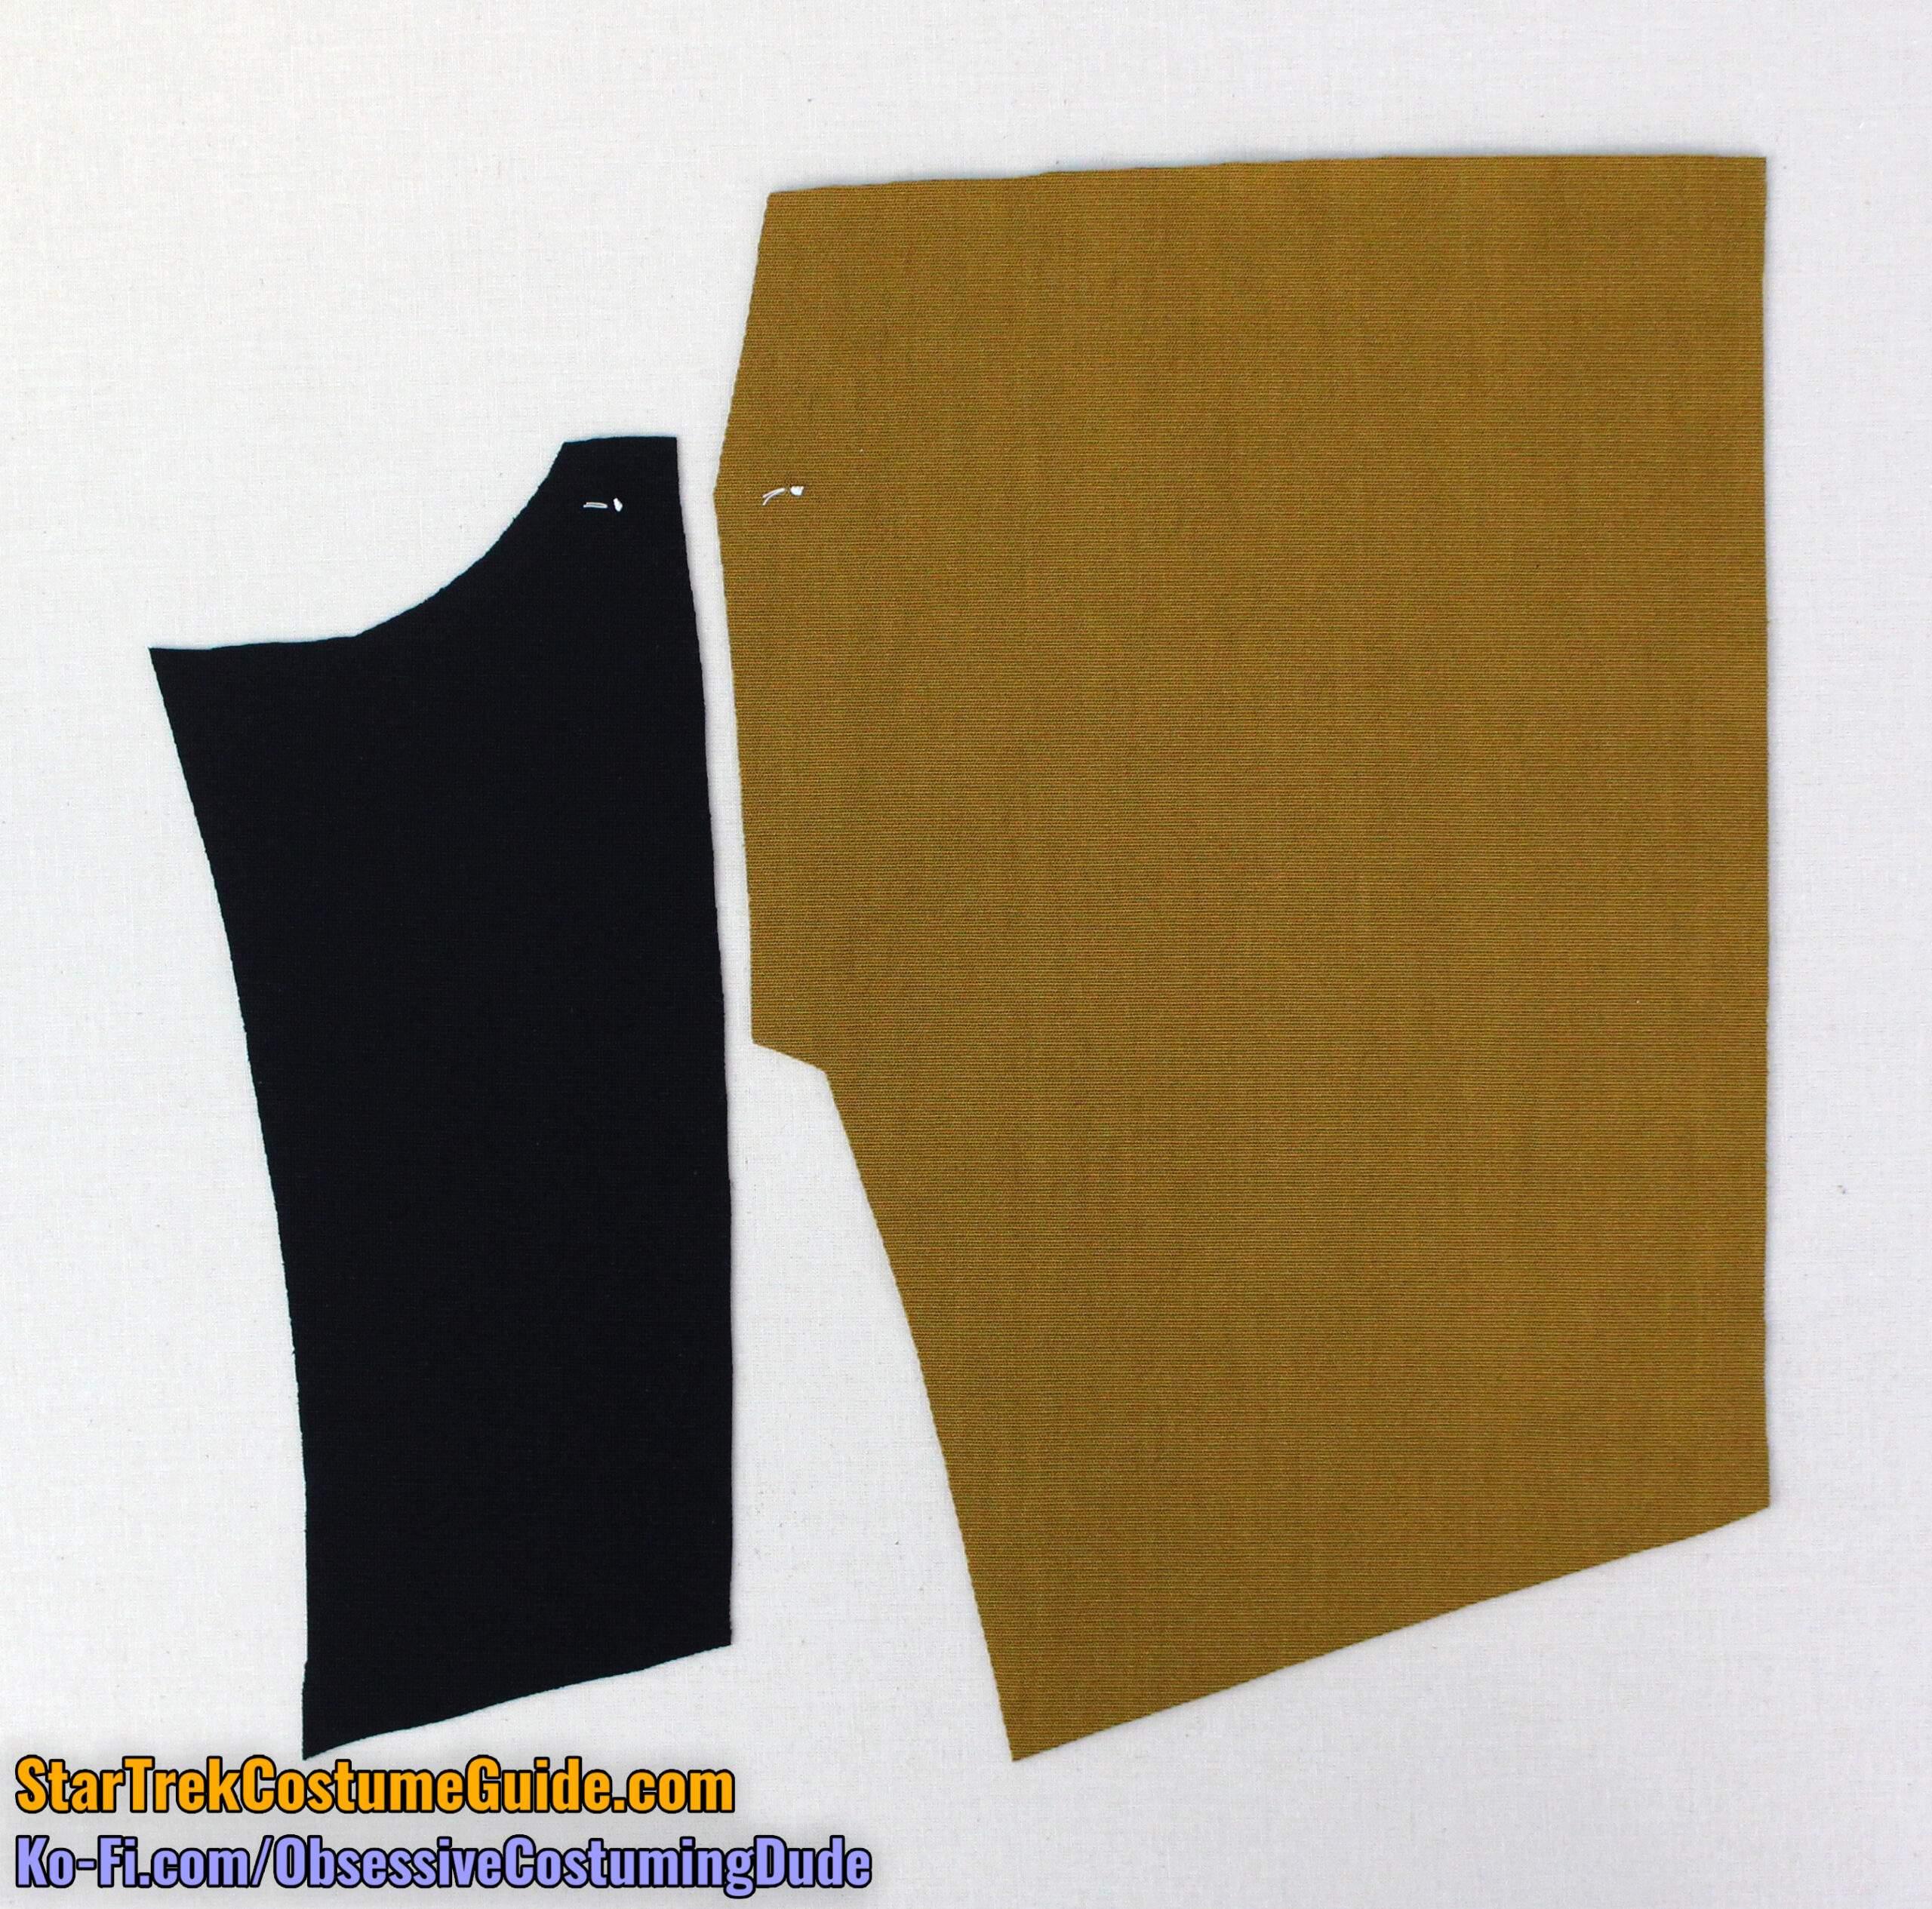
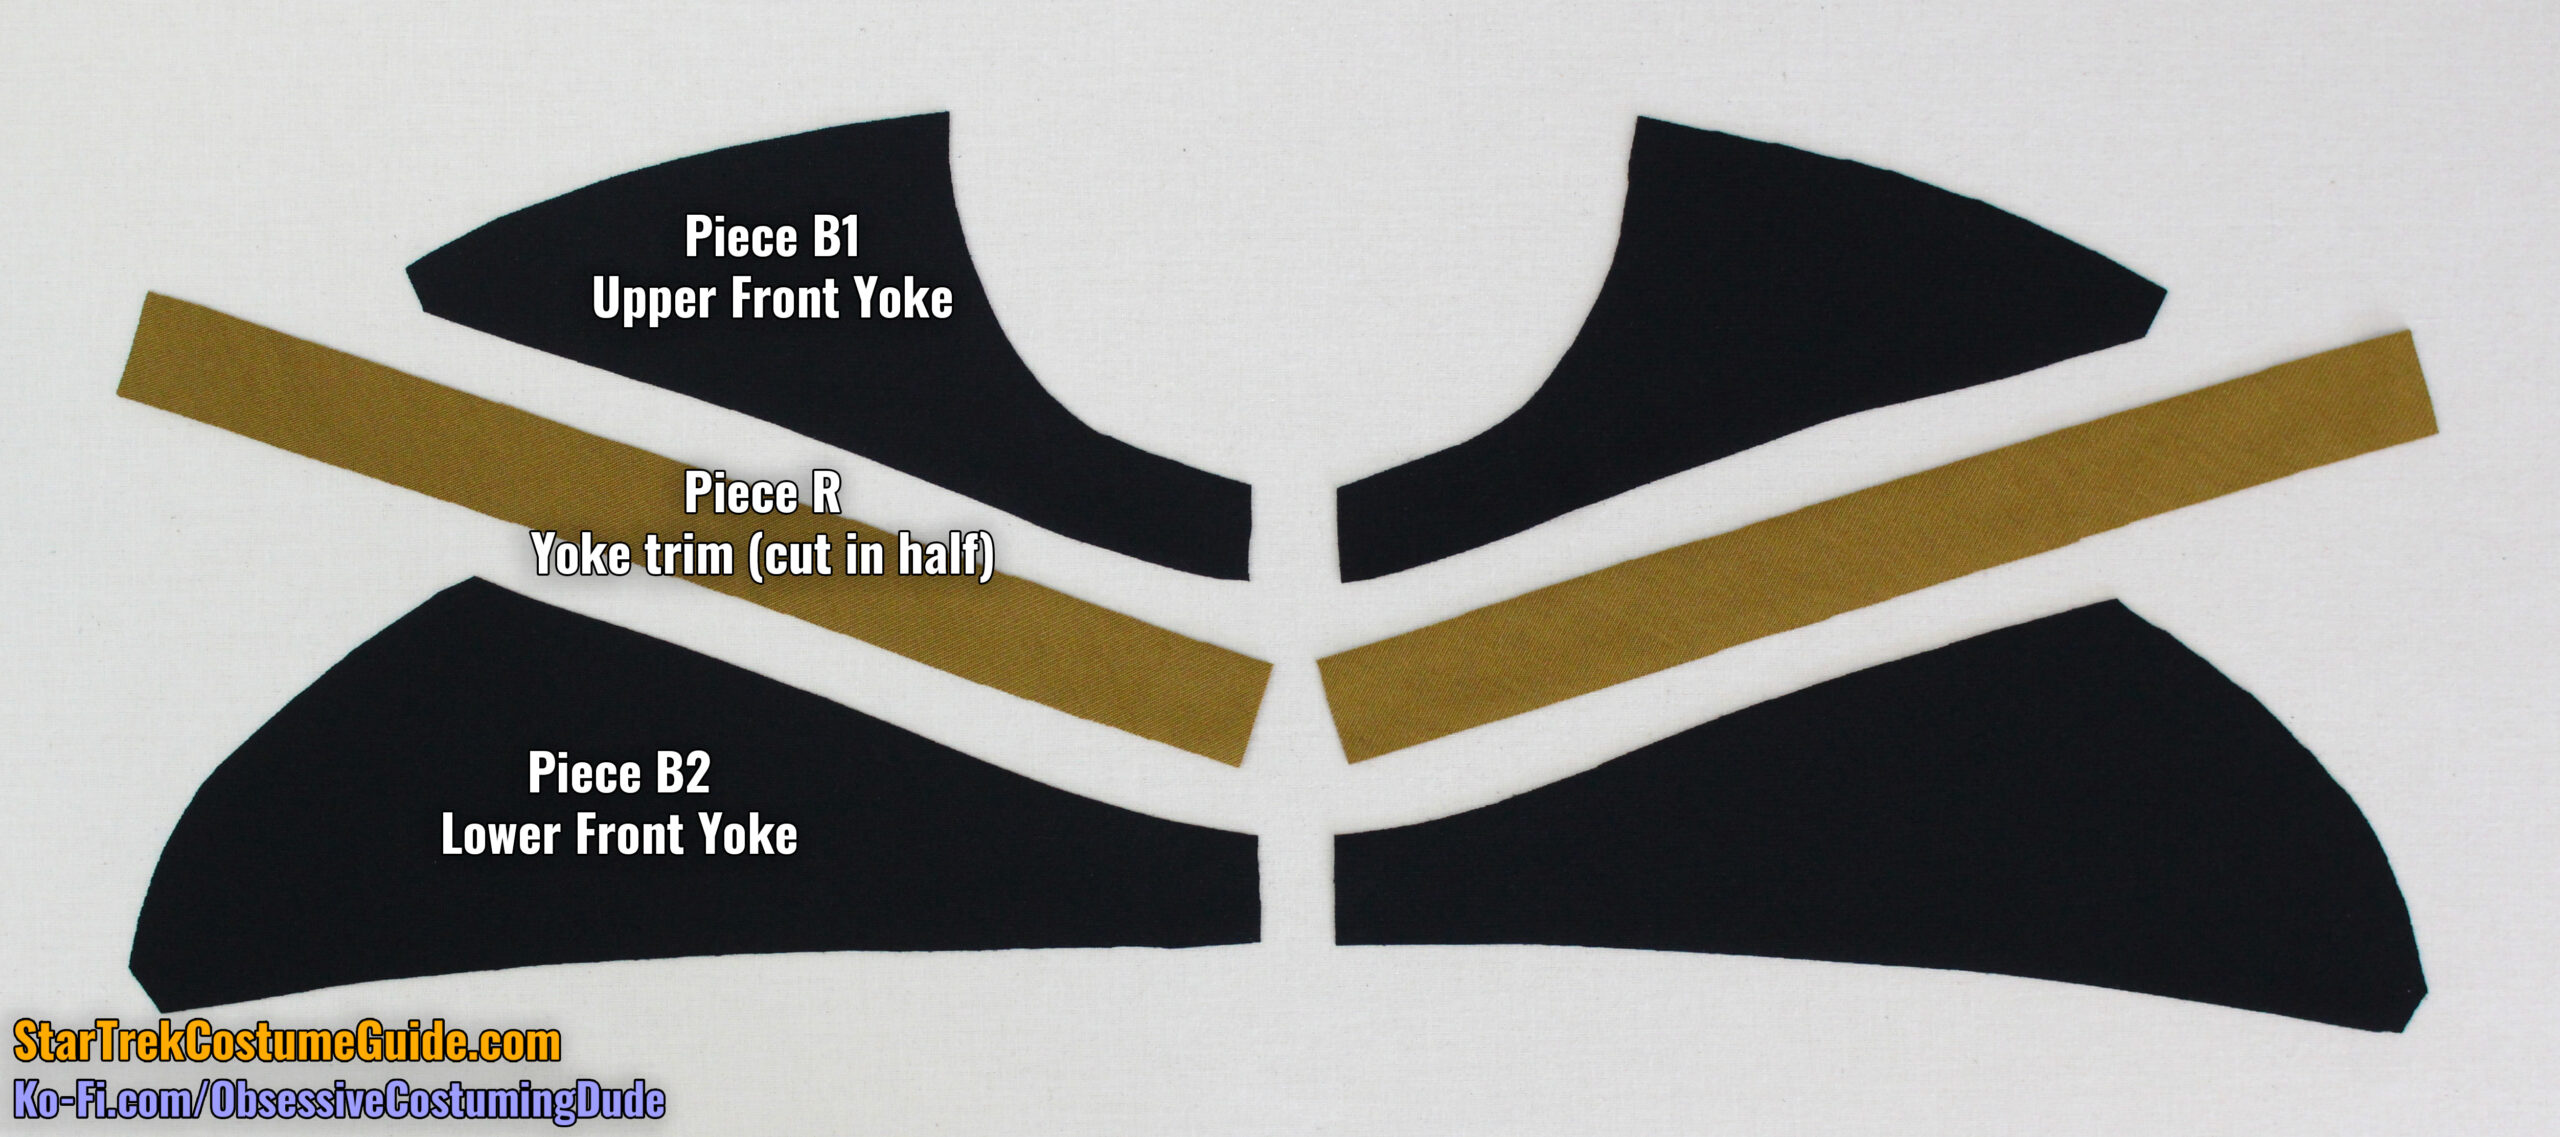
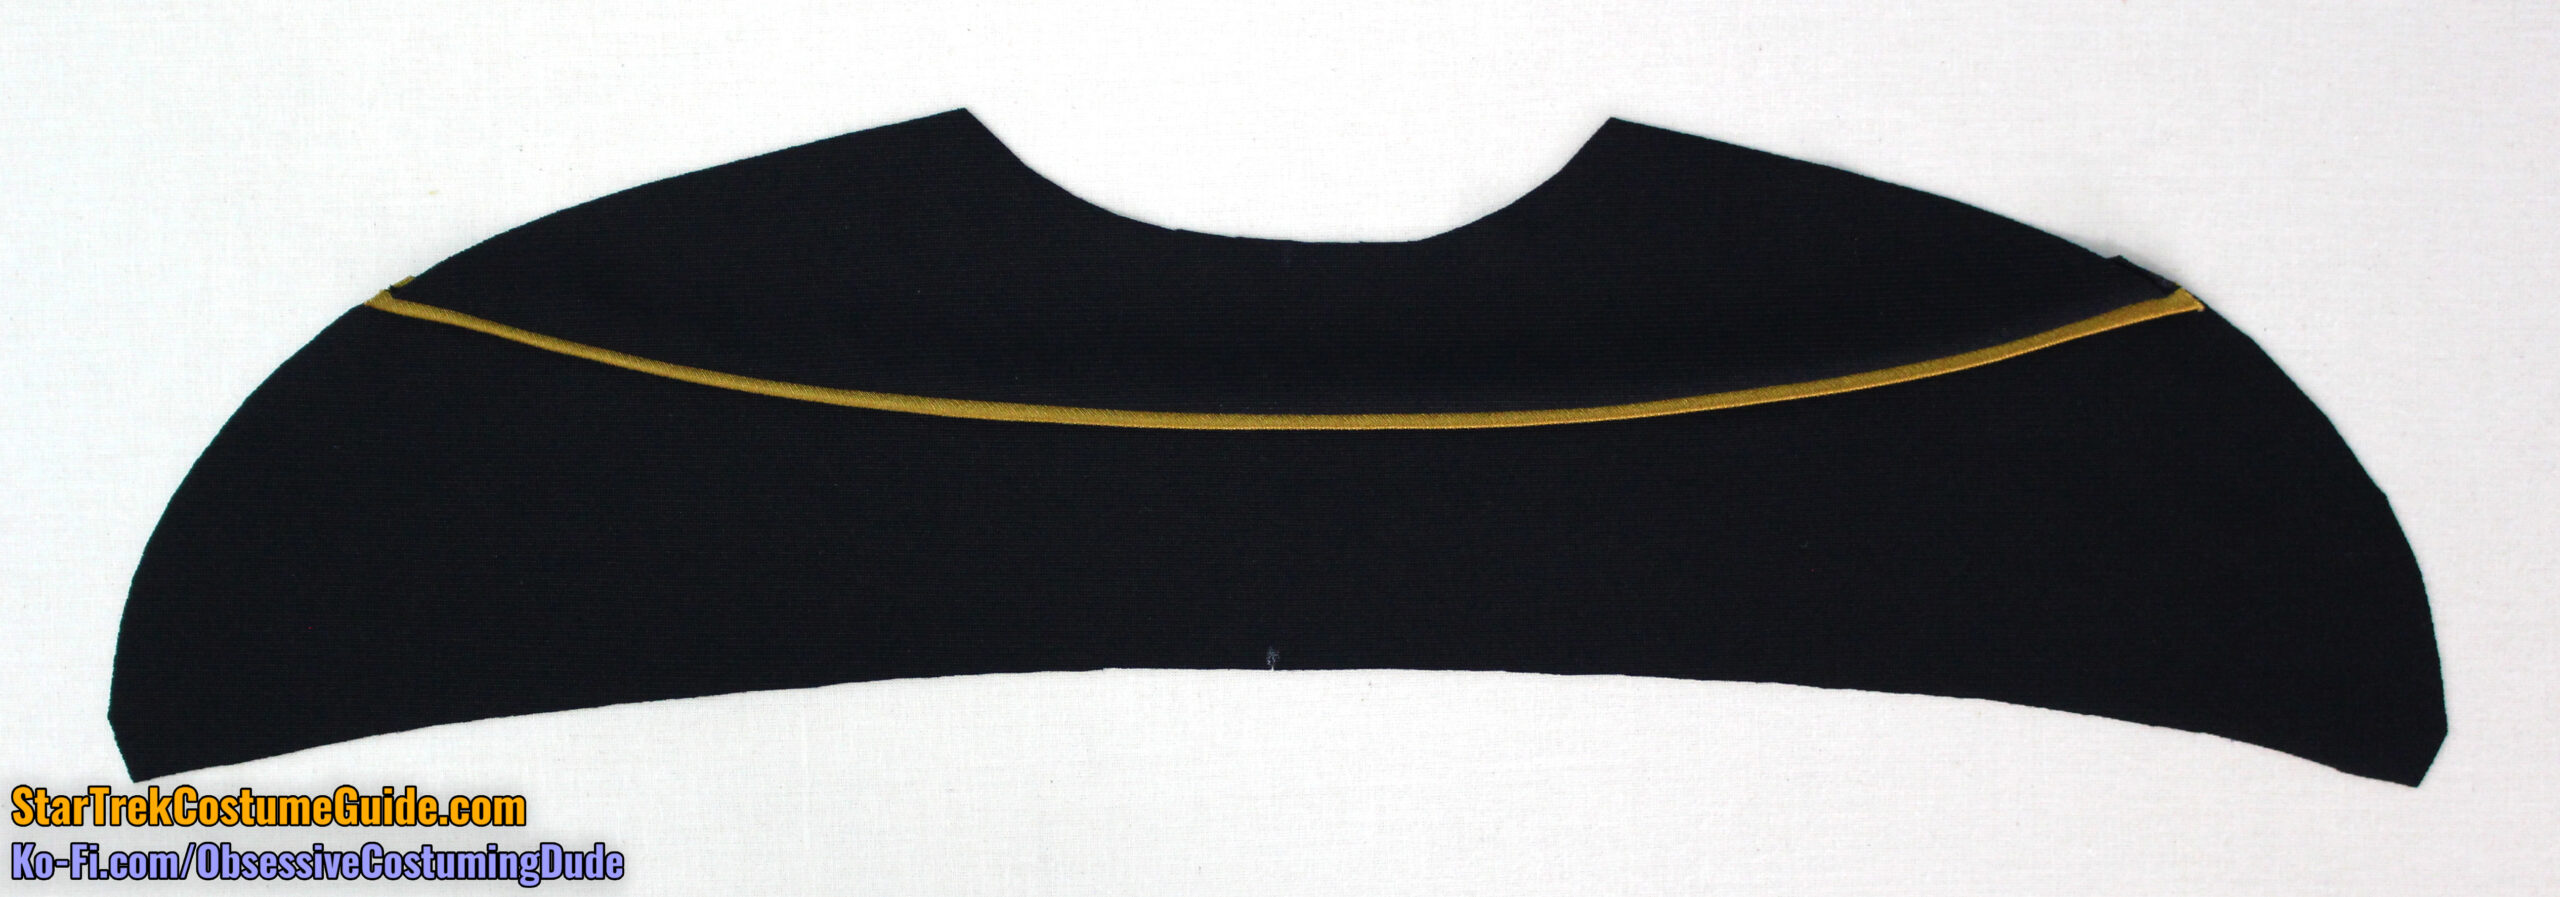
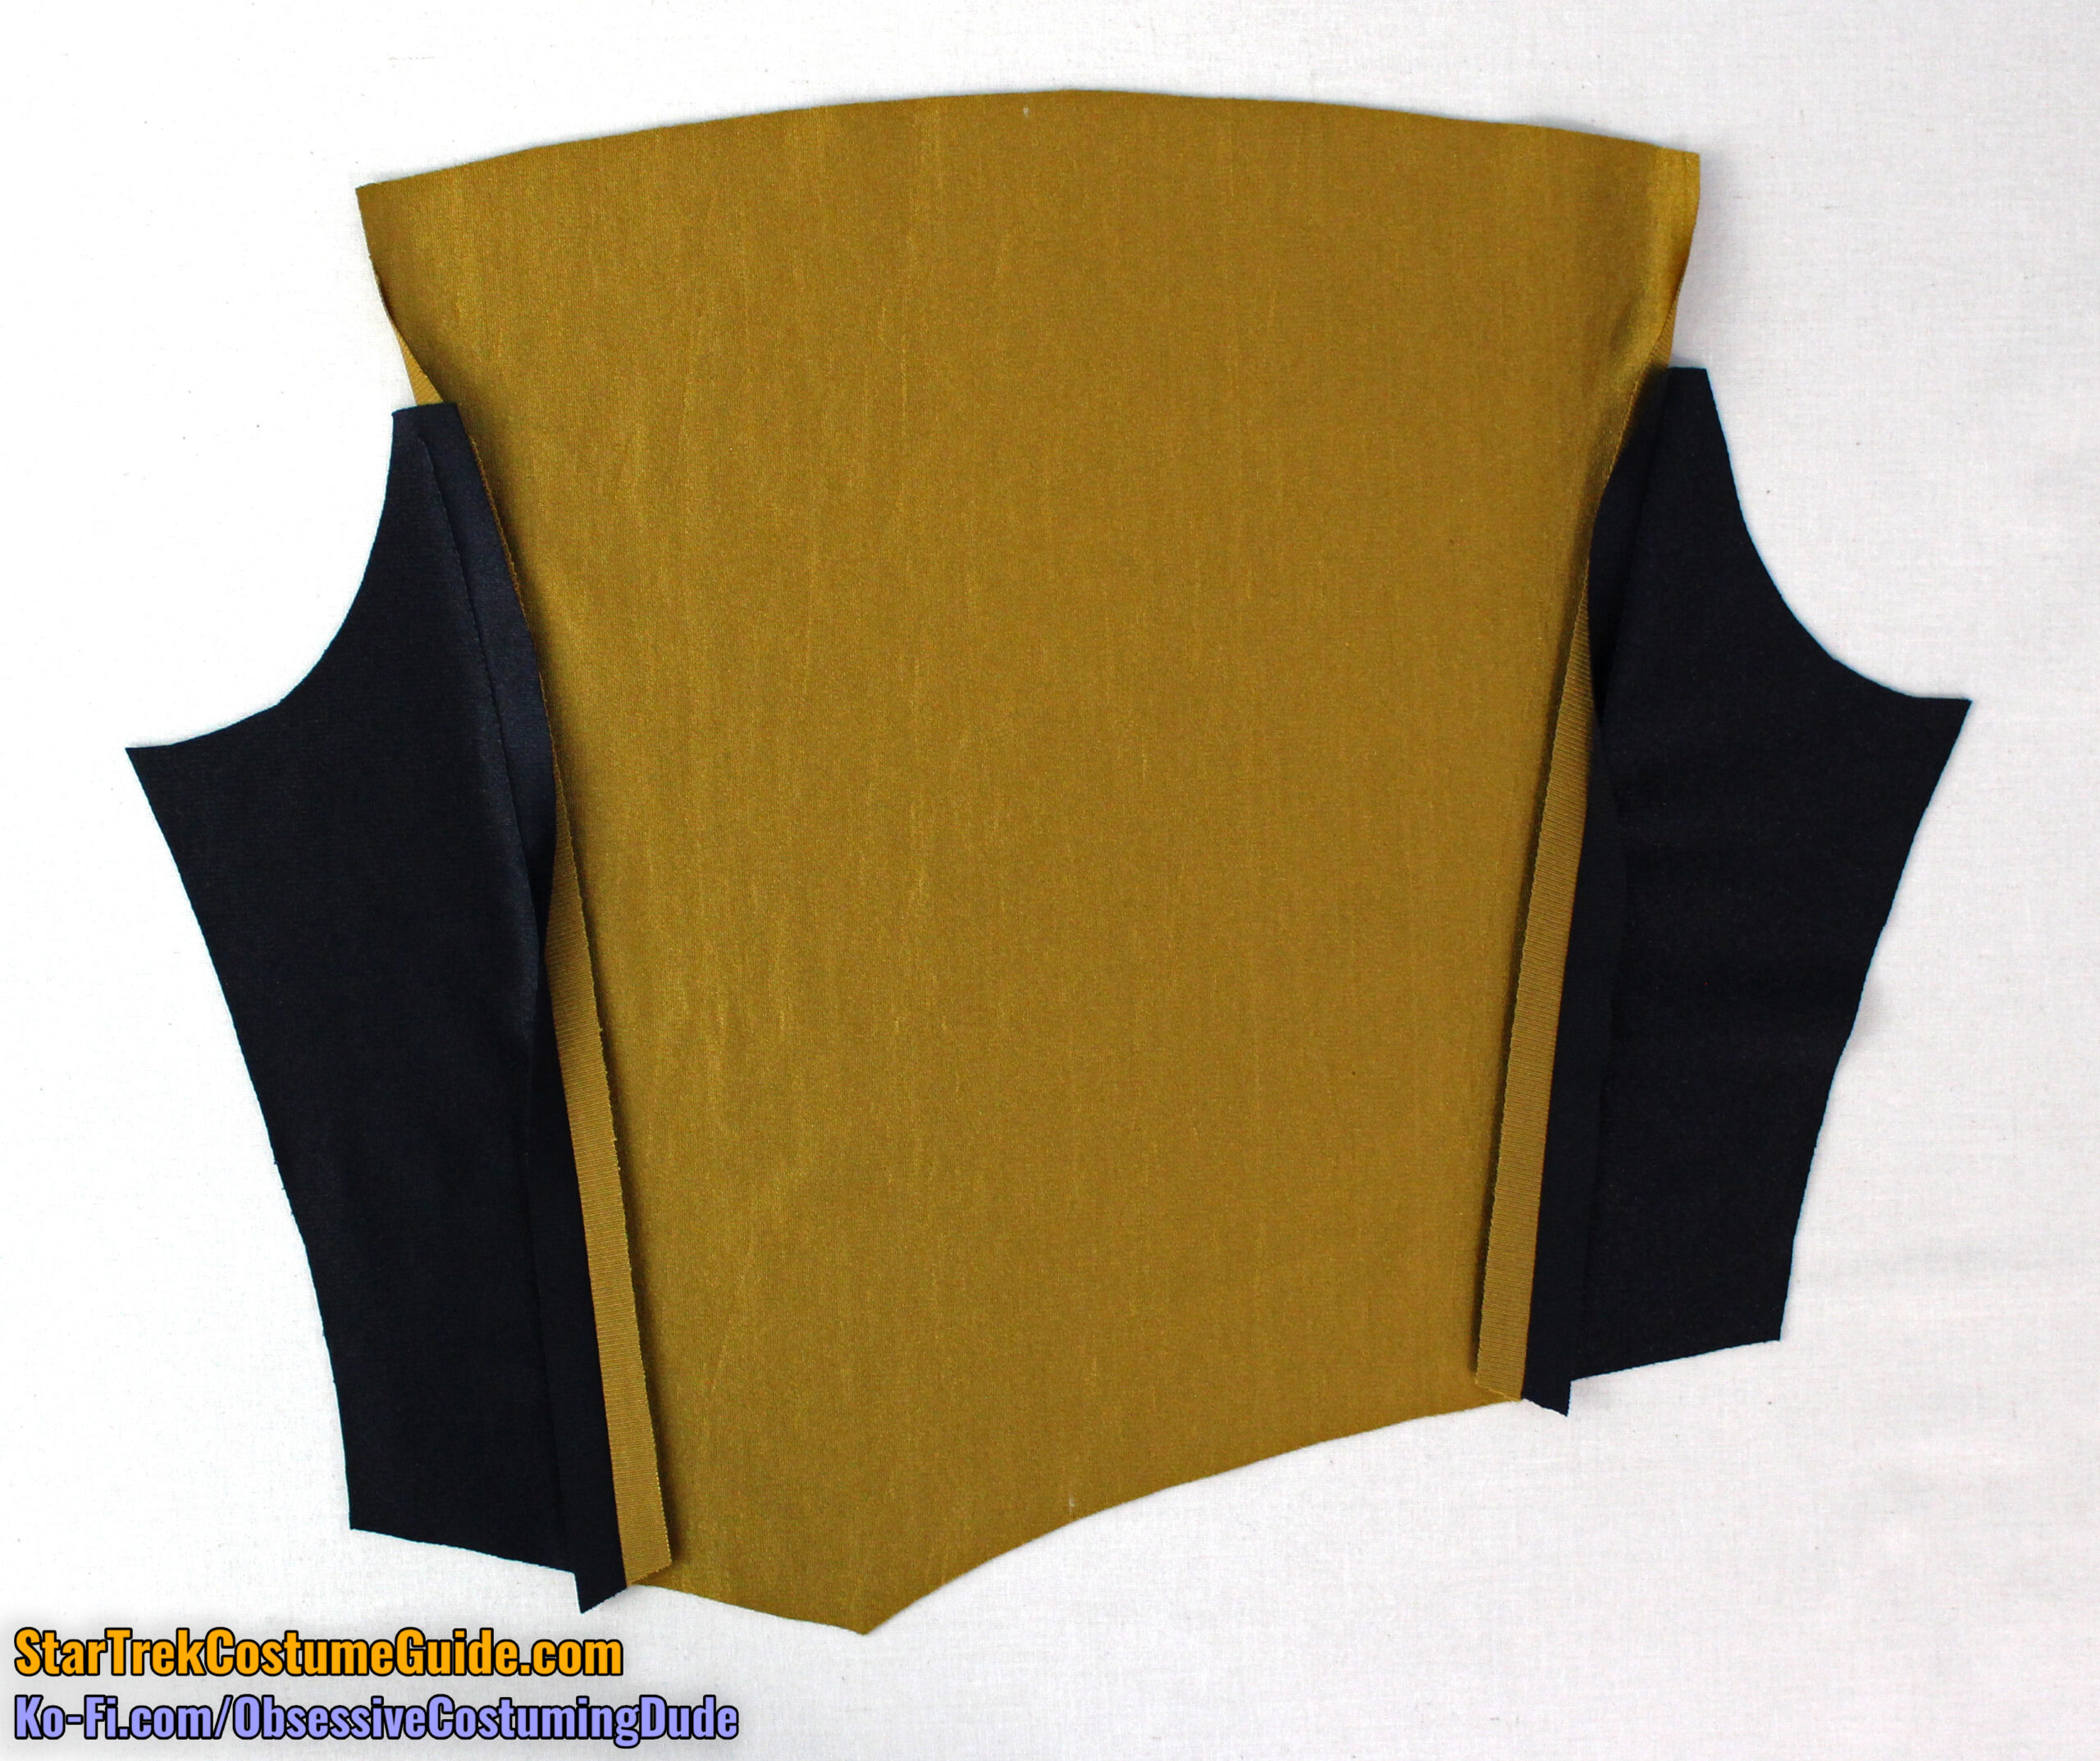
The early TNG jumpsuit’s front yoke assembly is comprised of three pieces:
I’ll again mention that on the original uniforms, the neckline/yoke/pants trim consistently appeared to be a lighter-weight spandex fabric than that of the jumpsuit body, and the two fabrics were often slightly different colors.
As a convenient “cheat,” I suggest simply using the same jumbo spandex for both the jumpsuit body and trim.
While not authentic to the originals, this has two major advantages:
1 – It’s more convenient to find and procure one fabric, rather than two separate ones.
2 – This will ensure your jumpsuit trim will match the body fabric.
While one could legitimately make the case that the two weren’t necessarily intended to be exact color matches, in this case, I personally lean toward an “idealized” color palette – especially with the added convenience of not having to hunt for a second, closely-matching fabric. 🙂
I suggest applying a lightweight fusible interfacing to the underside of the front yoke pieces, along the centermost couple inches or so, to stabilize them and prevent them from stretching out of shape during construction.
Personally, I prefer using a fusible interfacing over that area (see below).
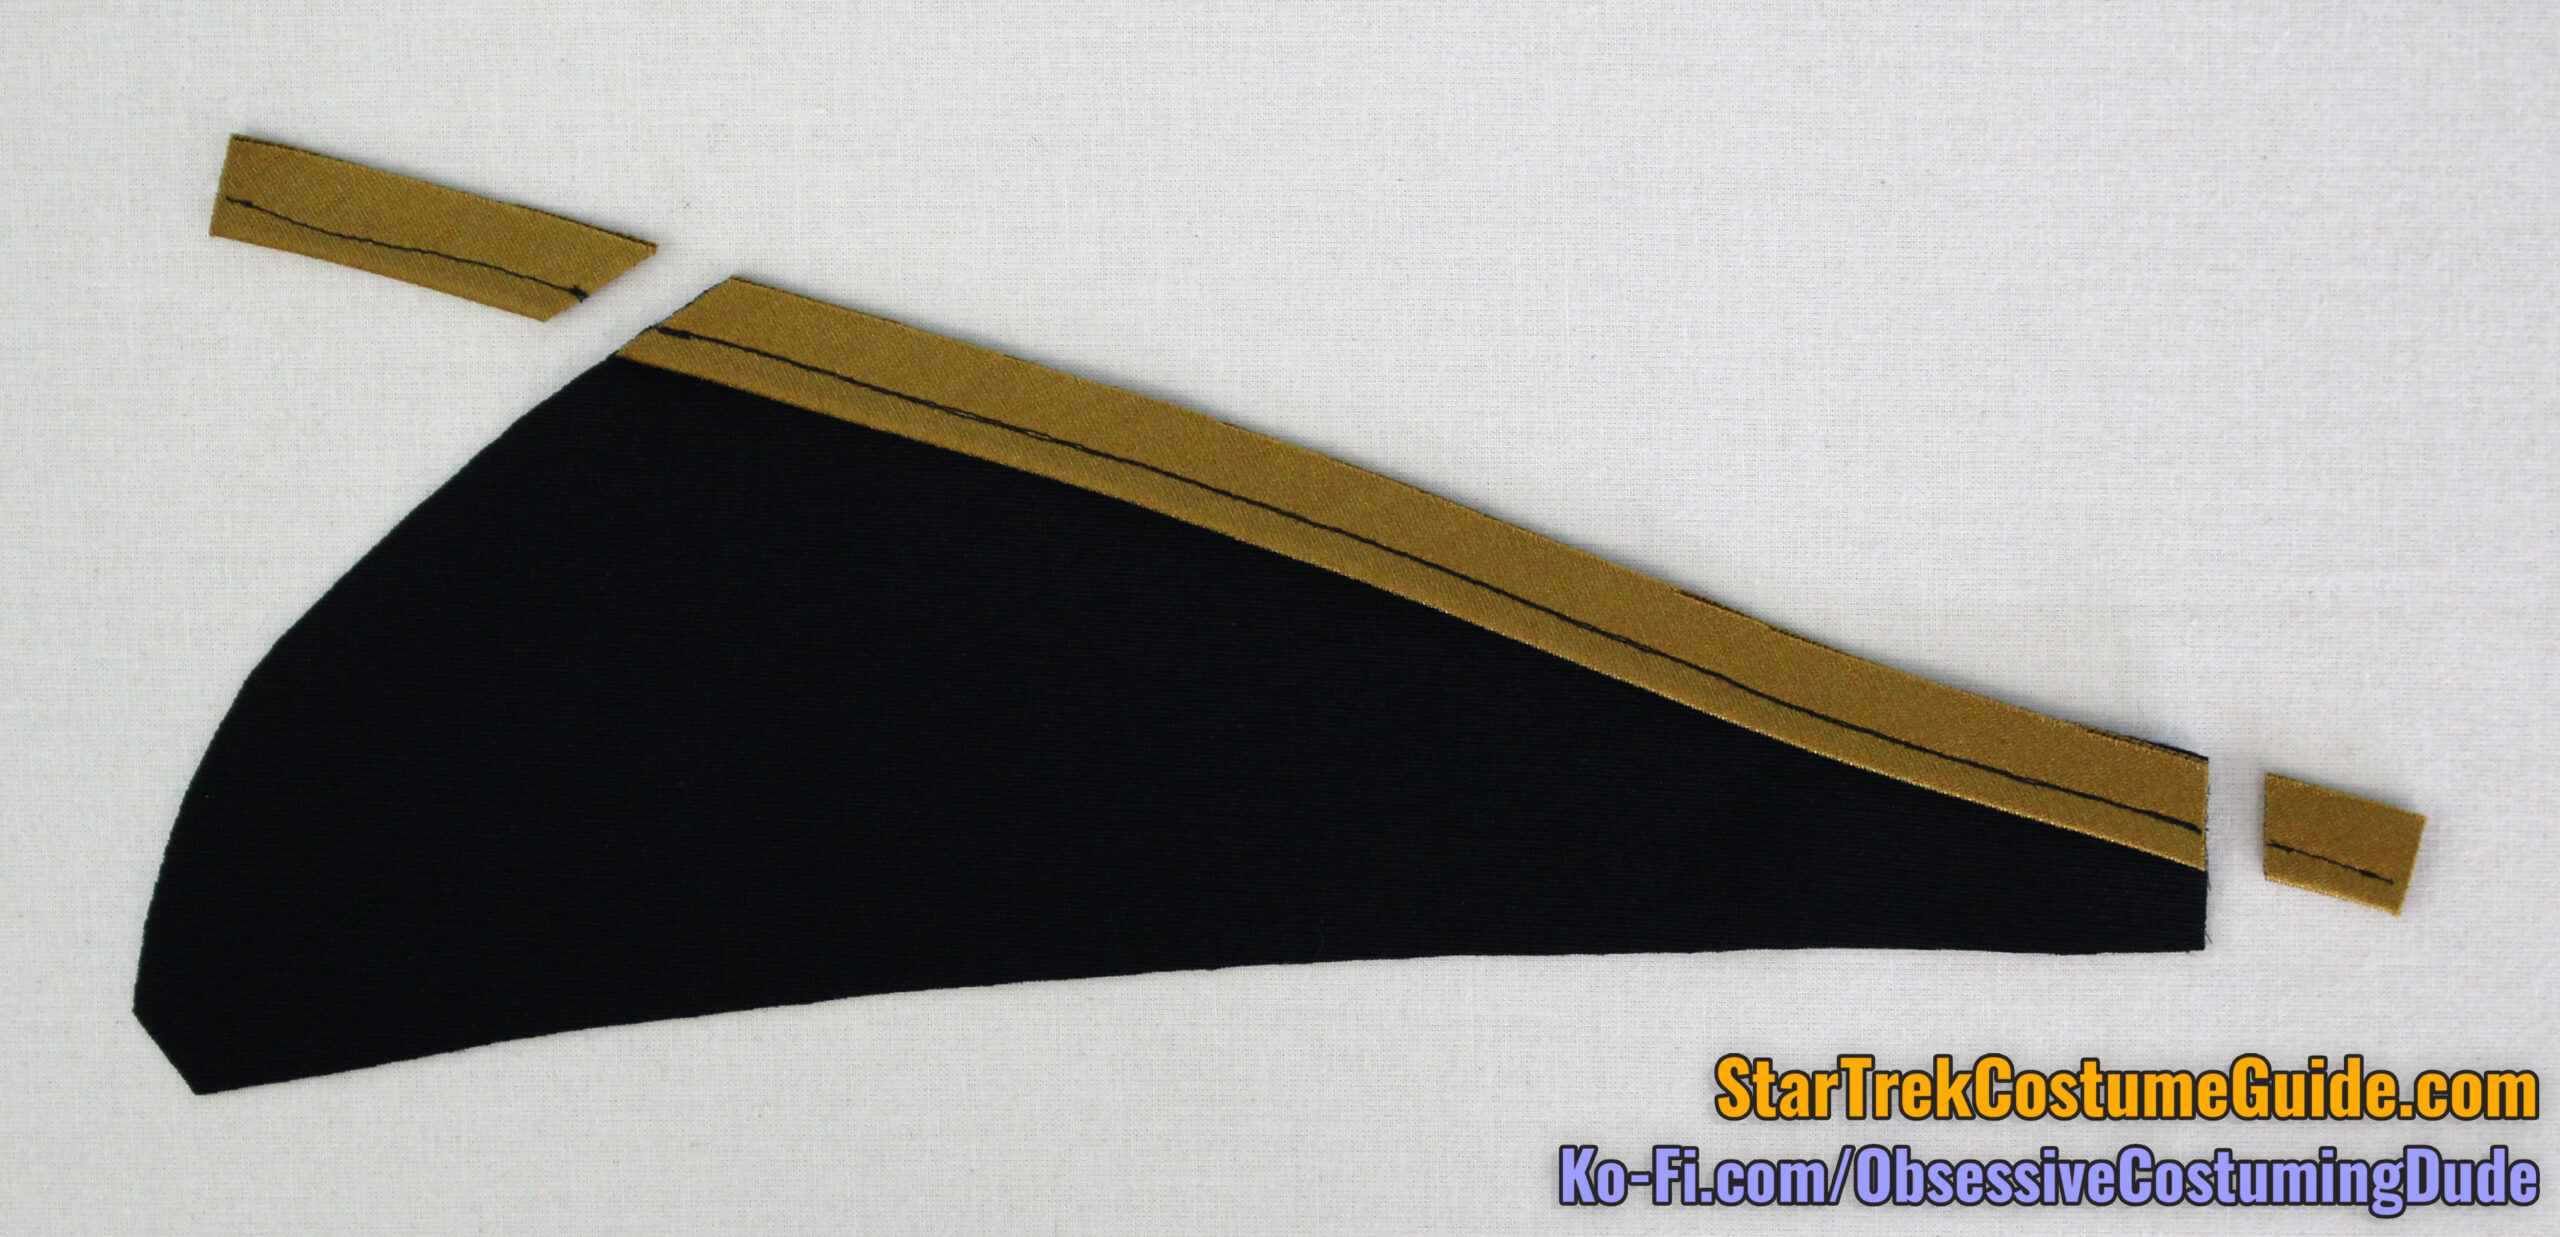
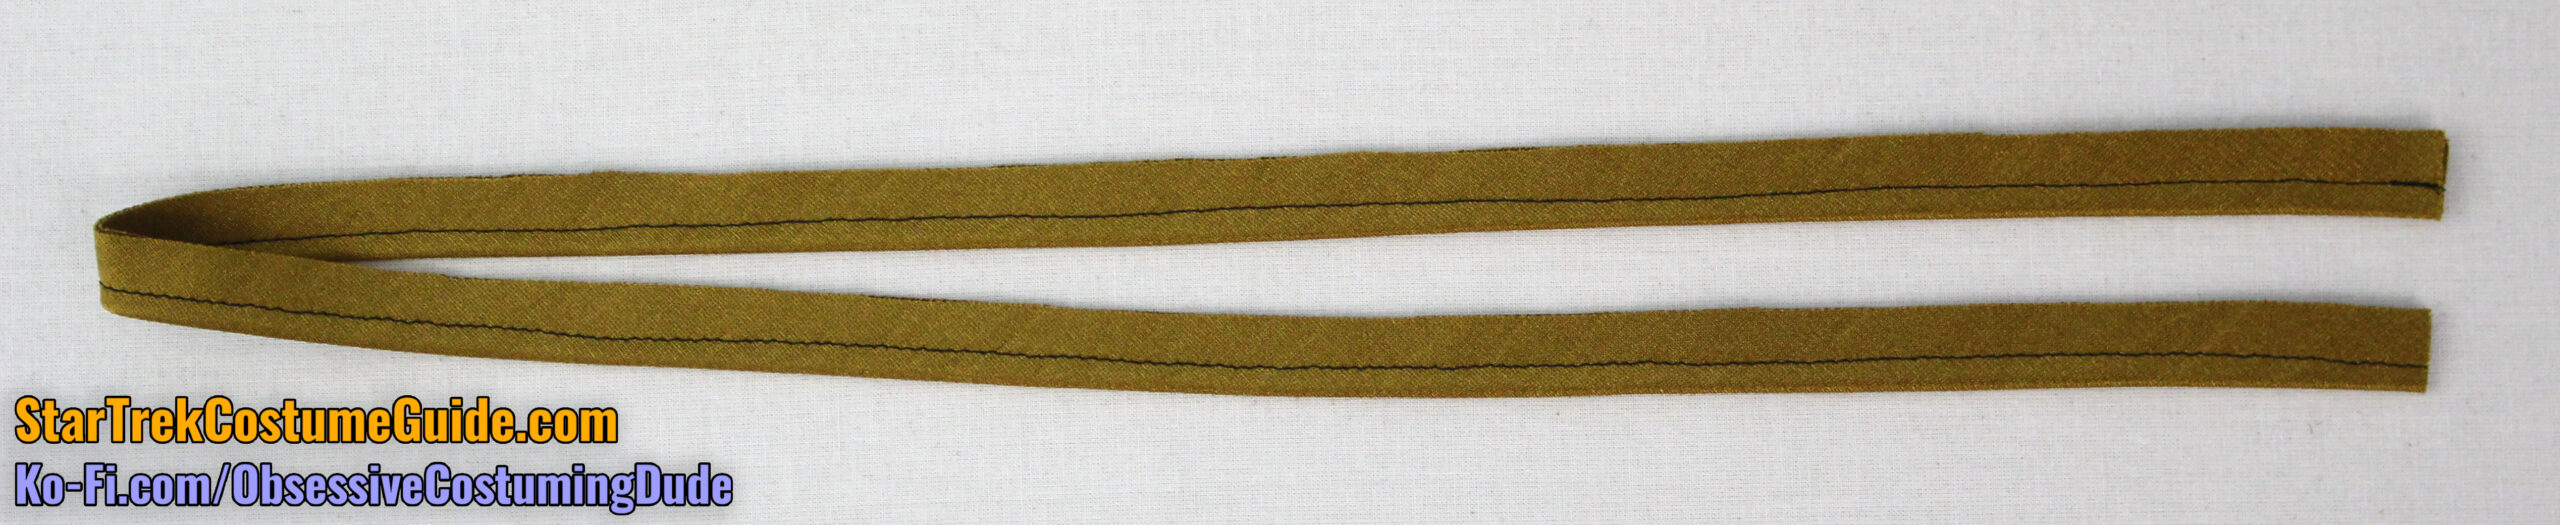
There’s a pattern piece for the front yoke piping (piece R), but it’s just a strip of bias-cut fabric 1 ⅛” wide.
Press your piping fabric in half, lengthwise.
If you’re “cheating” and using the same jumbo spandex as the body panels, remember to fold the matte/“dull” sides together so the trim is shiny-sides-out.
I suggest basting the length of trim closed along the seam line, ⅜” from the raw edges. (I recommend using a quilting/walking foot for this, to help prevent the bias trim from stretching as you go.)
Cut the length of trim in half; each half will be for one side of the yoke.
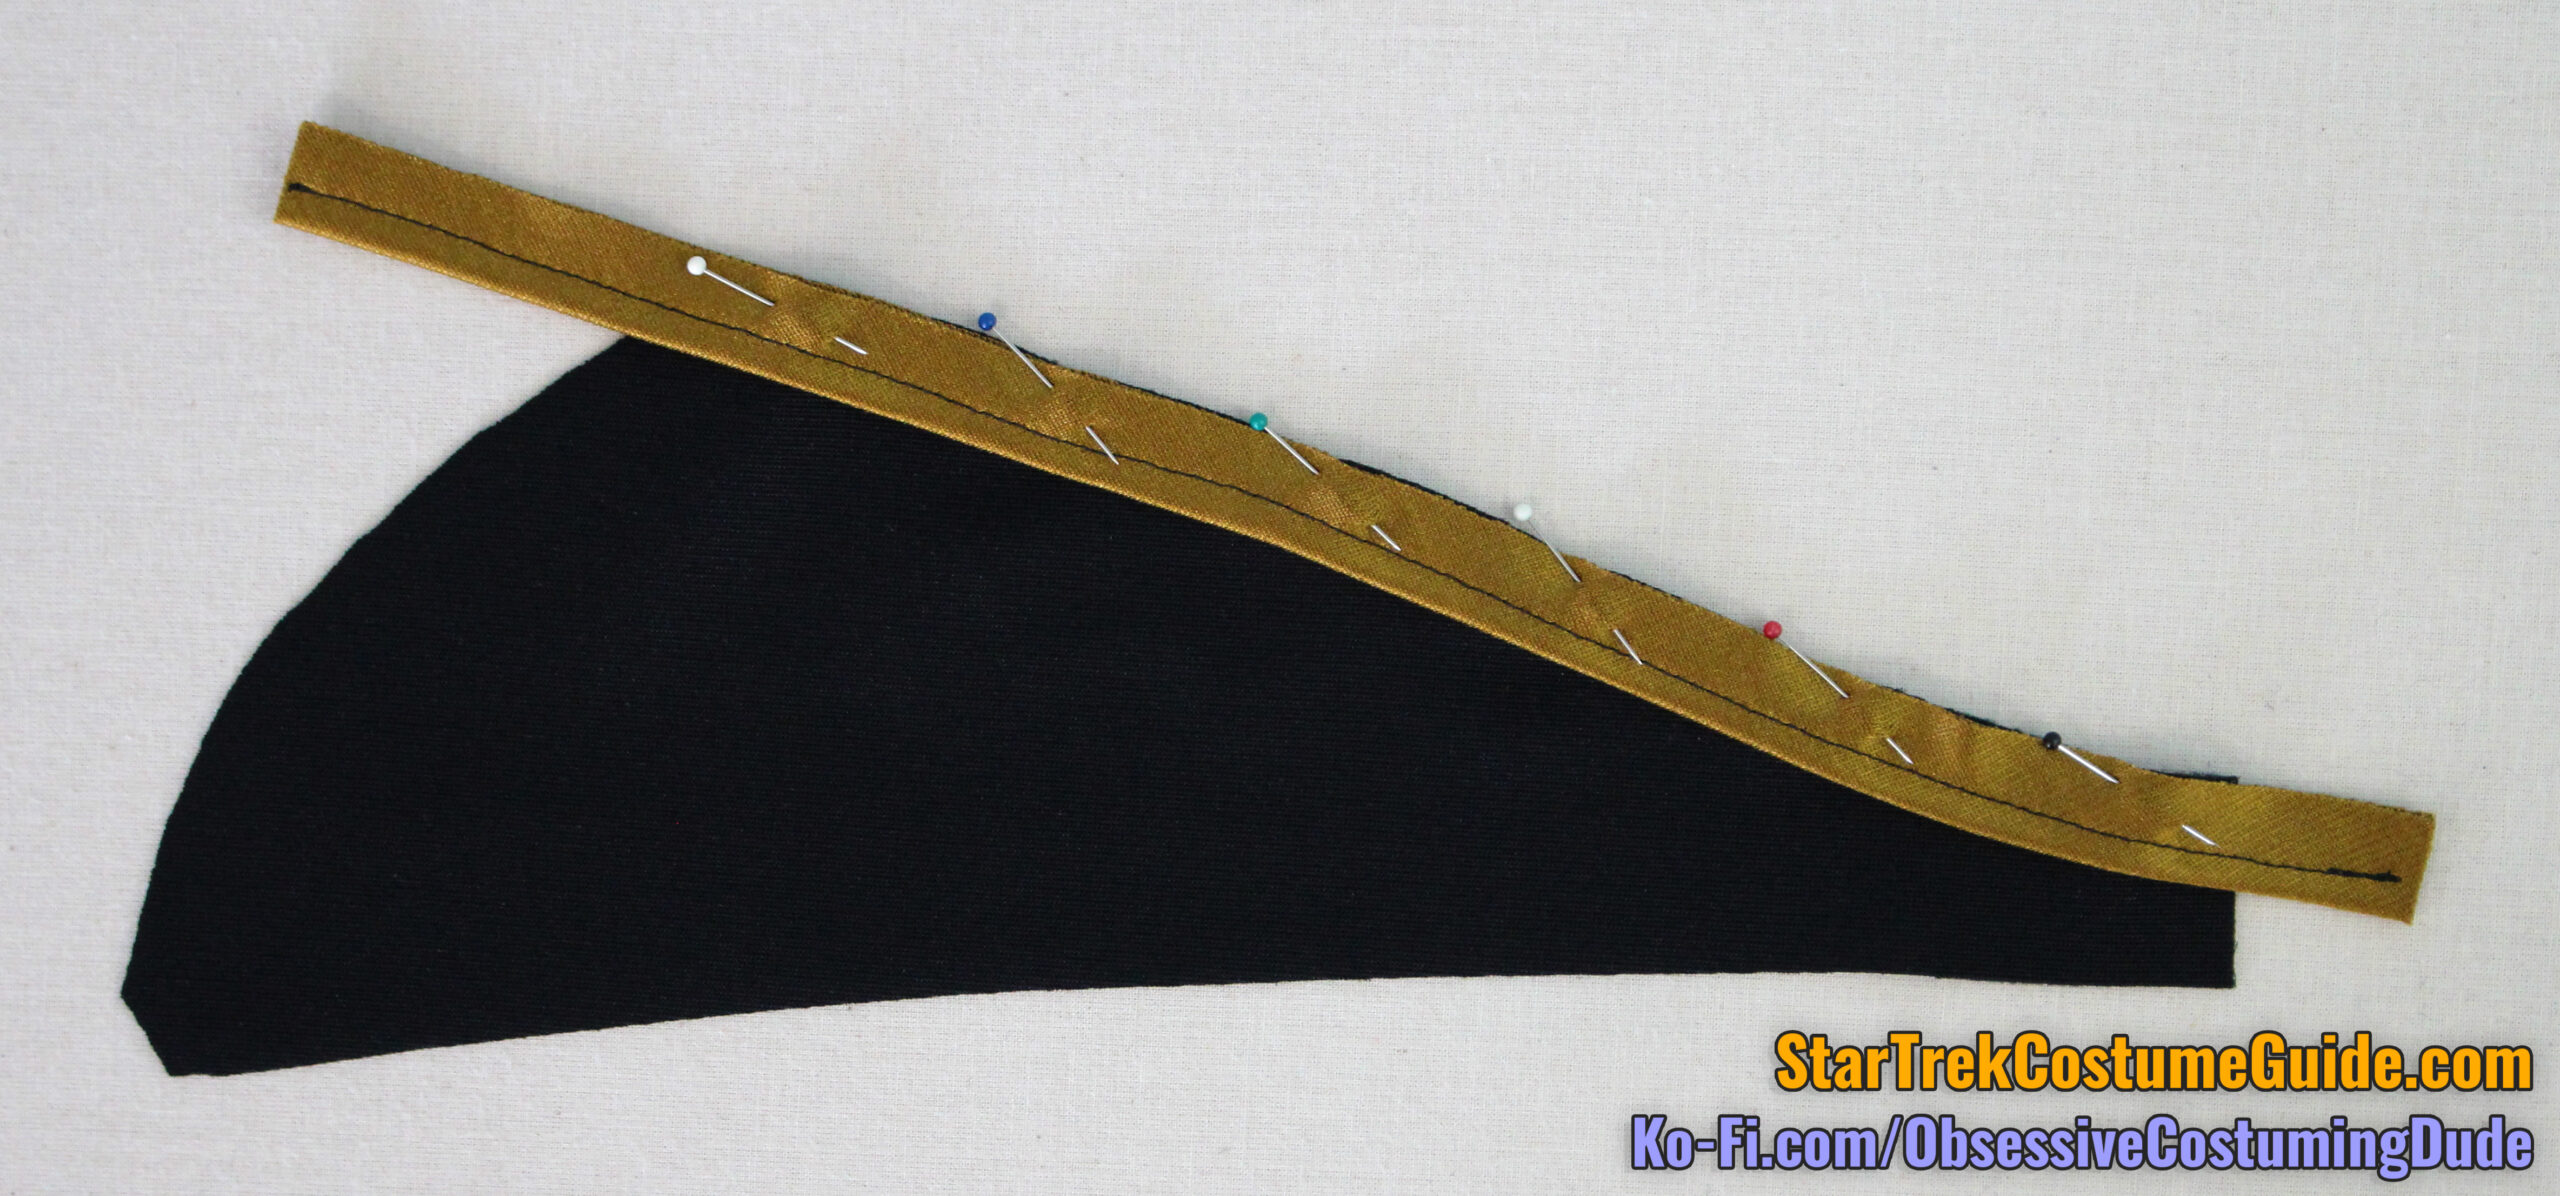
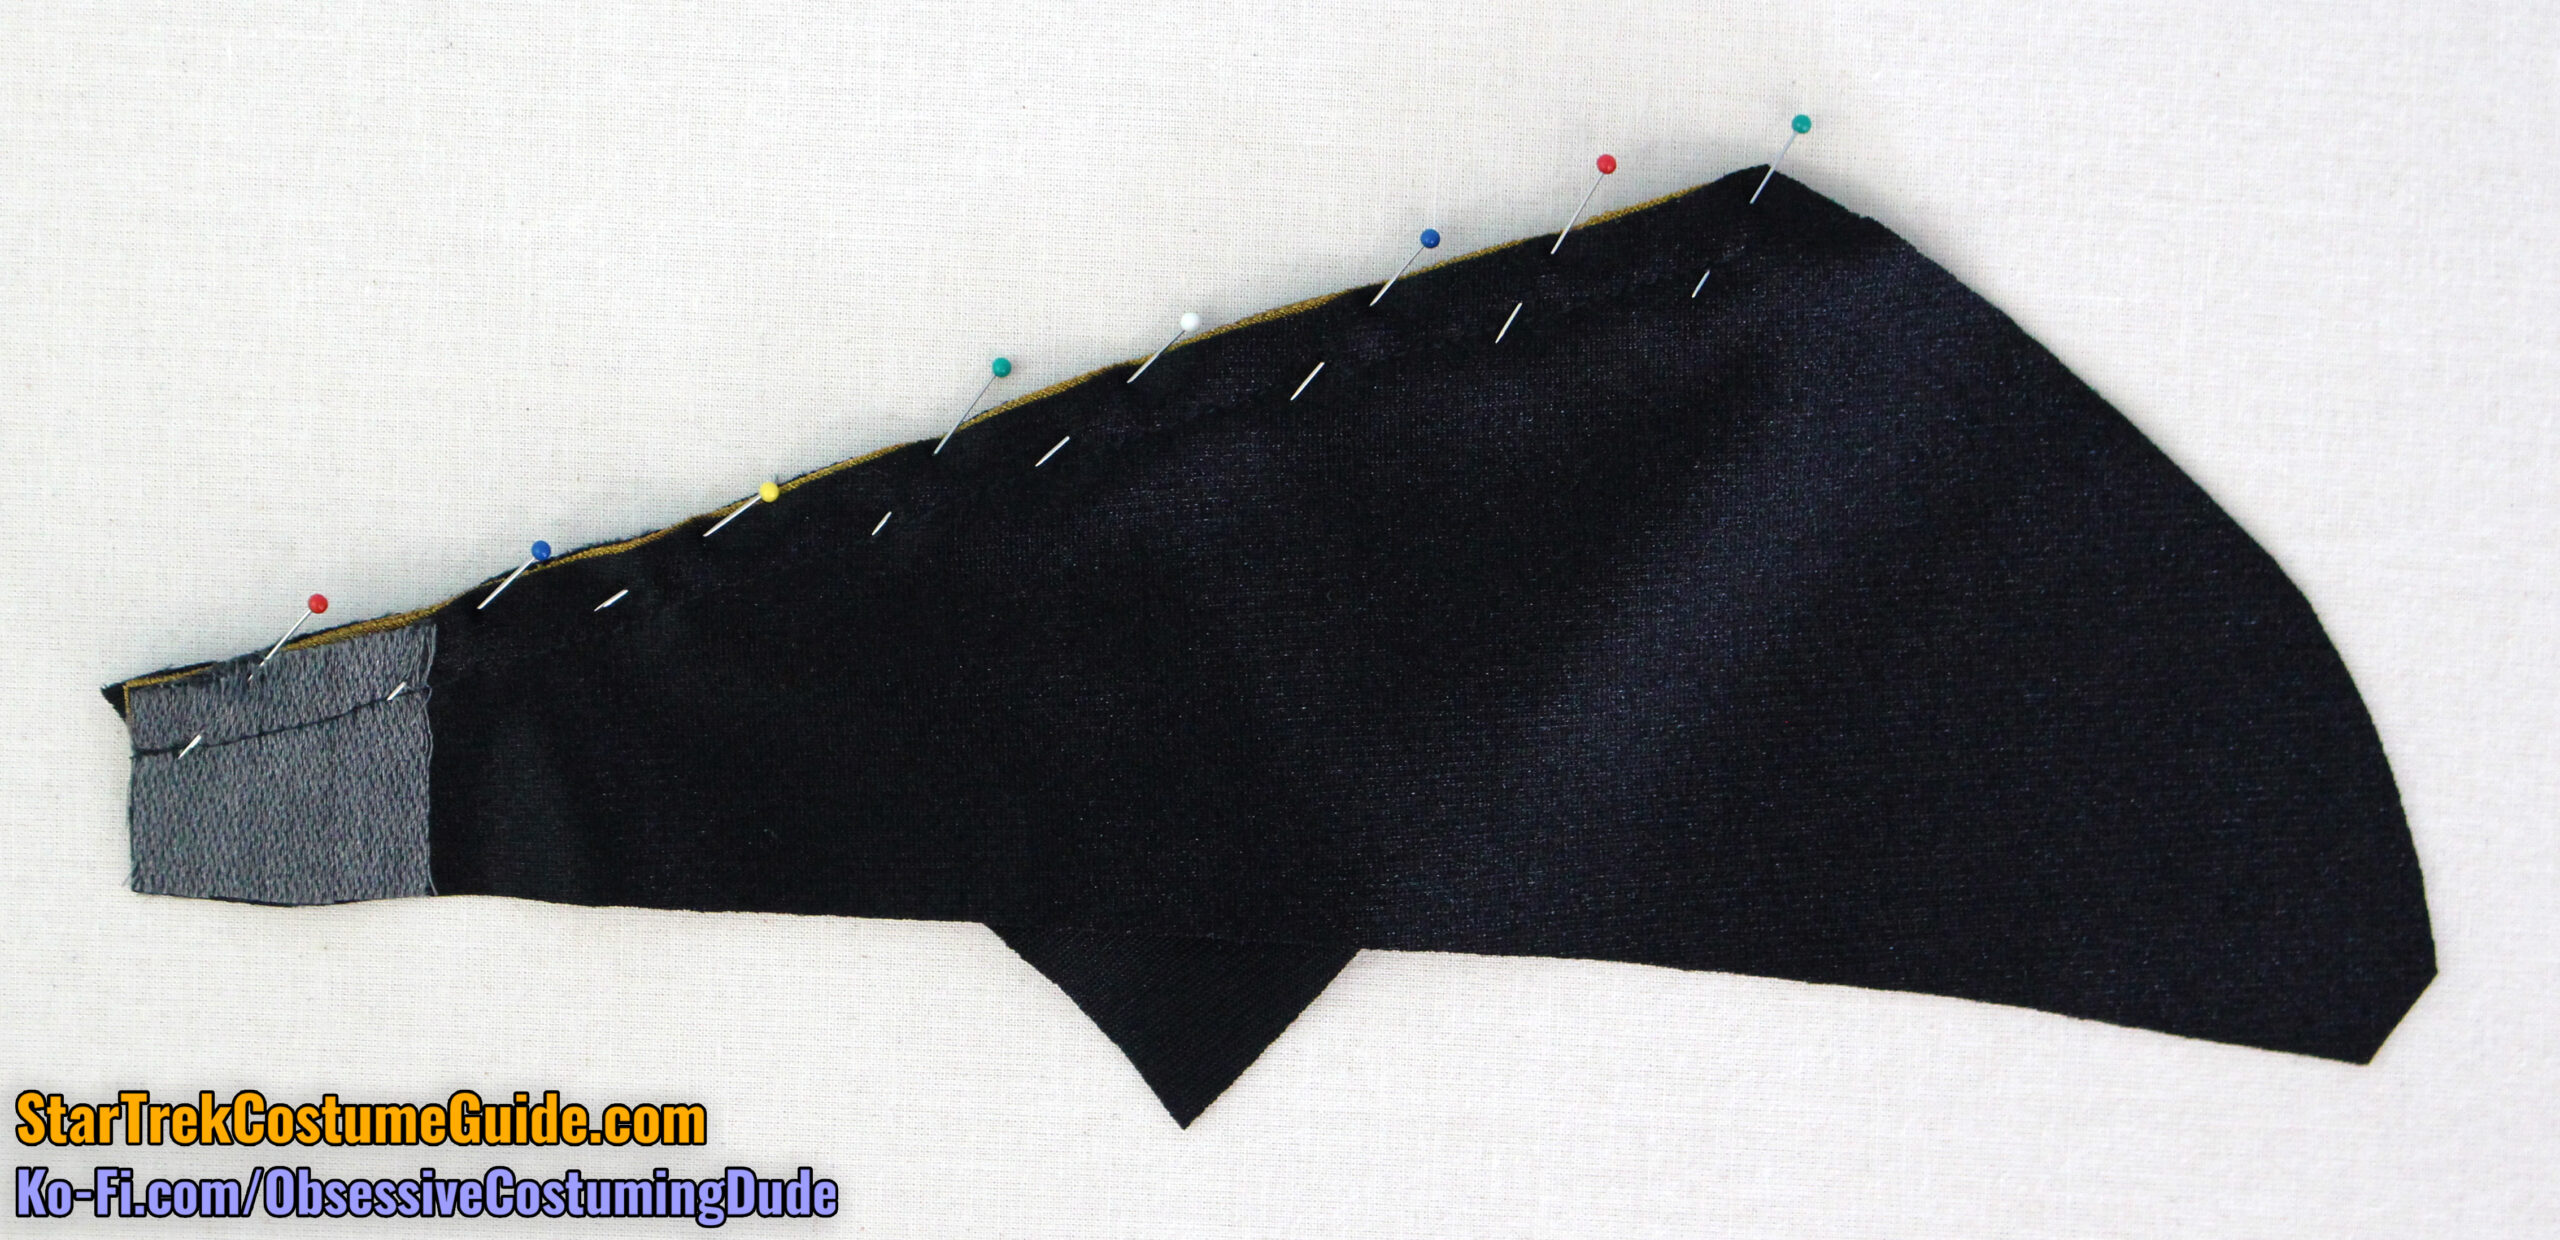
Pin the front yoke piping to the lower front yoke (piece B2), folded side down, with the upper edges flush.
There will probably be some excess, but that’s fine. Better too much than not enough!
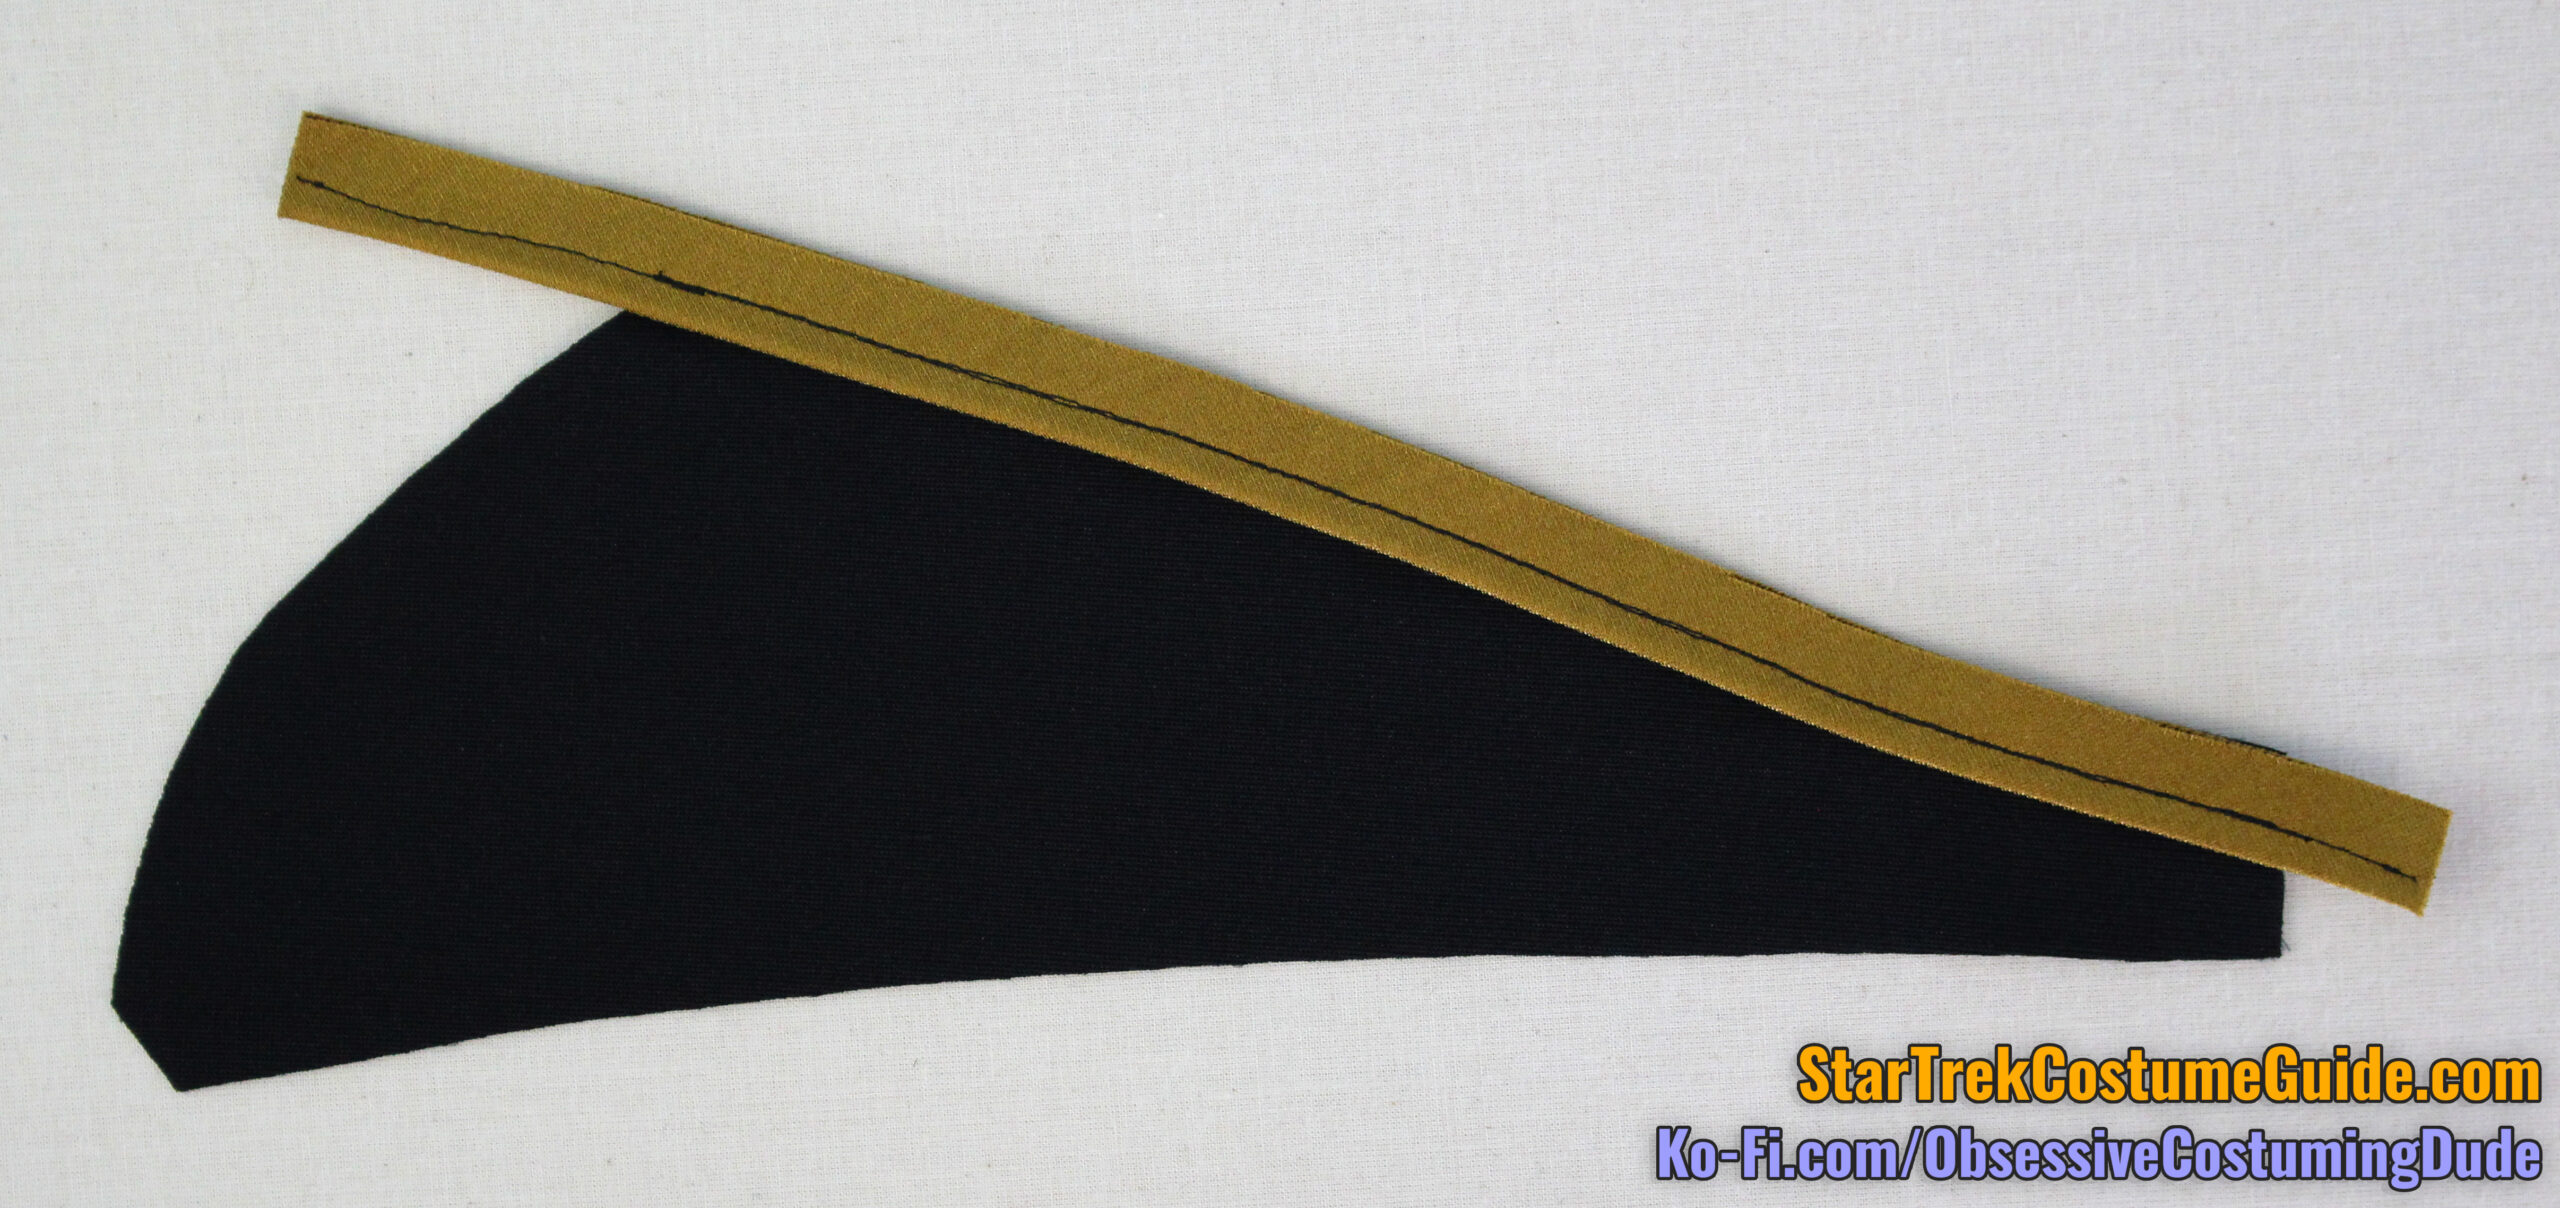
Sew the piping to the lower front along the seam line, ⅜” from the upper edges. (I again suggest using a quilting/walking foot for everything involving the yoke and neckline trims.)
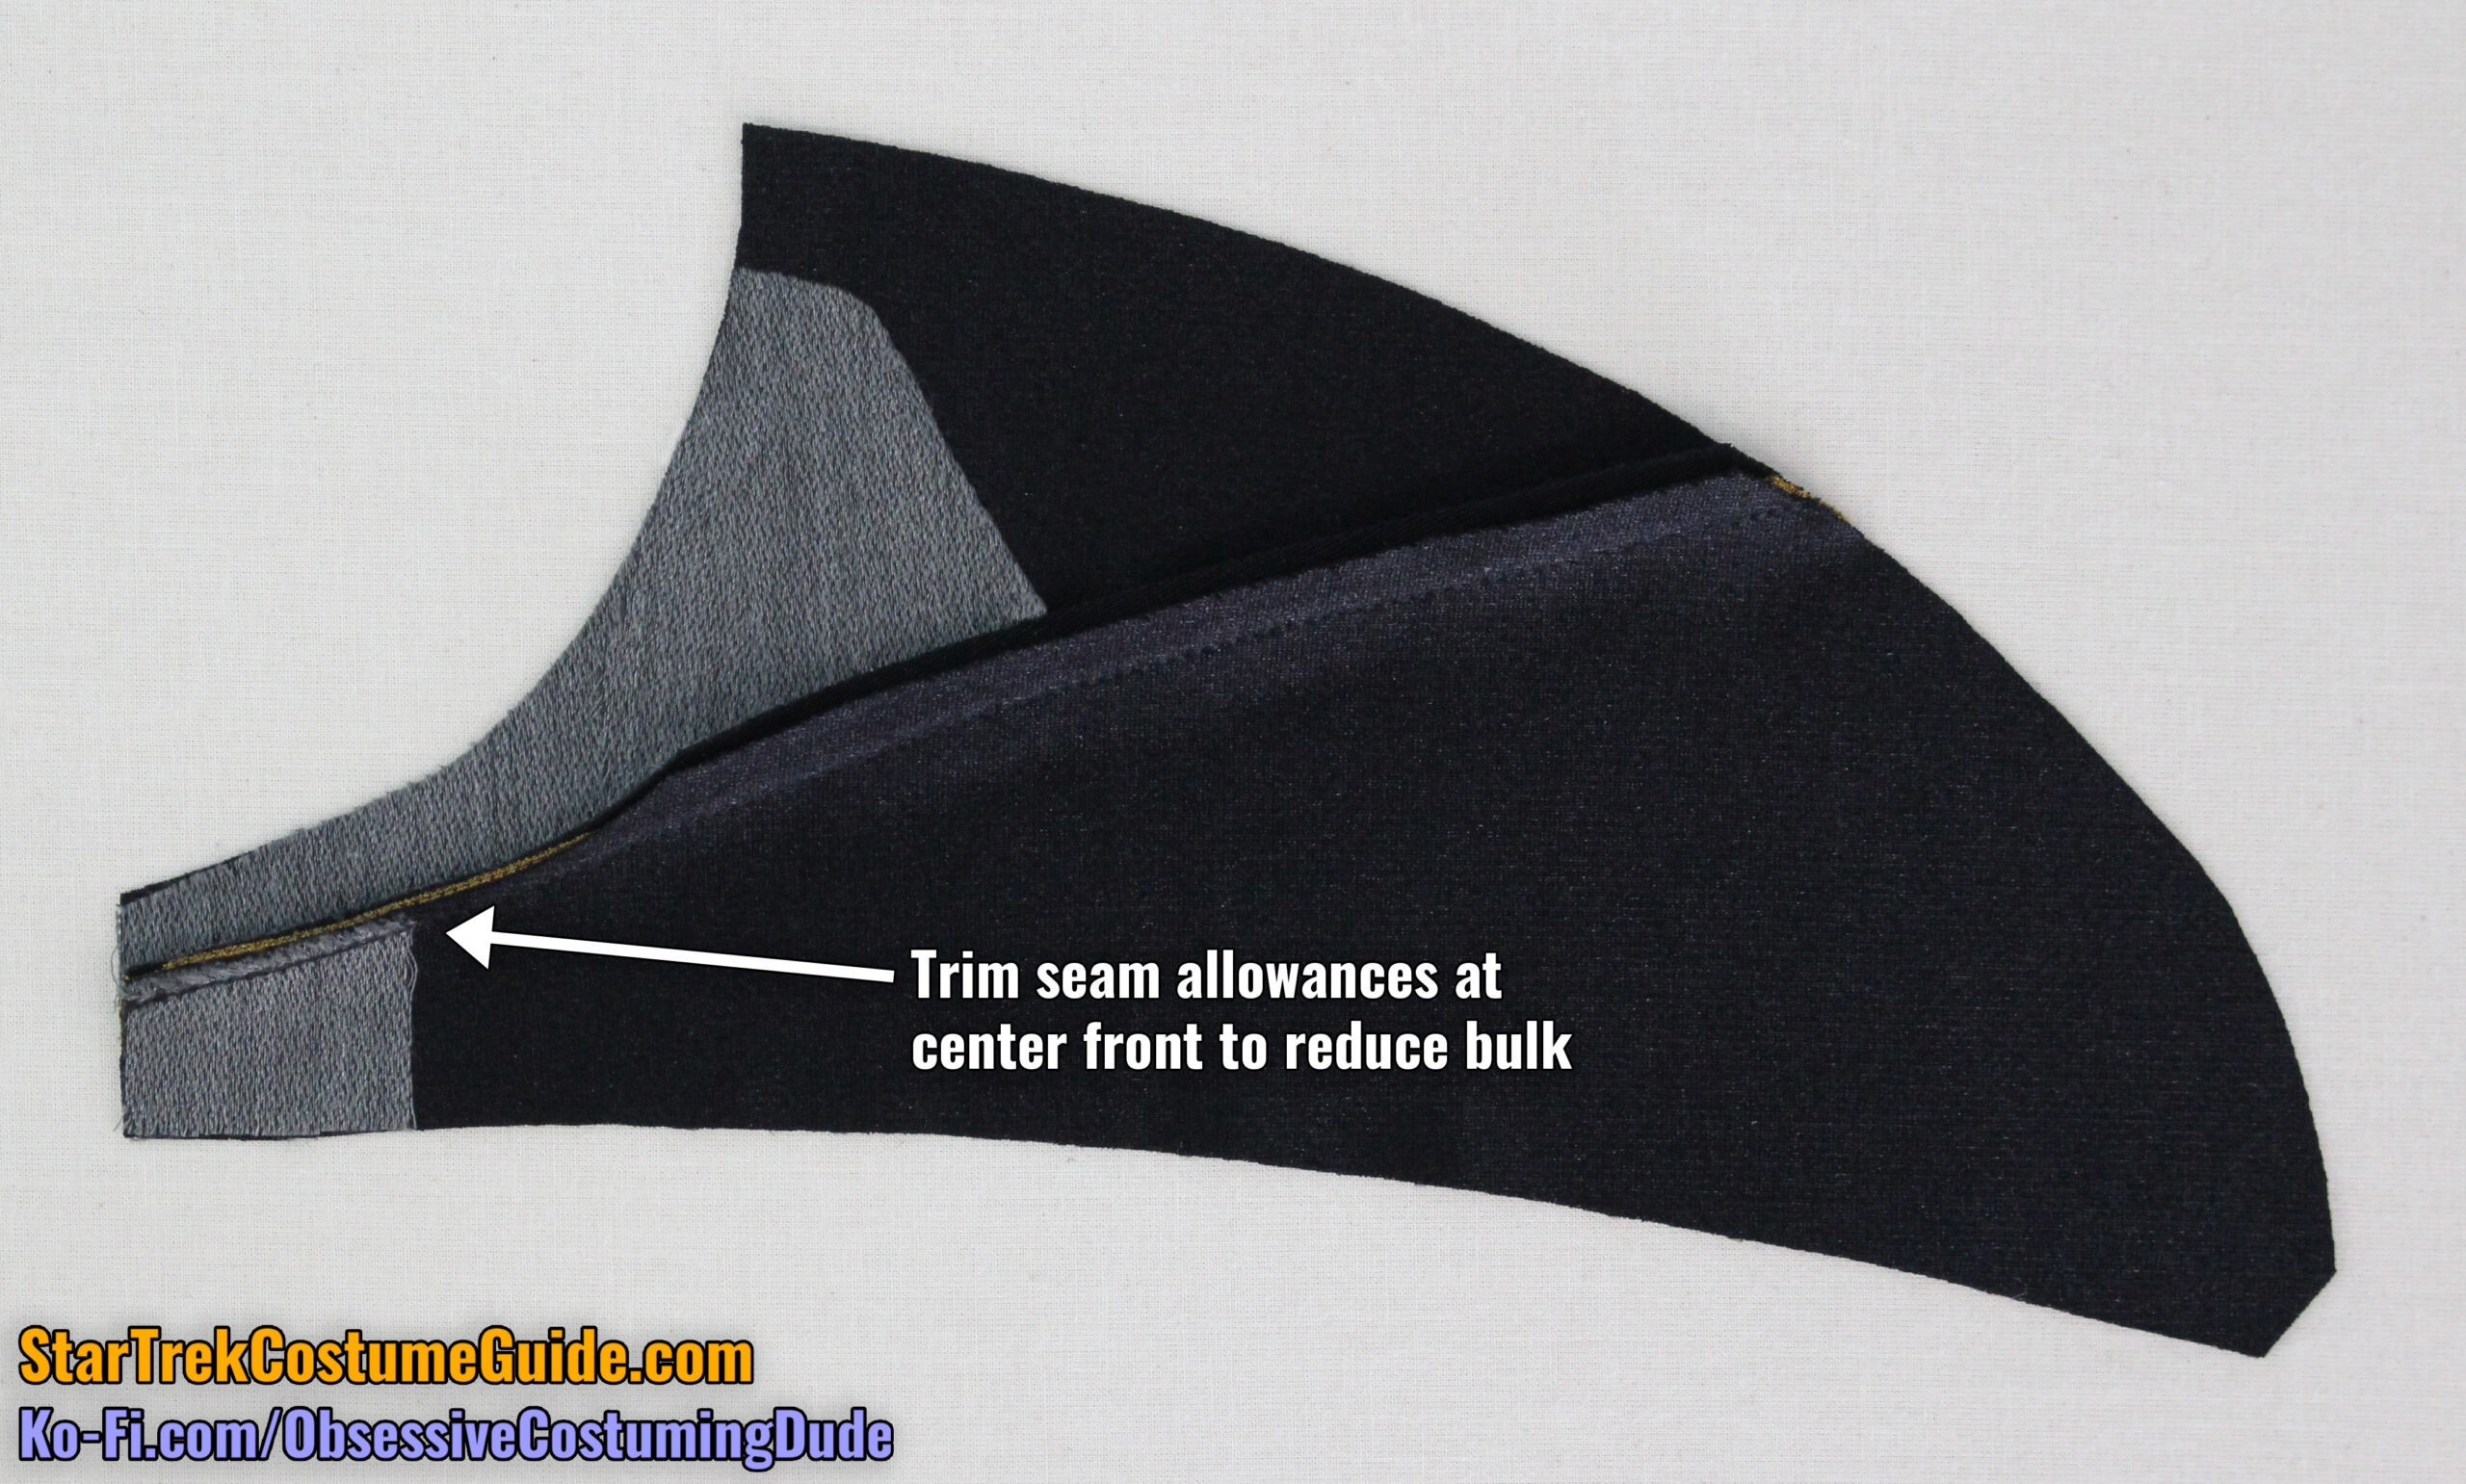
Trim away the excess at the outer shoulder and center front.
Pin the upper front yoke (piece B1) to the lower yoke assembly, right-sides-together.
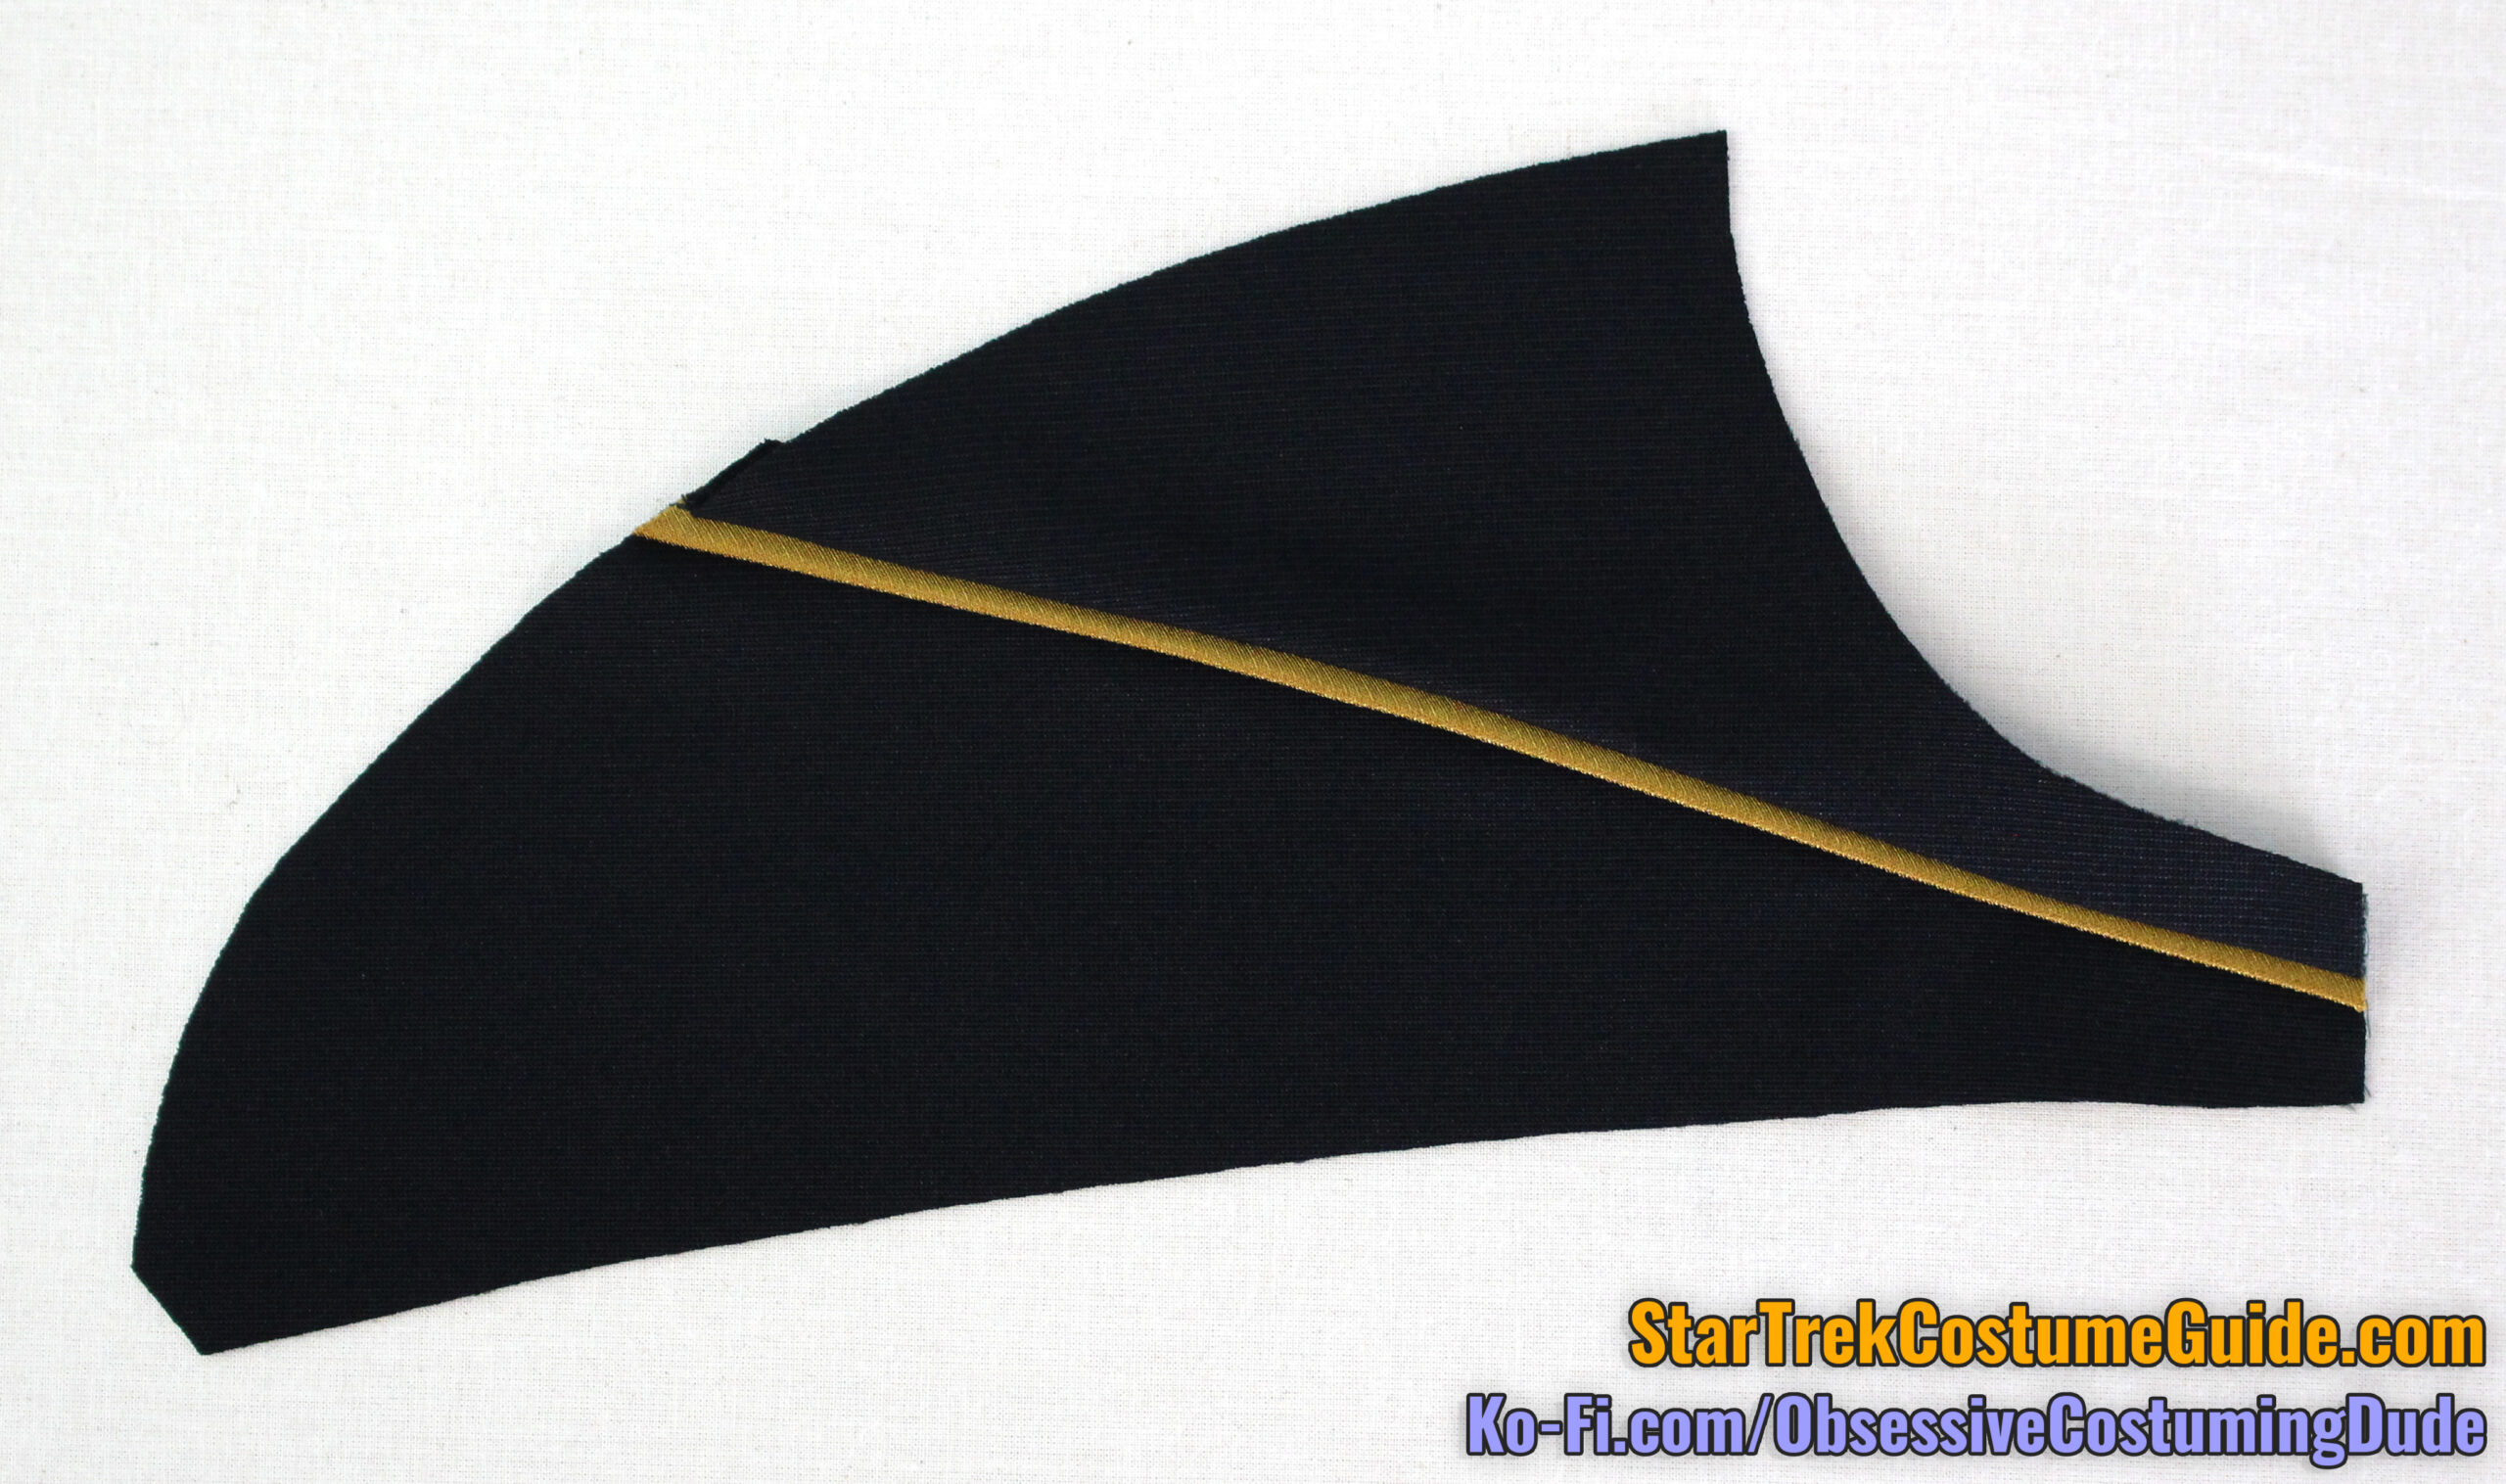
Sew the yokes together, stitching exactly over the previous stitch line (⅜” from the edge), with the yoke trim “sandwiched” between them.
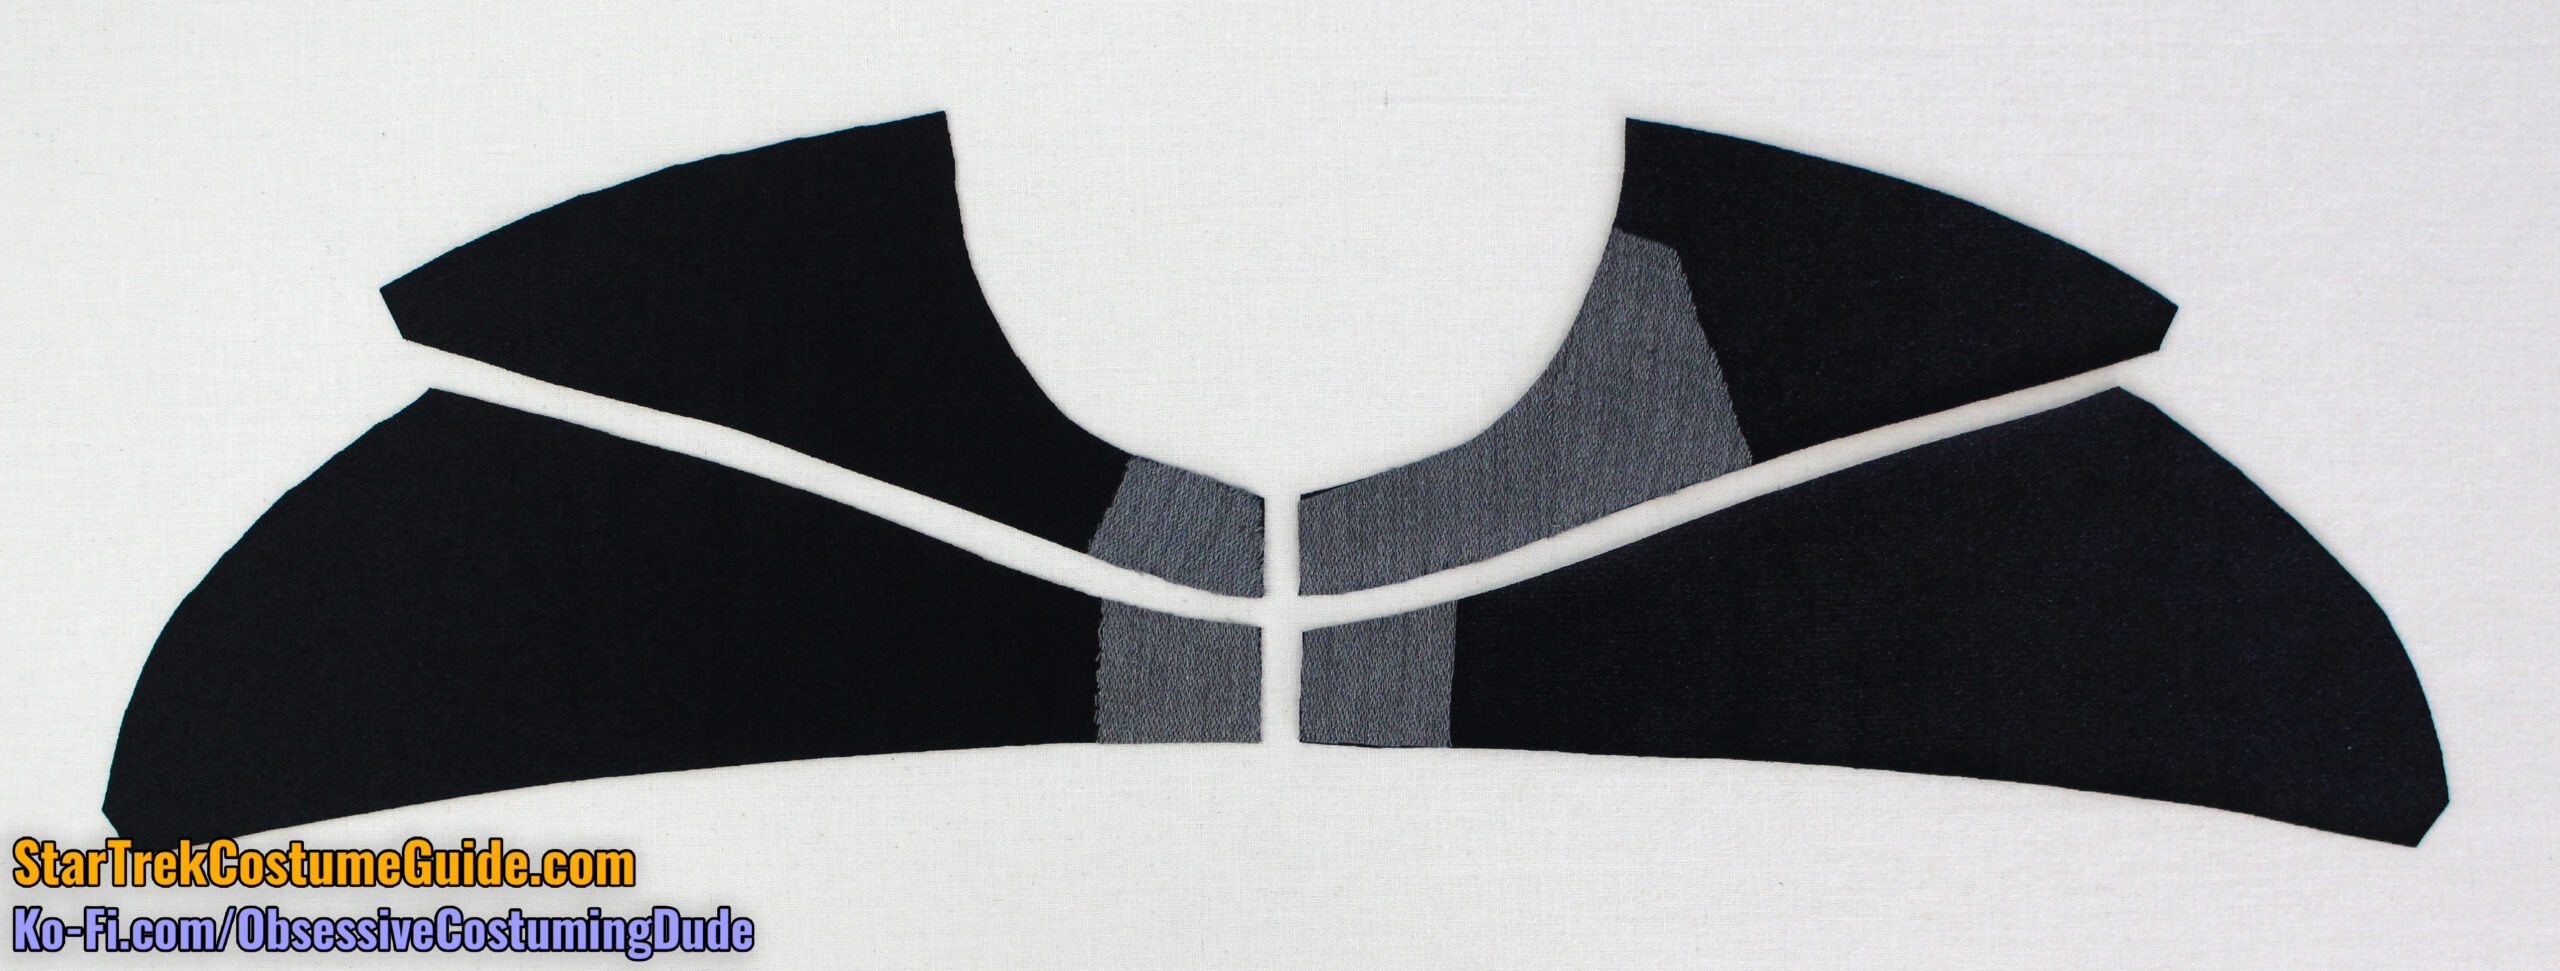
Press the seam allowances and upper yoke upward.
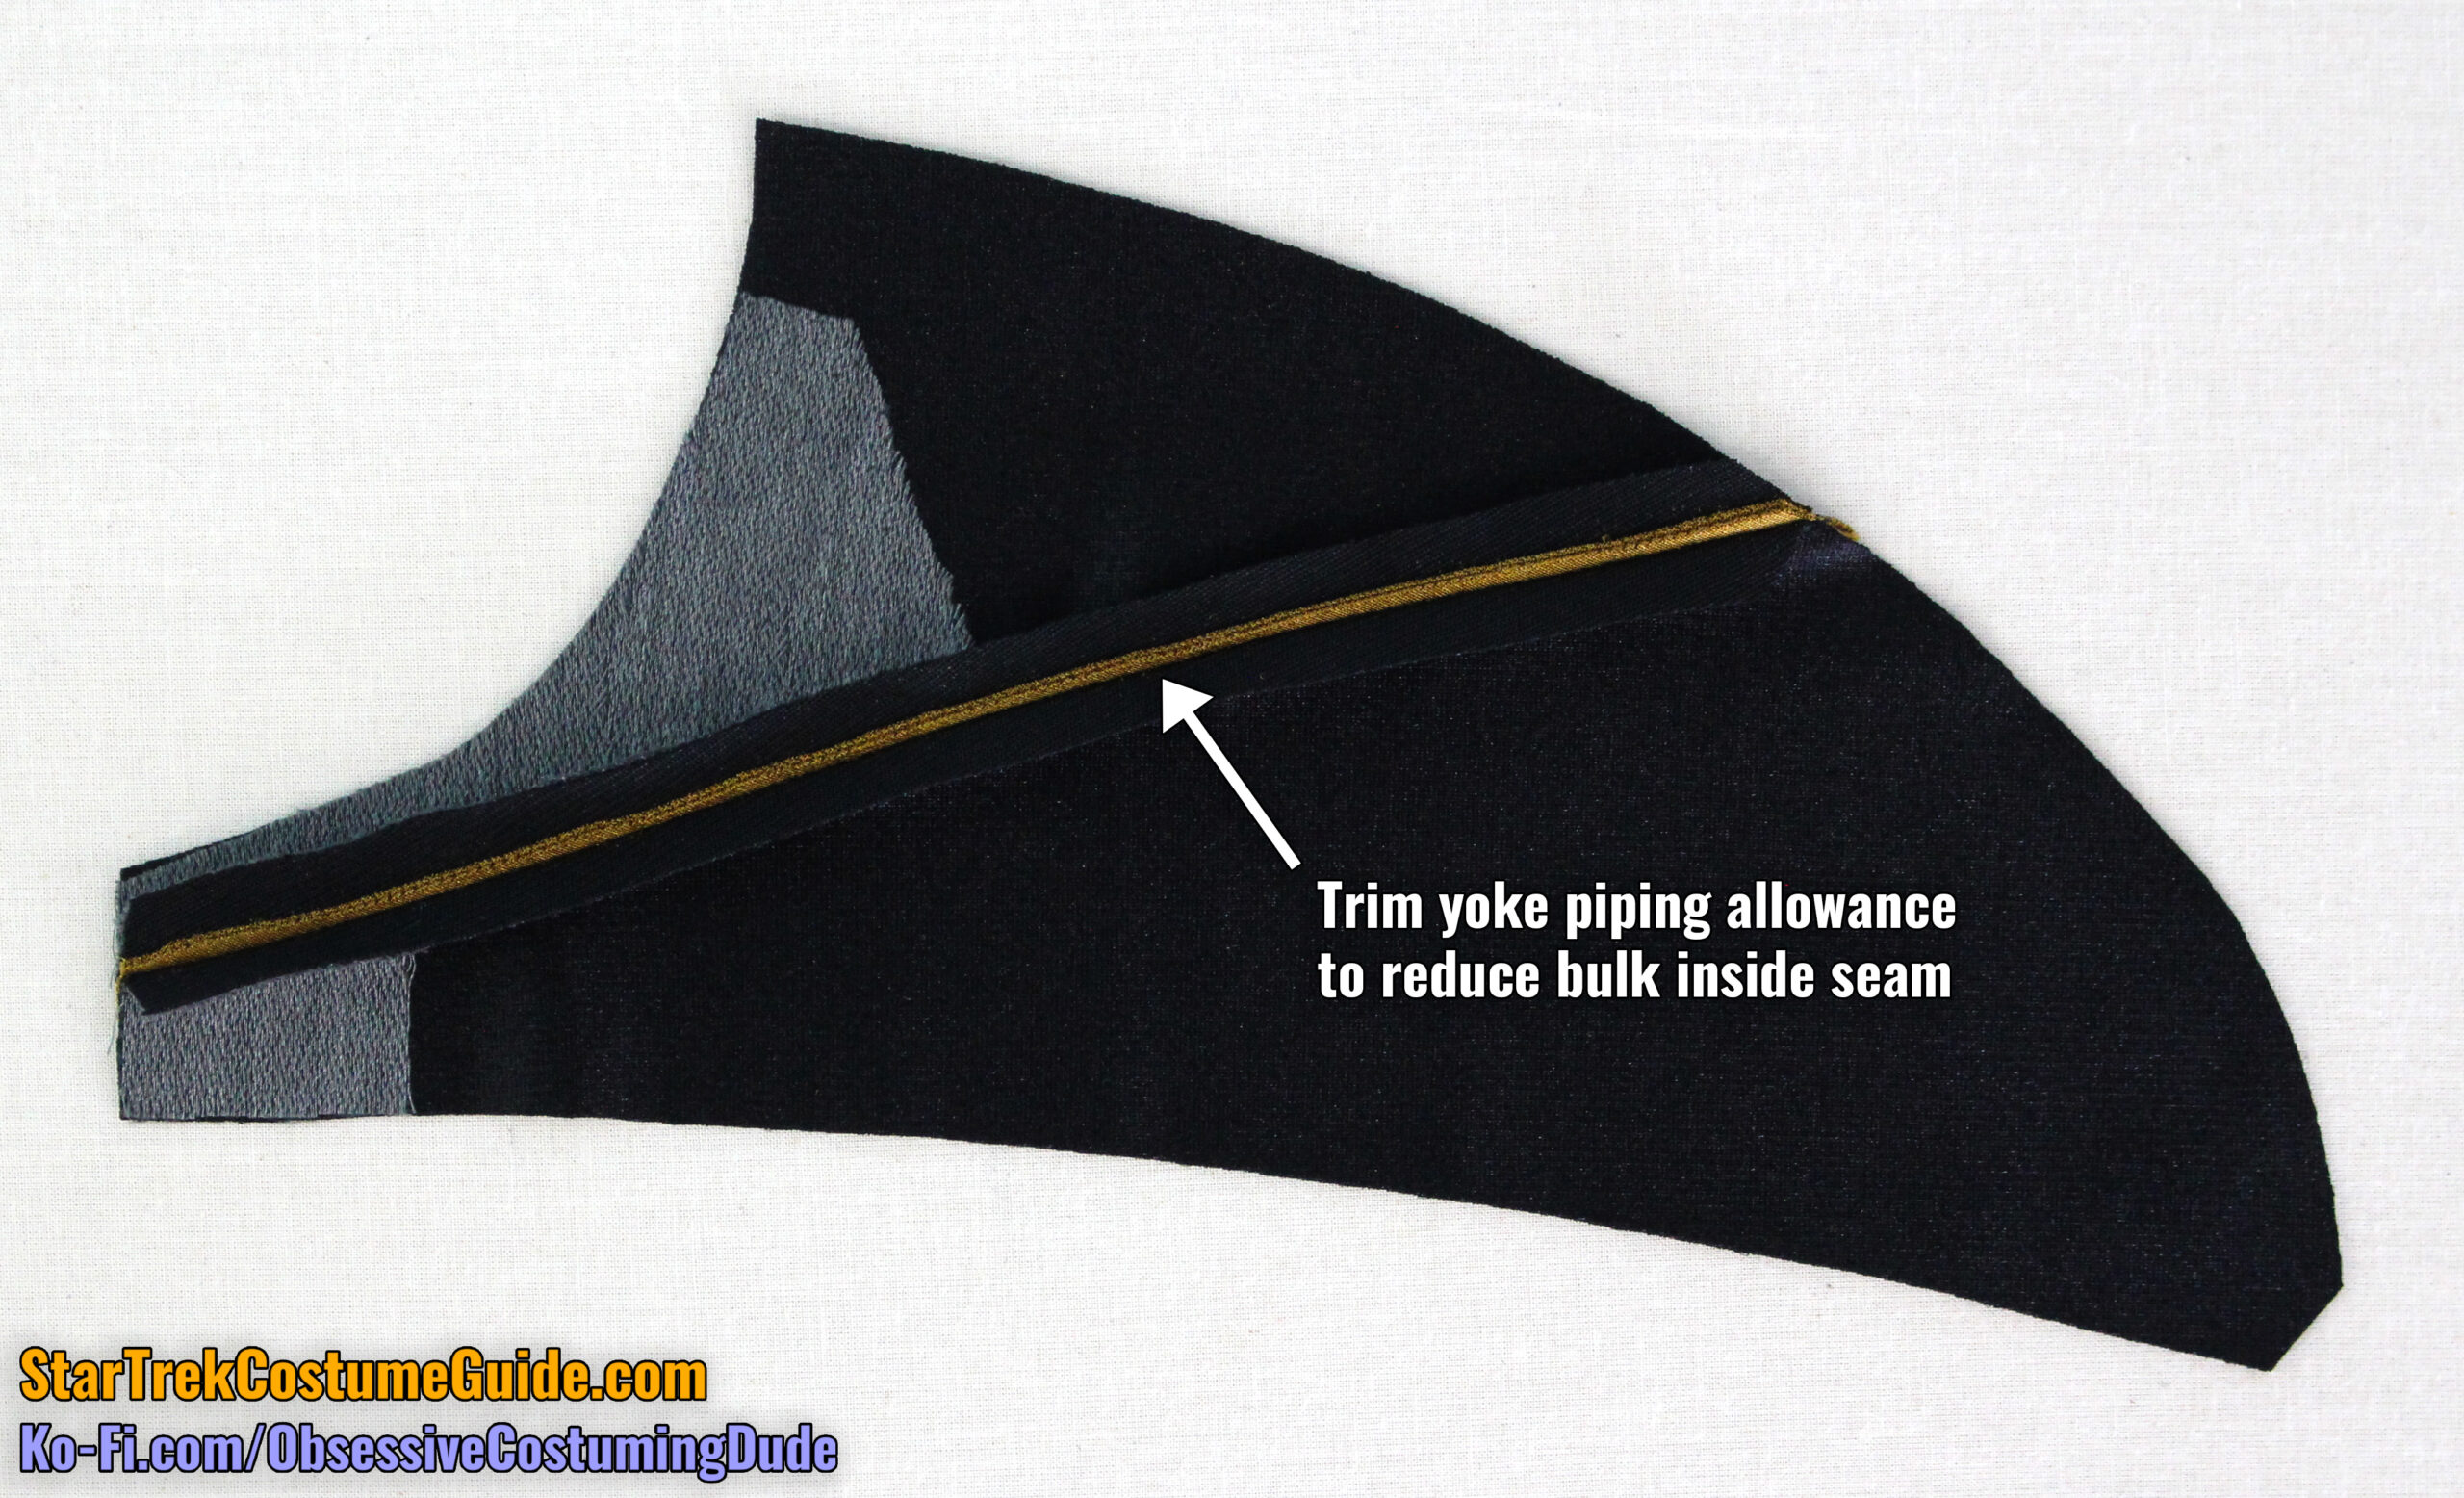
There should be exactly 3/16” of the piping fabric extending outward from underneath the seam.
I suggest trimming the yoke piping allowance down to ⅛” to reduce bulk in the seam – especially if you’re using jumbo spandex.
I also suggest trimming the yoke seam allowances along the centermost few inches to reduce bulk.
(Once the neckline trim is attached and the upper front allowances are turned under, the layers will all start to add up fast!)
Repeat for the other front yoke assembly.
Check to make sure both yokes are dimensionally identical at the center front.
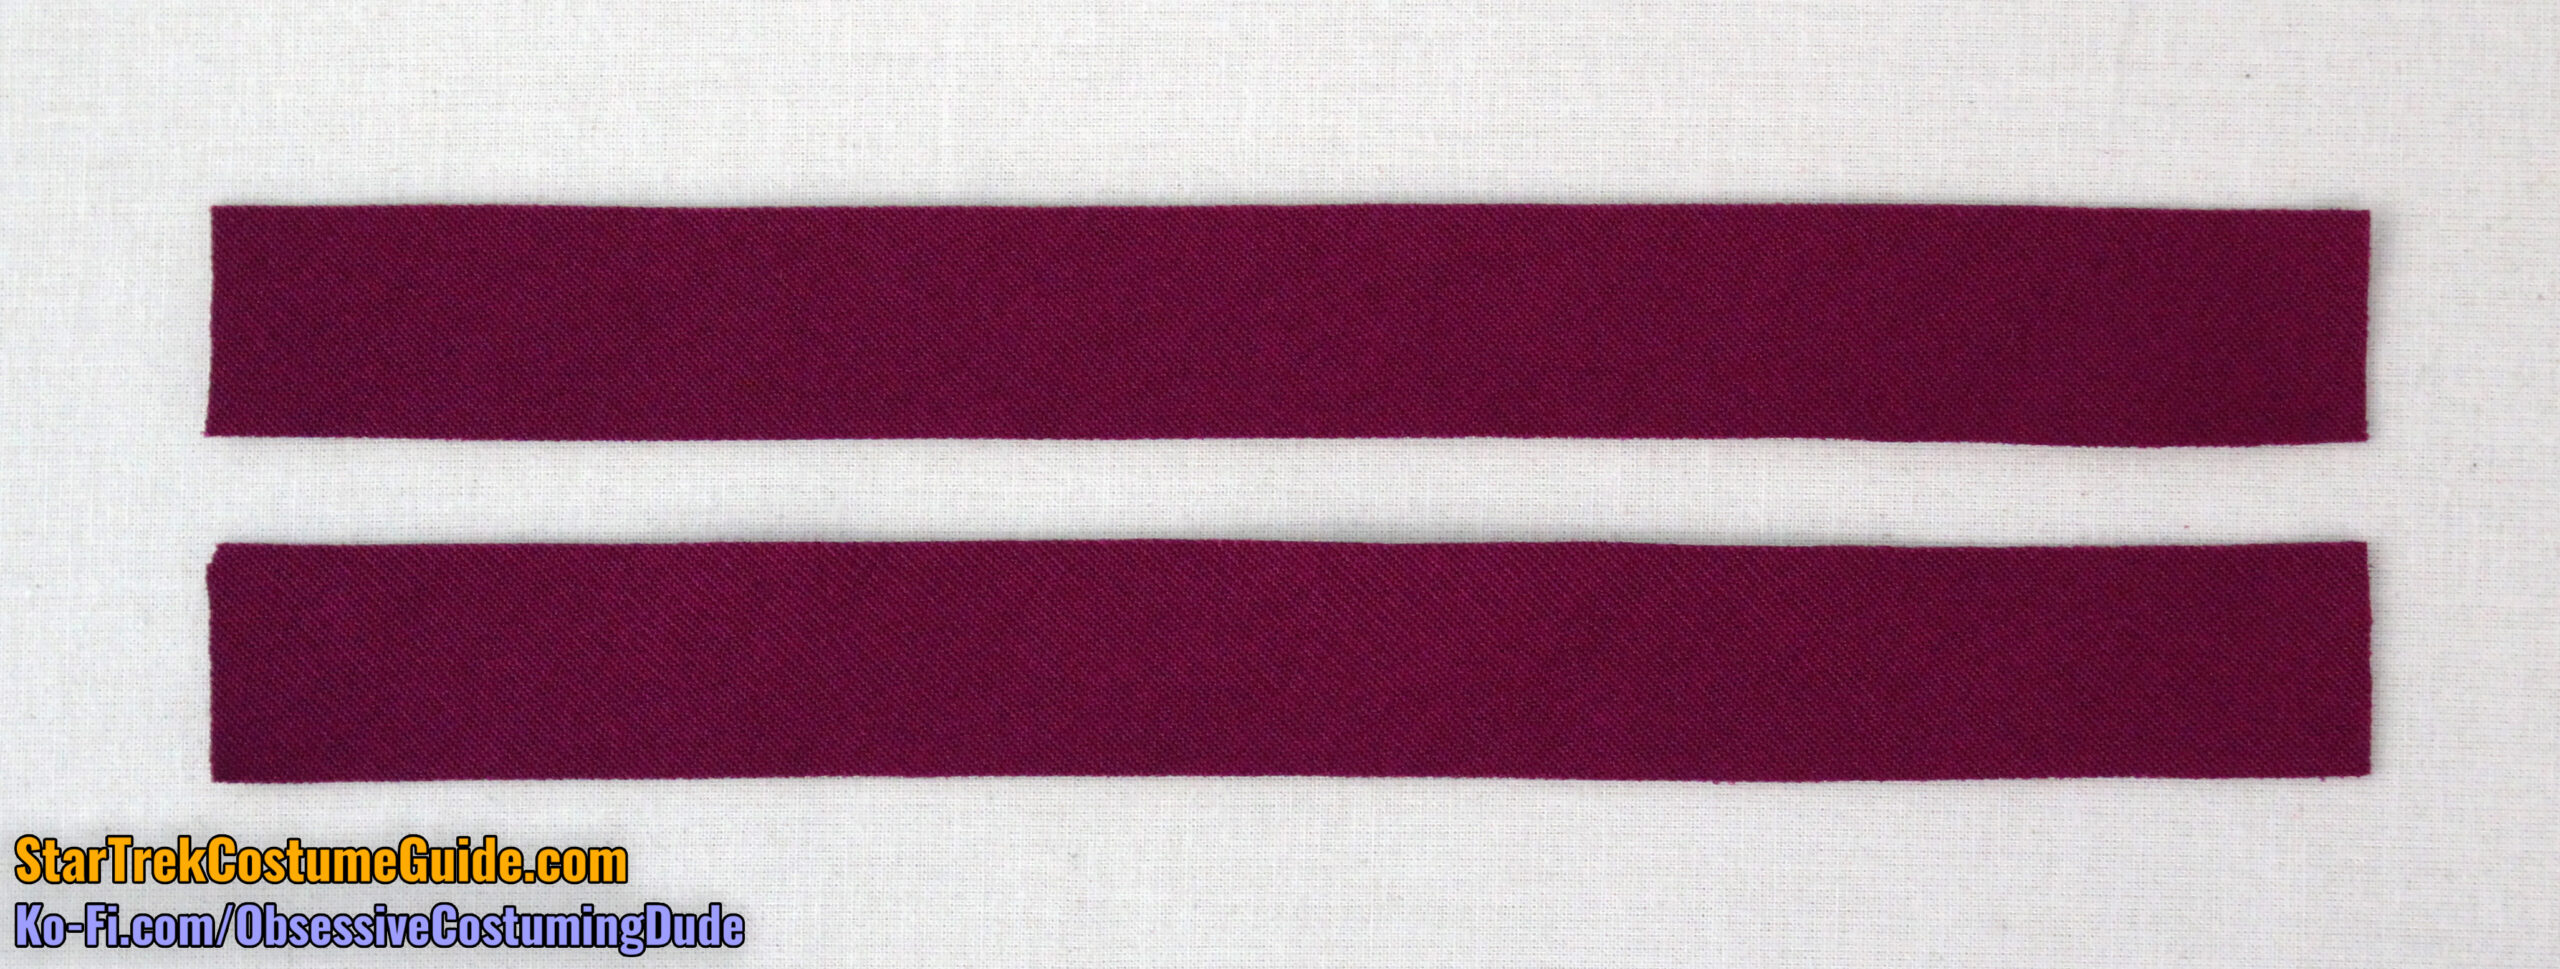
There’s a pattern piece for the trim (piece T1), but it’s just a strip of bias-cut fabric 1” wide and 16 ¼” long.
Press your trim fabric in half, lengthwise.
If you’re “cheating” and using the same jumbo spandex as the body panels, remember to fold the matte/“dull” sides together so the trim is shiny-sides-out.
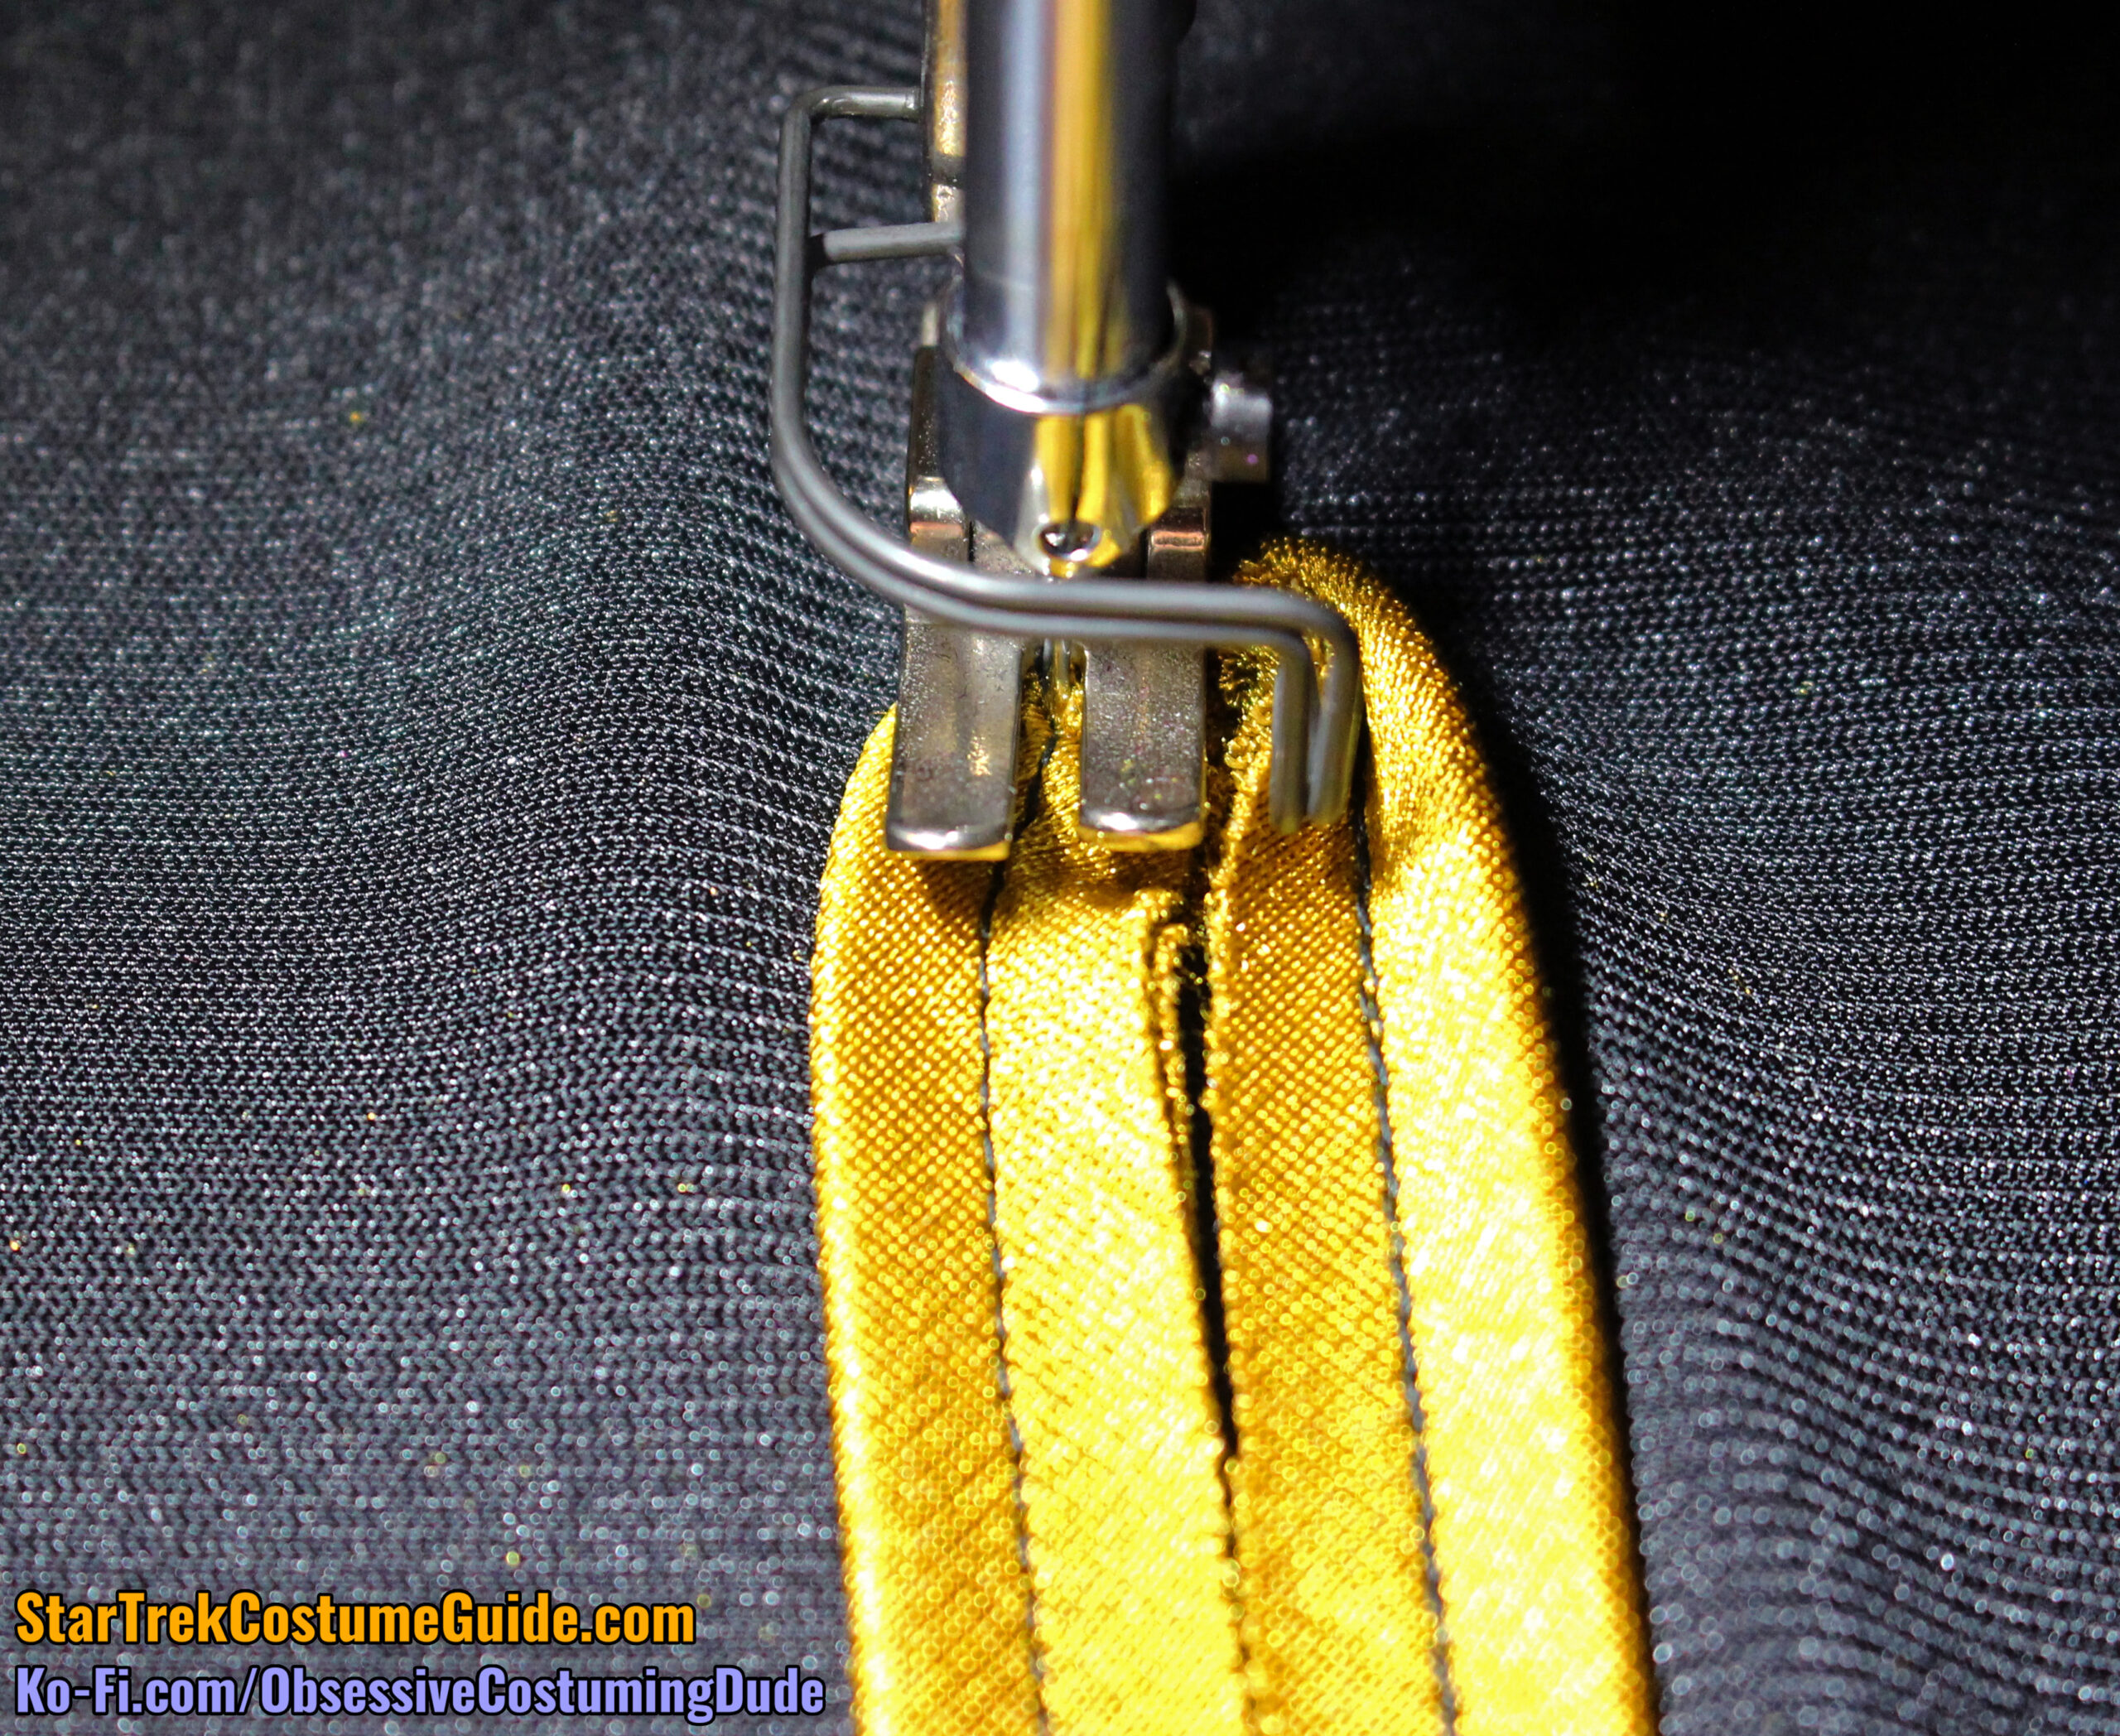
I suggest basting the length of trim closed ¼” from the raw edges. (Like the yoke trim, I suggest using a quilting/walking foot to help prevent the bias trim from stretching as you go.)
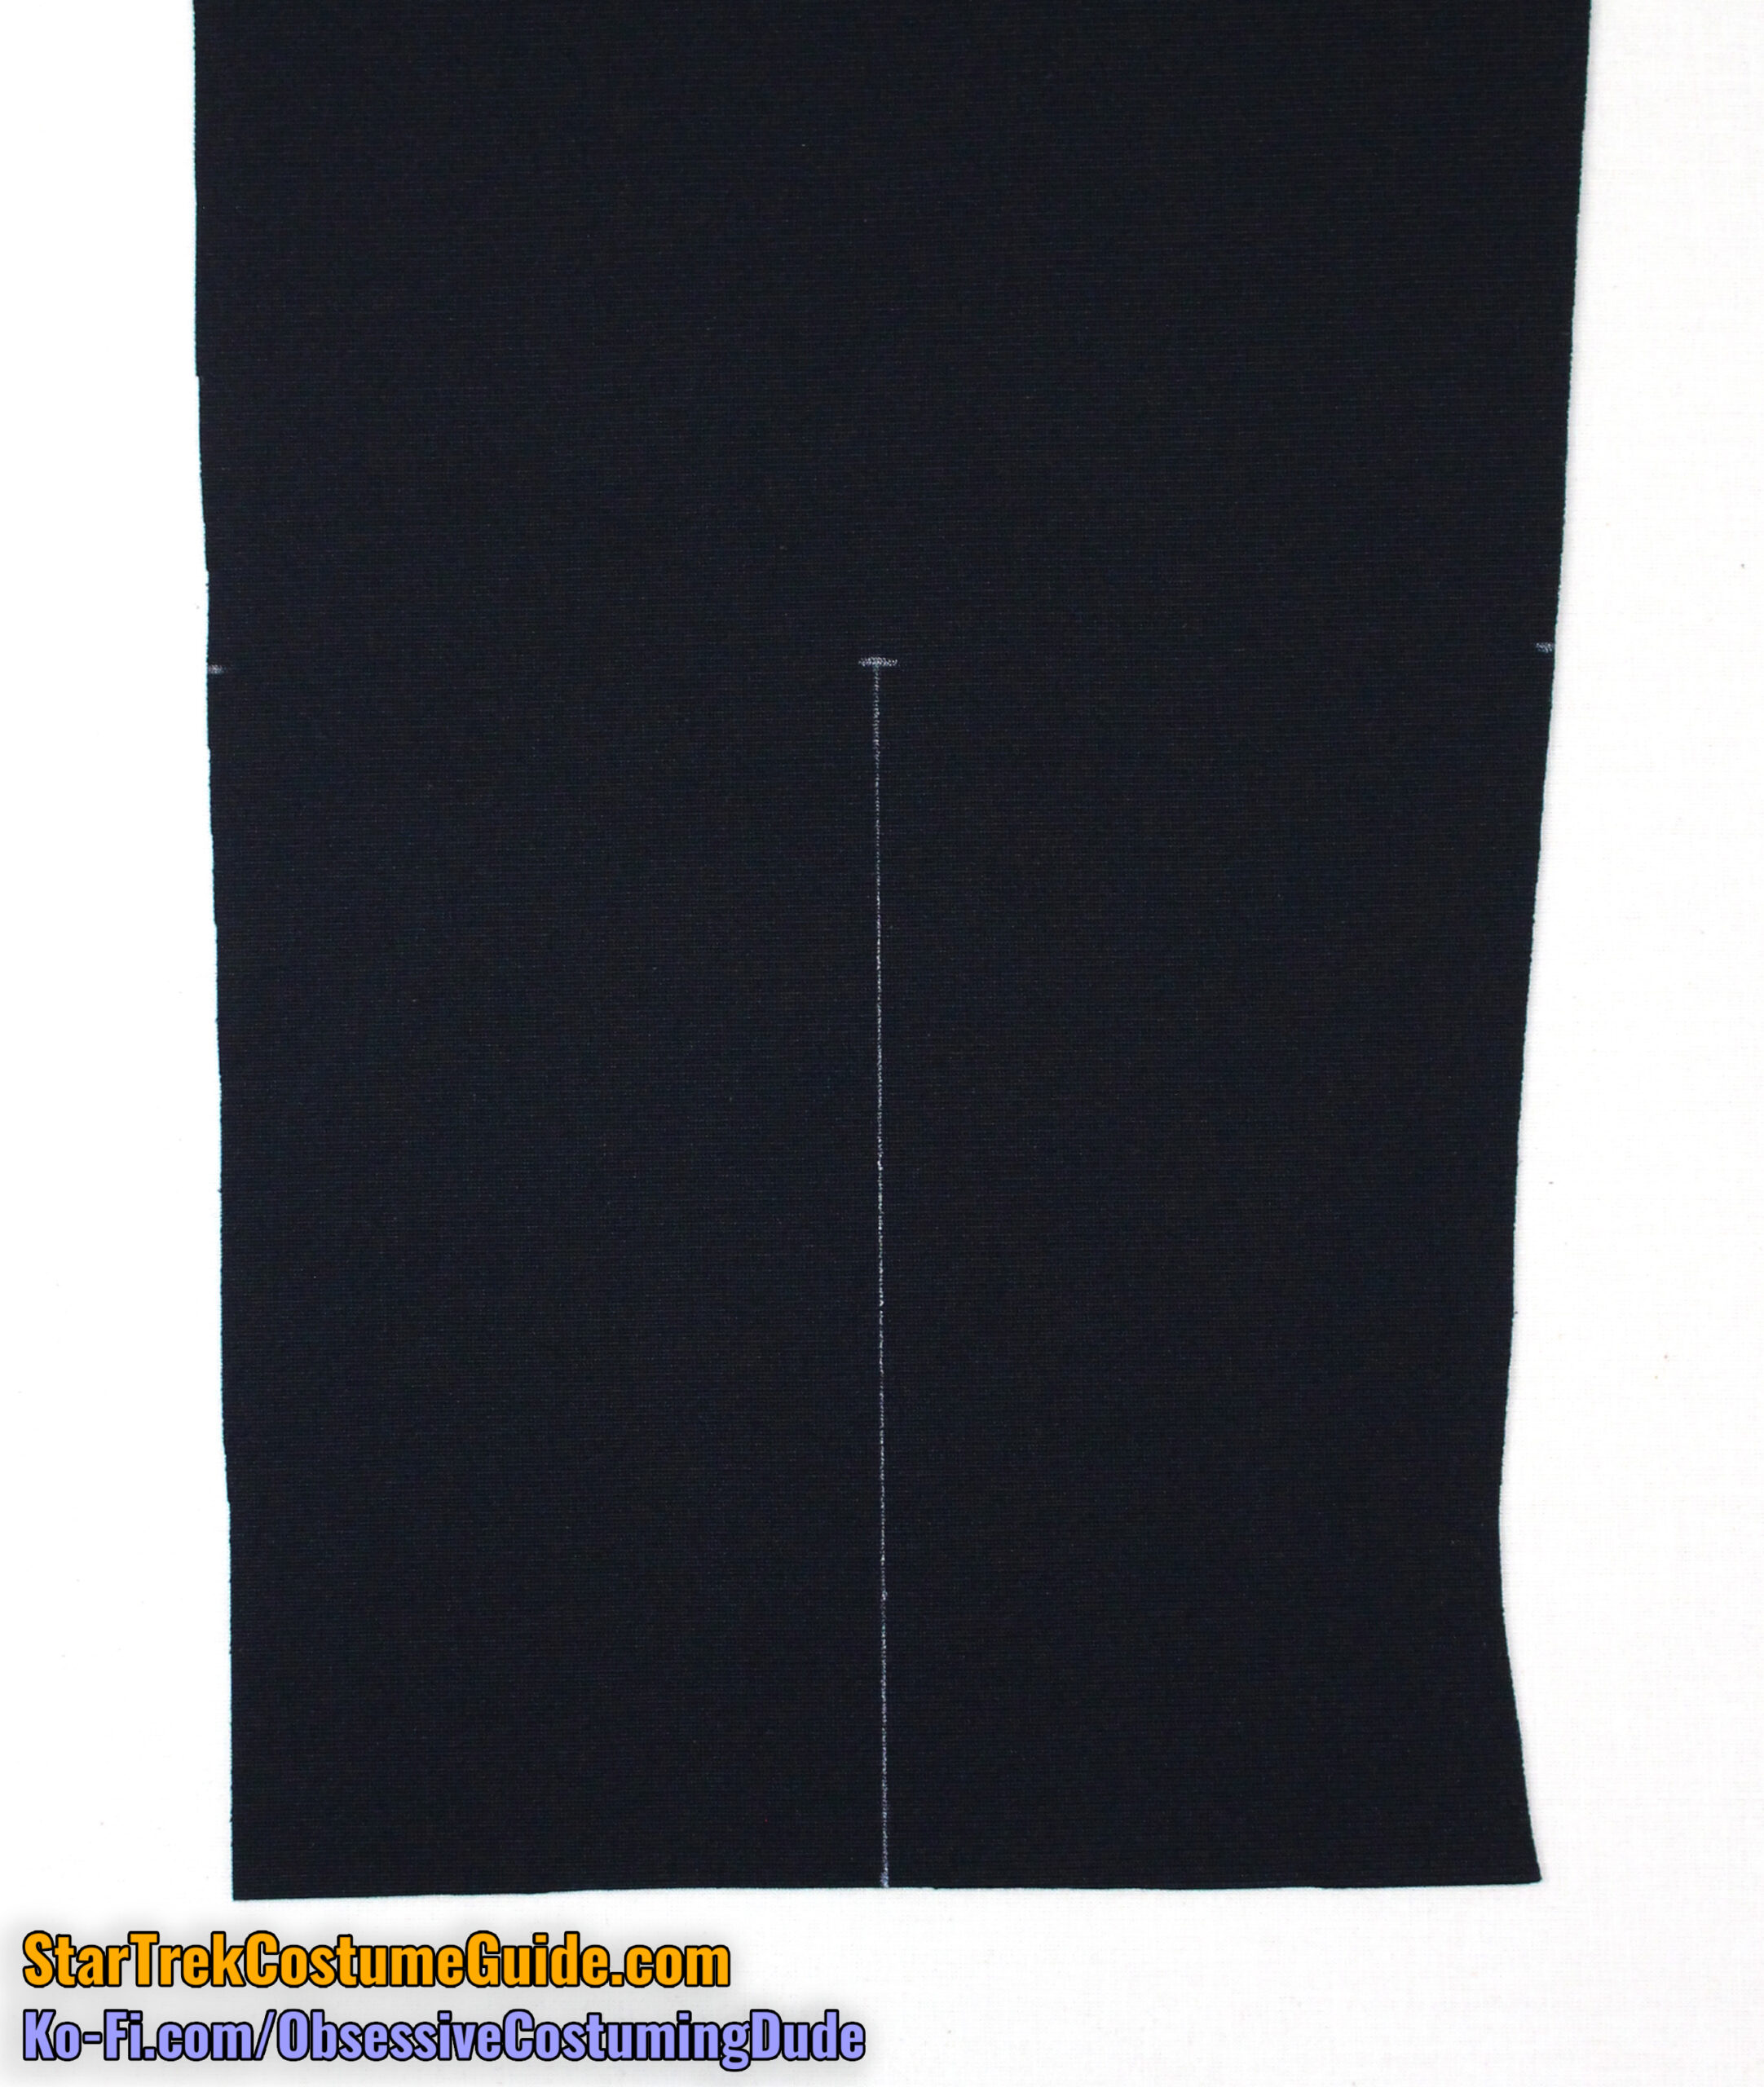
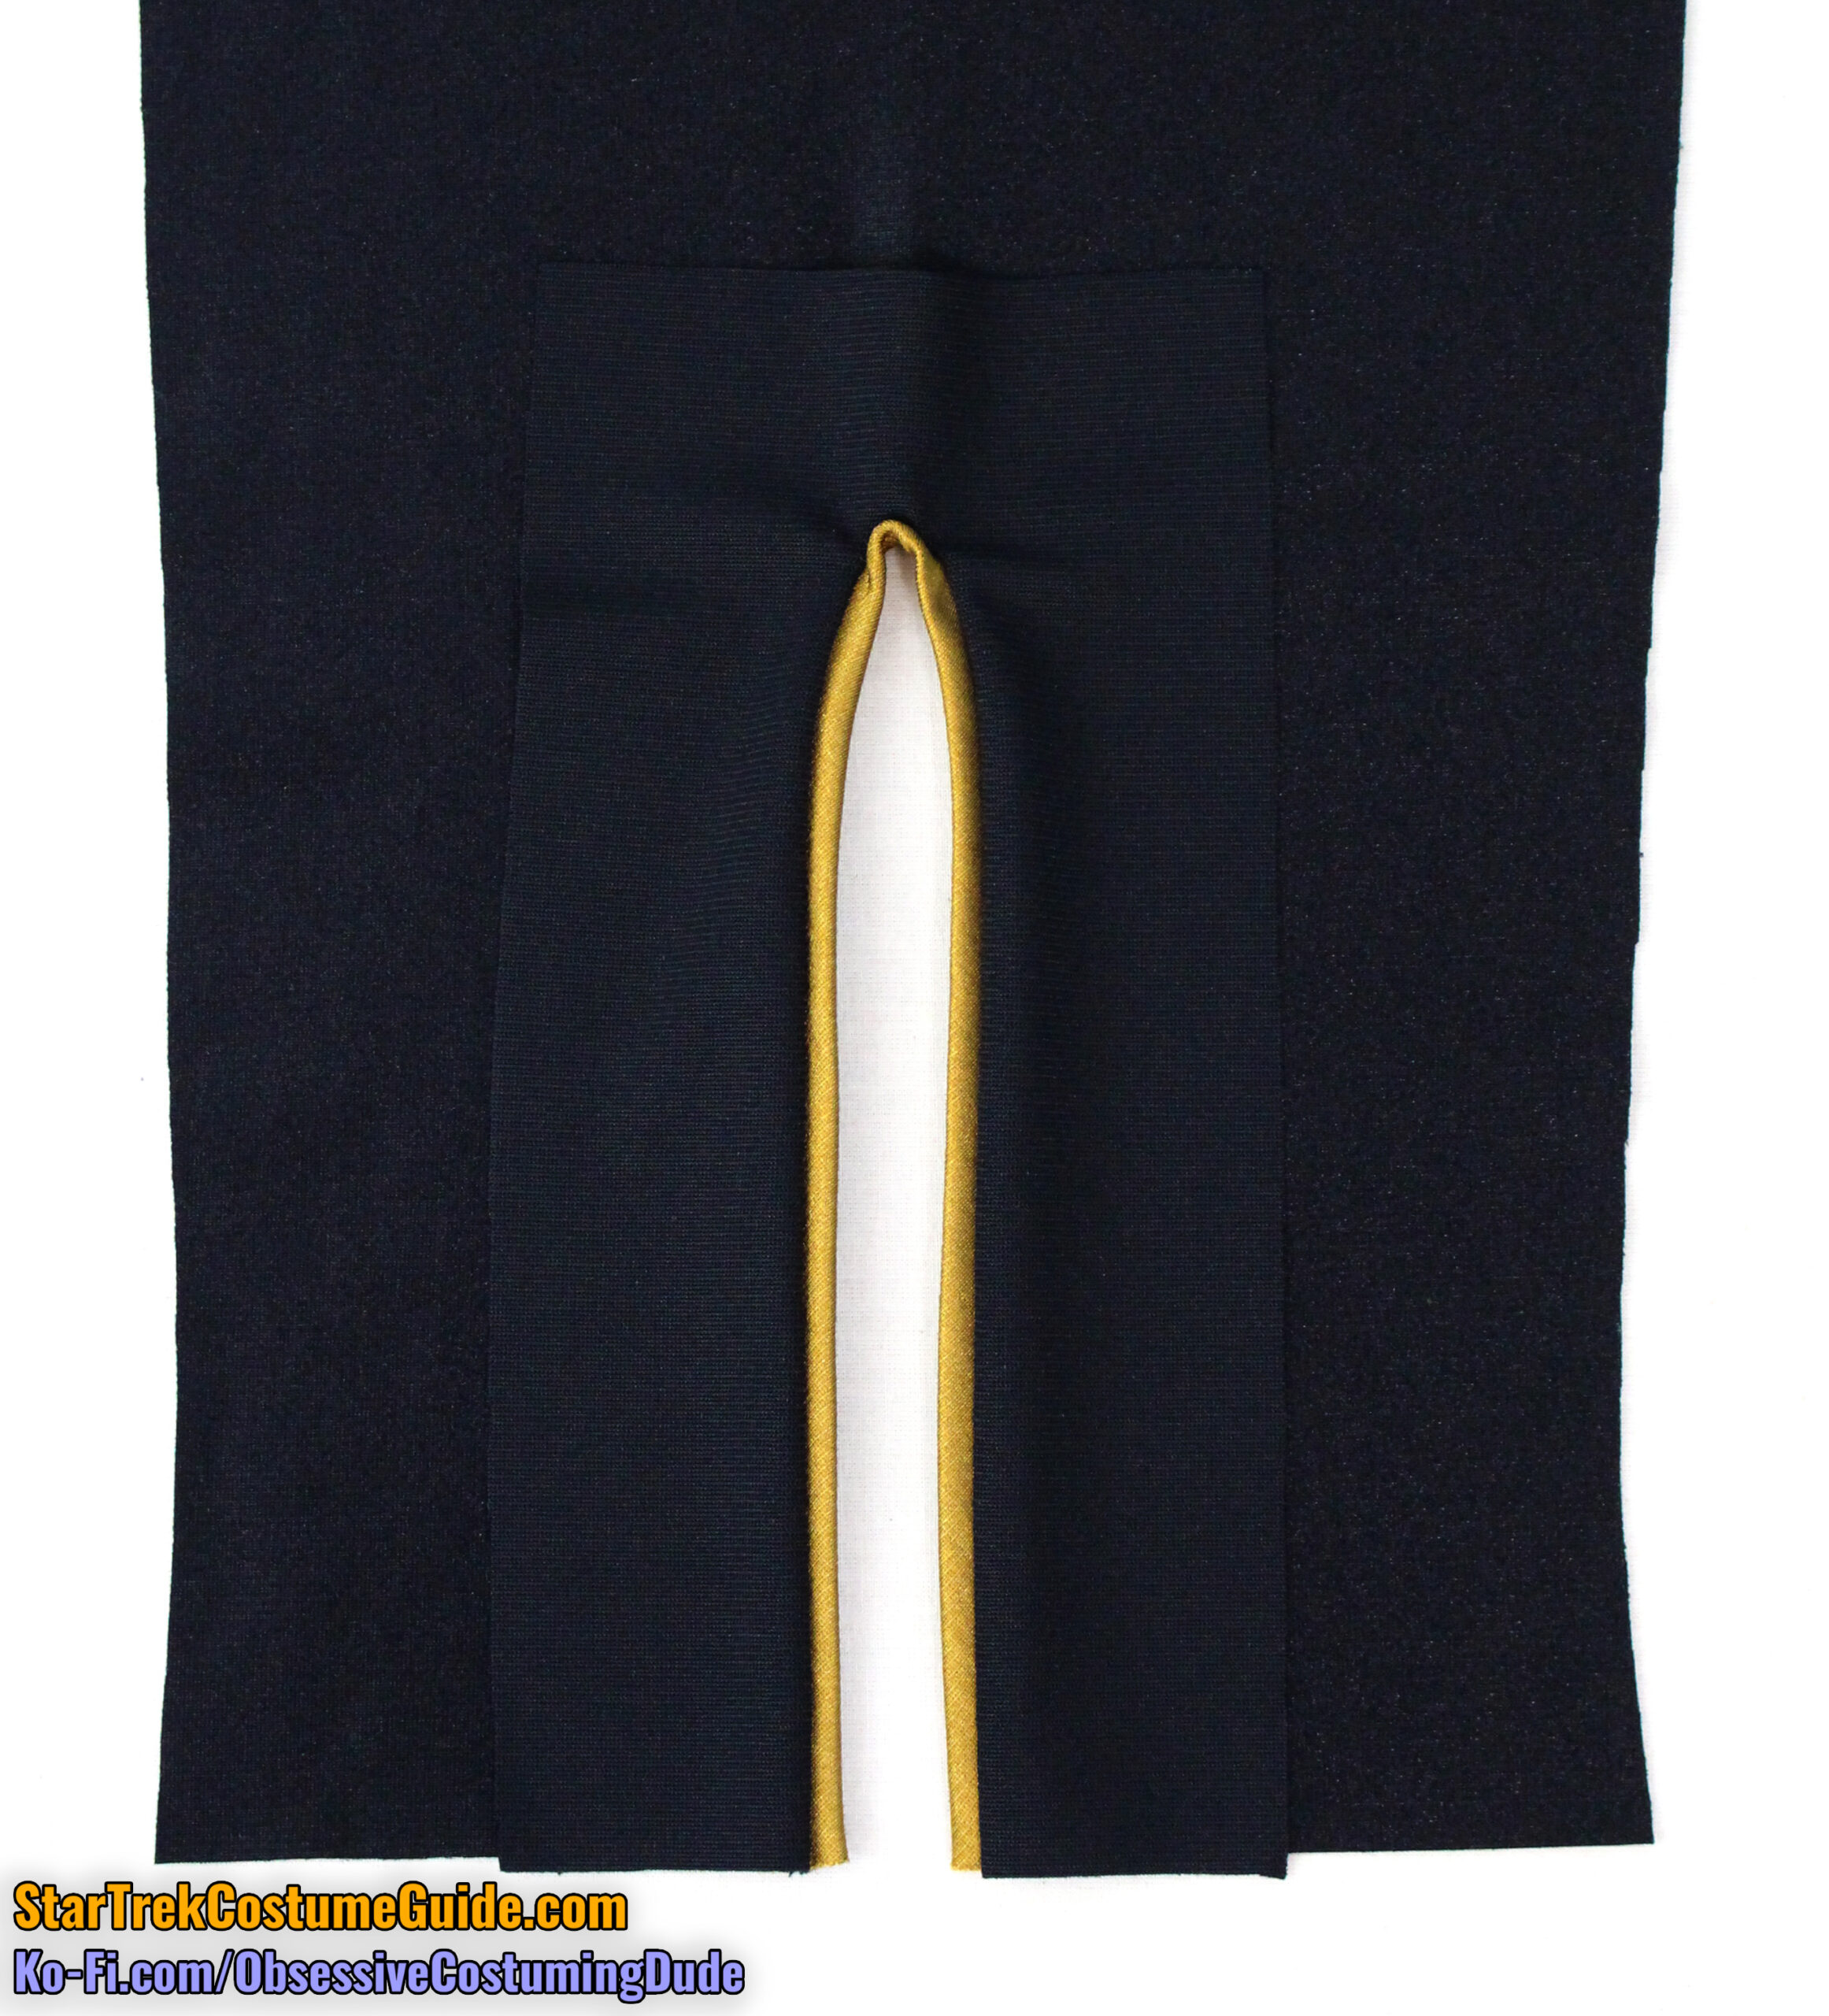
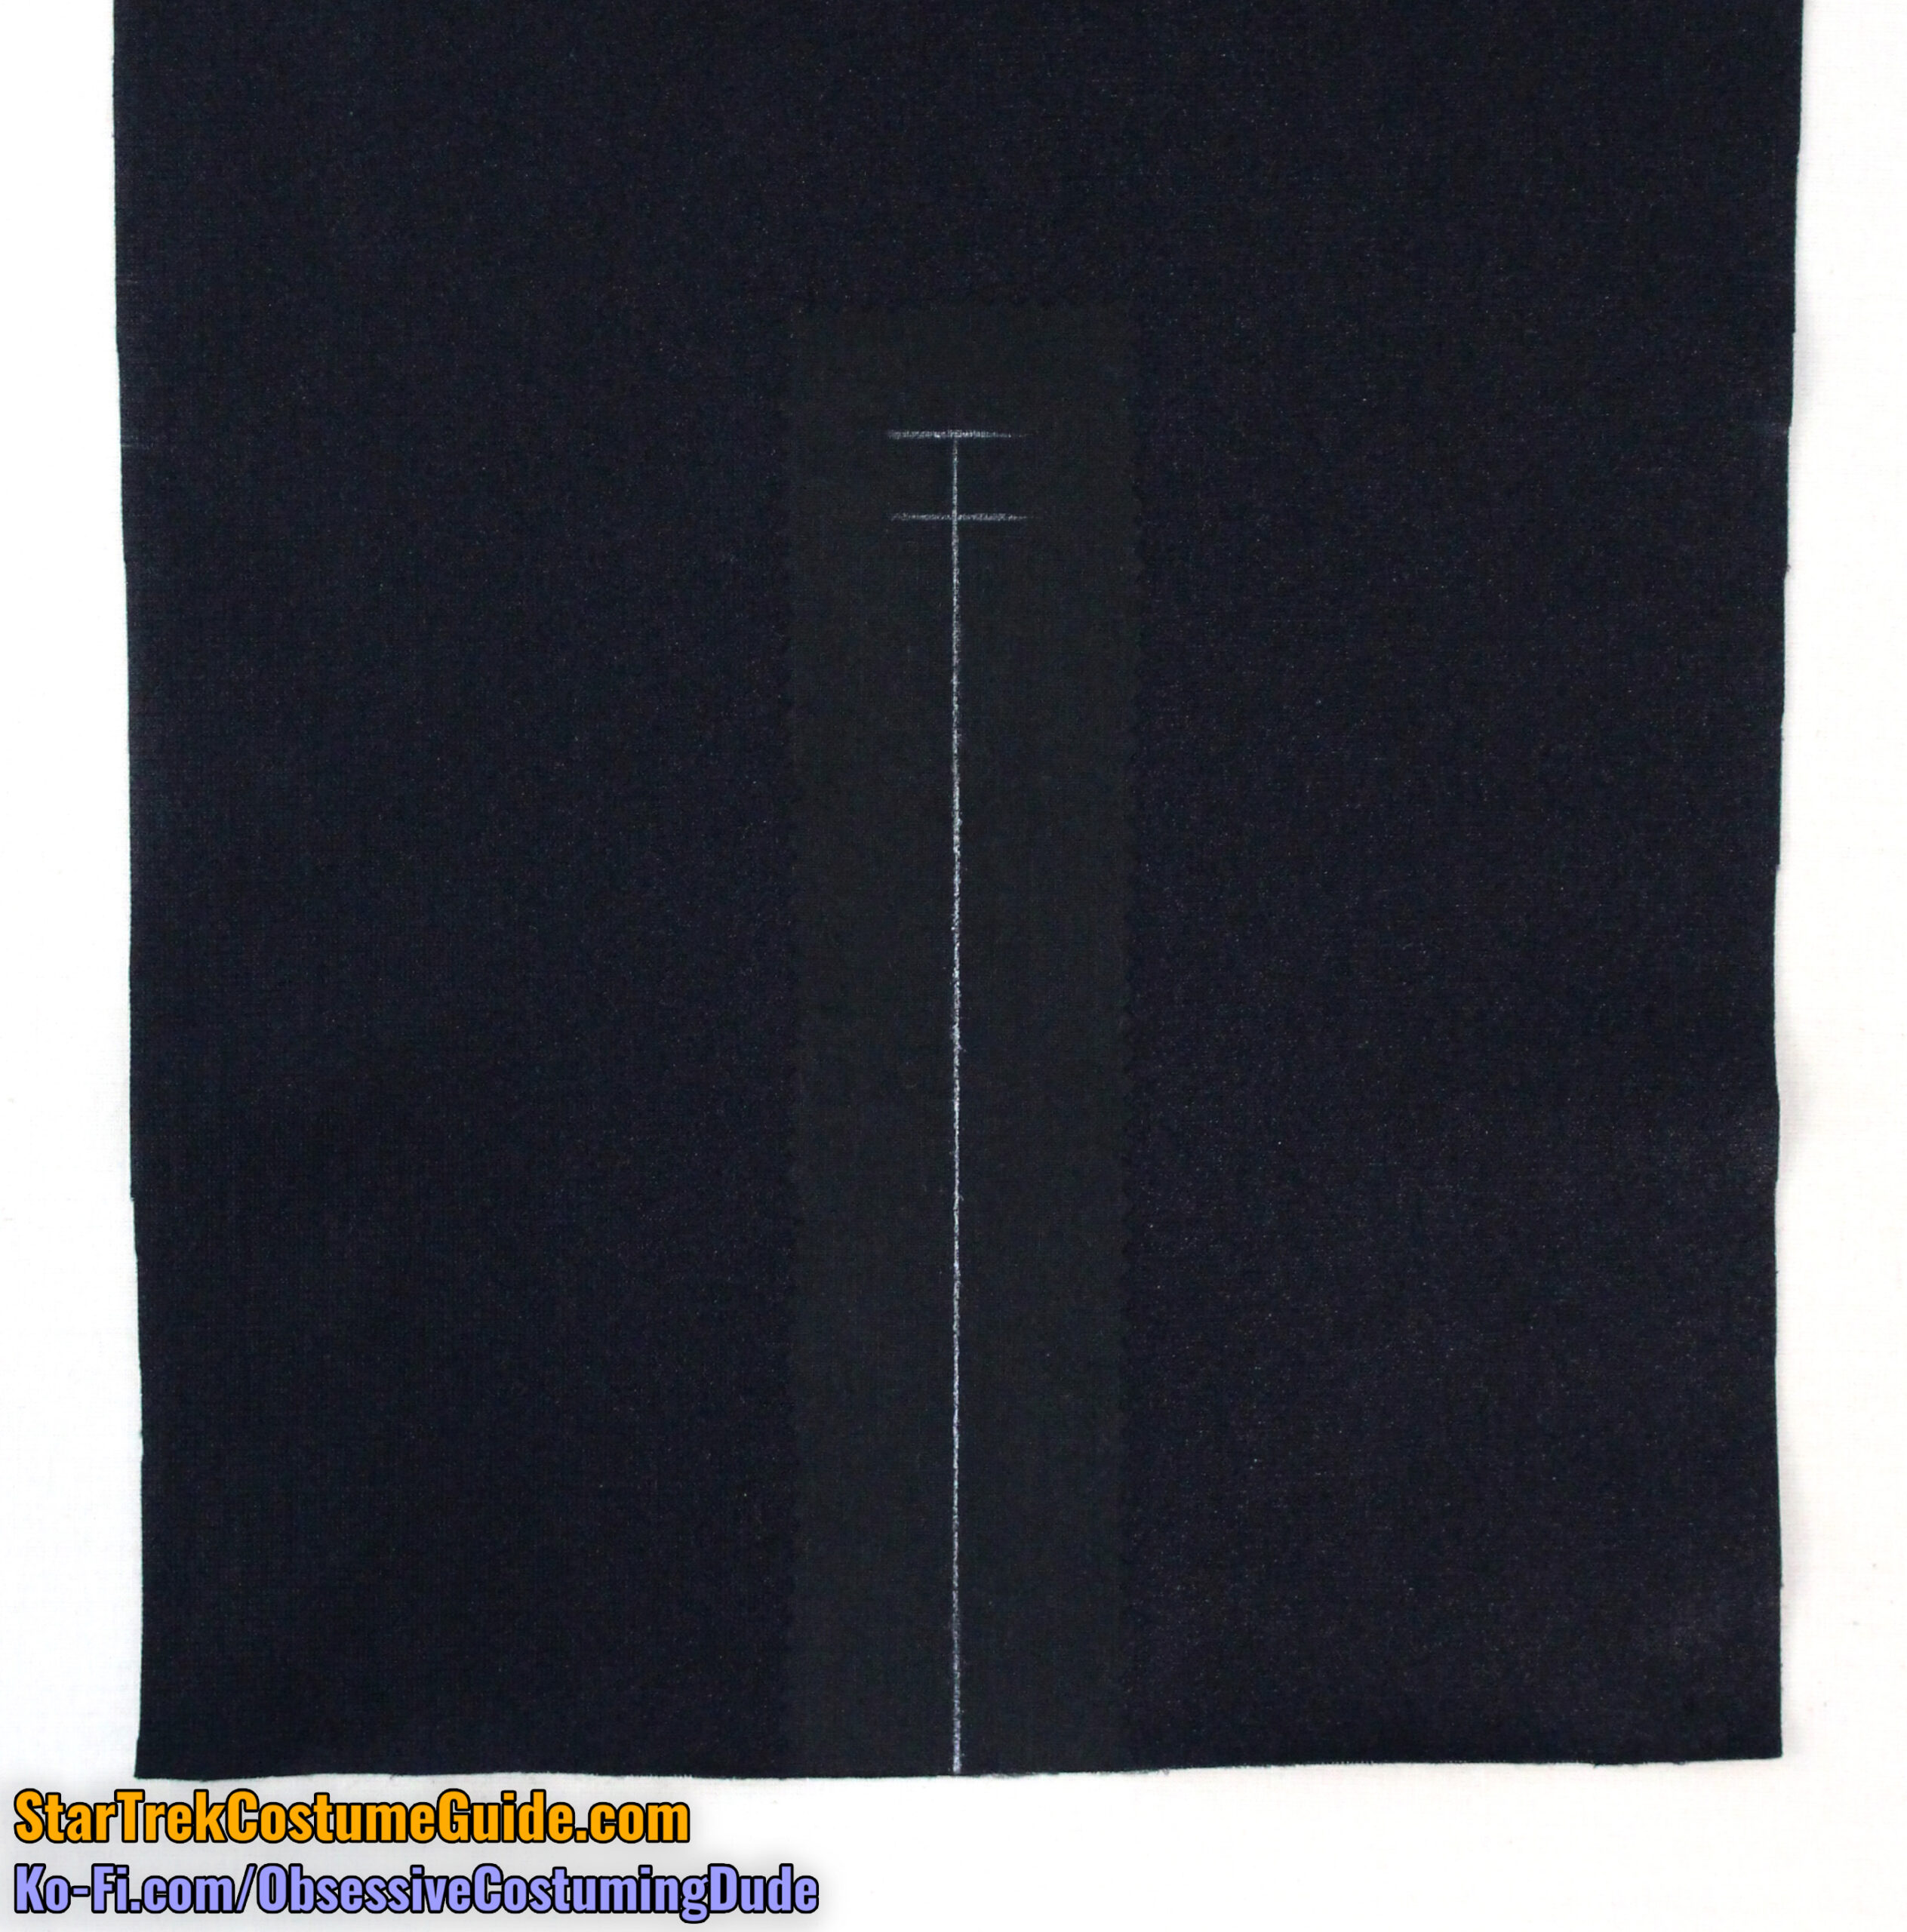
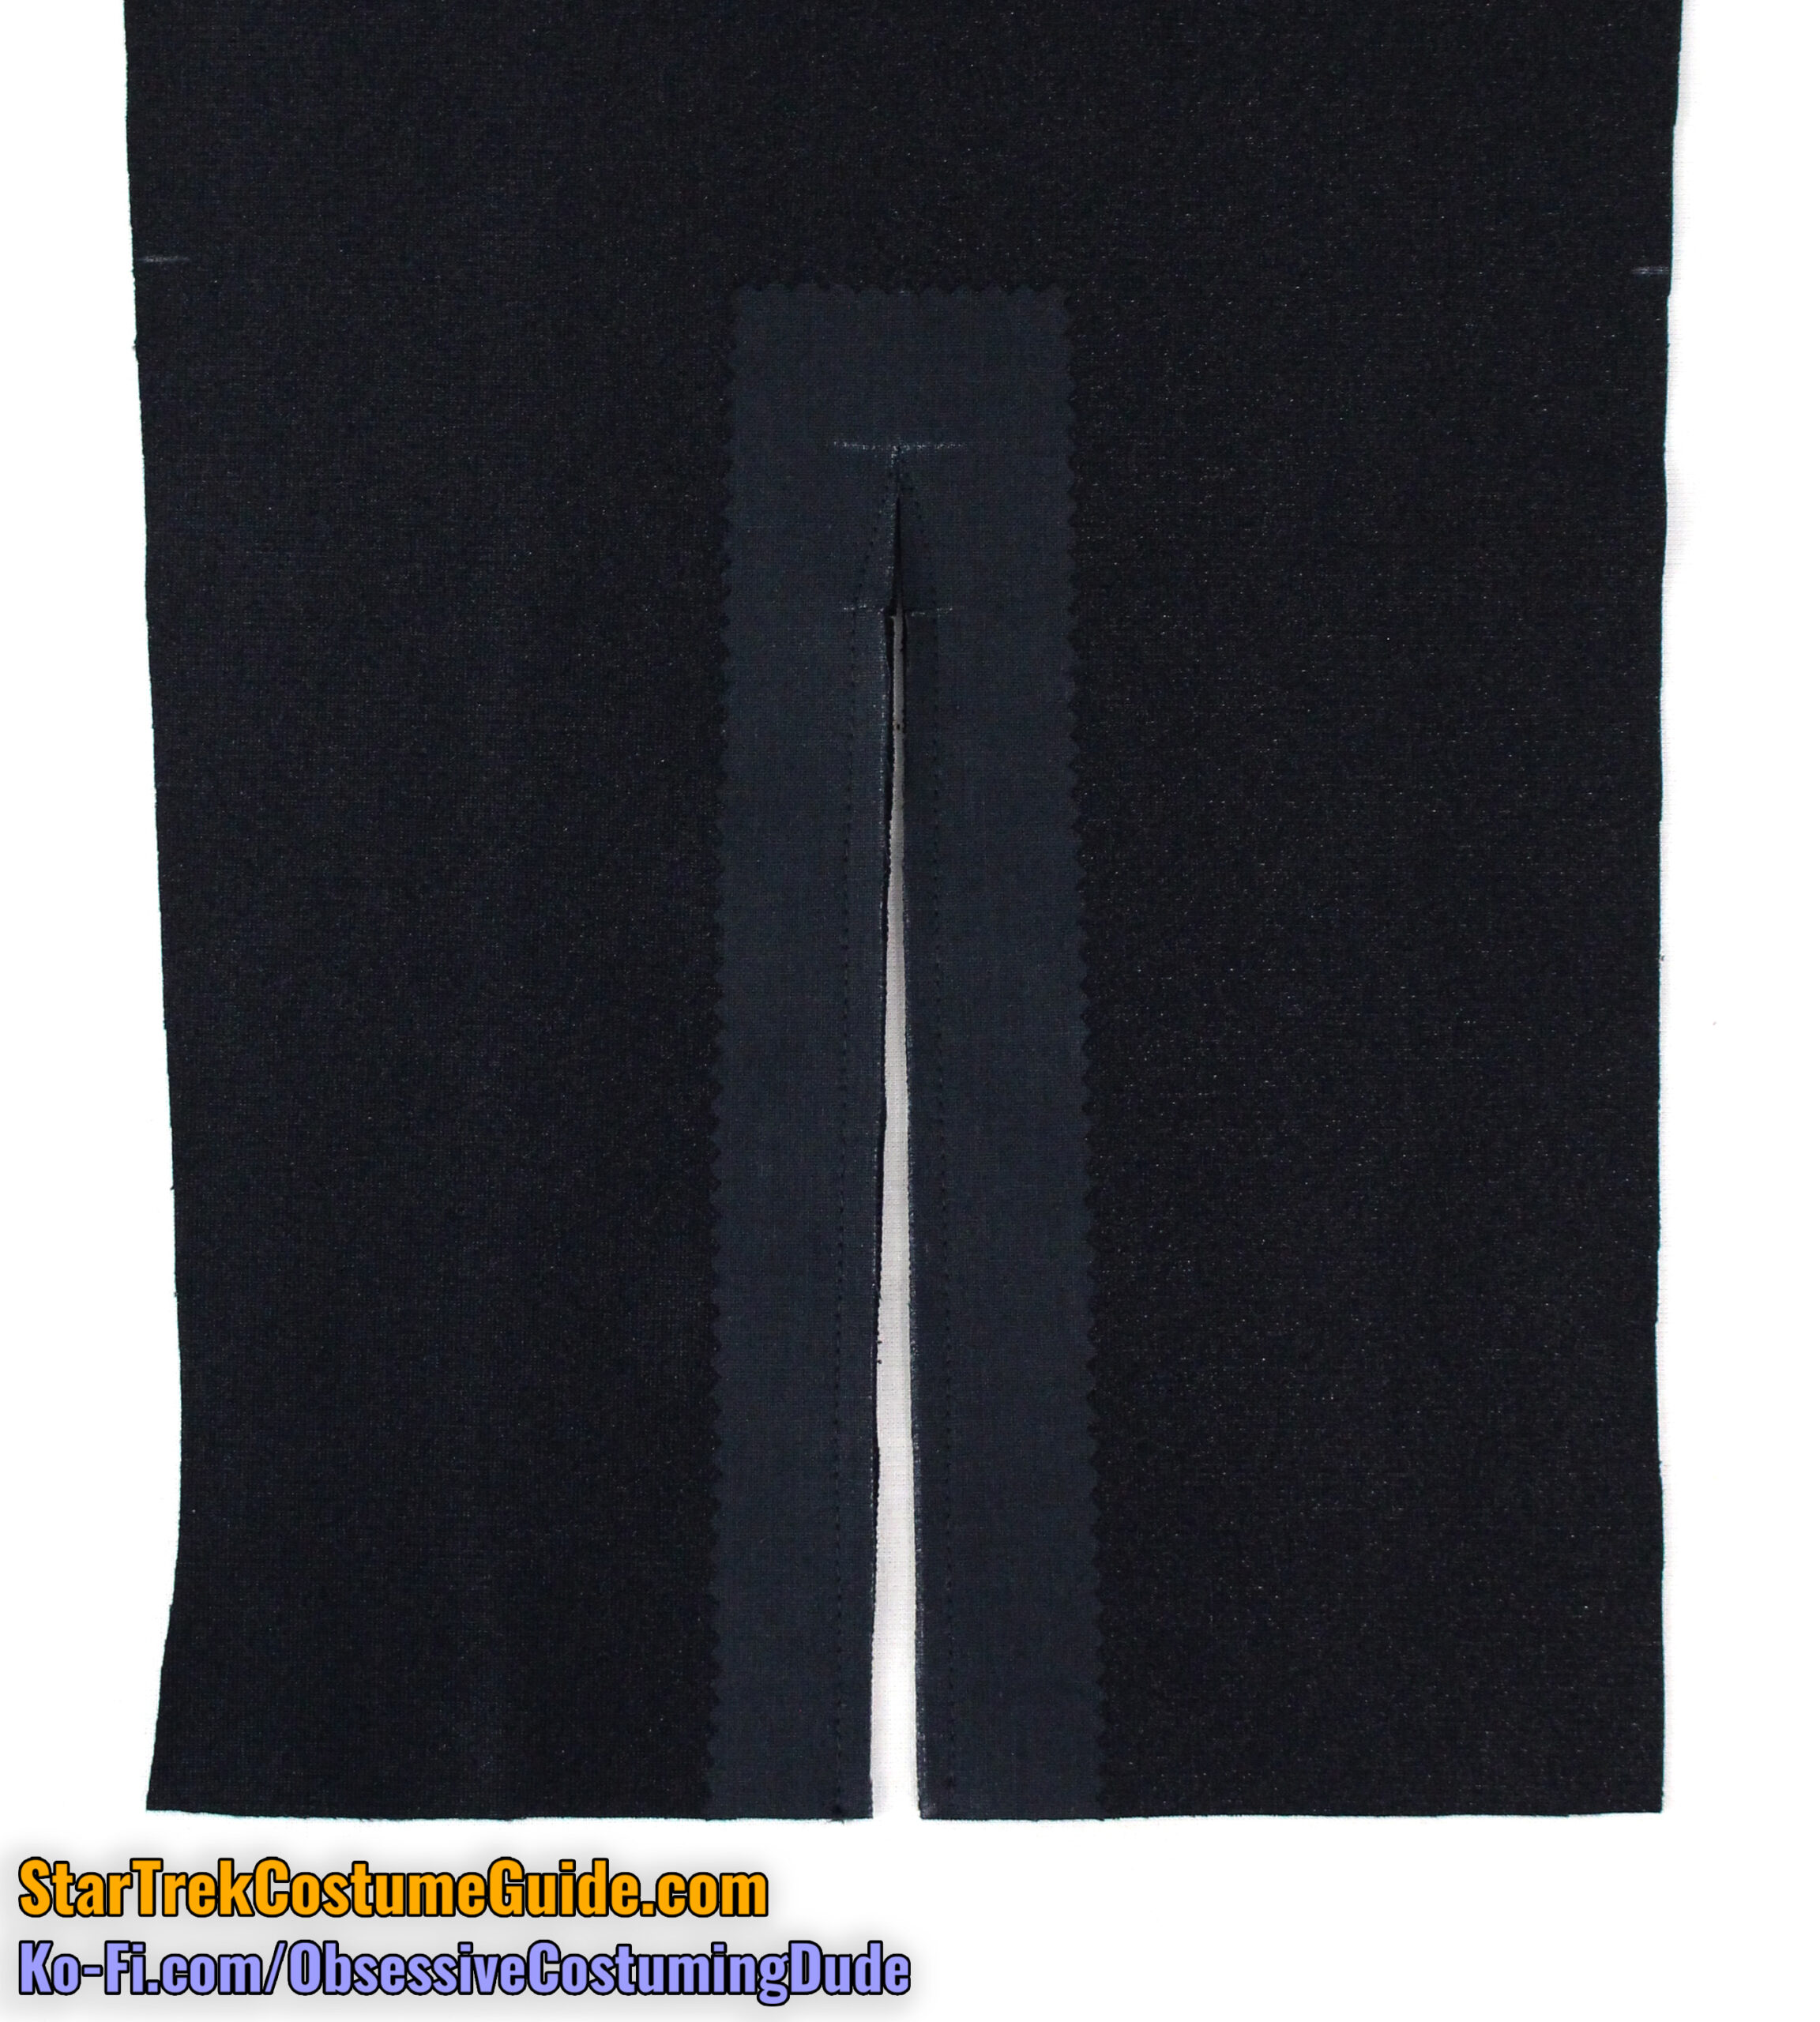
There’s an alignment guide for the lower pants slit on the printed pattern; you can reference that, but it’s just an 8” tall vertical line centered on the lower pant leg.
Lightly draw the alignment guide on the right side of the fabric; I suggest using disappearing tailor’s chalk.
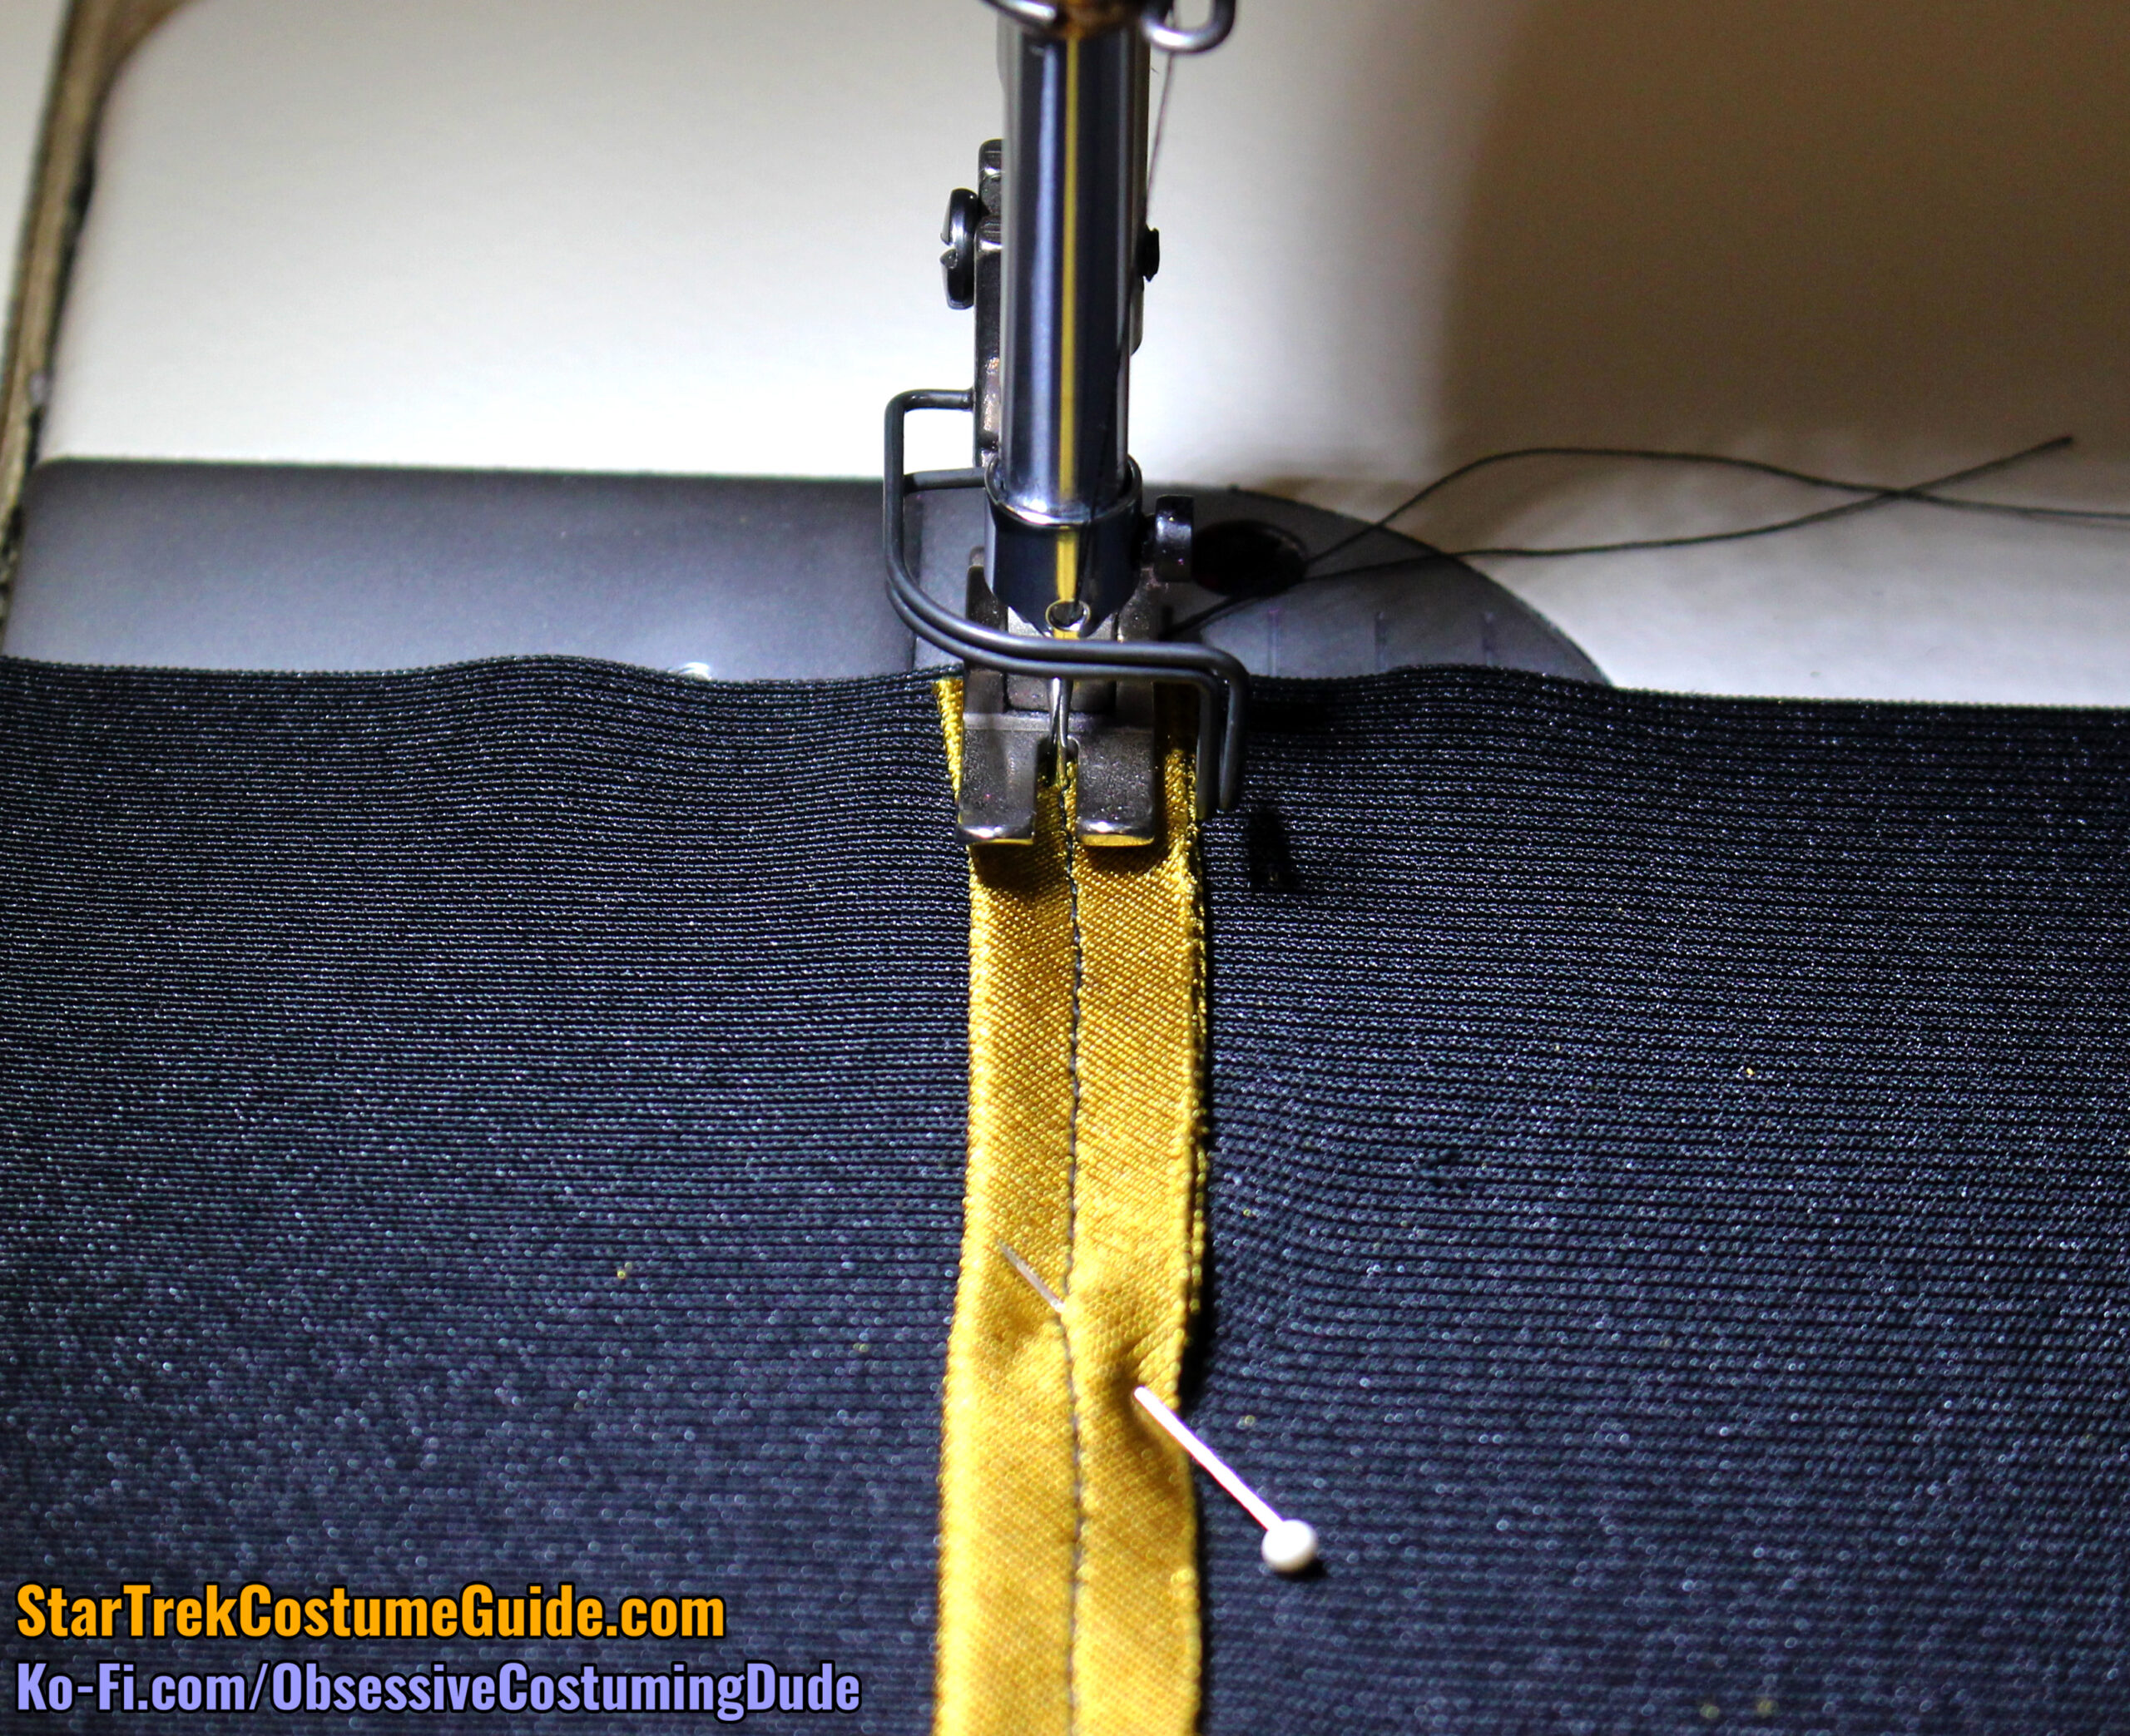
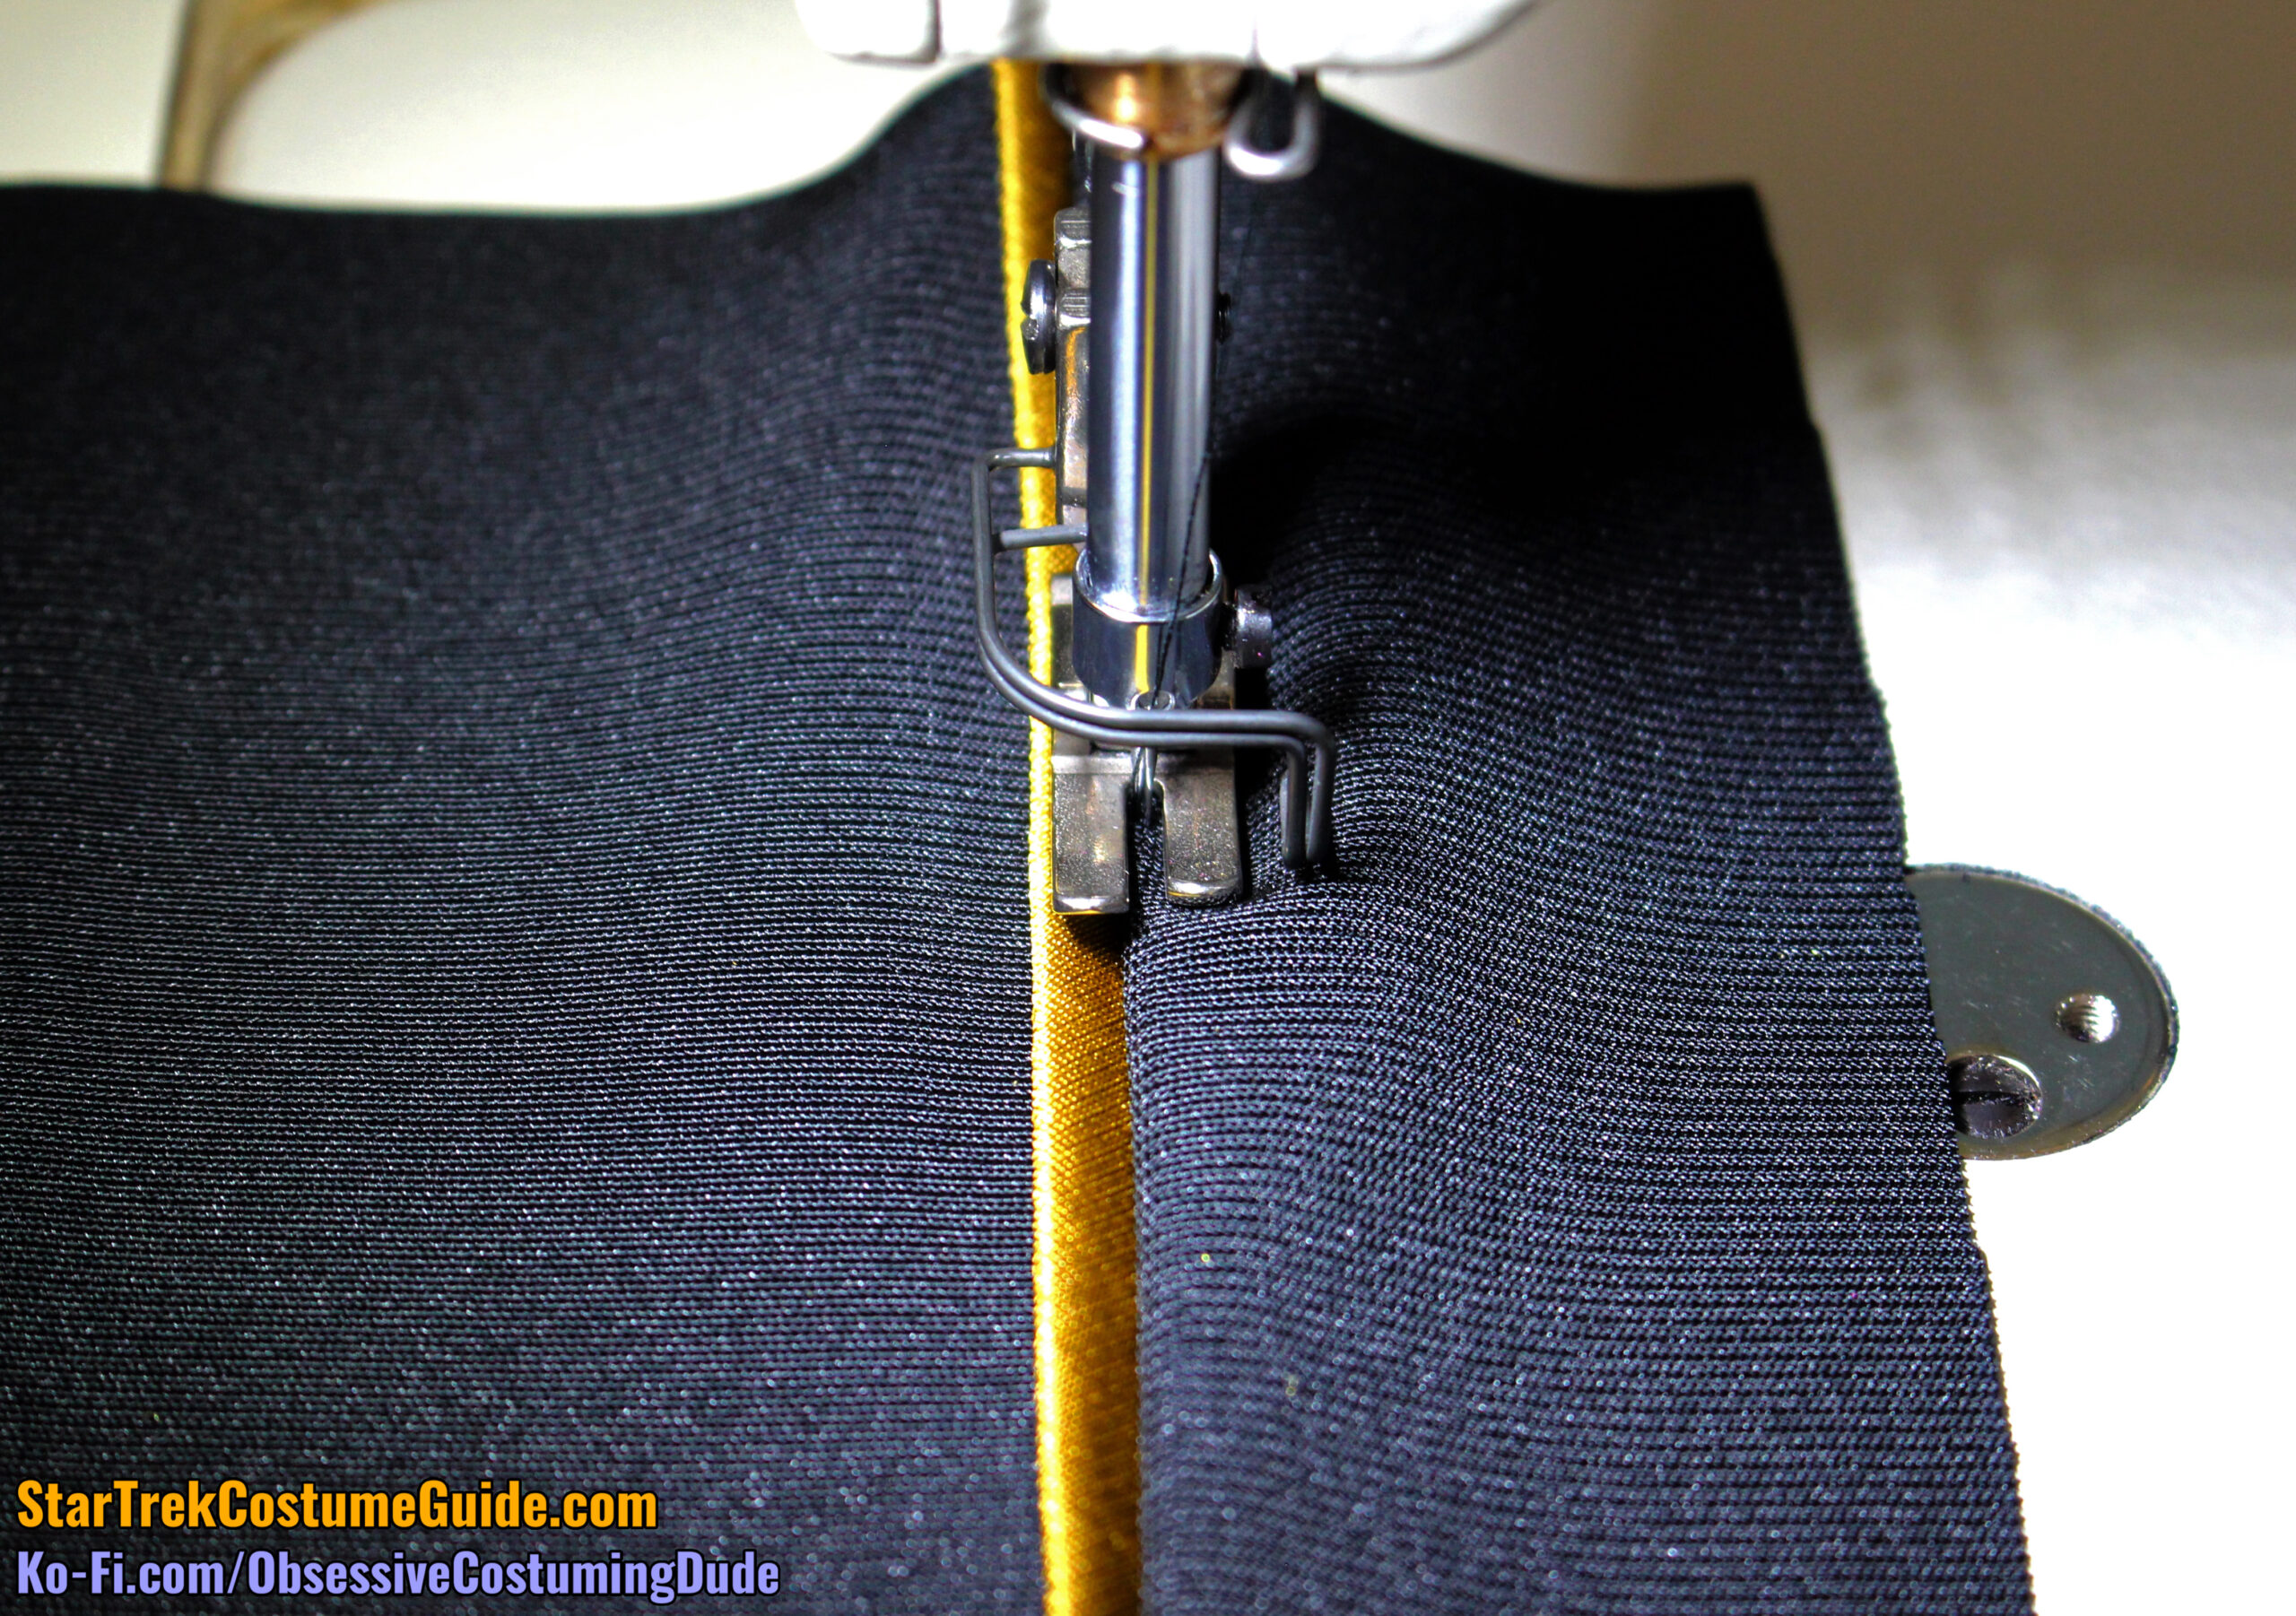
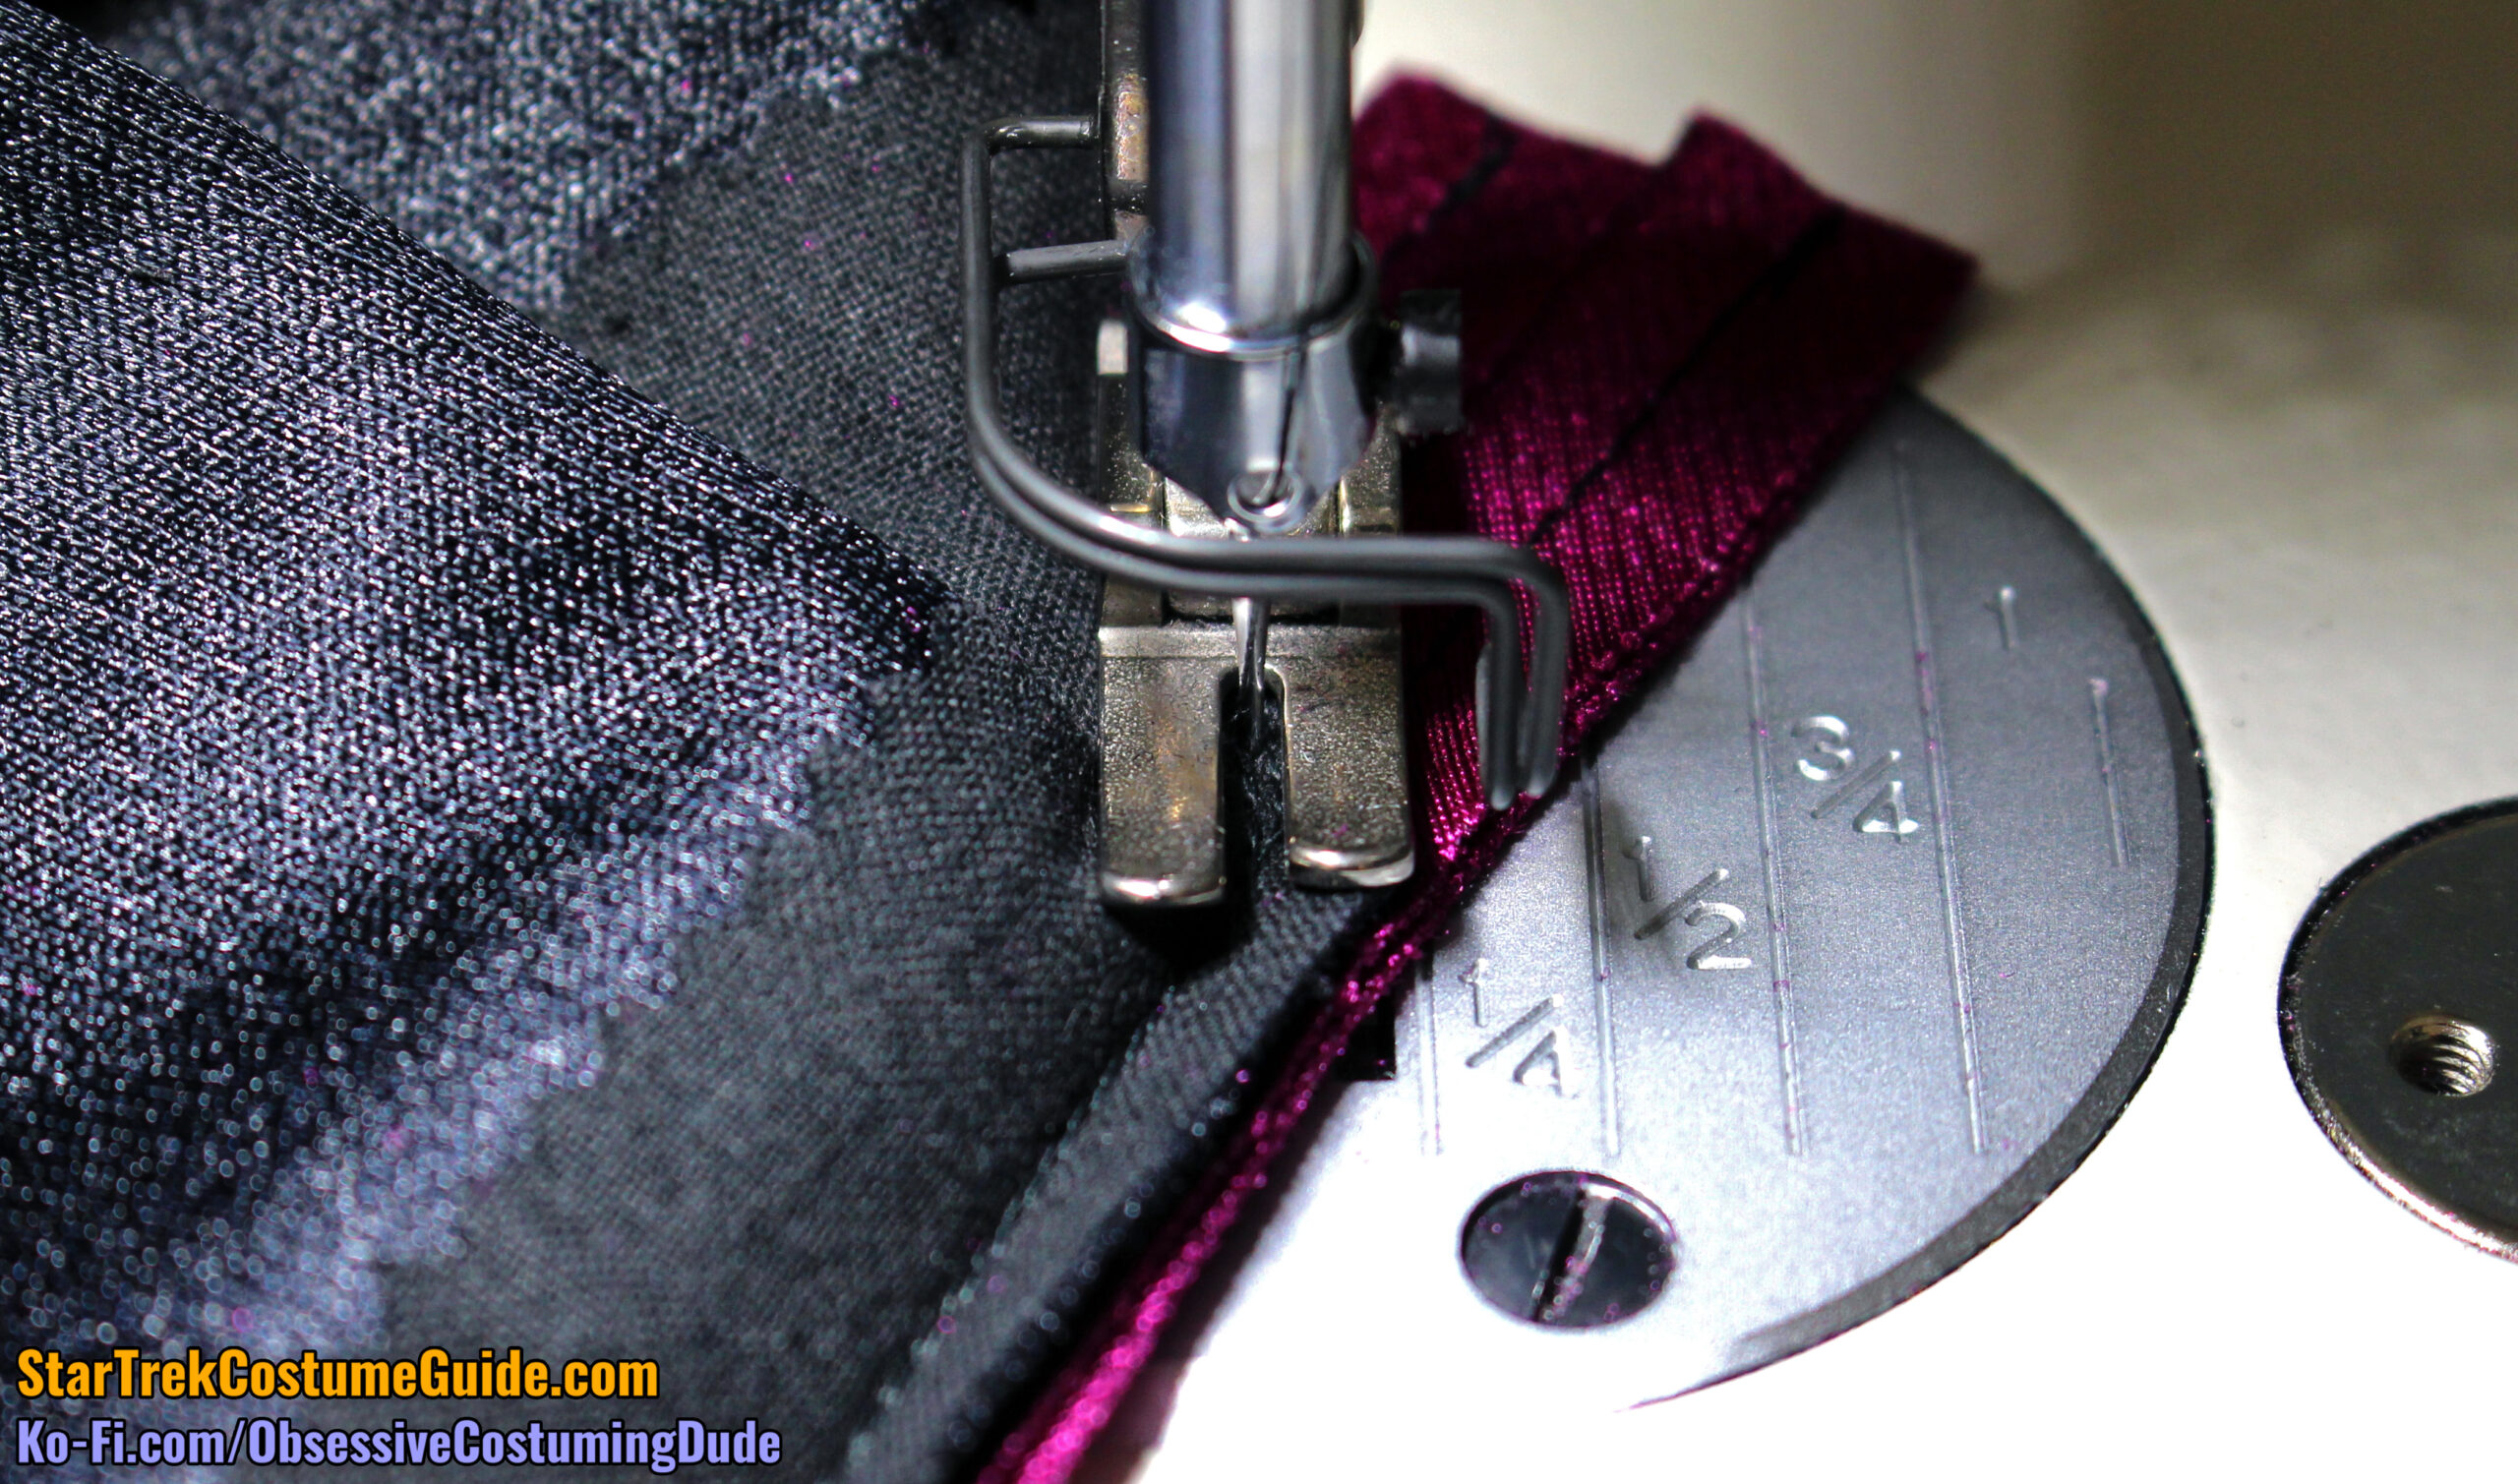
Turn the pant leg around so the bottom is facing away from you, toward the sewing machine.
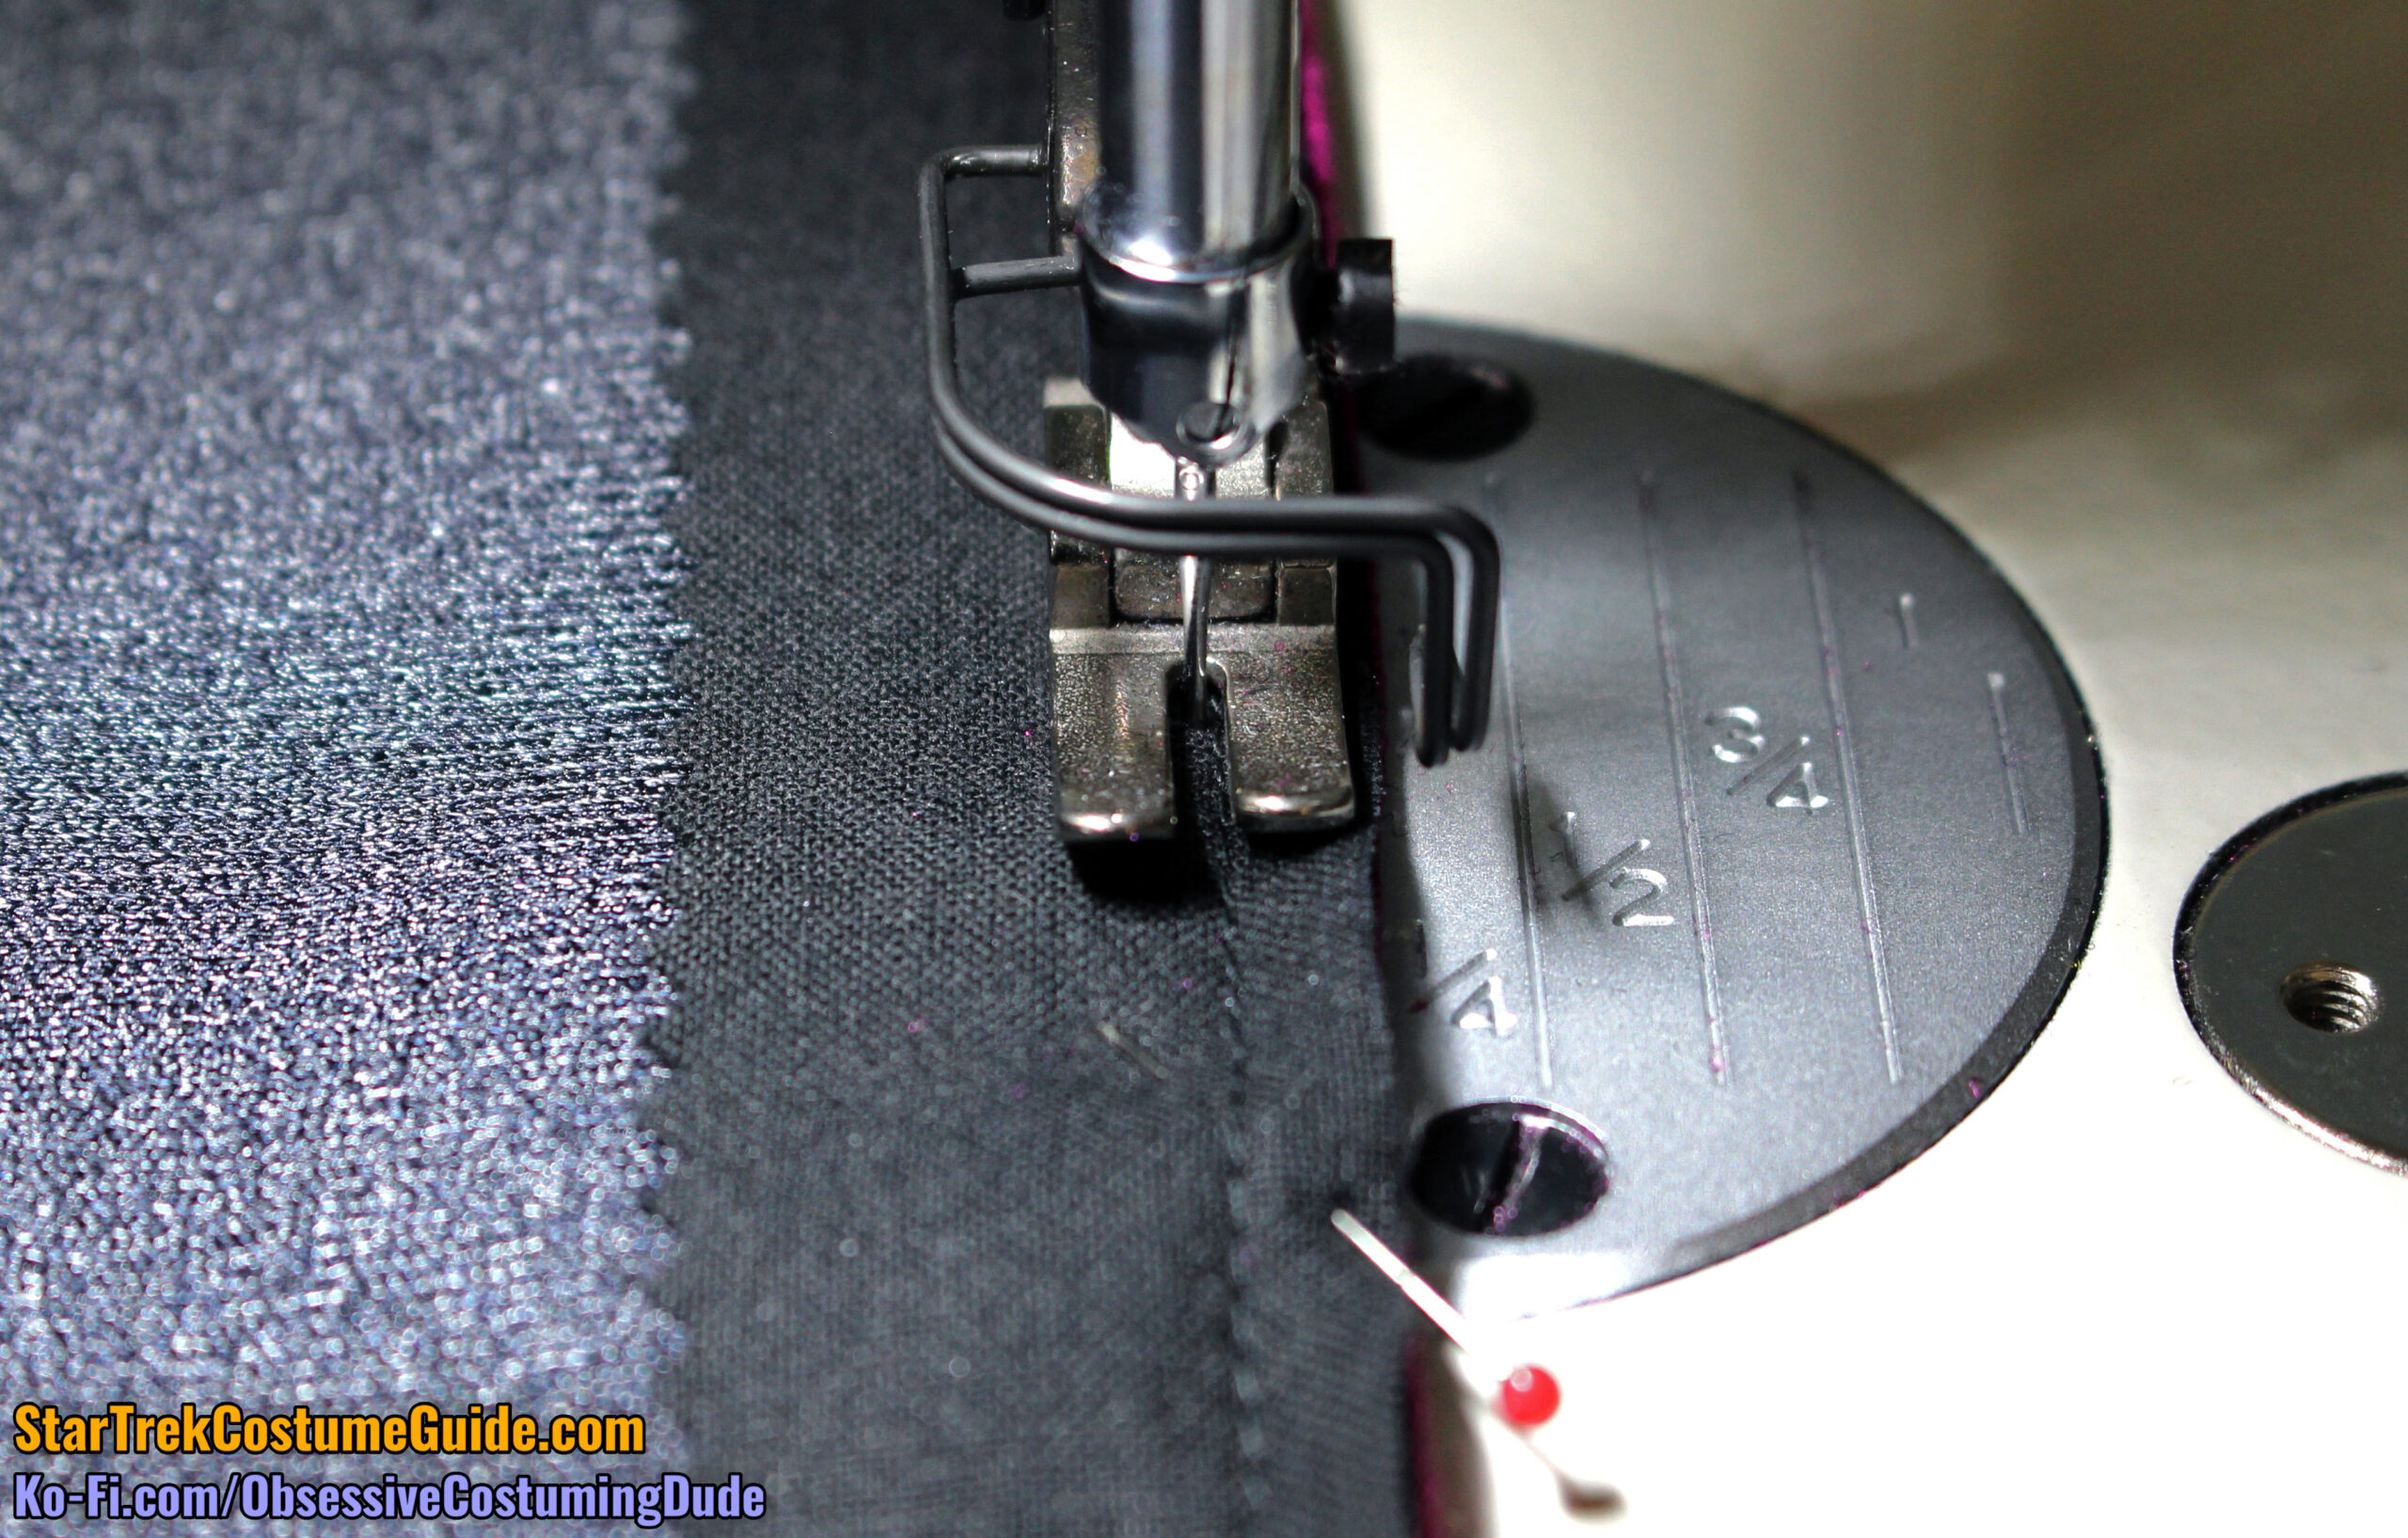
Position the strip of trim on the left so its raw edges are flush with the chalk line, and pin it into place.
Starting at the bottom of the pant leg, stitch the trim to the pant leg ¼” from the edge, exactly along the previous stitch line.
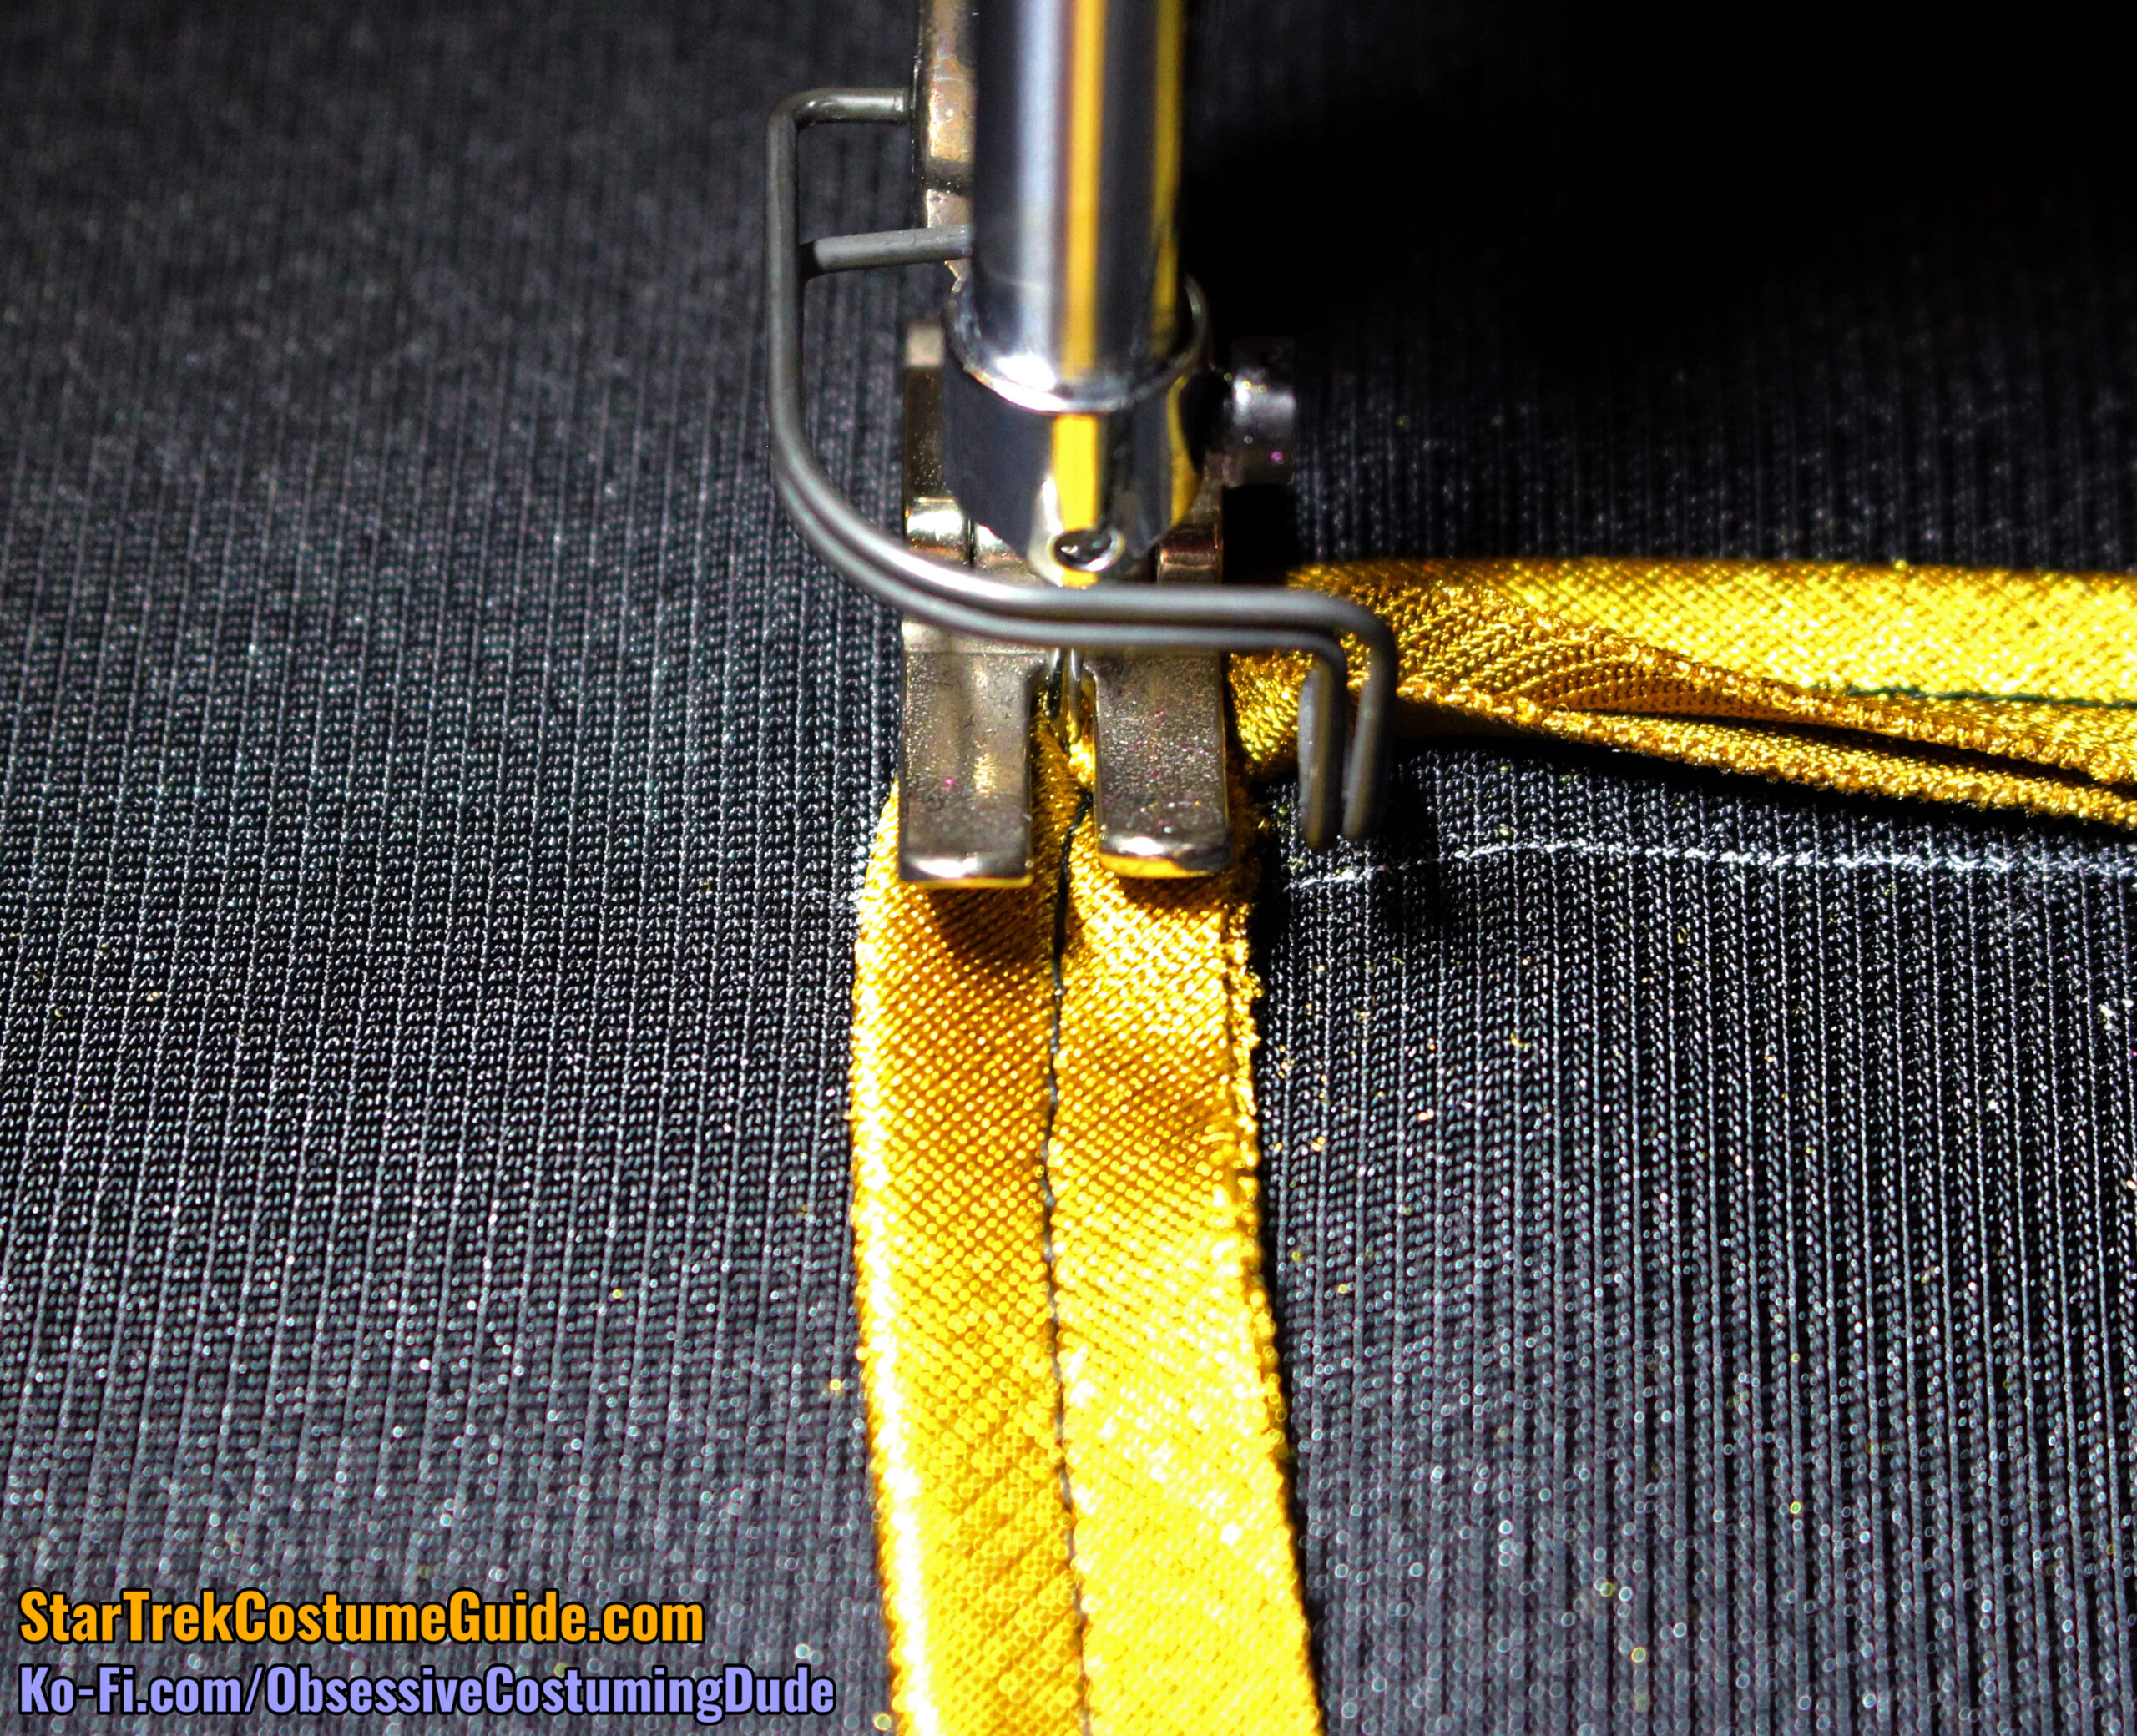
At the top of the alignment guide (8” from the bottom of the pant leg), stop with the needle in the fabric.
Left the presser foot and rotate the pant leg 90° clockwise so the lower pant leg is on the right.
Rotate the strip of trim 90° counterclockwise (so the remaining length is toward you), and gently move the bulk as far behind the presser foot as you can manage.
At a stitch length of 2.5, take two or three stitches (max) across the top, and stop again with the needle in the fabric. (Don’t take more than three stitches across the top, or it will cause an unsightly pucker on the finished result.)
Rotate the pant leg 90° clockwise again, so the lower pant leg is toward you.
Rotate the trim 90° counterclockwise again, so the raw edges are flush with those of the opposite side you’ve already sewn.
Gently move the bulk as far behind the presser foot as you can manage.
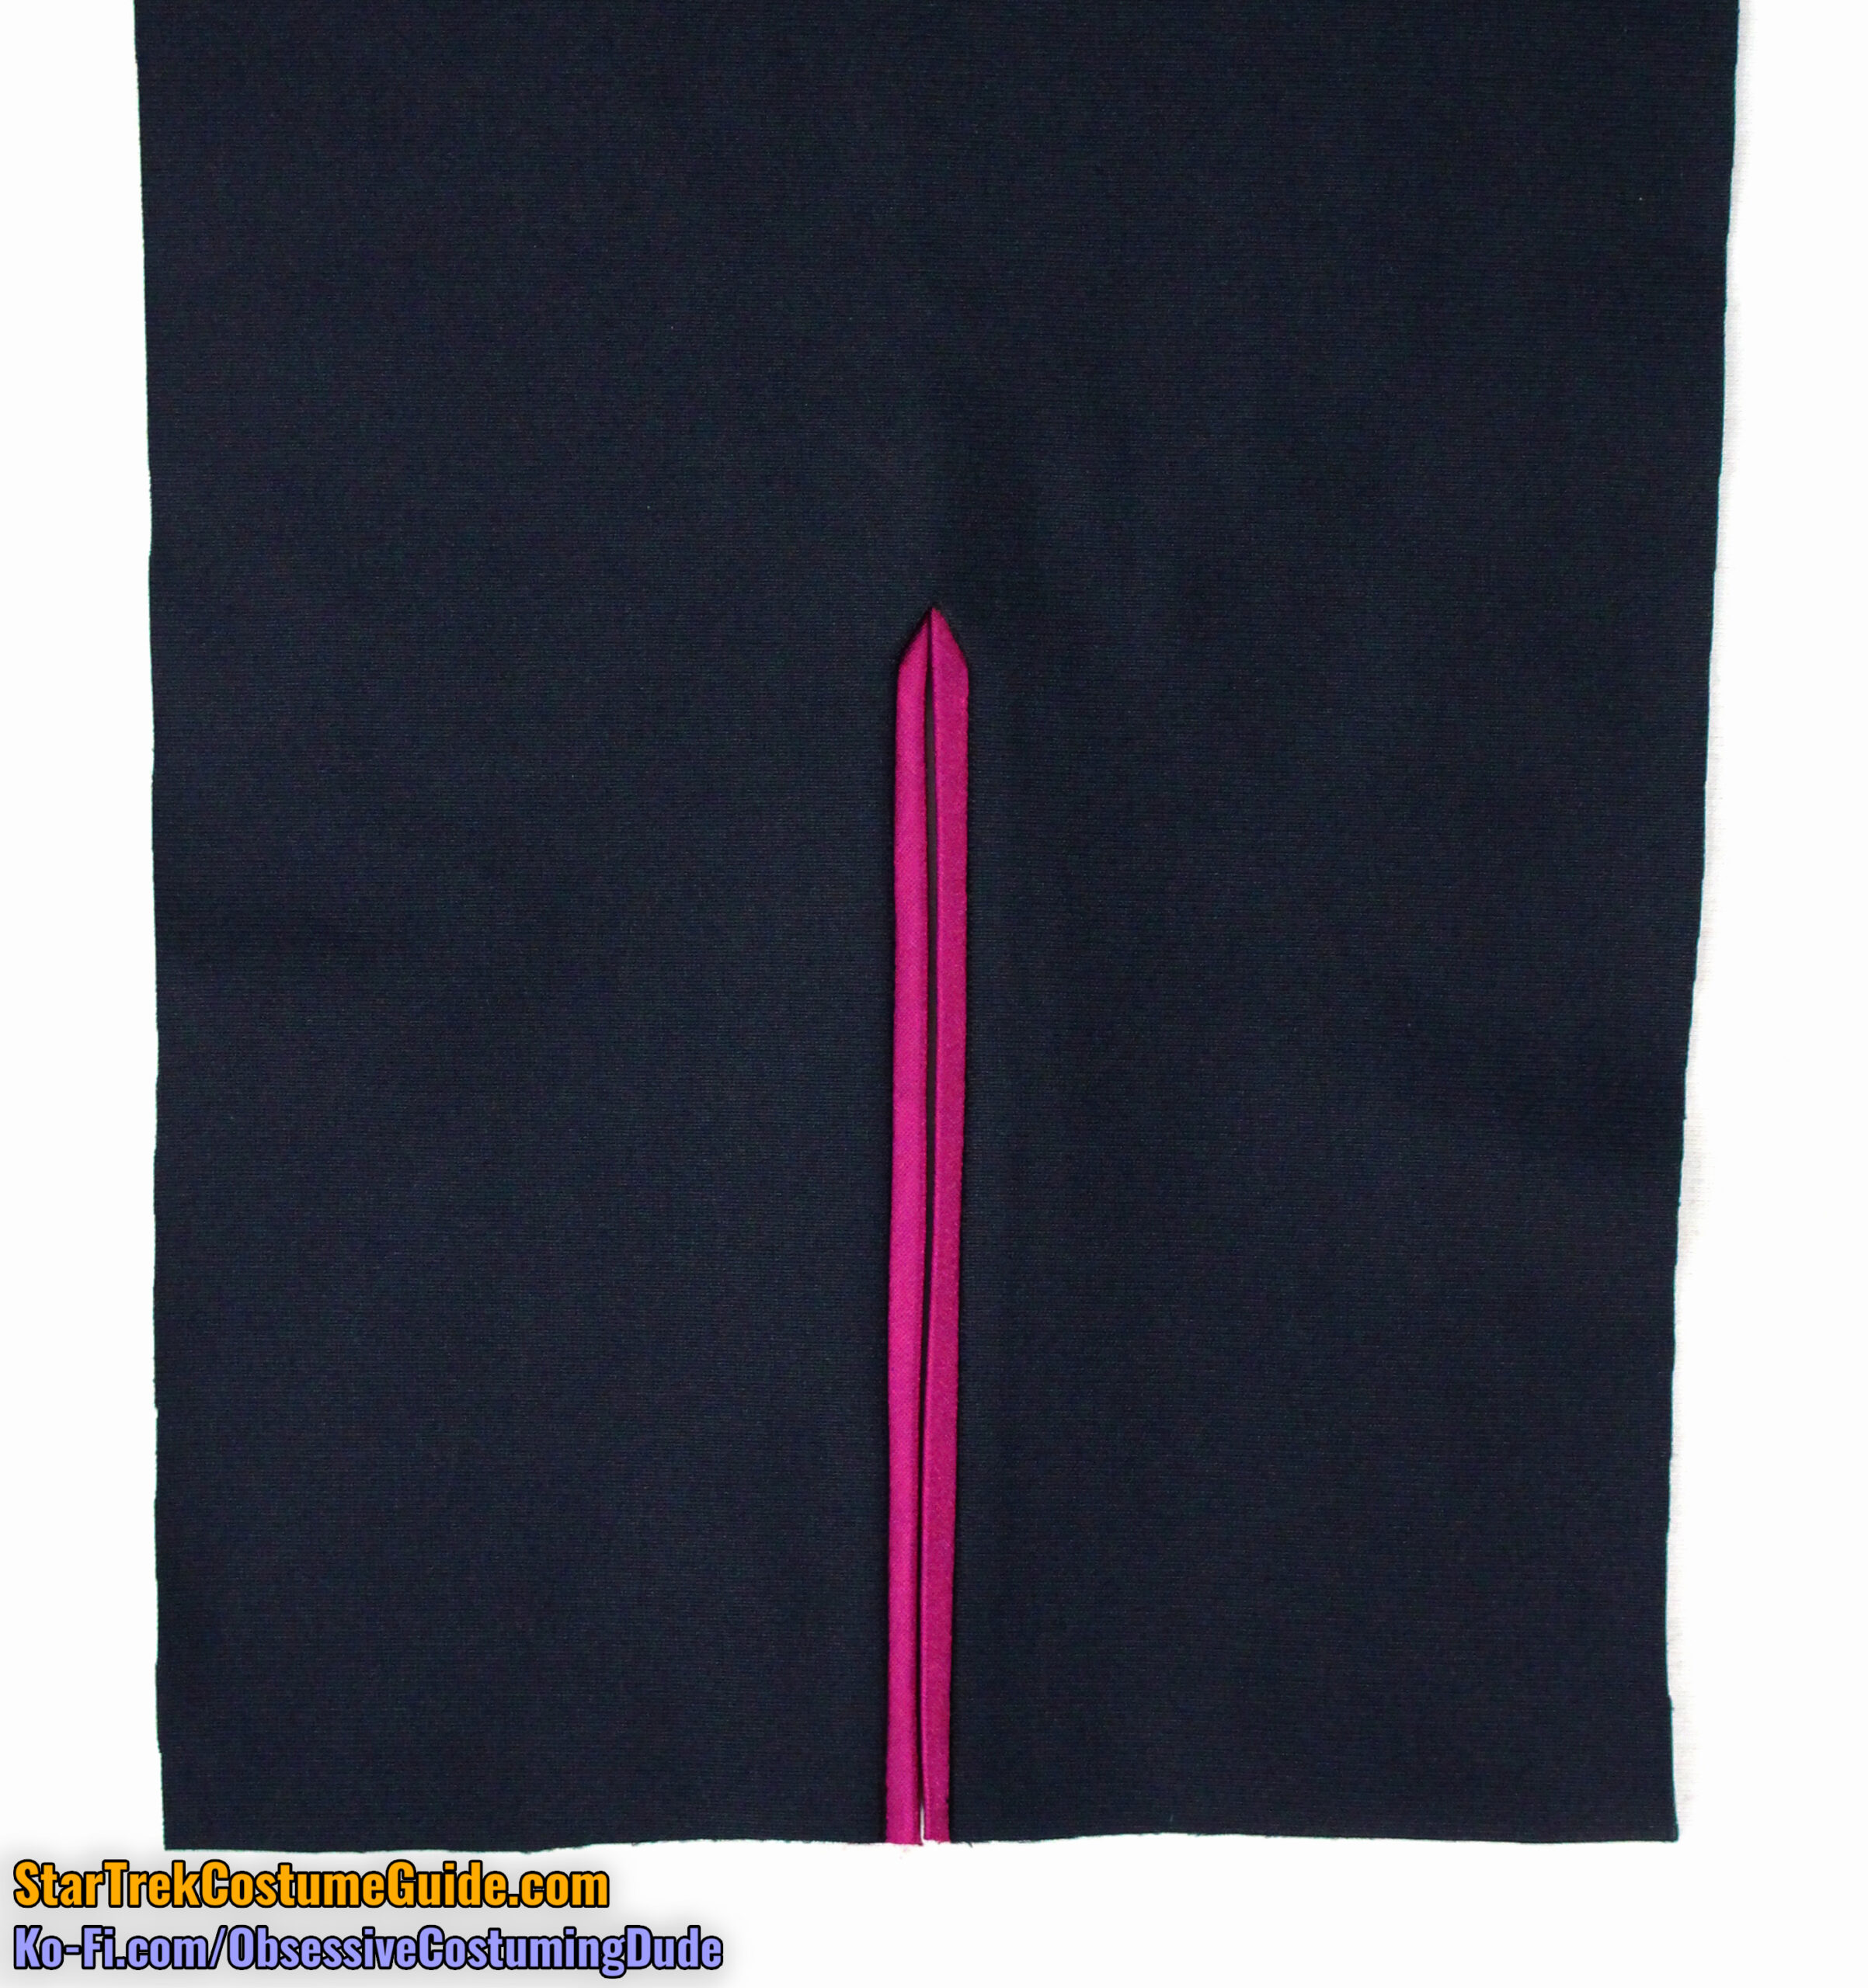
Stitch back down the other length of trim toward the bottom of the pant leg.
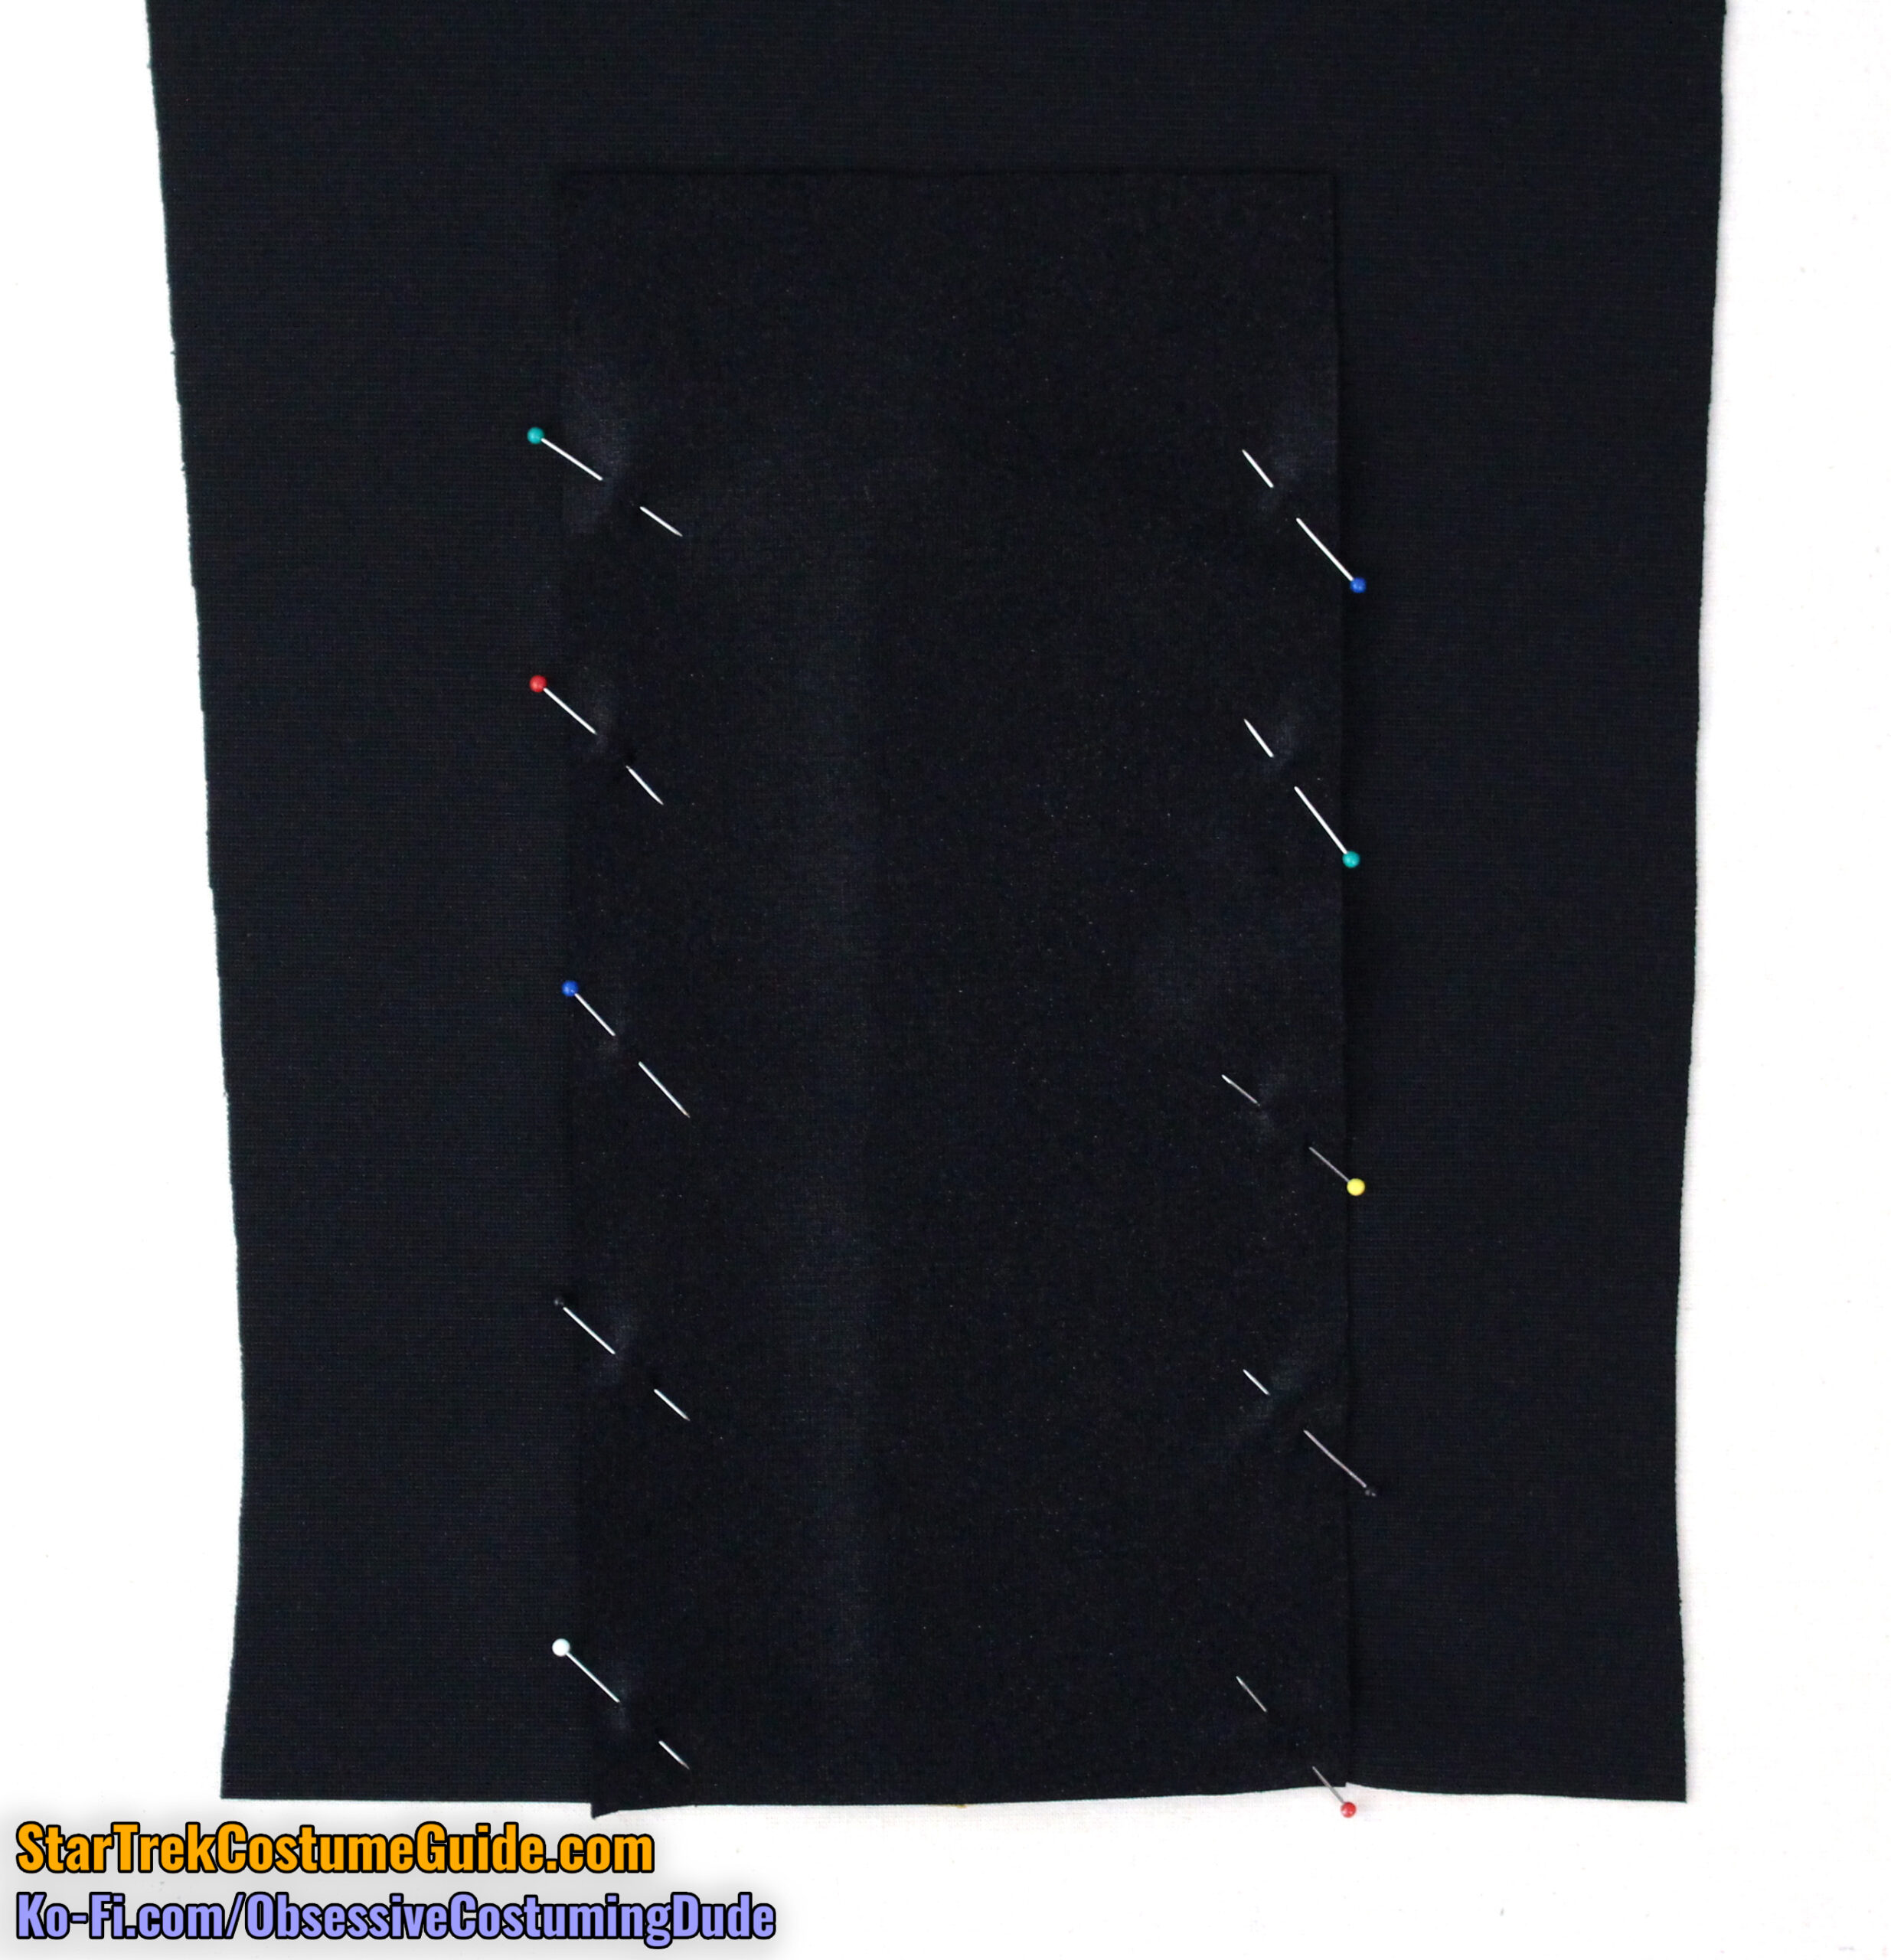
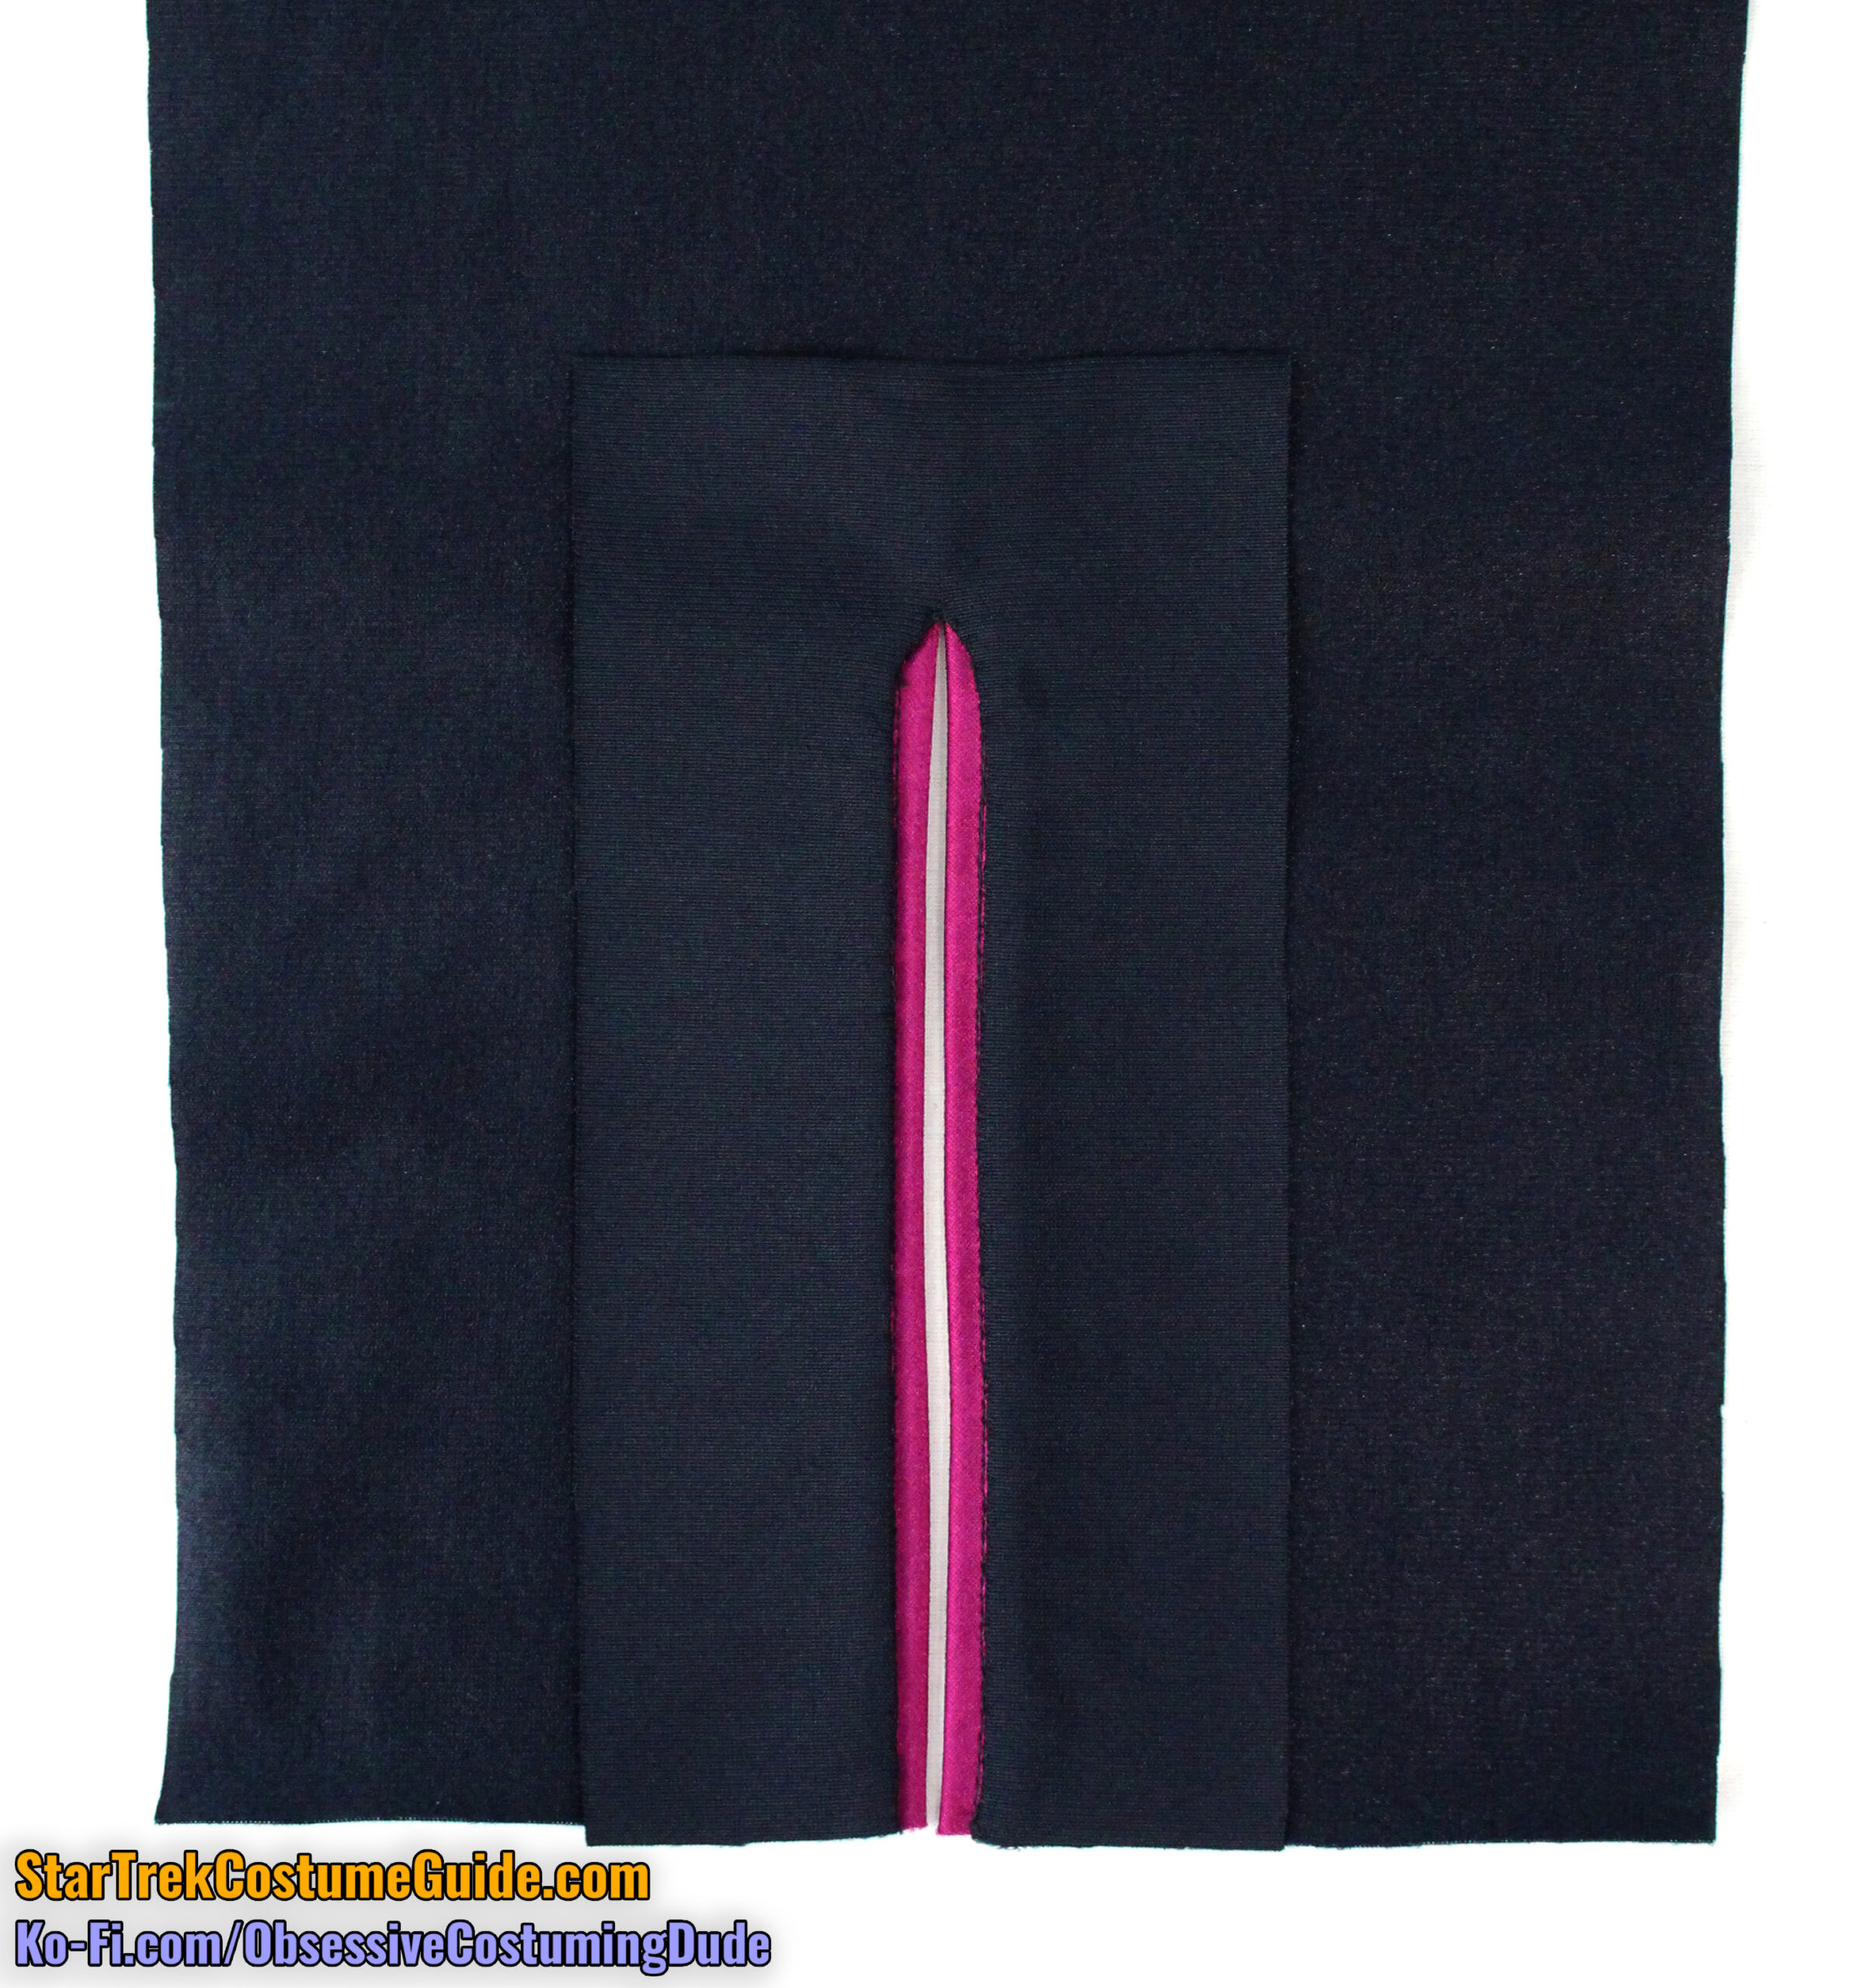
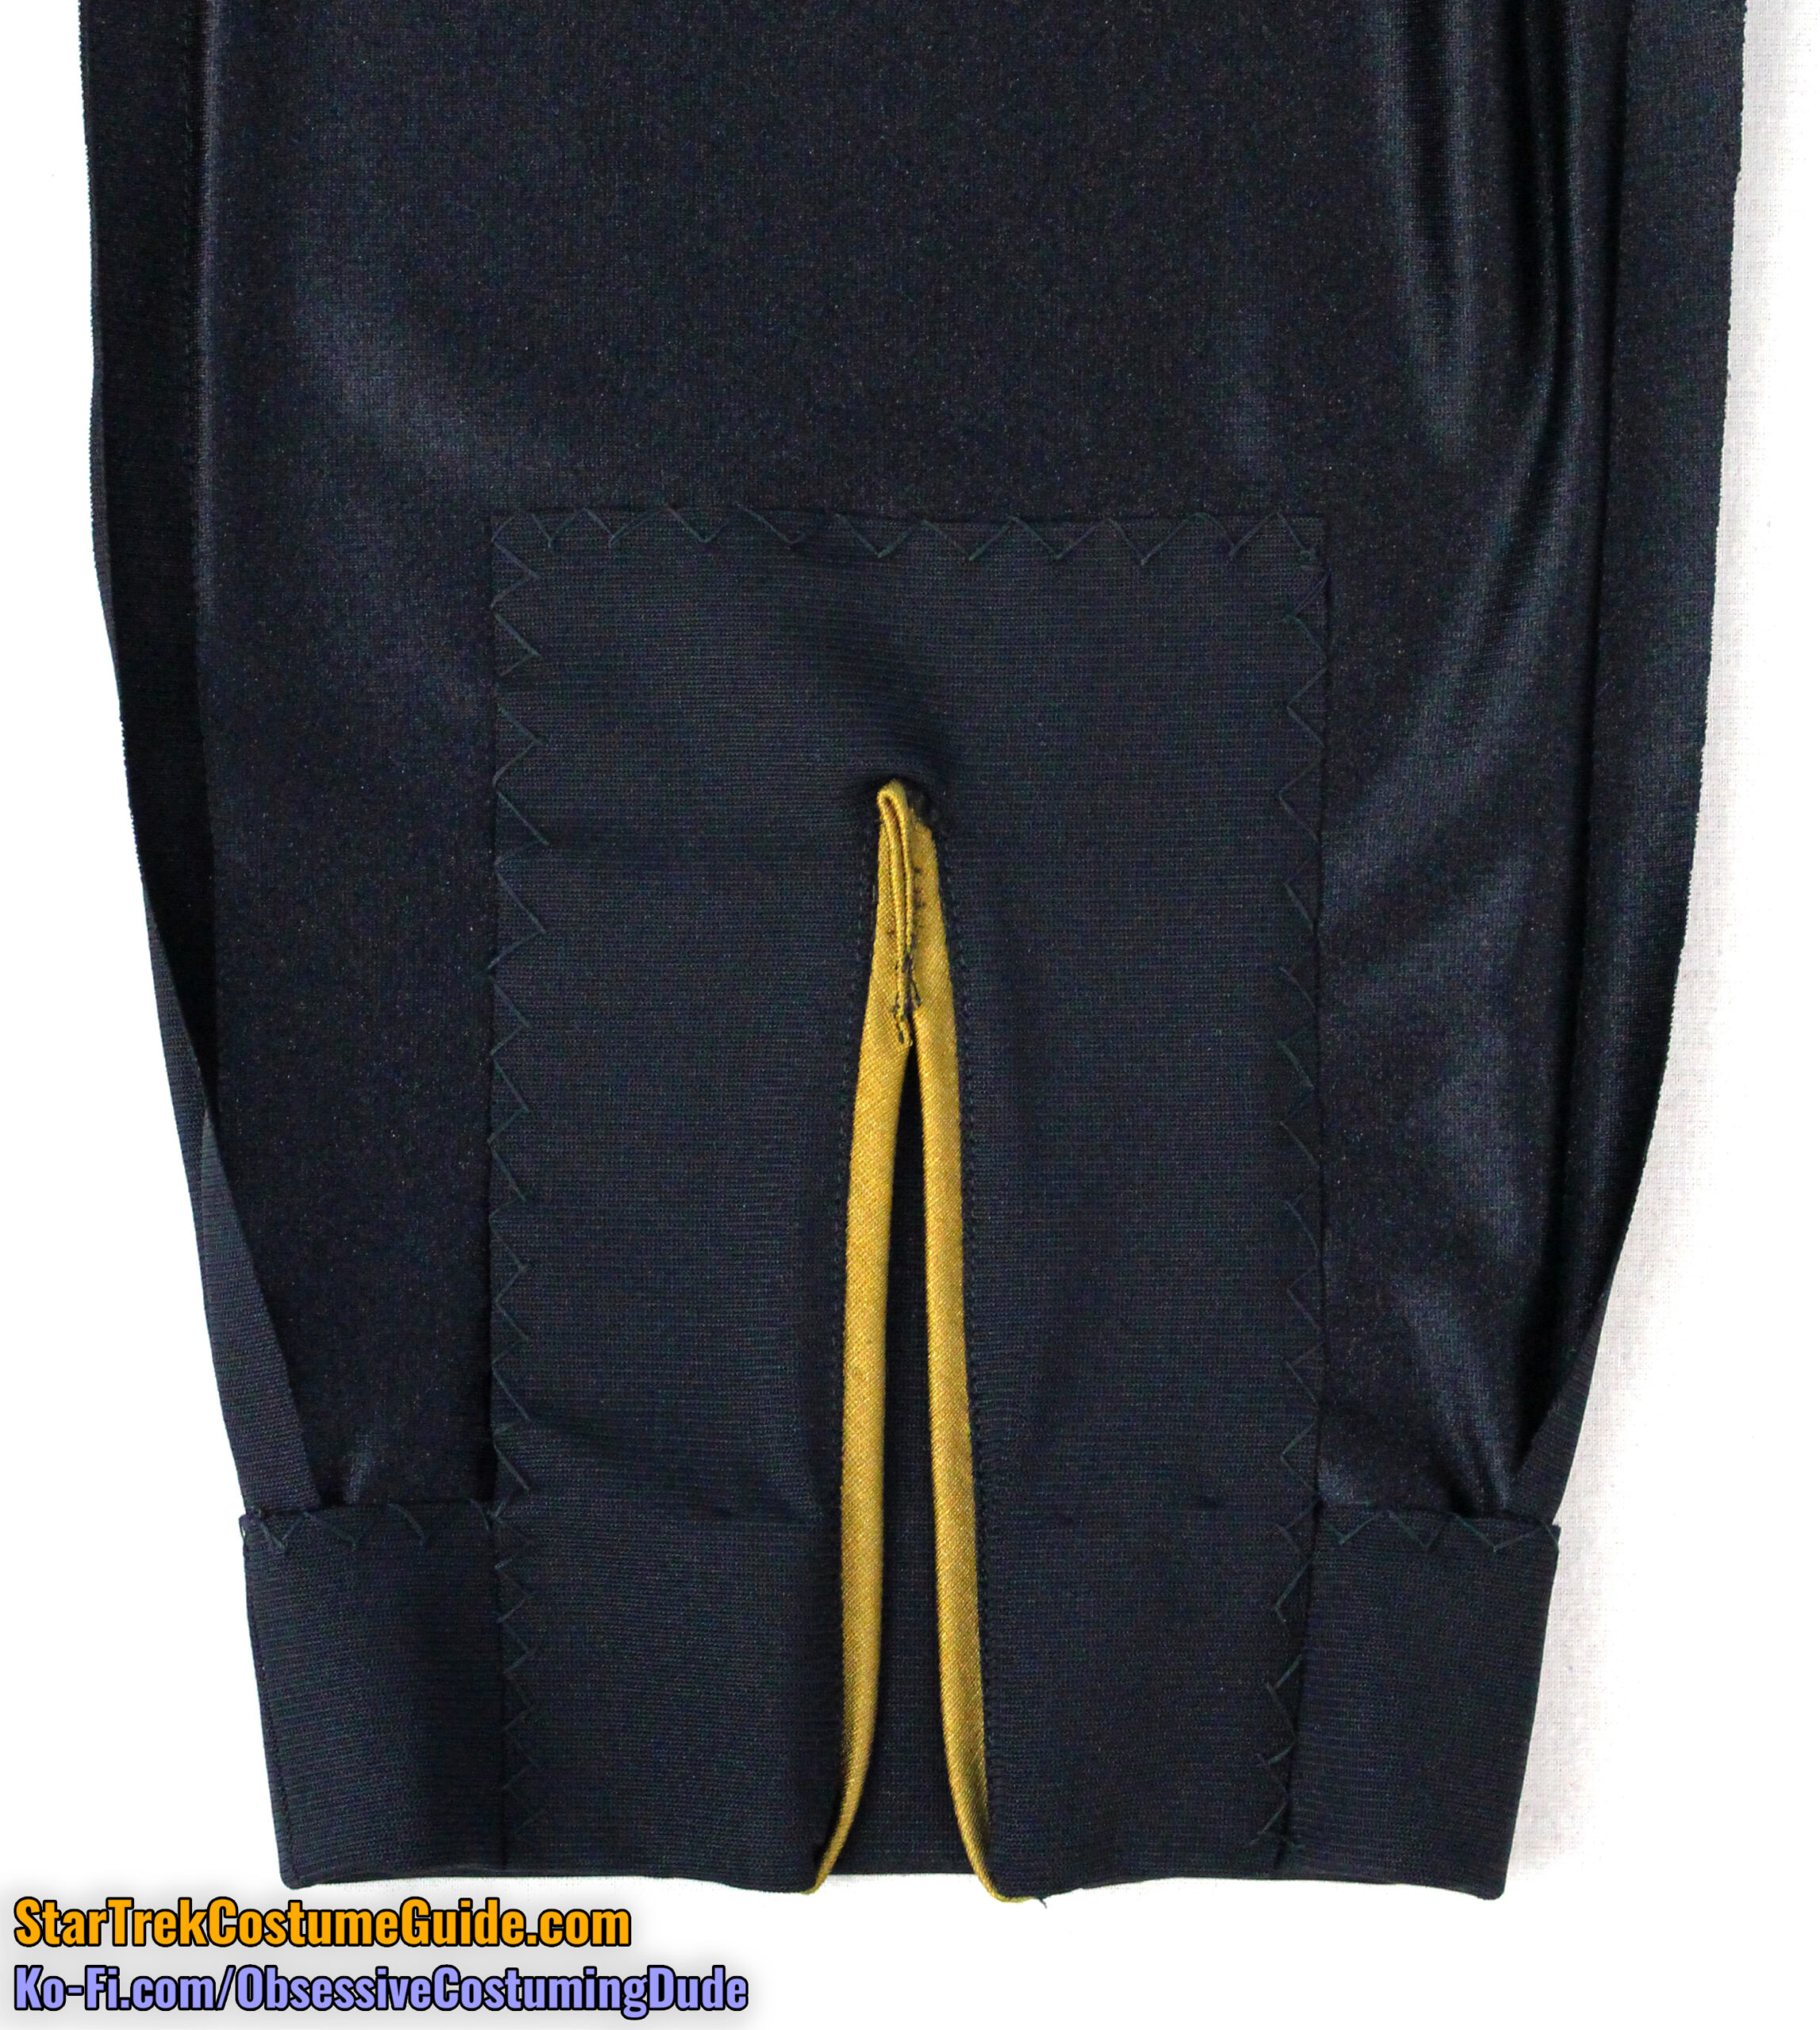
Pin the lower pant leg facing (piece S) to the lower pant leg, right sides together and centered over the alignment guide.
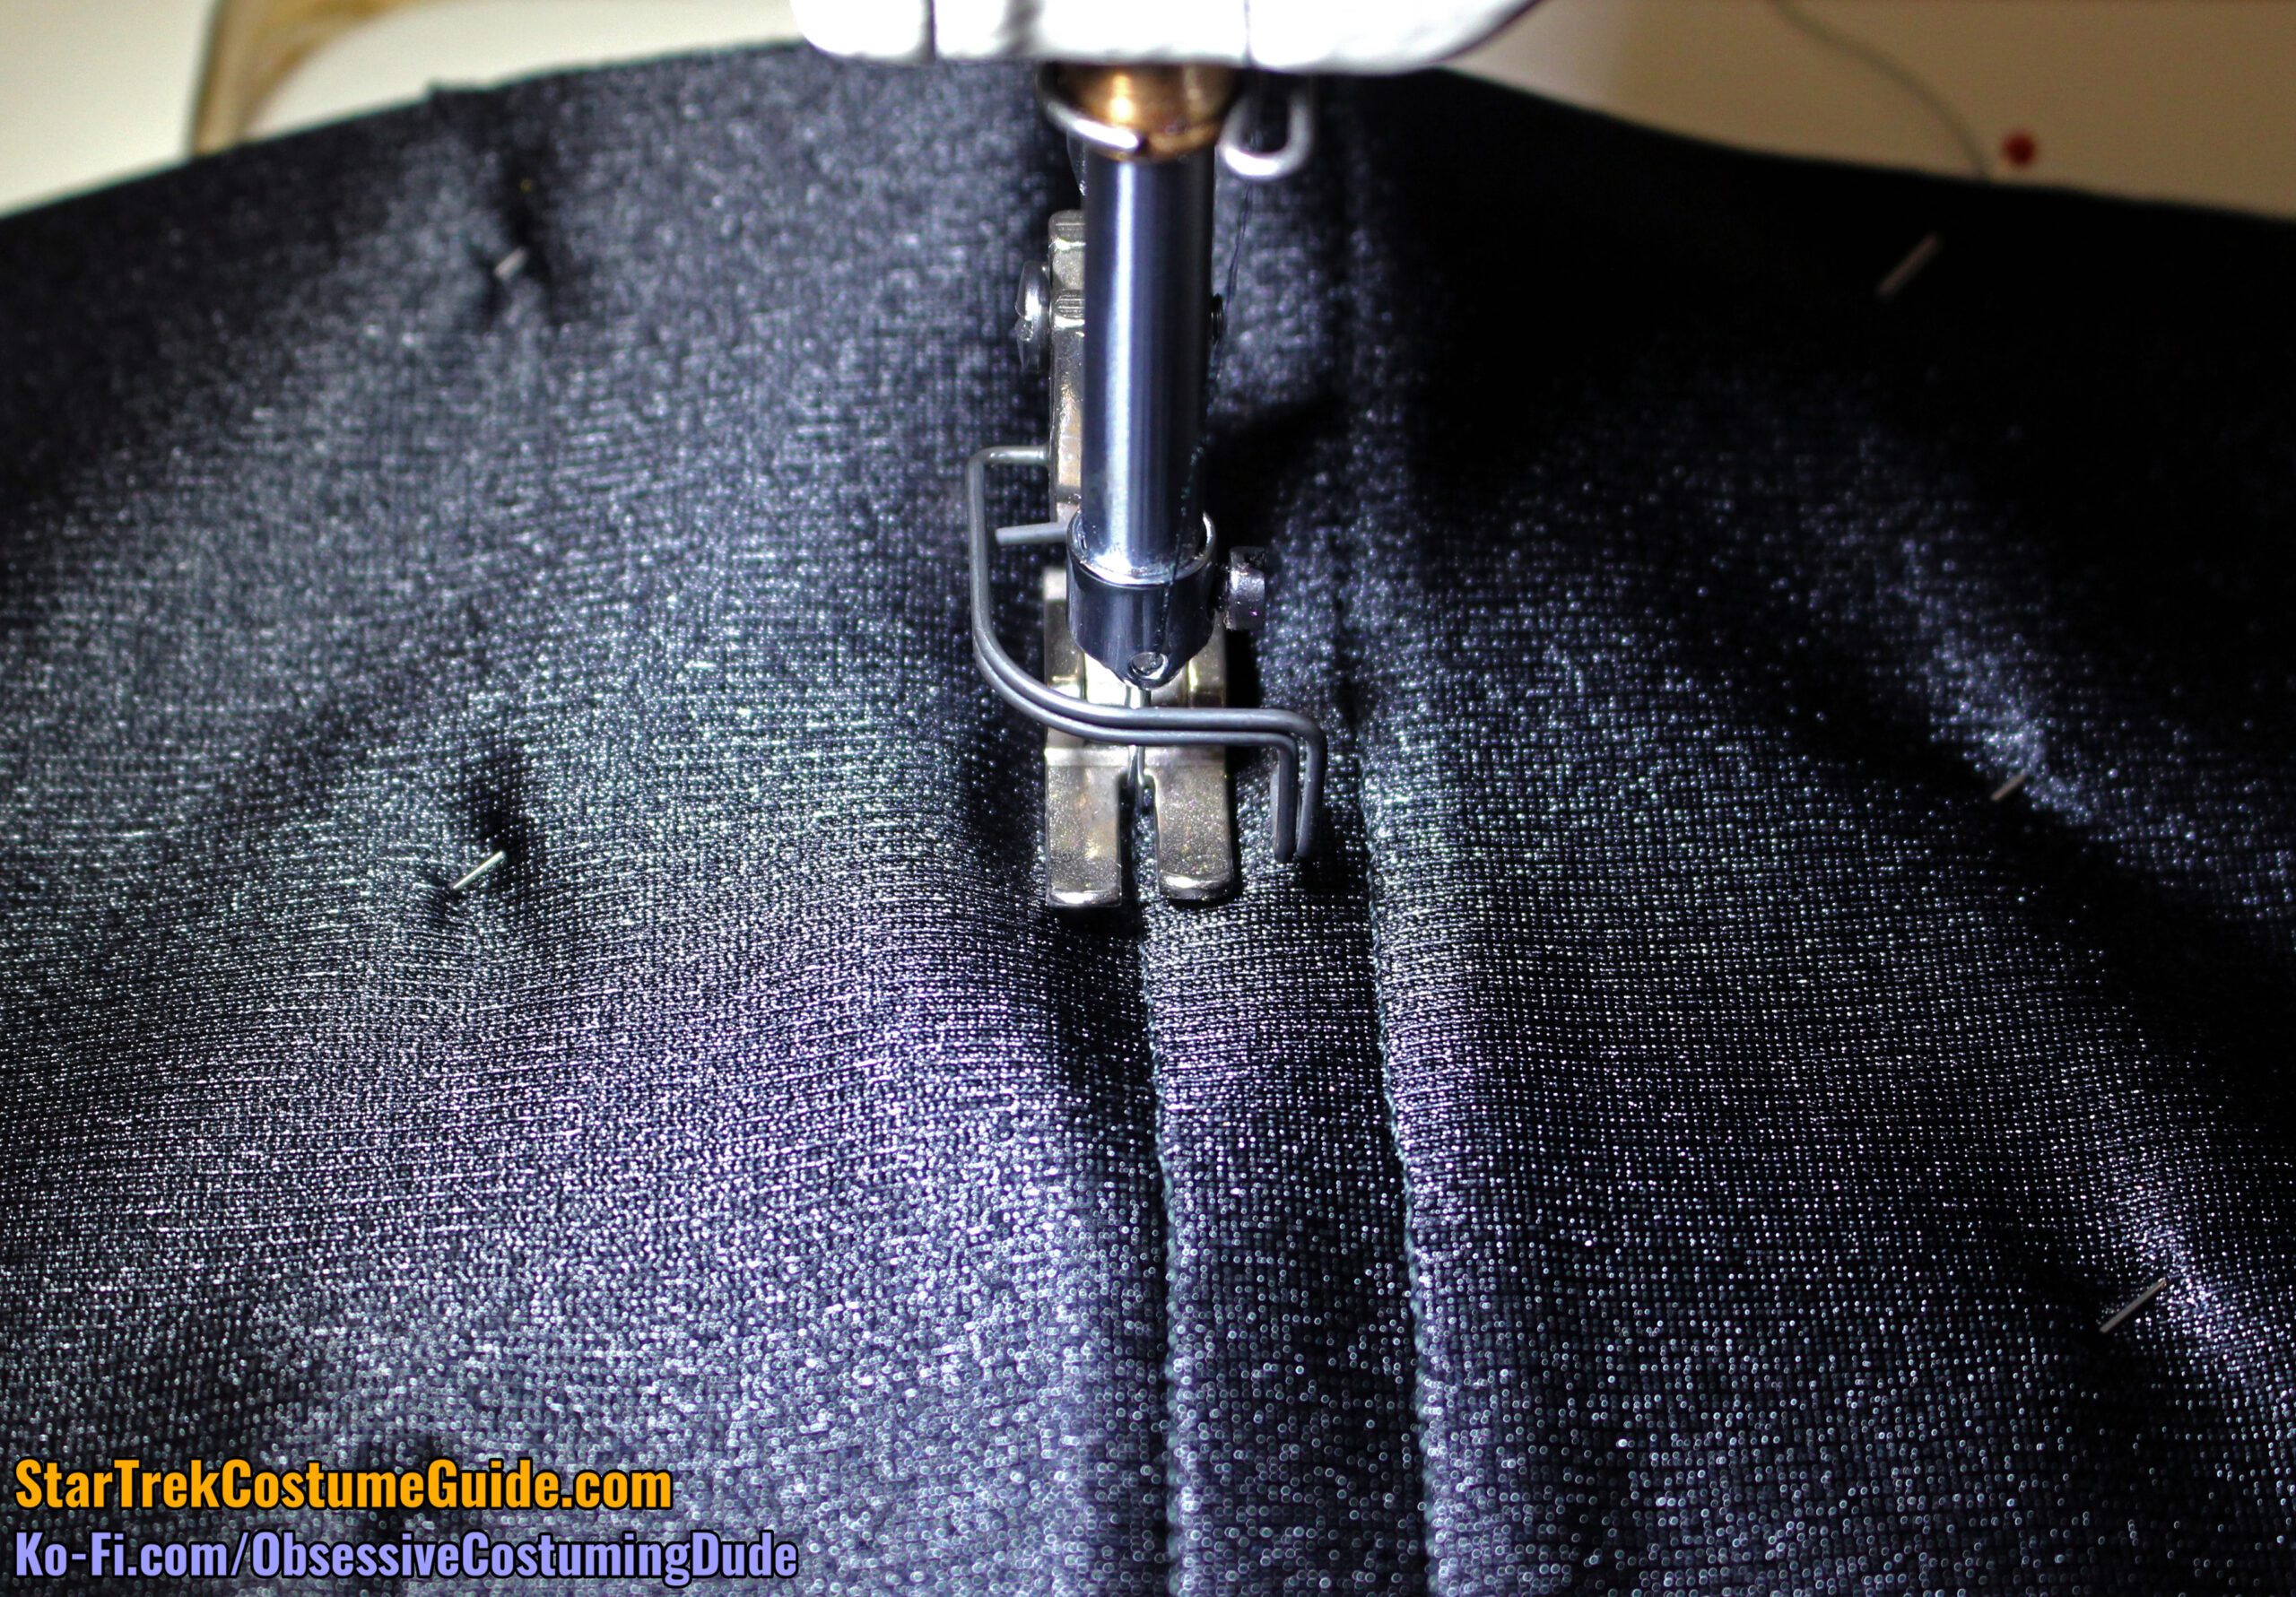
From the underside of the pant leg, stitch again exactly over the previous stitching through all layers, taking care to keep the trim allowance tucked inside the stitching along the top. (I found tweezers helpful for this.)
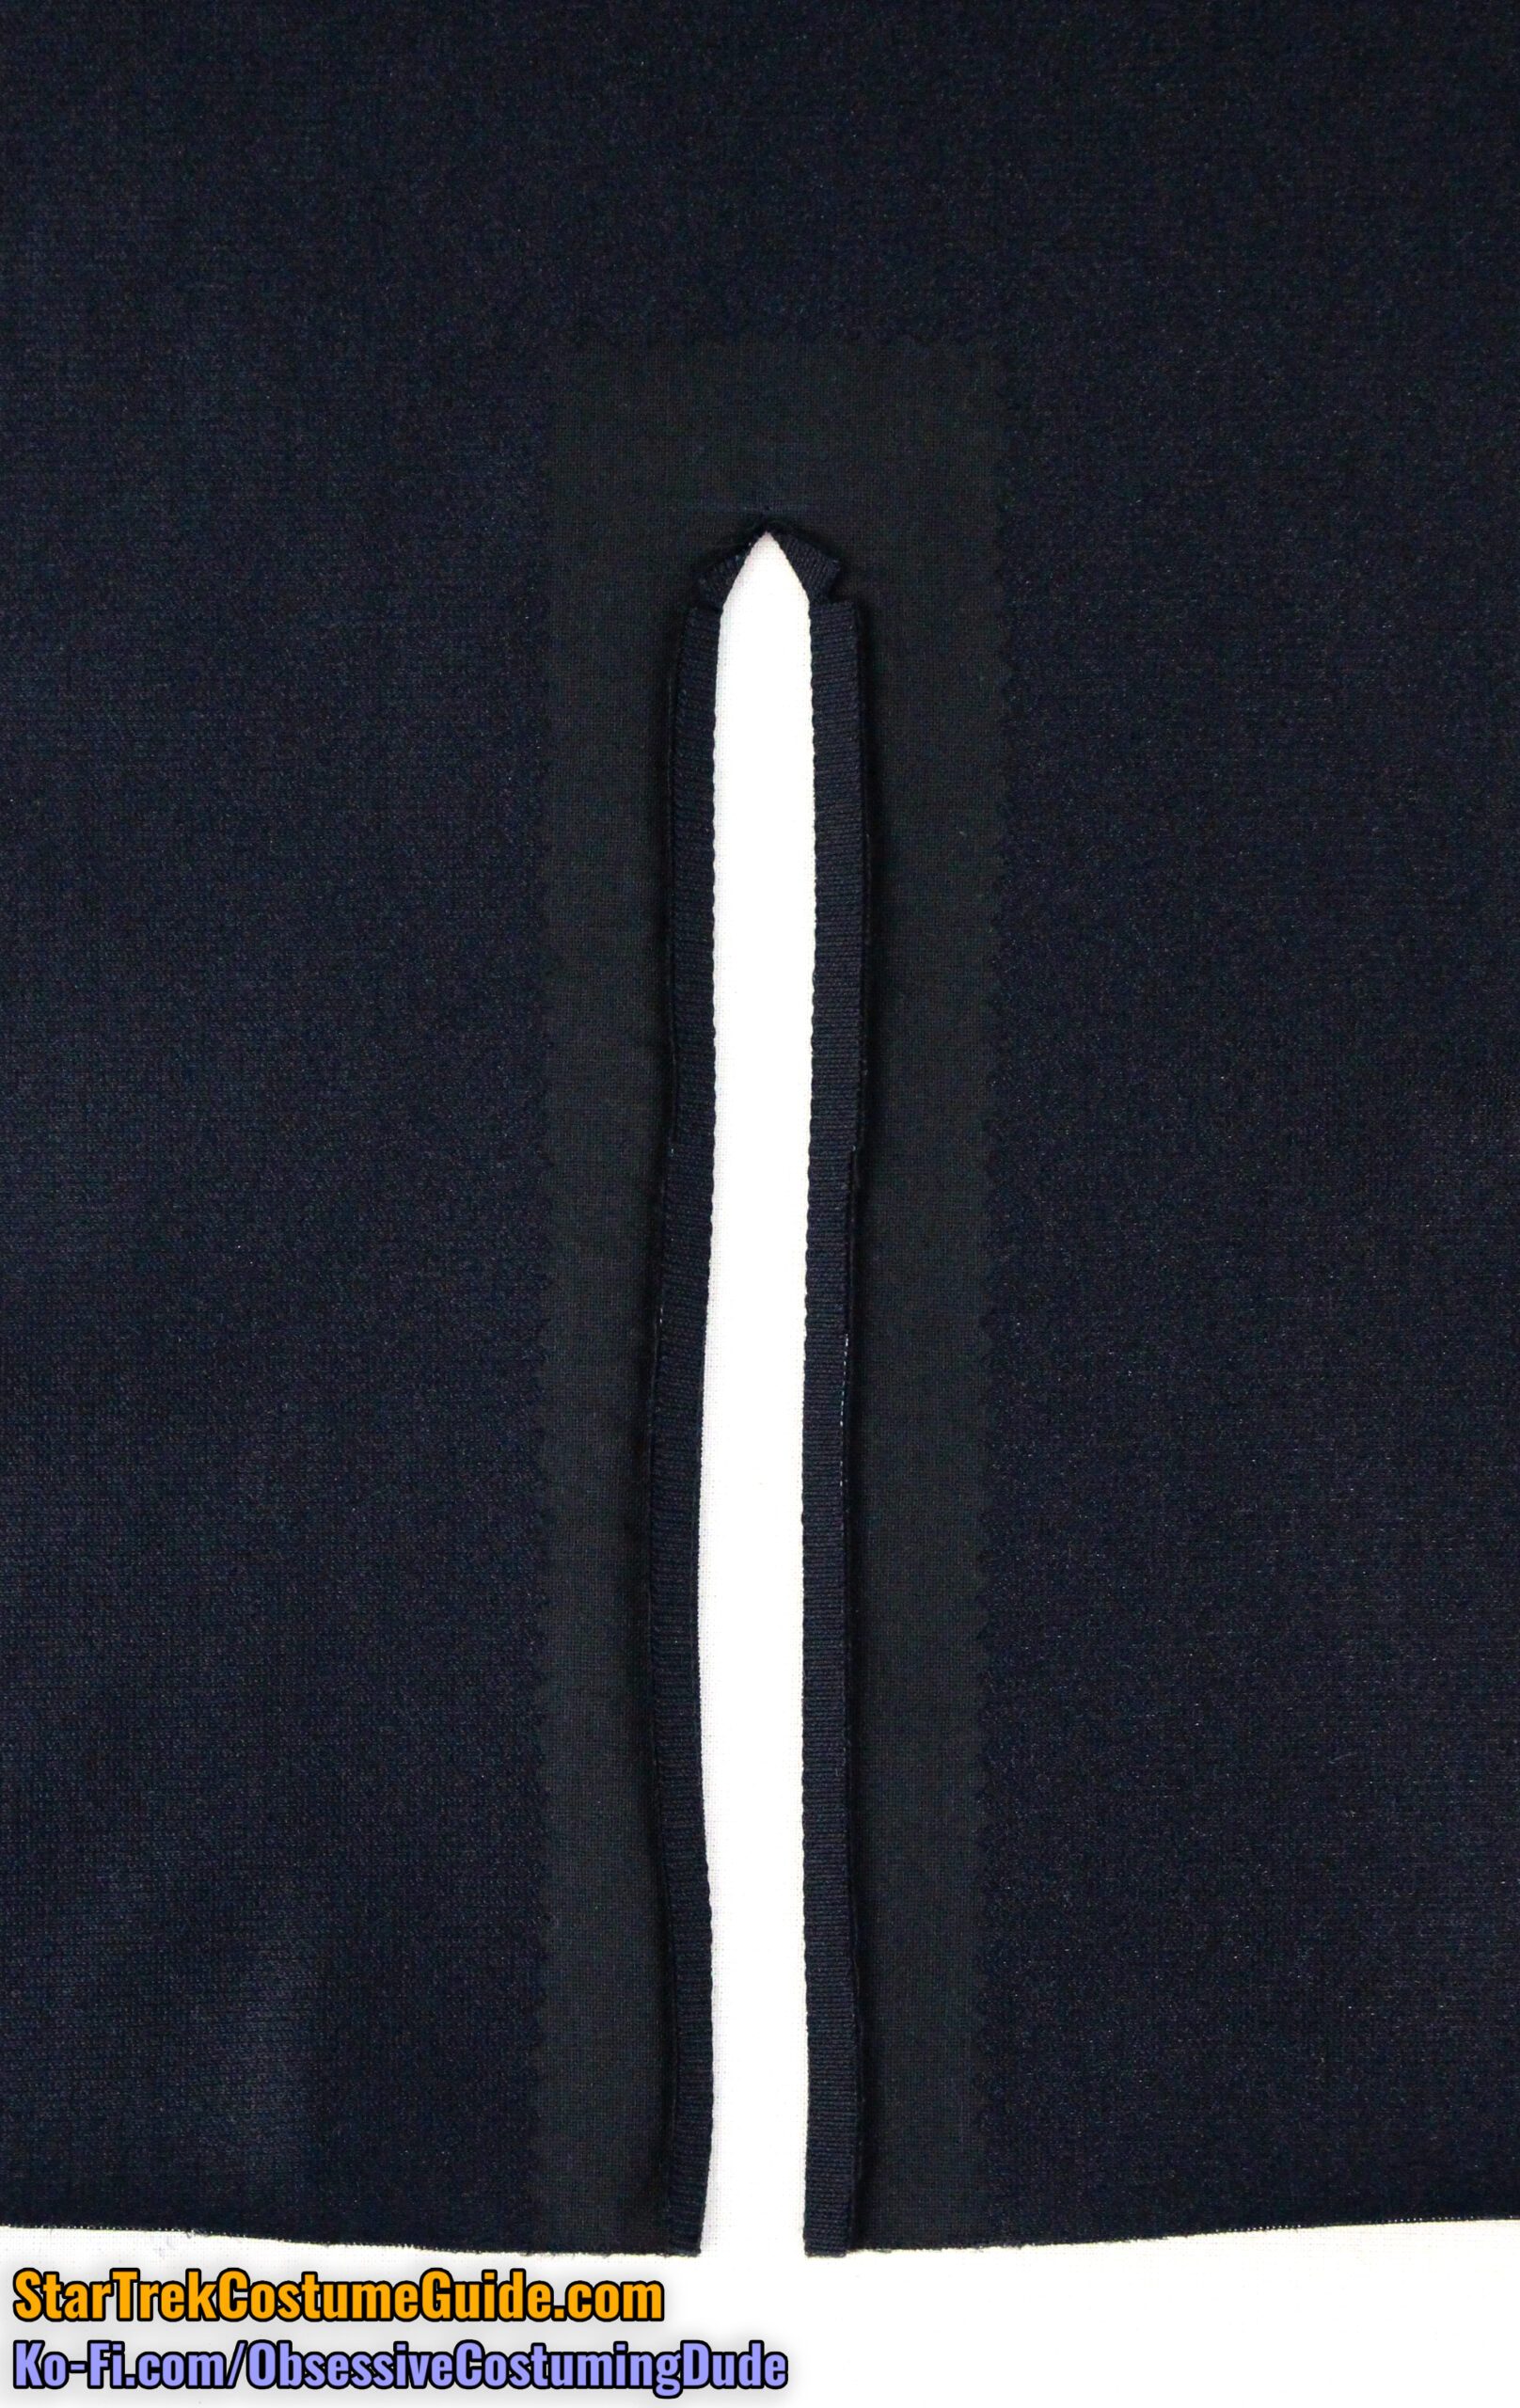
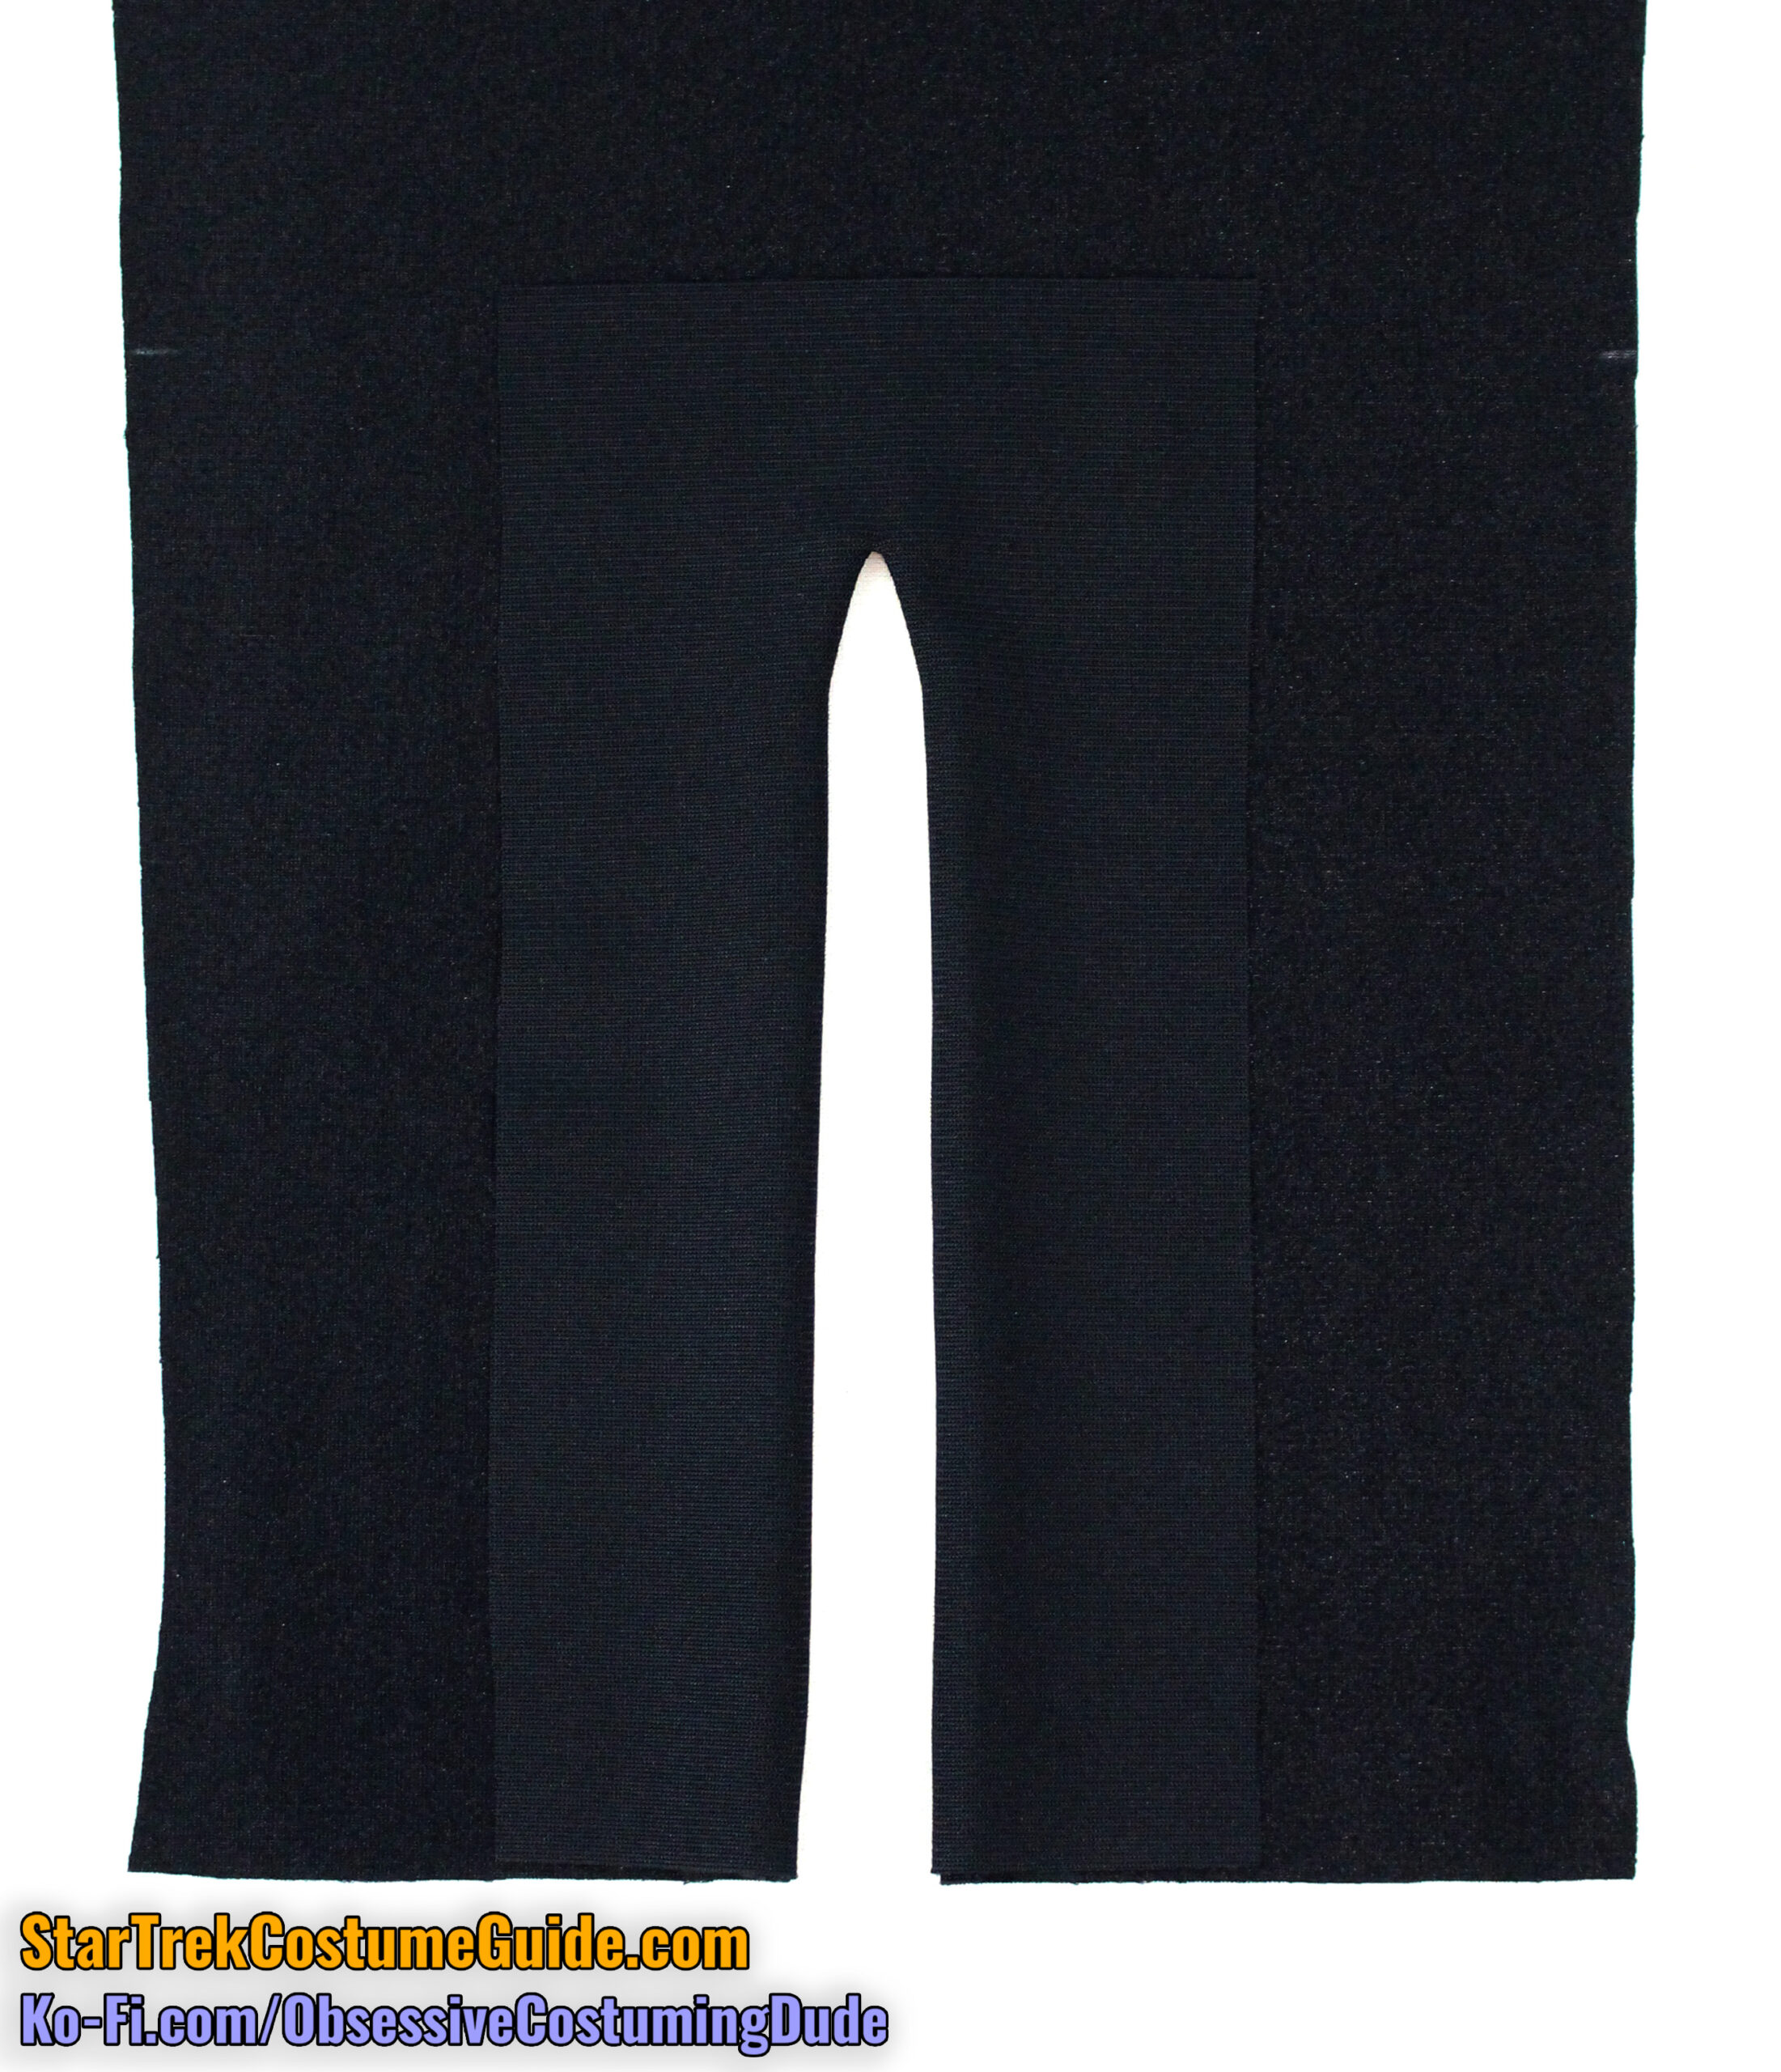
Clip the pant leg and facing open along the alignment guide up to the stitching.
Turn the trim toward the opening, turn the facing under, and press the entire area.
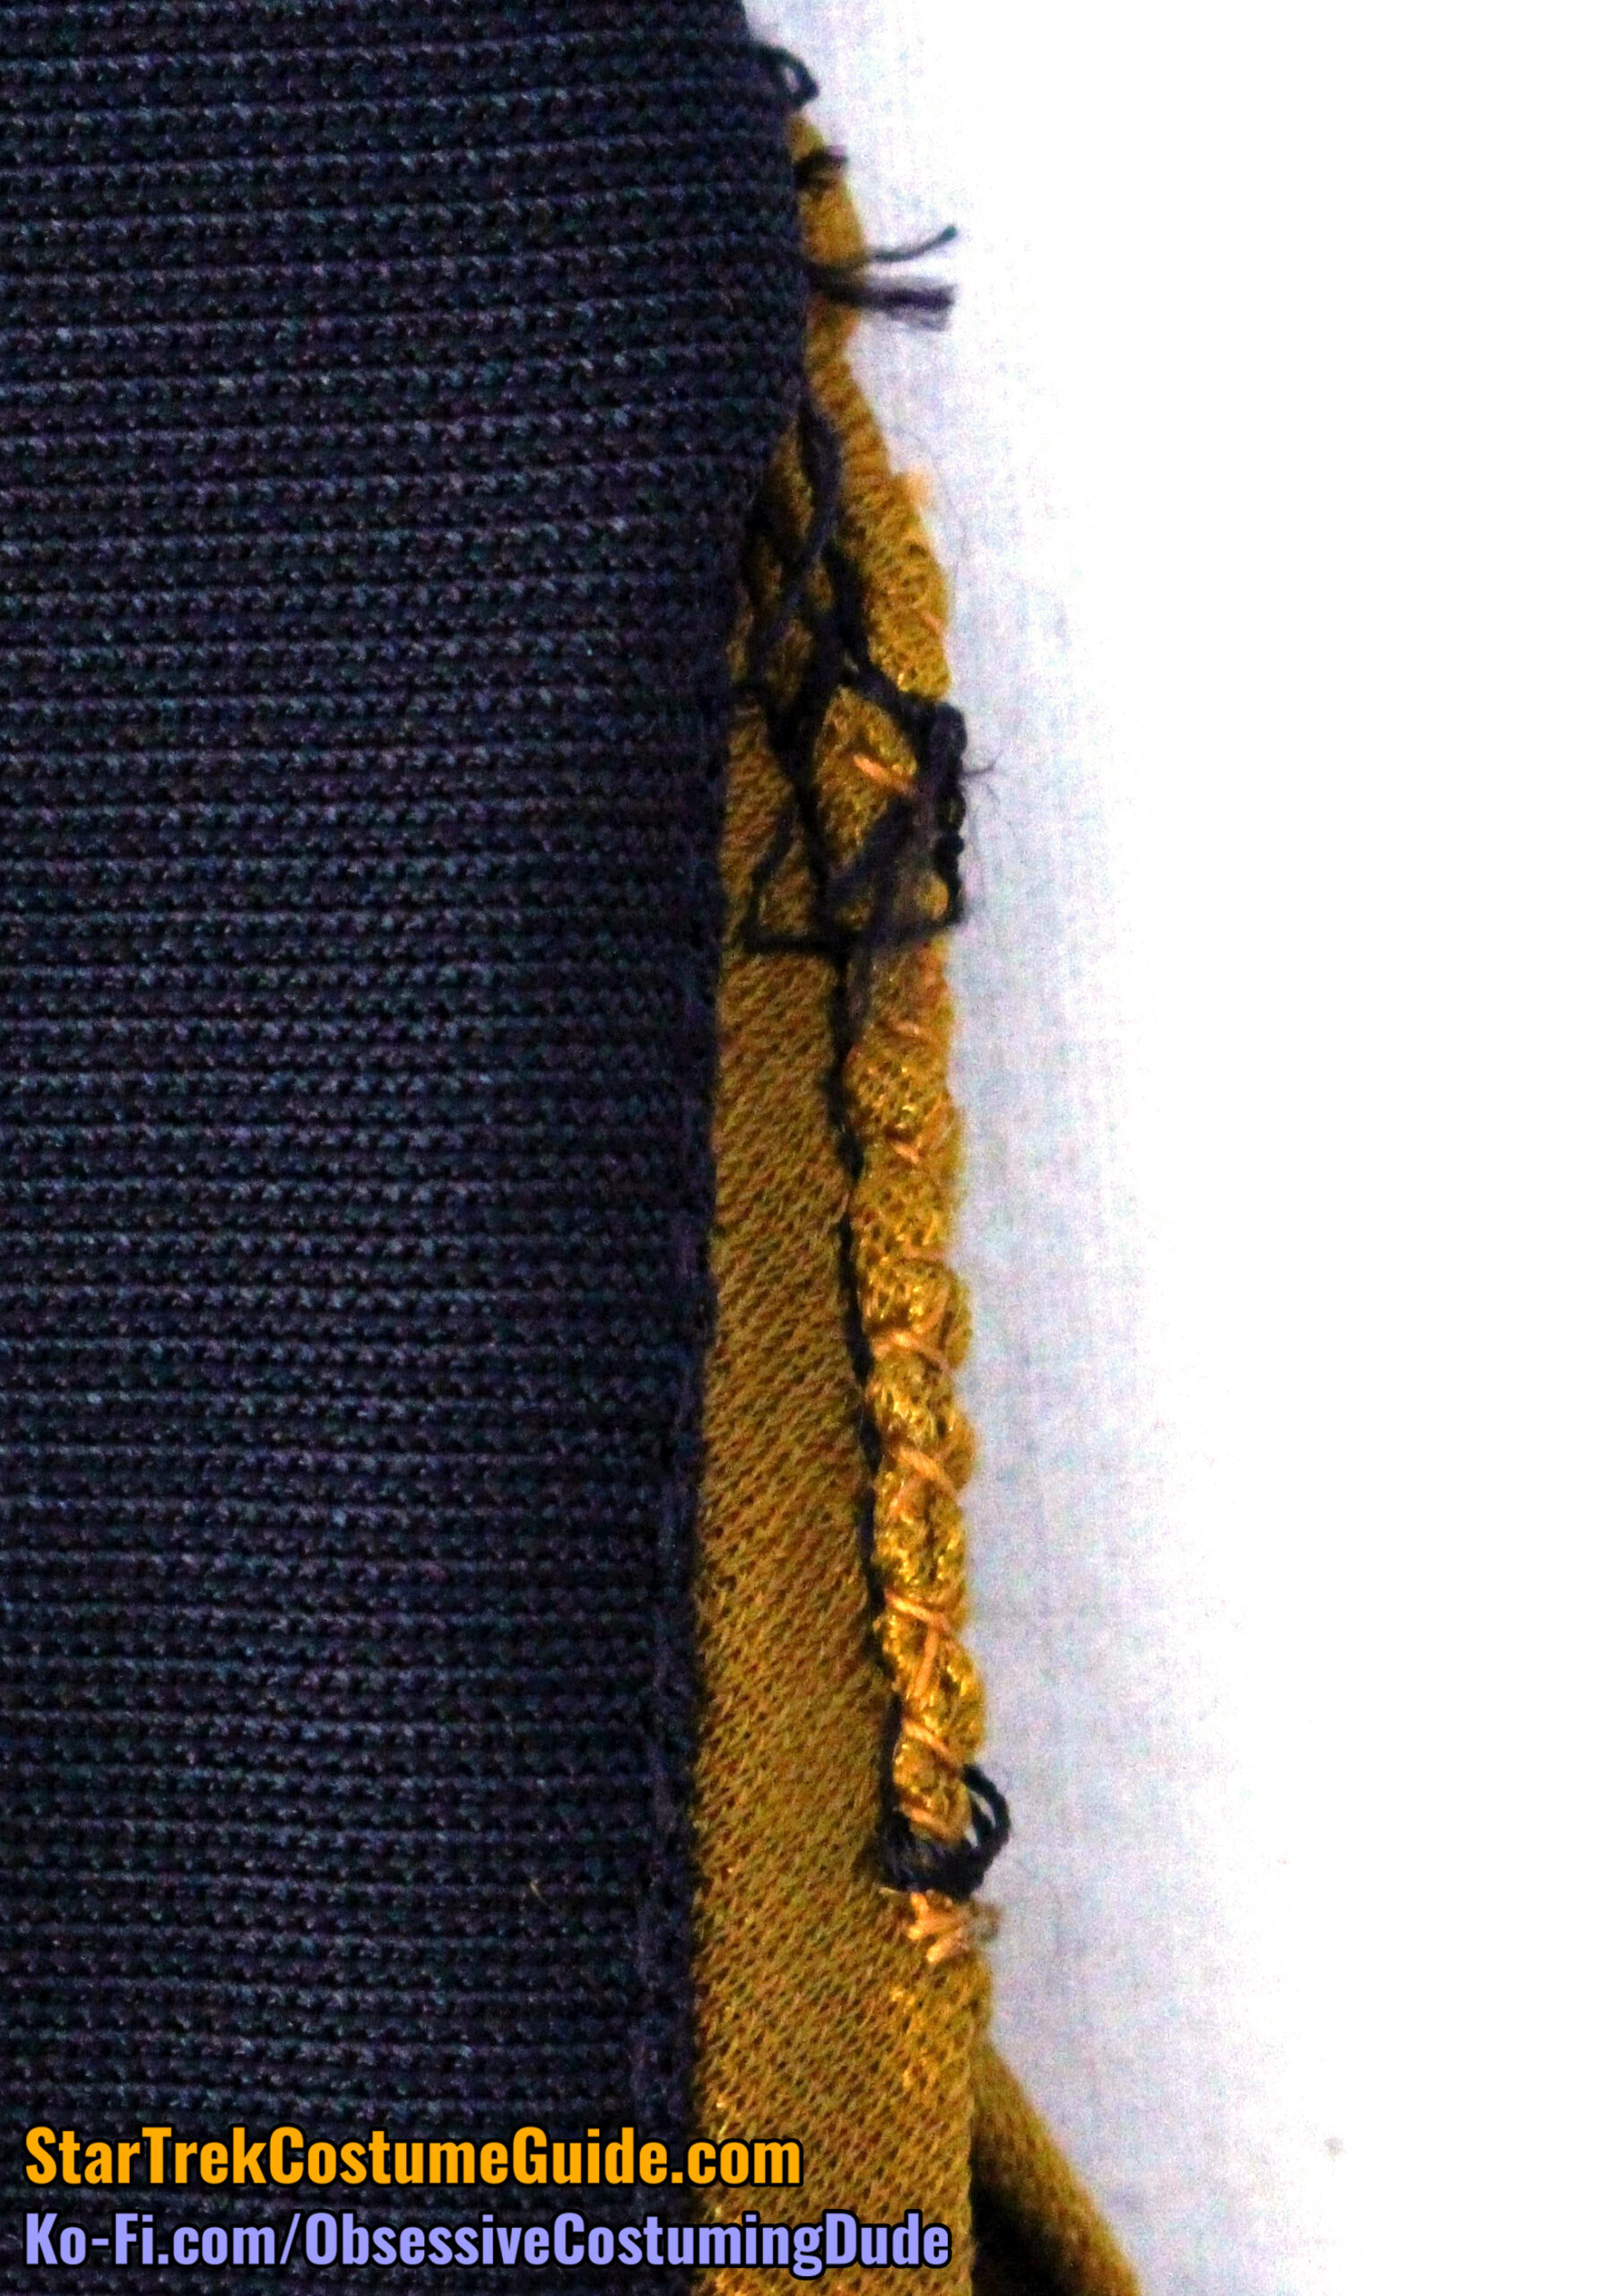
Unfold the facing and allowances toward the opening, and understitch the facing to the allowances along the entire opening. (Just do your best around the top.)
Turn everything back under and press again.
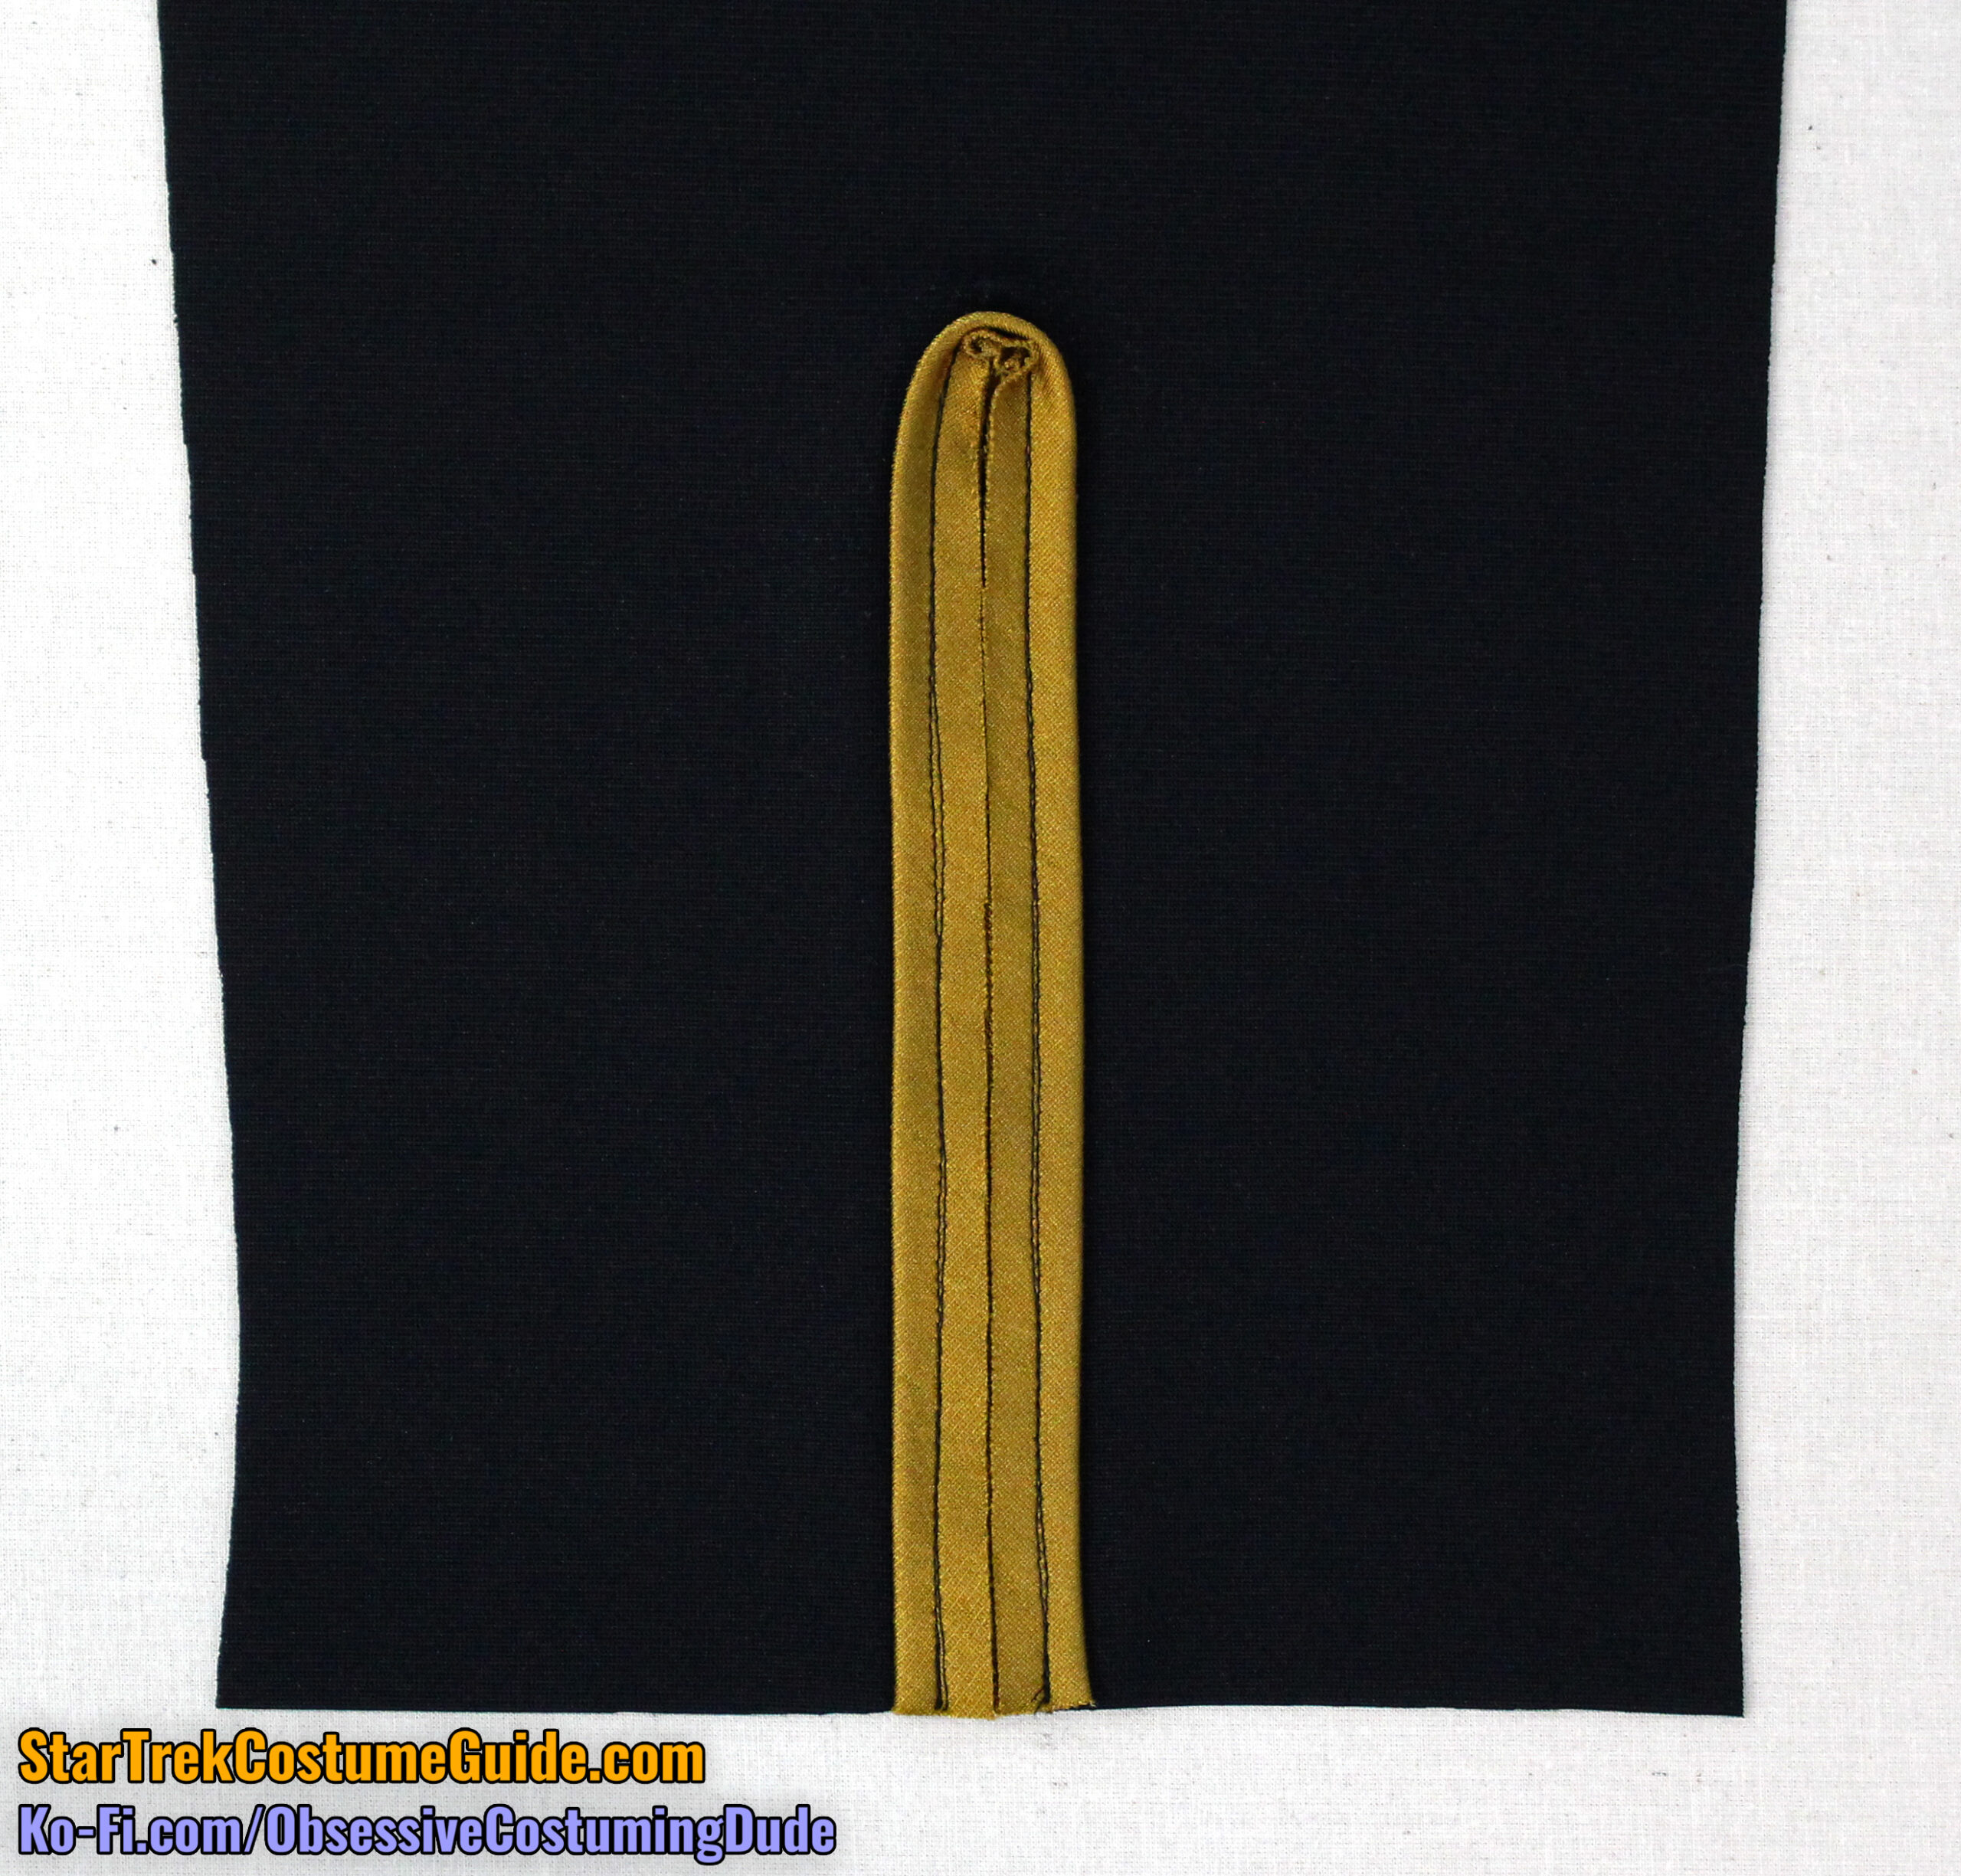
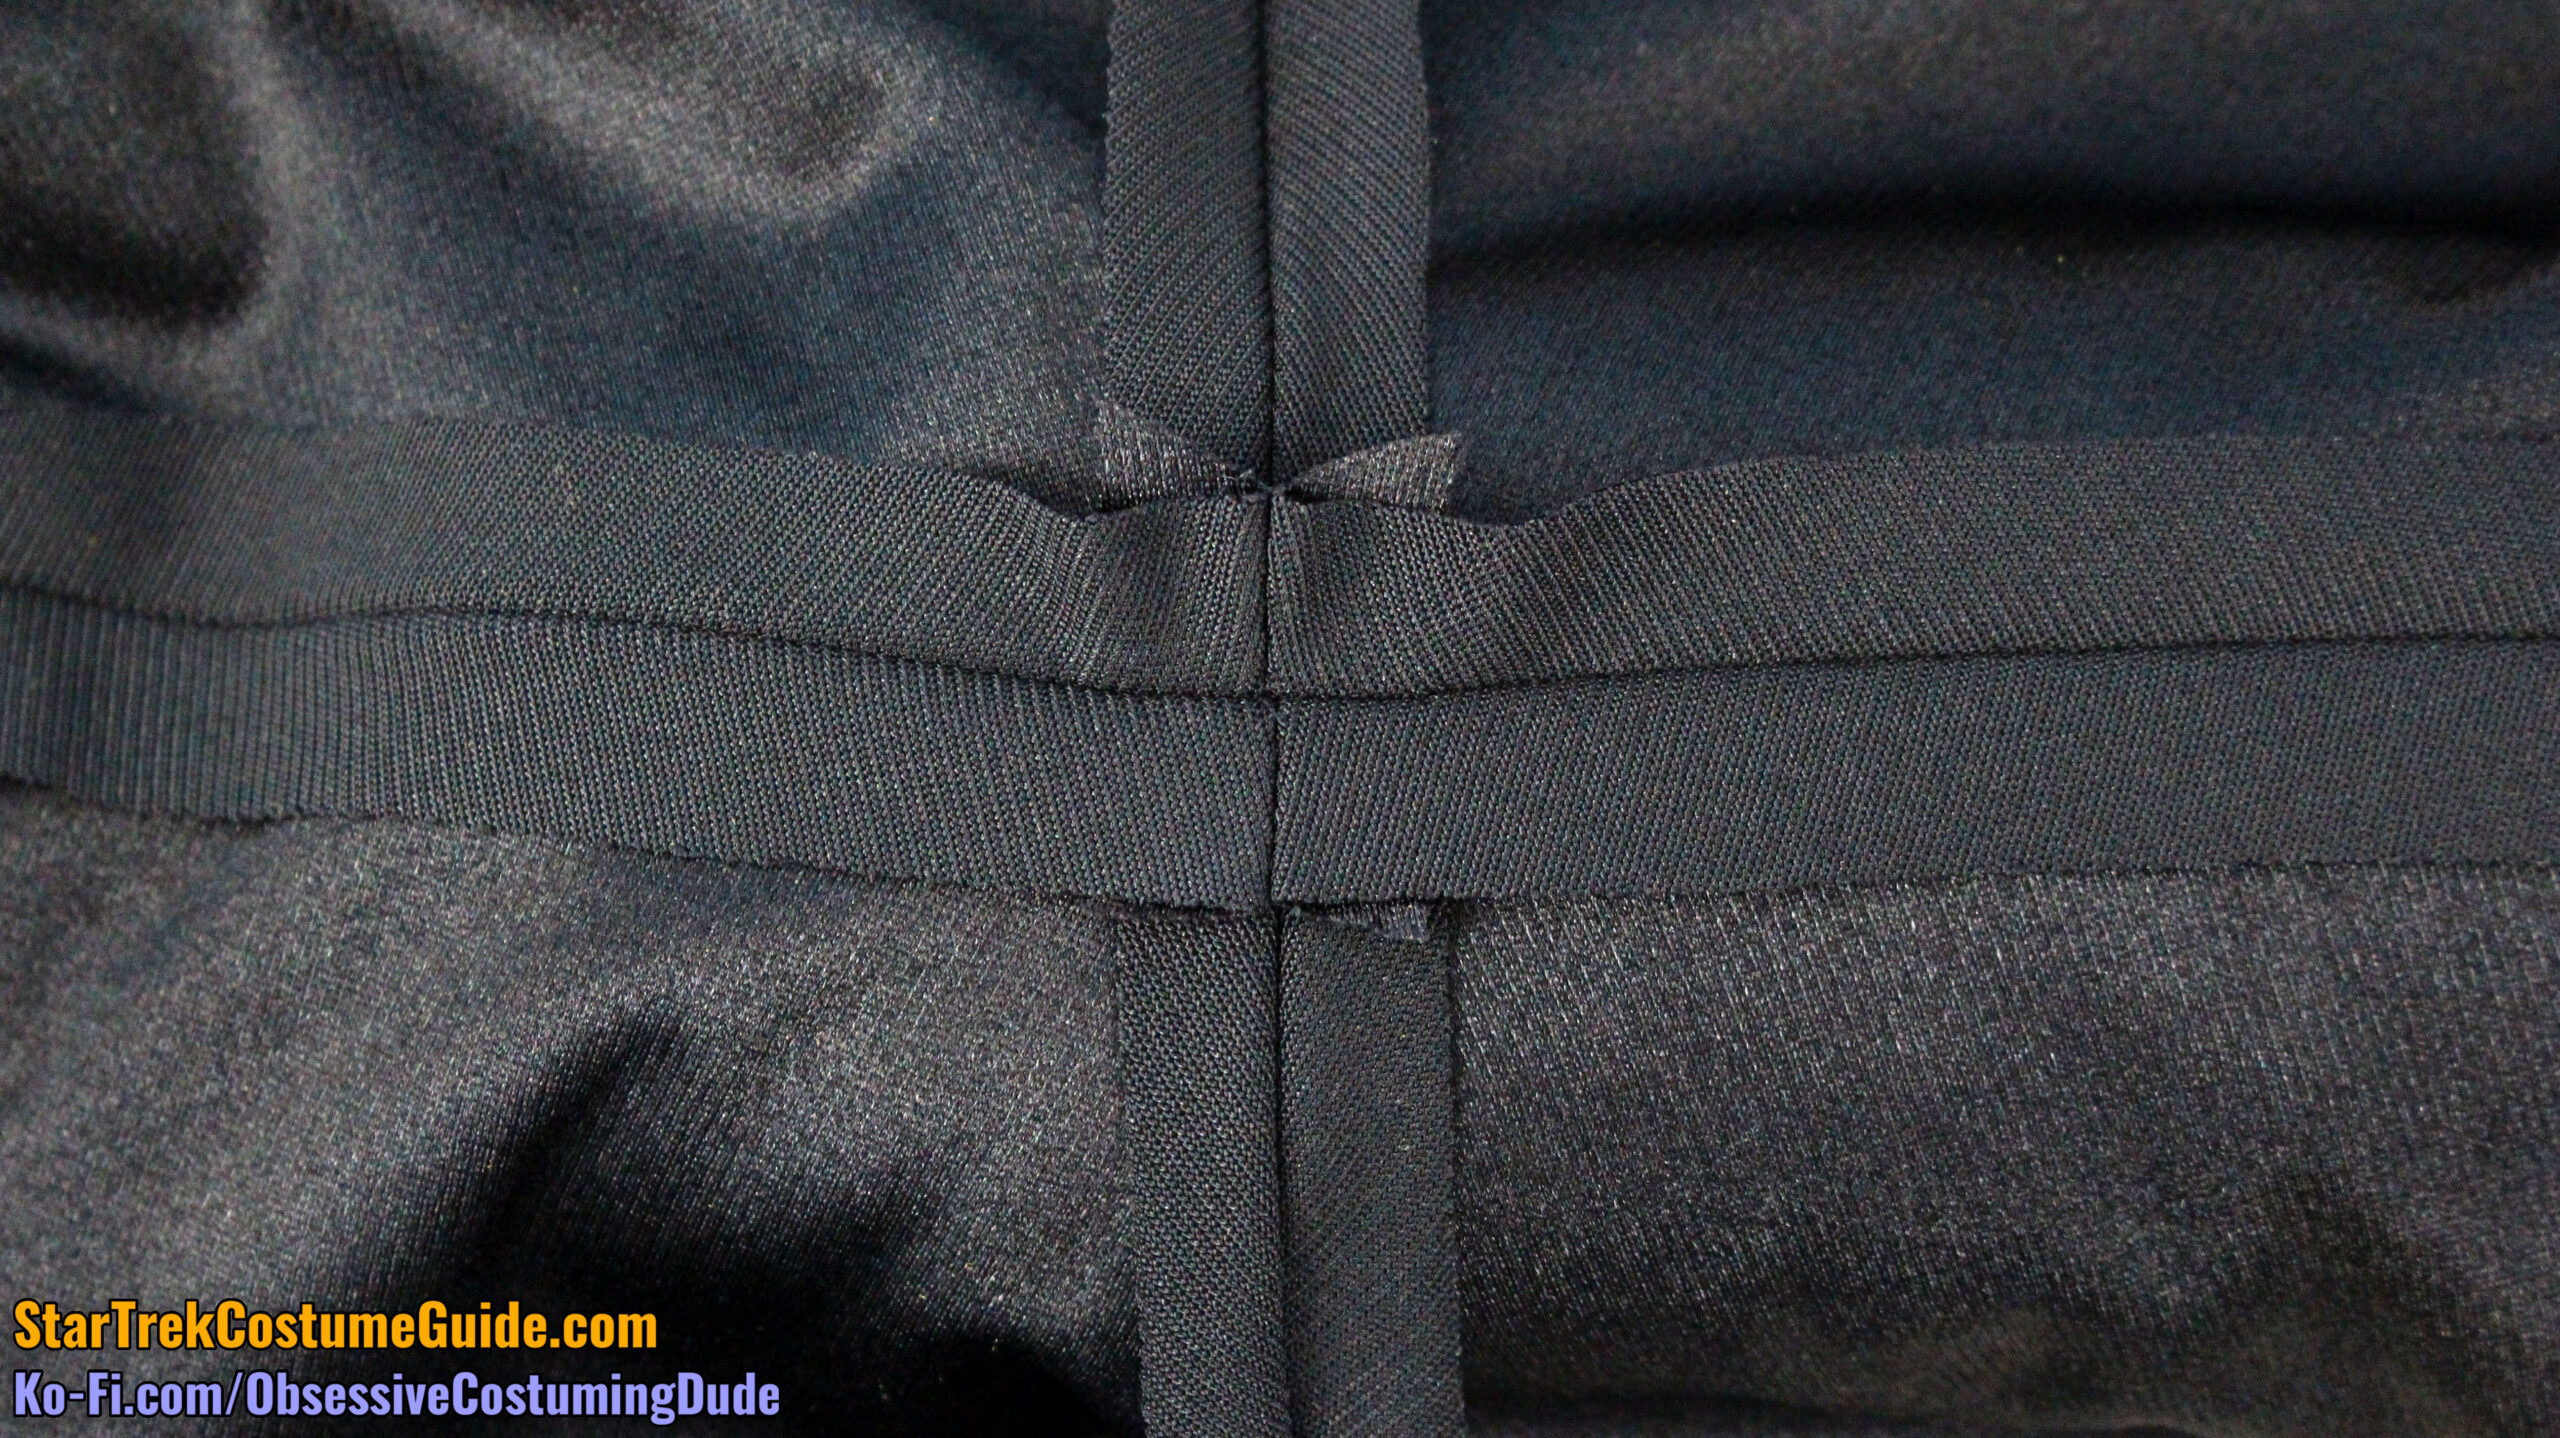
Fold the pant leg vertically over the opening, so the trim is symmetrically folded over itself at the top.
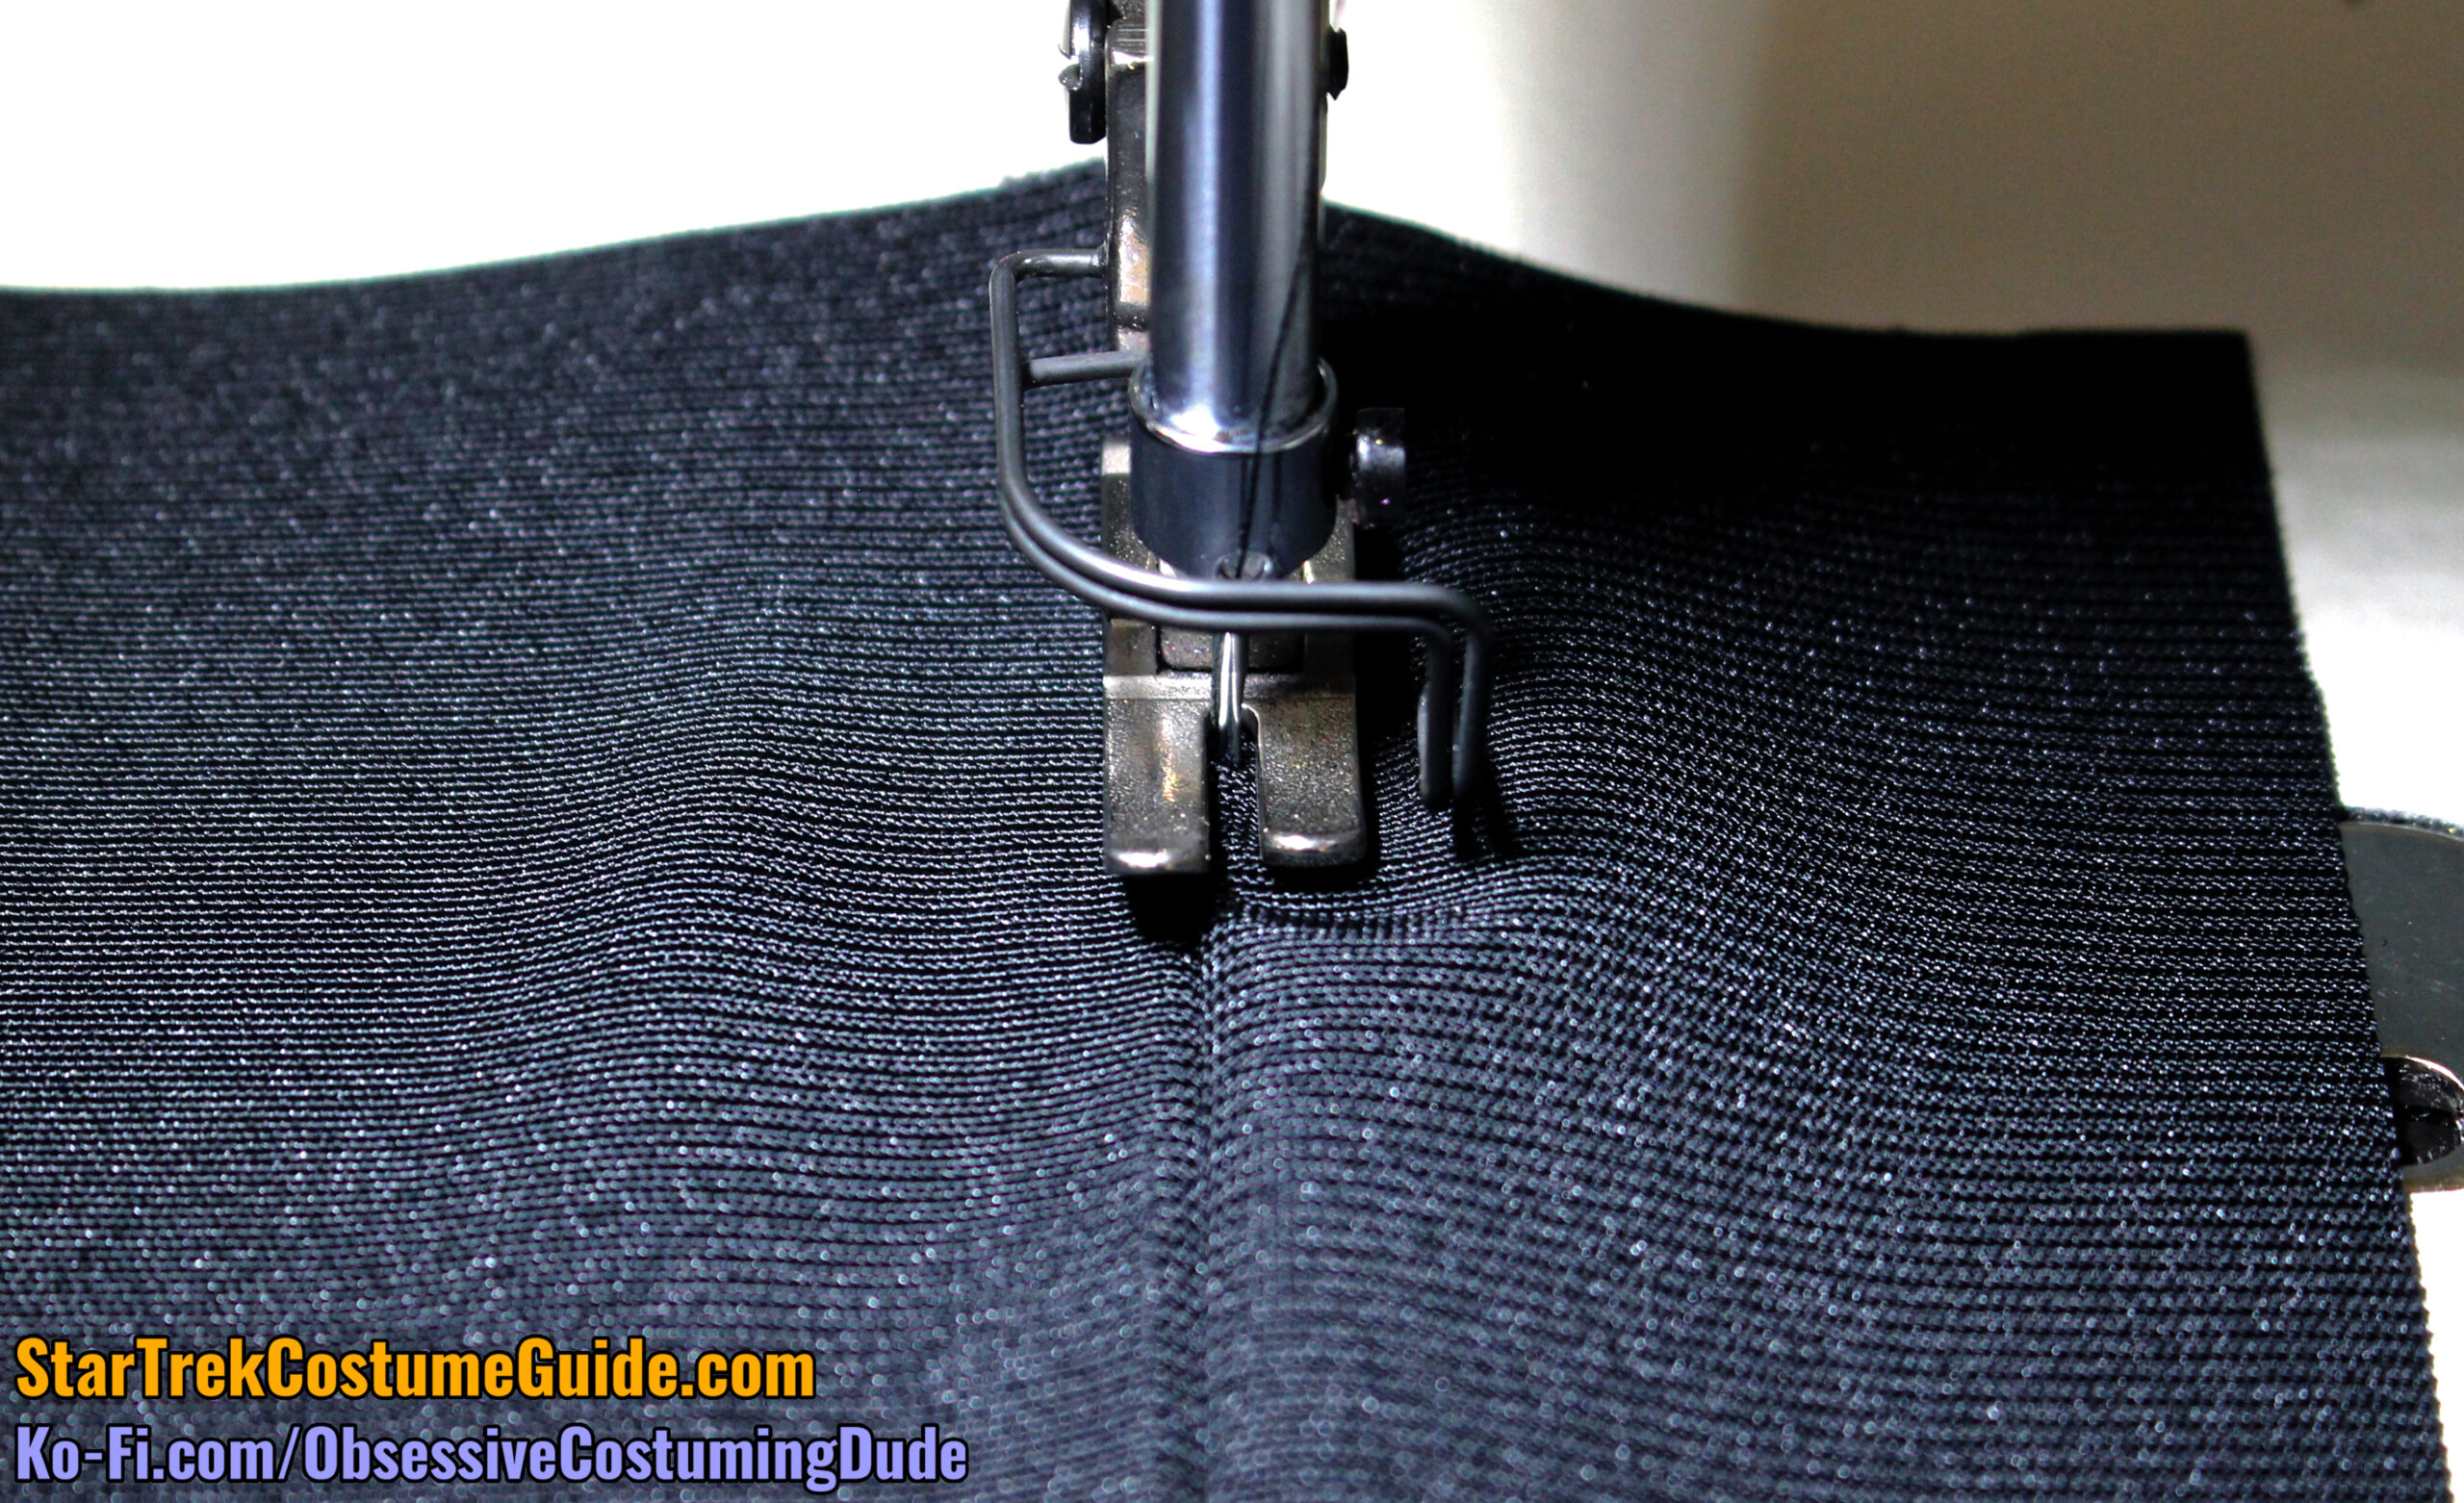
Stitch the trim layers together diagonally, from the upper centermost fold down to a couple inches or so from the top, reinforcing your stitching several times on both ends.
For extra security, you may wish to zig-zag stitch or hand-sew the layers together inside the machine stitching.
Screen-used Tasha Yar TNG jumpsuit
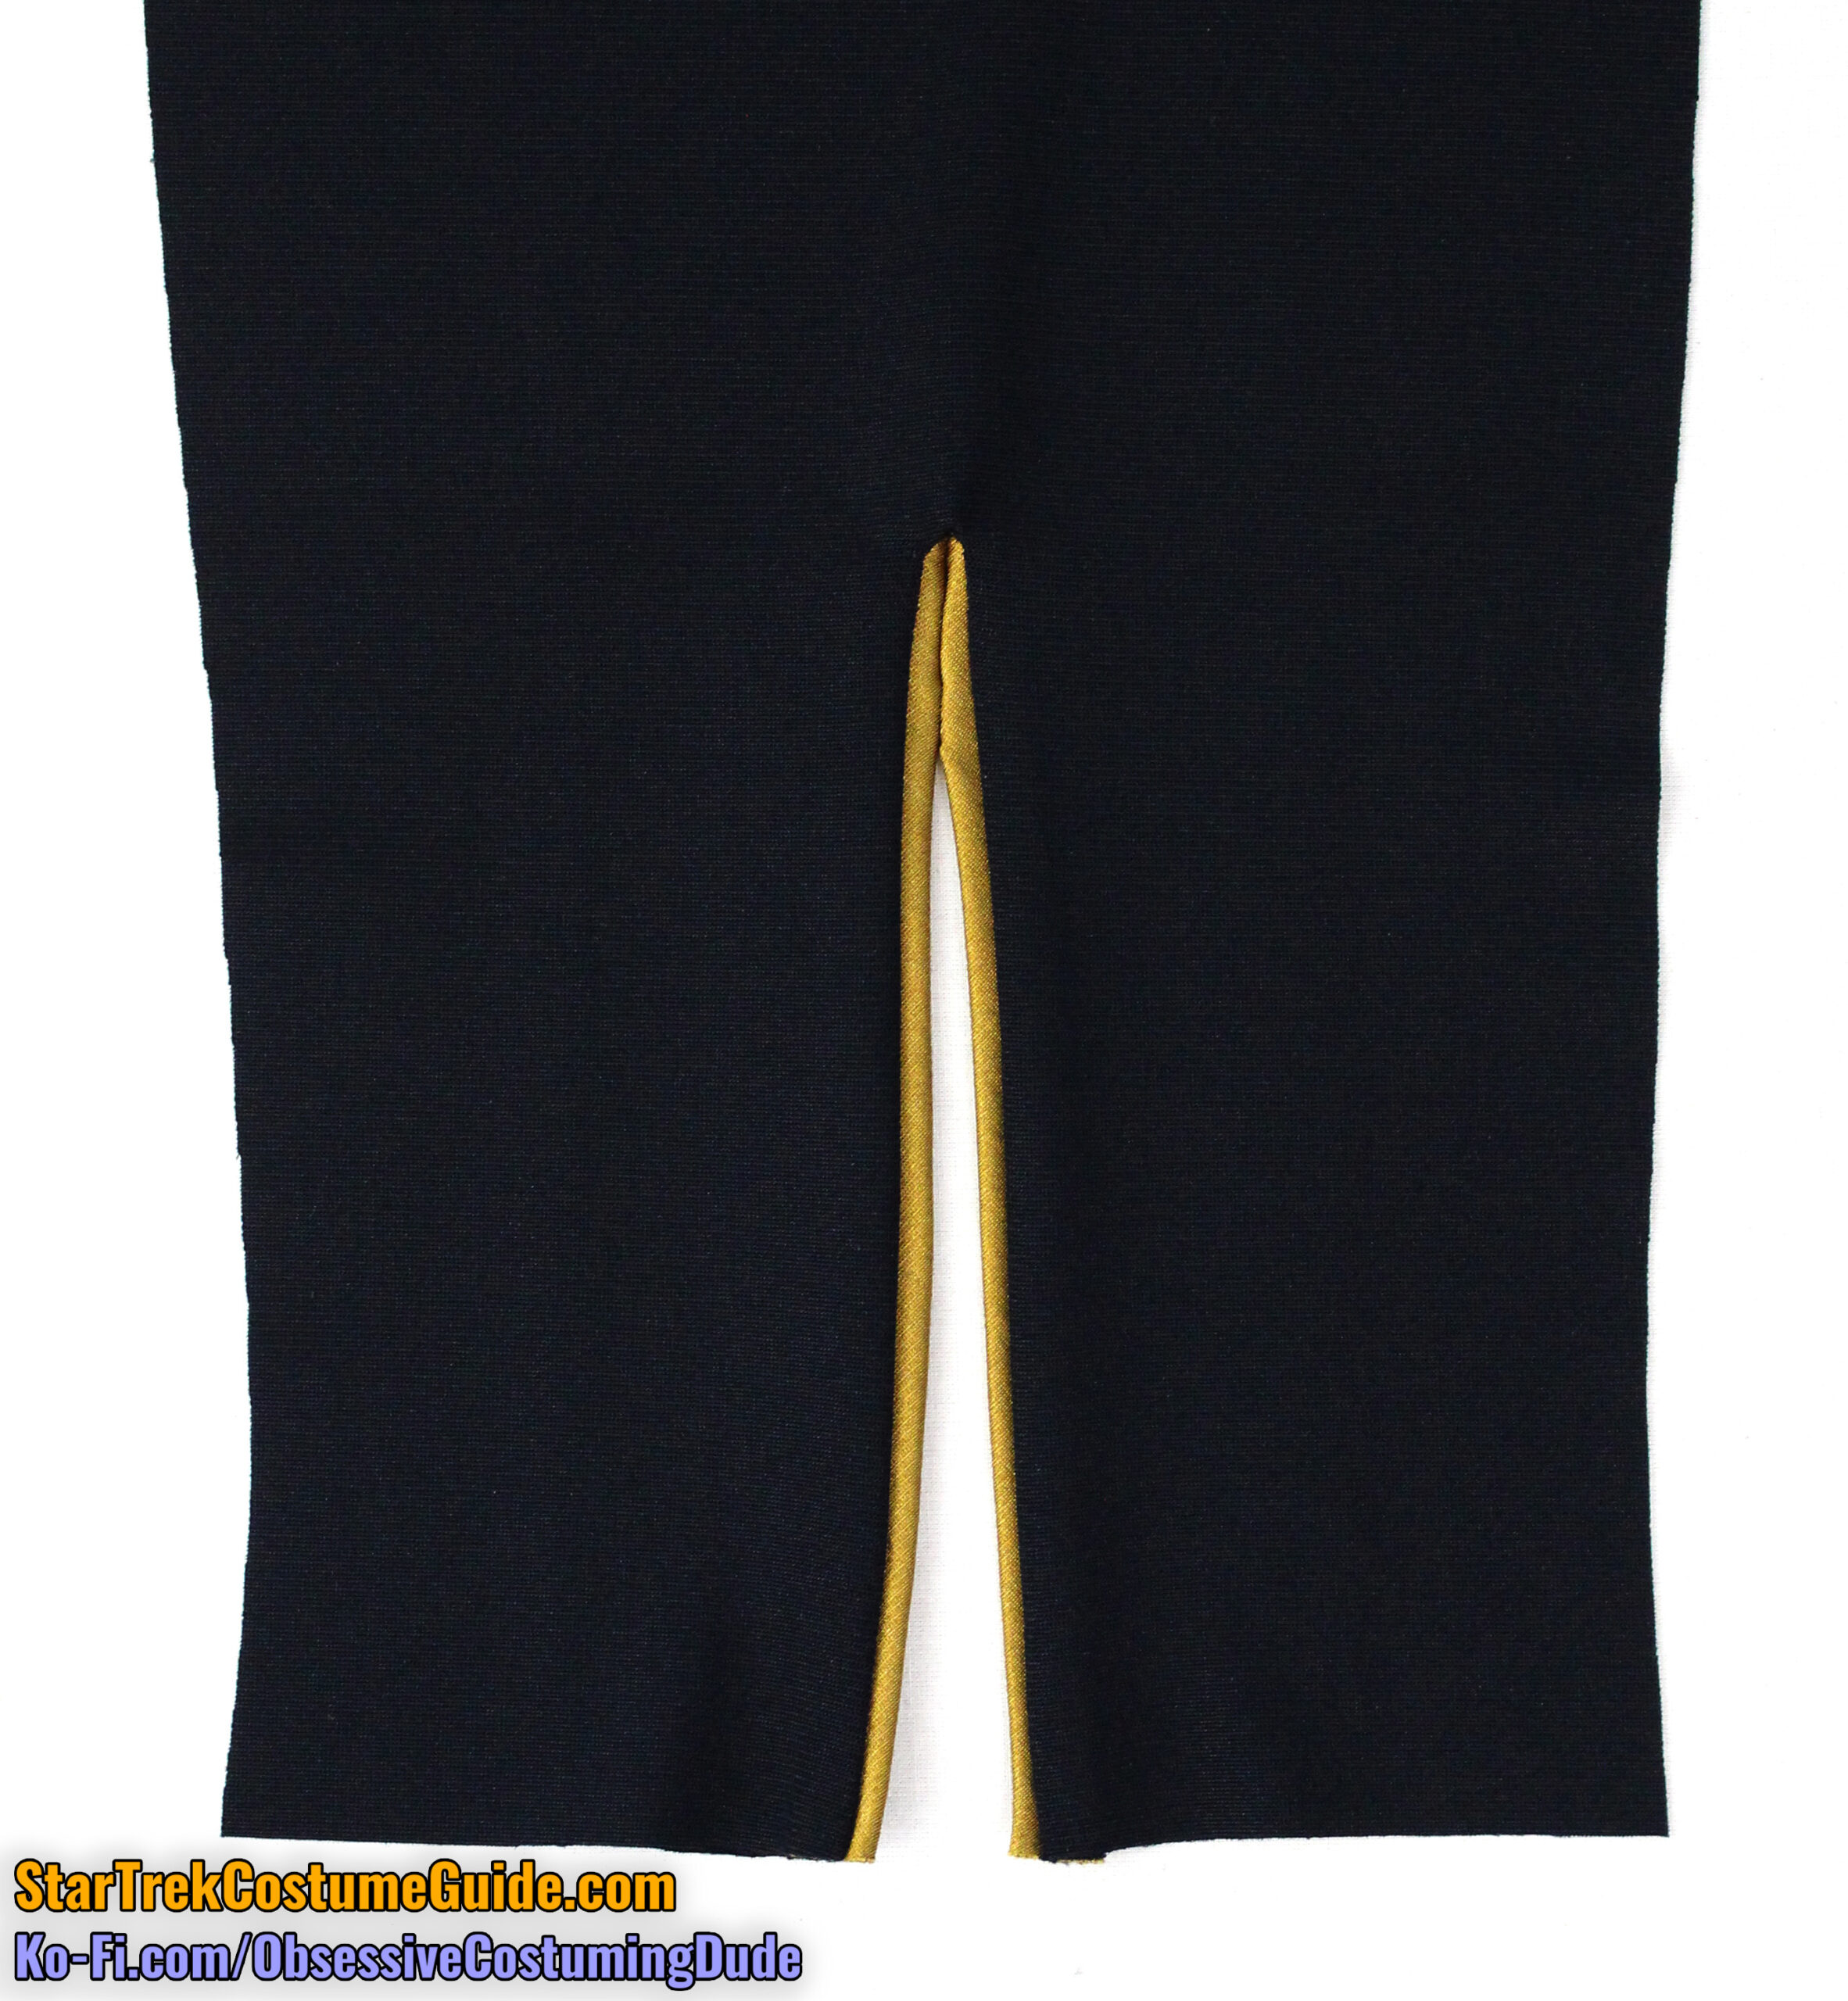
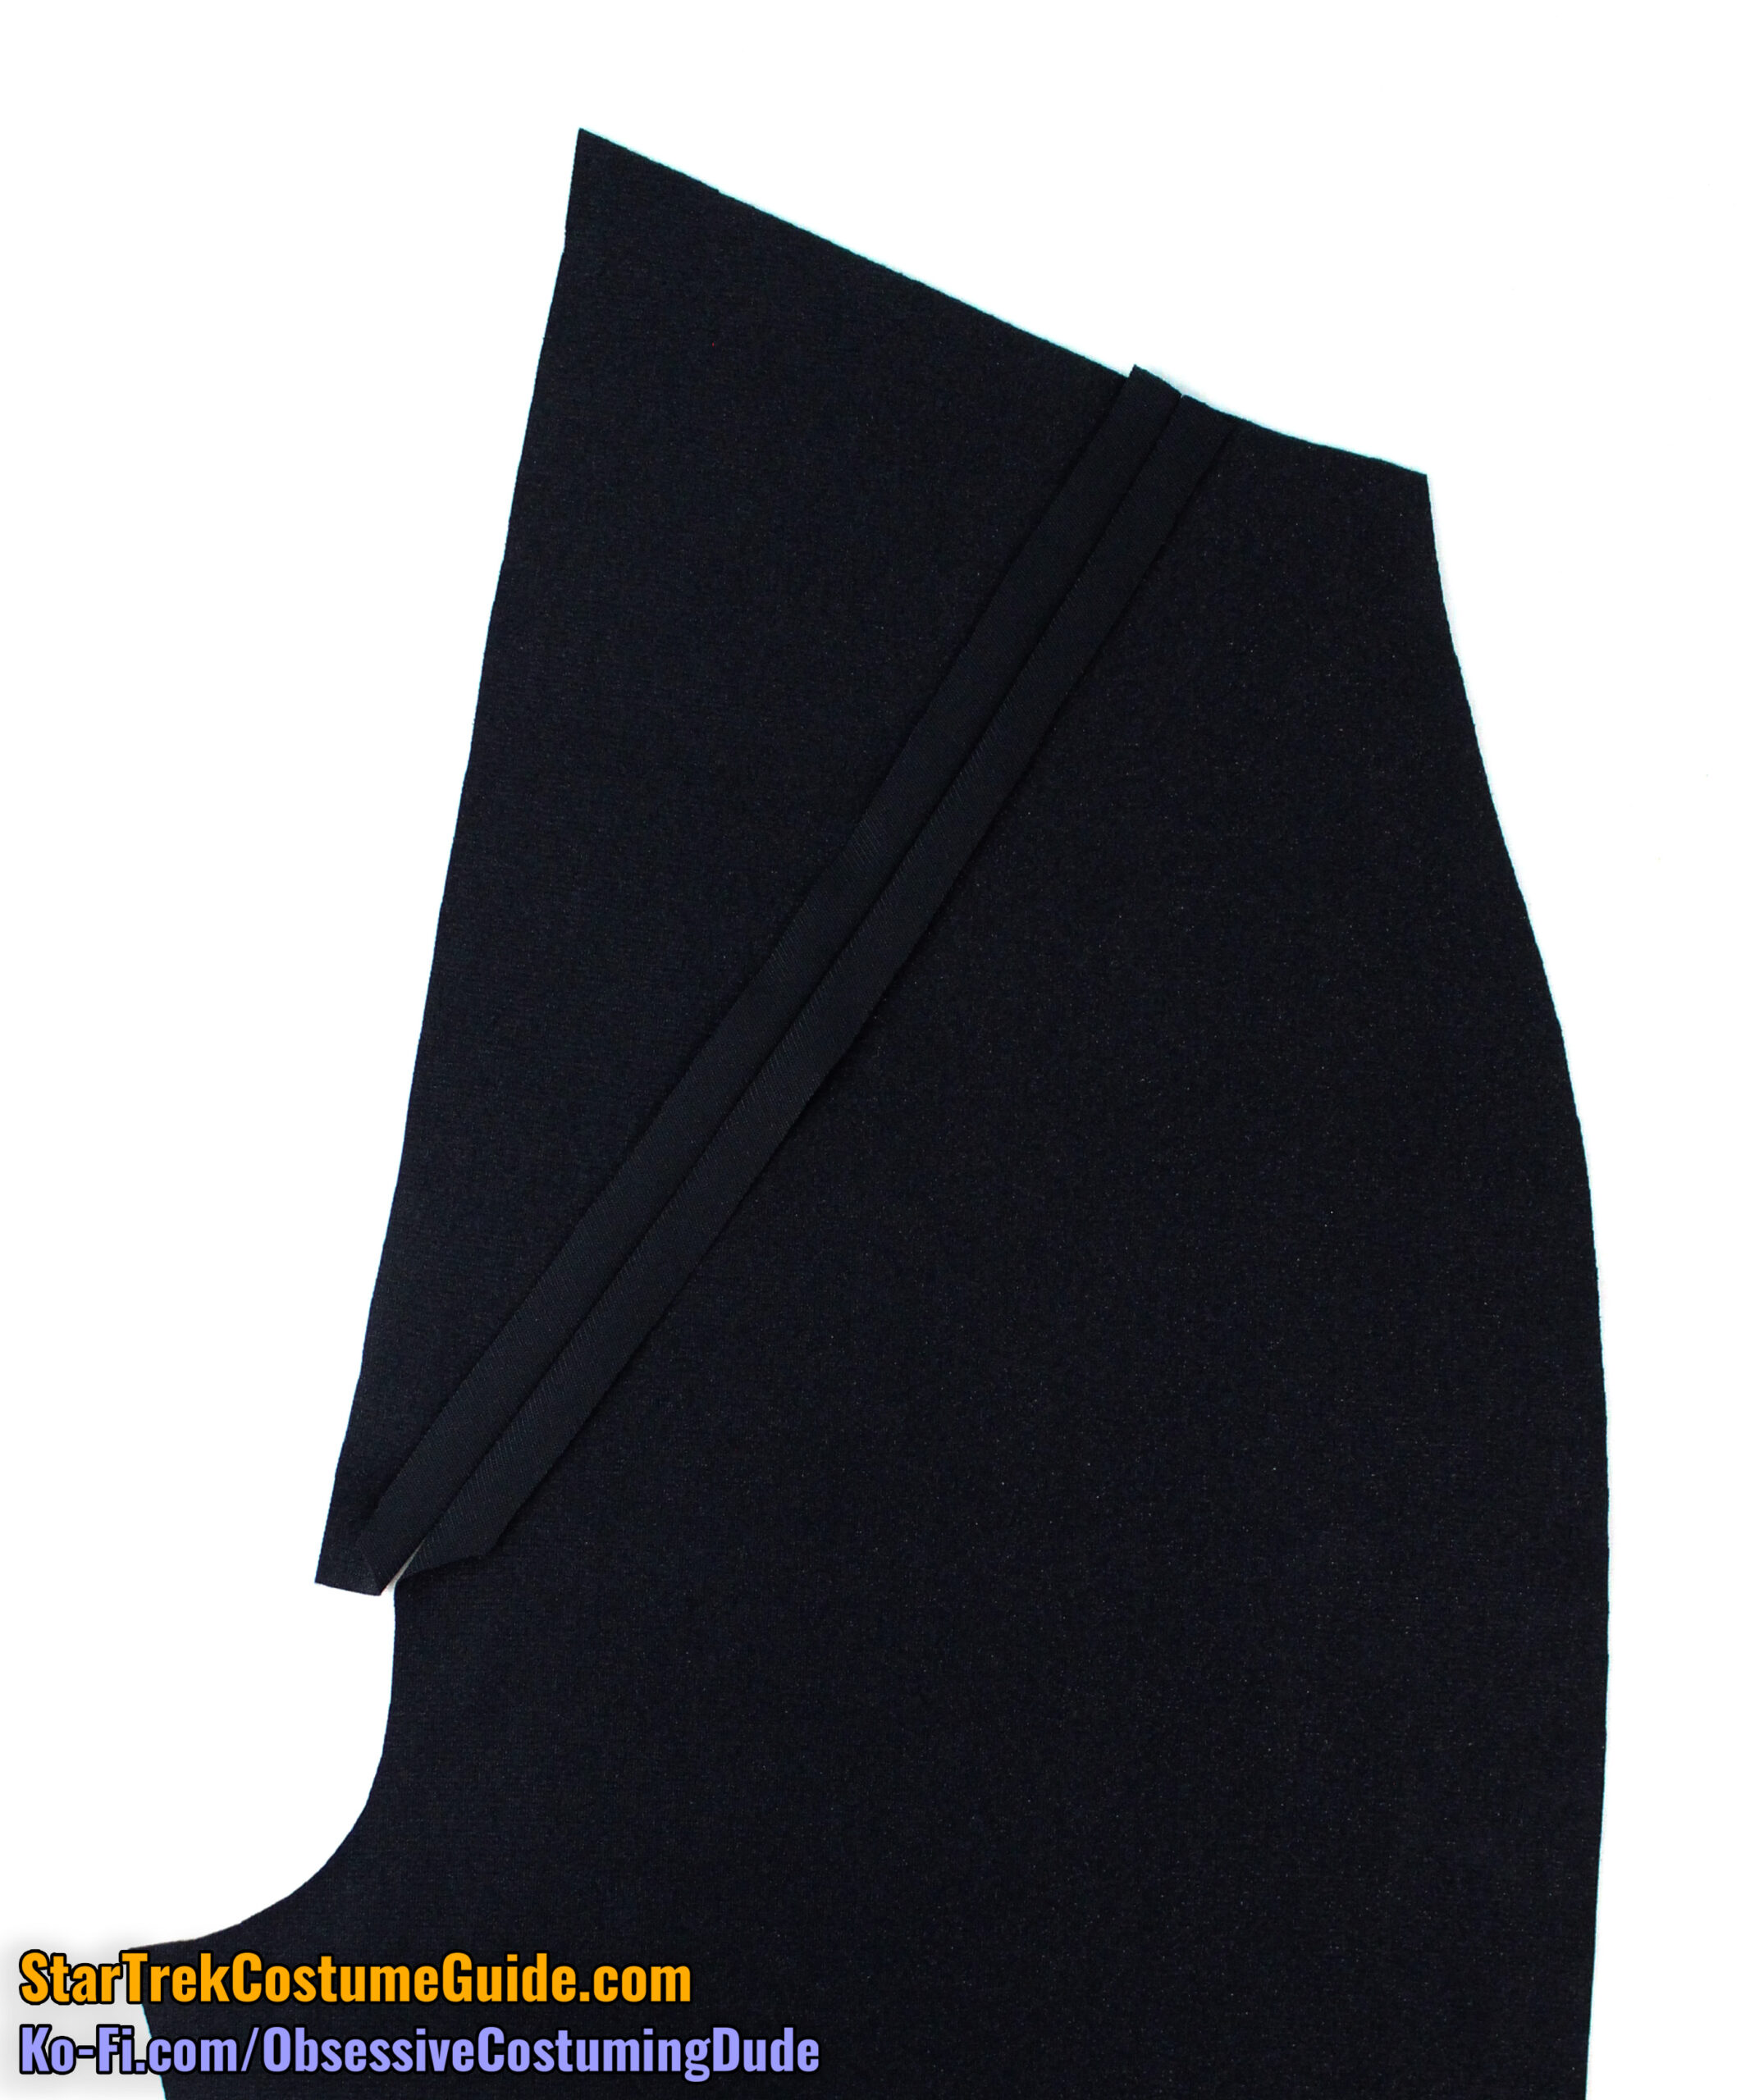
Open the pant leg back up and press the area flat again.
That’s all for now; we’ll finish the area toward the end of the process.
Repeat for the other pant leg.
For the season 2 method, I’m not sure exactly how it was done, but the process I describe here will (at the very least) produce a very similar result.
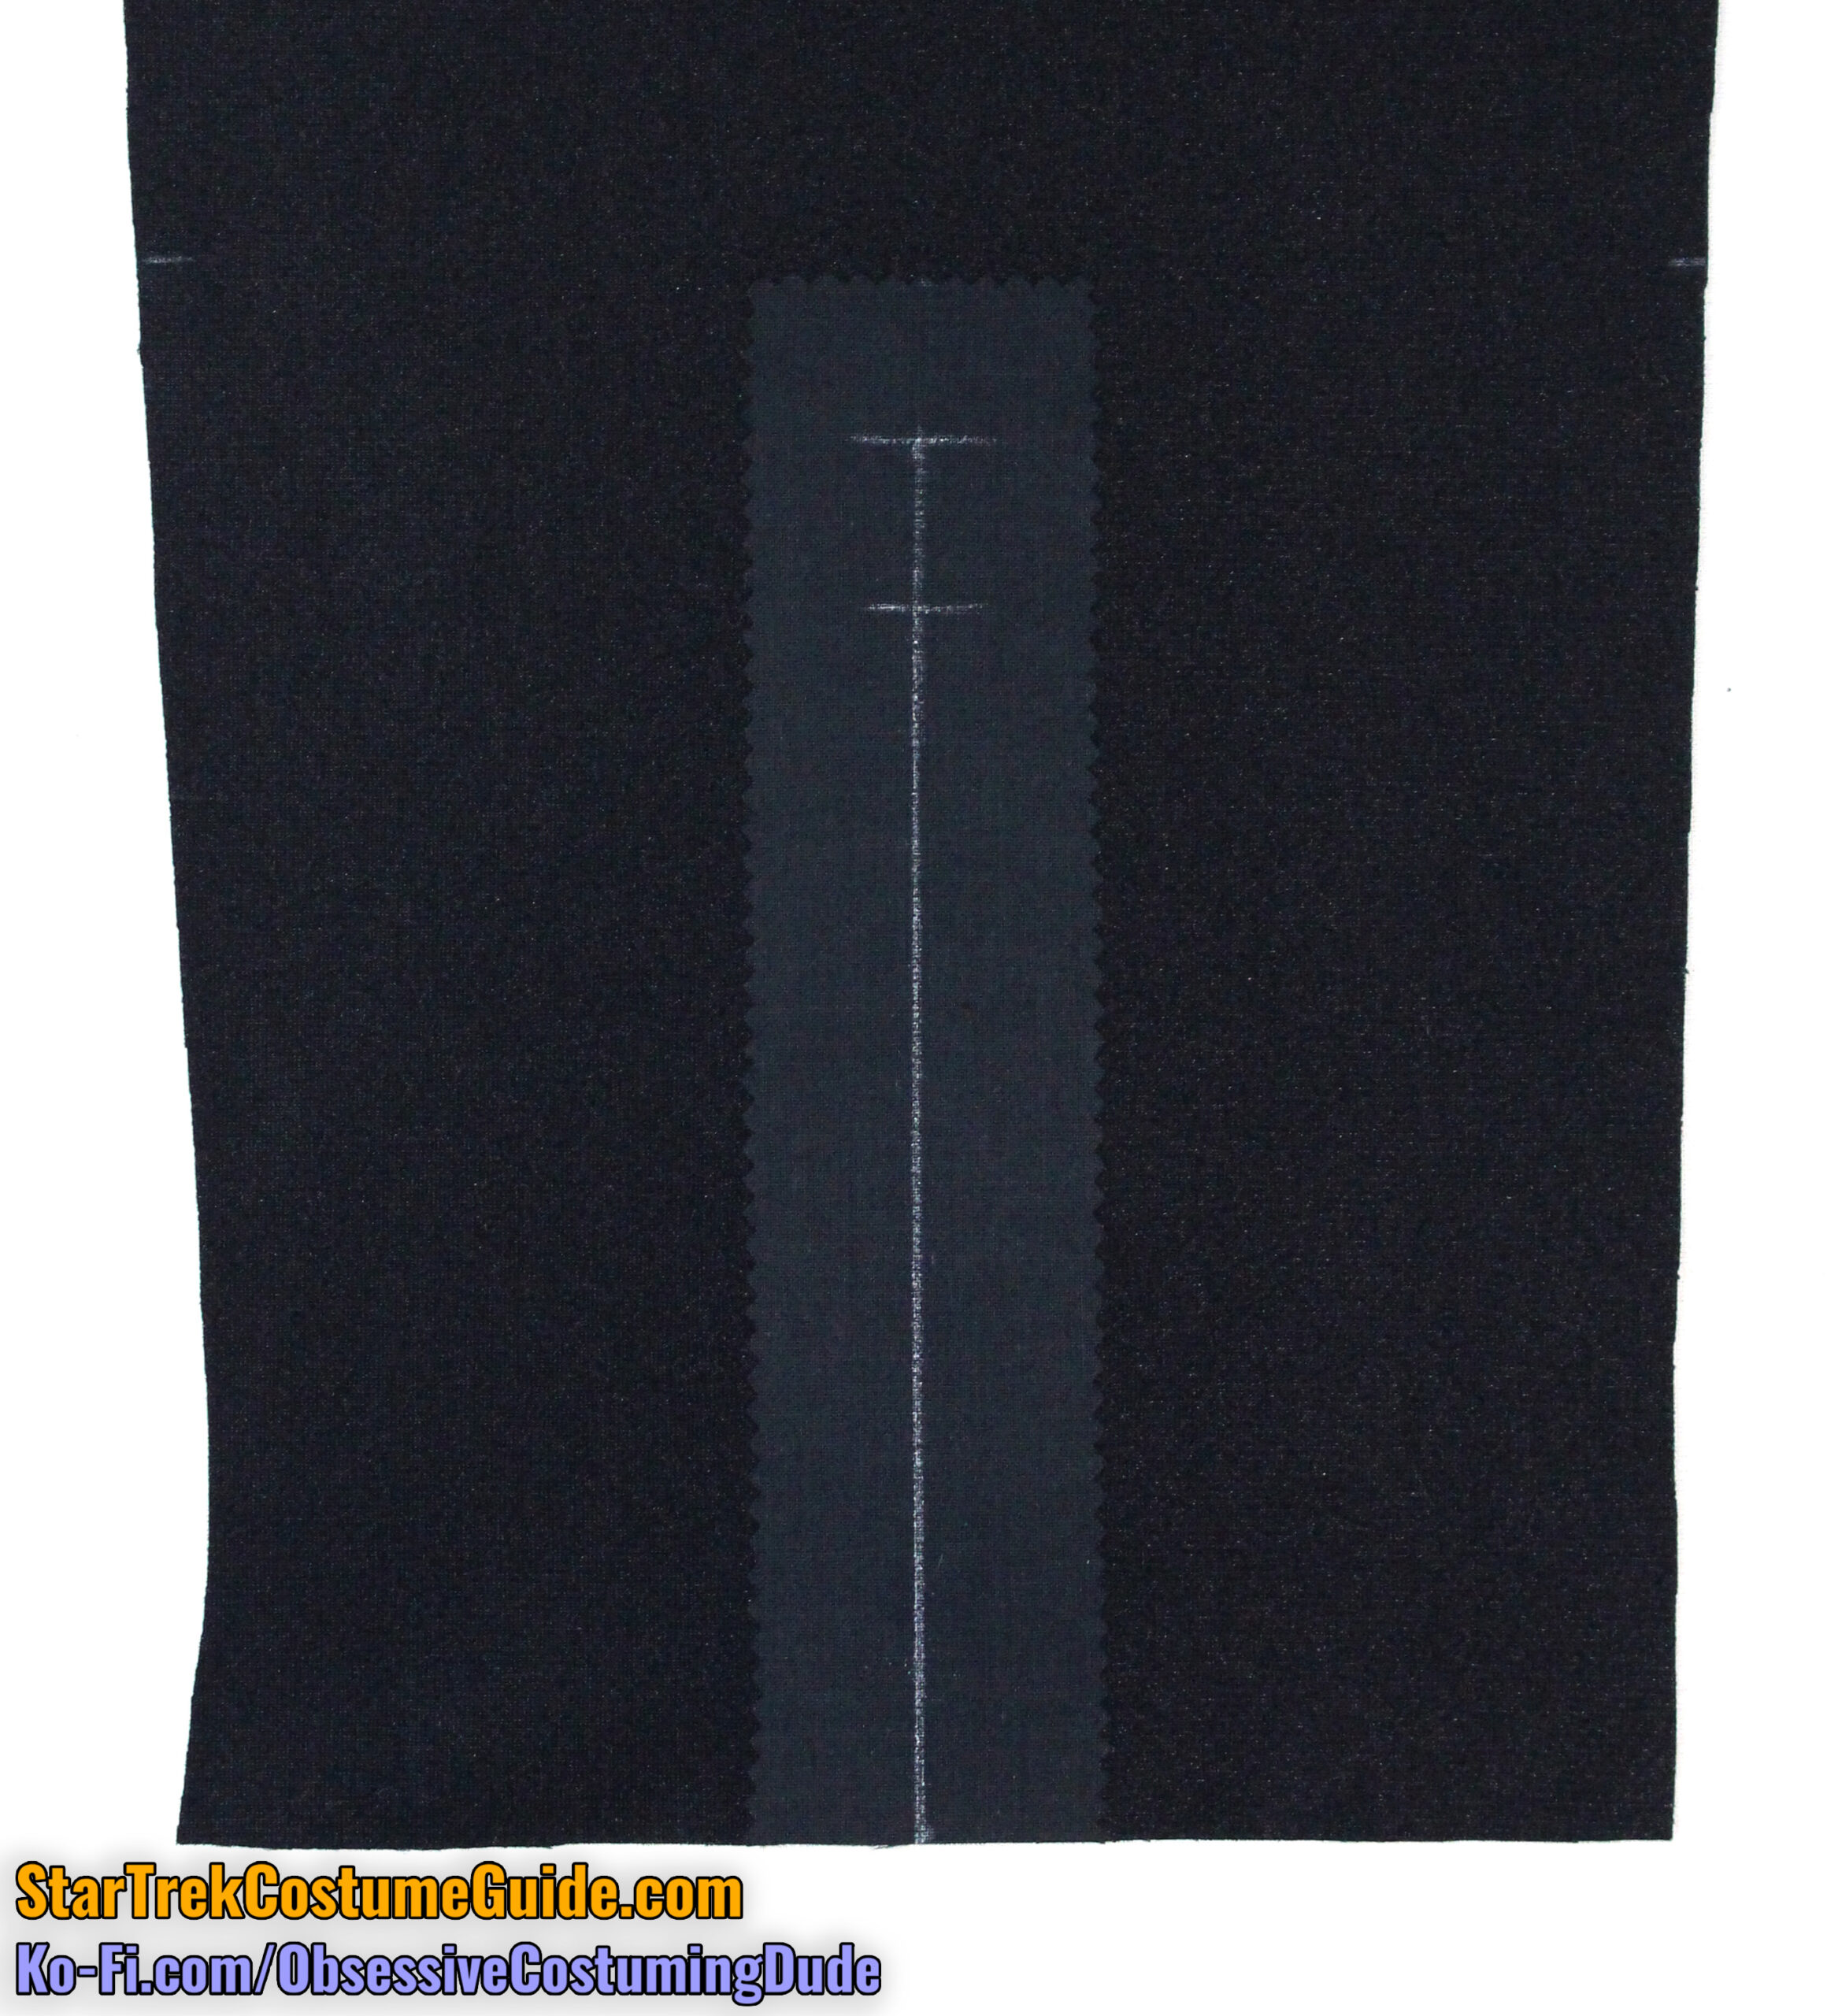
I like to start by applying a narrow strip of fusible interfacing (approximately 2” wide by 9” tall) to the underside of the pant leg, horizontally centered over the alignment guide.
Mark the alignment guide on the fusible interfacing using white tailor’s chalk, then mark a horizontal line perpendicular to it ½” beneath the top.
The edges of the opening are established with a row of stitching.
Starting at the bottom of the pant leg, stitch ¼” away from the alignment guide up to the horizontal line you marked (½” from the top of the opening).
Shorten your stitch length and pivot your stitching to the upper corner. Pivot again and stitch back to the horizontal line, then pivot again and stitch down the opposite edge.
Slit the fabric open along the alignment guide (halfway between the stitch lines), from the bottom of the pant leg to the upper corner.
Also clip the allowances horizontally to the stitching at the line you marked (½” from the top of the opening).
Press the allowances under along the stitching.
There’s a pattern piece for the season 2 pants trim (piece T2), but they’re just a strips of bias-cut fabric 1” wide and 9” long. (Note that while the season 1 pants trim was one long strip, the season 2 trim is two shorter strips.)
Press your trim strips in half, lengthwise.
I suggest basting the lengths of trim closed ¼” from the raw edges. (Like the yoke trim, I suggest using a quilting/walking foot to help prevent the bias trim from stretching as you go.)
Unfold the pant leg allowances and position one length of trim on the outside of the pant leg so its lower and raw edges are flush with those of the pant leg, and pin it into place.
From the underside of the pant leg, sew the trim to the pant leg with ¼” seam allowance, stitching again exactly over the previous stitch line up to where the original stitching pivoted.
At the top corner, fold the pant leg diagonally out of the way so the folded edge of the trim is flush with the upper corner of the opening.
Stitch the trim into place along the upper corner, again stitching exactly over the previous (diagonal) stitching.
Repeat for the other length of trim.
Press the allowances back under and the trim toward the opening.
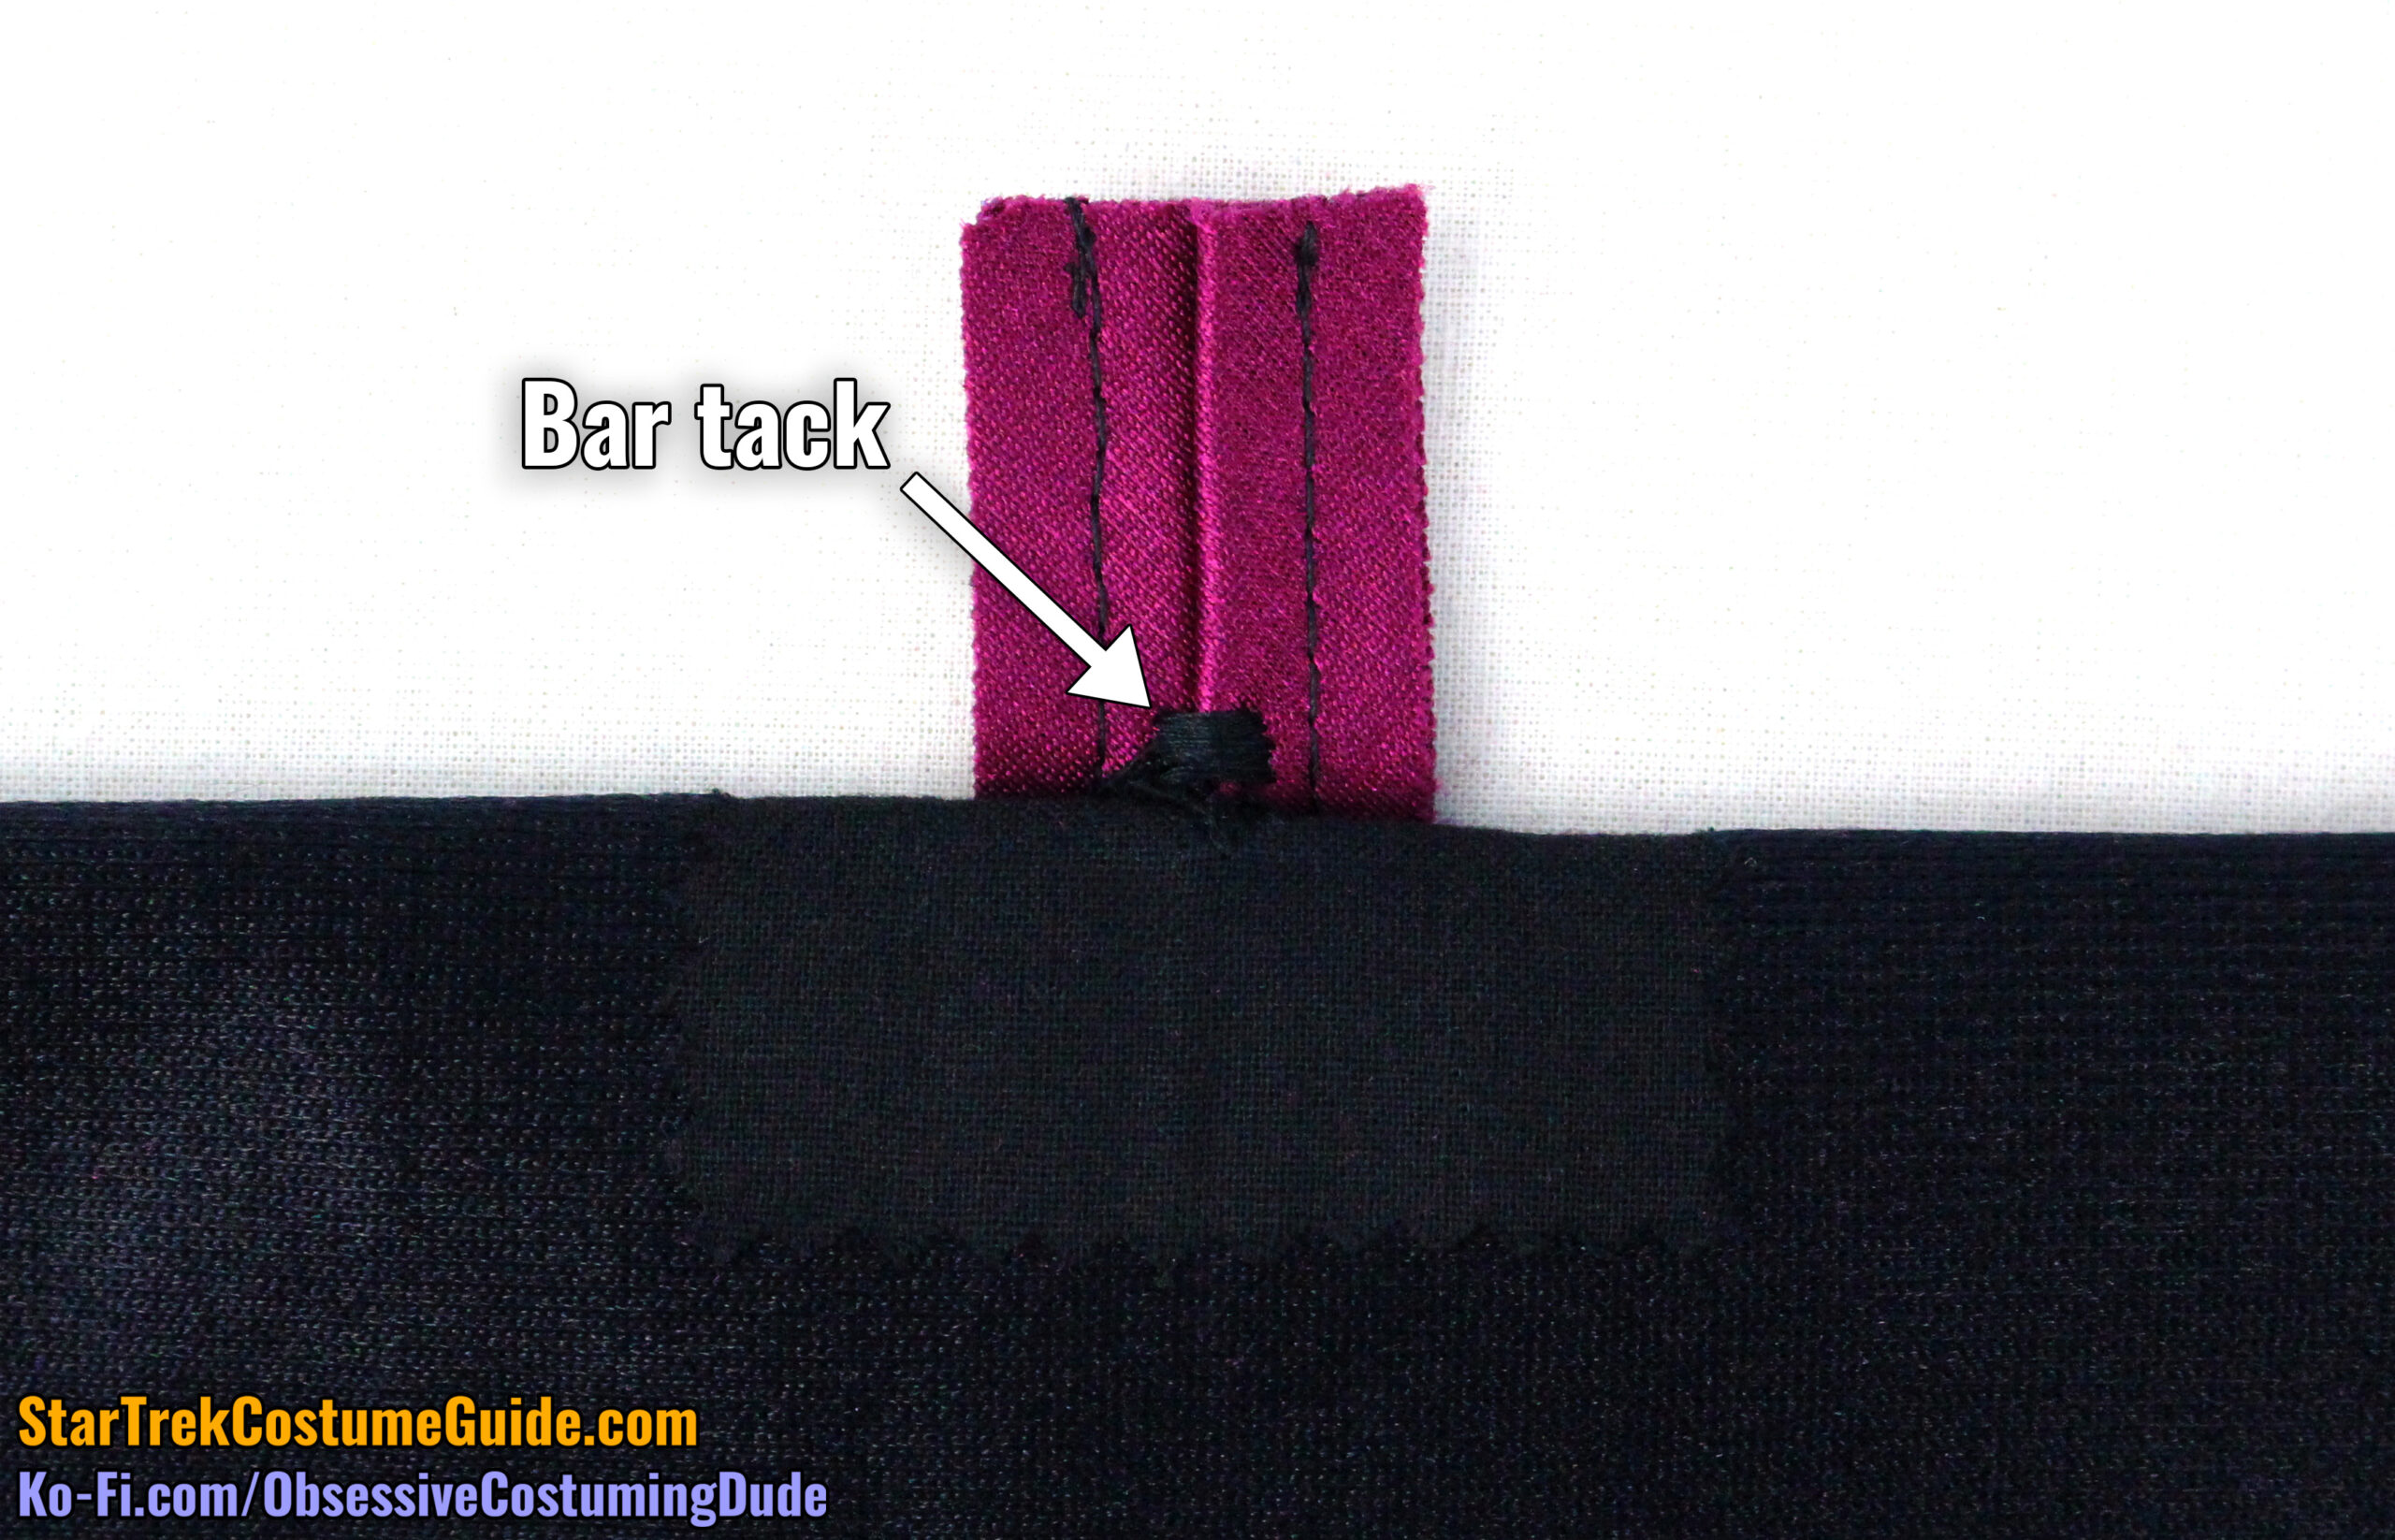
The folded edges of the trim should be flush at the upper corner.
To reduce the strain on the two lengths of trim, I suggest making a bar tack directly above the opening.
Prepare the lower pant leg facing (piece S) the same way you did for the pant leg, except omit the fusible interfacing.
(You can apply a fusible interfacing if you like, but I prefer to avoid bulking up the area any more than necessary.)
Position the facing so it’s centered underneath the pant leg opening, and its folded edges are flush with the previous stitch lines.
Machine-sew the facing to the lower pant leg along the previous stitch lines if you dare, but you may find it both faster and easier to simply hand-sew it into place.
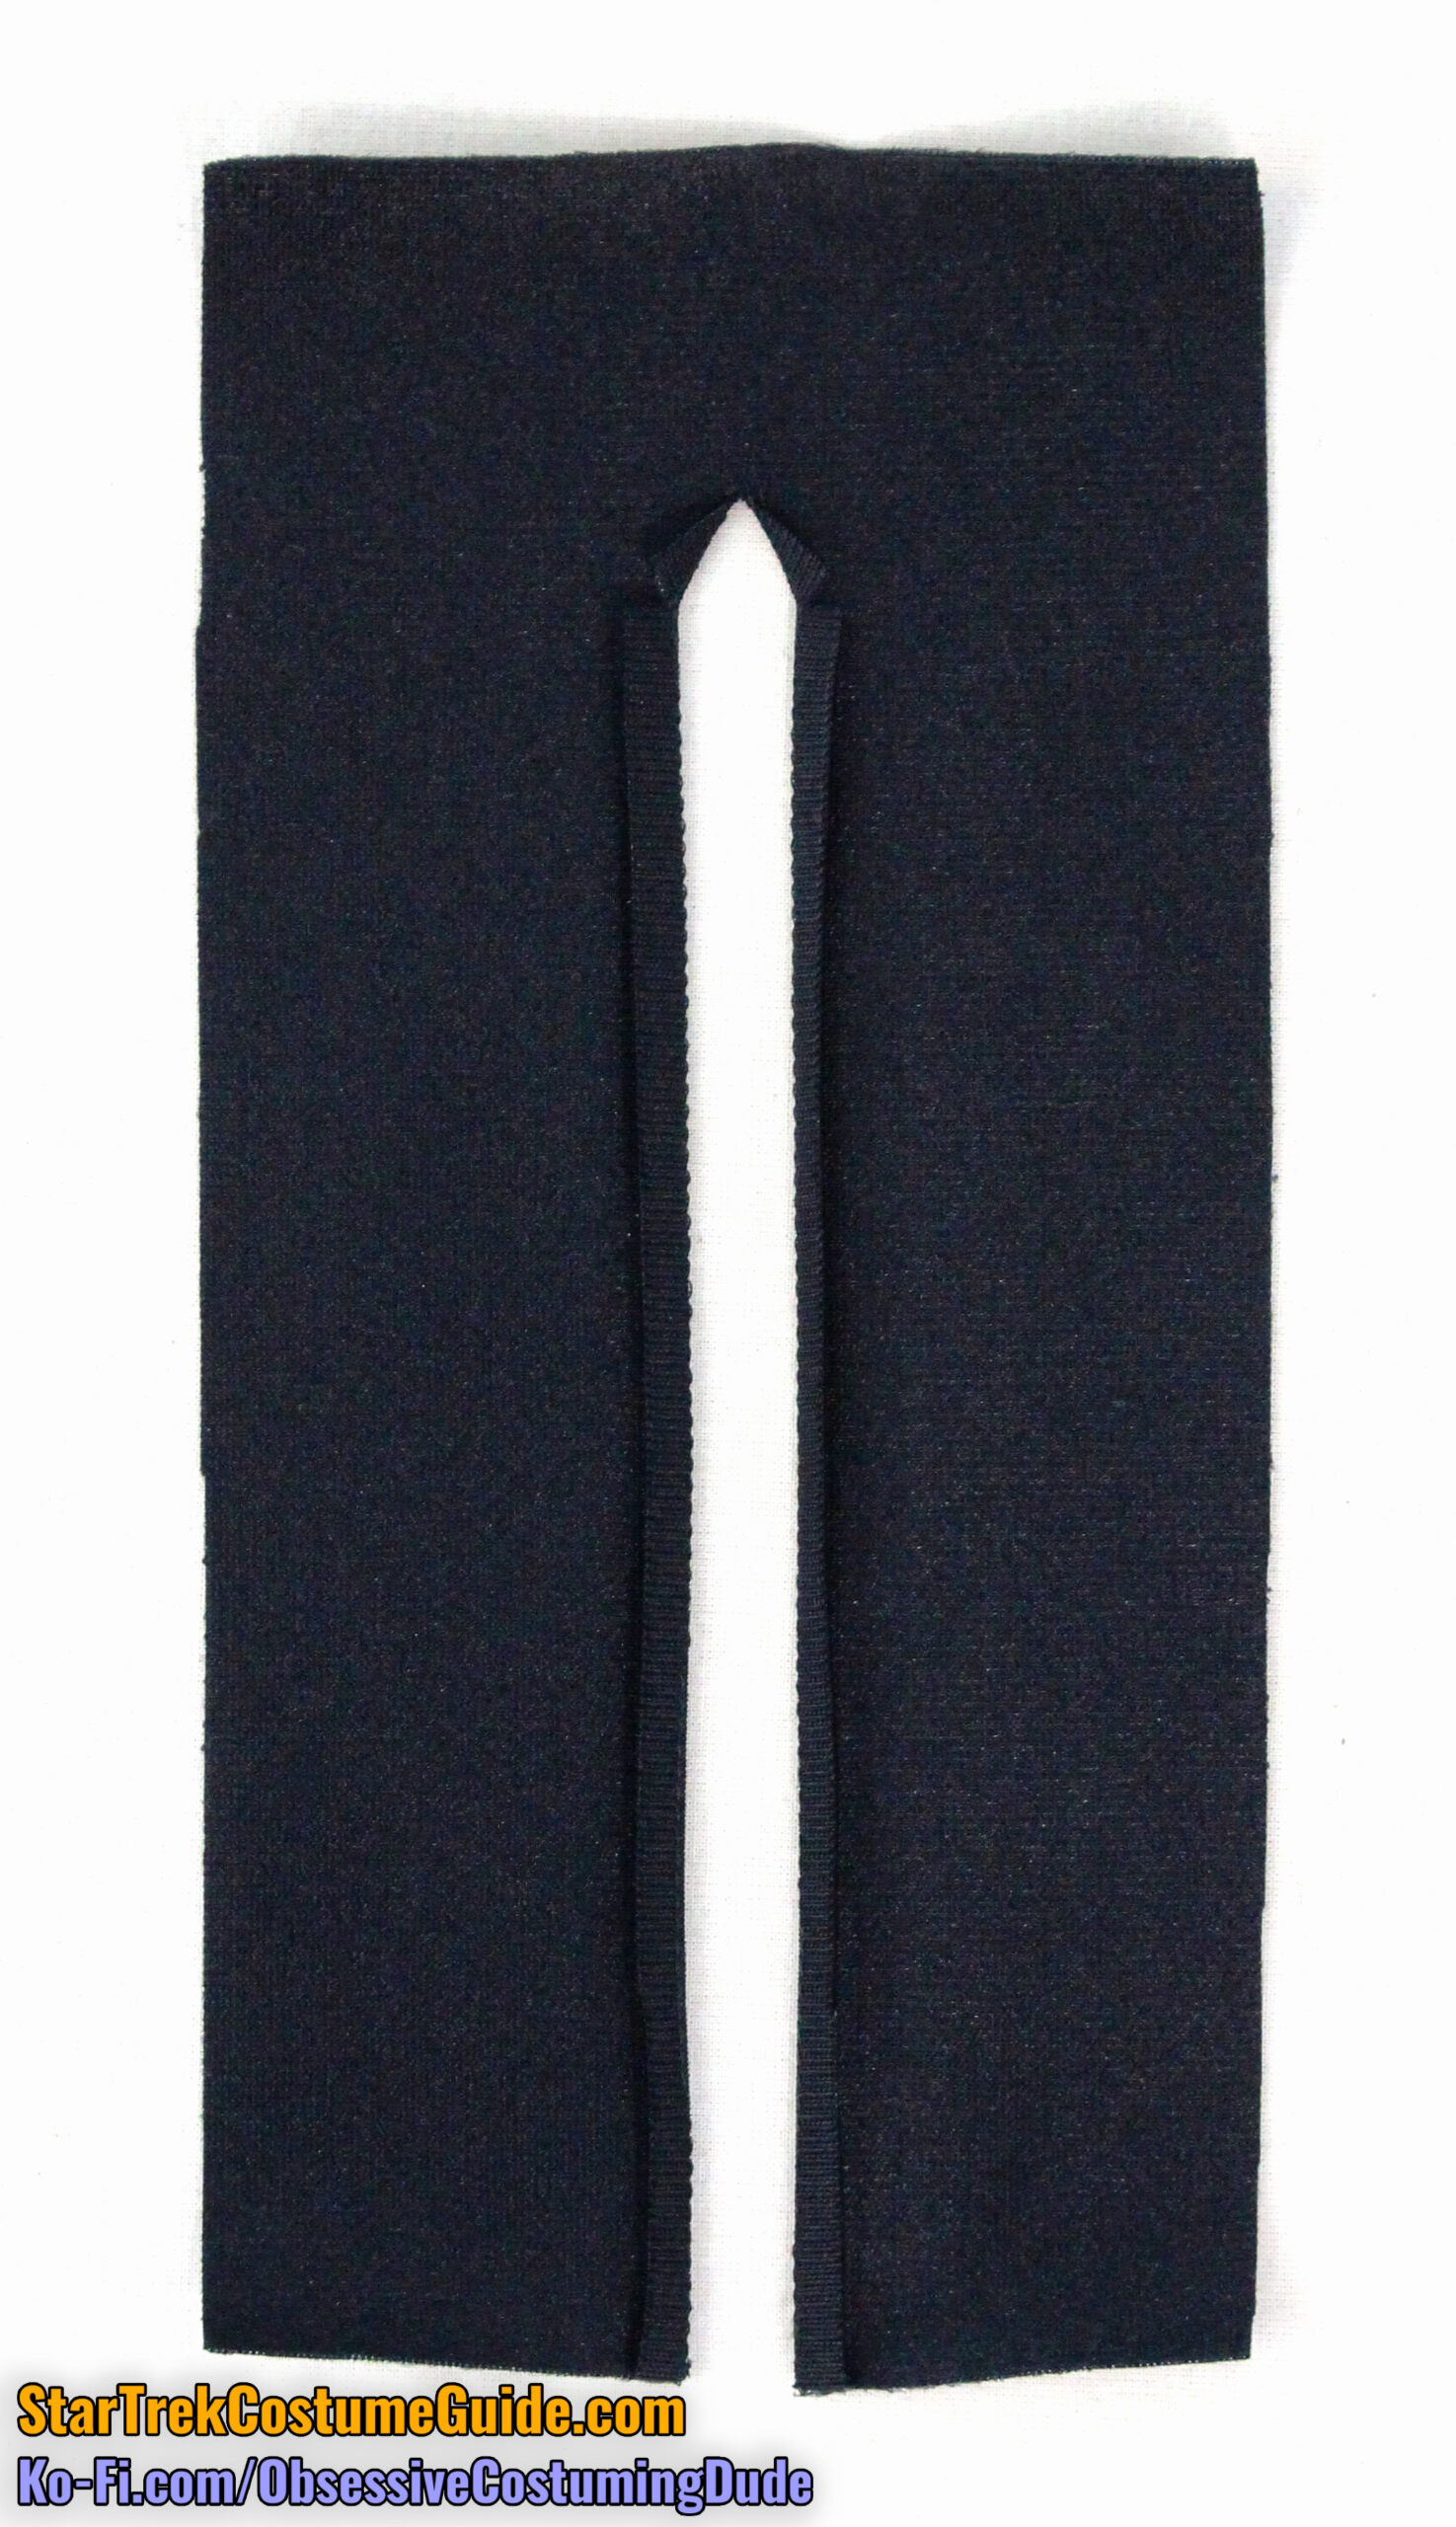
That’s all for now; we’ll finish the area toward the end of the process.
Repeat for the other pant leg.
The lower pant leg area on the later TNG jumpsuit styles is much easier than either of the early techniques, since there is no division-colored trim to contend with.
I again like to start by applying a narrow strip of fusible interfacing (approximately 2” wide by 9” tall) to the underside of the pant leg, horizontally centered over the alignment guide.
Mark the alignment guide on the fusible interfacing using white tailor’s chalk, then mark a horizontal line perpendicular to it 1” beneath the top.
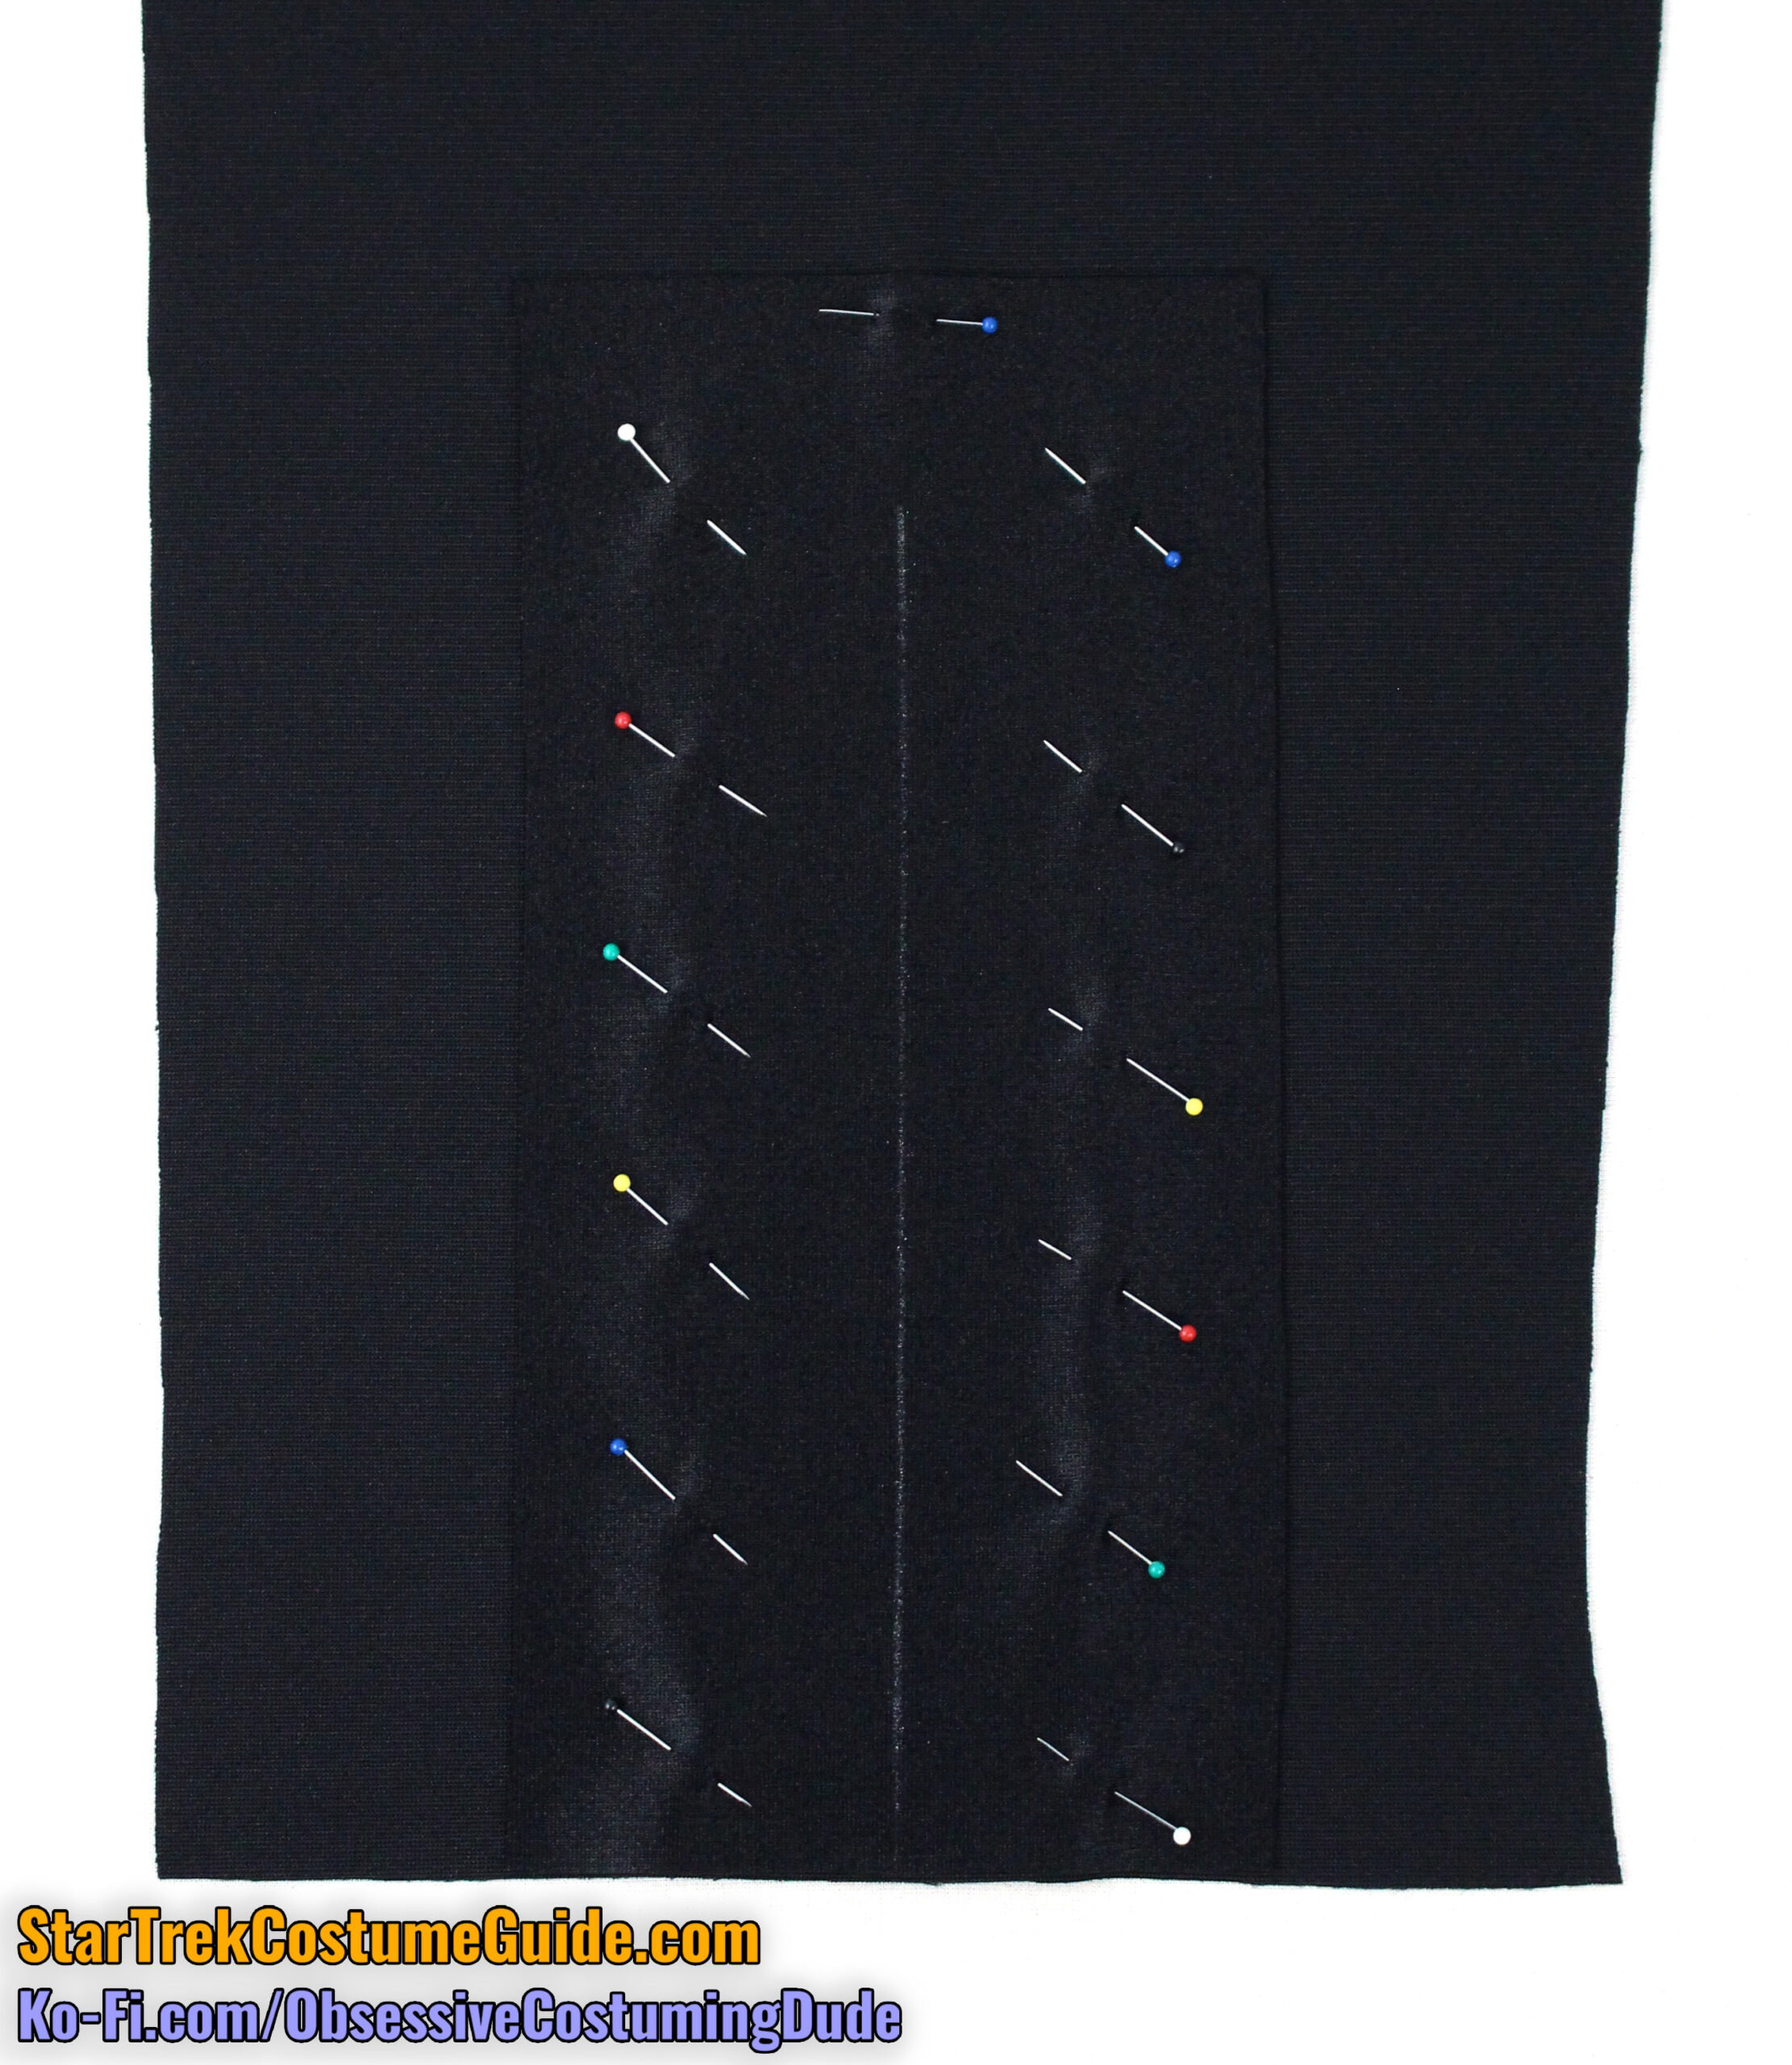
Pin the lower pant leg facing (piece S) to the lower pant leg, right sides together and centered over the alignment guide.
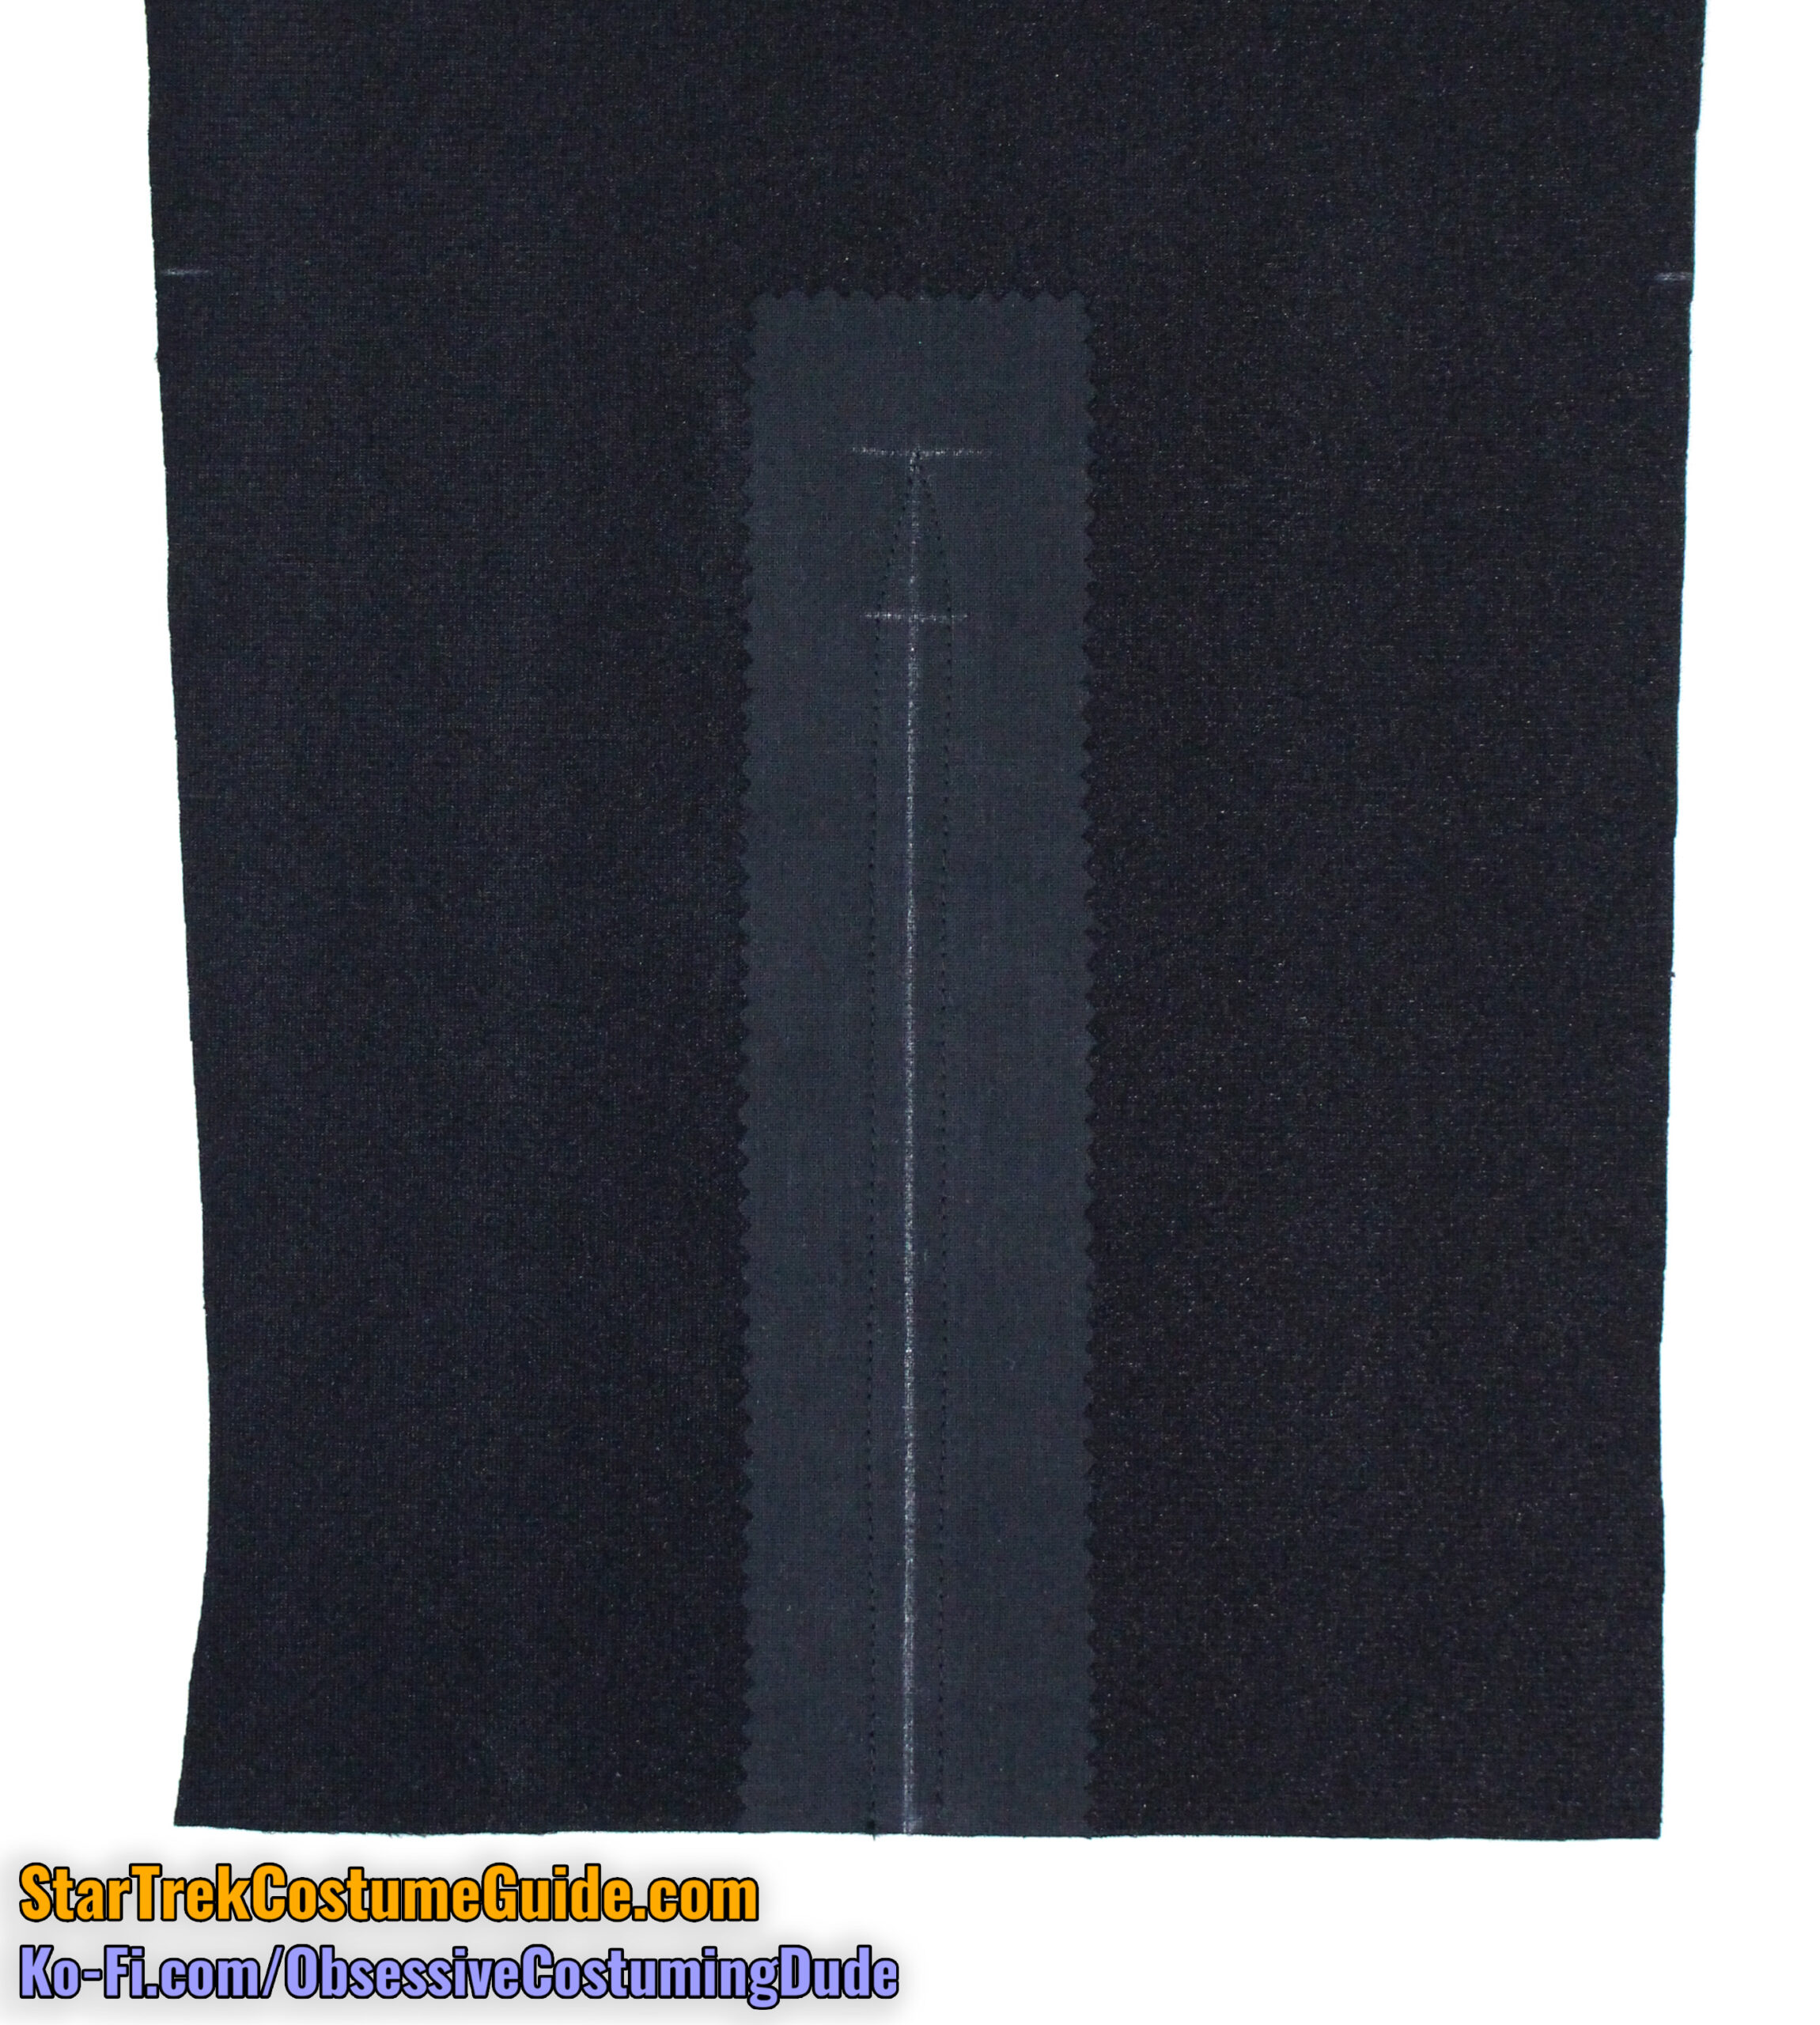
Starting at the bottom of the pant leg, stitch ¼” away from the alignment guide up to the horizontal line you marked (1” from the top of the opening).
Shorten your stitch length and pivot your stitching to the upper corner. Pivot again and stitch back to the horizontal line, then pivot again and stitch down the opposite edge.
Clip the fabric open along the alignment guide, from the bottom of the pant leg to the upper corner.
Also clip the allowances horizontally to the stitching at the line you marked (1” from the top of the opening).
Turn the facing under and press.
Unfold the facing and allowances toward the opening, and understitch the facing to the allowances along the entire opening. (Just do your best around the top.)
Turn the facing back under and press.
That’s all for now; we’ll finish the area toward the end of the process.
Repeat for the other pant leg.
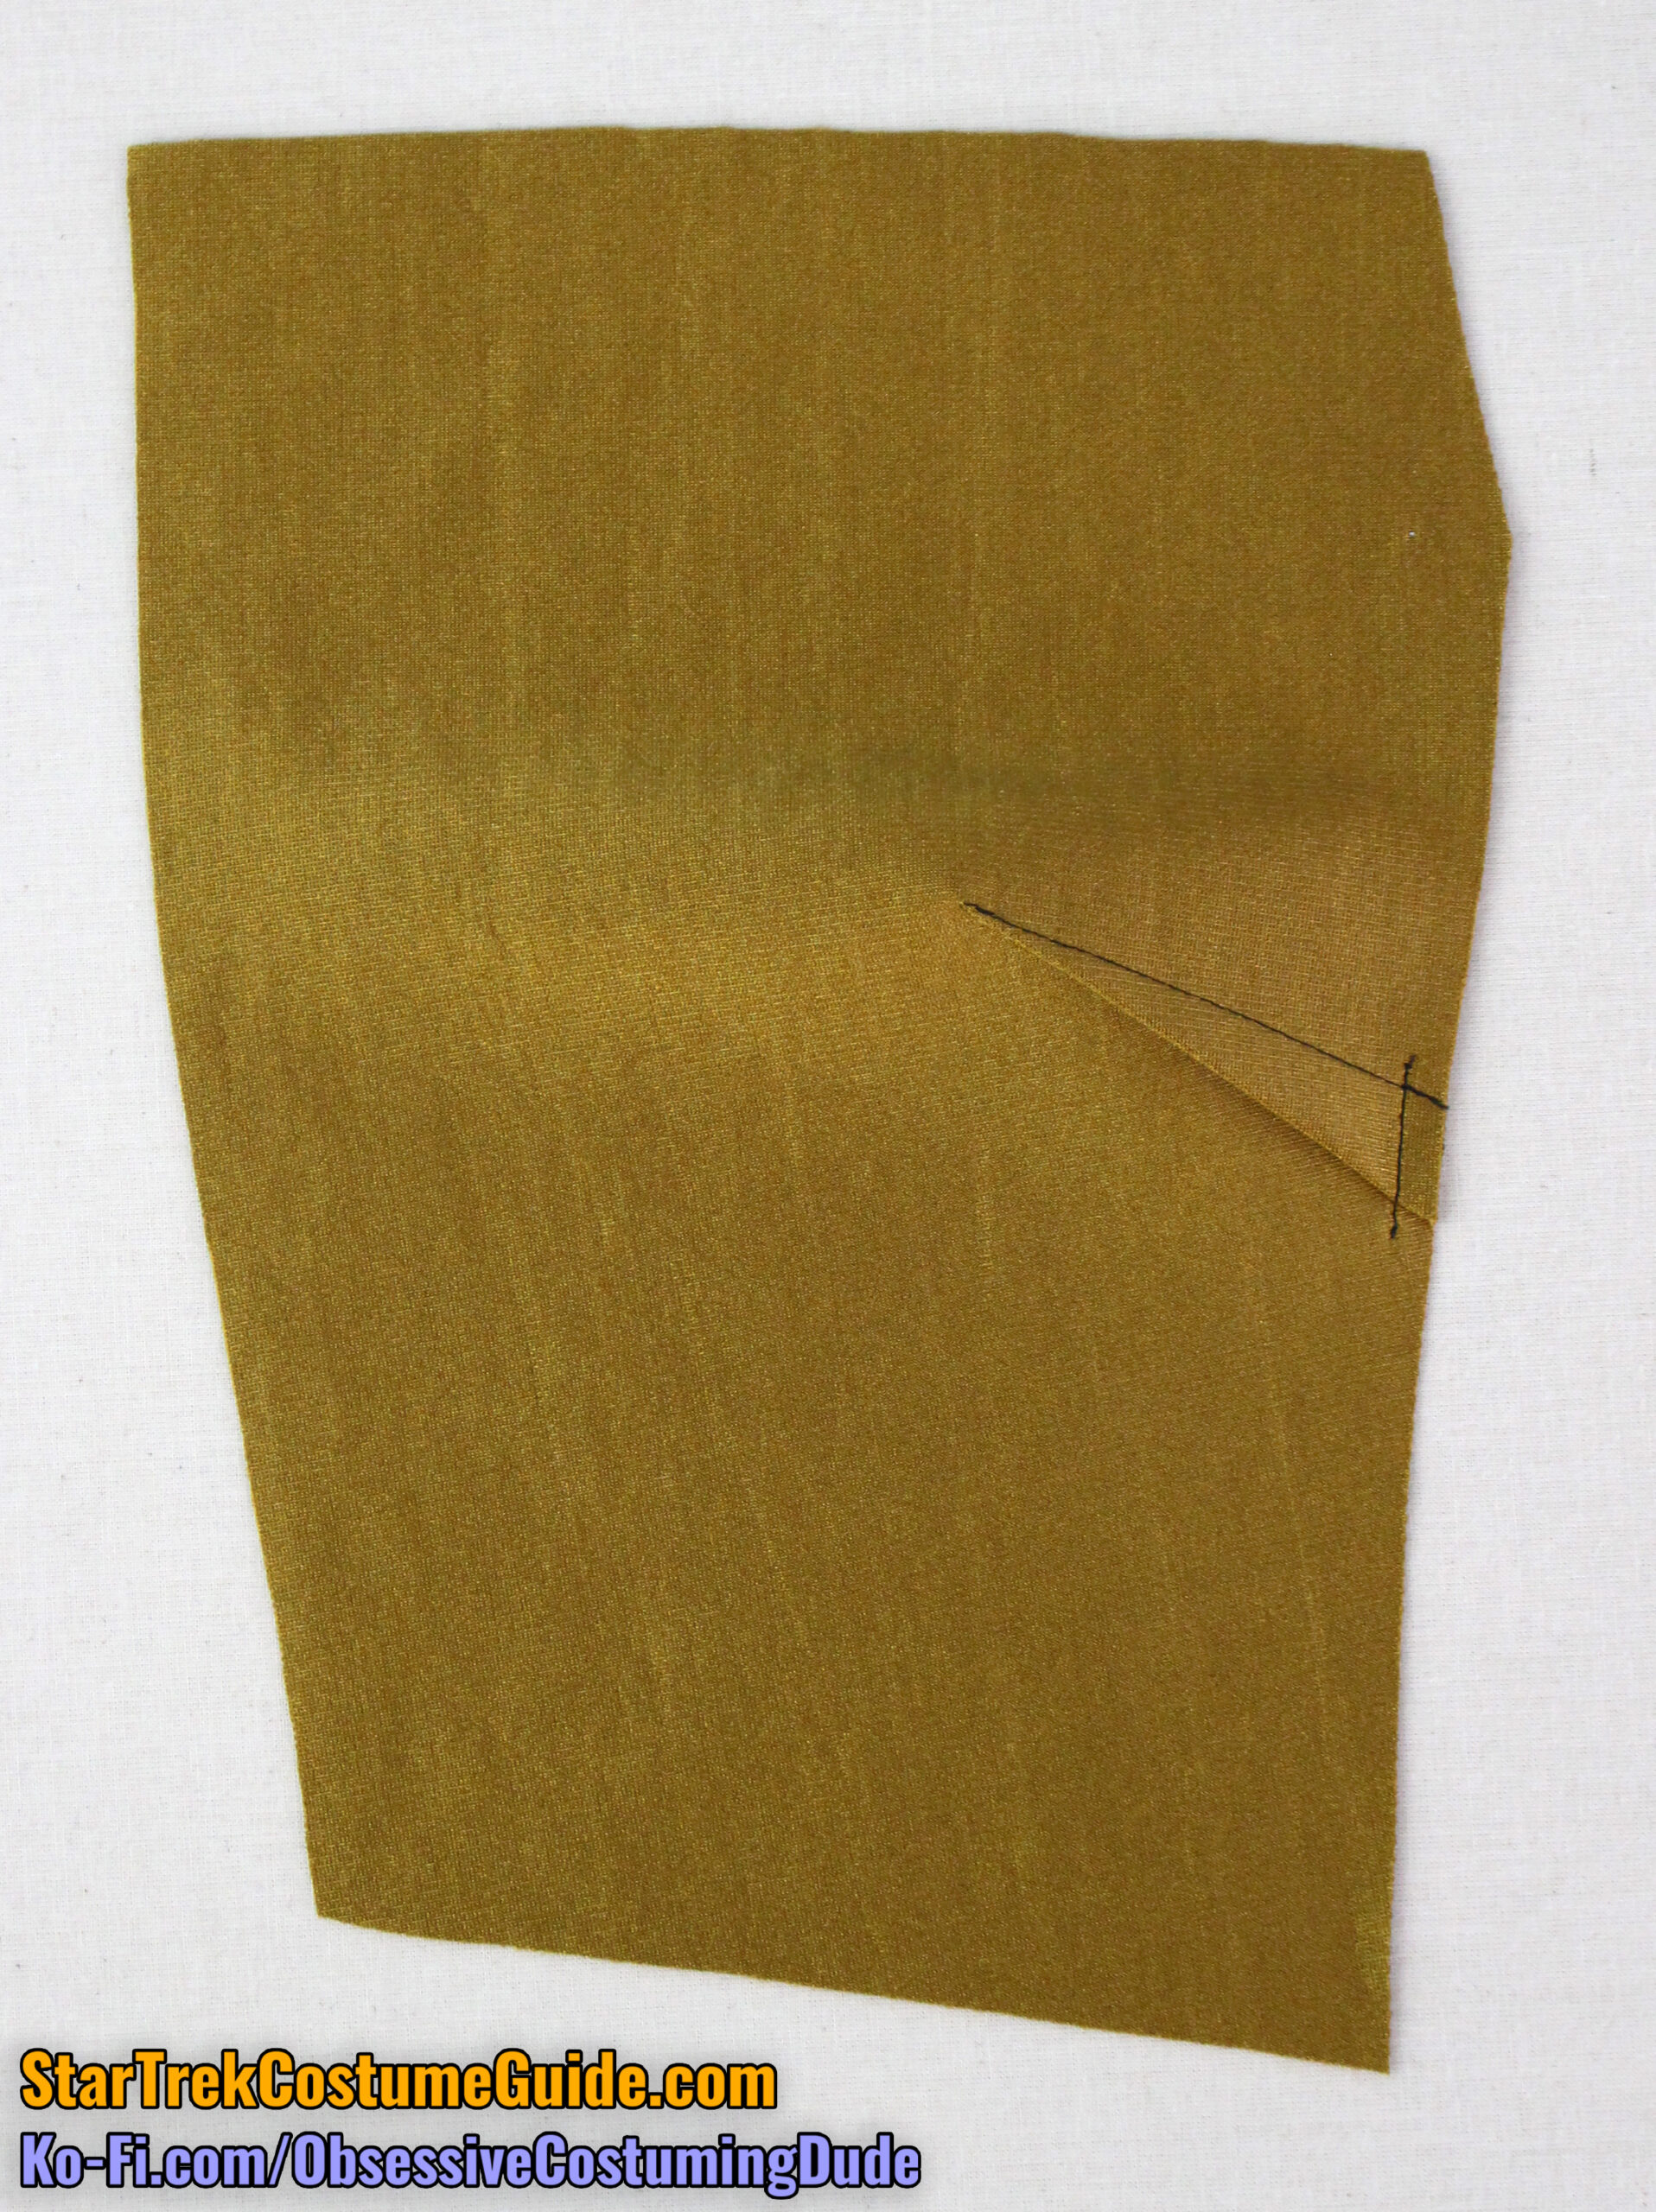
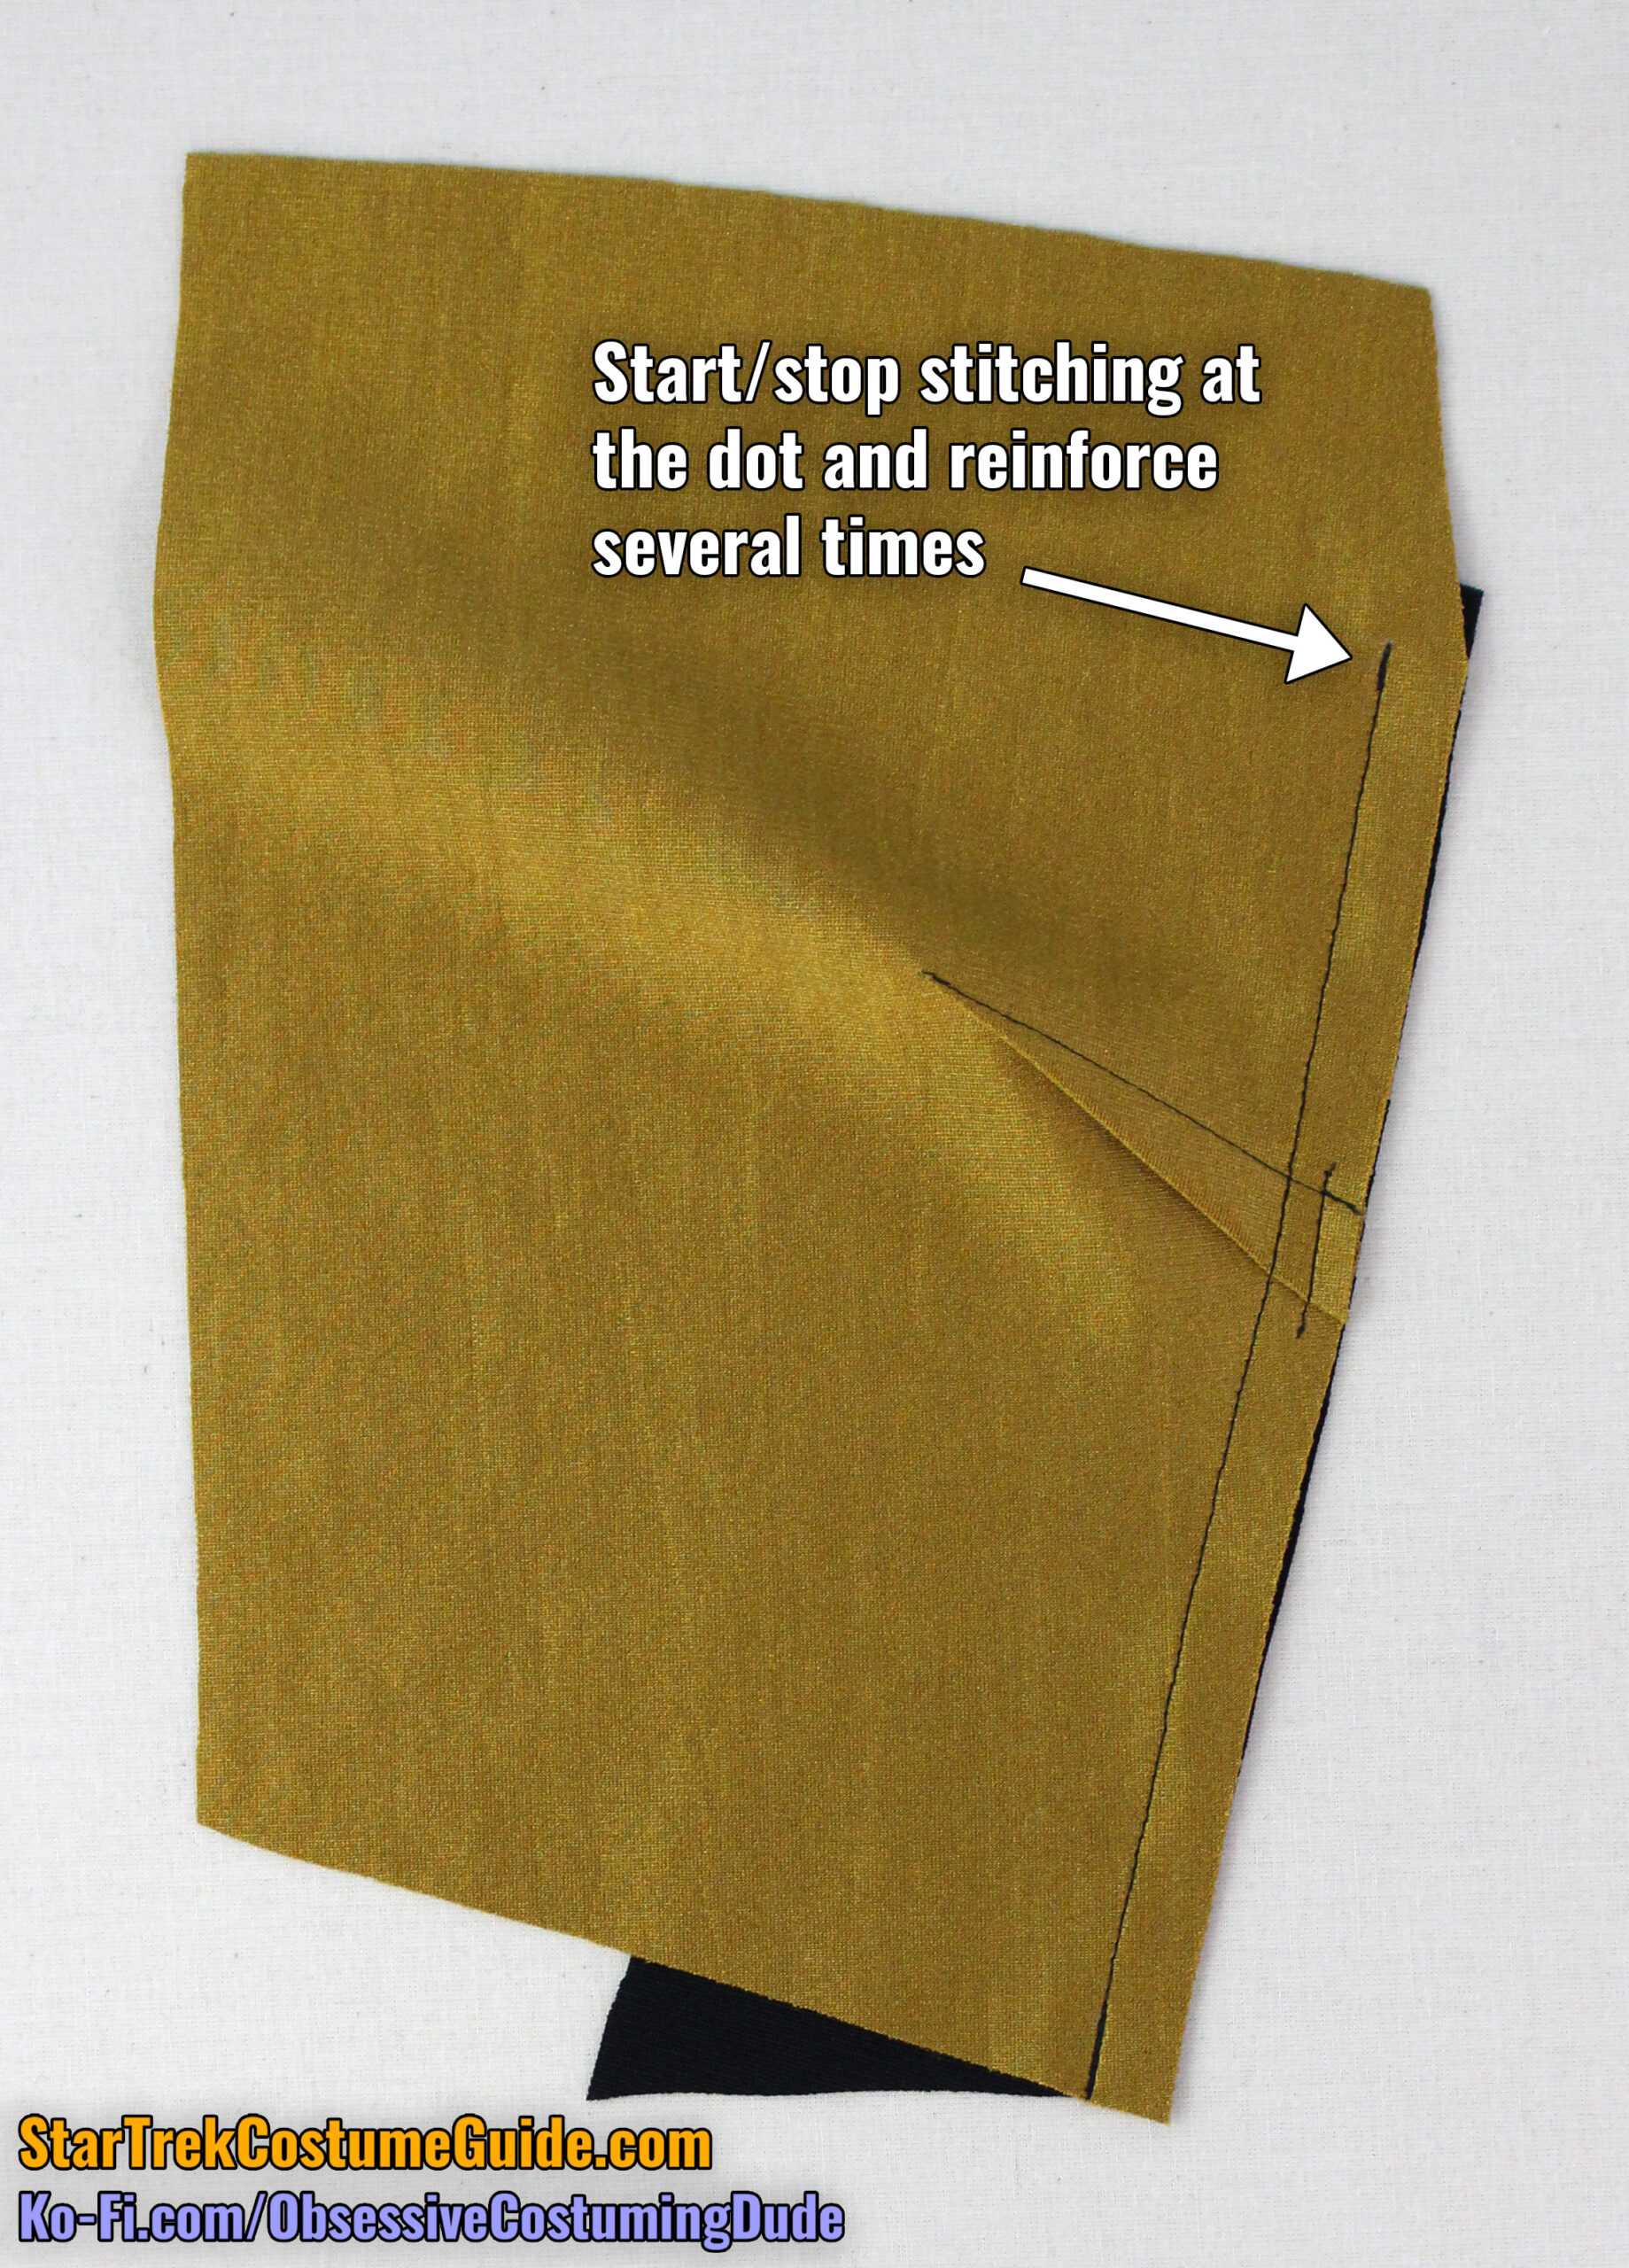
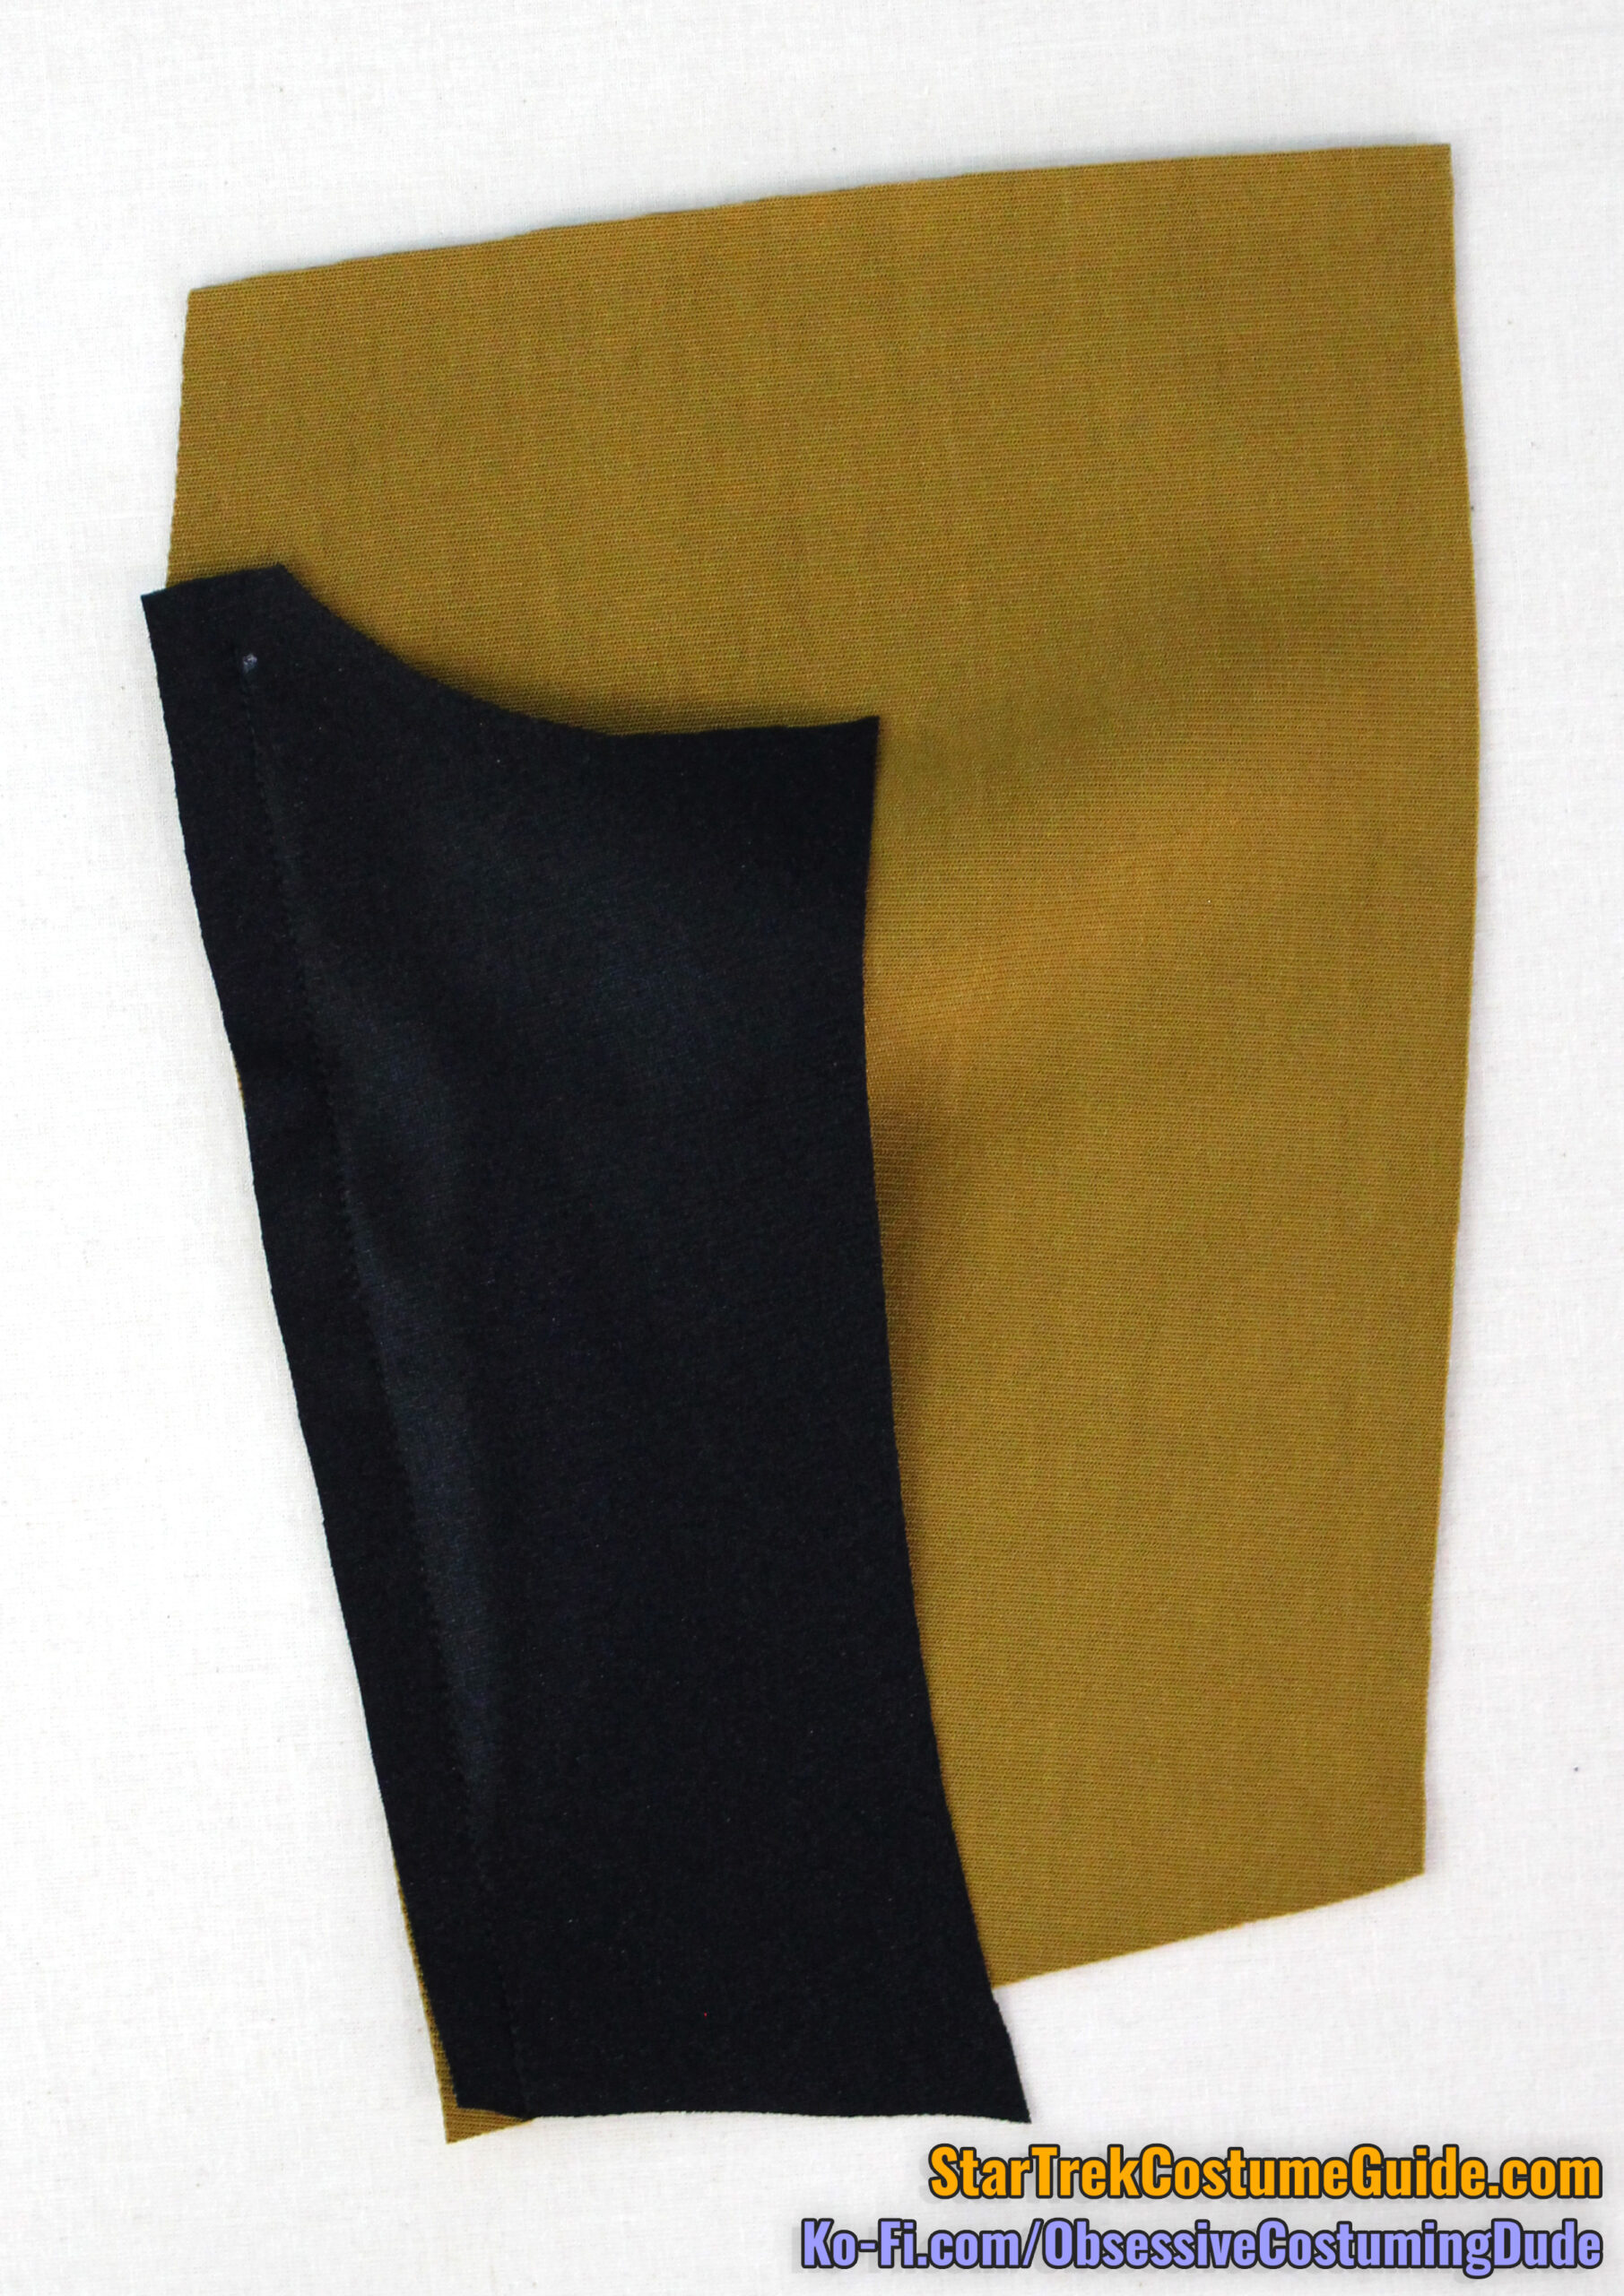
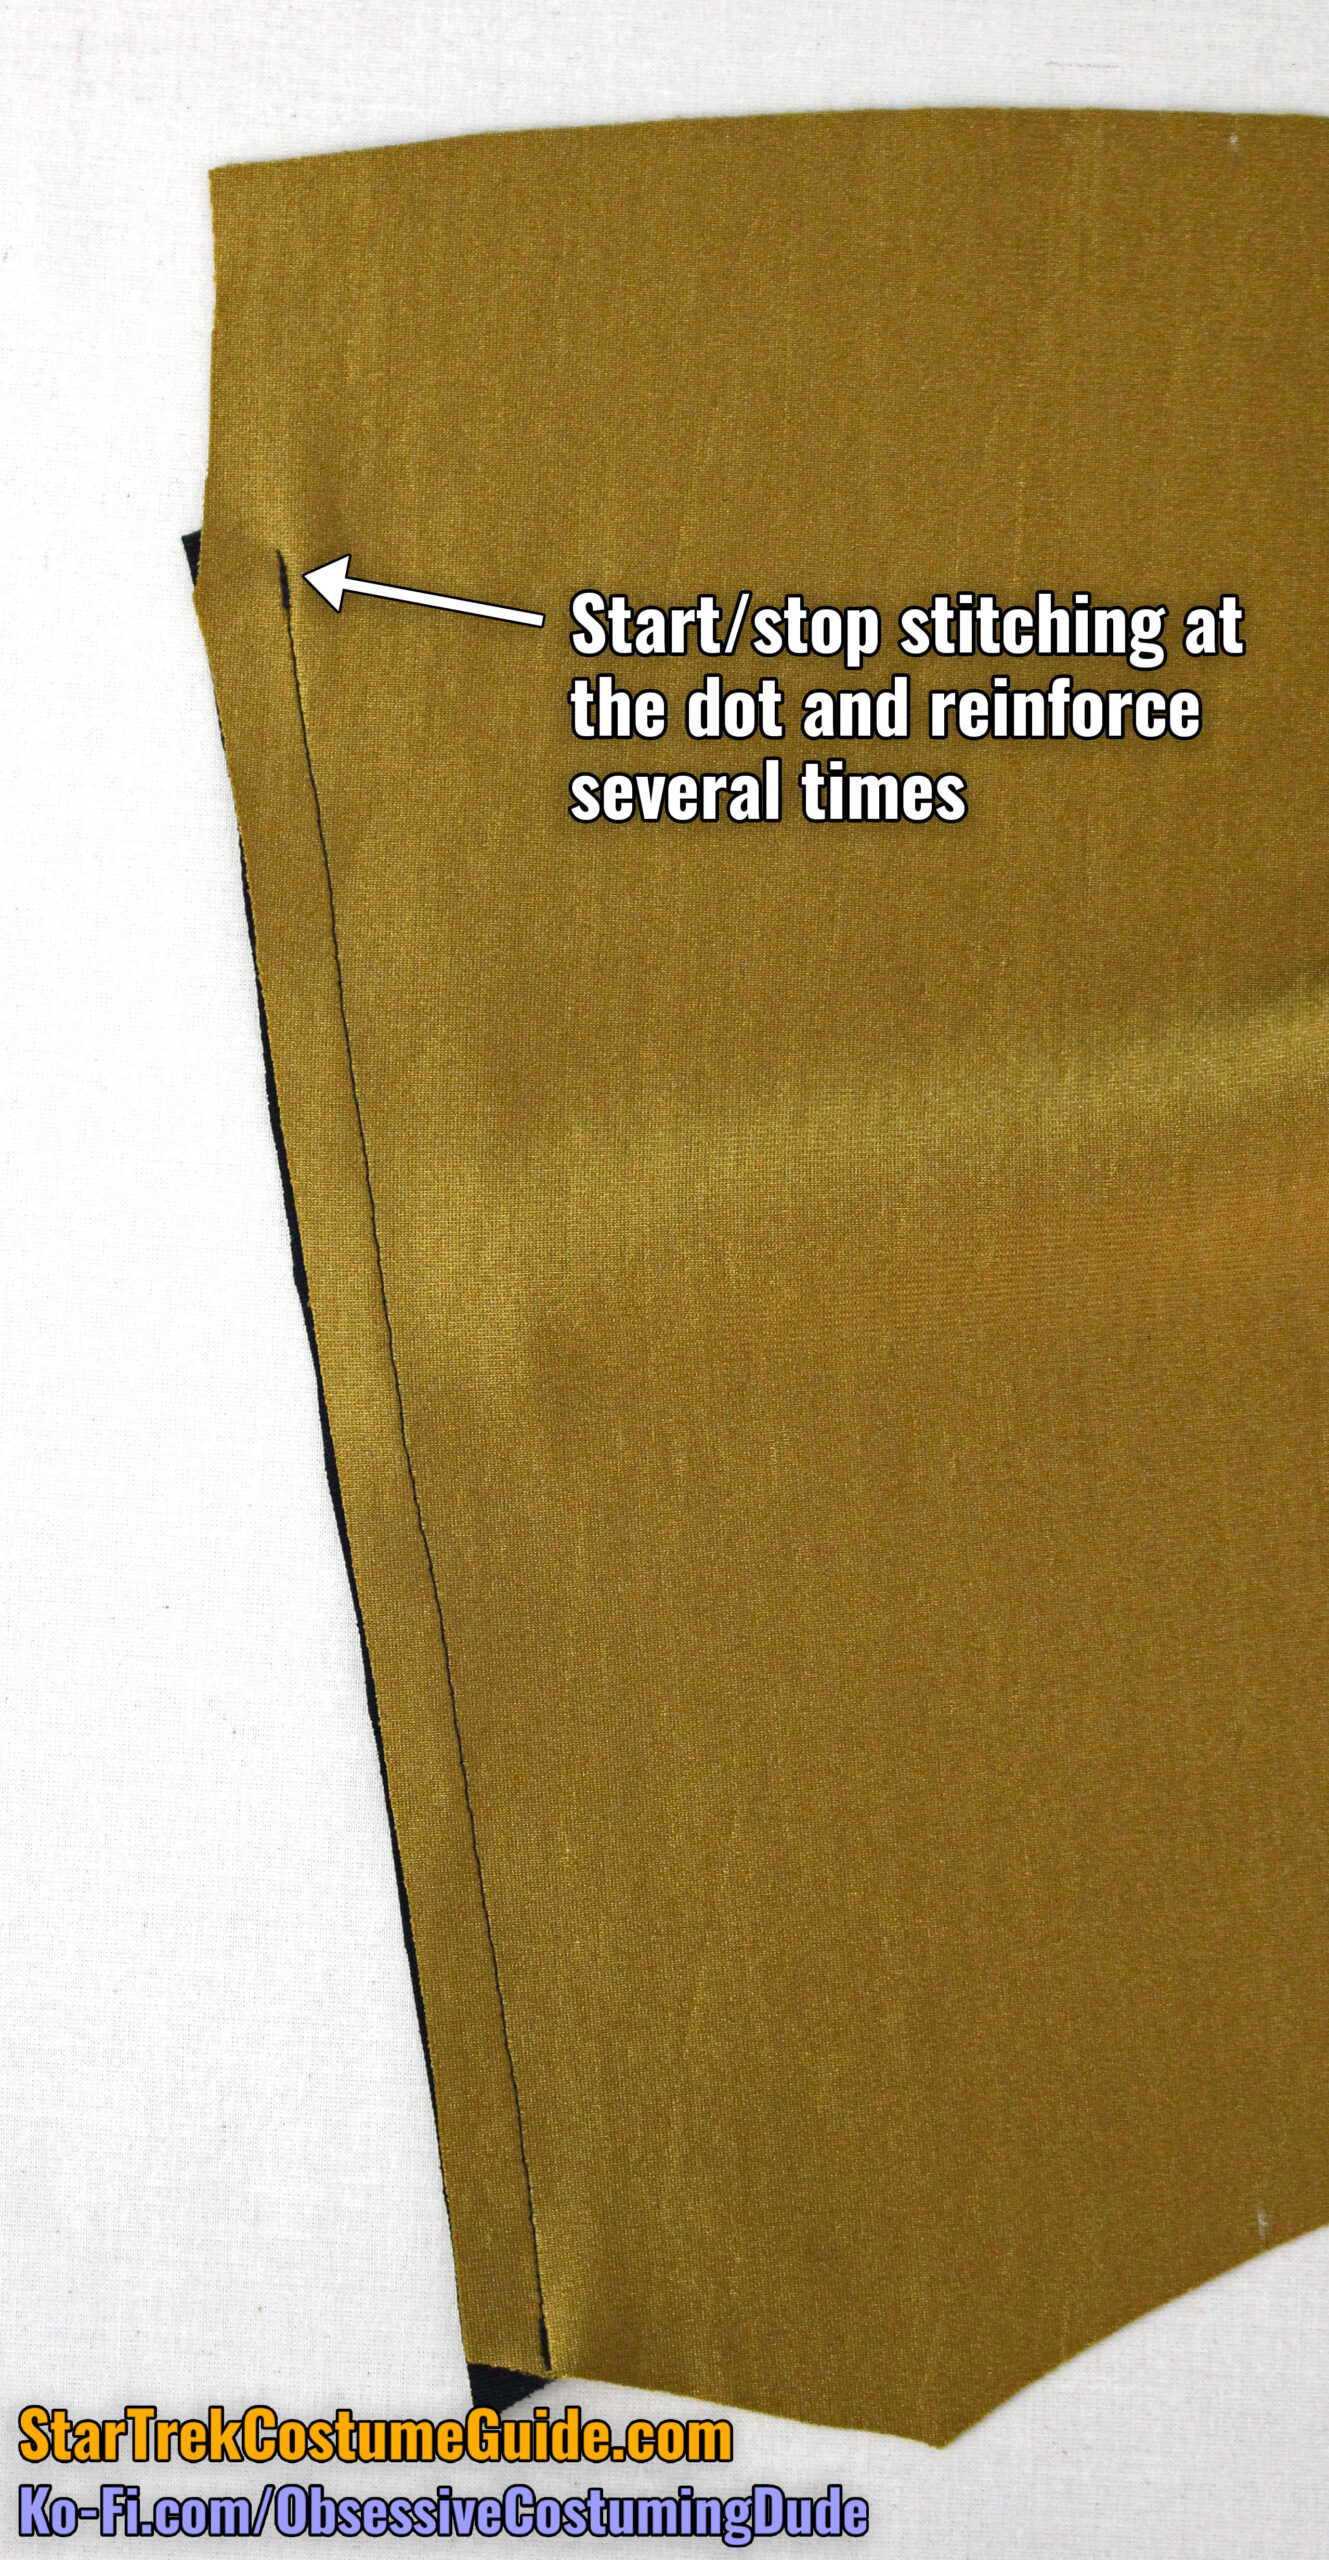
Sew the lower right front (piece J1) to the right front pant leg (piece K) with ½” seam allowance, right sides together and matching lower dots. You can sew past the dot if you like, or you can start/stop your stitching at the dot and reinforce several times – as long as the dots match.
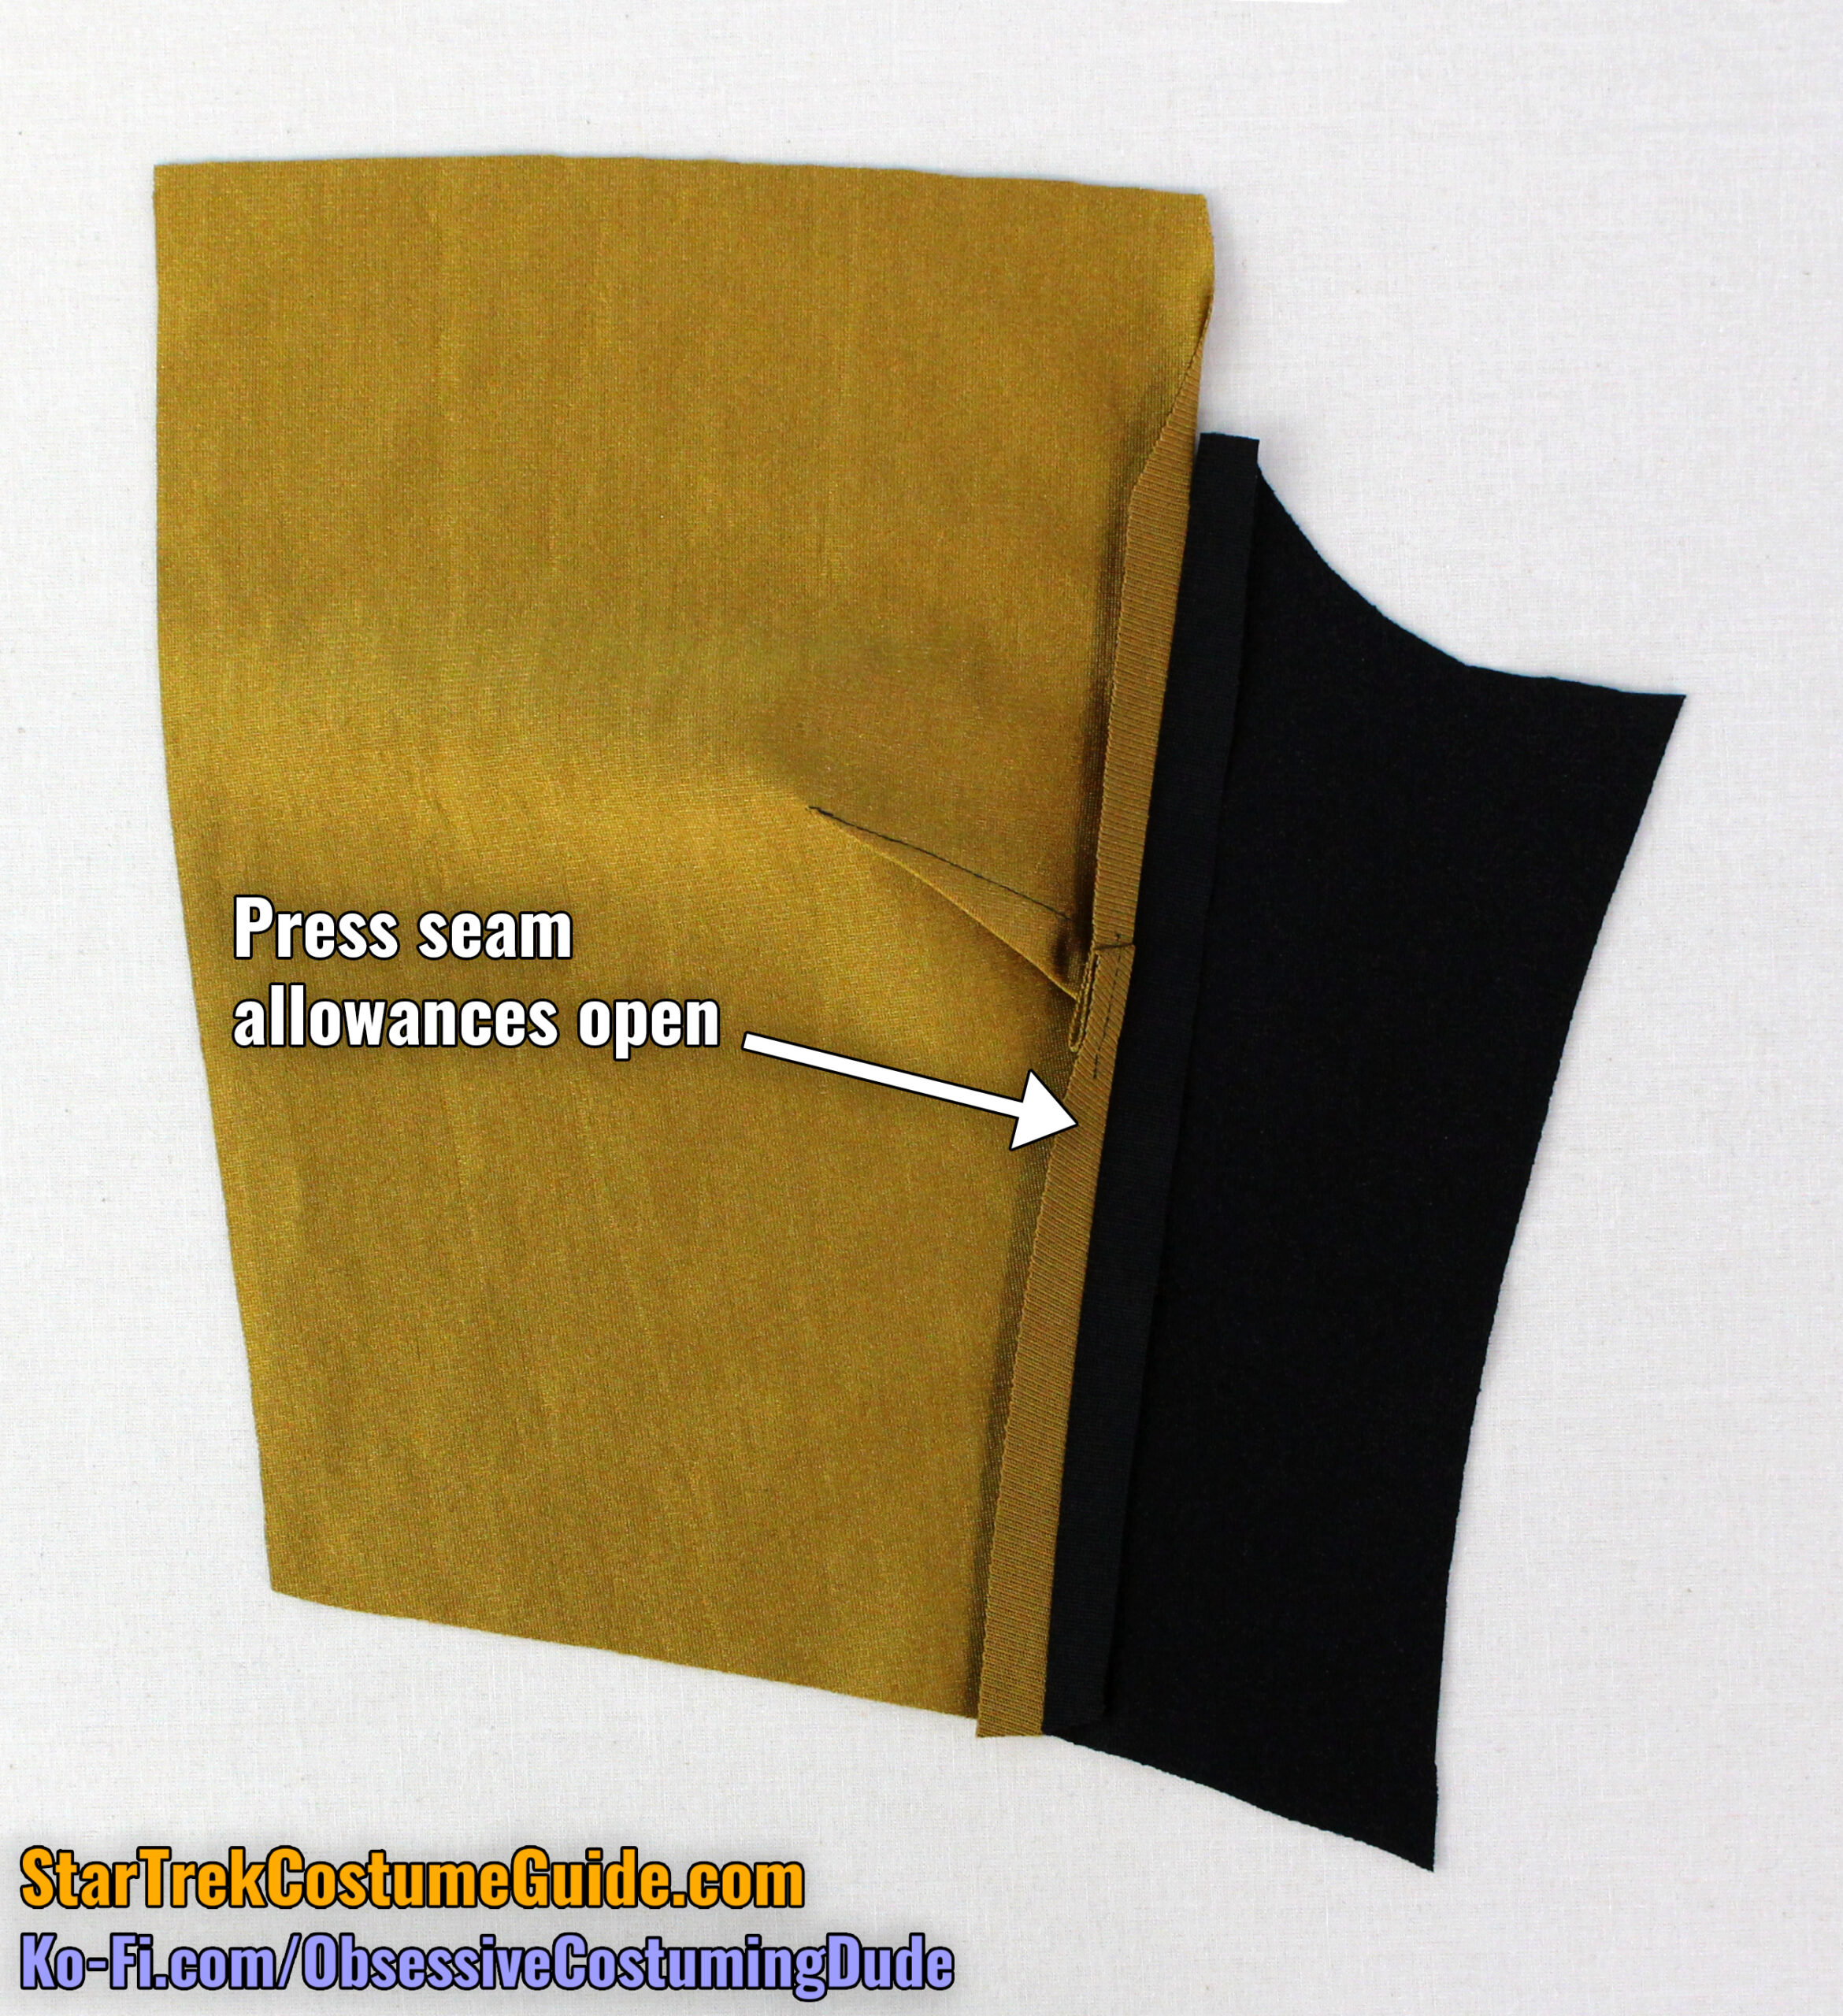
Press the seam allowances open over a tailor’s ham.
For the women’s jumpsuit, sew the bust dart closed on the upper right front (piece D1).
I suggest basting the dart into place inside the seam allowance.
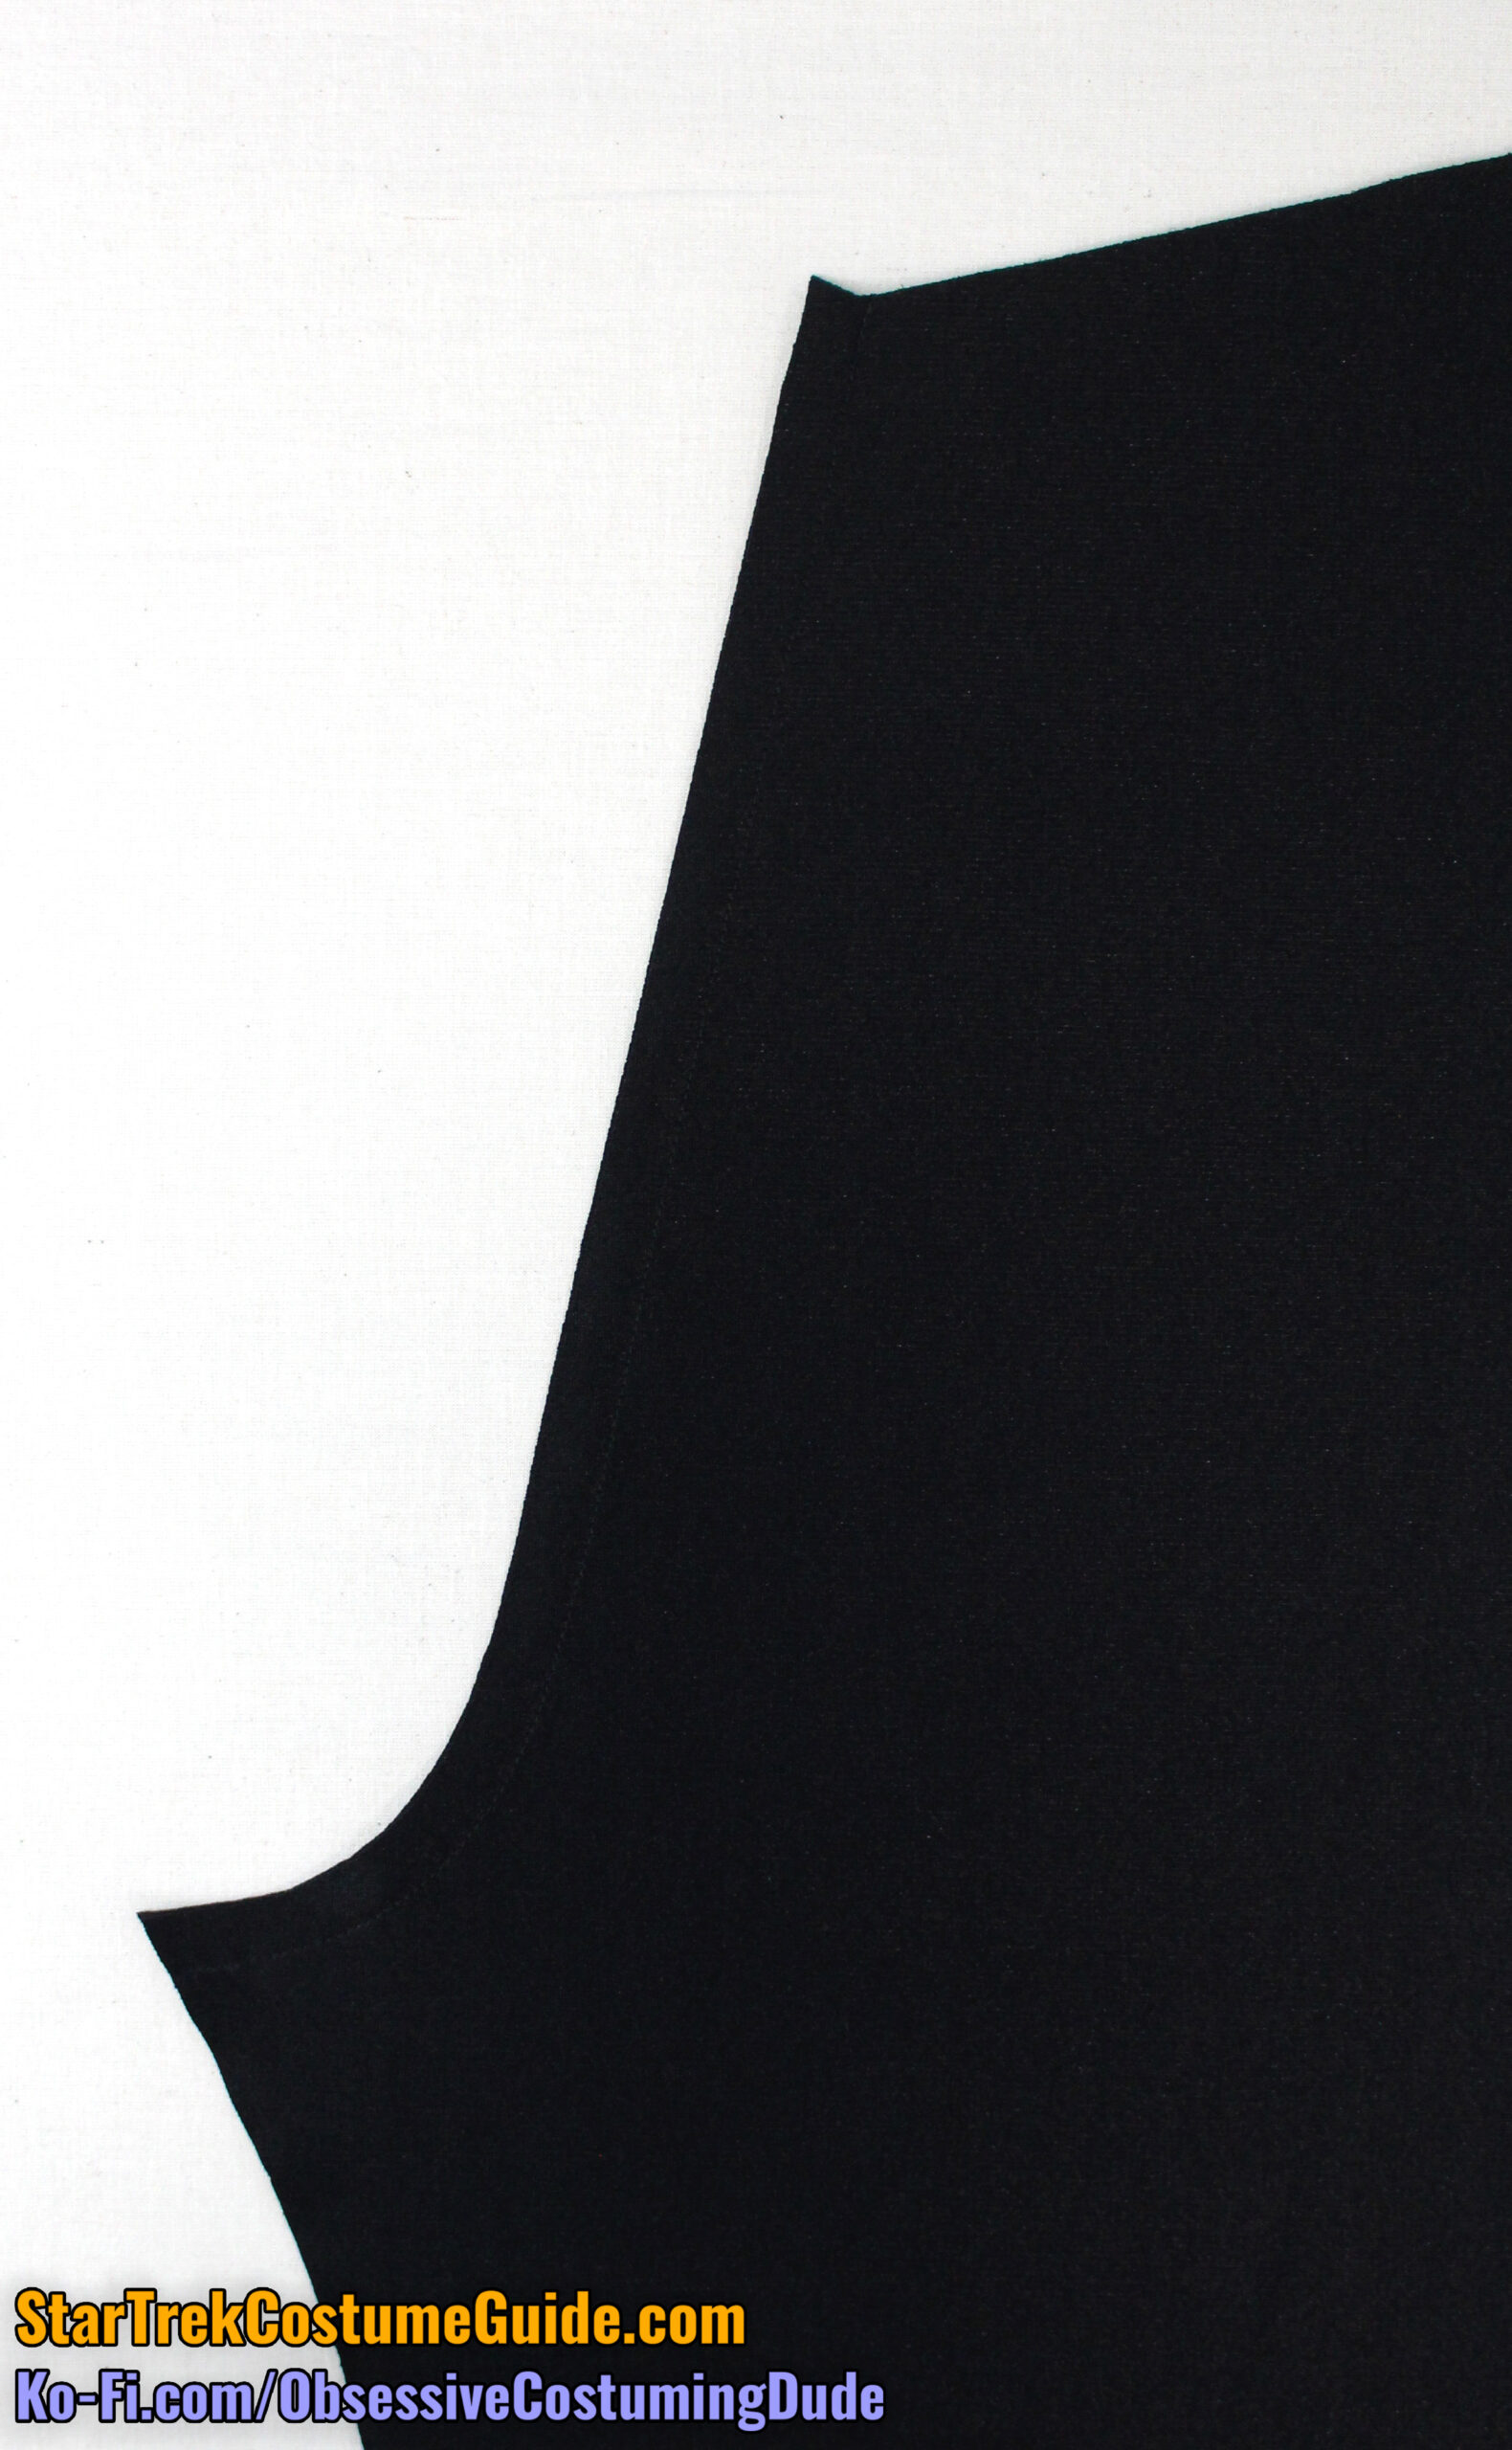
Sew the upper right front (piece D1) to the right side front (piece E), right sides together with ½” seam allowance, starting/stopping and reinforcing your stitching several times at the dot.
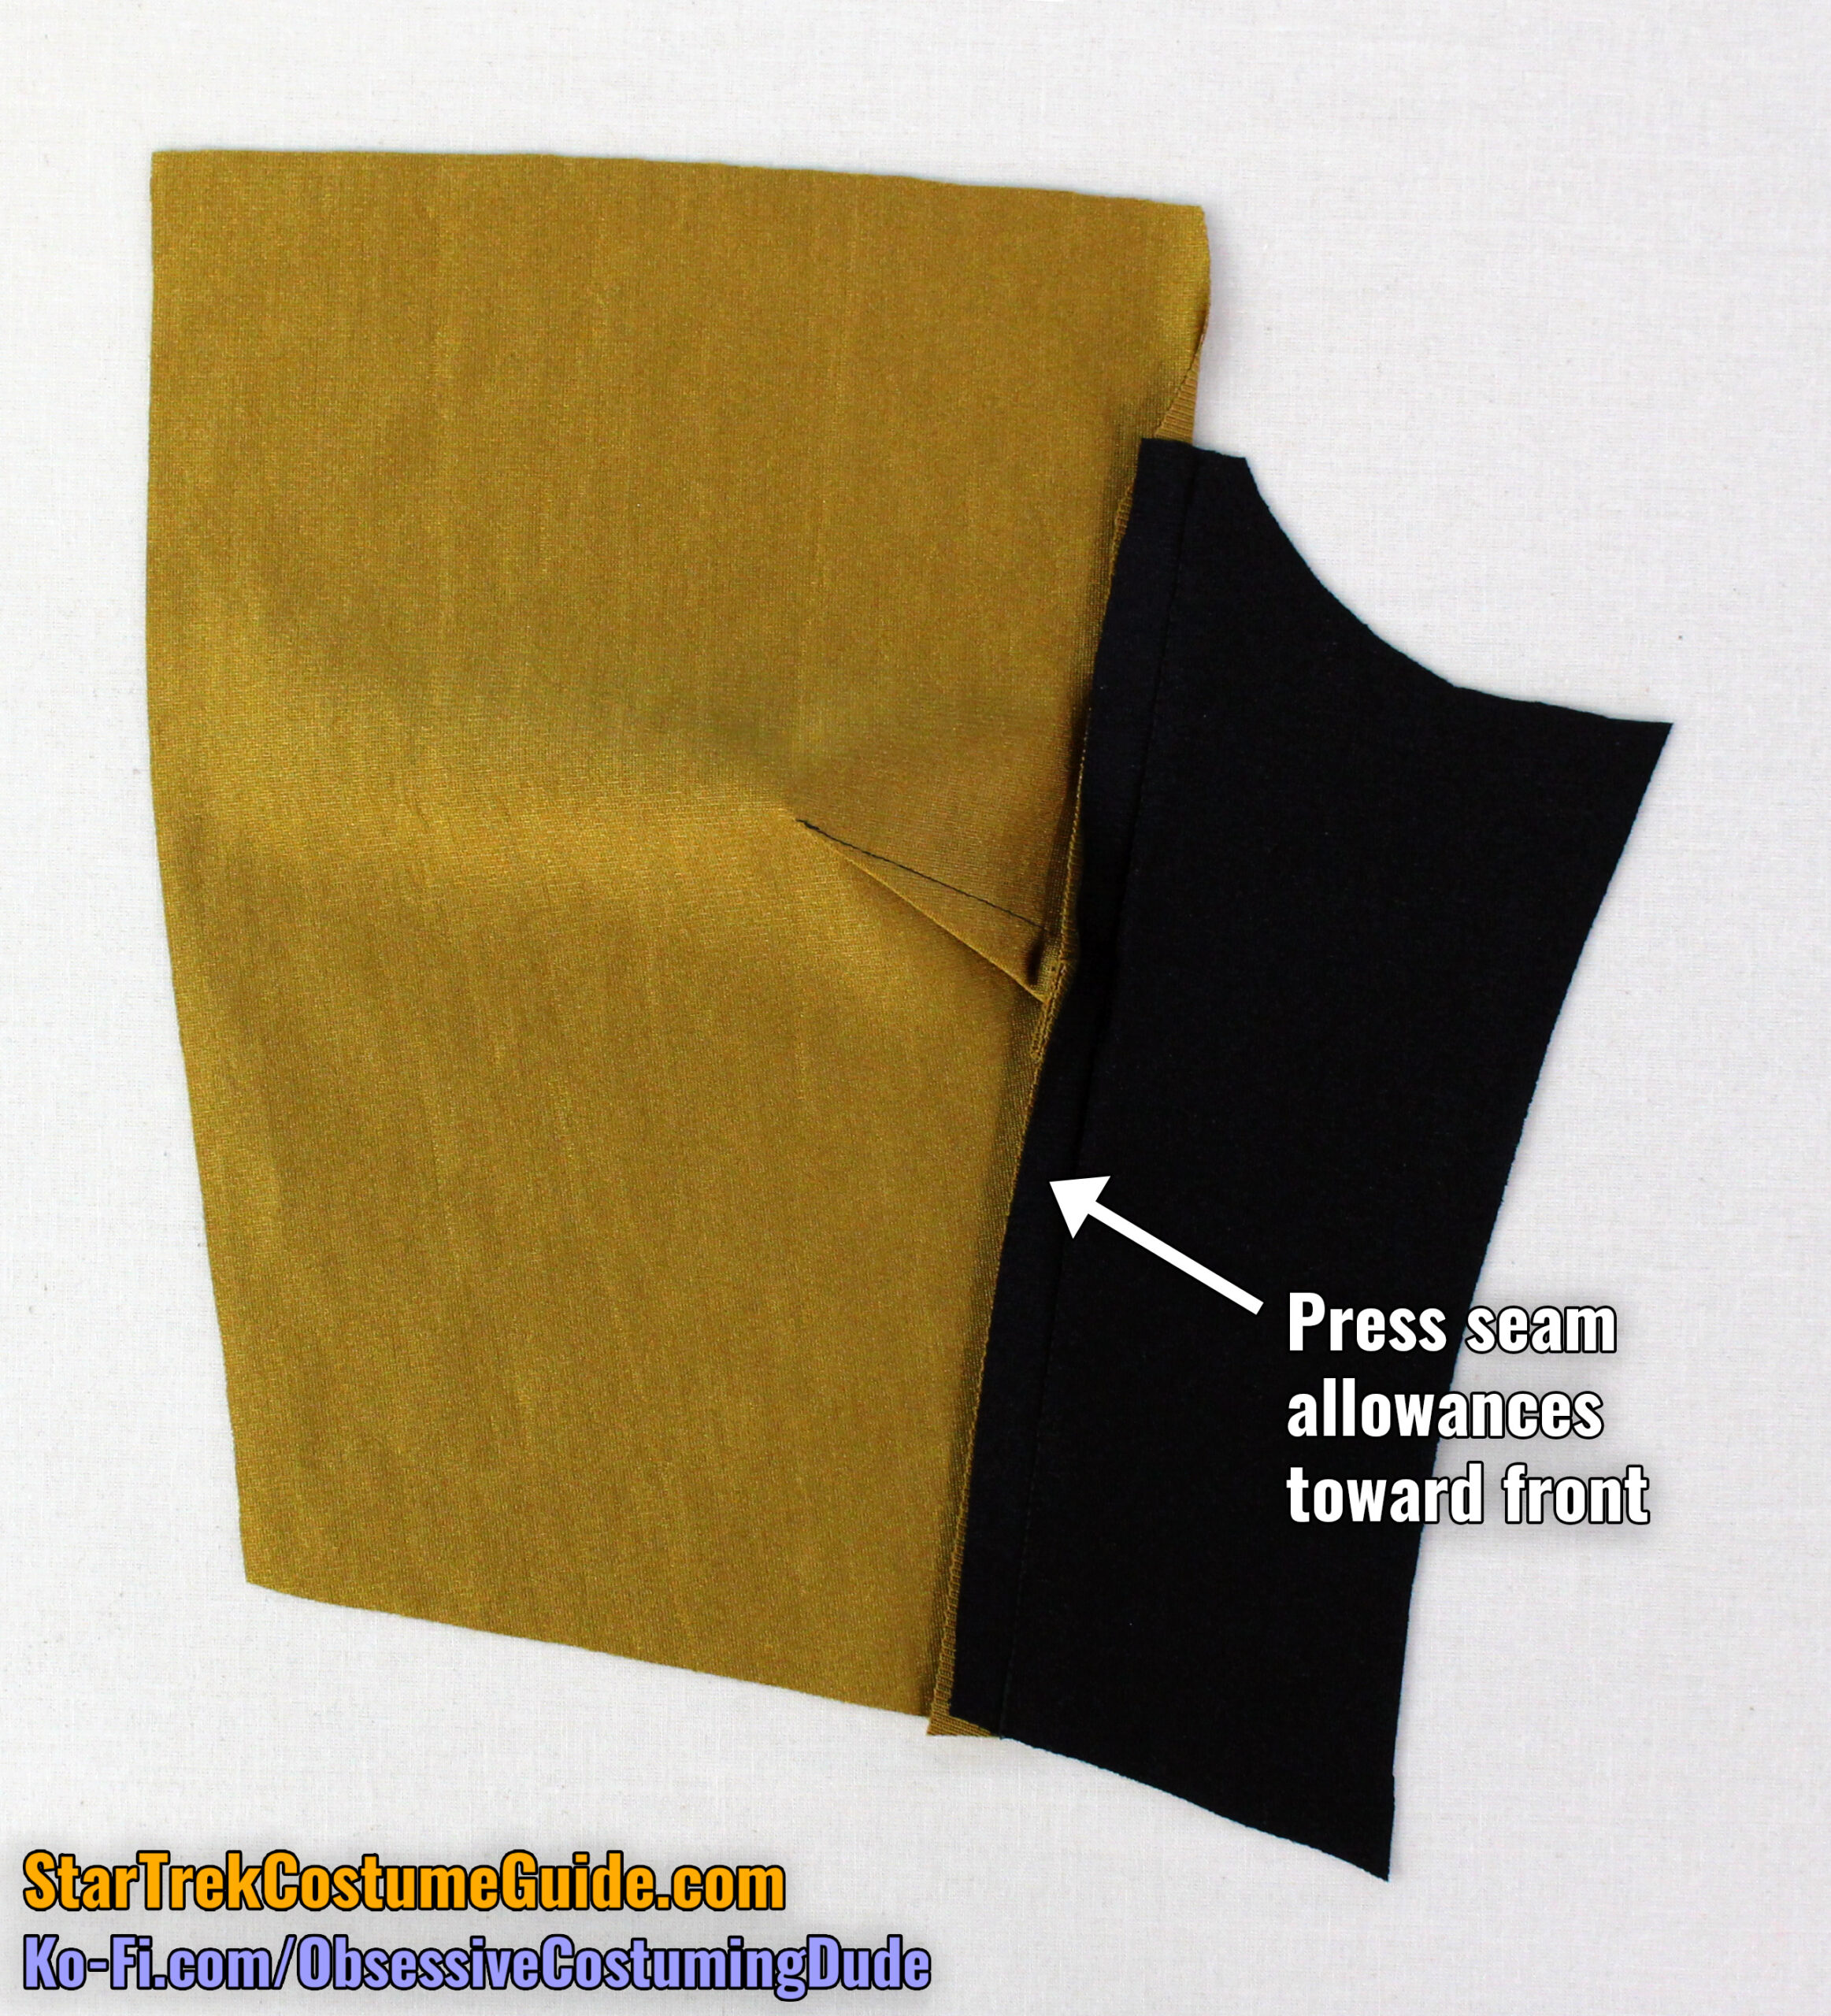
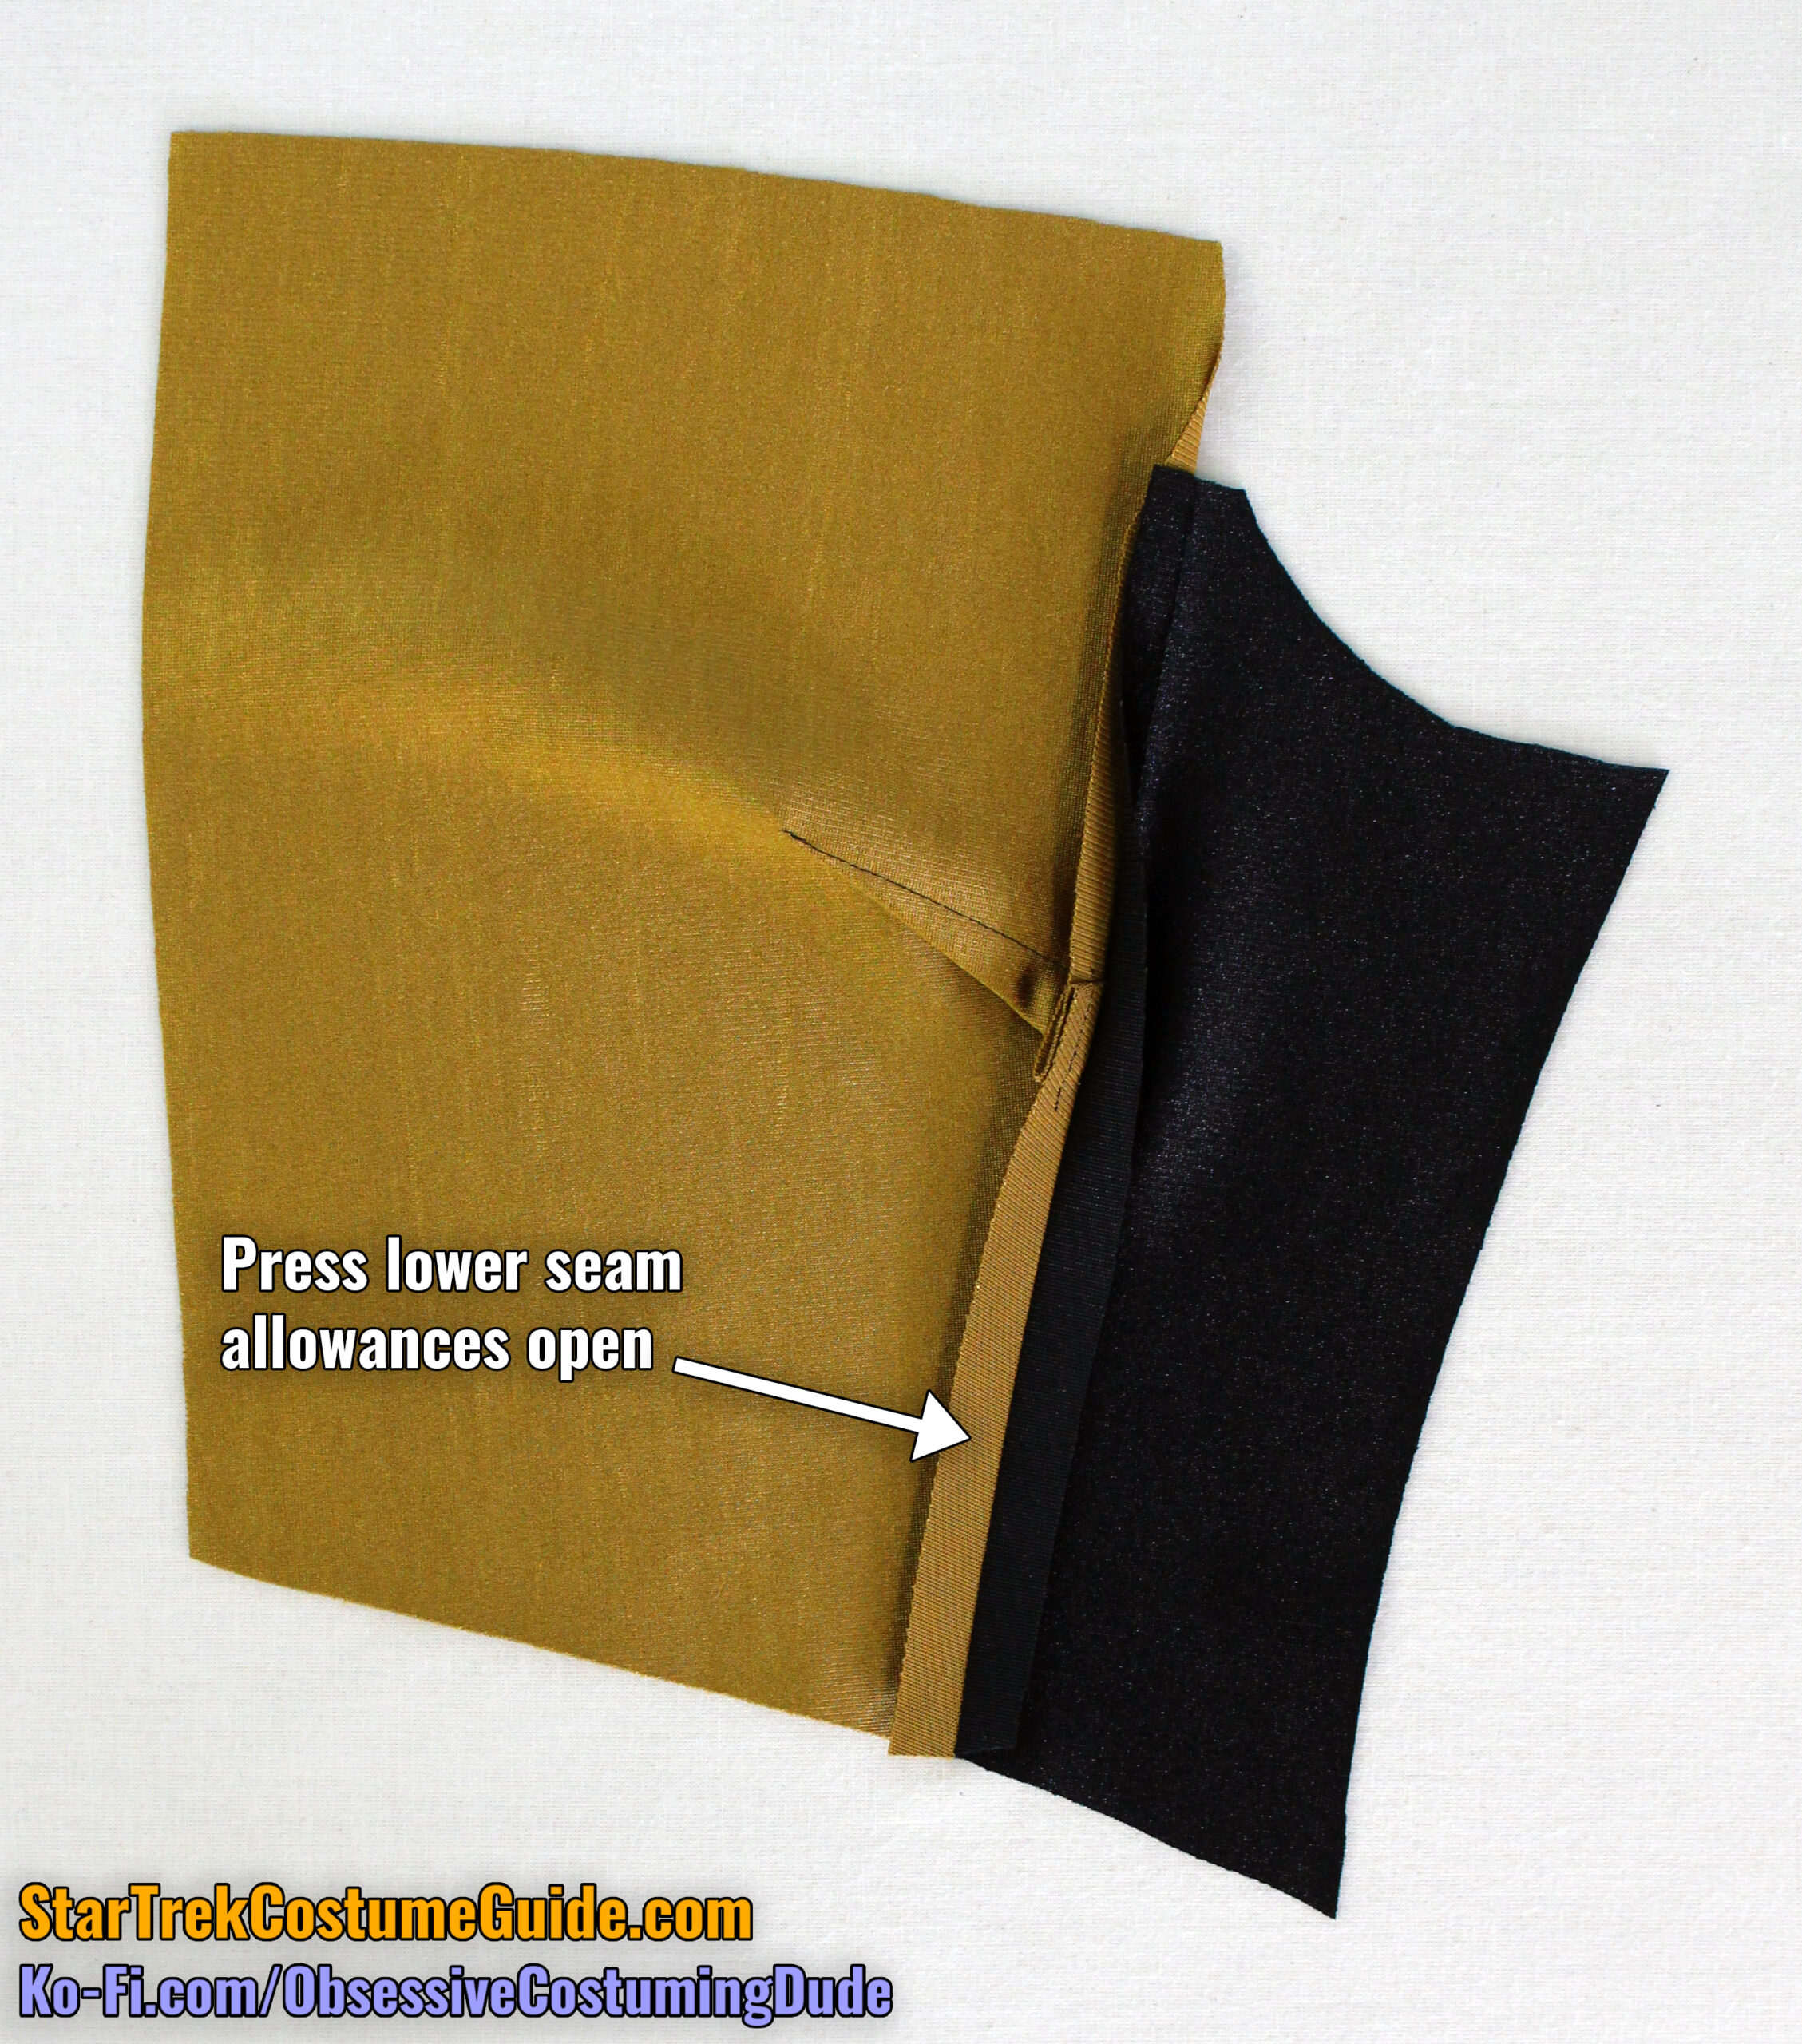
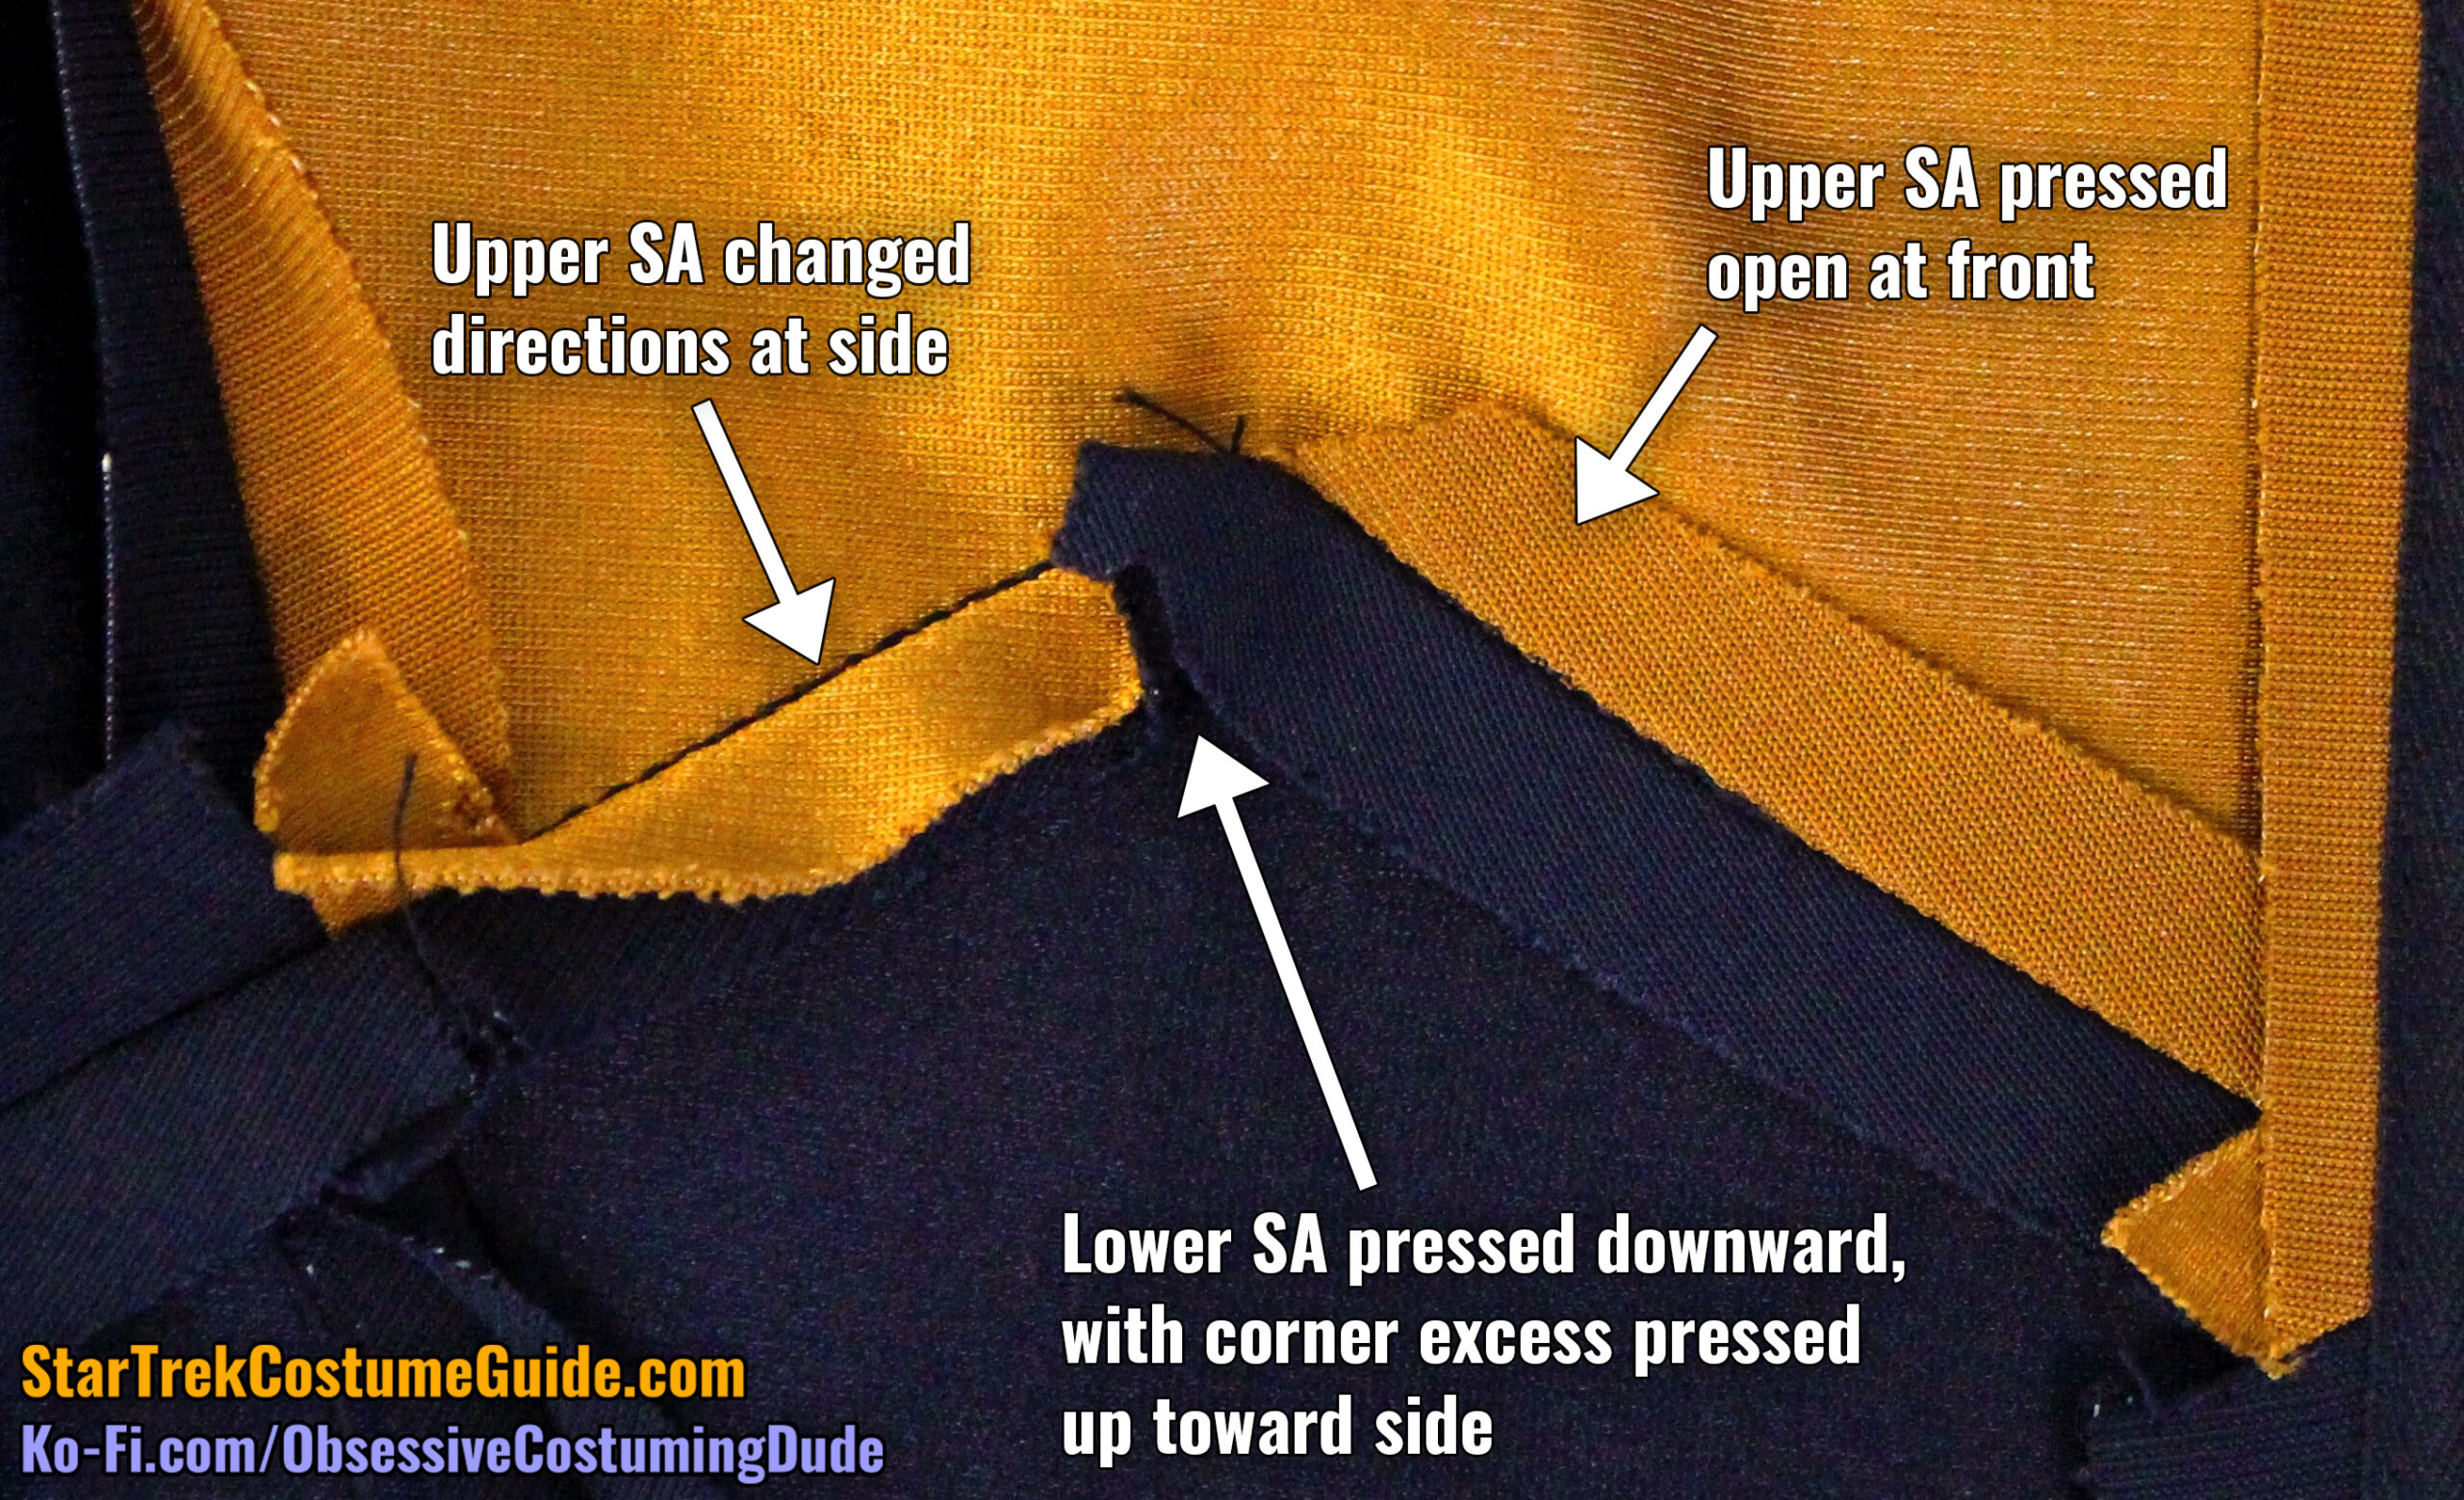
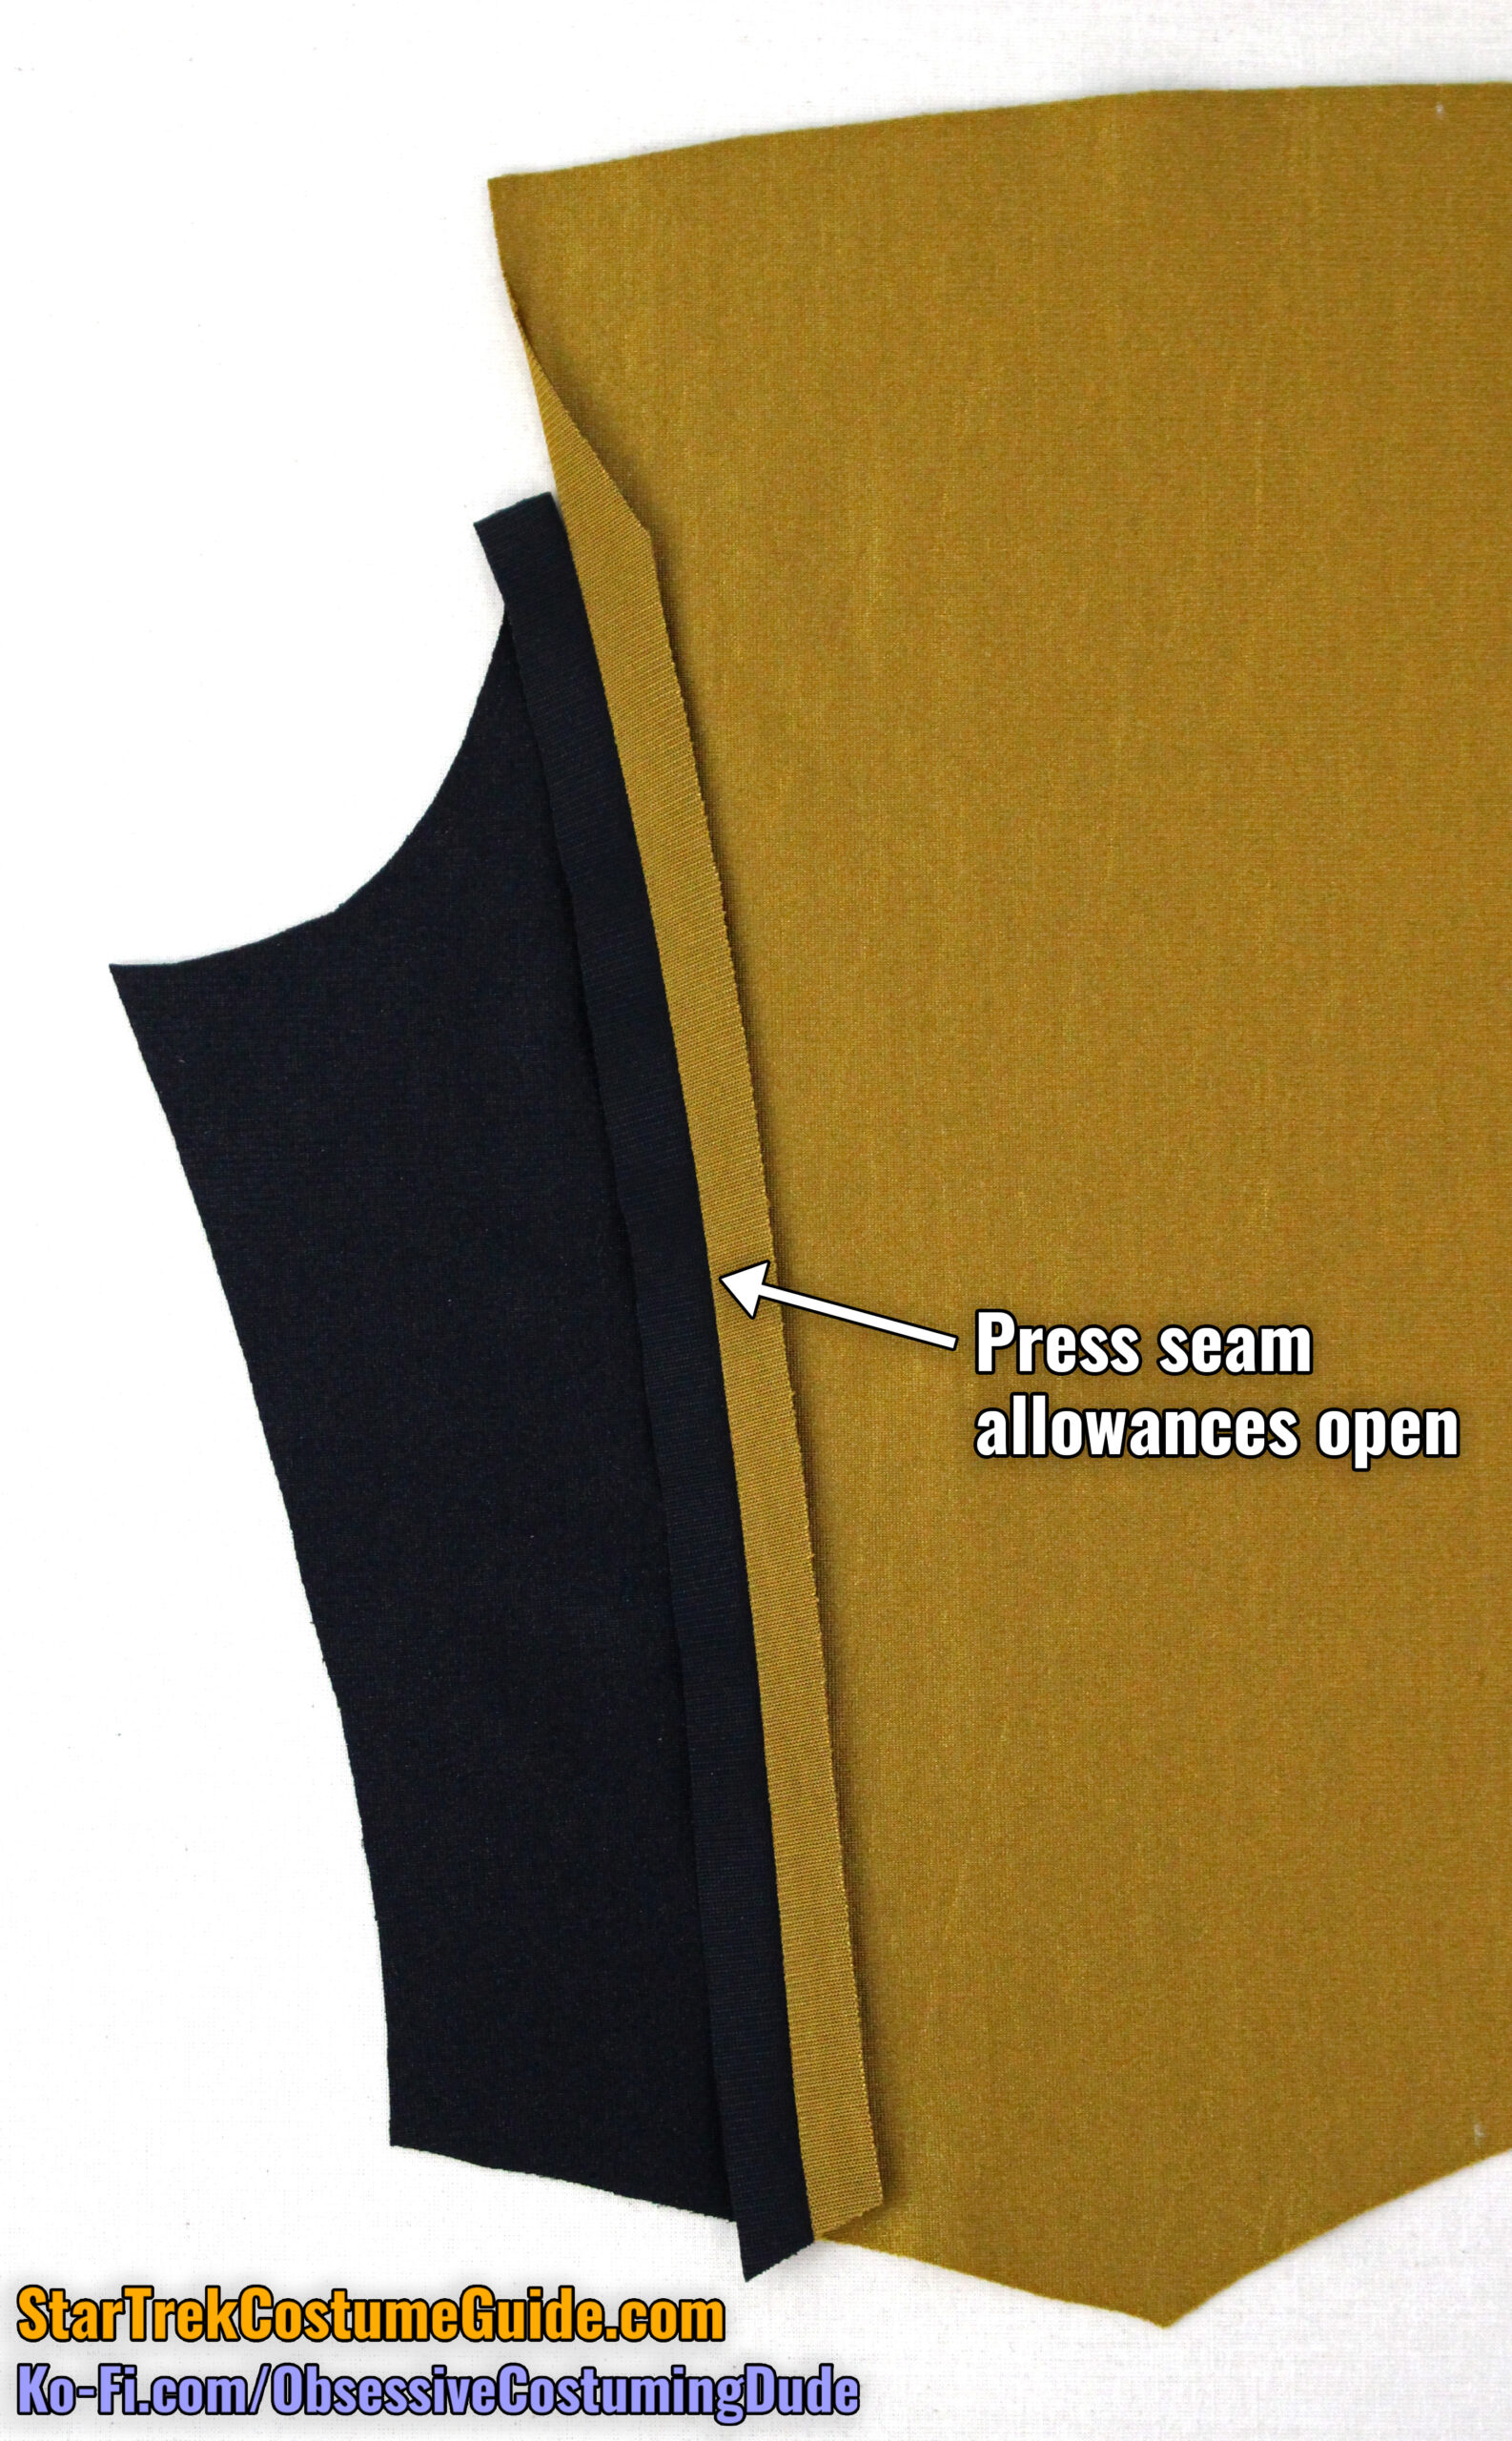
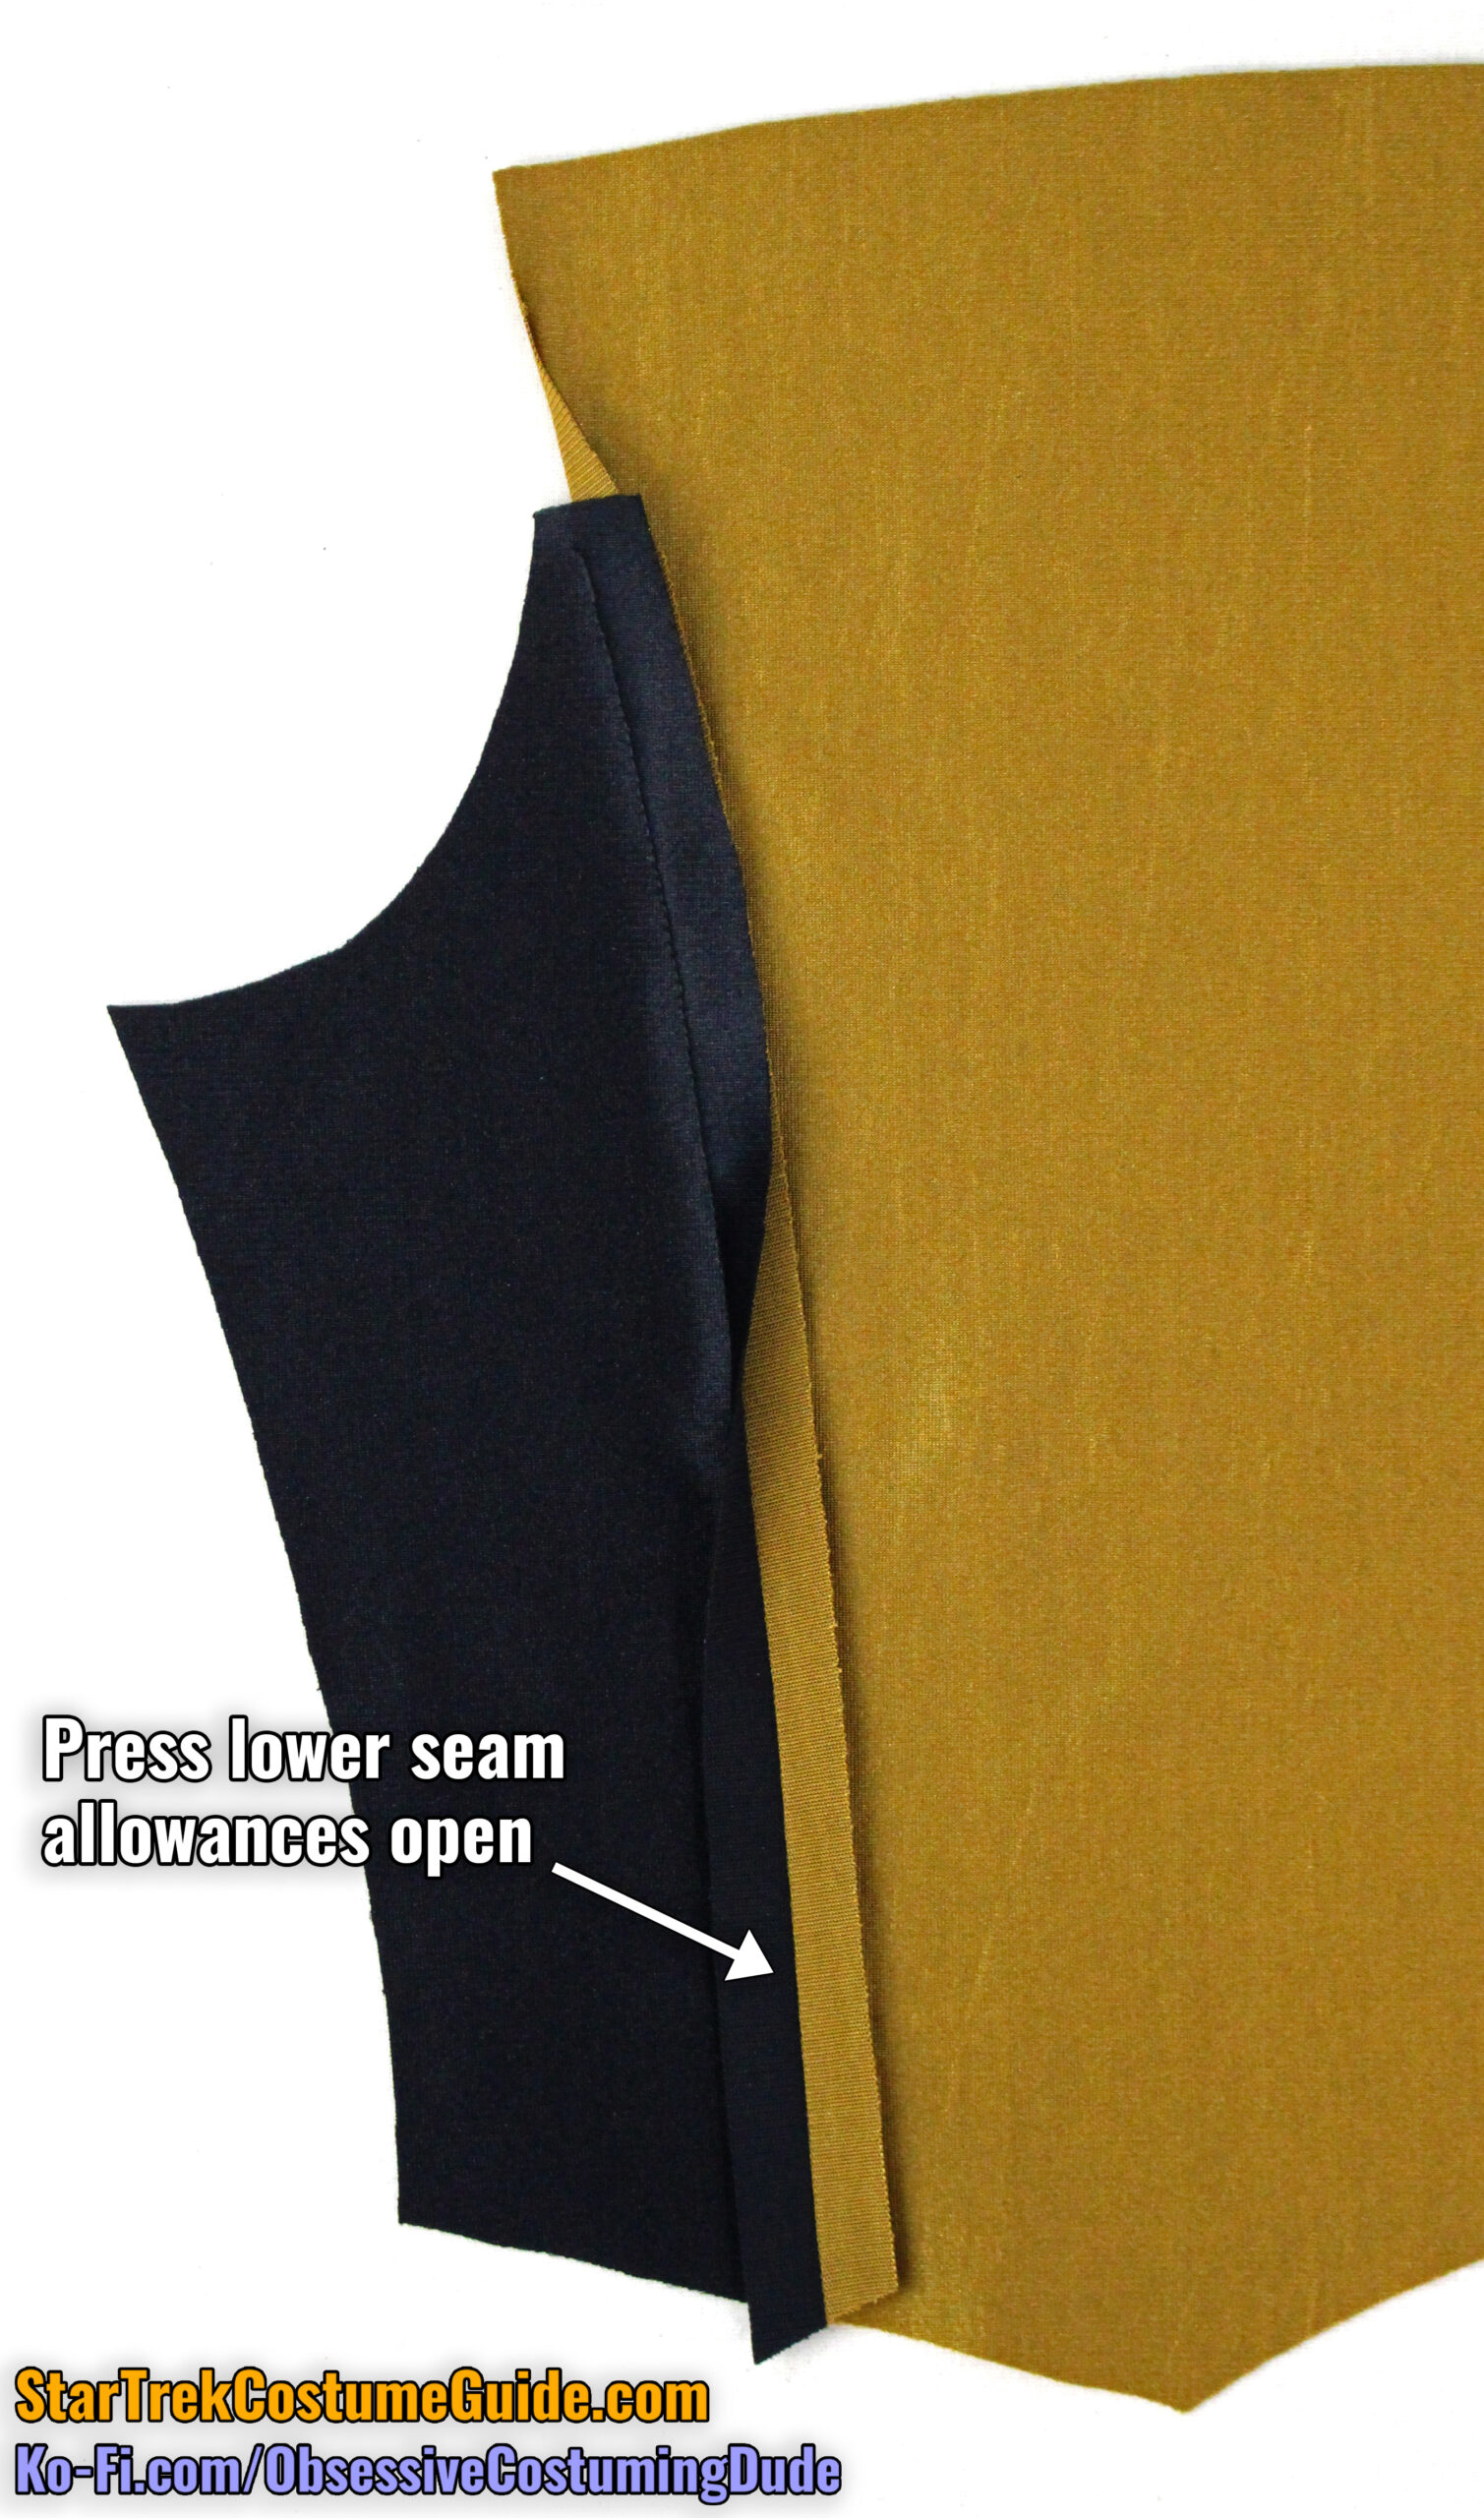
The side front (and side back) allowances were … wonky … on all of the screen-used TNG jumpsuits I studied – specifically in that the allowances consistently changed directions partway down the seam.
To best replicate the original uniforms, first press the seam allowances open.
Then, press both seam allowances toward the front.
And finally, press the seam allowances open again, but only on the lower portion of the seam.
Strange as this is, I believe it to have been an attempt to maintain the allowances pressed forward at the top (the way the side panel wants to drape) while avoiding otherwise unnecessary bulk in the waist seam.
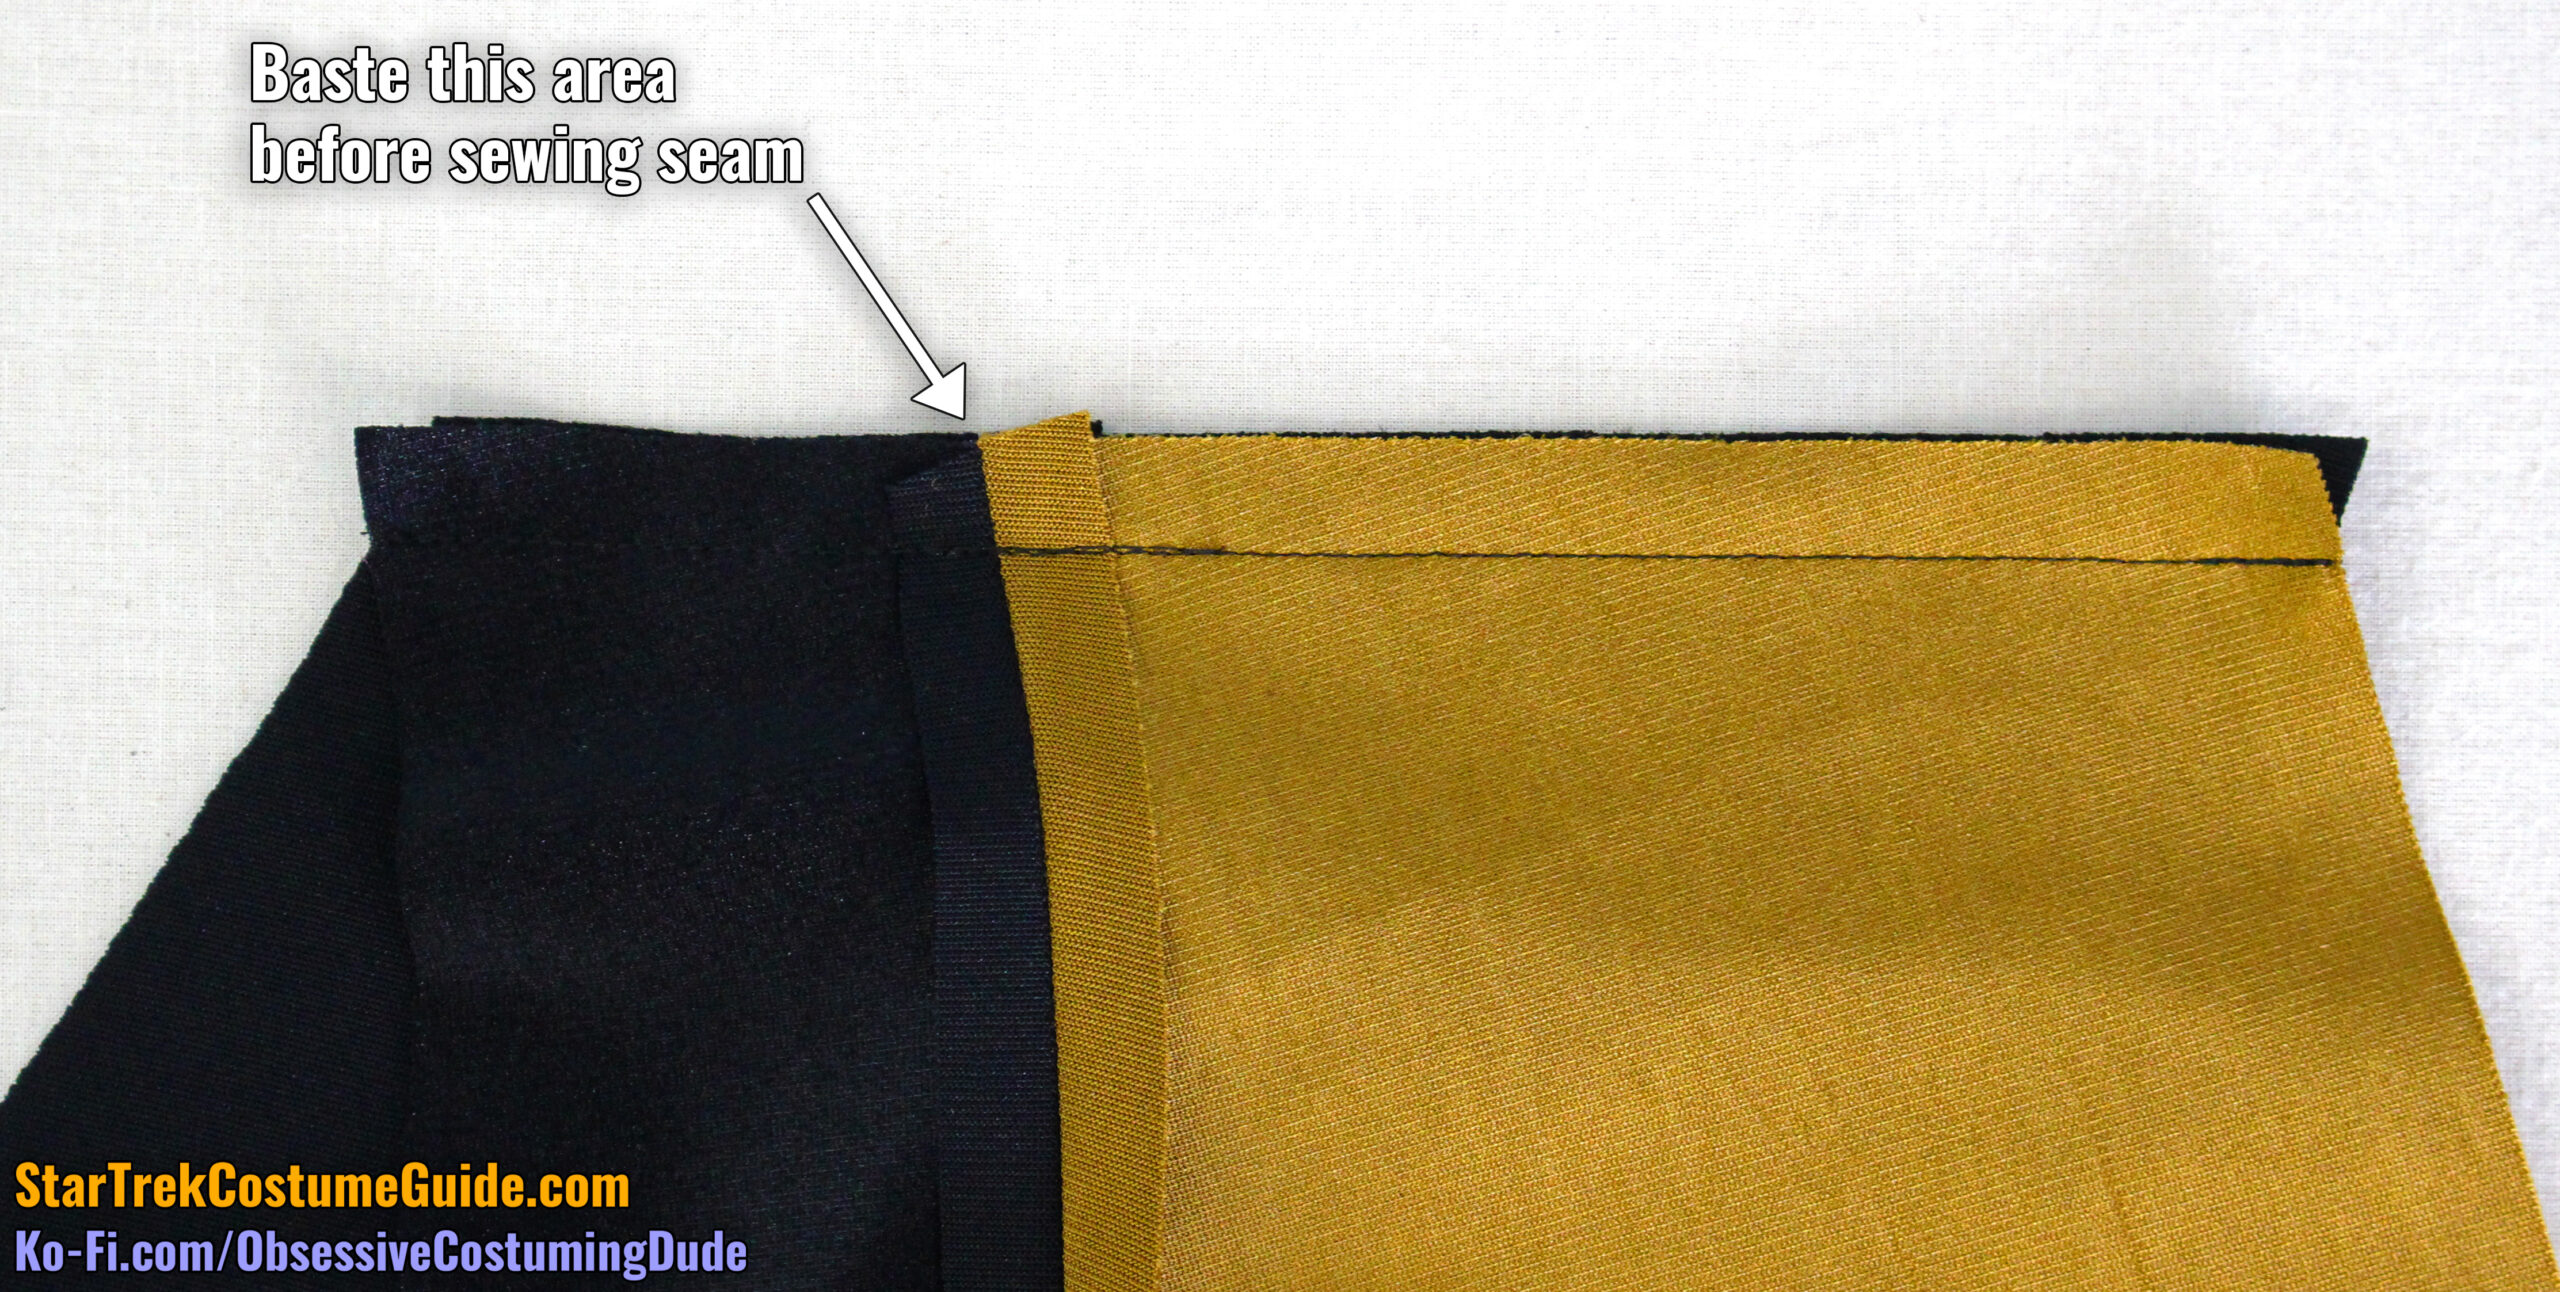
Sew the upper front assembly to the lower front assembly at the waist with ½” seam allowance, right sides together and matching side front seams at the waist seam line.
I suggest basting over the lower front/side front seams first, and only sewing the entire seam once you’re satisfied with the proper alignment.
Press the seam allowances open.
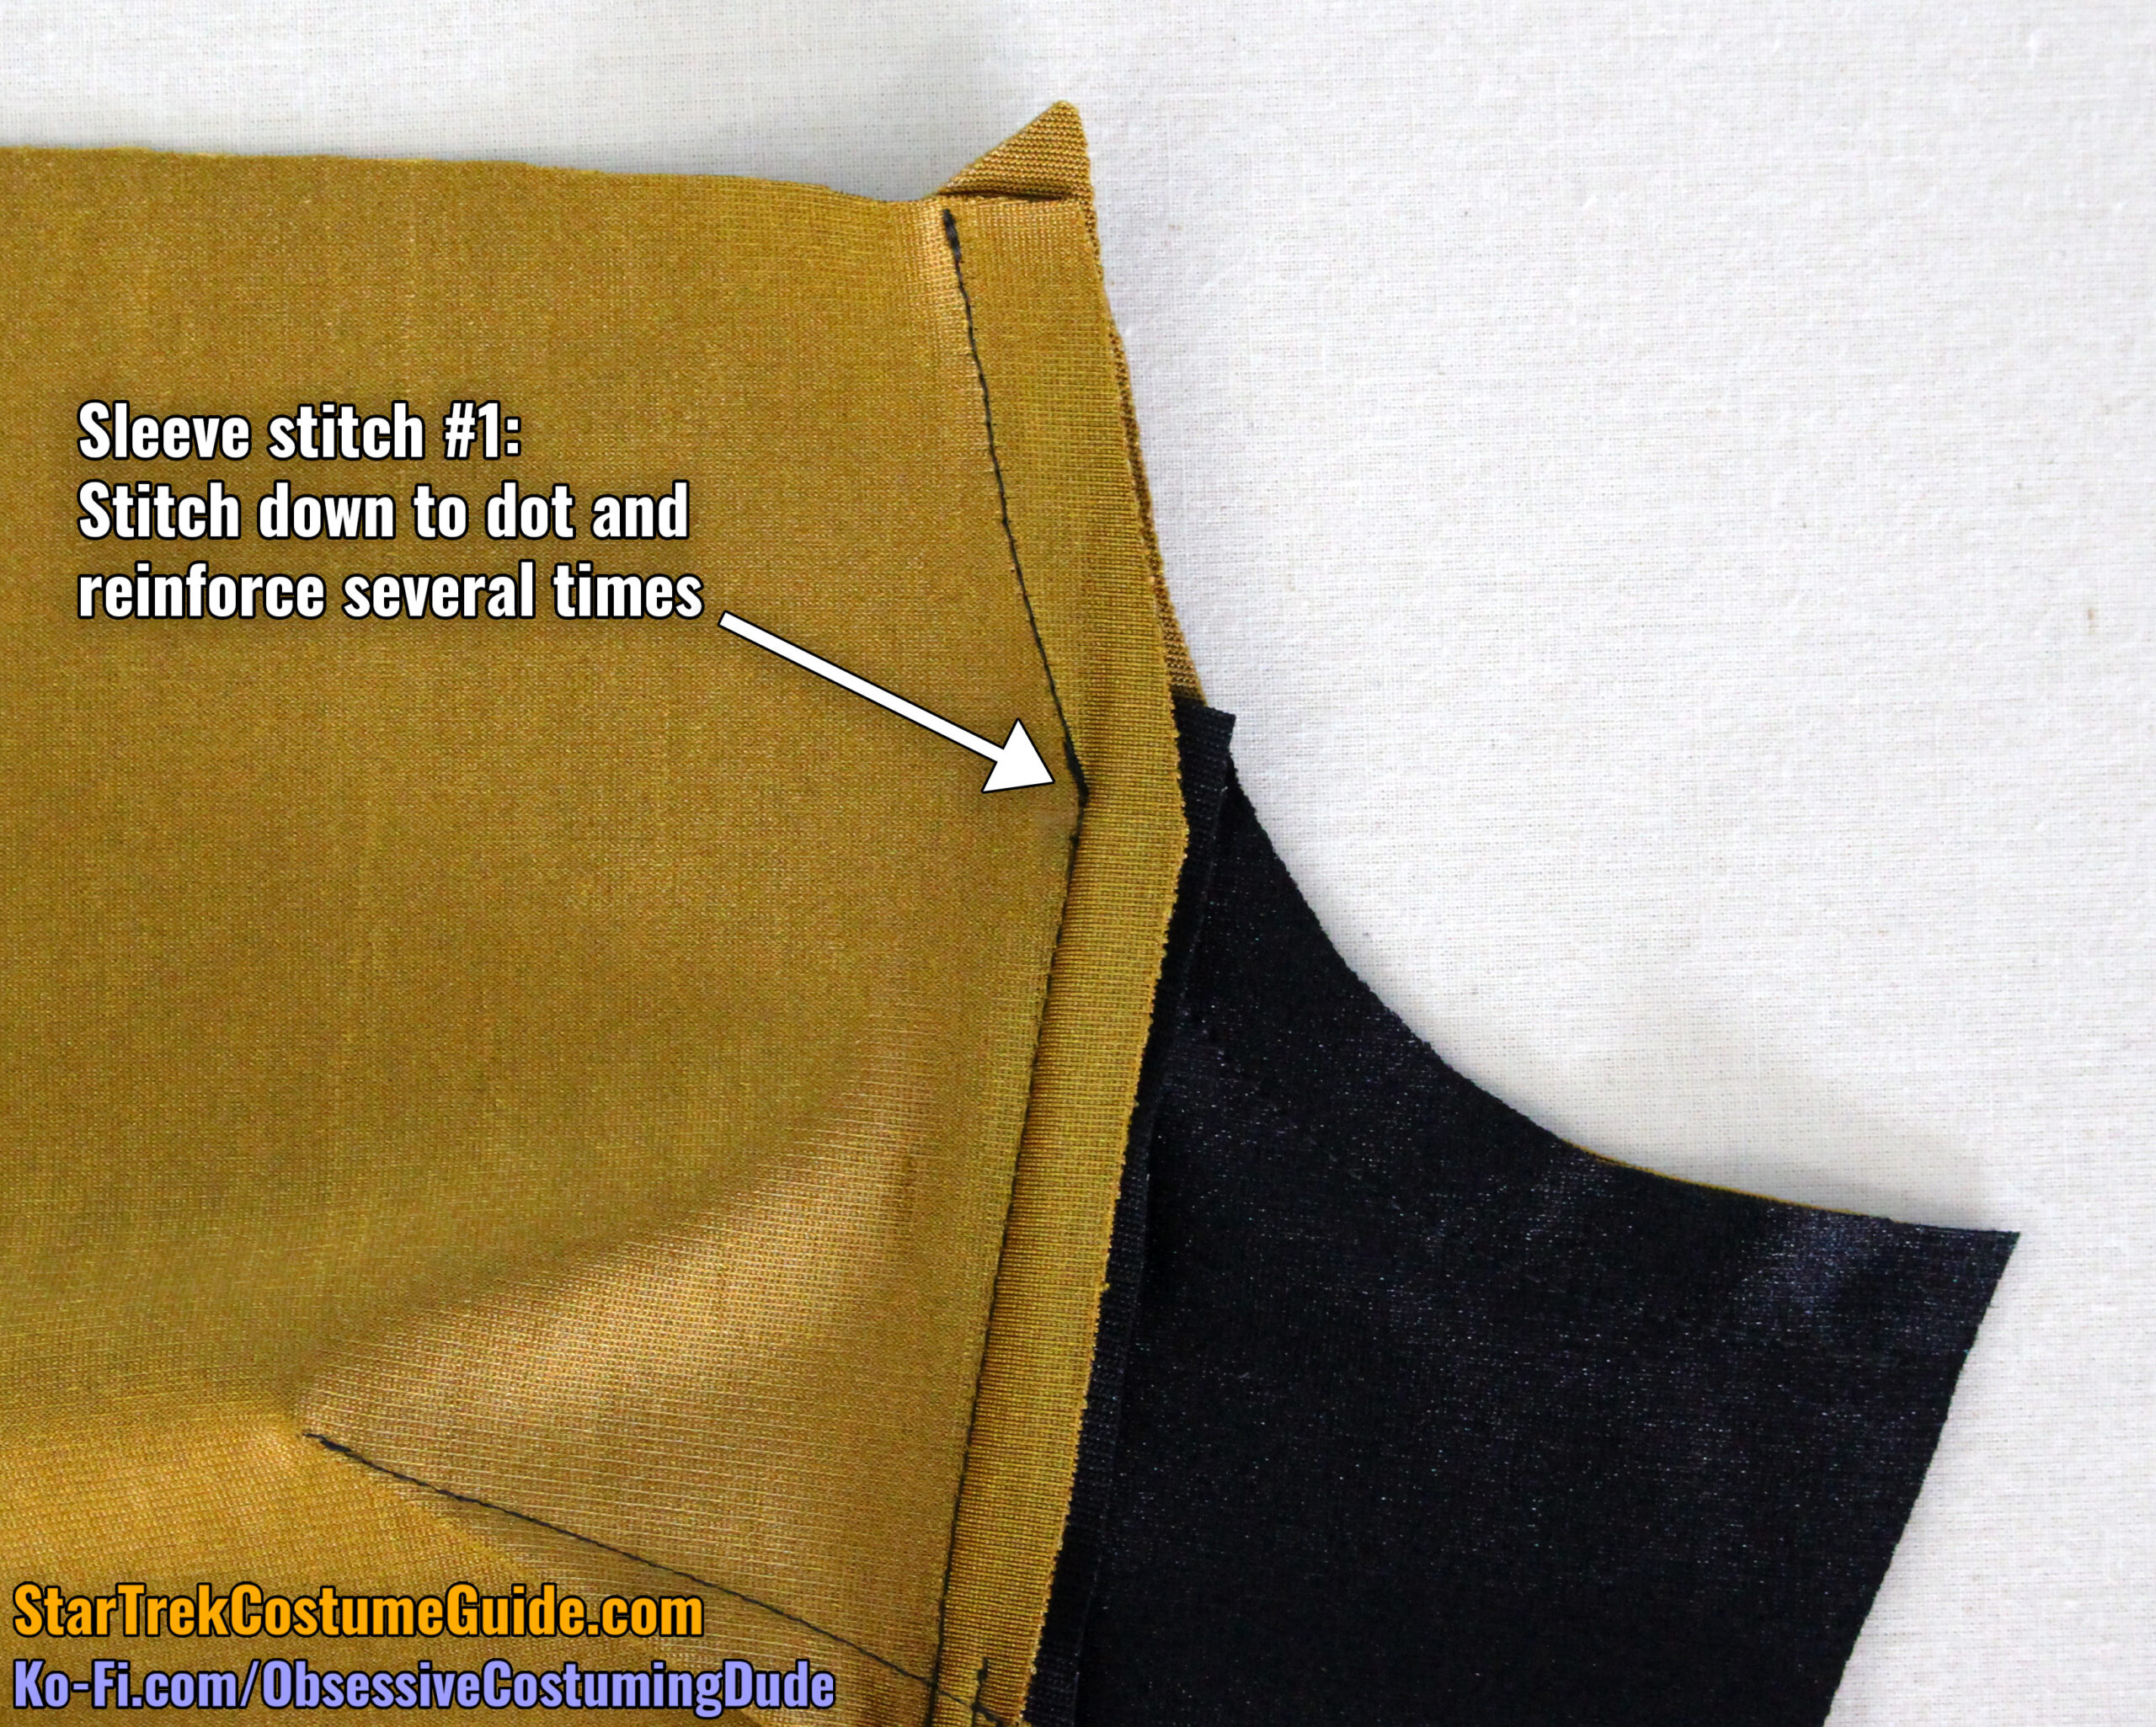
The TNG jumpsuit sleeves are attached to the body via two separate stitches, which can be done in either order.
Position the front sleeve (piece O) onto the body assembly, right sides together and matching armscyes.
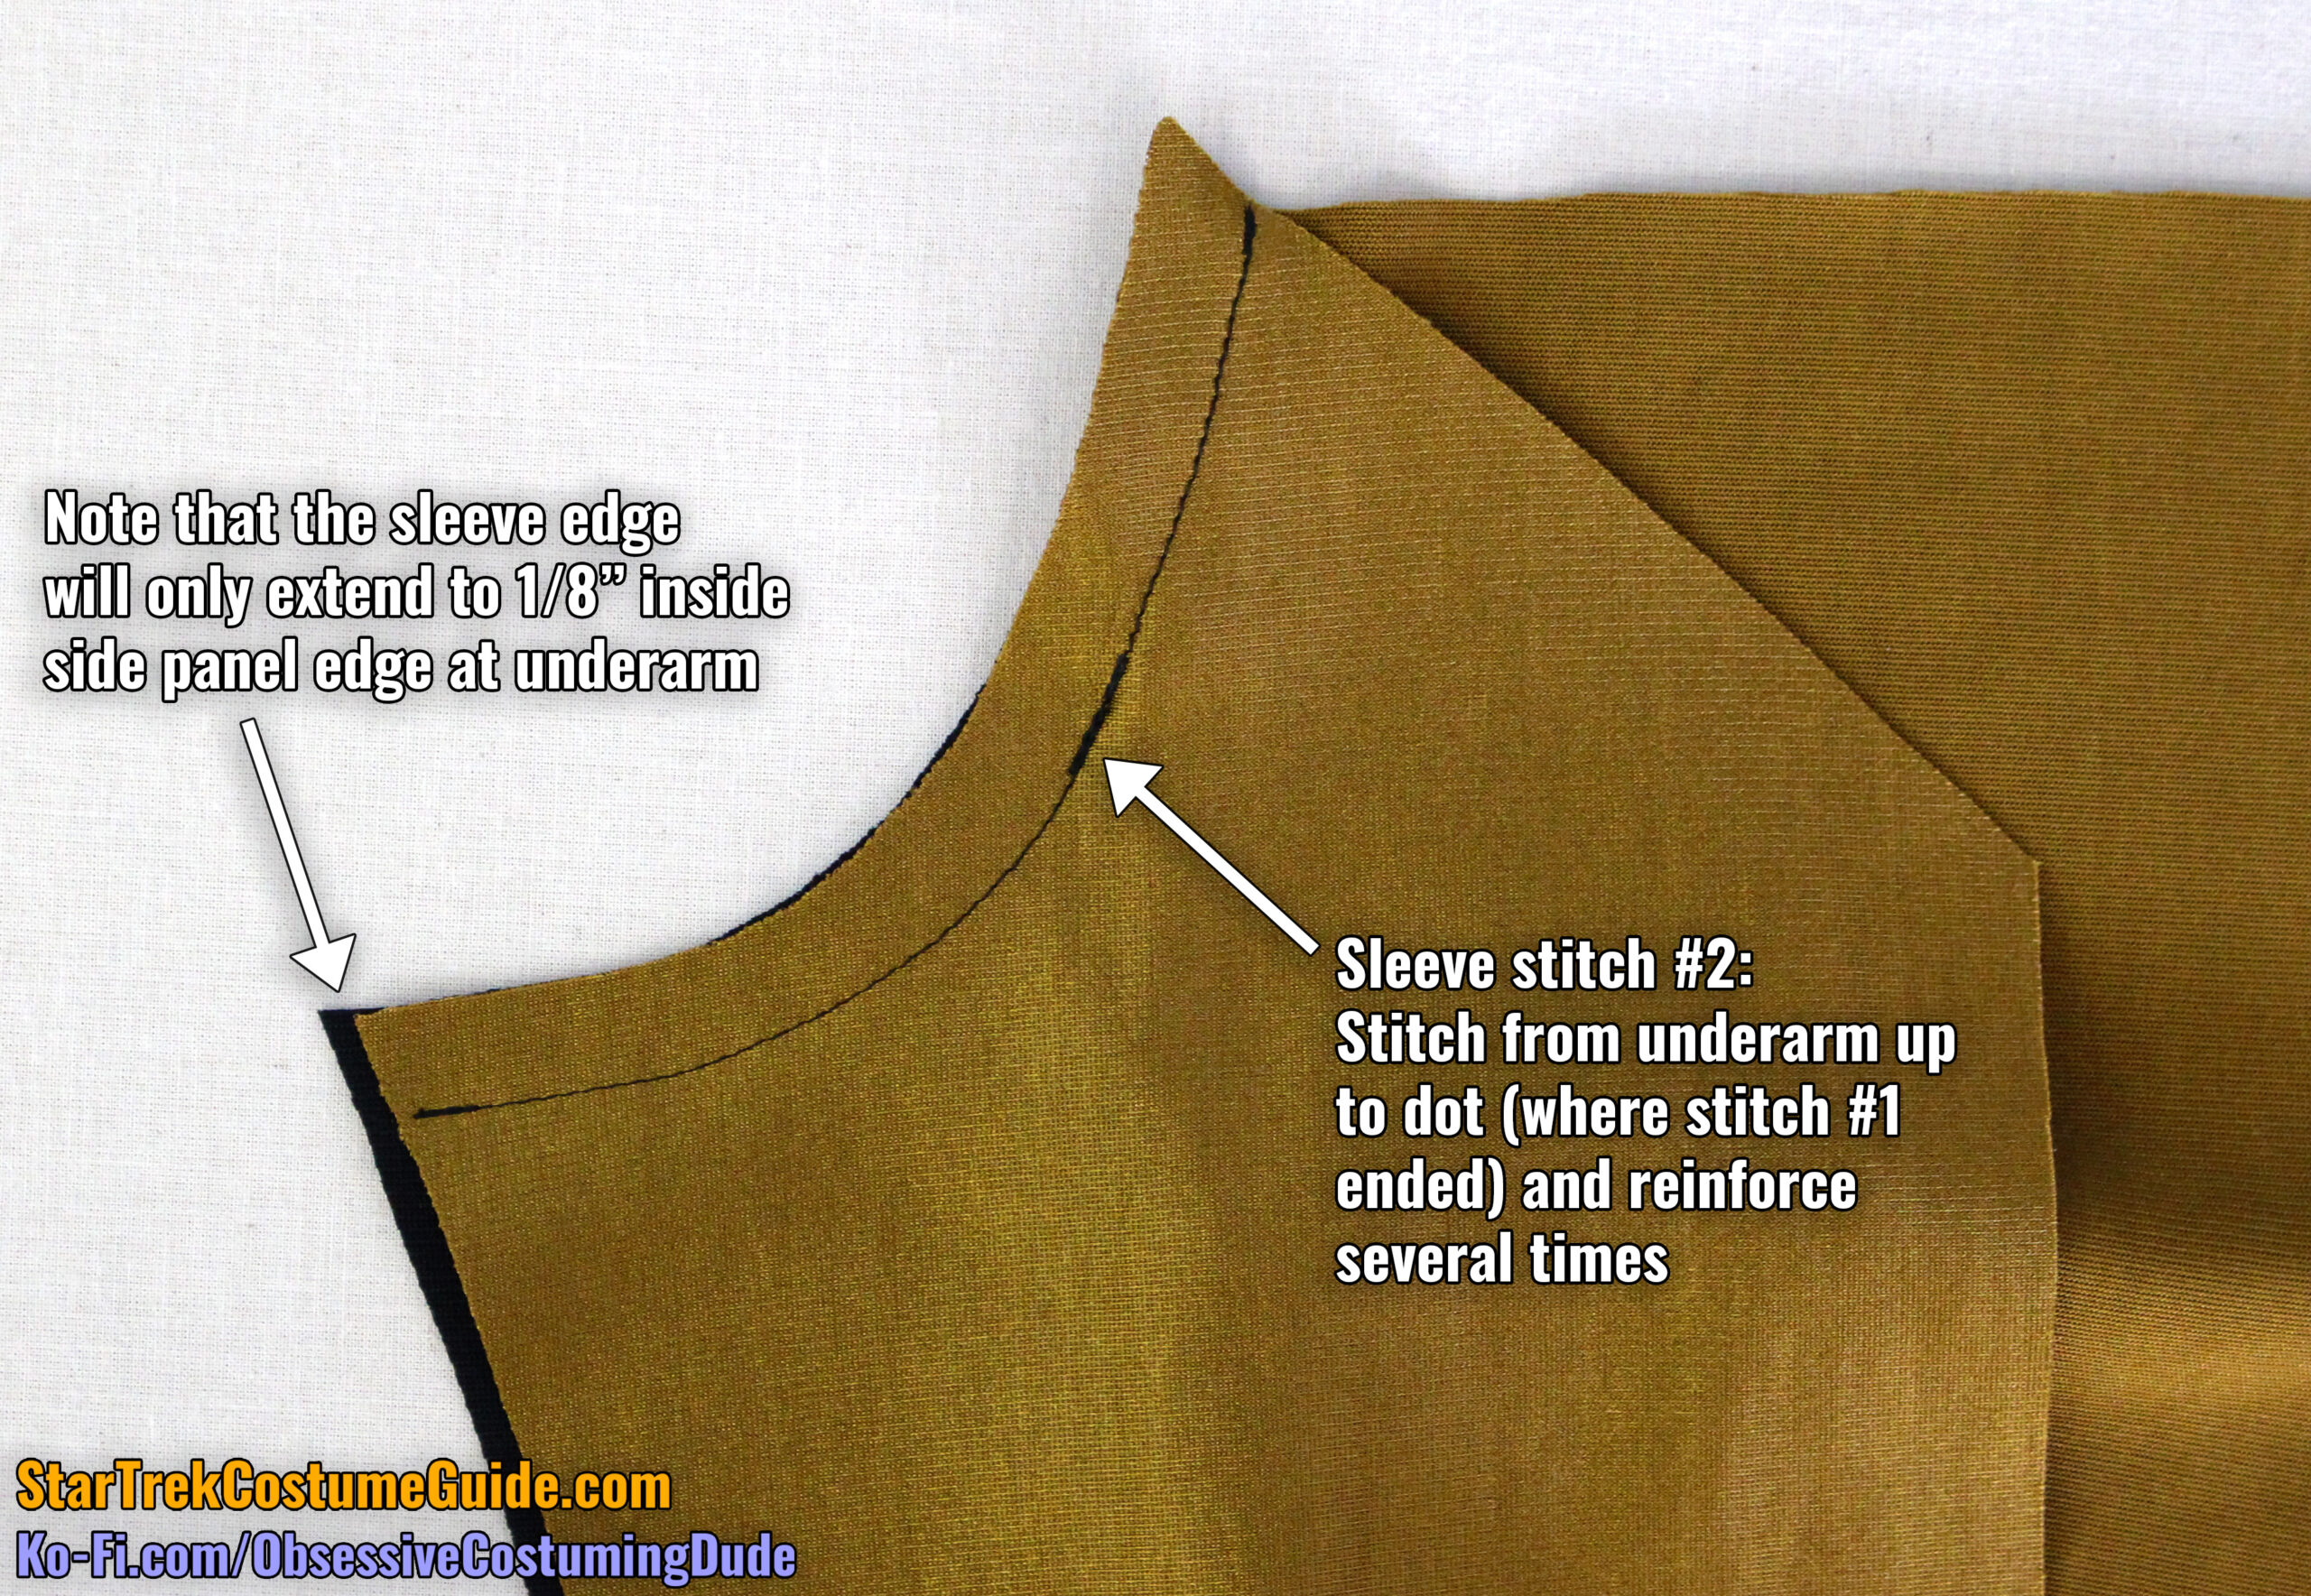
Note that because the sleeve has ½” seam allowance but the body’s side seam has ⅝” seam allowance, the sleeve edge will only extend to ⅛” inside the side panel edge at the underarm.
Stitch from the upper body down to the dot (where the side front stitching ended) and reinforce several times.
Then, flip the assembly over and stitch from the underarm up to the dot (again, where the previous stitching ended) and reinforce several times.
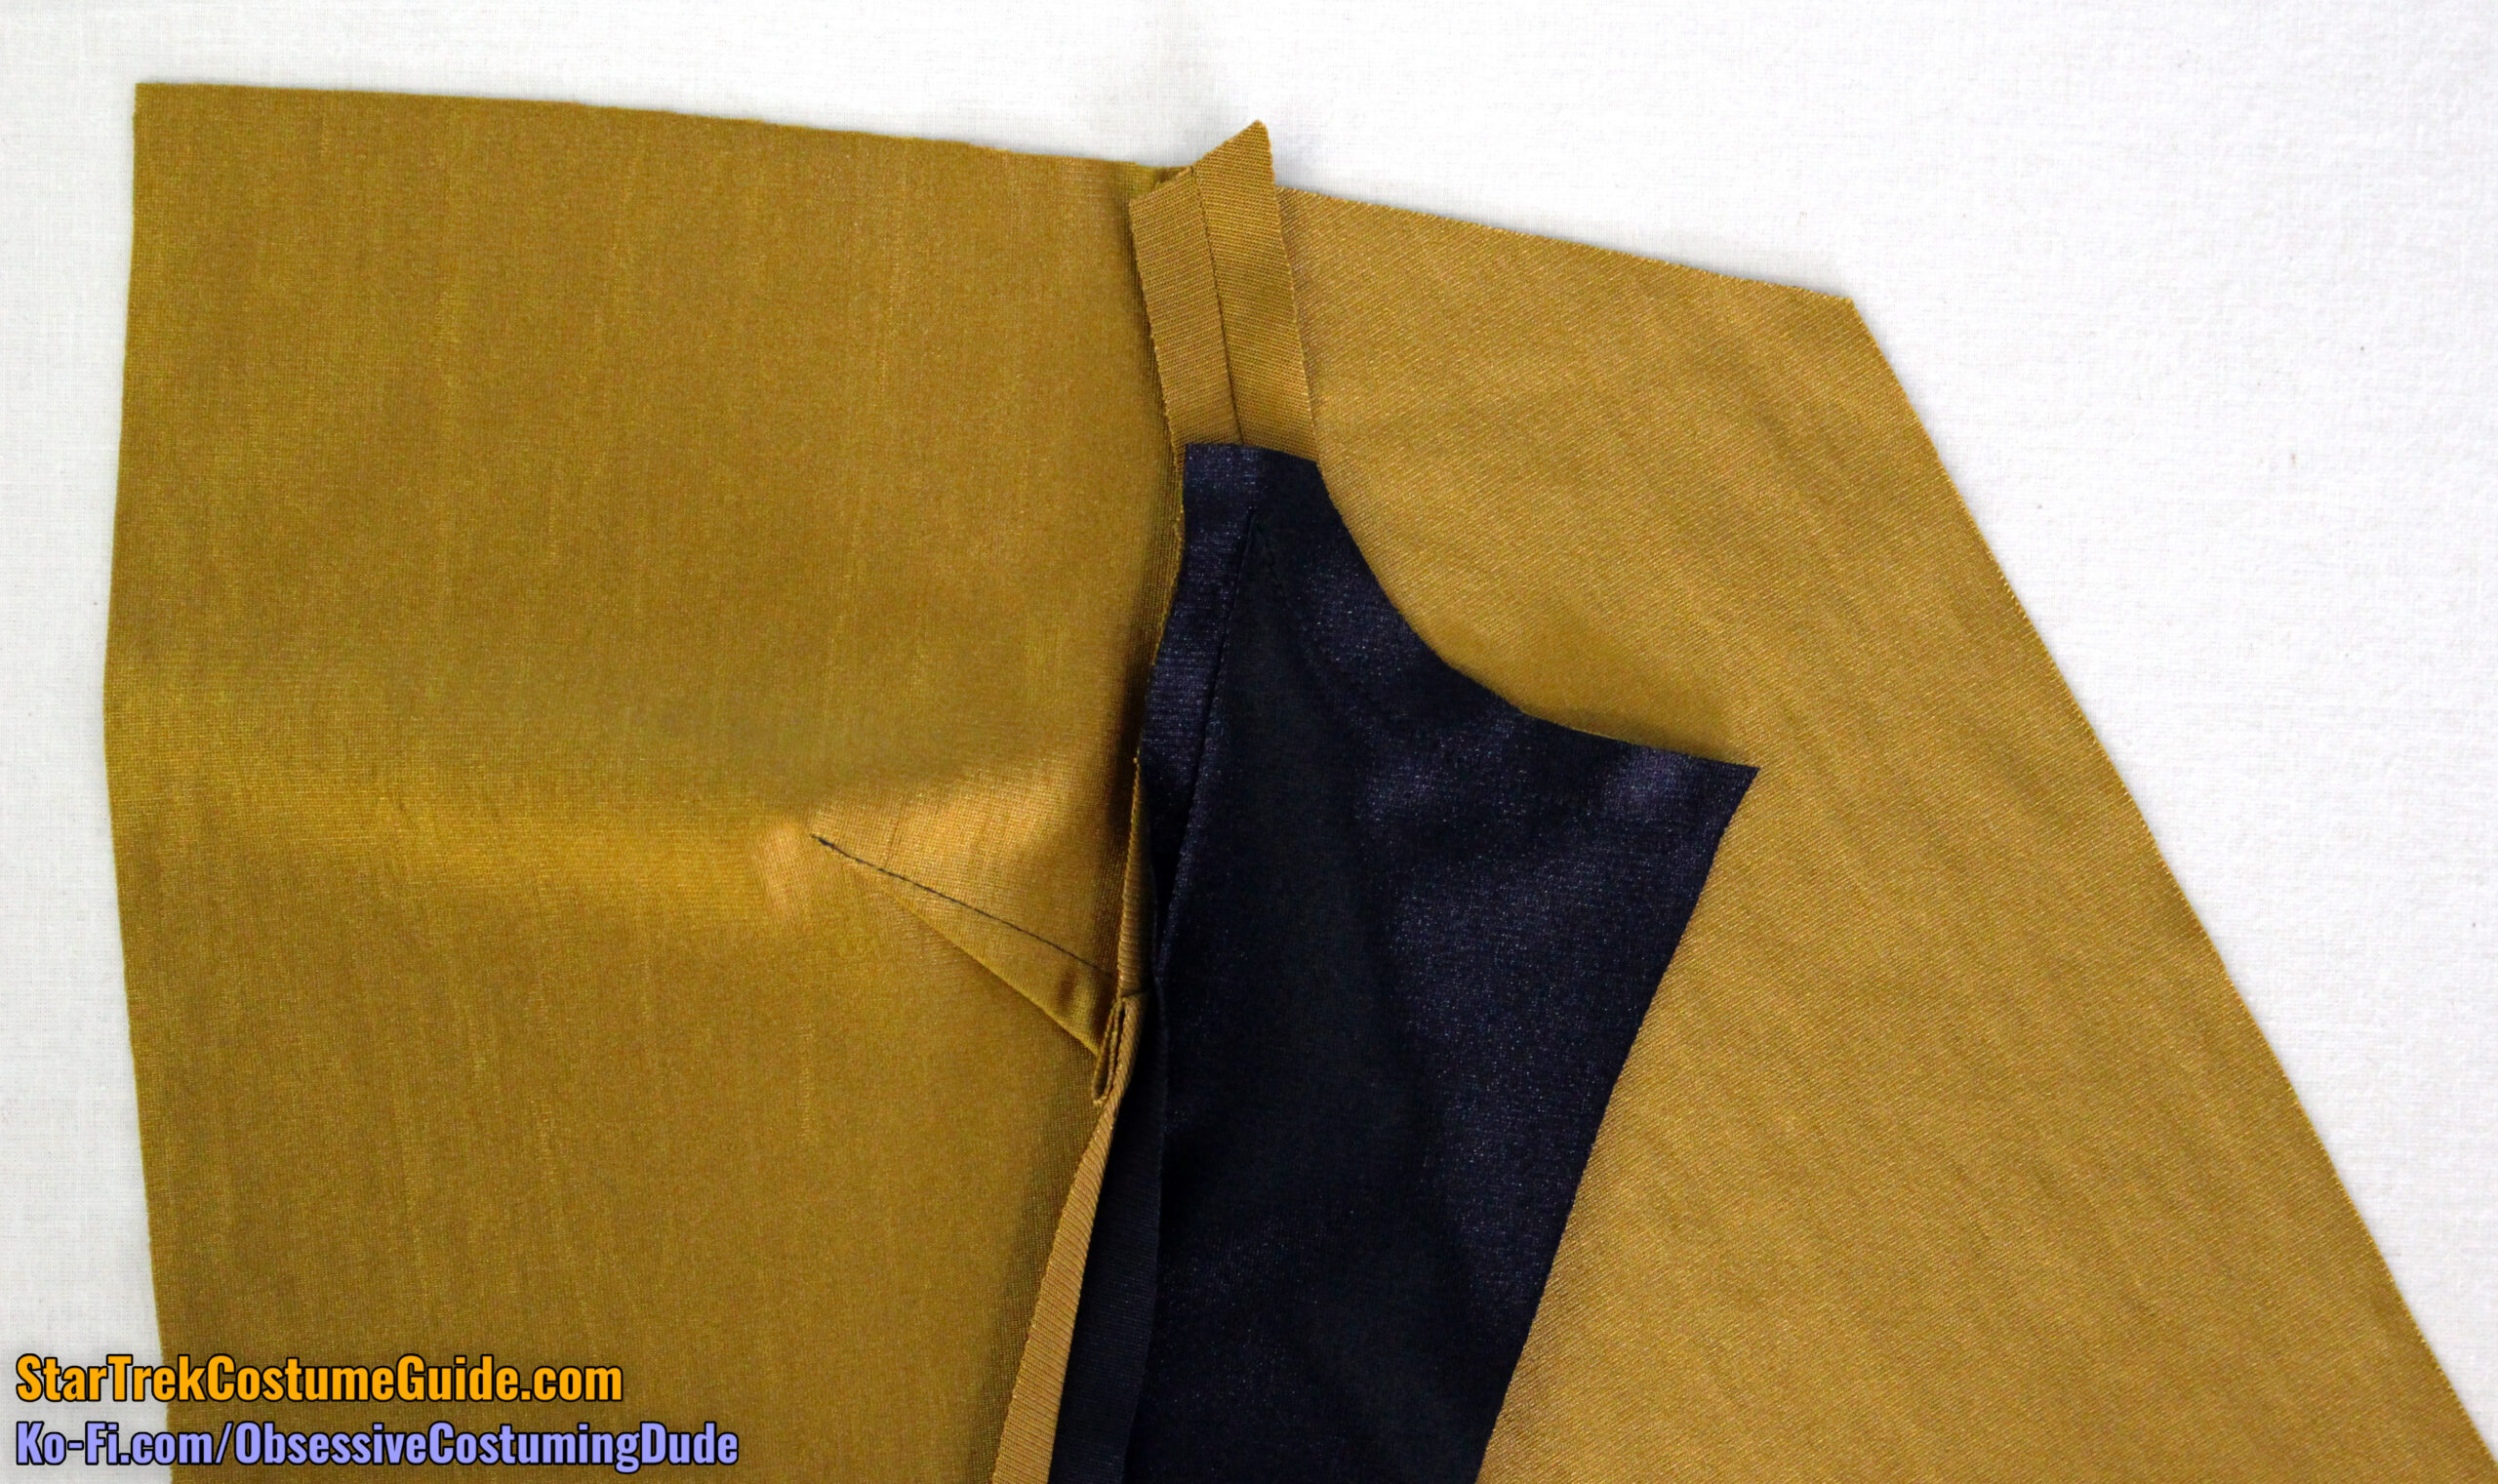
Press the lower armscye/sleeve (underarm) allowances toward the sleeve, and press the upper armscye/sleeve allowances open.
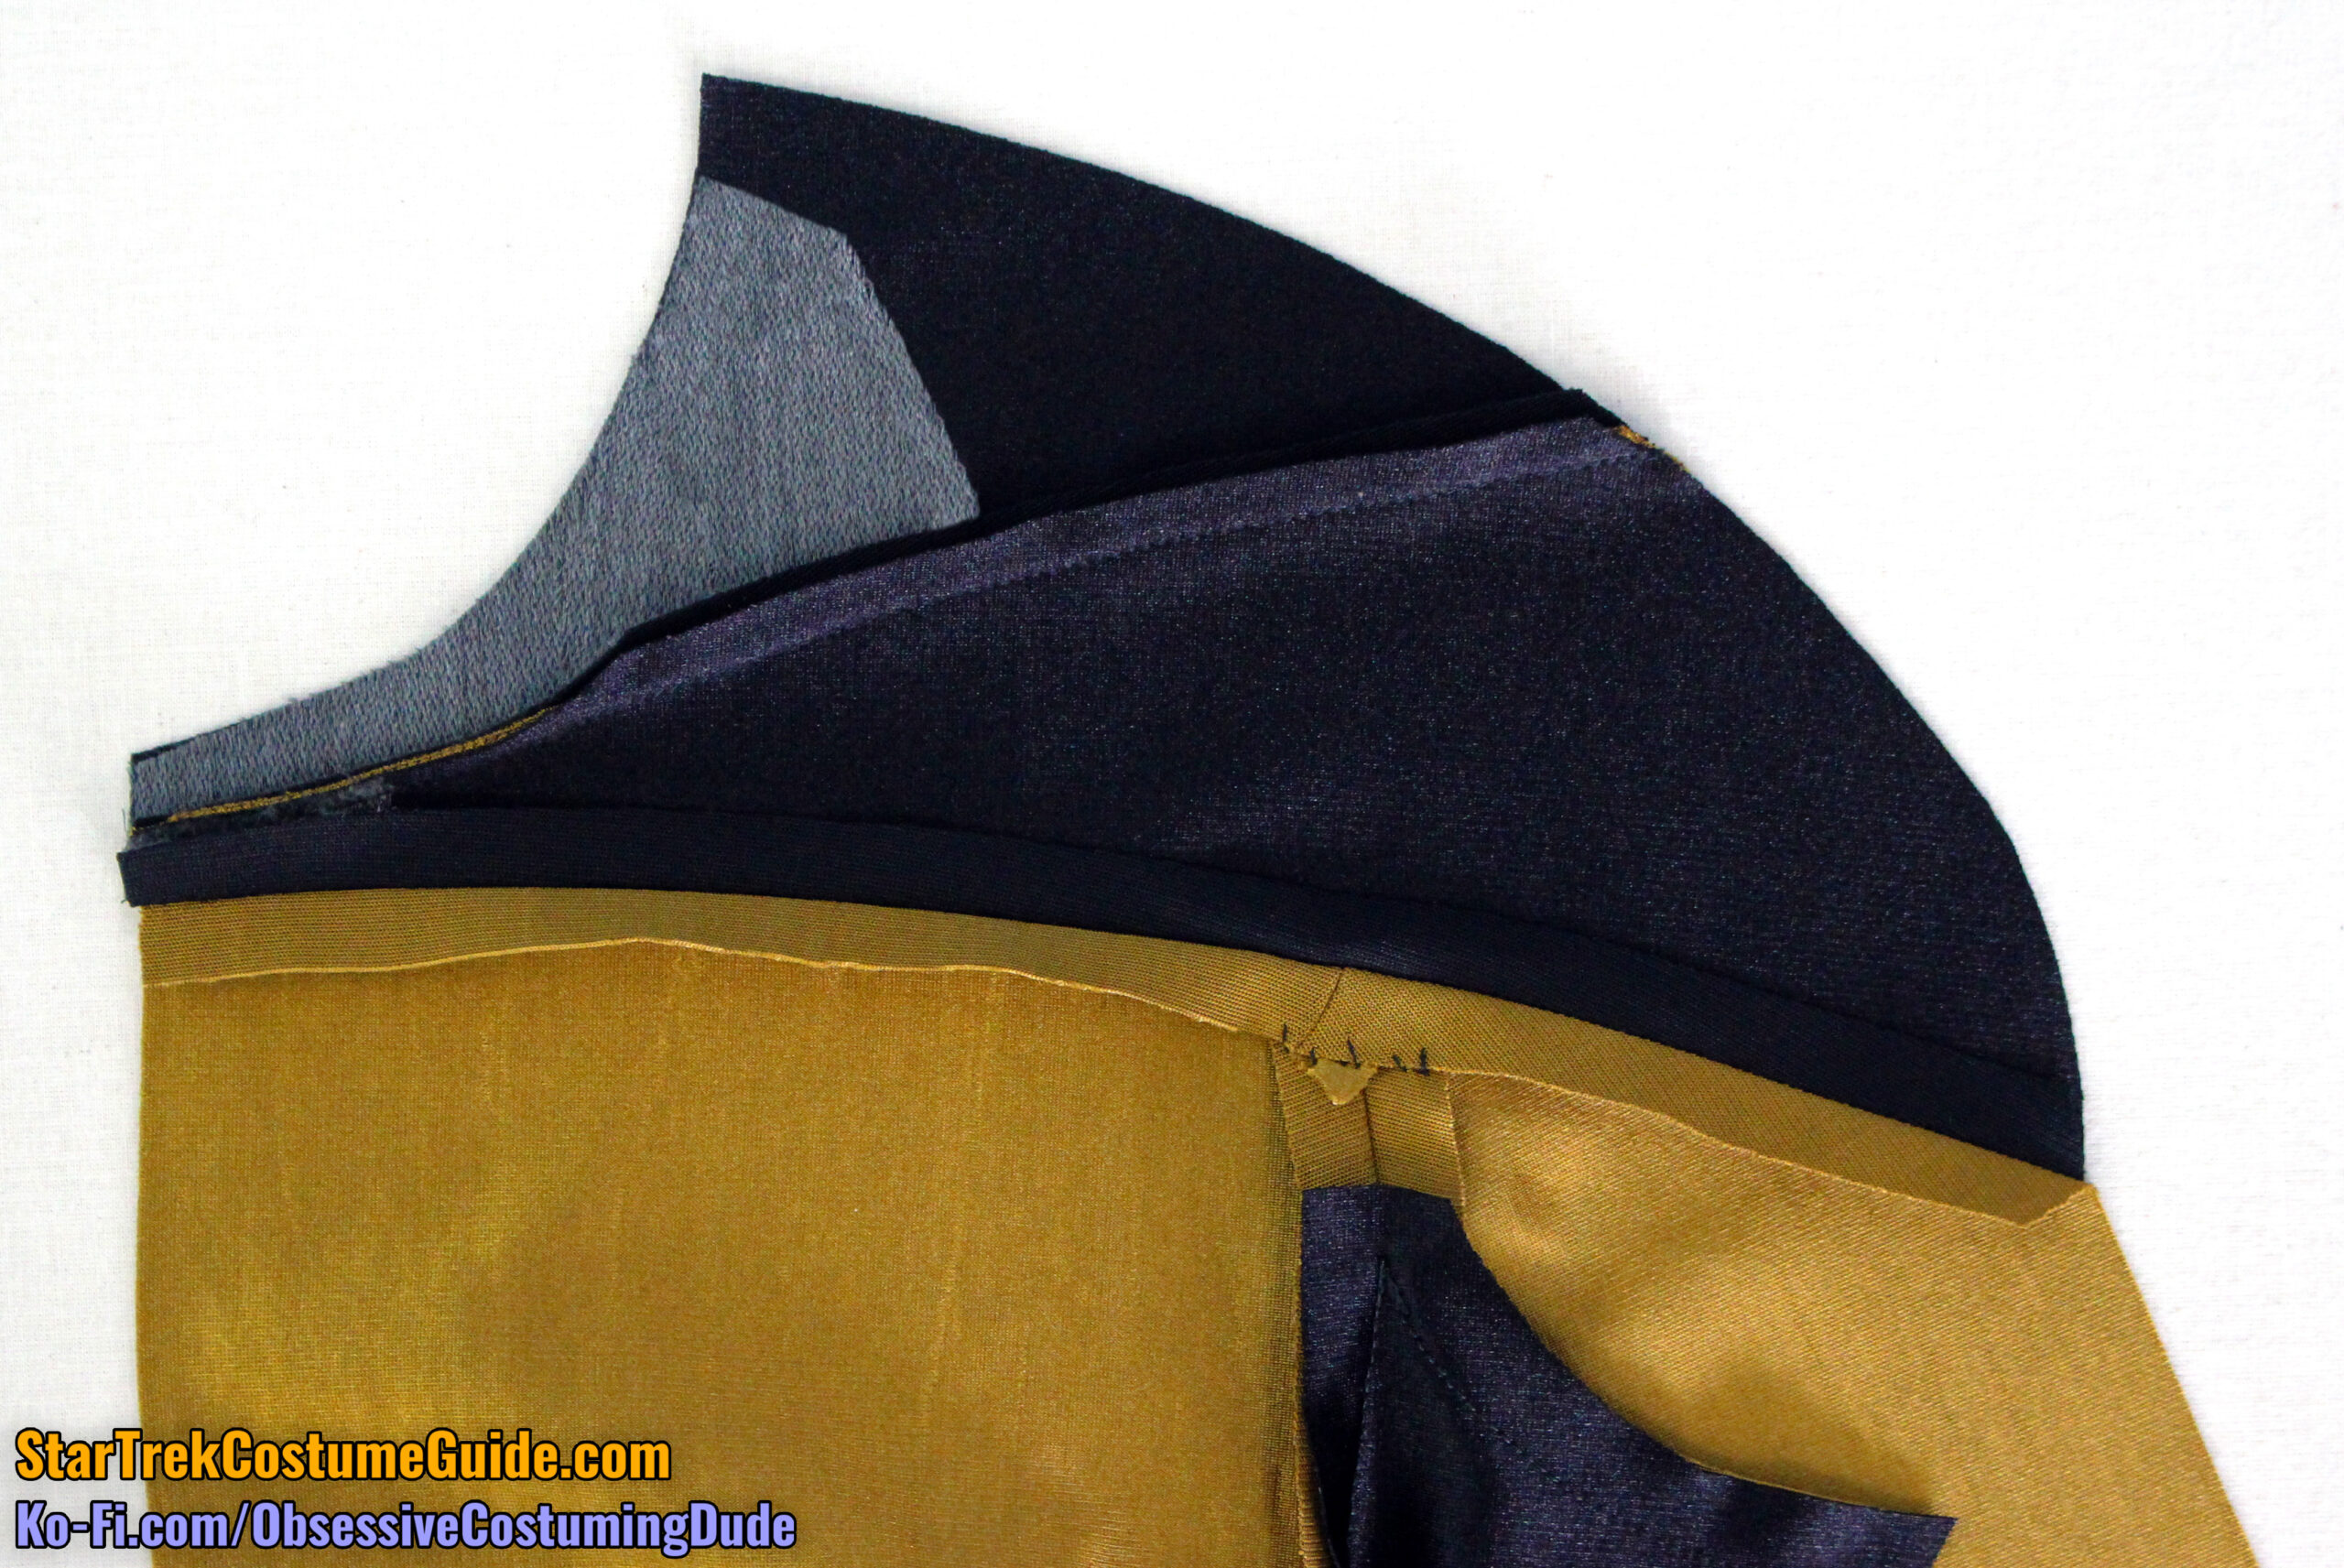
Sew the front yoke assembly to the body assembly, right sides together with ½” seam allowance.
Press the seam allowances open.
I also suggest machine-basting the allowances open at the lower, outer corner of the yoke, and tacking the upper body allowance down by hand at the armscye.
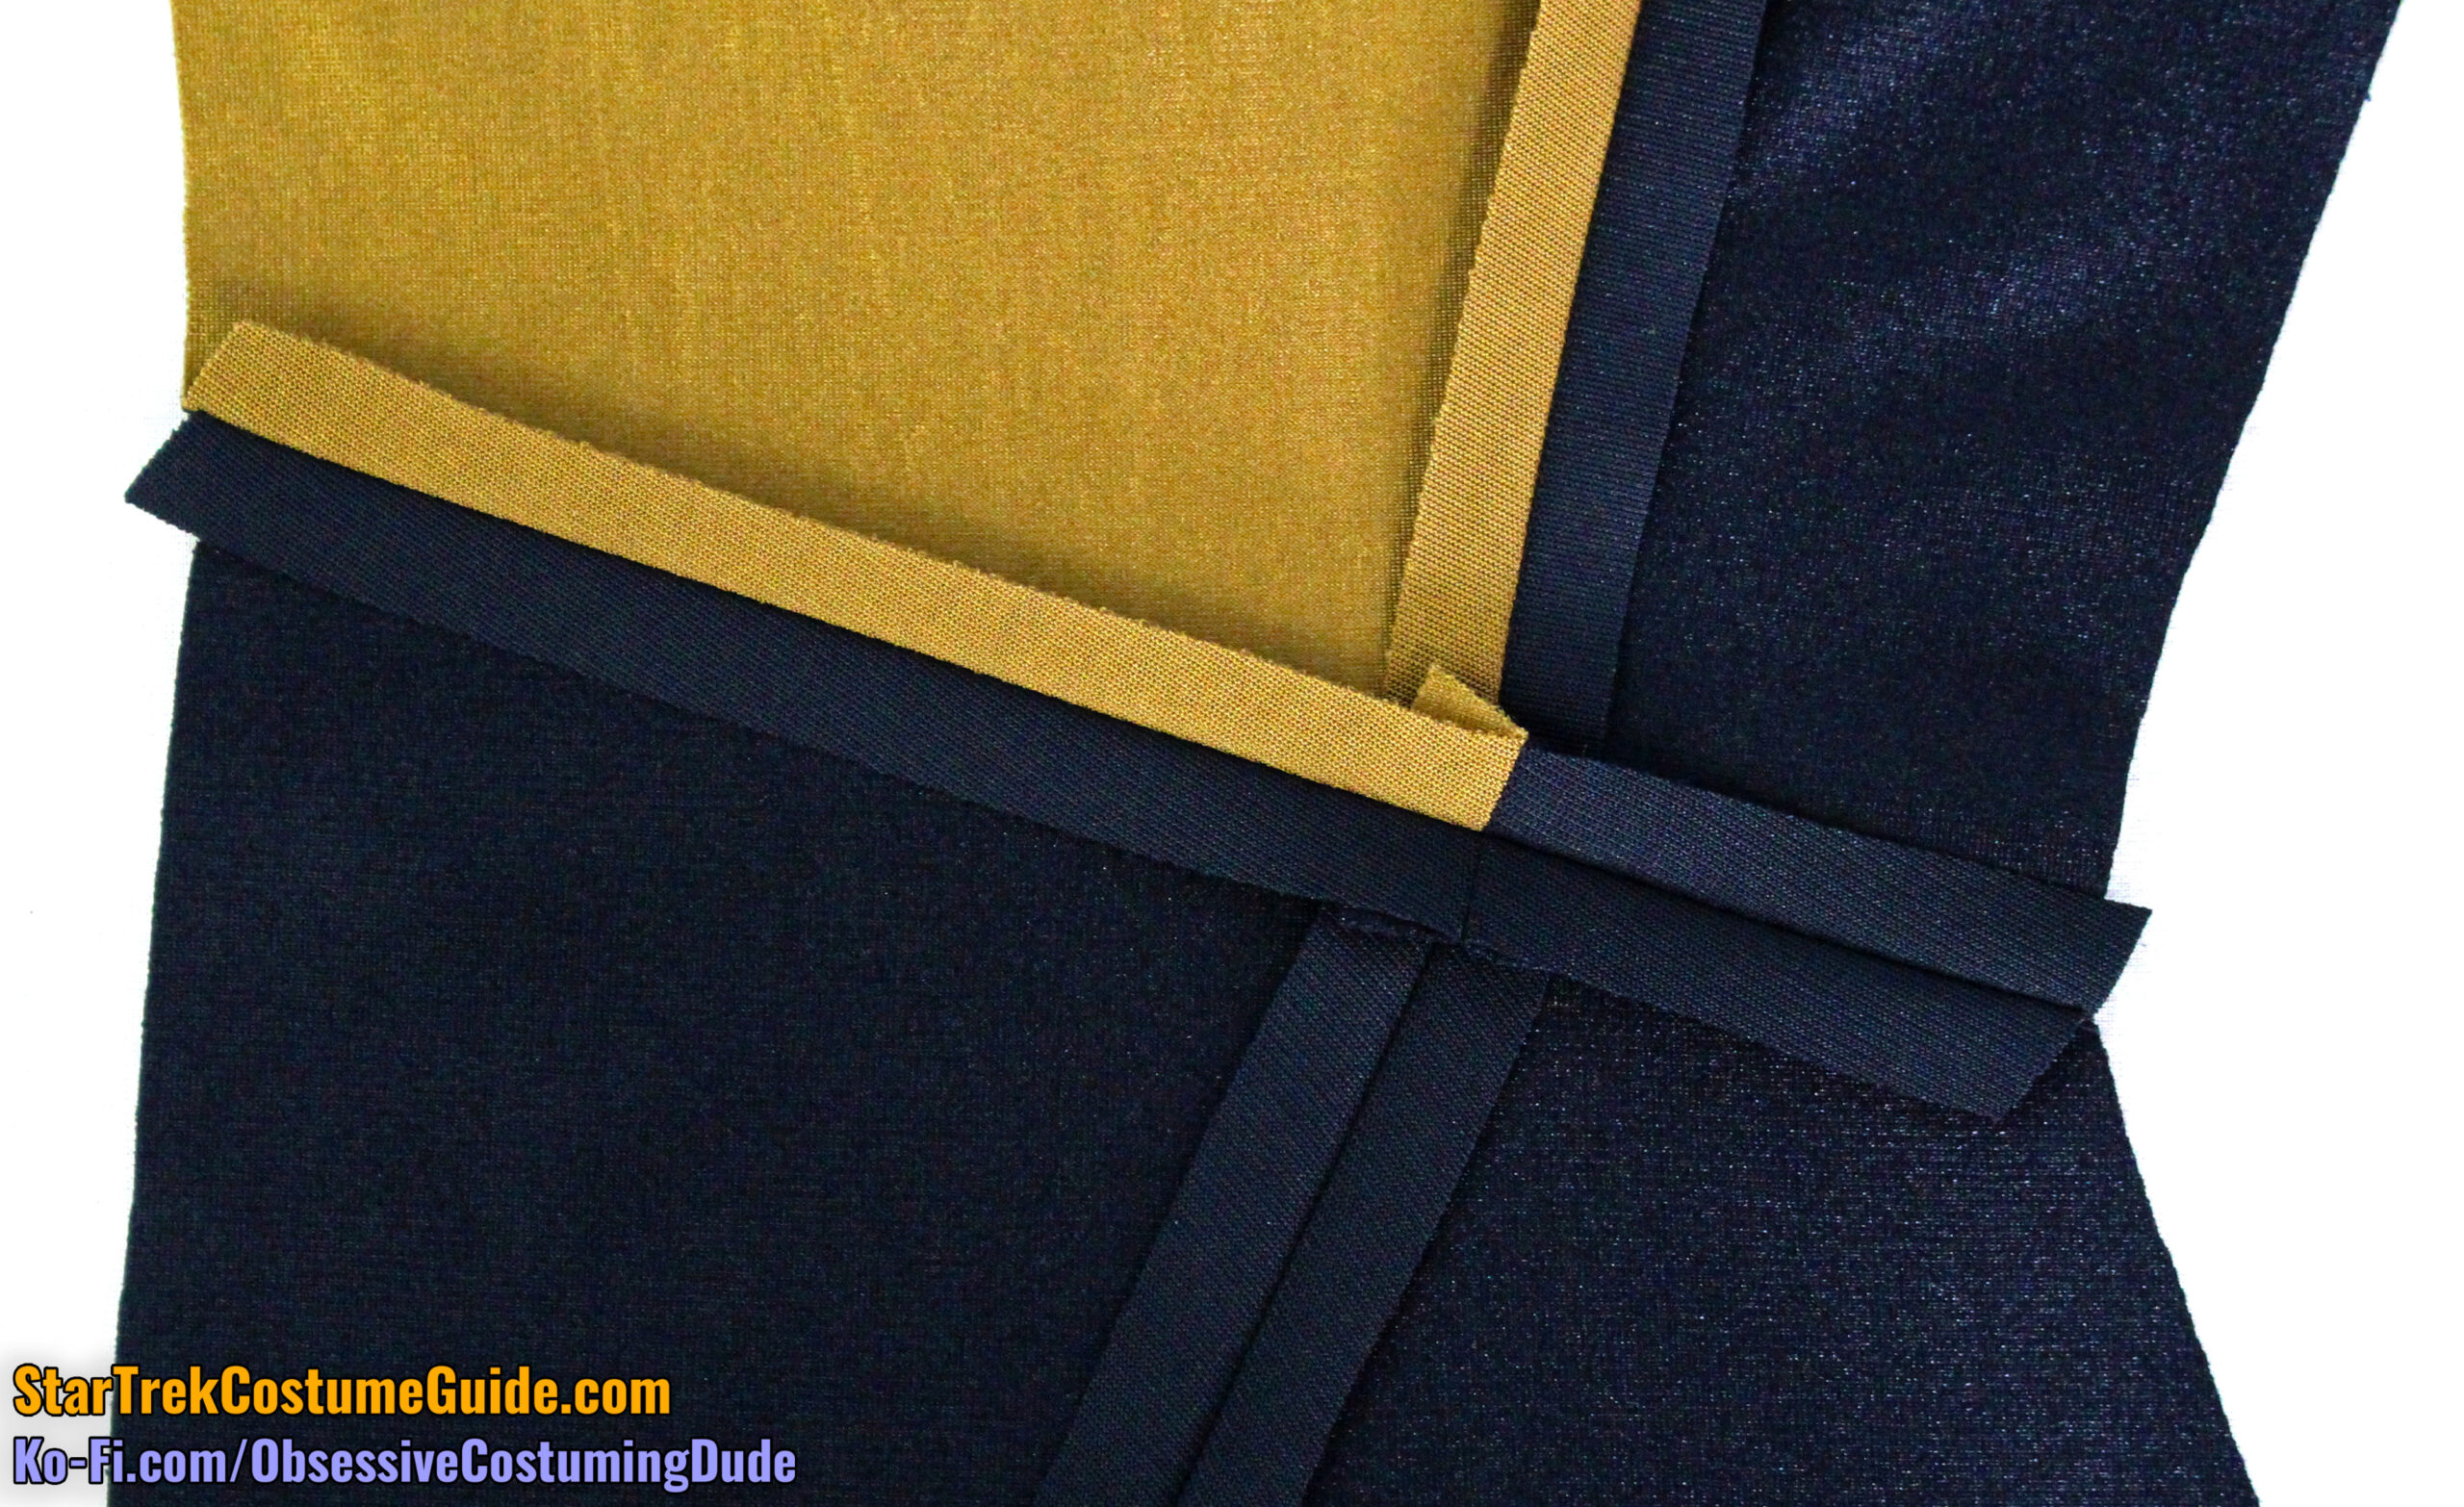
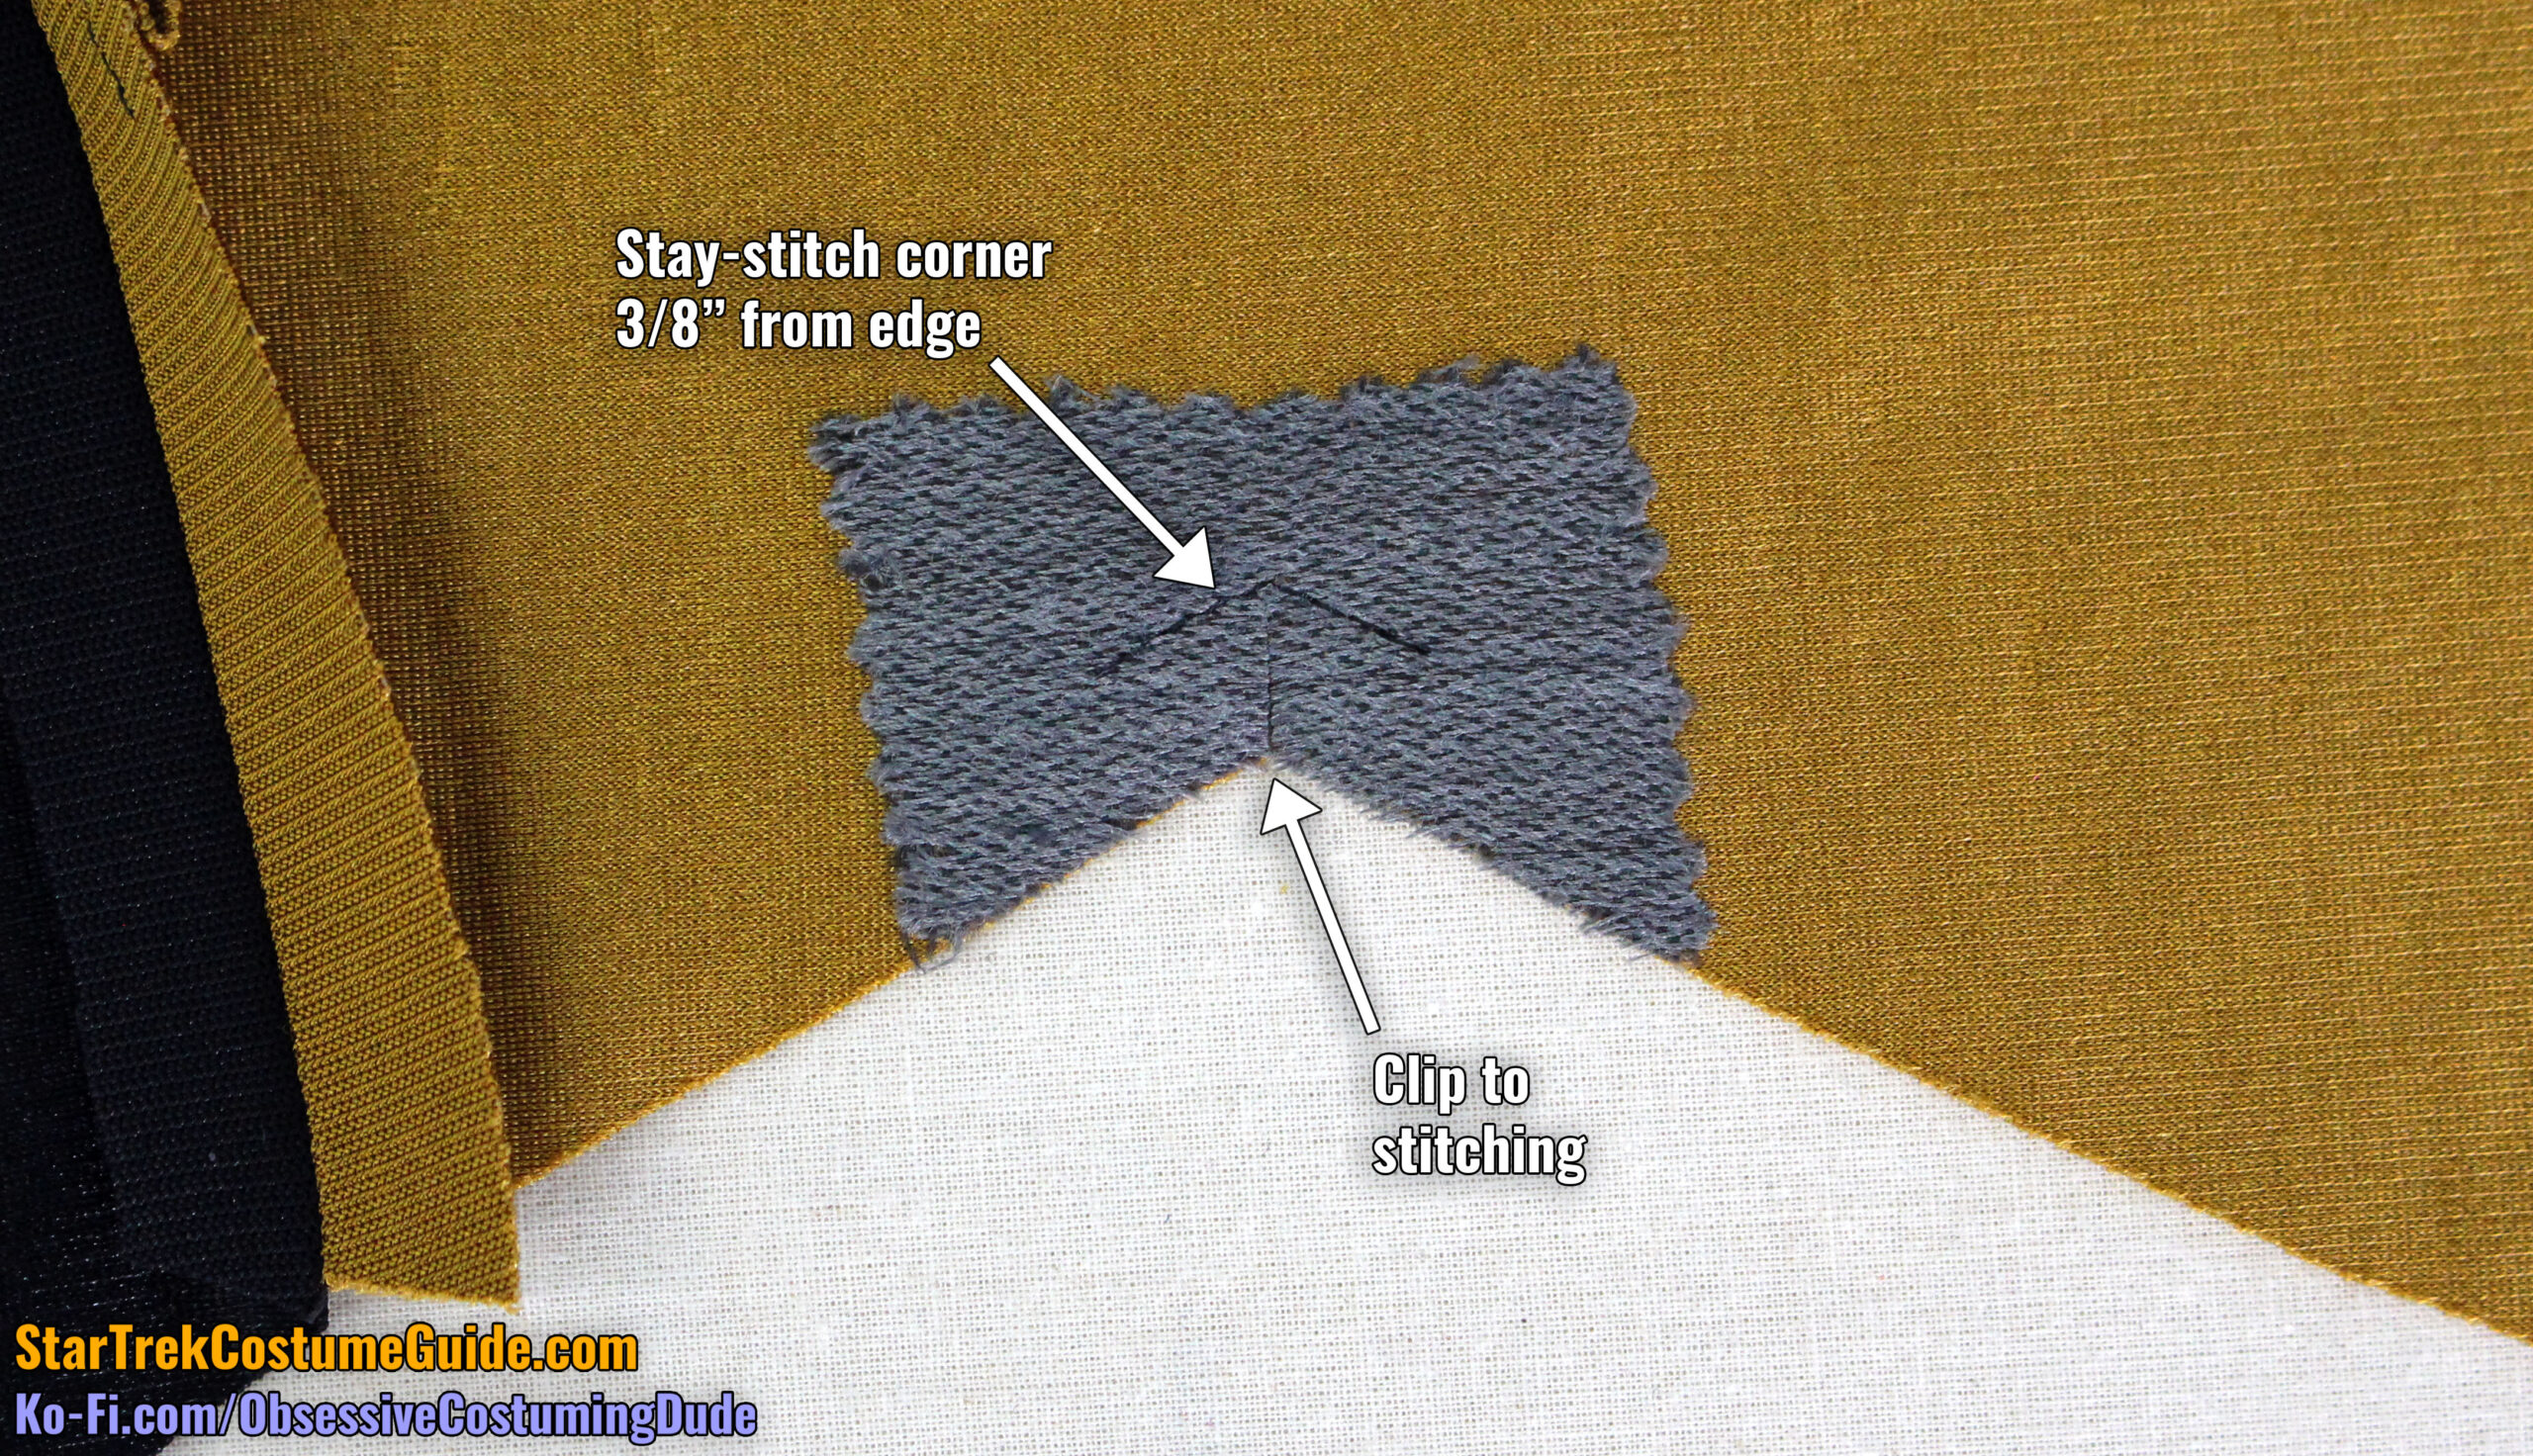
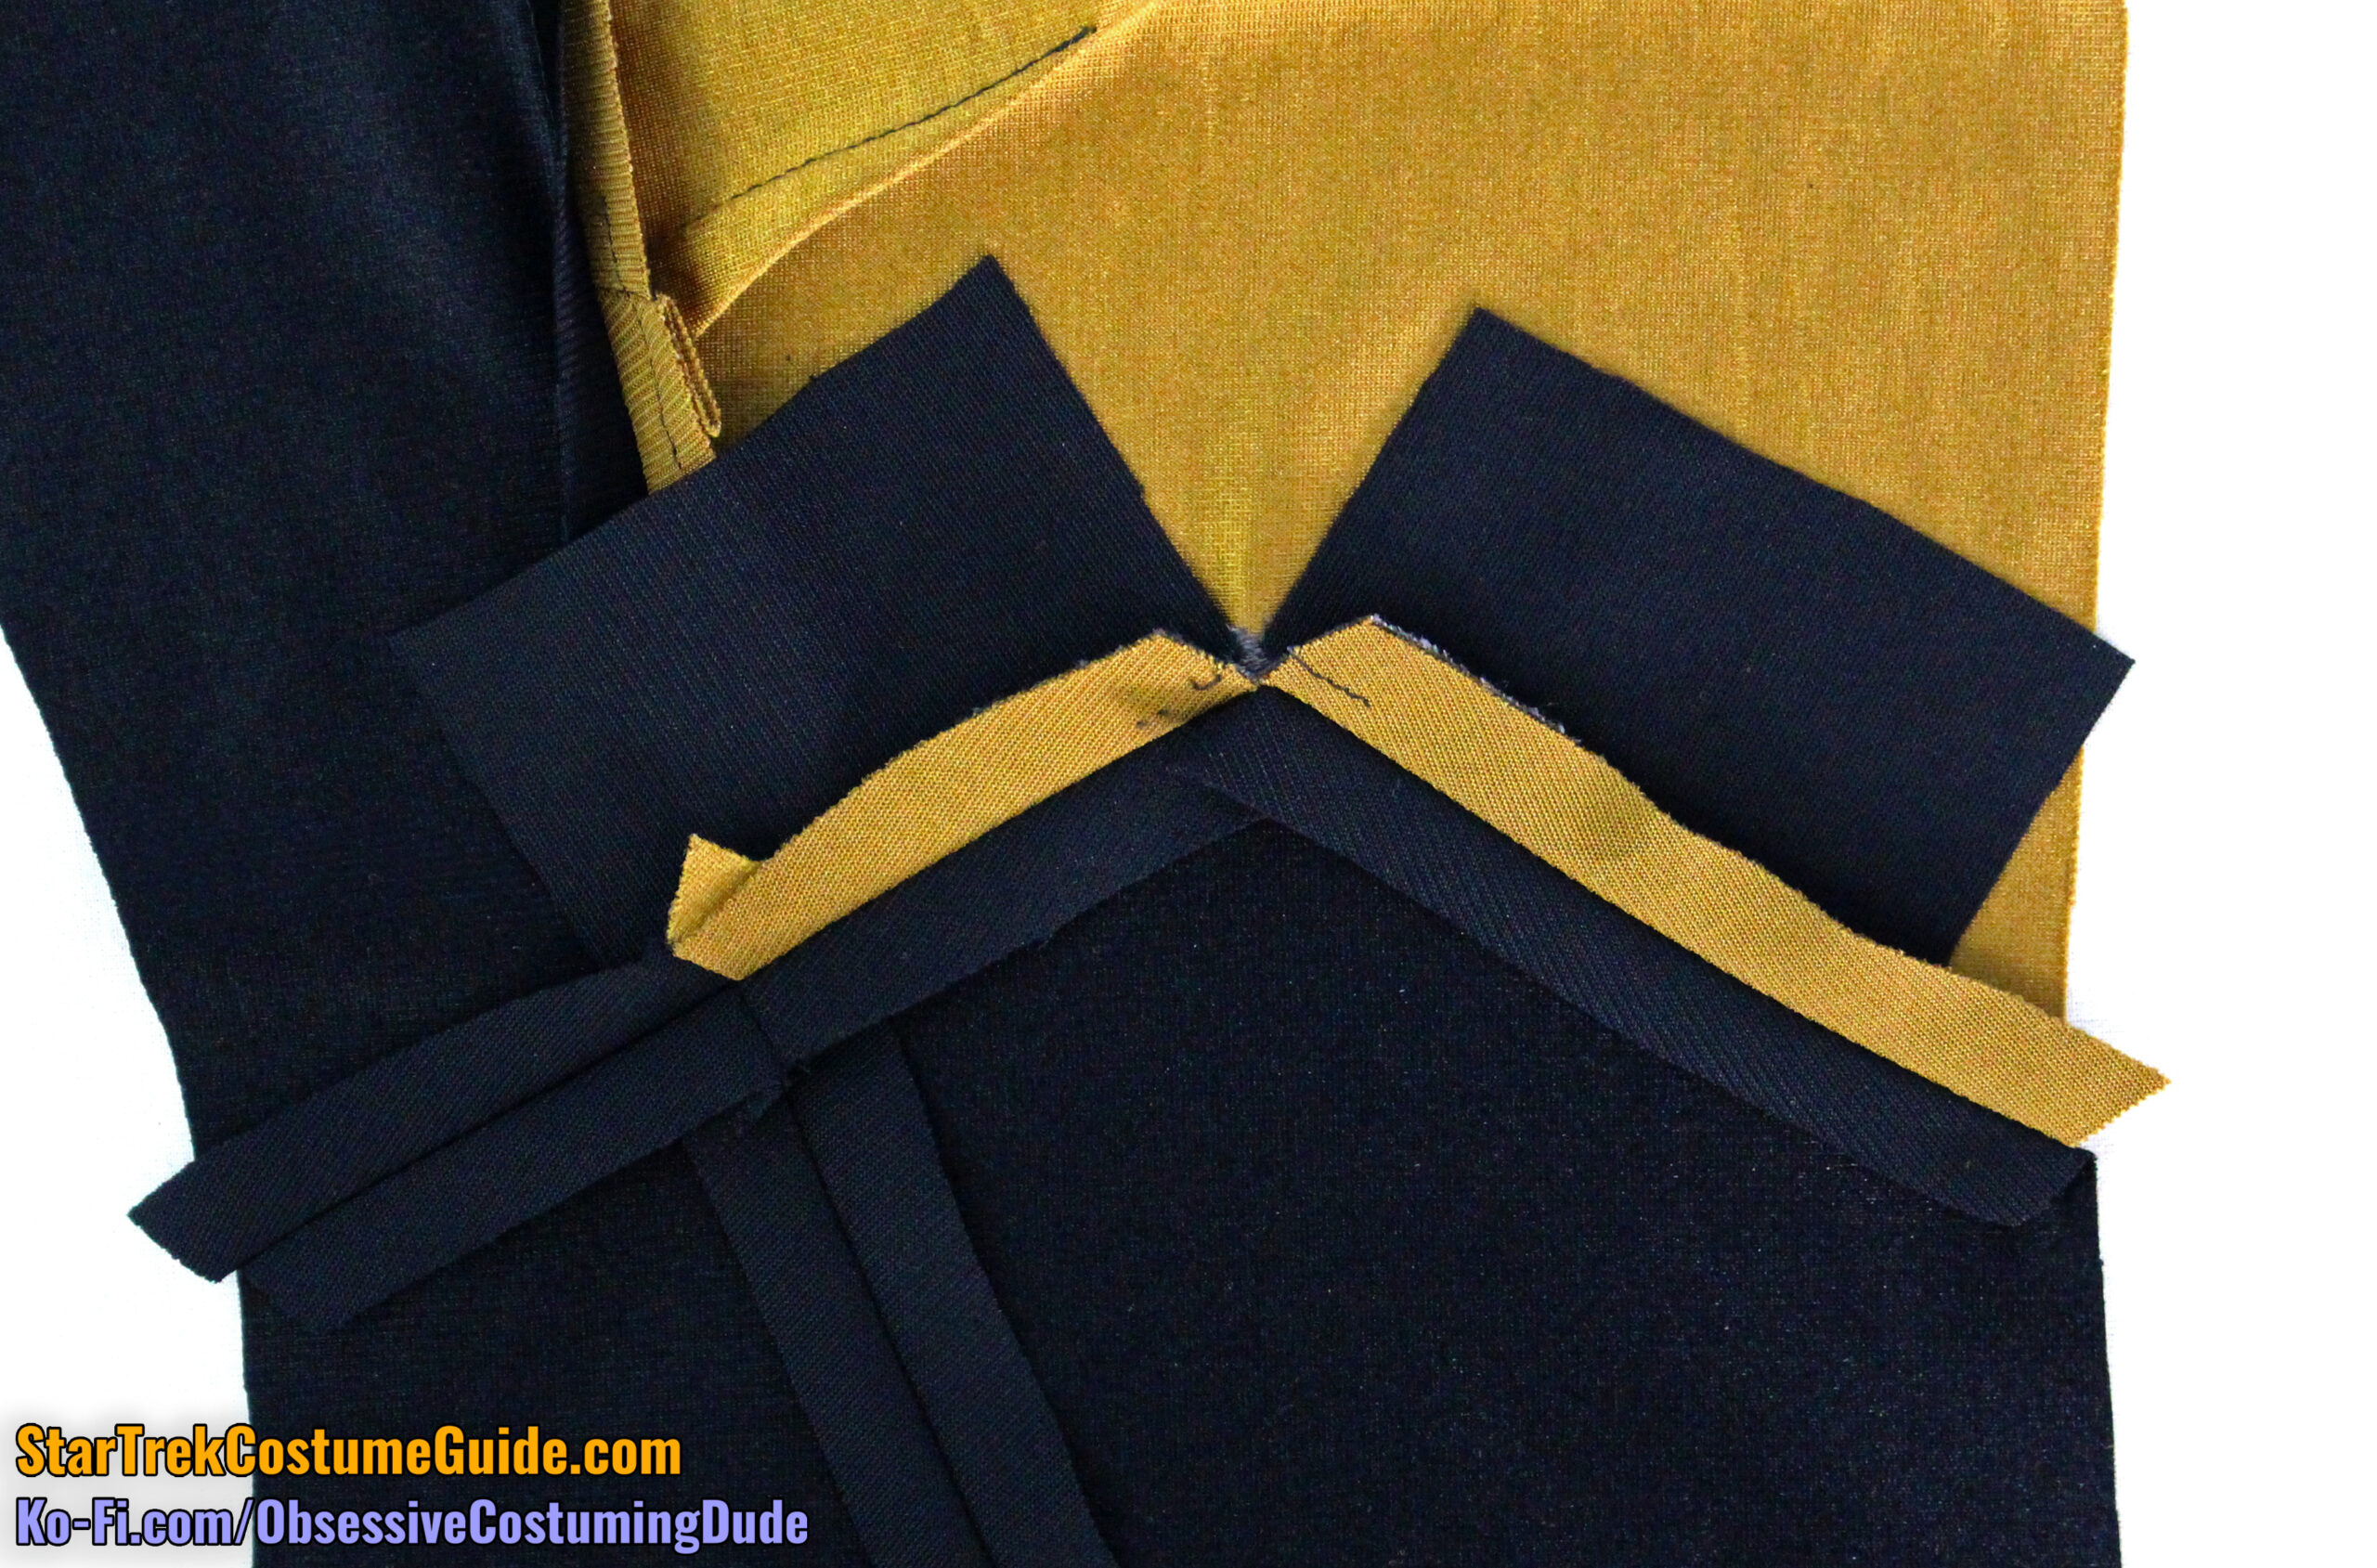
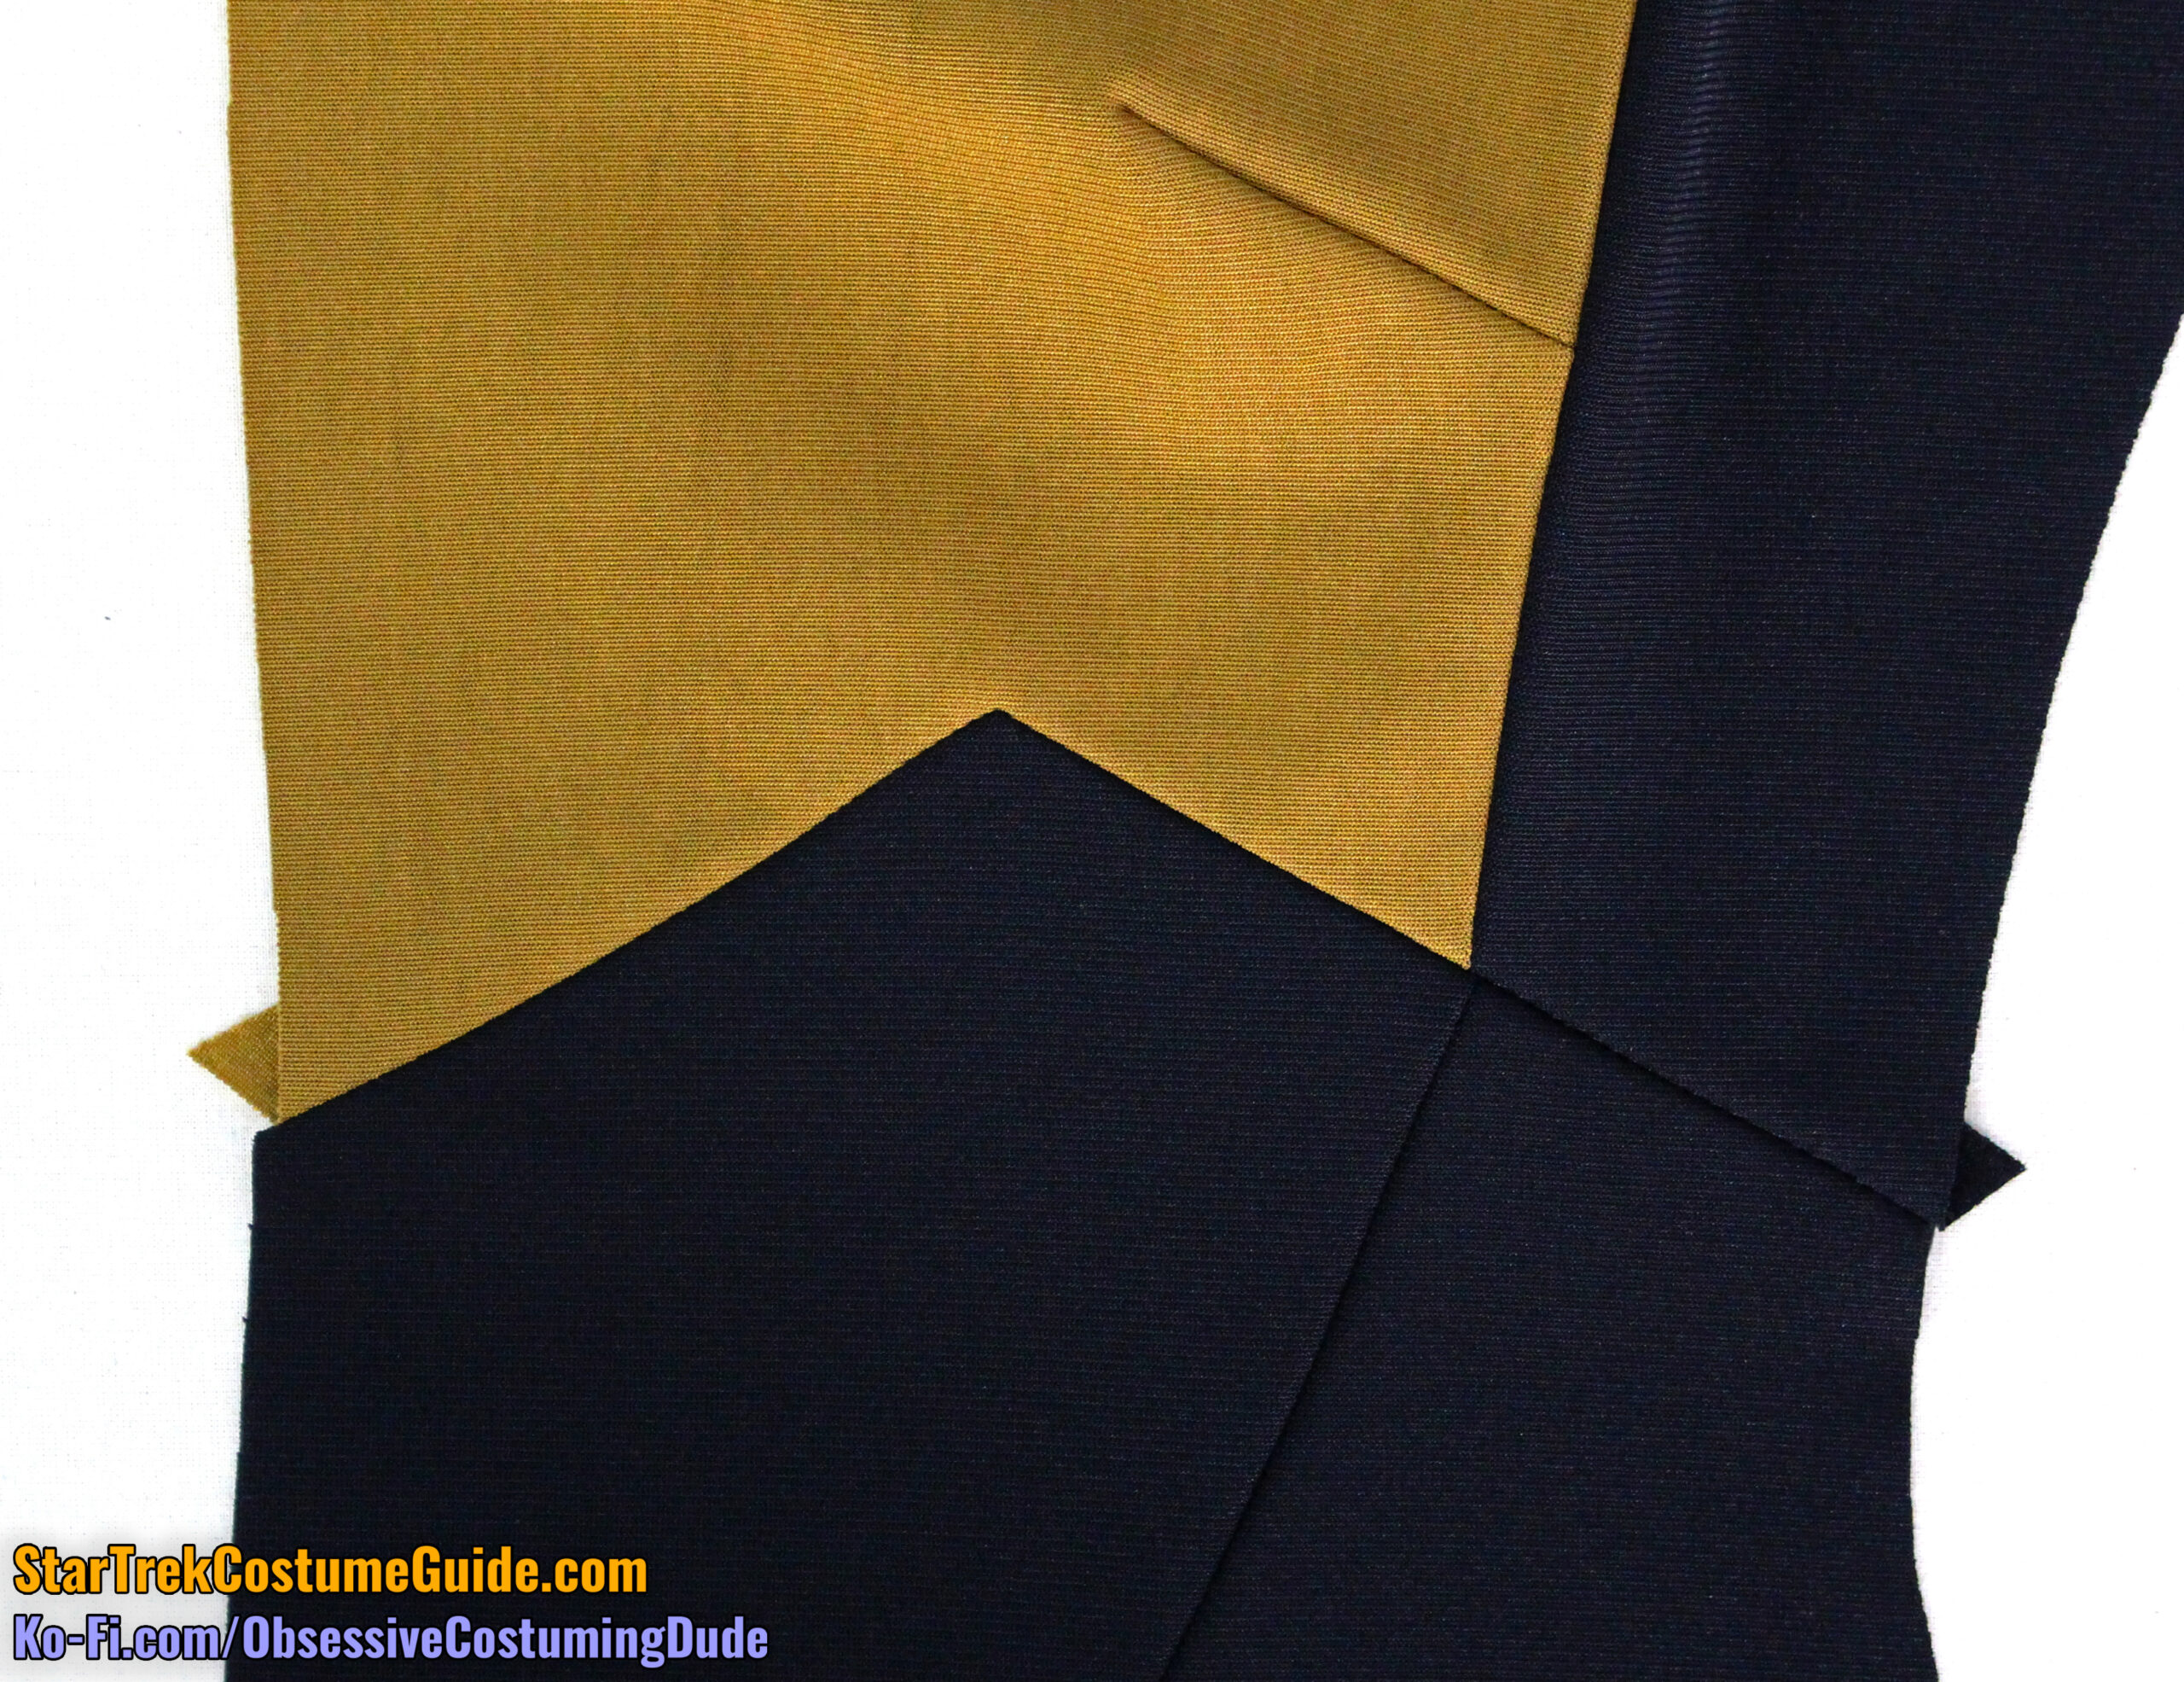
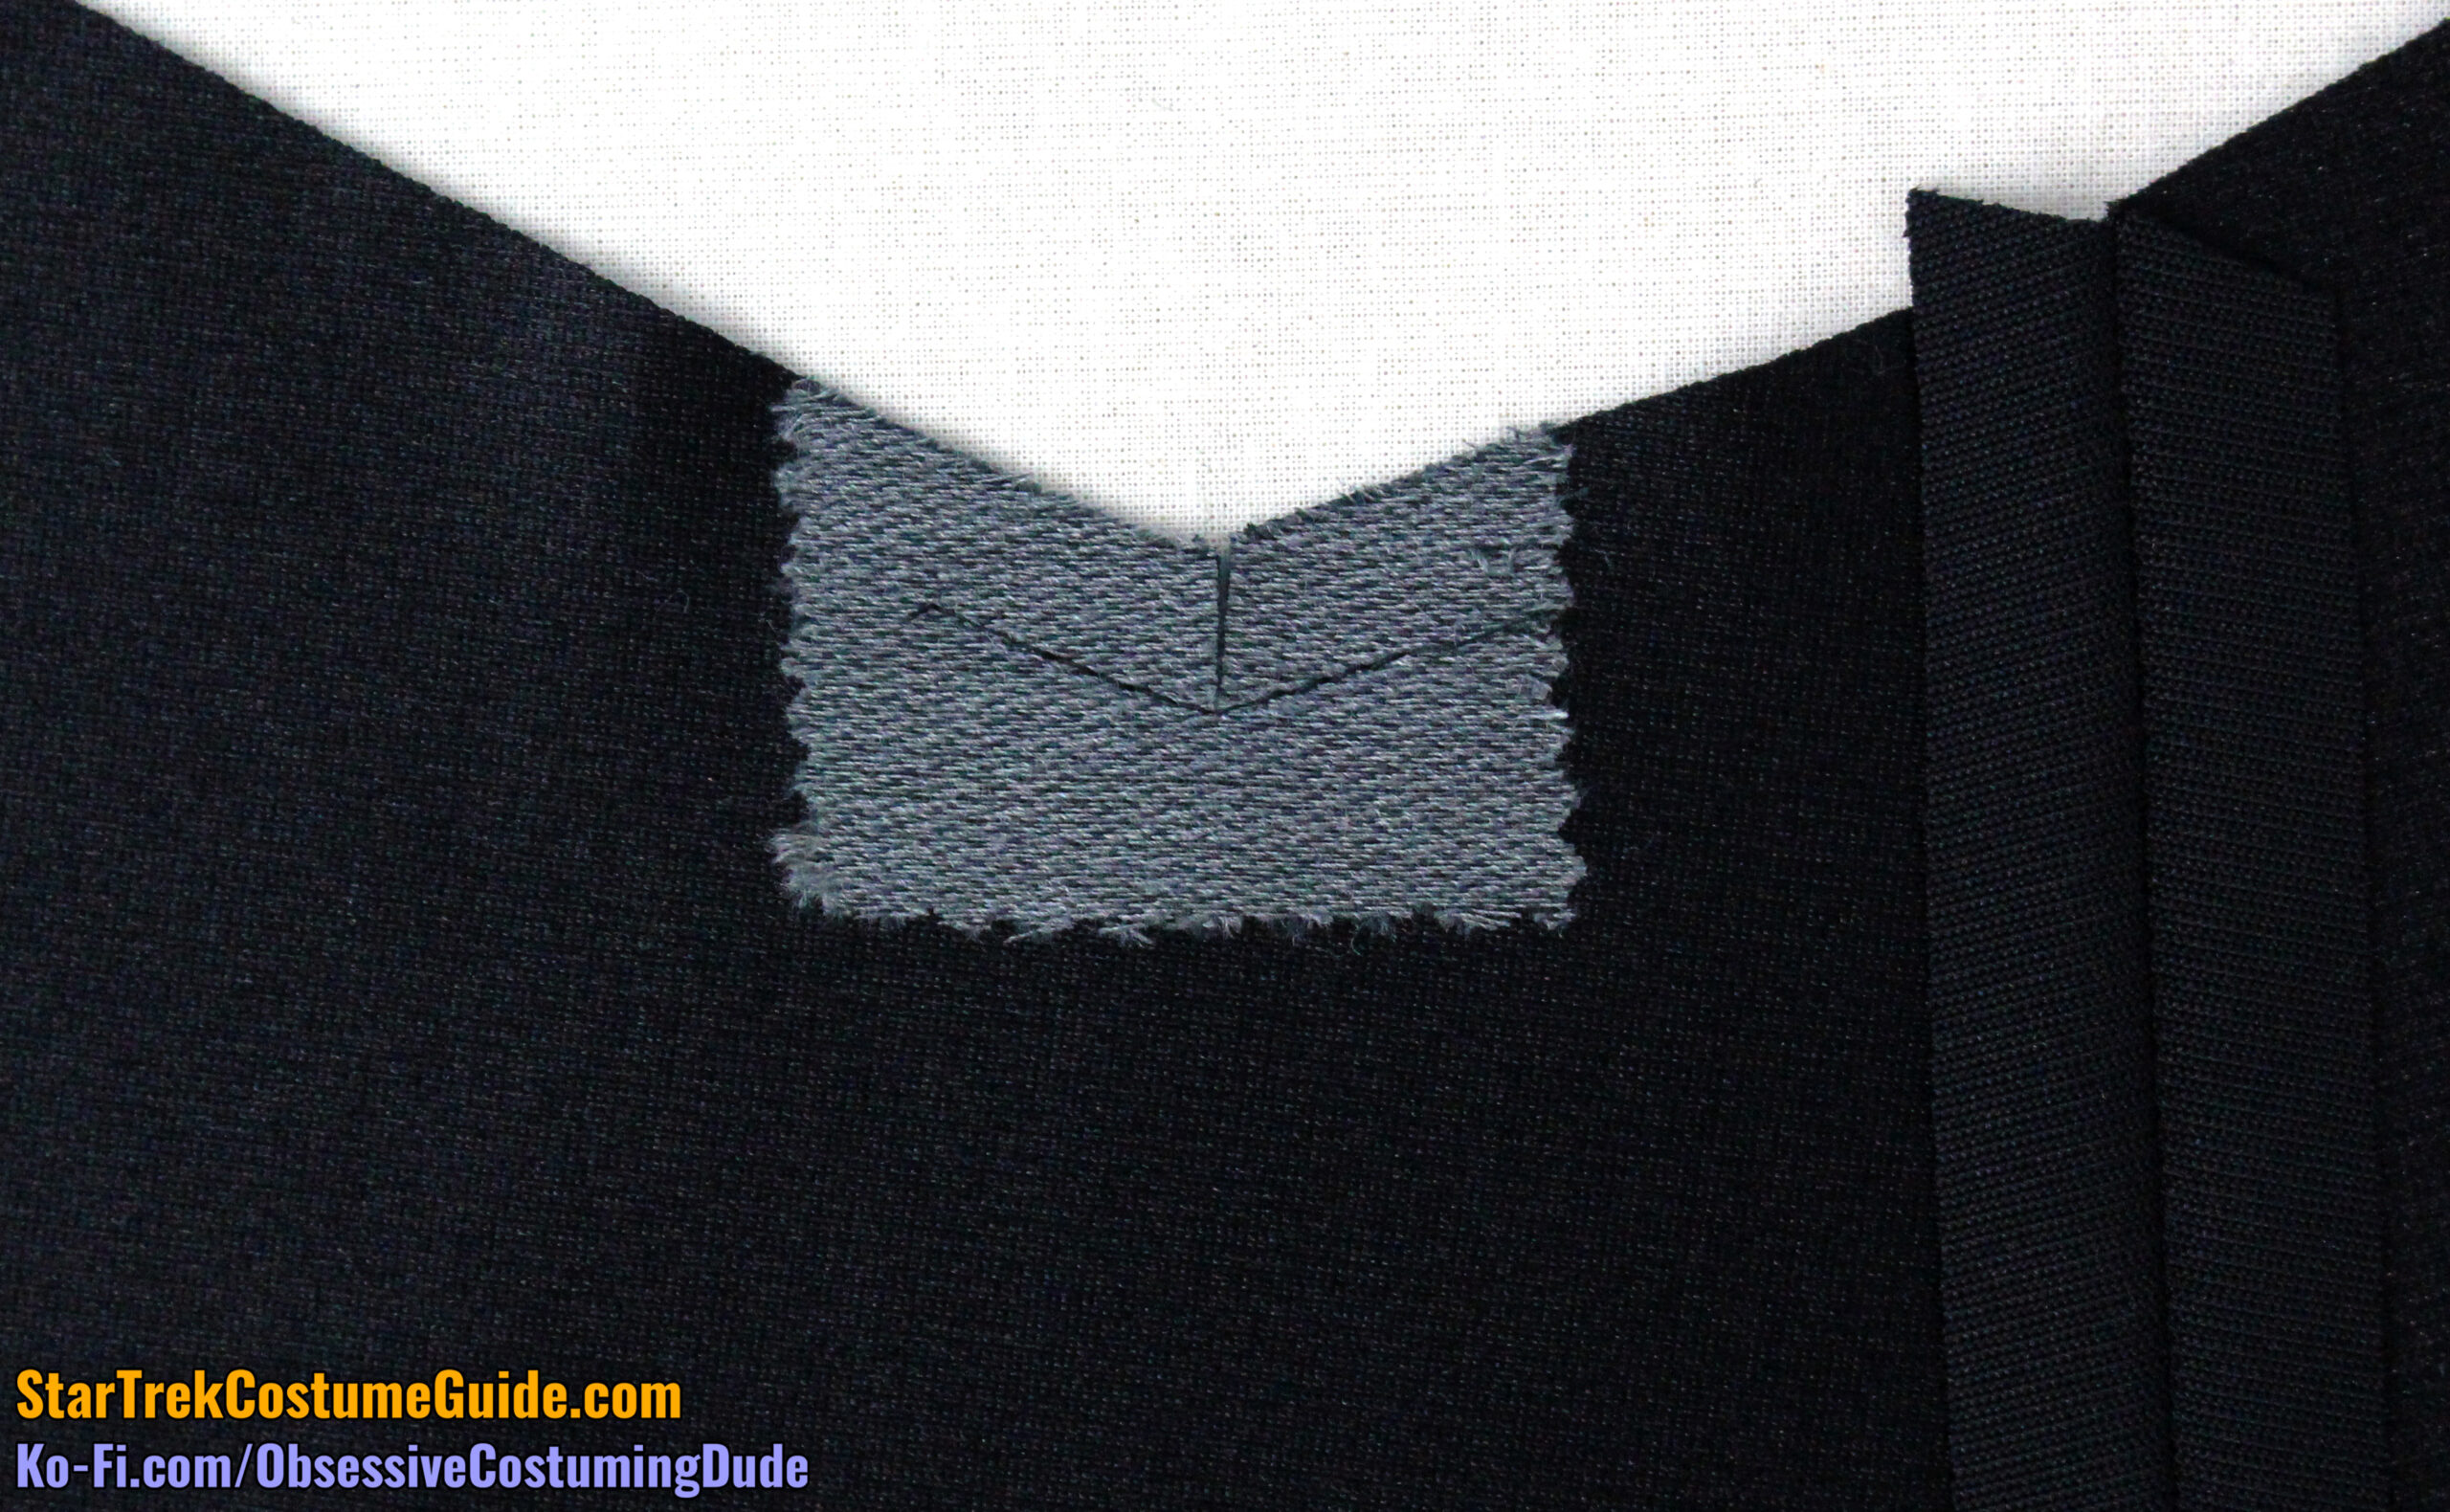
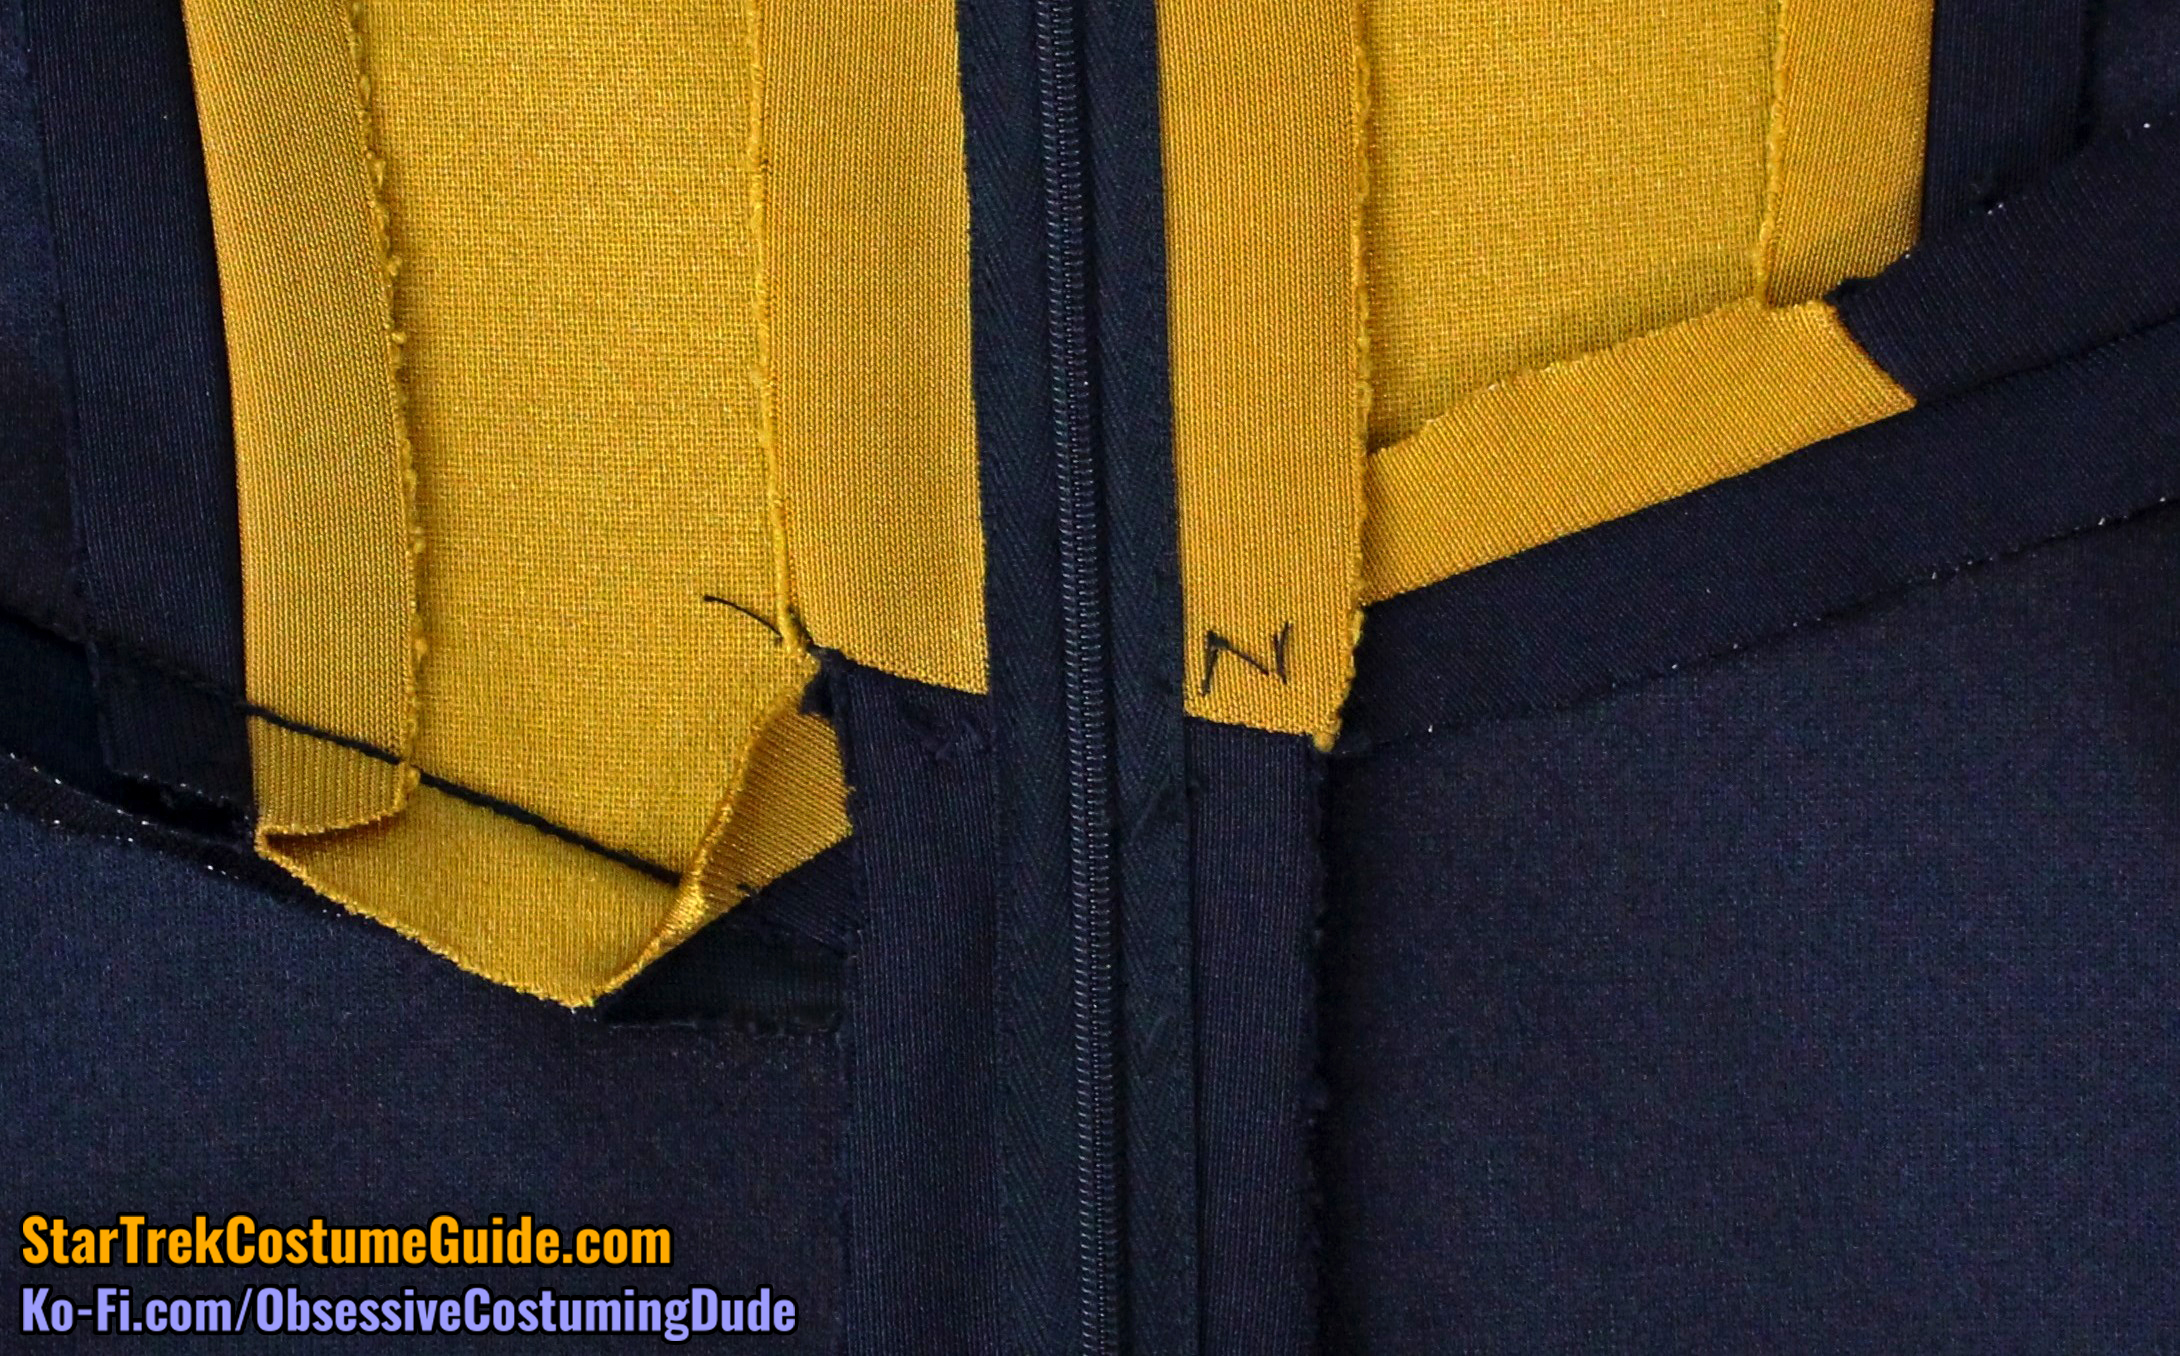
The left front assembly is the same as the right side, except for the cornered area of the waist seam.
I recommend stabilizing the corner area on the upper left front (piece D2) by applying a small piece of lightweight fusible interfacing to the underside.
Stay-stitch the corner ⅜” from the edges, and clip the allowance to the stitching at the corner.
Sew the lower left assembly to the upper left assembly at the waist with ½” seam allowance, pivoting at the corner.
I again suggest basting across the lower front/side front seam lines to ensure they properly align before sewing the entire seam.
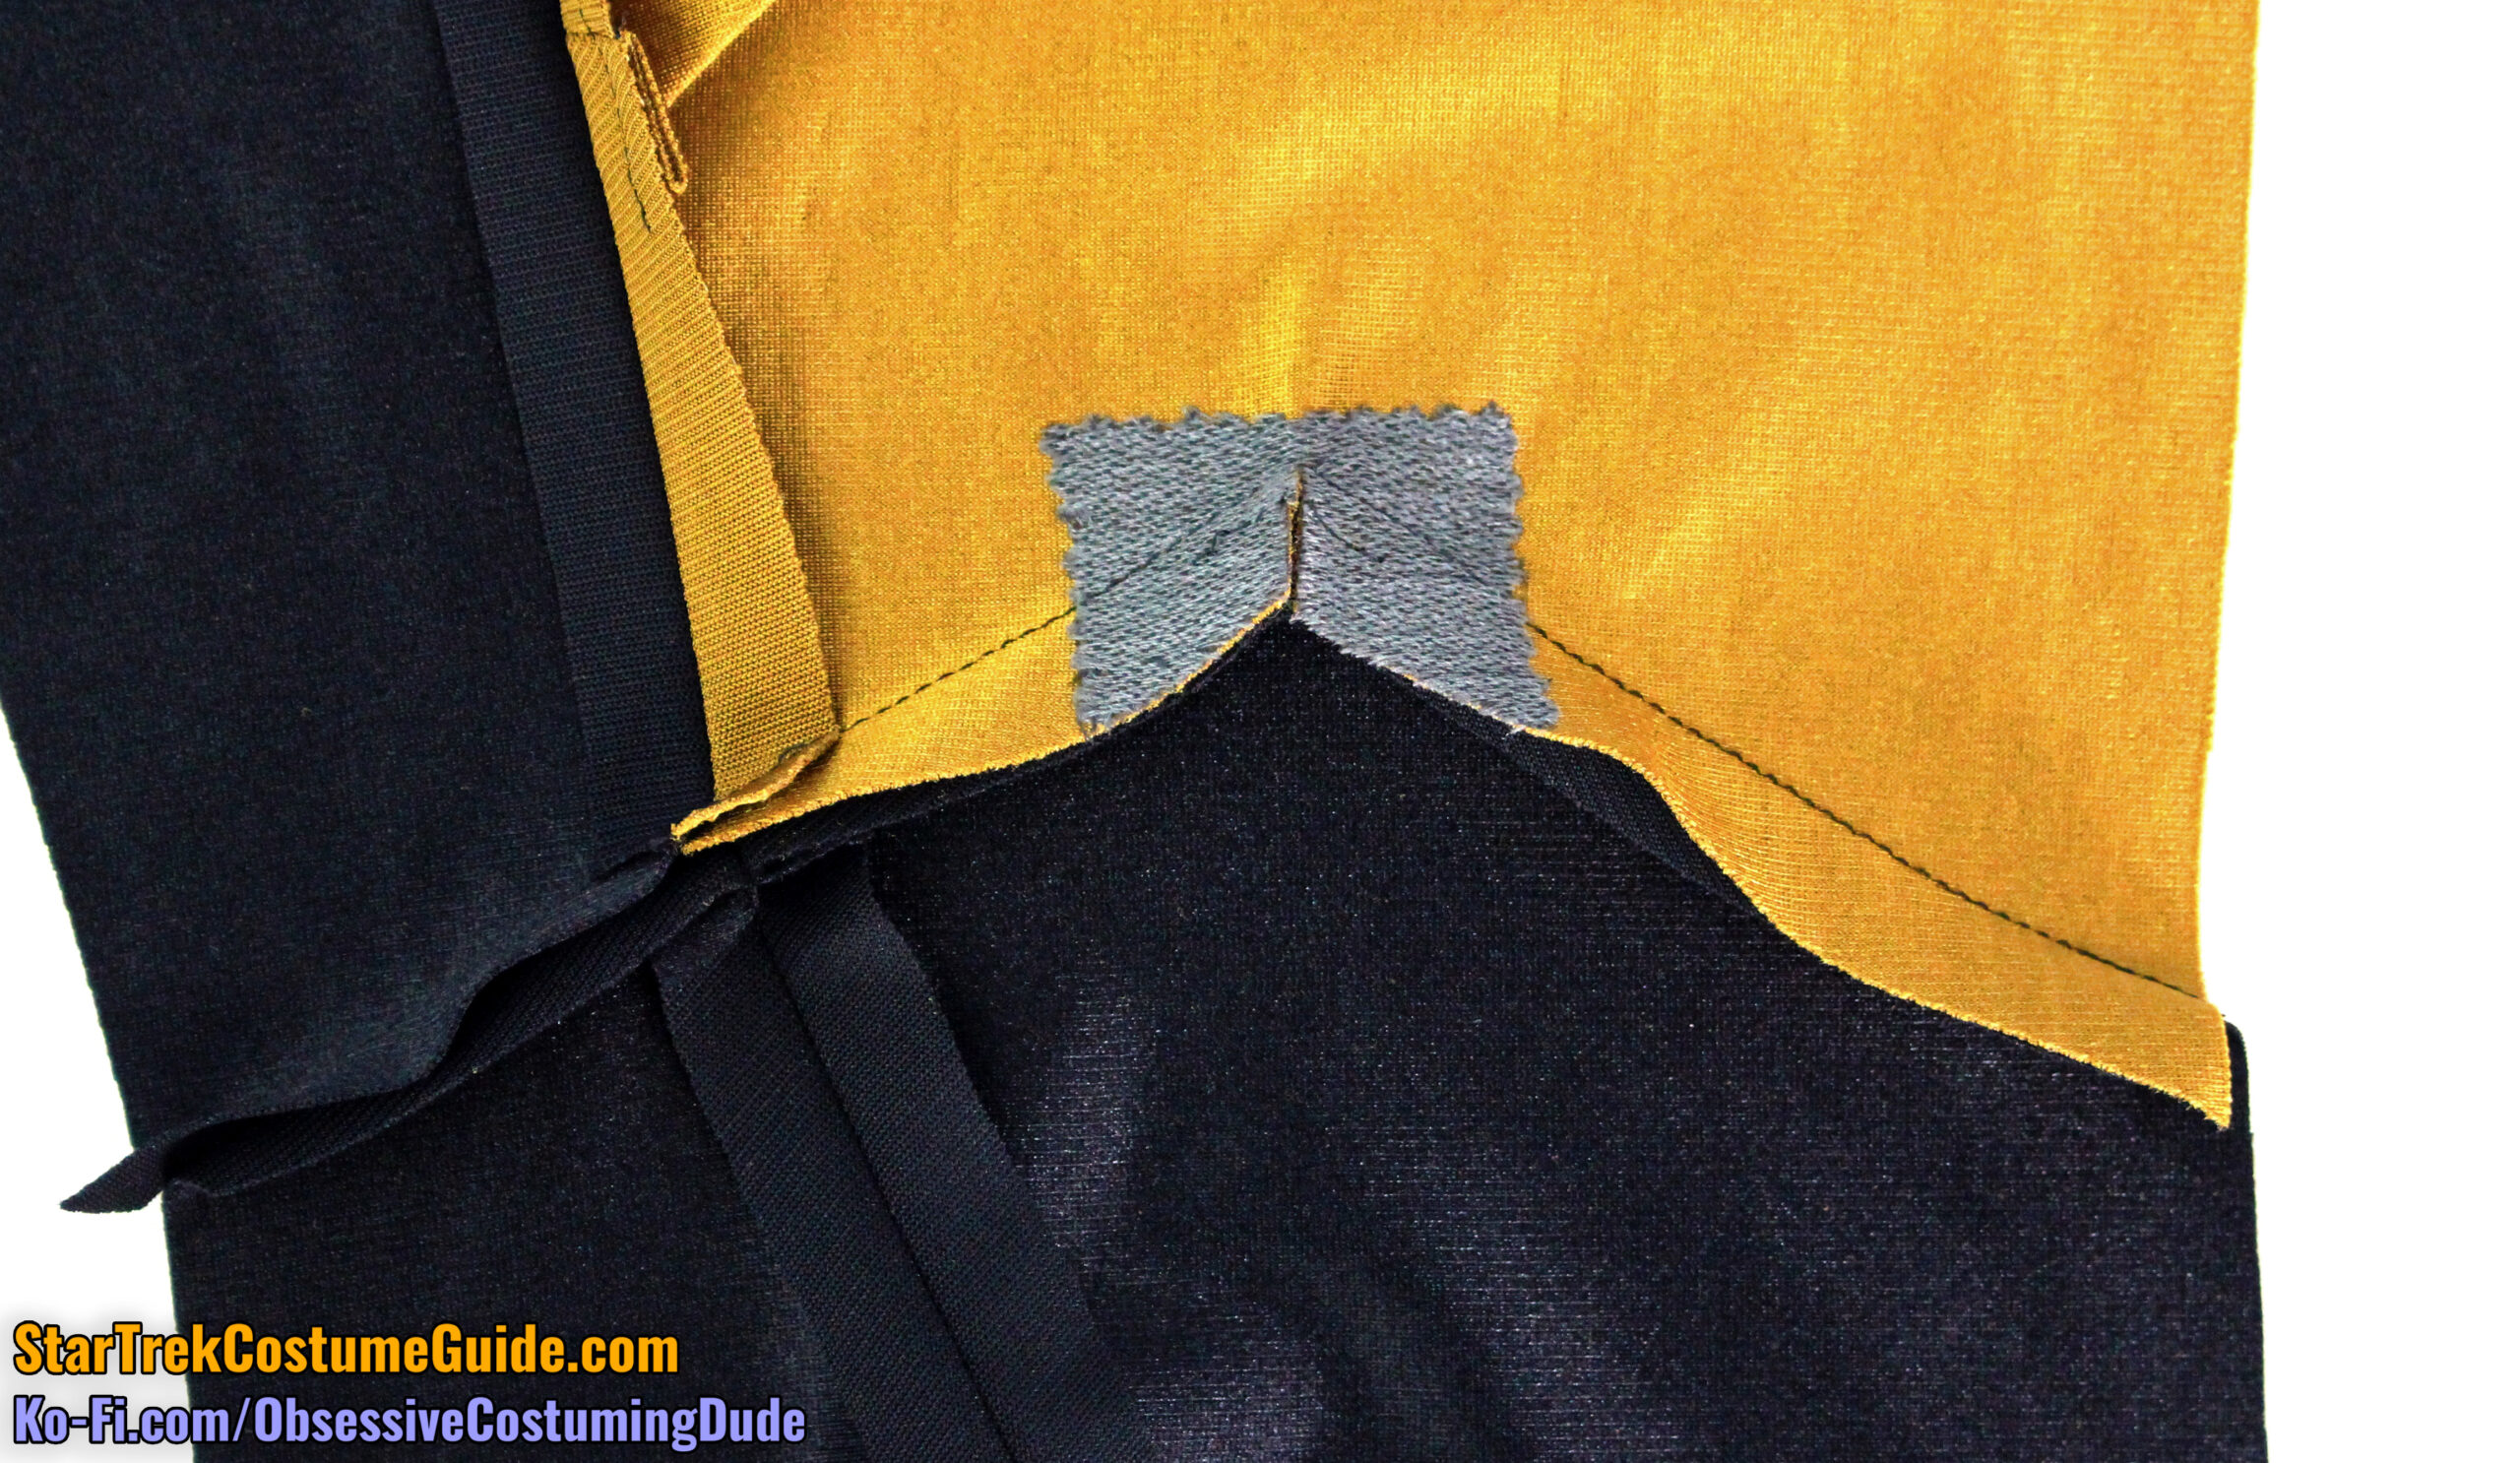
Clip the upper front allowance exactly to the stitching at the corner.
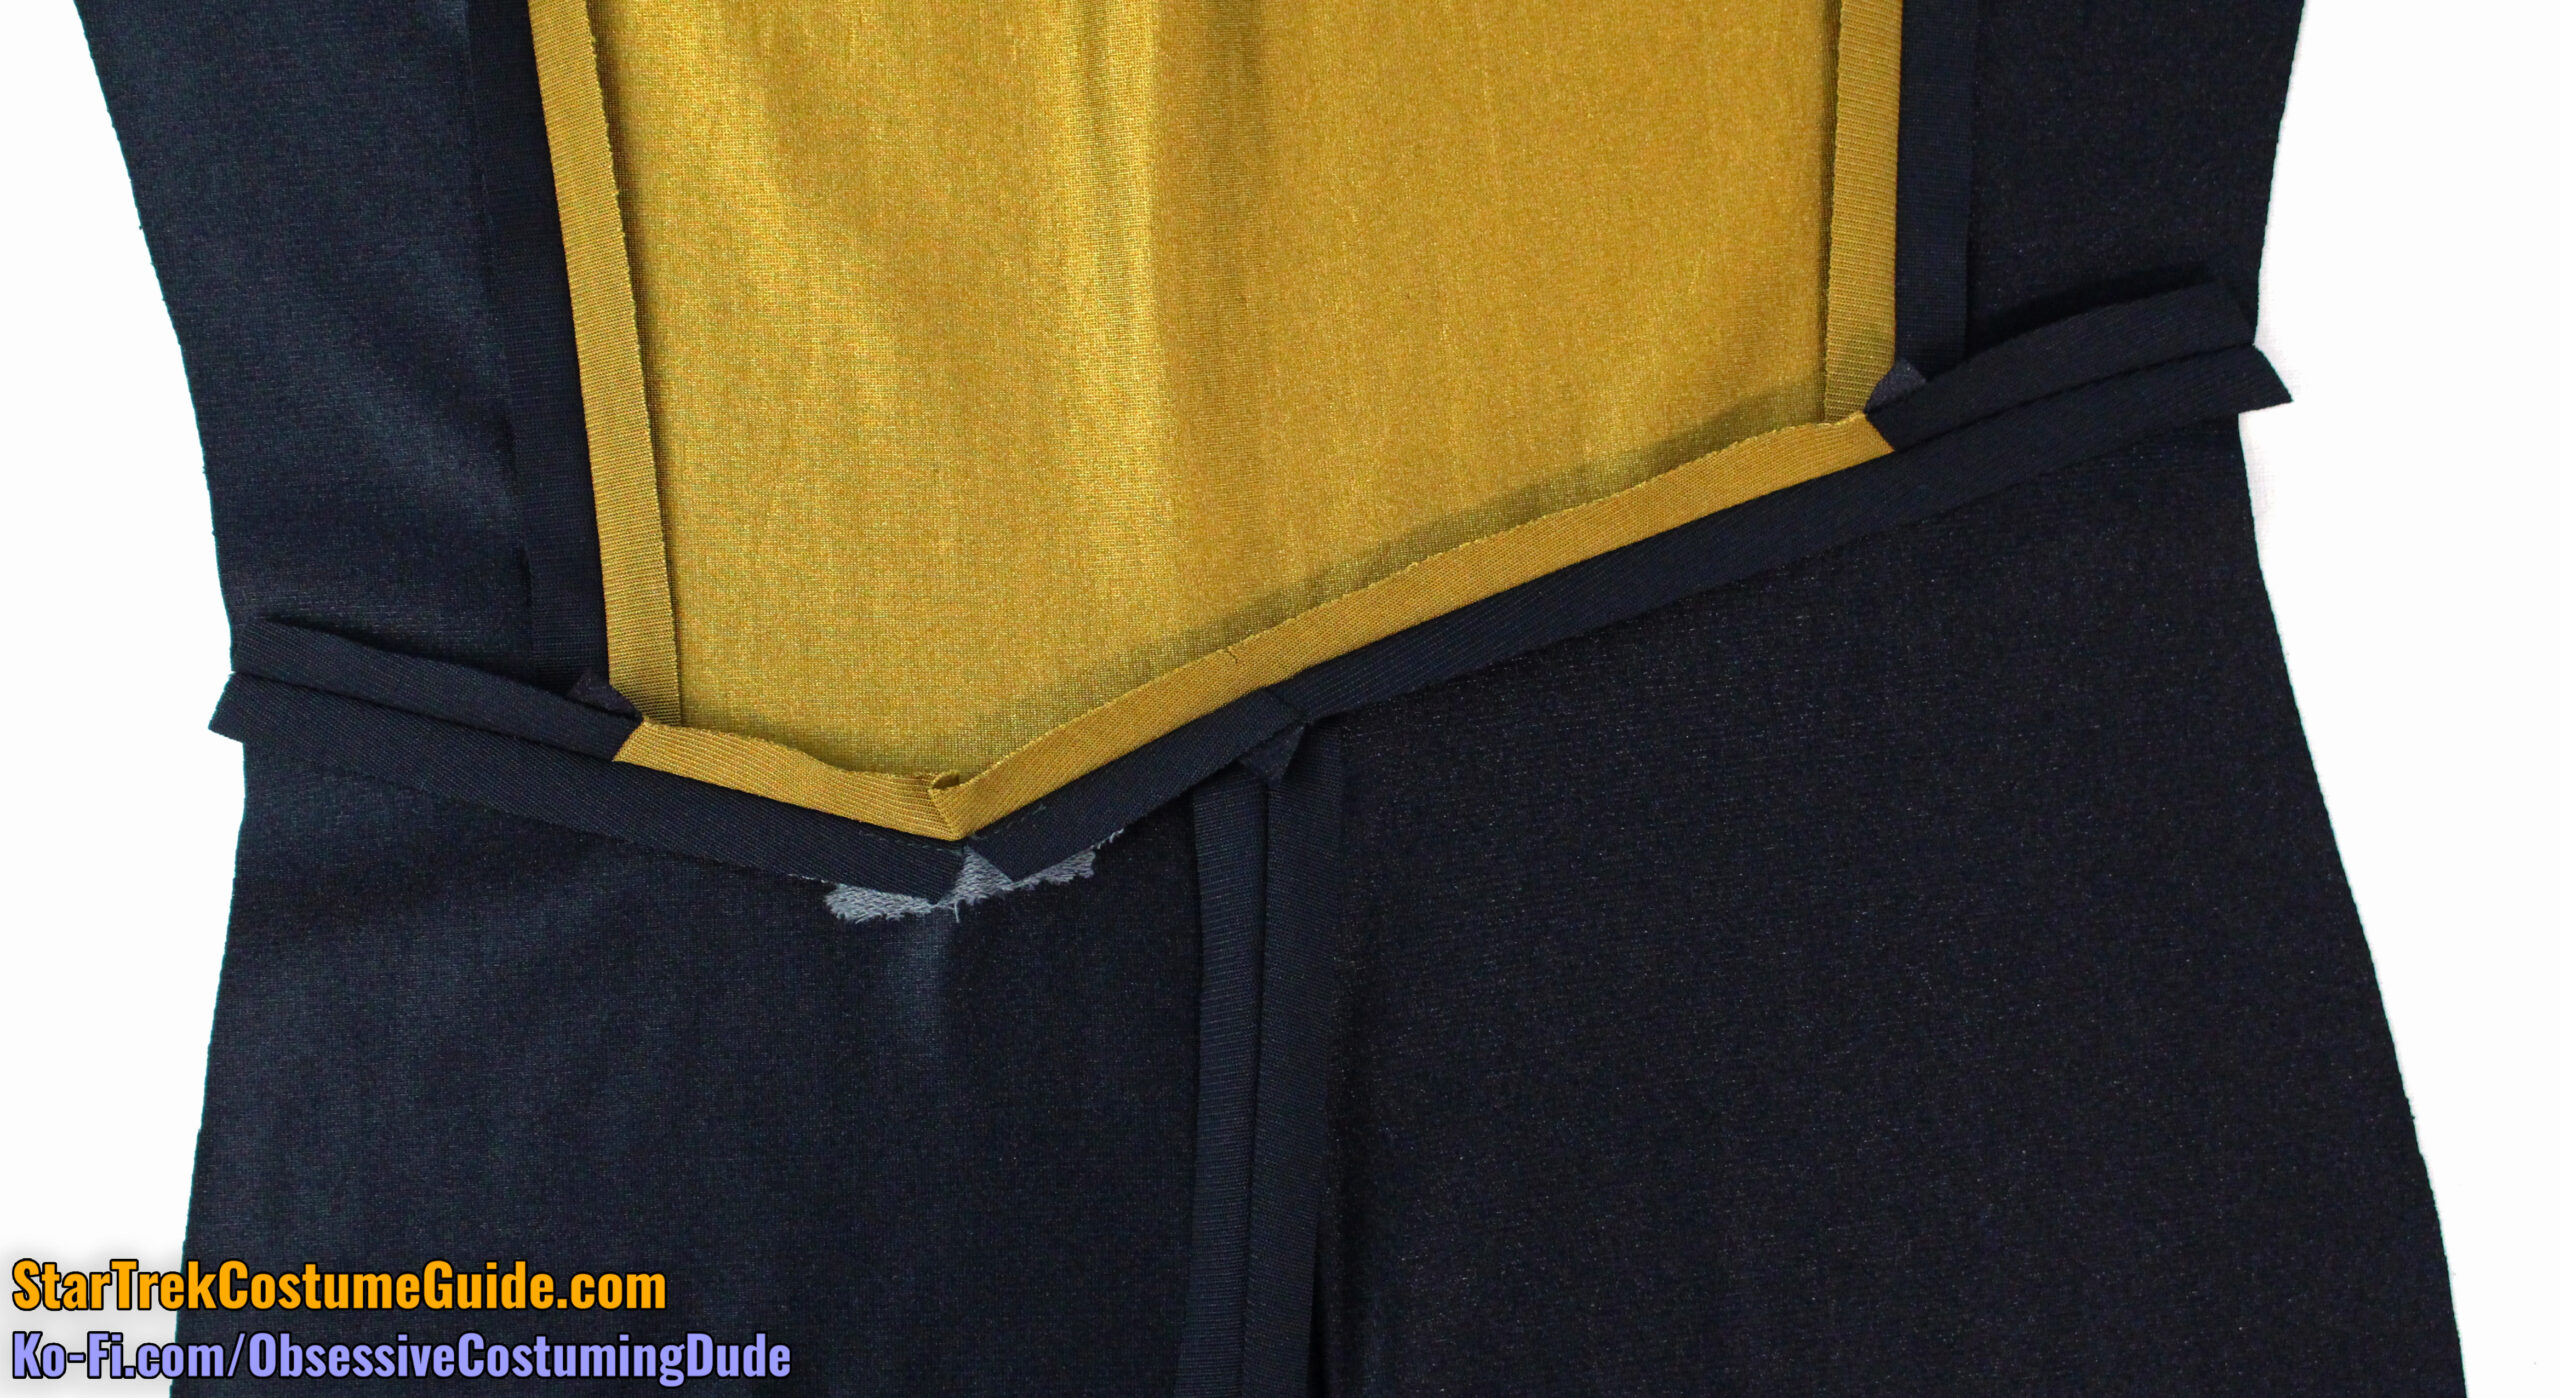
Unfortunately, even if the corner is sewn perfectly, once the area is pressed, the impression of the upper body allowances can form an unsightly pucker above the corner.
As you might recall from my multiple screen-used TNG jumpsuit examinations, a variety of increasingly unholy measures were taken to prevent these ugly puckers.
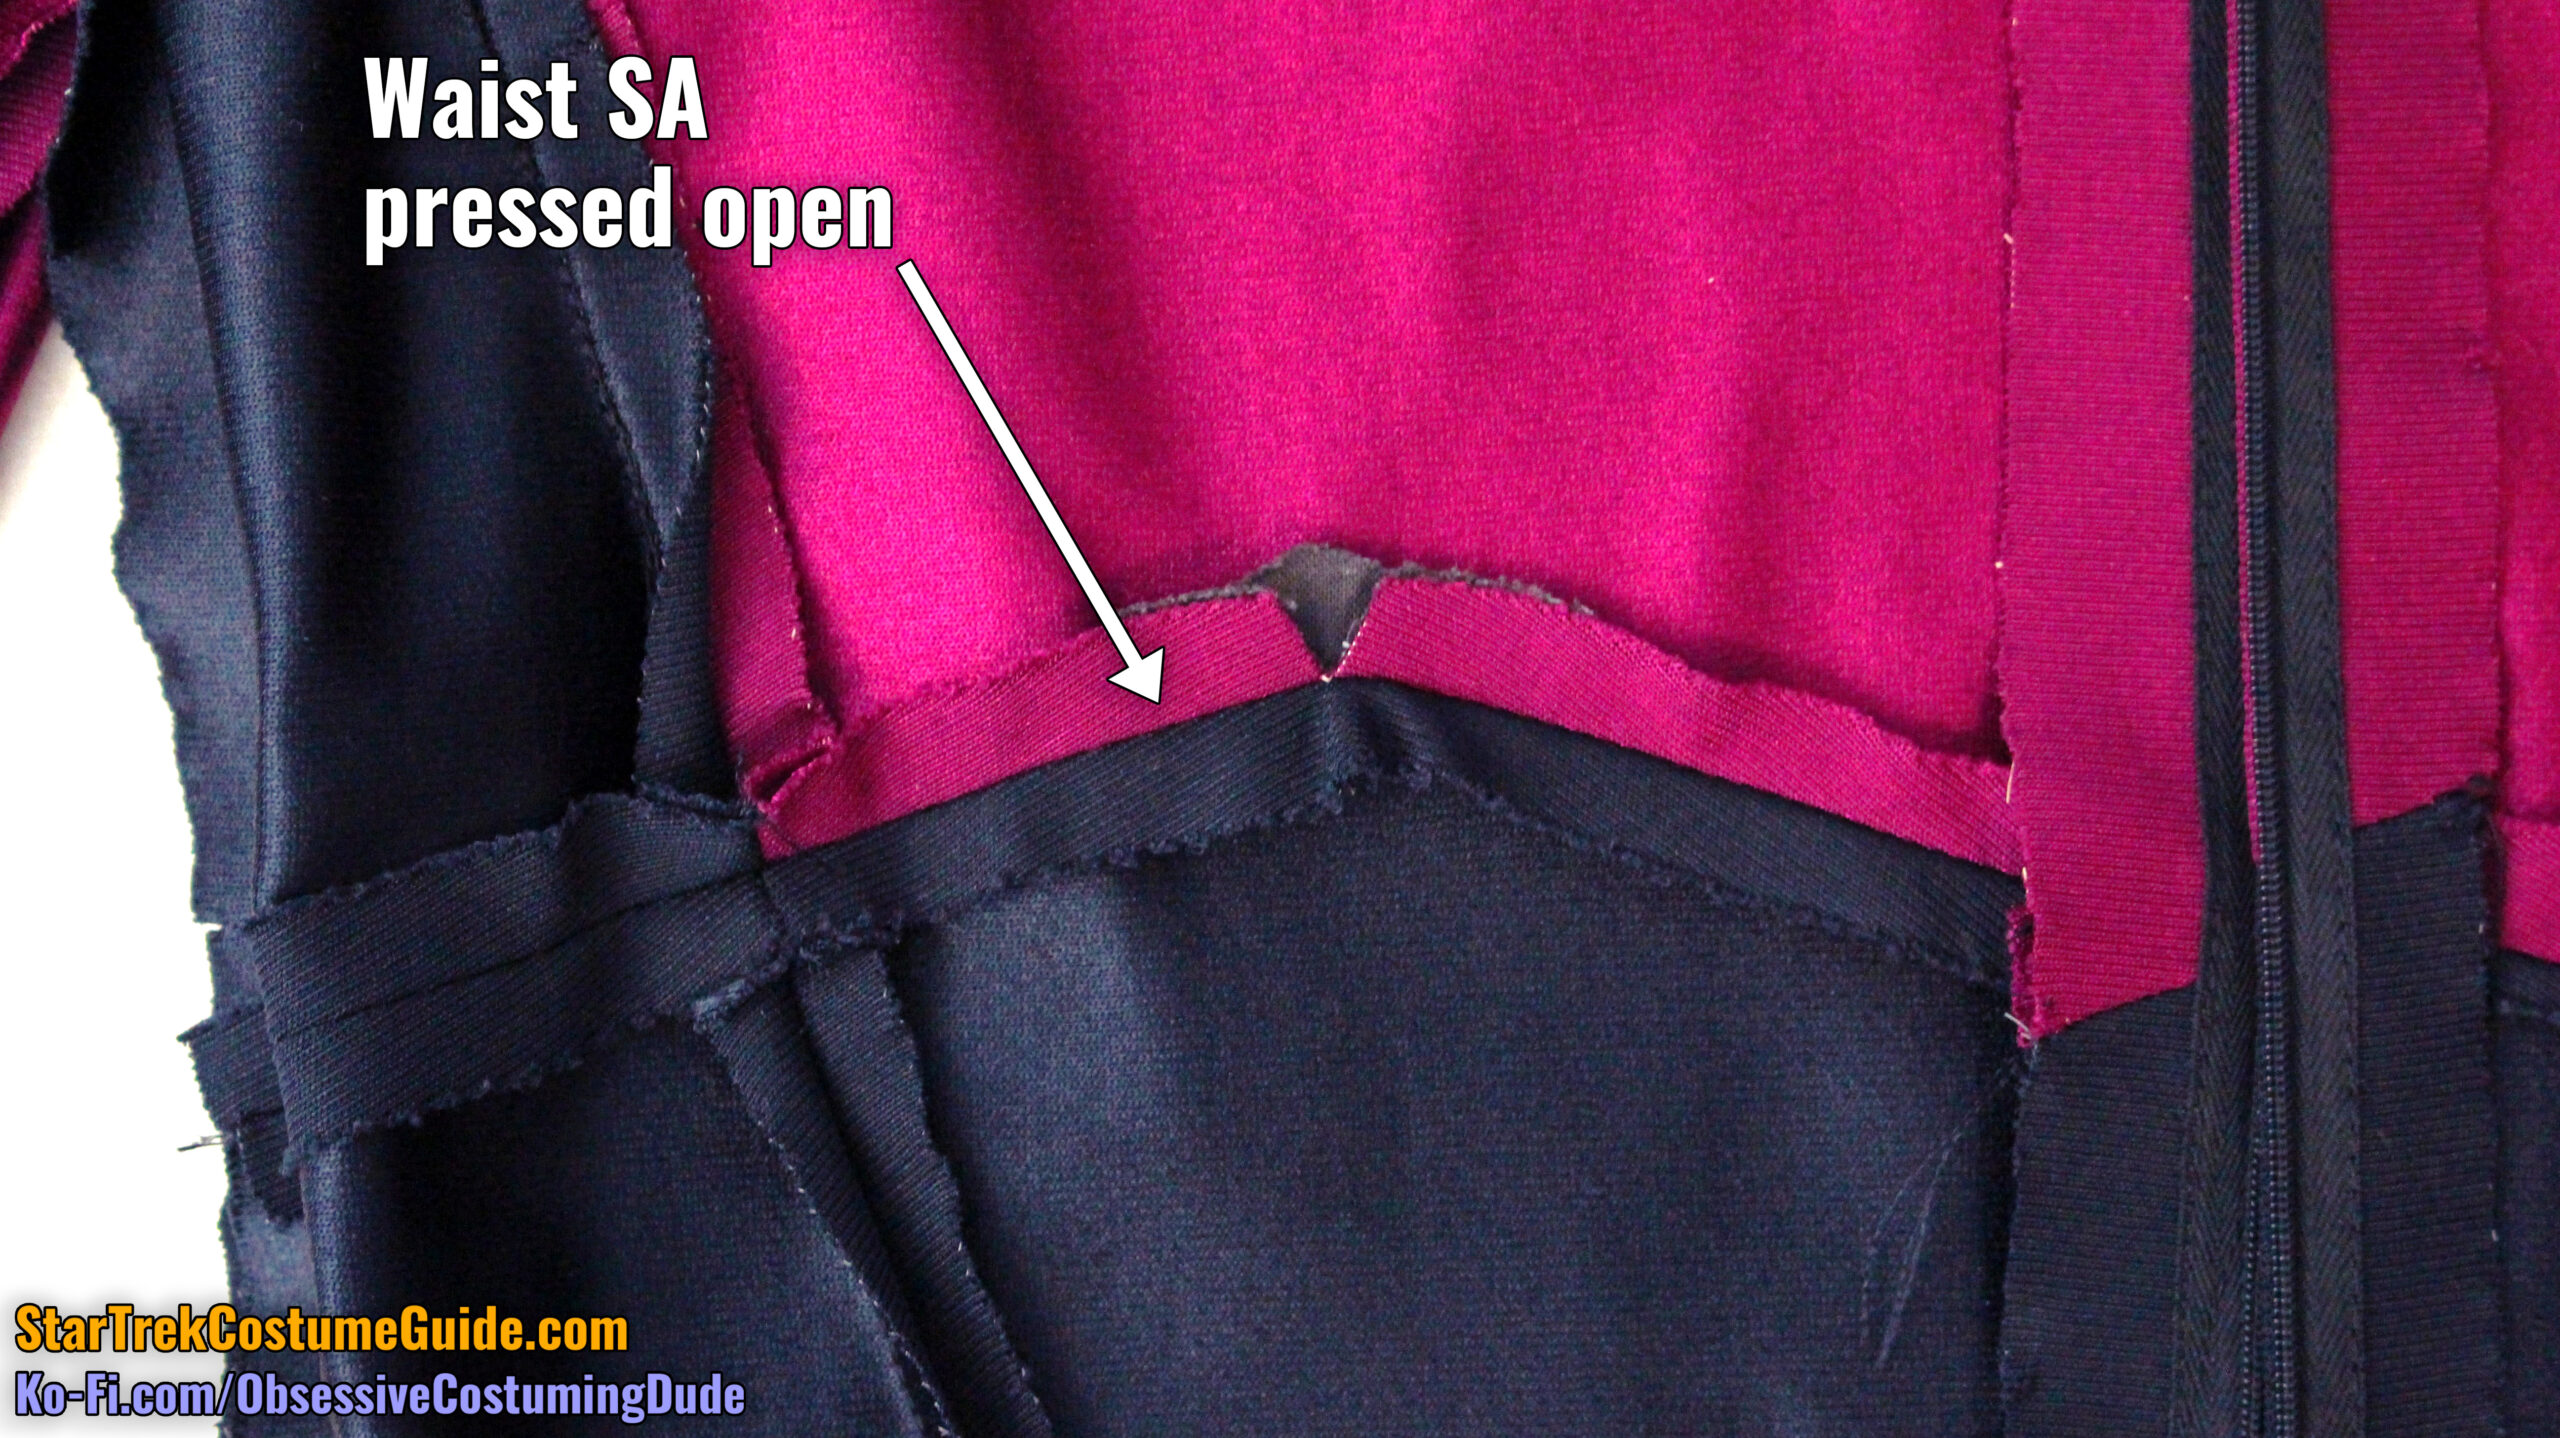
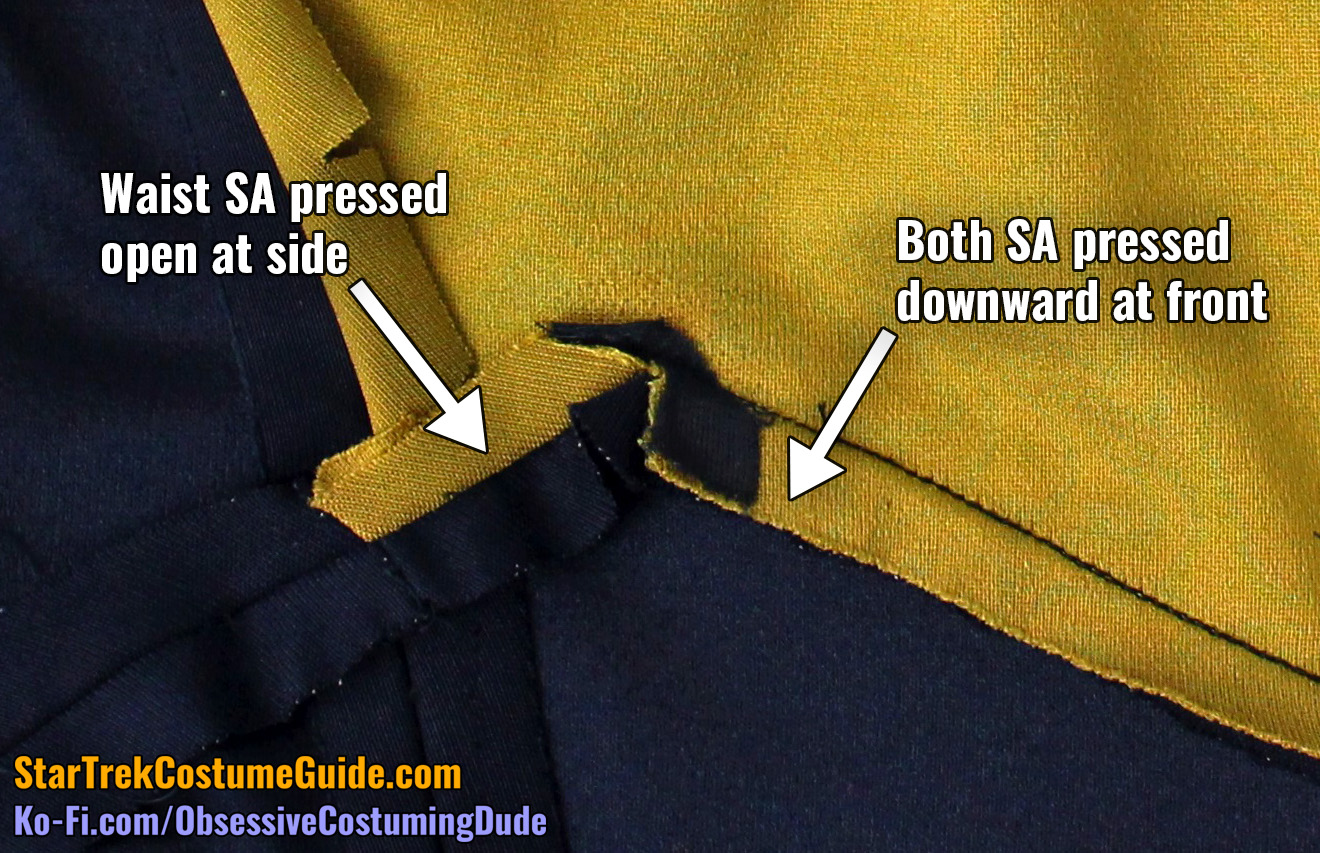
The Dr. Crusher and male extra (“Scranton”) uniforms I looked at had the left front waist allowances simply pressed open.
Screen-used Dr. Crusher TNG jumpsuit
Screen-used male extra TNG jumpsuit
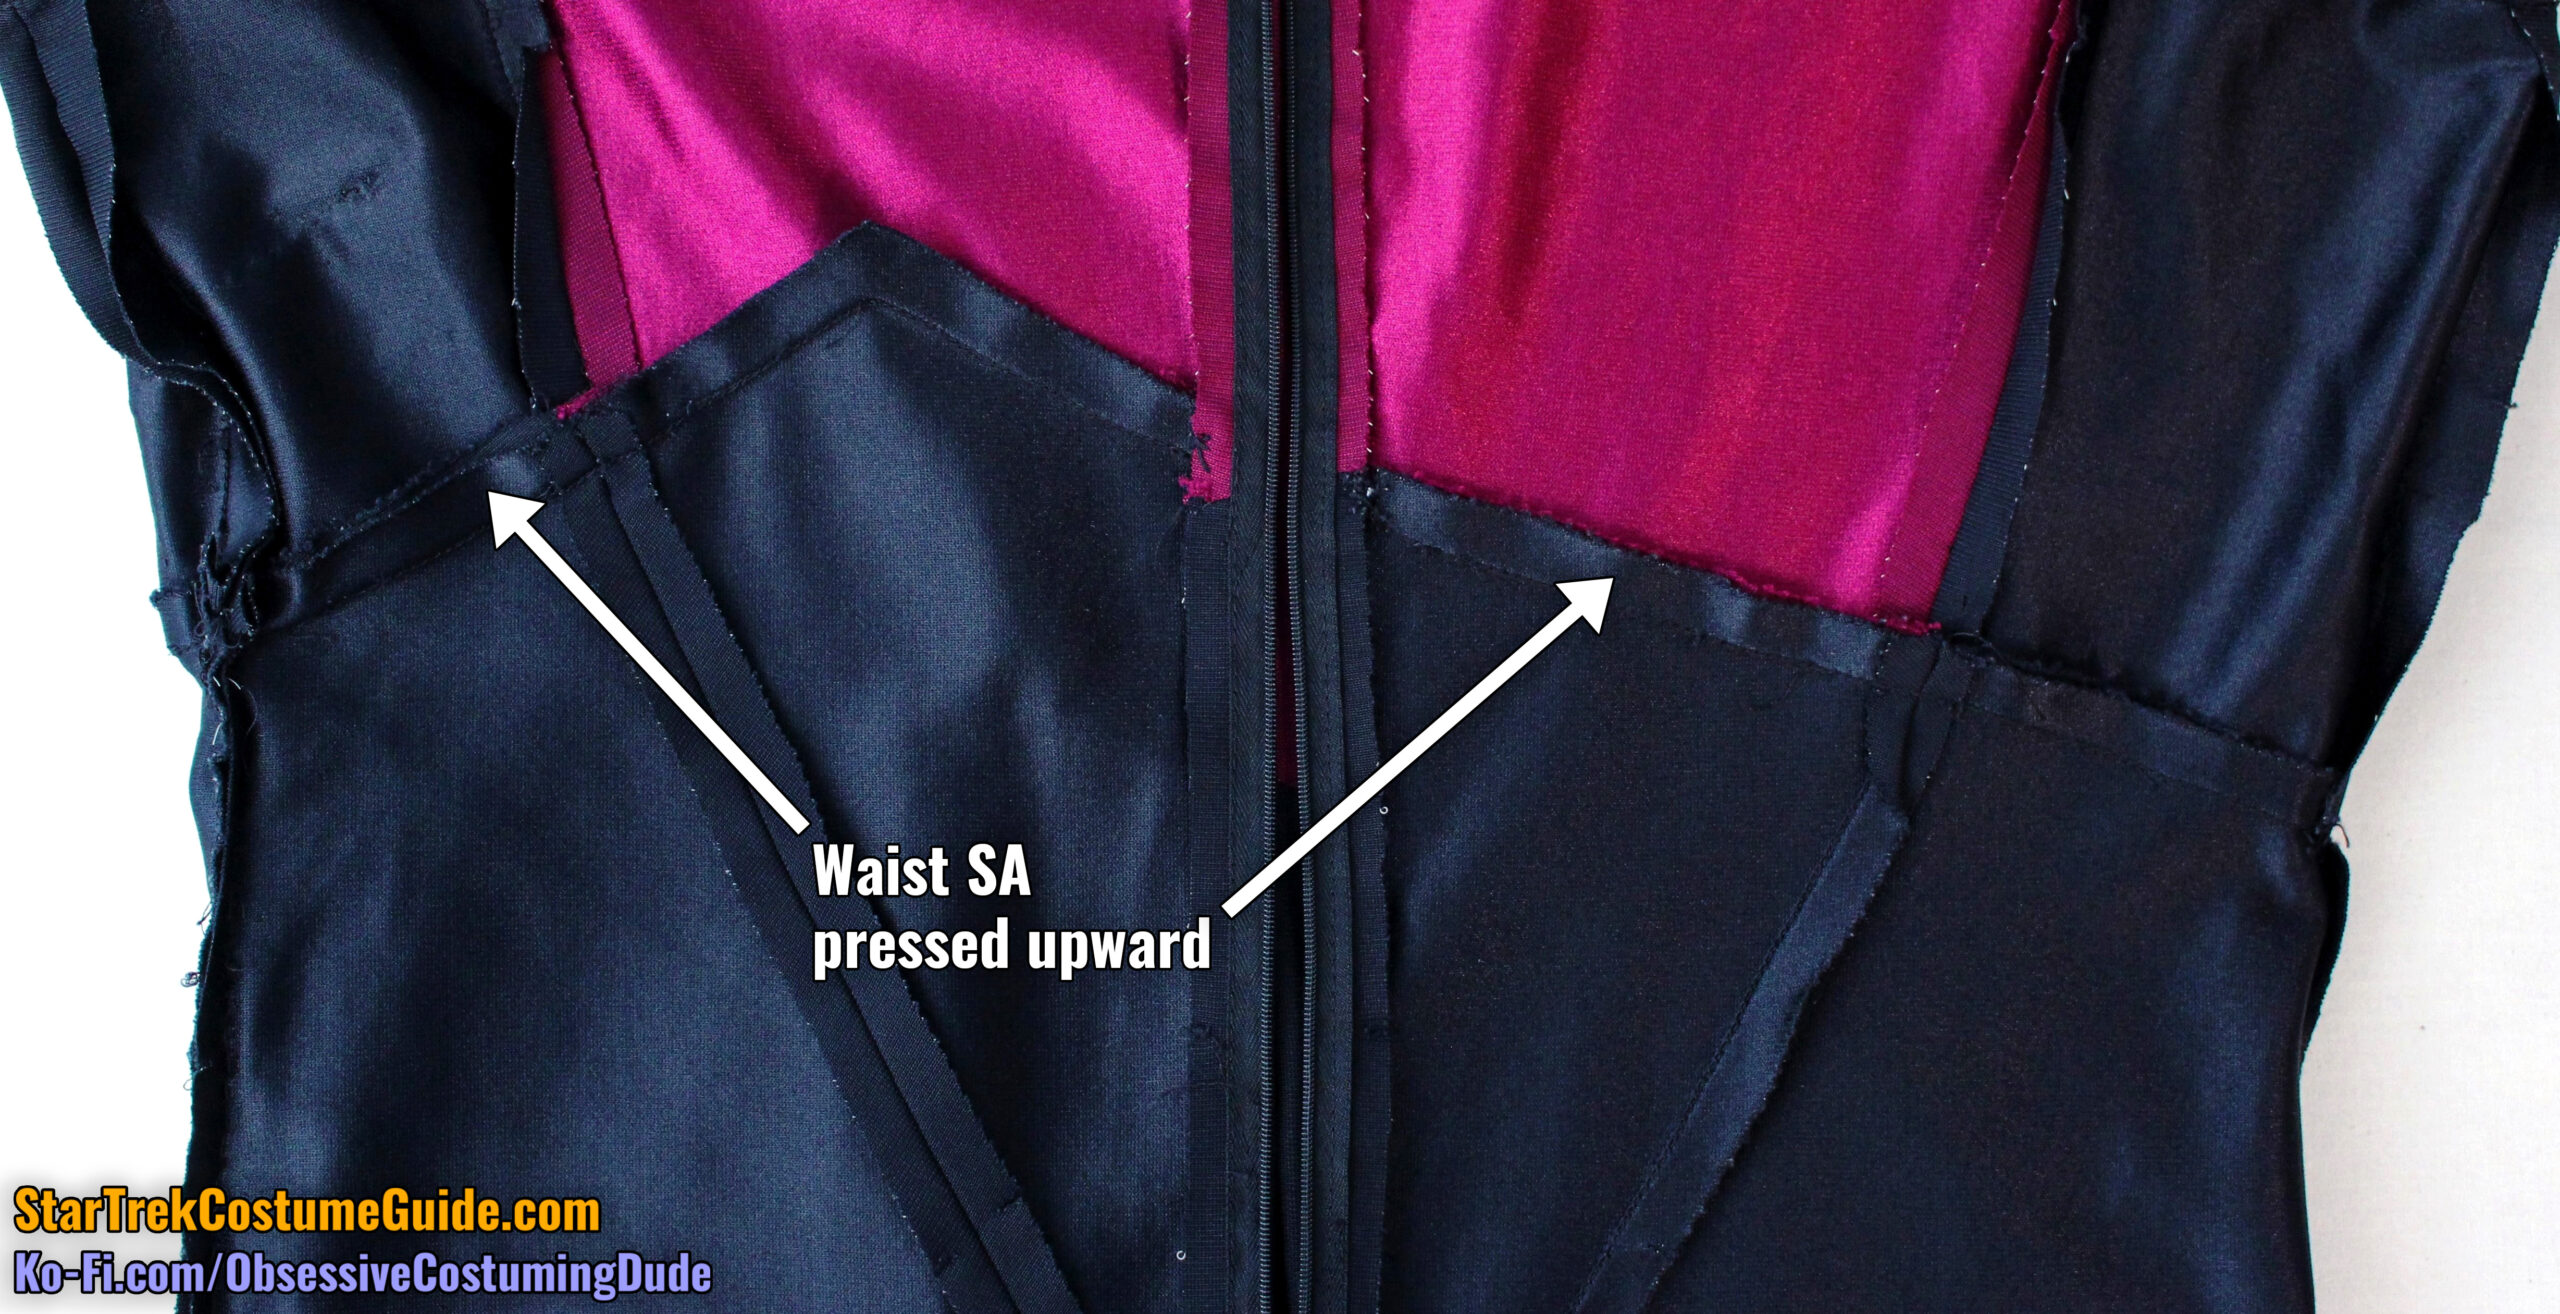
However, the Worf uniform I studied had the front waist allowances all pressed upward.
Screen-used Worf TNG jumpsuit
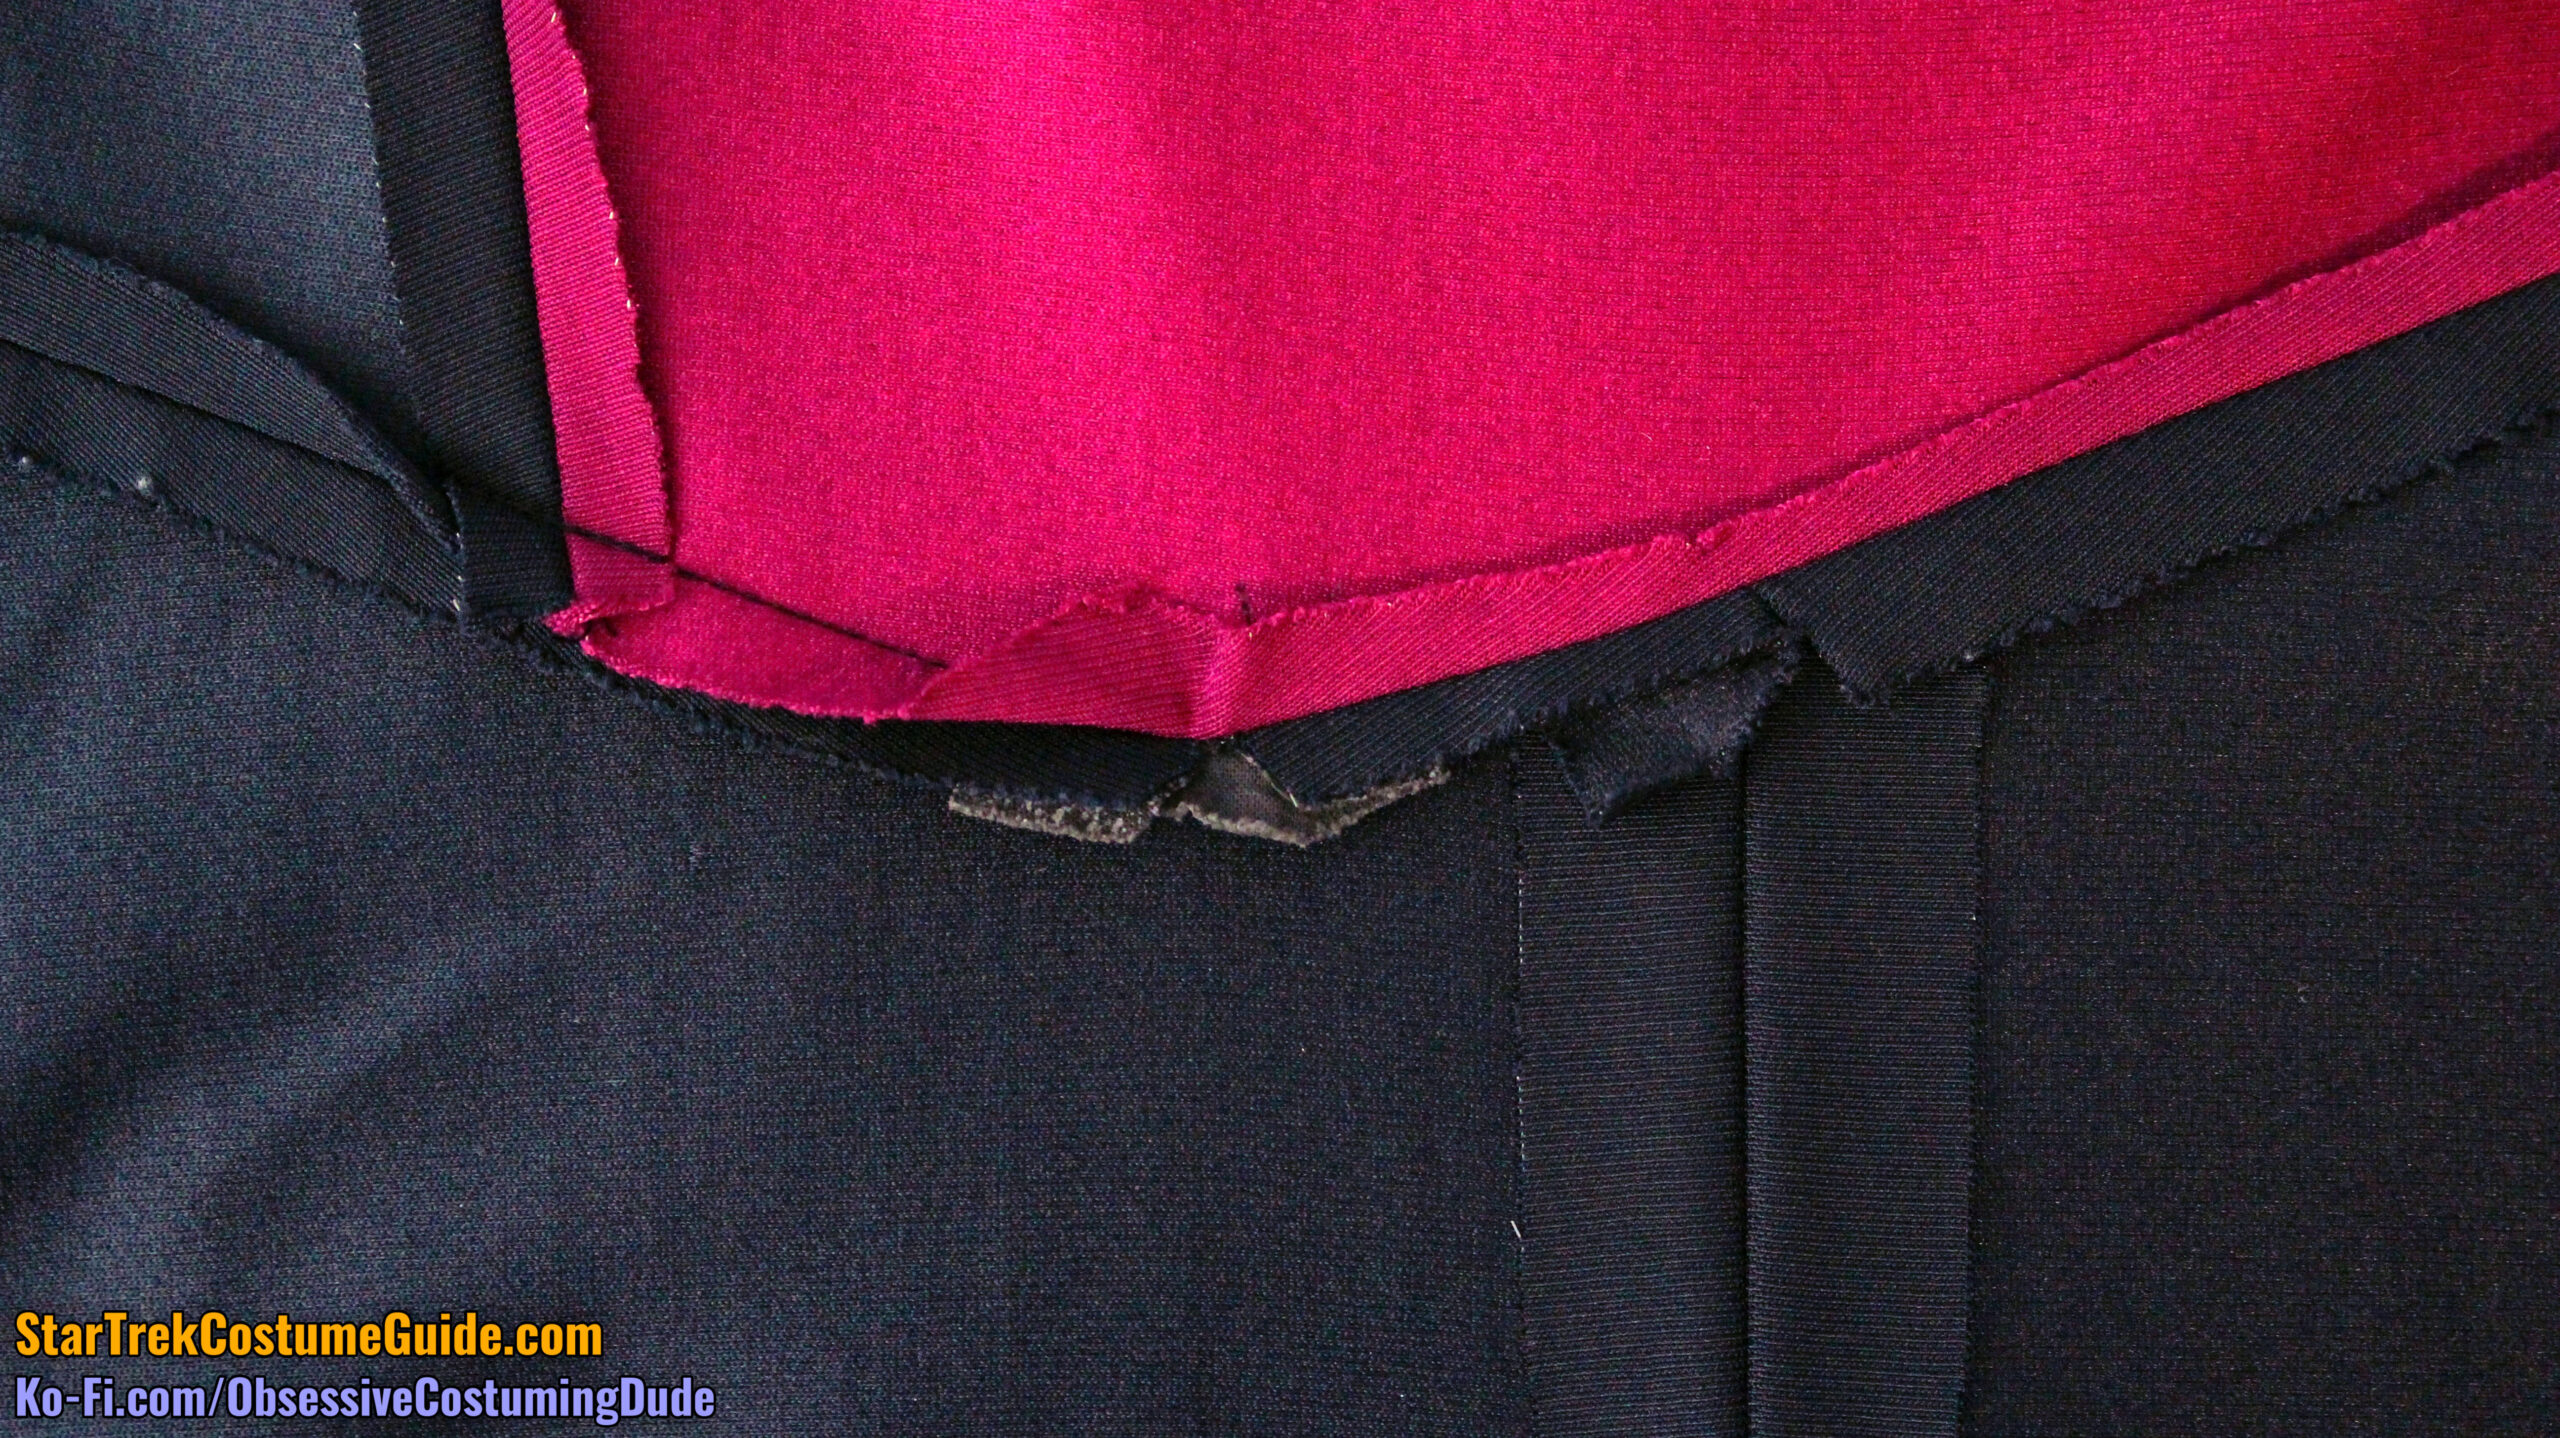
The Tasha Yar and Ensign Sito uniforms I studied had the allowances actually pressed in different directions!
Screen-used Tasha Yar TNG jumpsuit
Screen-used Ensign Sito TNG jumpsuit
(The Ensign Sito uniform was obviously a back-zipping later style, but I mention it here because the issue of the front left corner applies to all of the TNG jumpsuit uniforms.)
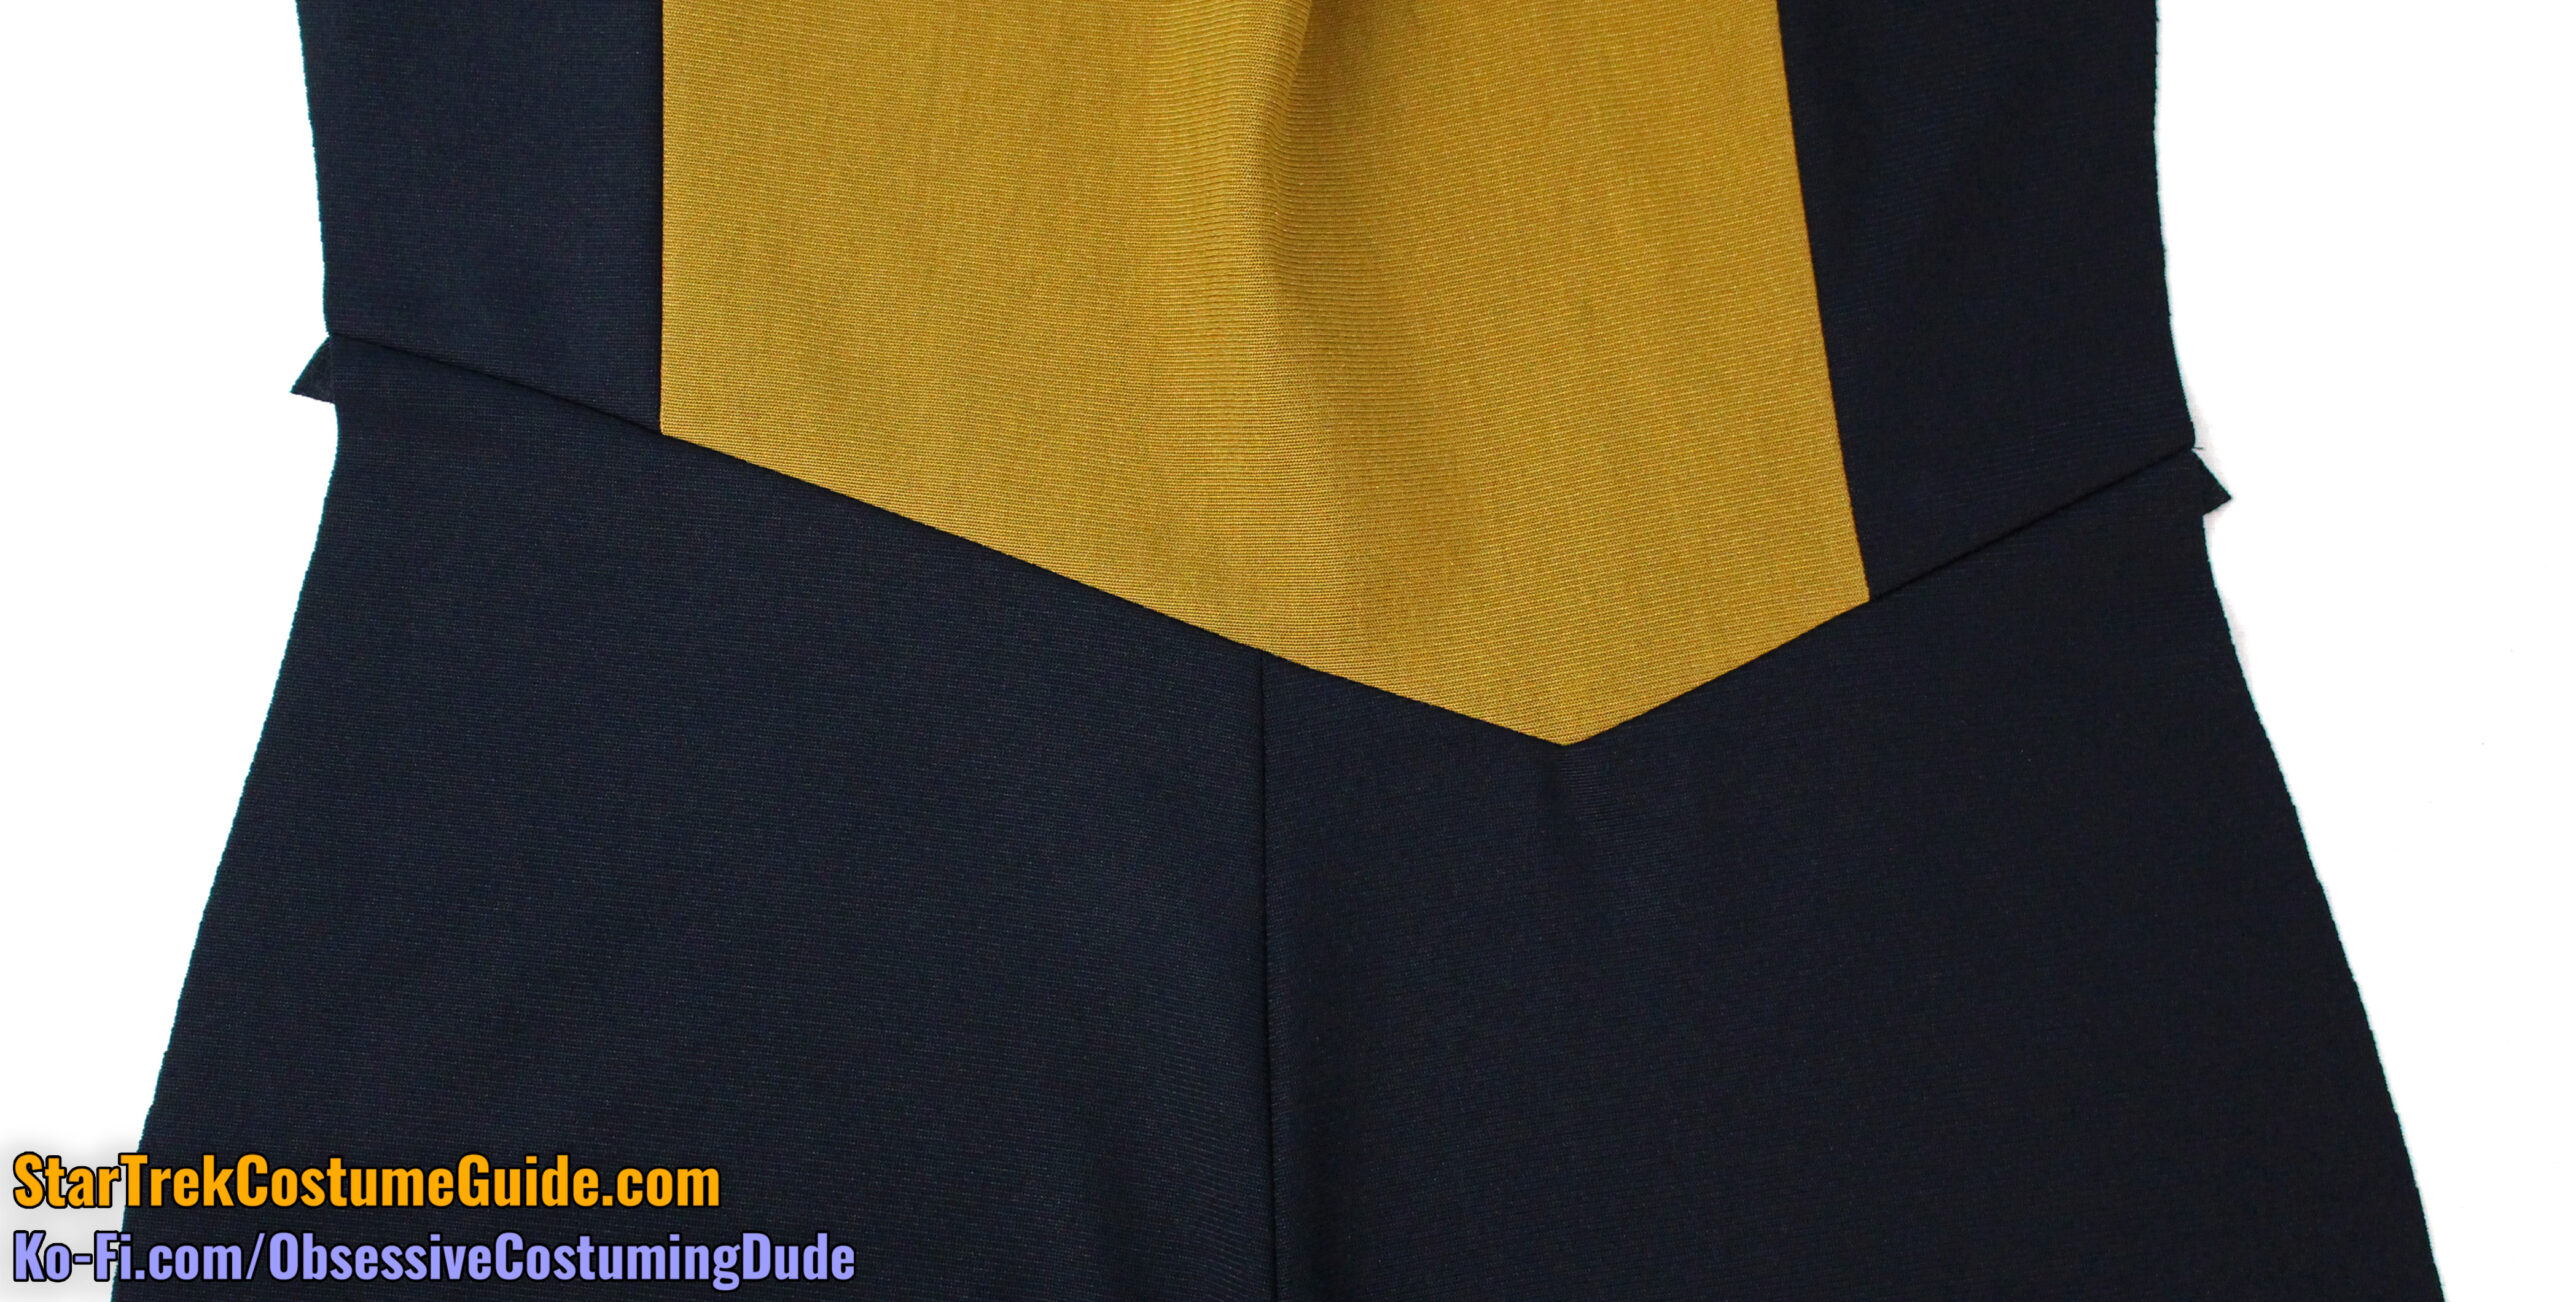
Personally, I favor simply pressing the seam allowances open, albeit carefully and with a press cloth on each of the upper edges.
I also recommend pressing the corner area on the upper body (but not with any of the allowances – just the upper body) both at first, and as a final step.
This particular method has generally produced acceptable results for me, although you may wish to experiment on some scraps to determine which method(s) you prefer.
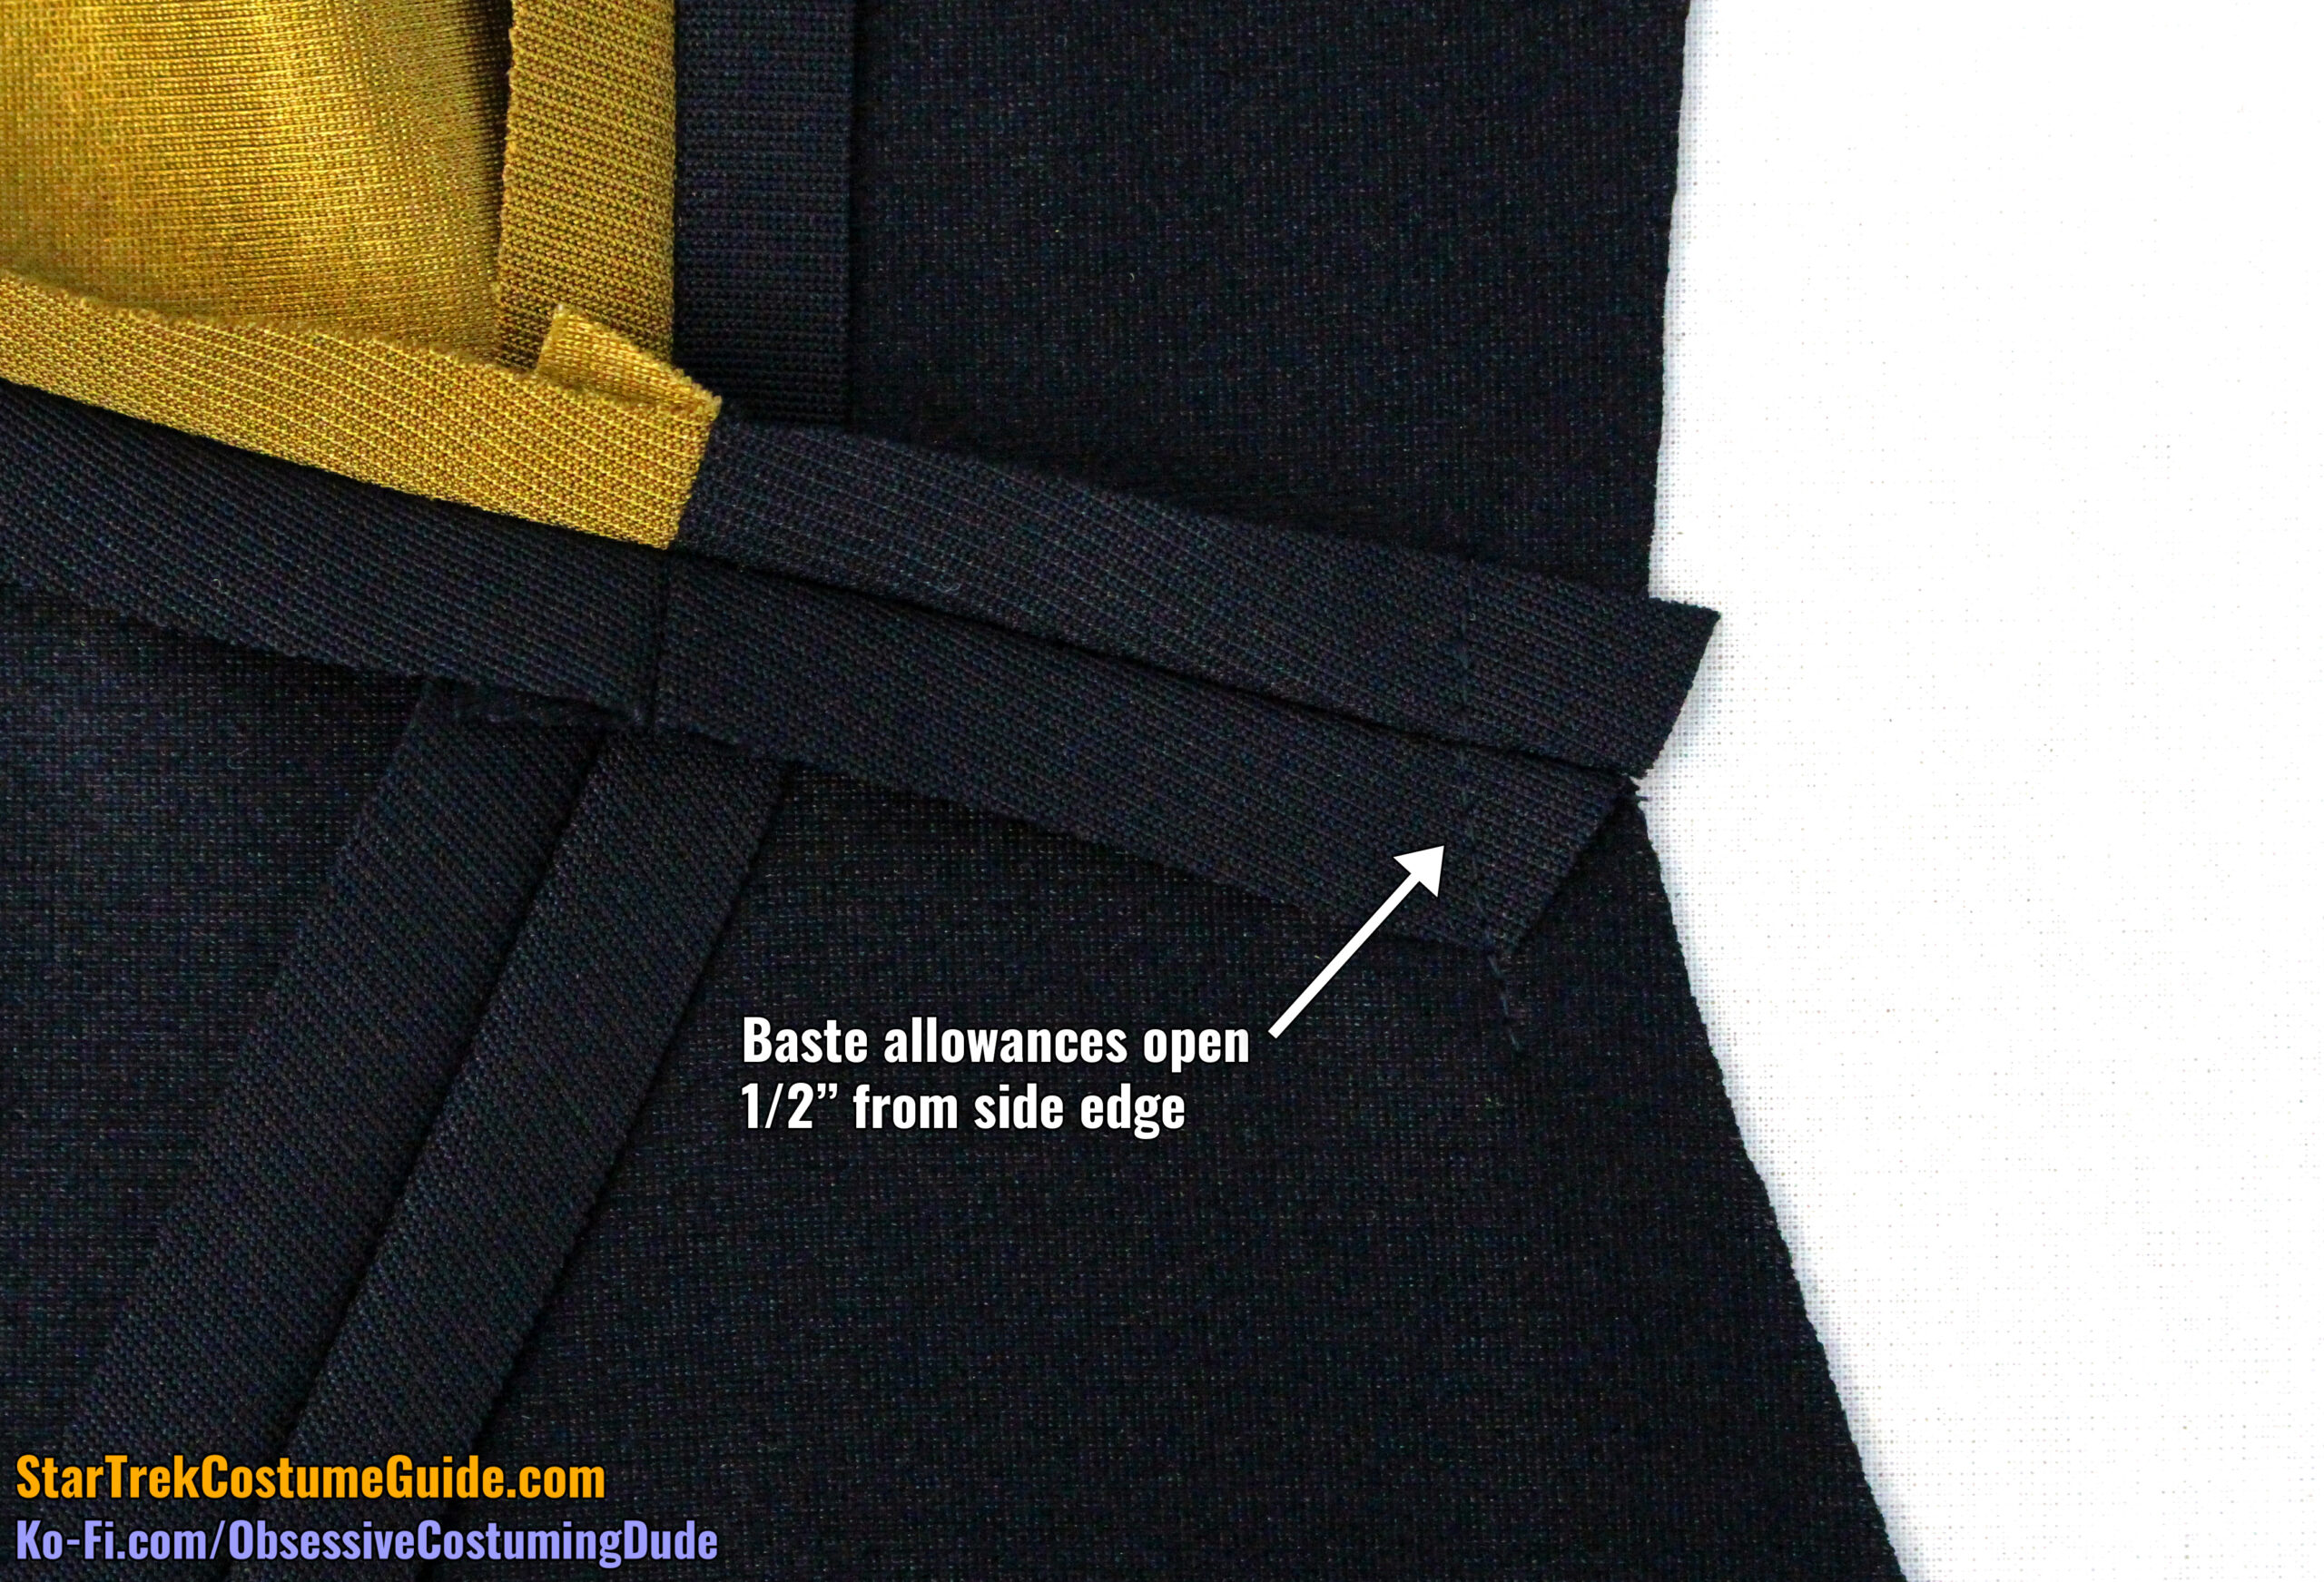
On both front assemblies, I recommend basting the waist allowances open ½” from the side edges – provided you chose to press your waist allowances open, of course.
On both front assemblies, I recommend basting the waist allowances open ½” from the side edges – provided you chose to press your waist allowances open, of course.
BACK ASSEMBLY
The jumpsuit back assembly is very similar to the front assemblies.
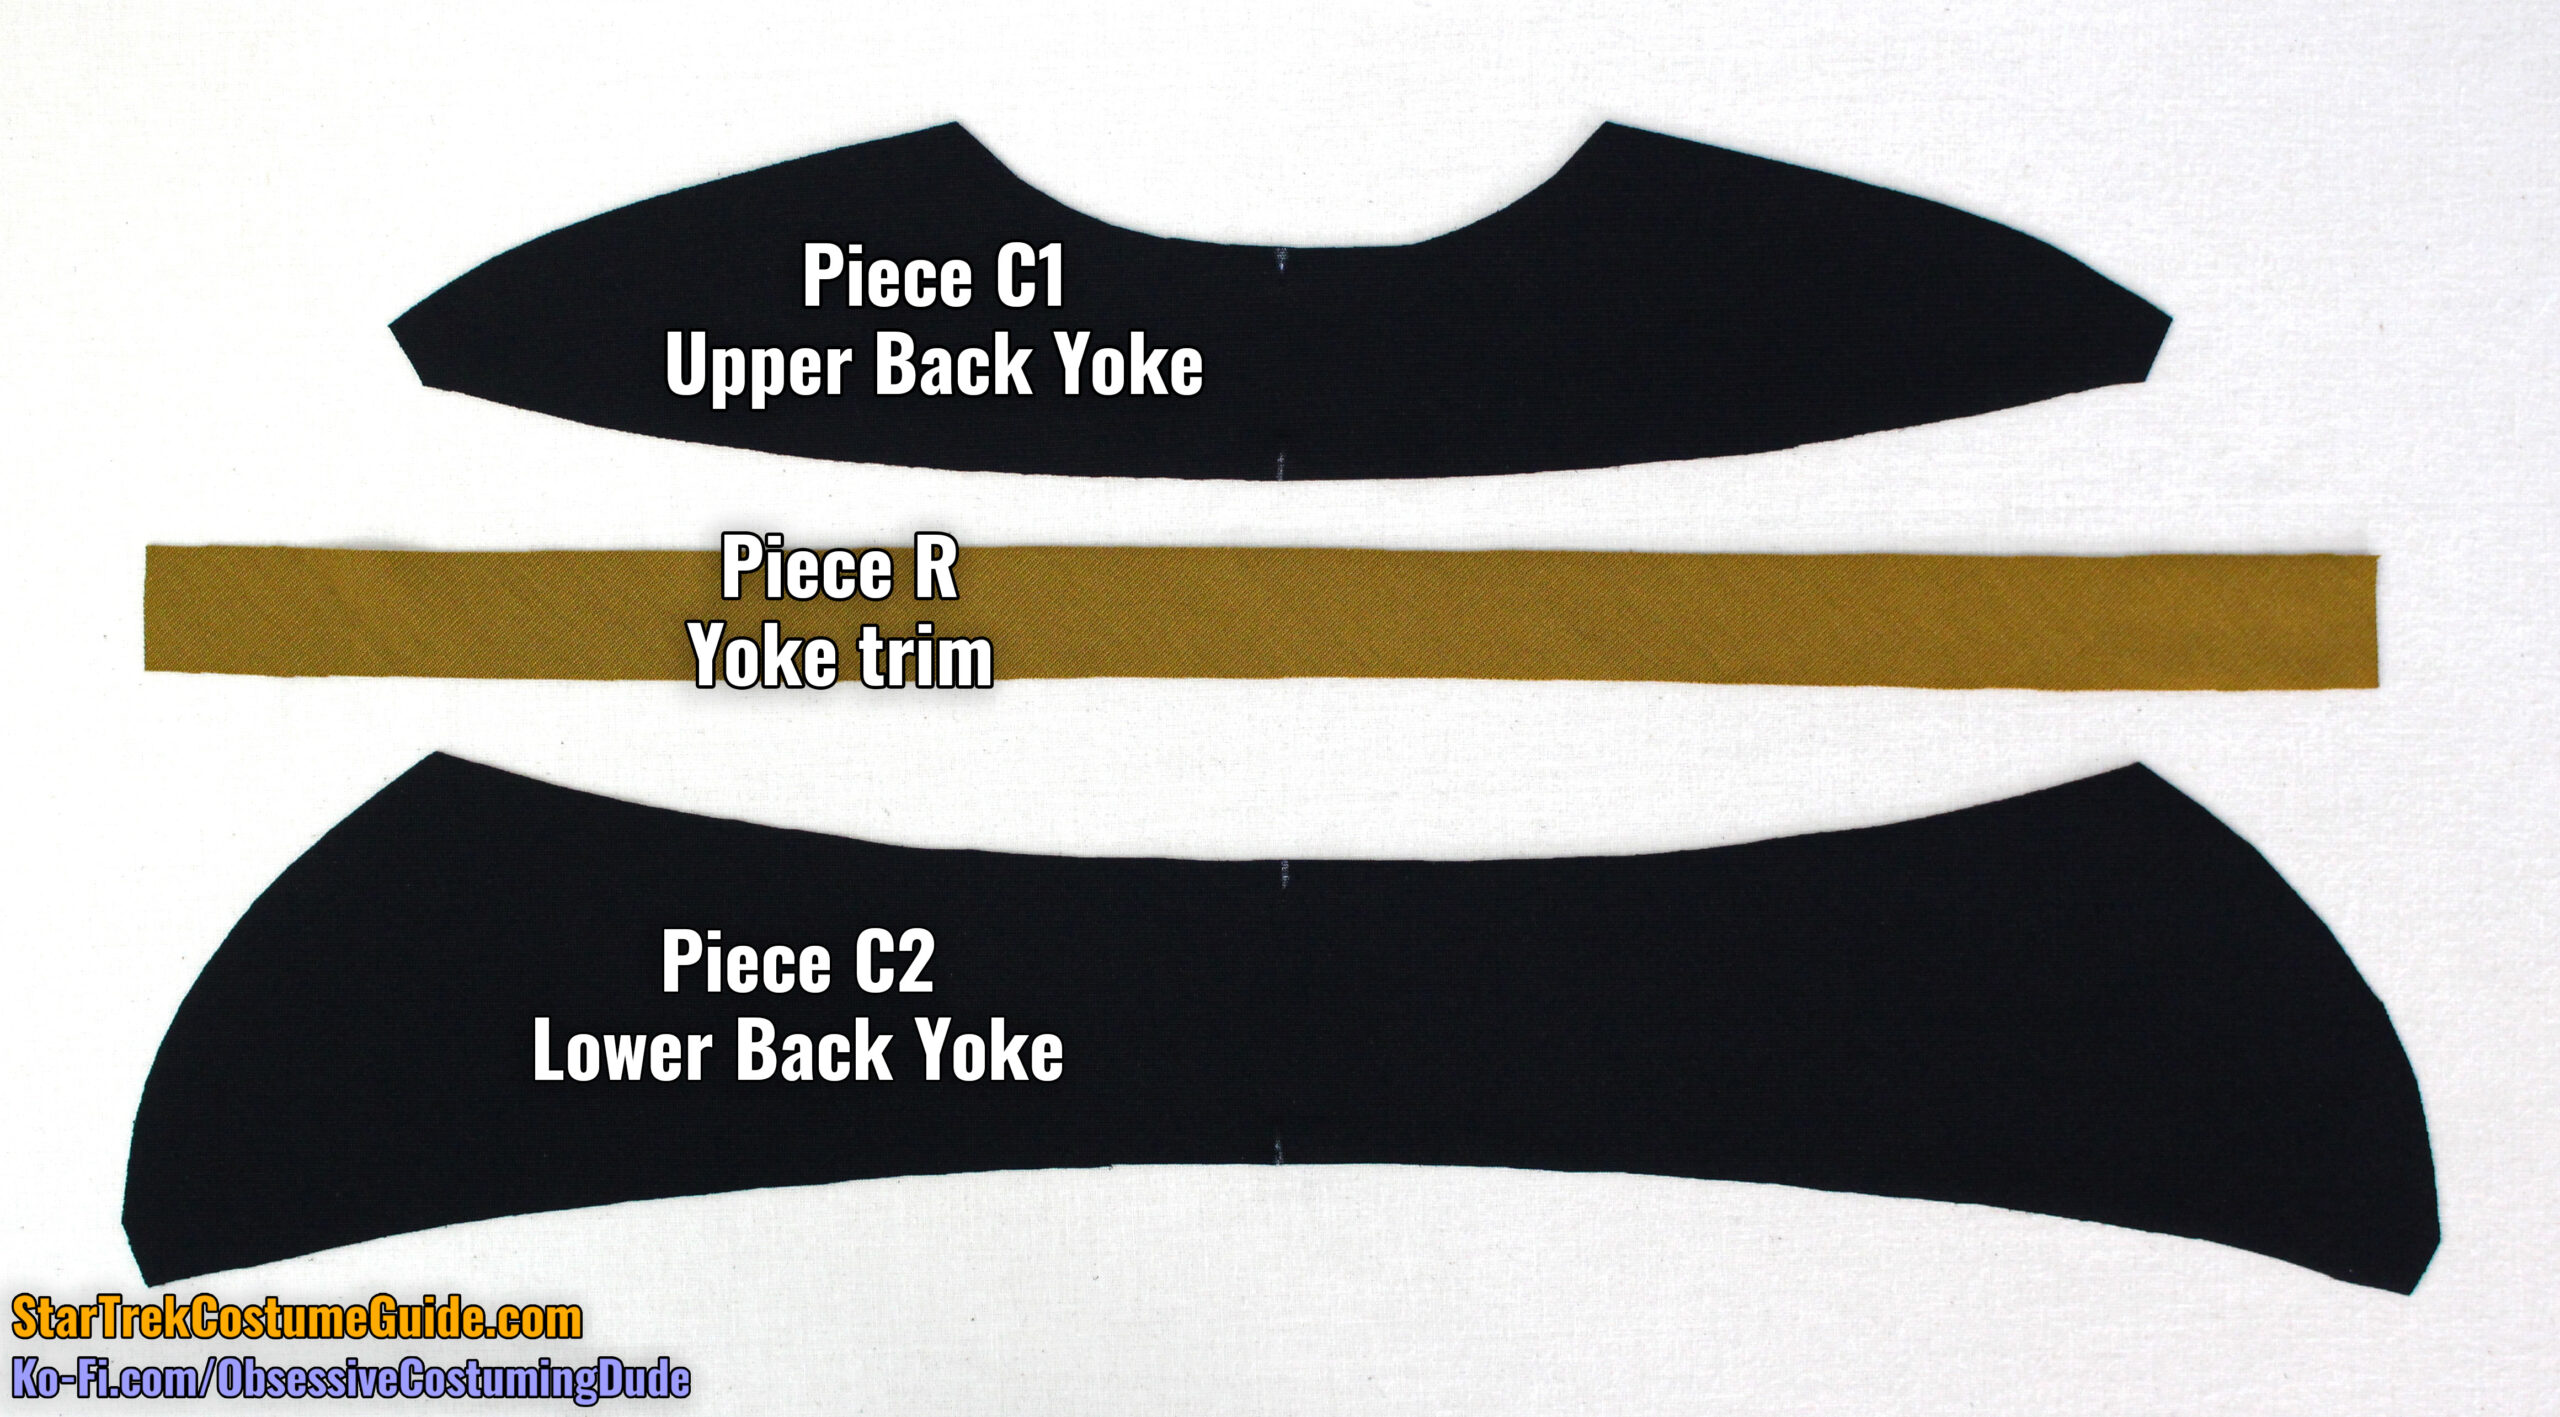
For the back yoke assembly, you’ll need the upper back yoke (piece C1), the back yoke trim (again piece R), and the lower back yoke (piece C2).
There’s a pattern piece for the back yoke piping (piece R), but it’s just a strip of bias-cut fabric 1 ⅛” wide.
Press your piping fabric in half, lengthwise.
If you’re “cheating” and using the same jumbo spandex as the body panels, remember to fold the matte/“dull” sides together so the trim is shiny-sides-out.
I suggest basting the length of trim closed along the seam line, ⅜” from the raw edges. (I also suggest using a quilting/walking foot for this, to help prevent the bias trim from stretching as you go.)
Pin the back yoke piping to the lower back yoke (piece C2), folded side down, with the upper edges flush.
There will probably be some excess, but that’s fine. Again, better too much than not enough!
Sew the piping to the lower back along the seam line, ⅜” from the upper edges. (Again, I recommend using a quilting/walking foot for everything involving the yoke and neckline trims.)
Trim away the excess at the outer shoulder and center front.
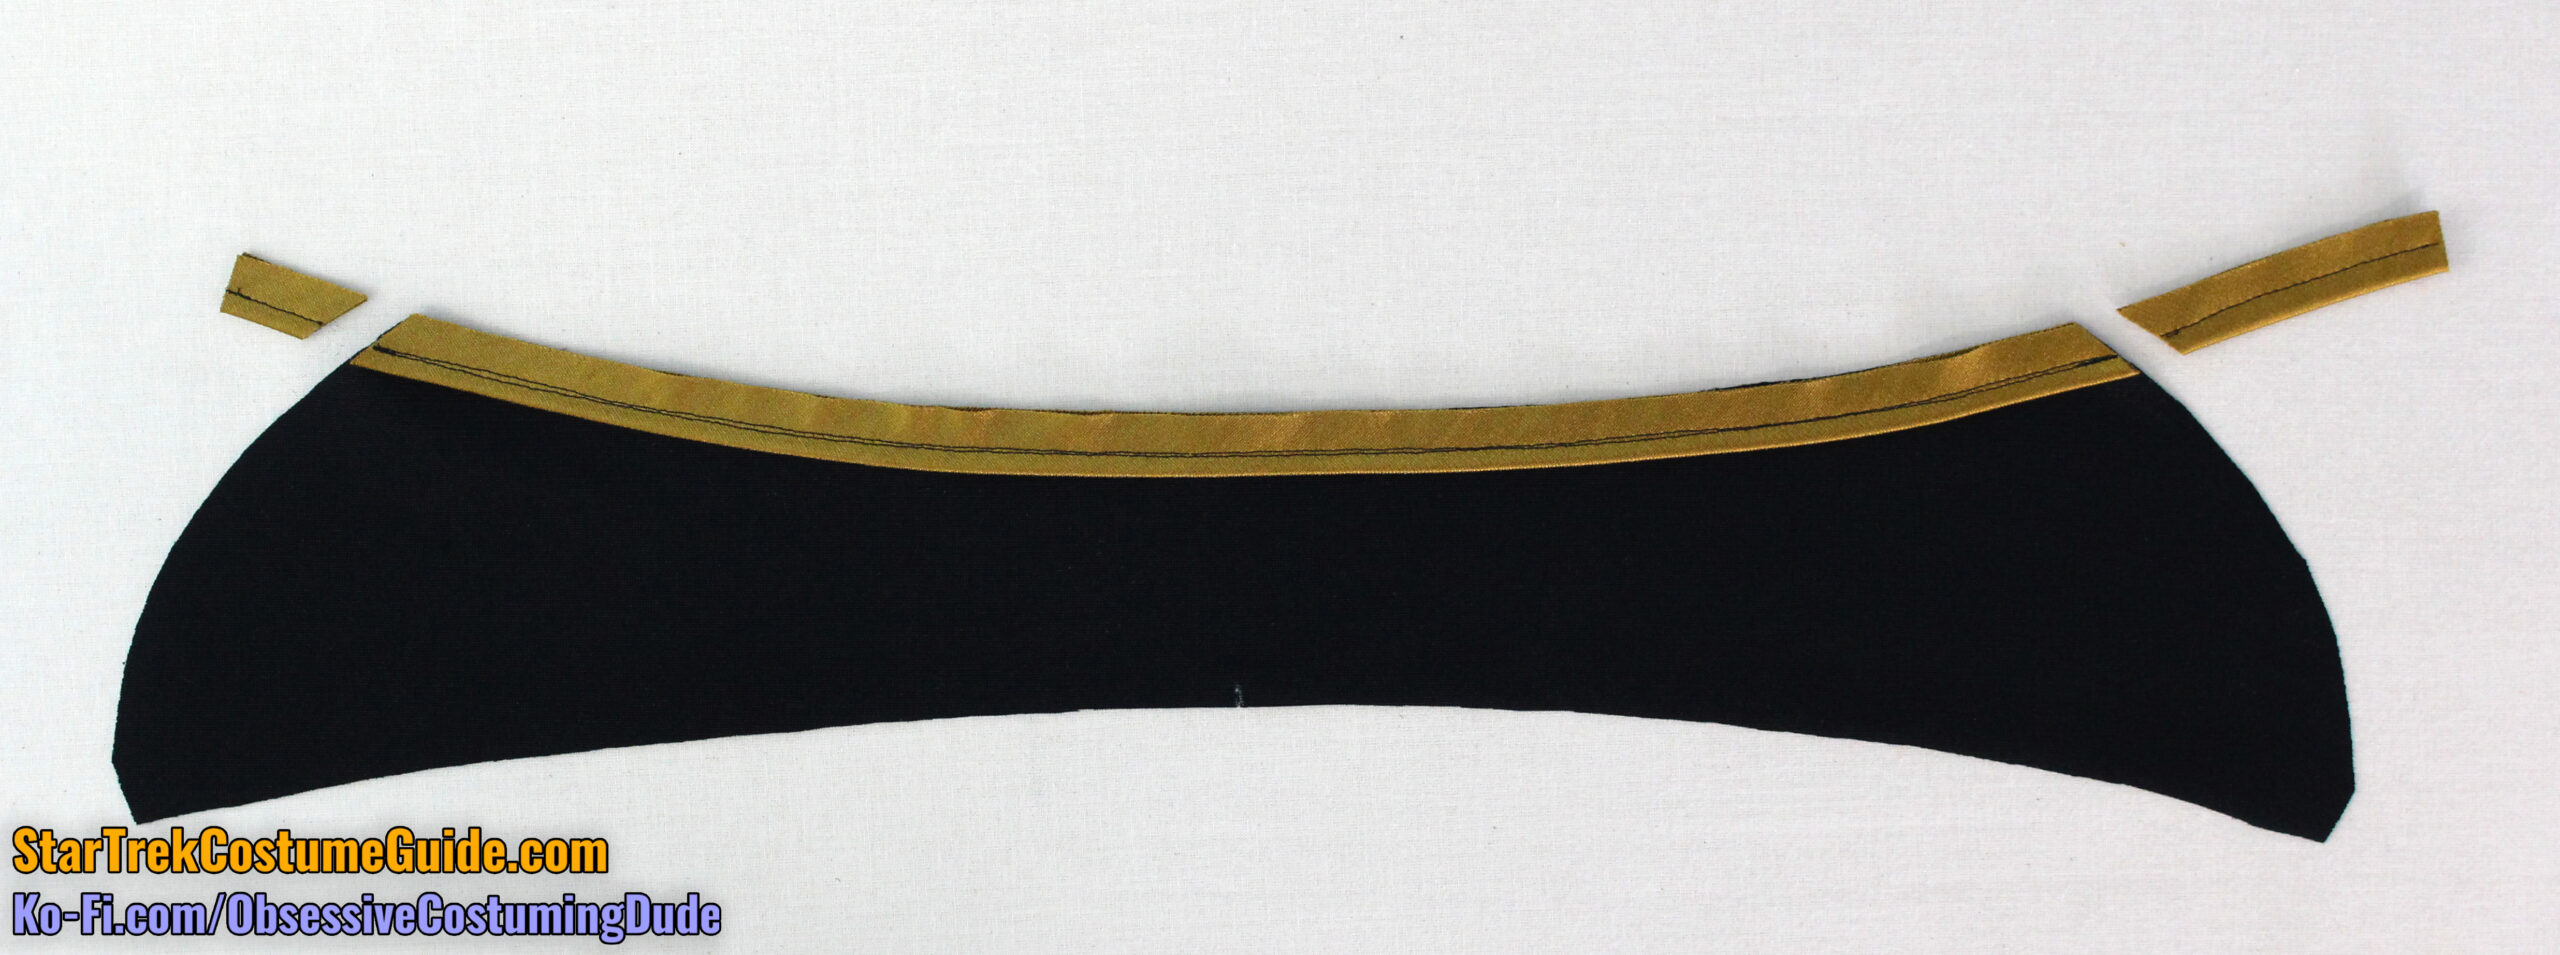
Pin the upper back yoke (piece C1) to the lower assembly, right-sides-together.
Sew the yokes together, stitching exactly over the previous stitch line (⅜” from the edge), with the yoke trim “sandwiched” between them.
Press the seam allowances and upper yoke upward.
There should be exactly 3/16” of the piping fabric extending outward from underneath the seam.
Sew the upper back (piece G1) to the right side back (piece H), right sides together with ½” seam allowance, starting/stopping and reinforcing your stitching several times at the dot.
As with the side front allowances, the side back allowances on the screen-used TNG jumpsuits I studied consistently changed directions partway down the seam.
To best replicate the original uniforms, first press the seam allowances open.
Then, press both seam allowances toward the back.
And finally, press the seam allowances open again, but only on the lower portion of the seam.
Repeat for the left side back seam.
Sew the right back pant leg (piece M) to the left back pant leg (piece N) along the crotch and center back, right sides together, with ½” seam allowance.
Press the seam allowances open.
As with the front left corner, I recommend stabilizing the corner area on the lower back right pant leg by applying a small piece of lightweight fusible interfacing to the underside.
Stay-stitch the corner ⅜” from the edges, and clip the allowance to the stitching at the corner.
Sew the upper back assembly to the lower back assembly, right sides together with ½” seam allowance, matching center backs and pivoting at the lower back corner.
After you’ve sewn the waist seam, clip the lower back allowance exactly to the stitching at the corner.
Fortunately, there’s less risk of a visible pucker beneath the lower back corner – both because the corner isn’t as sharp as the front, and because the outer corner is on black fabric (where indentions from the allowances are less likely to be visible).
Even still, equally desperate attempts were made by the original wardrobe department to avoid creating an ugly puckers beneath the corner.
Even though the waist allowances were otherwise all pressed upward on the screen-used Worf uniform I examined, they changed directions and were pressed open along the center back area.
Screen-used Worf TNG jumpsuit
And even though the waist allowances were otherwise all pressed open on the screen-used male extra’s uniform I examined, they briefly changed directions and were pressed downward to the right of the back corner.
As with the front corner area, I prefer simply pressing the seam allowances open, albeit carefully and with a press cloth on each of the upper edges.
On both sides of the back assembly I recommend basting the waist allowances open ½” from the side edges – provided you chose to press your waist allowances open, of course.
Attach the back sleeves (piece P) and press the allowances as described previously for the jumpsuit front.
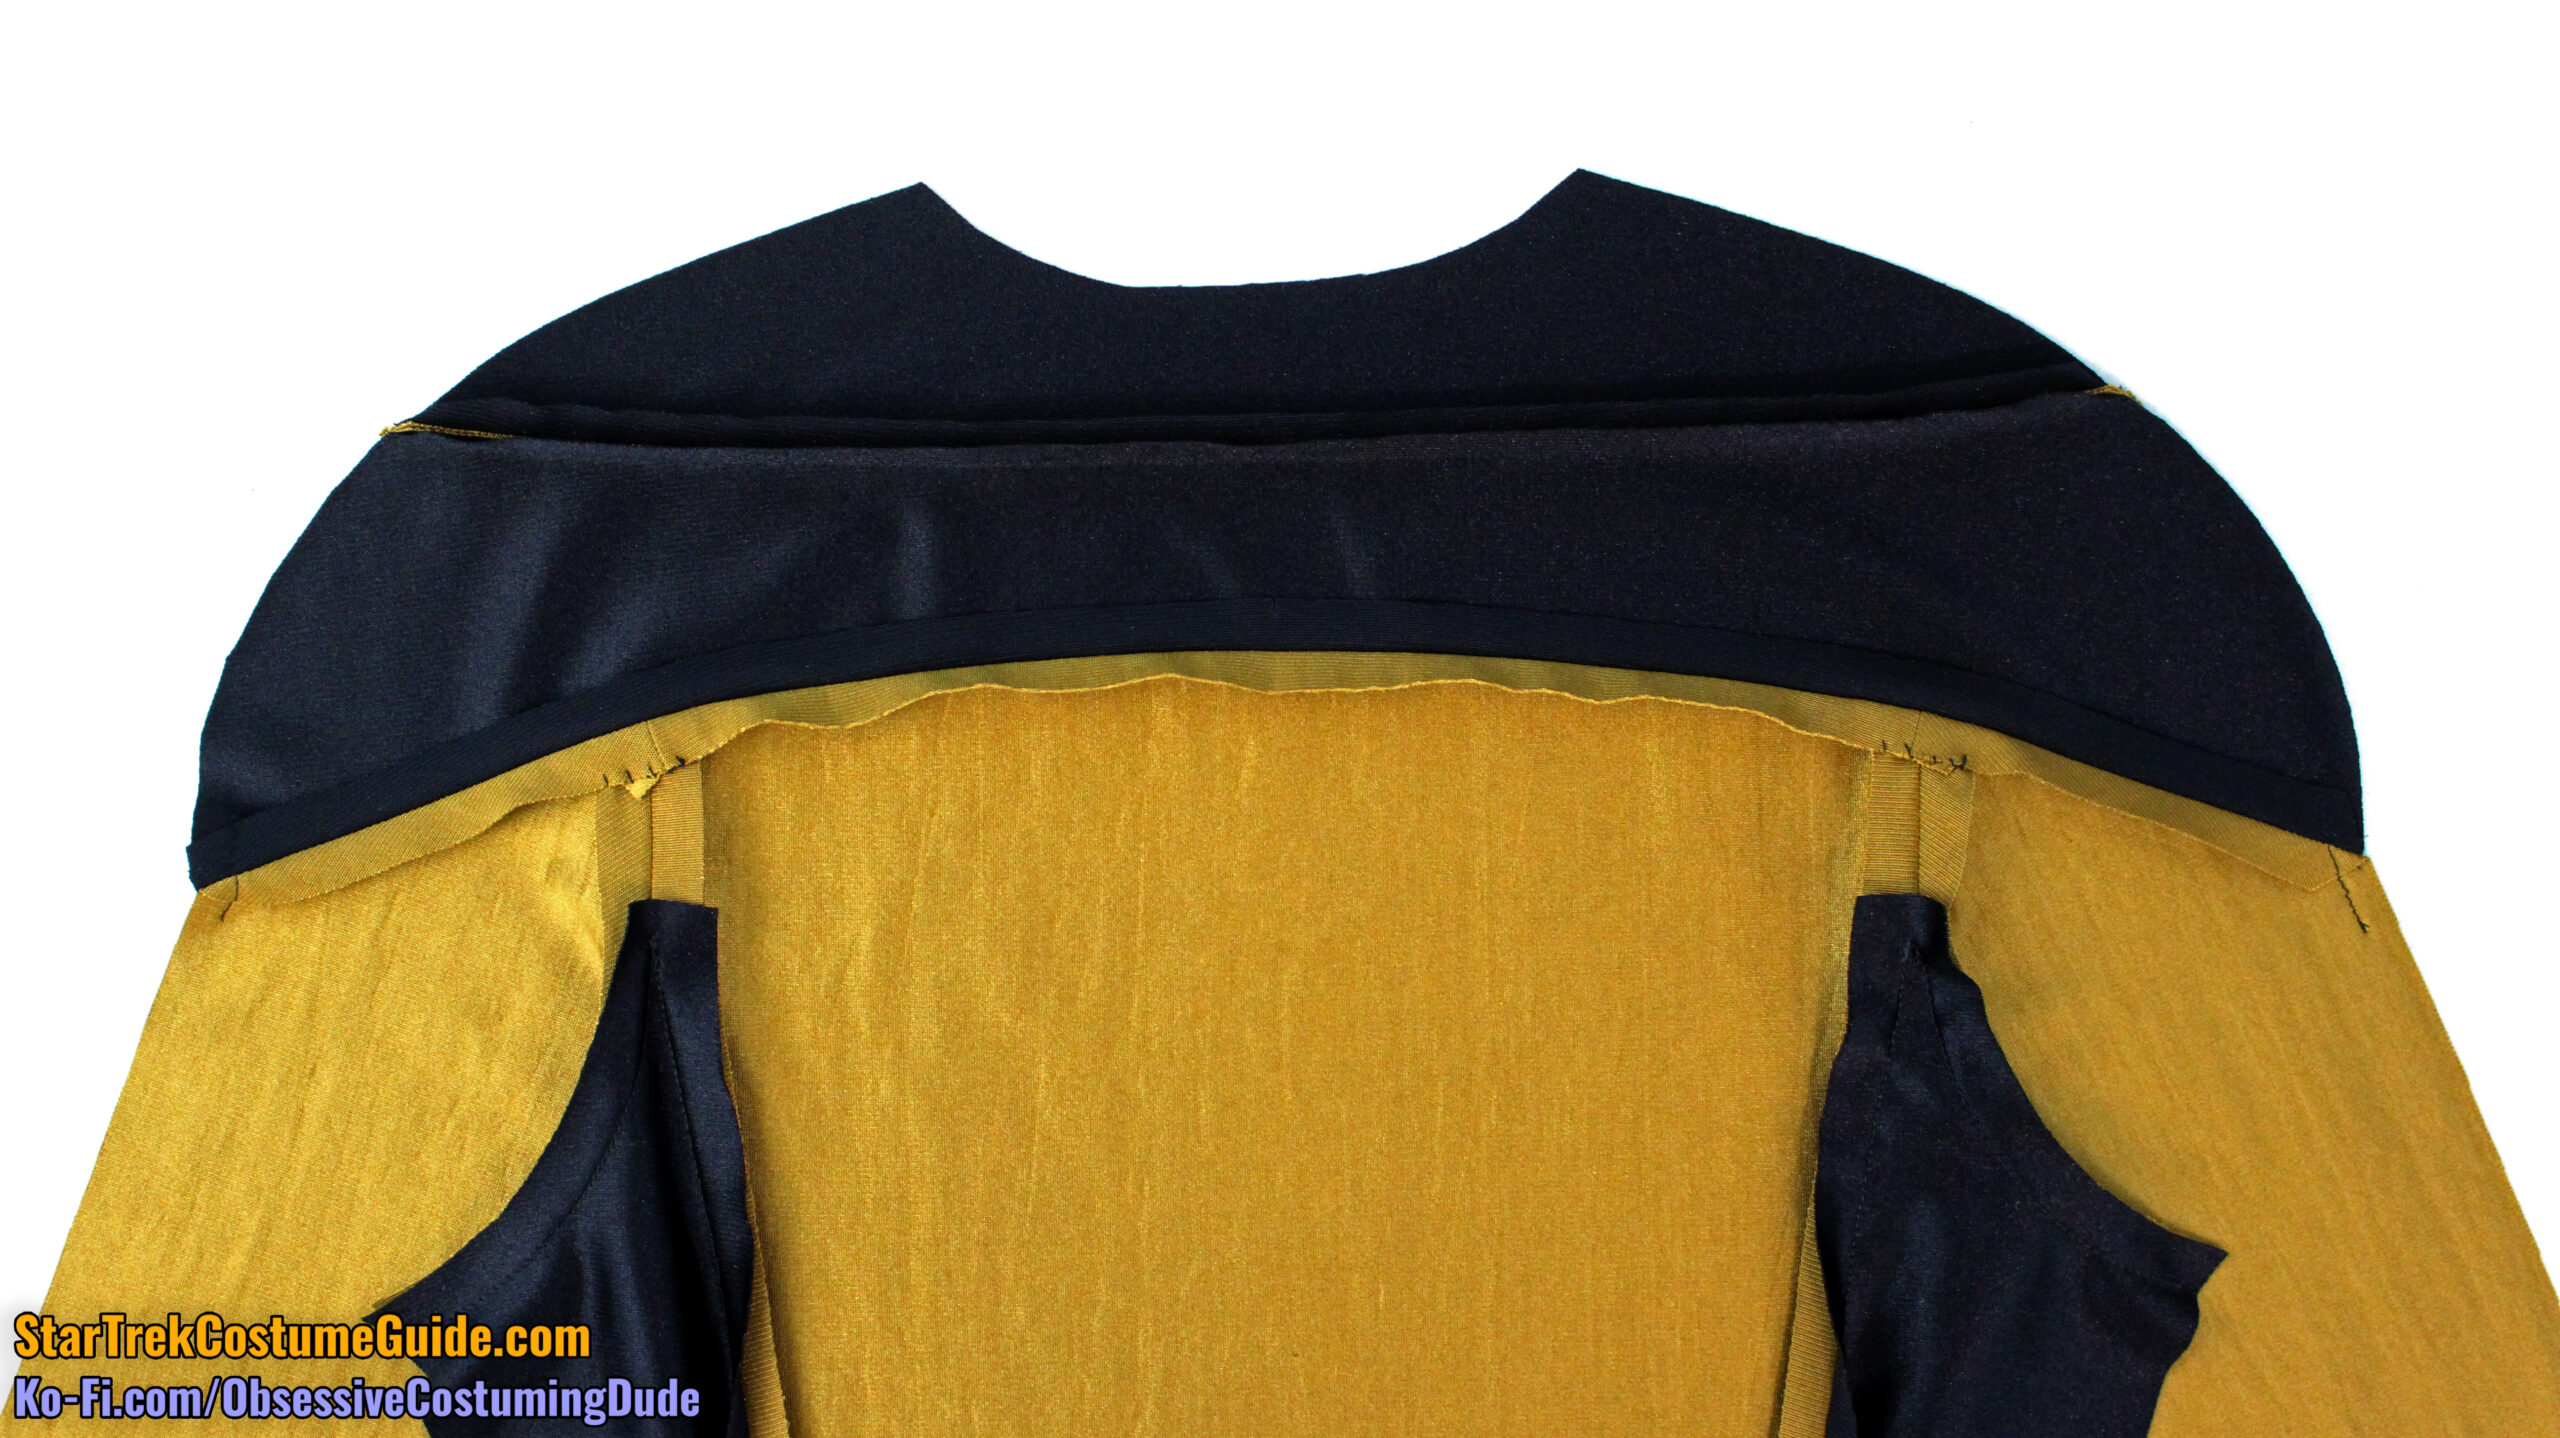
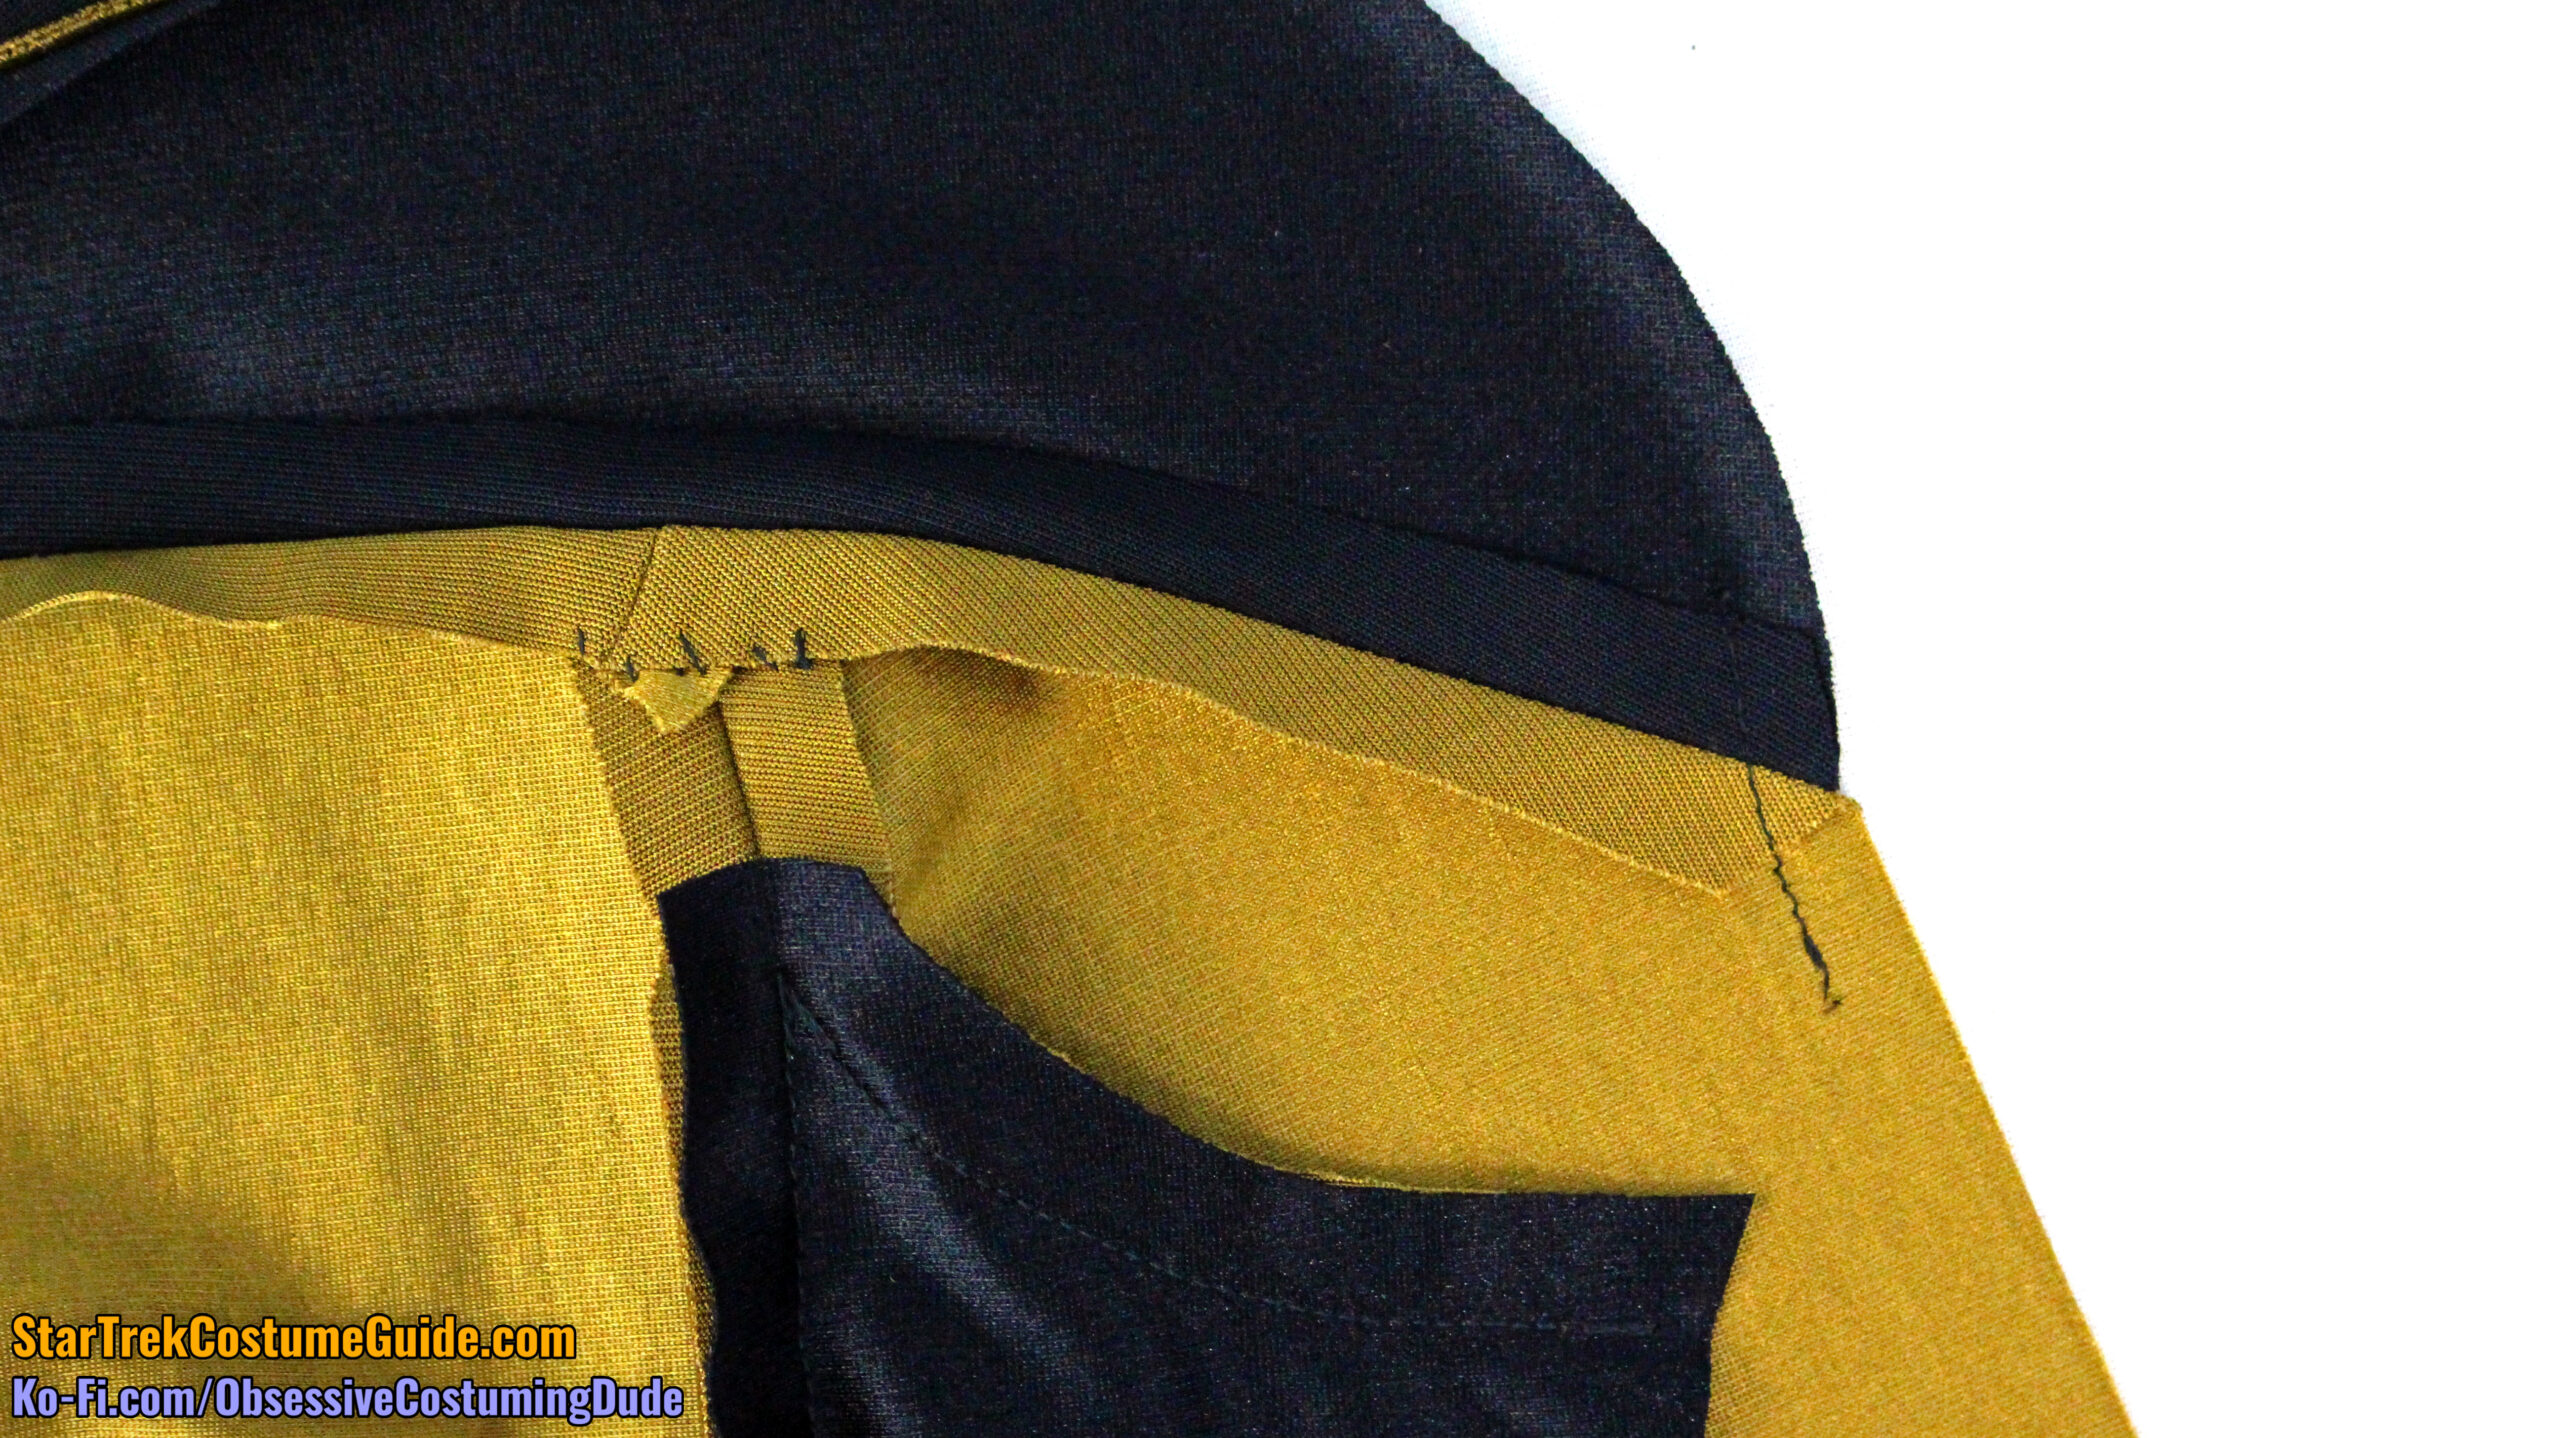
Sew the back yoke assembly to the back body assembly, right sides together with ½” seam allowance.
Press the seam allowances open.
I also suggest machine-basting the allowances open at the lower, outer corner of the yoke, and tacking the upper body allowance down by hand at the armscye.
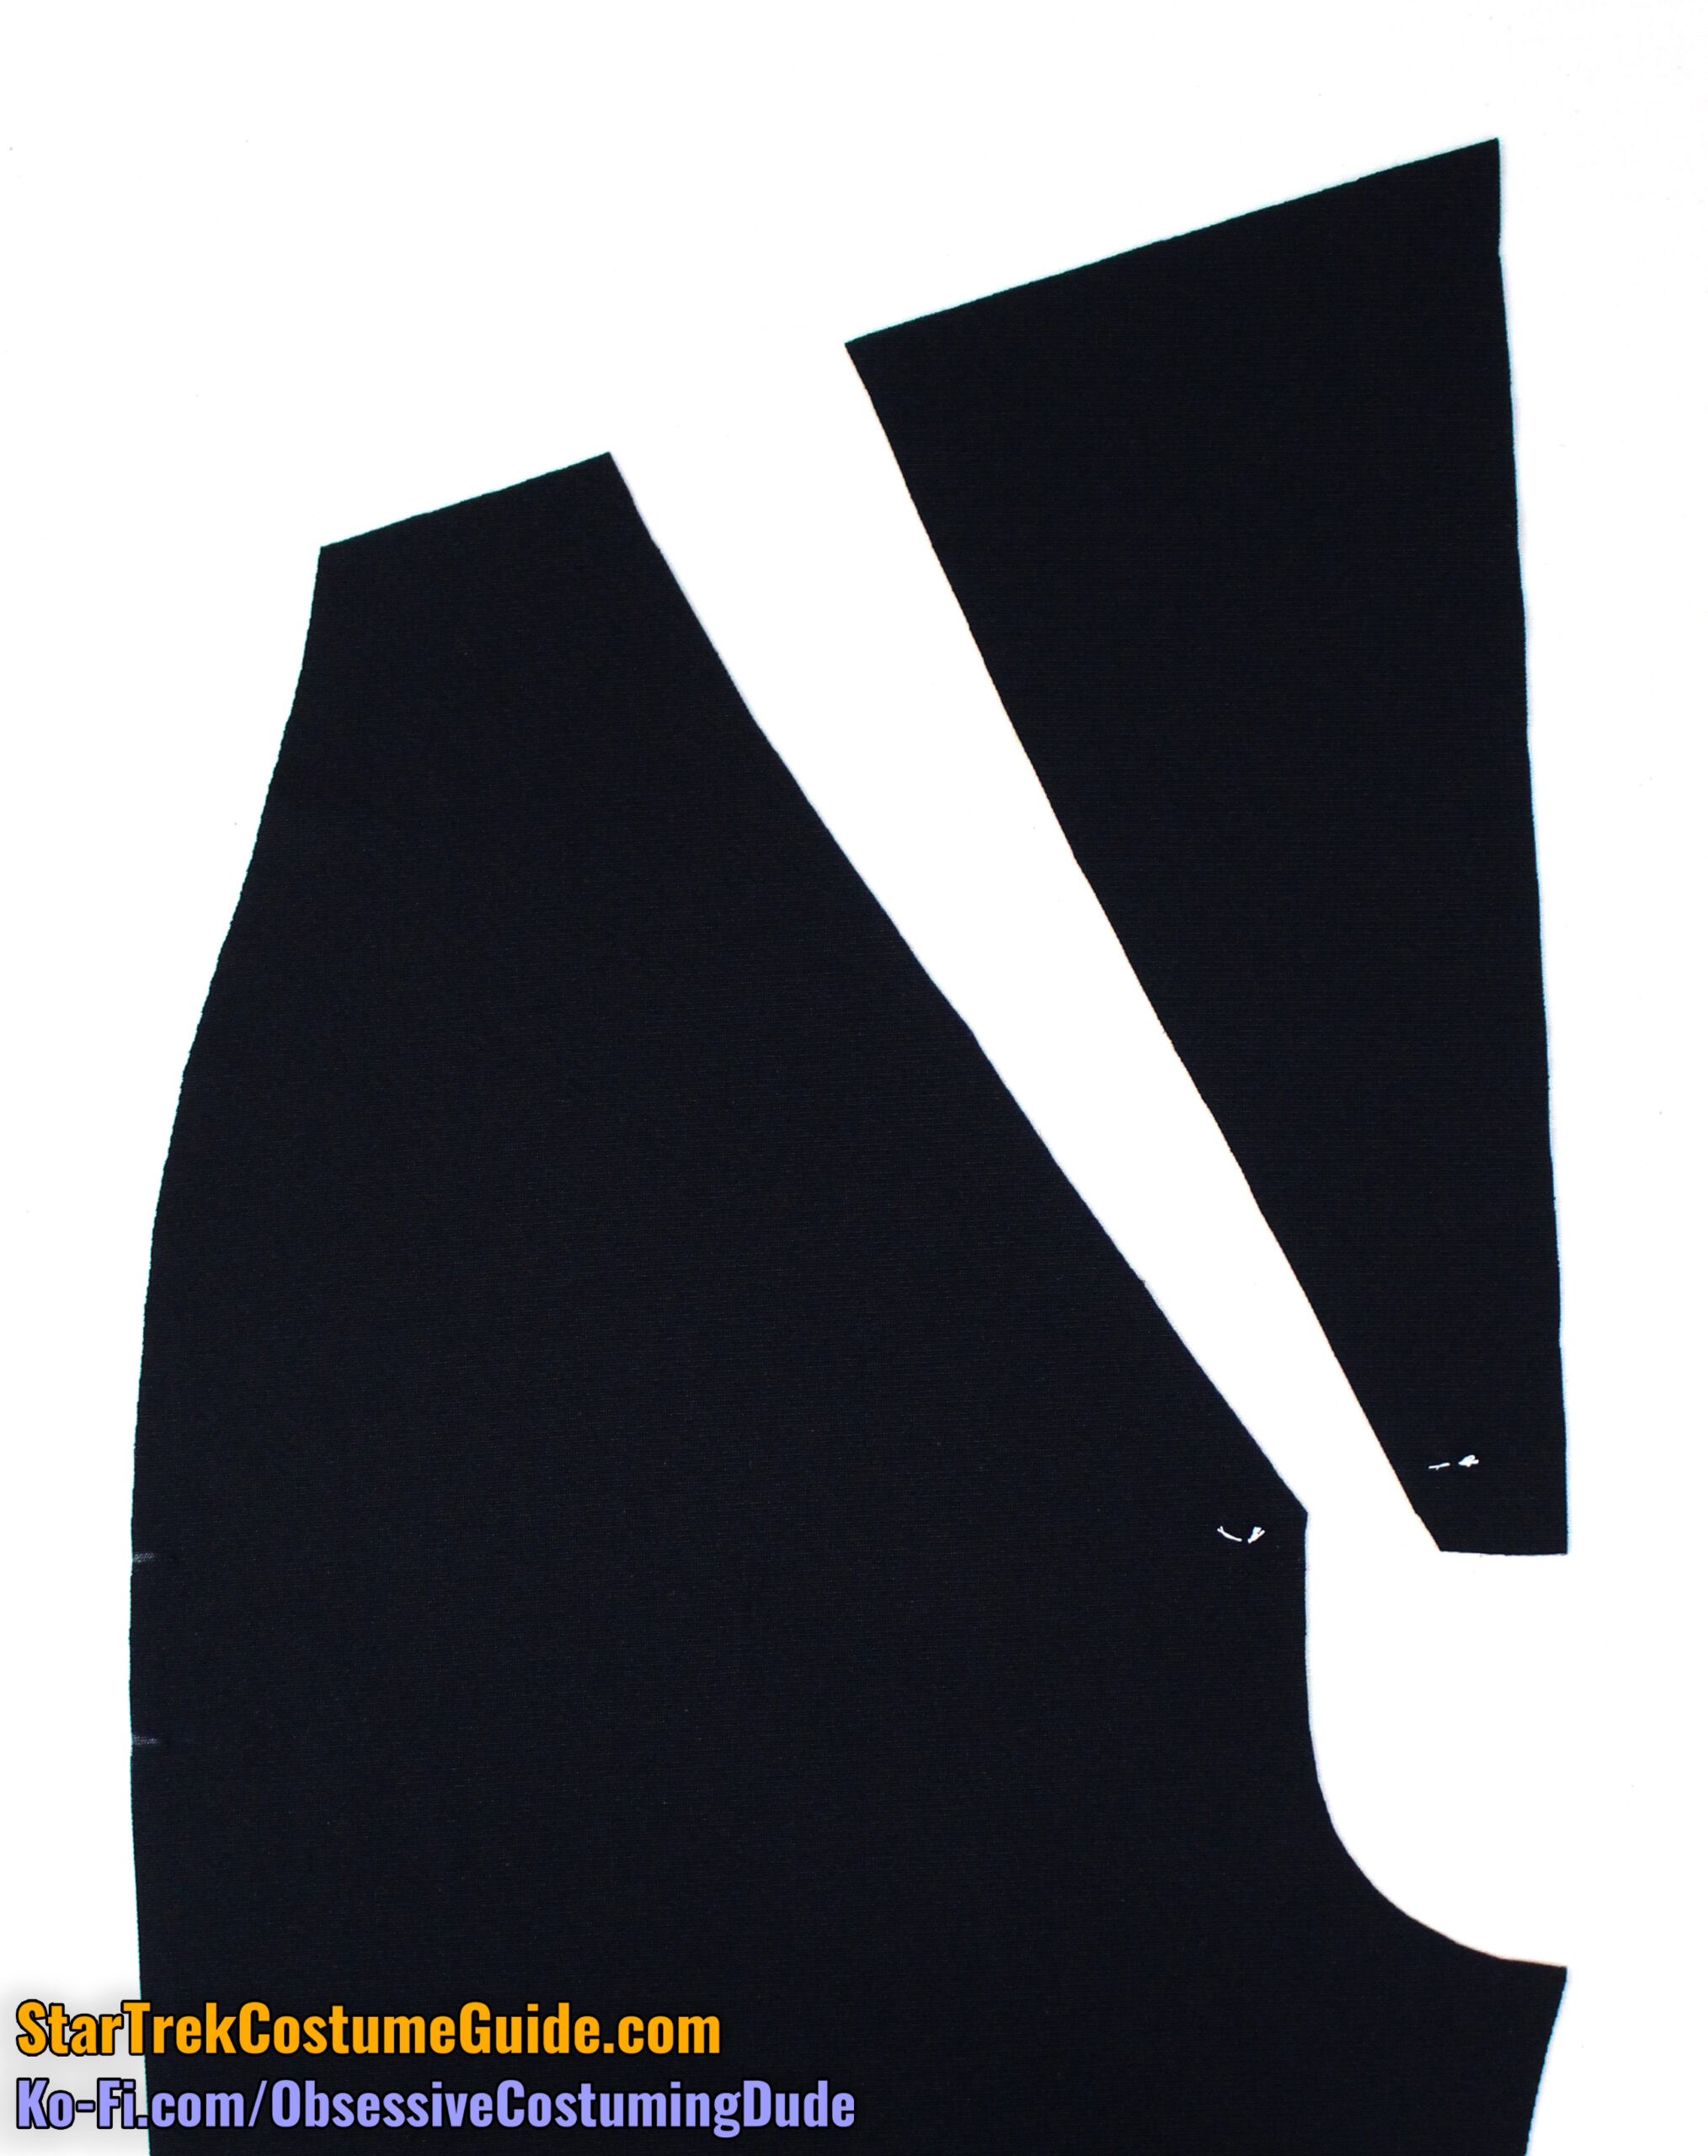
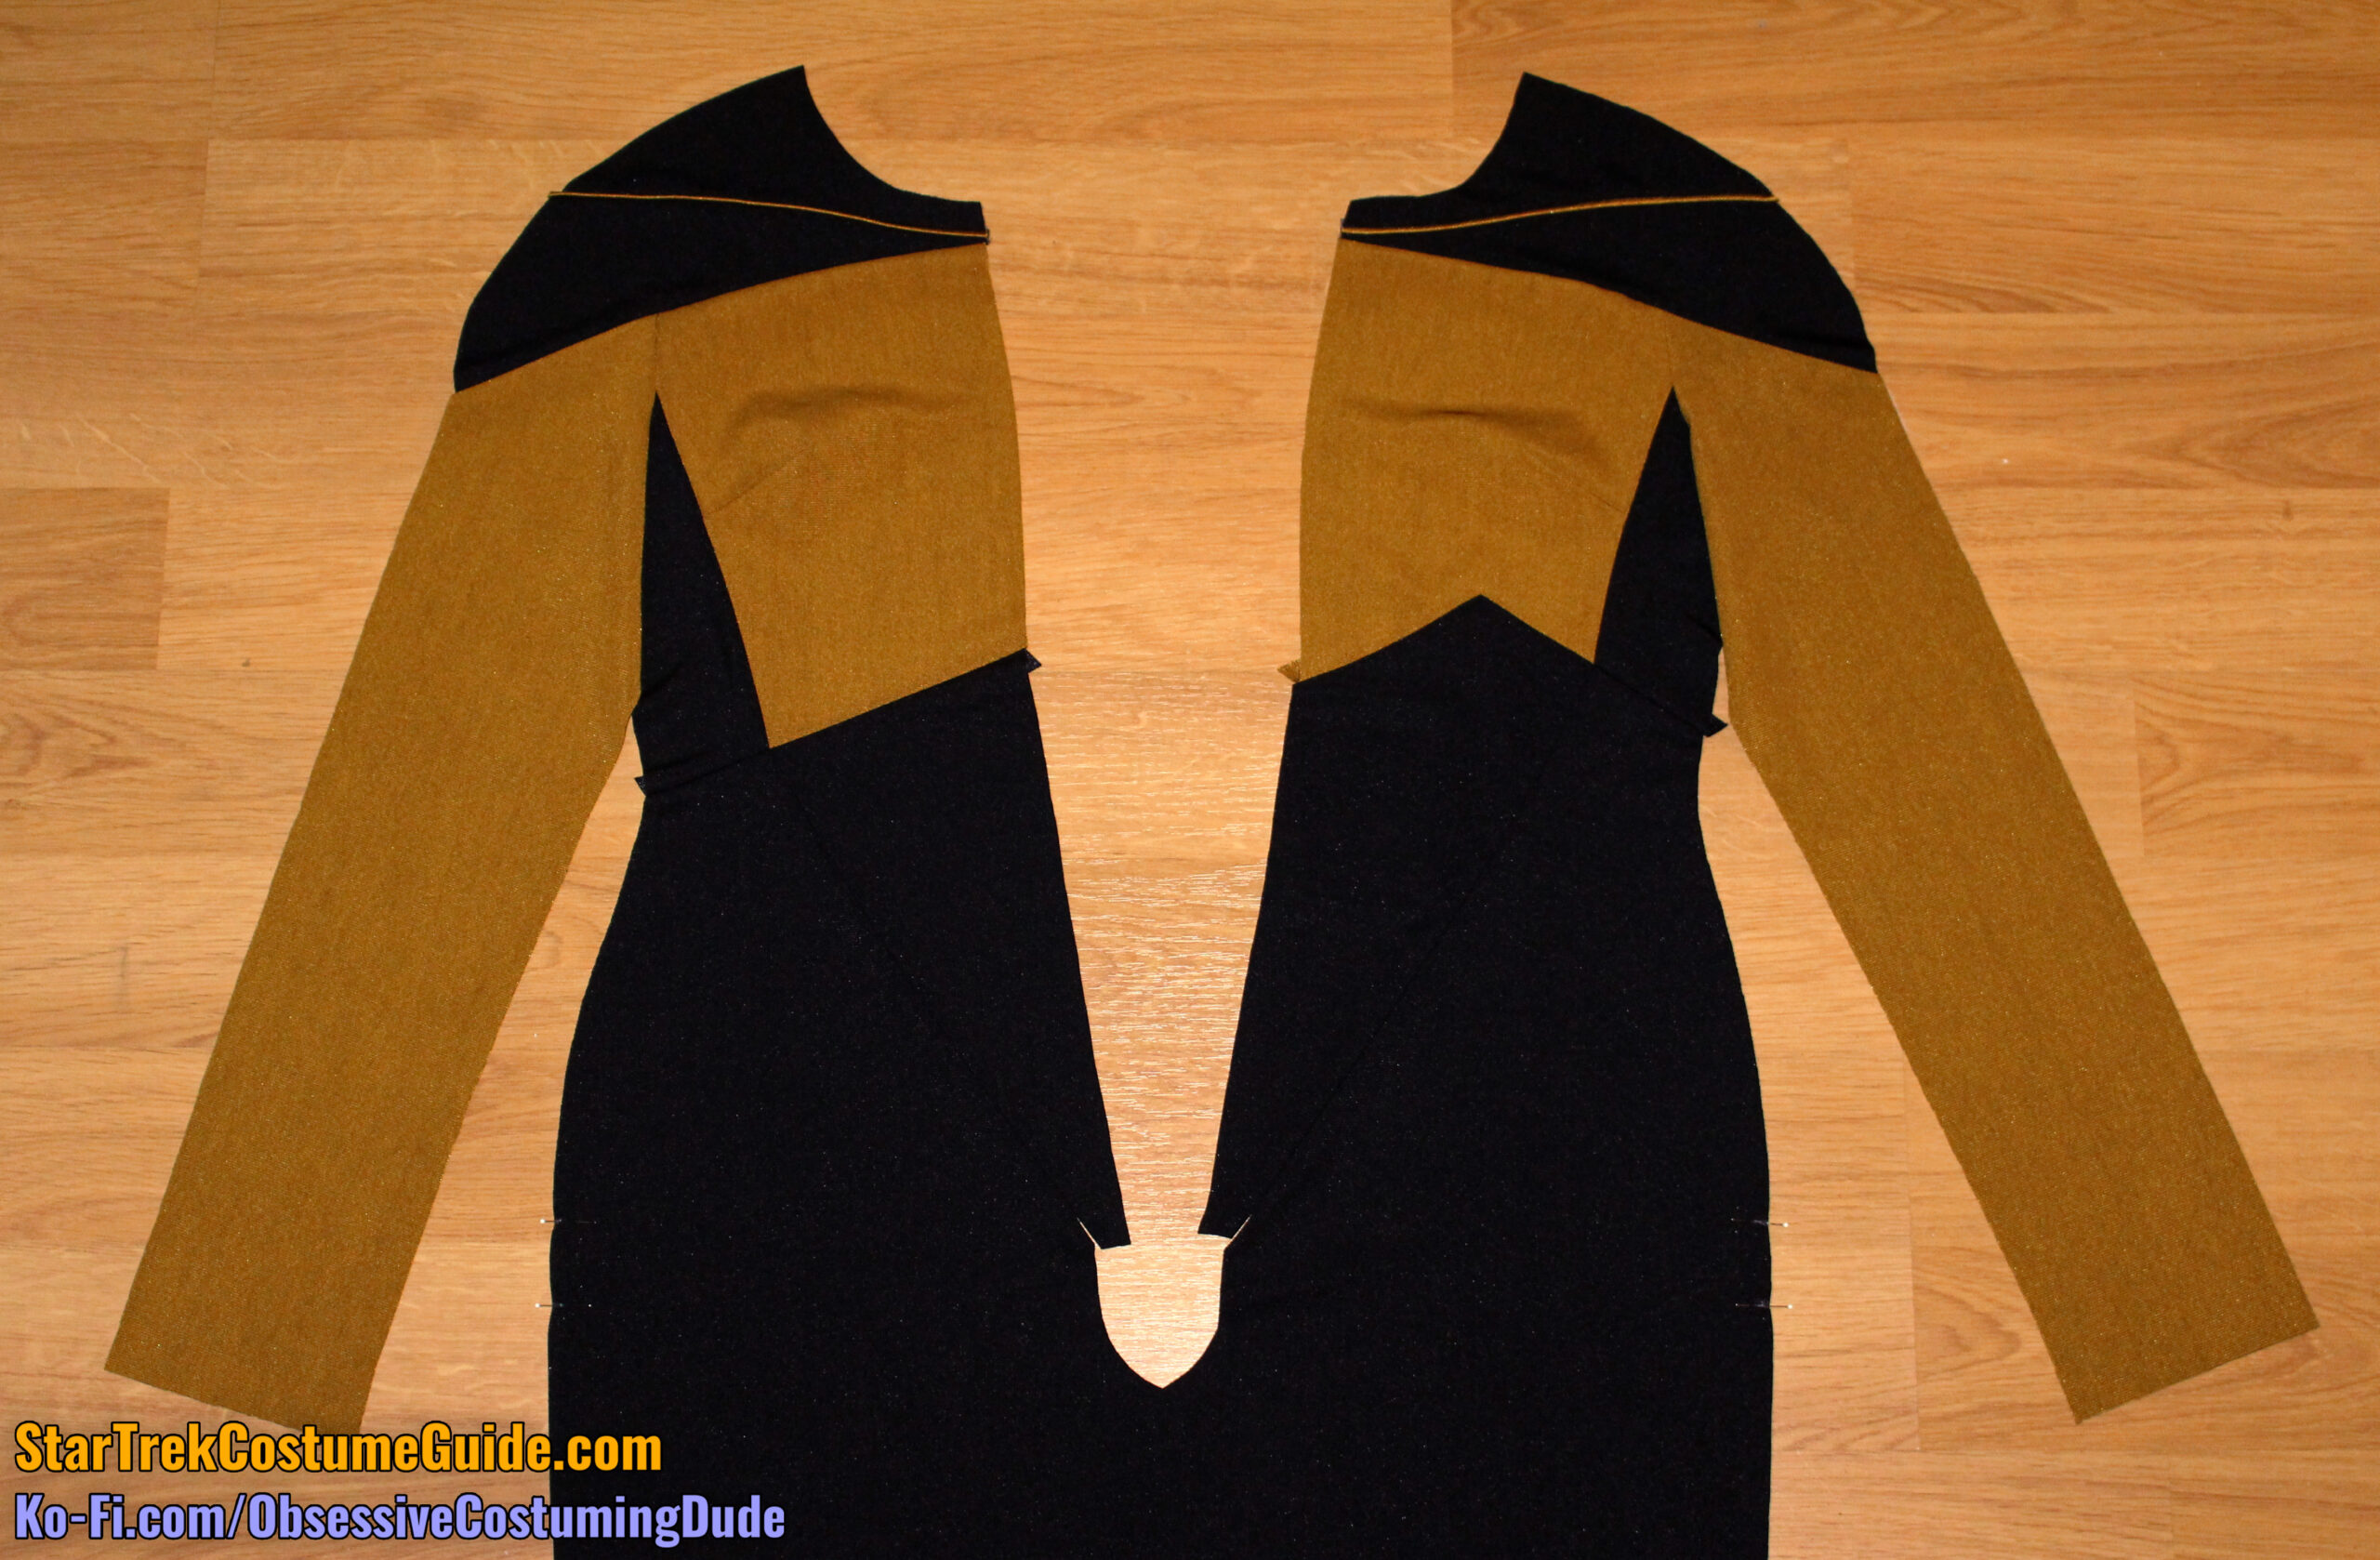
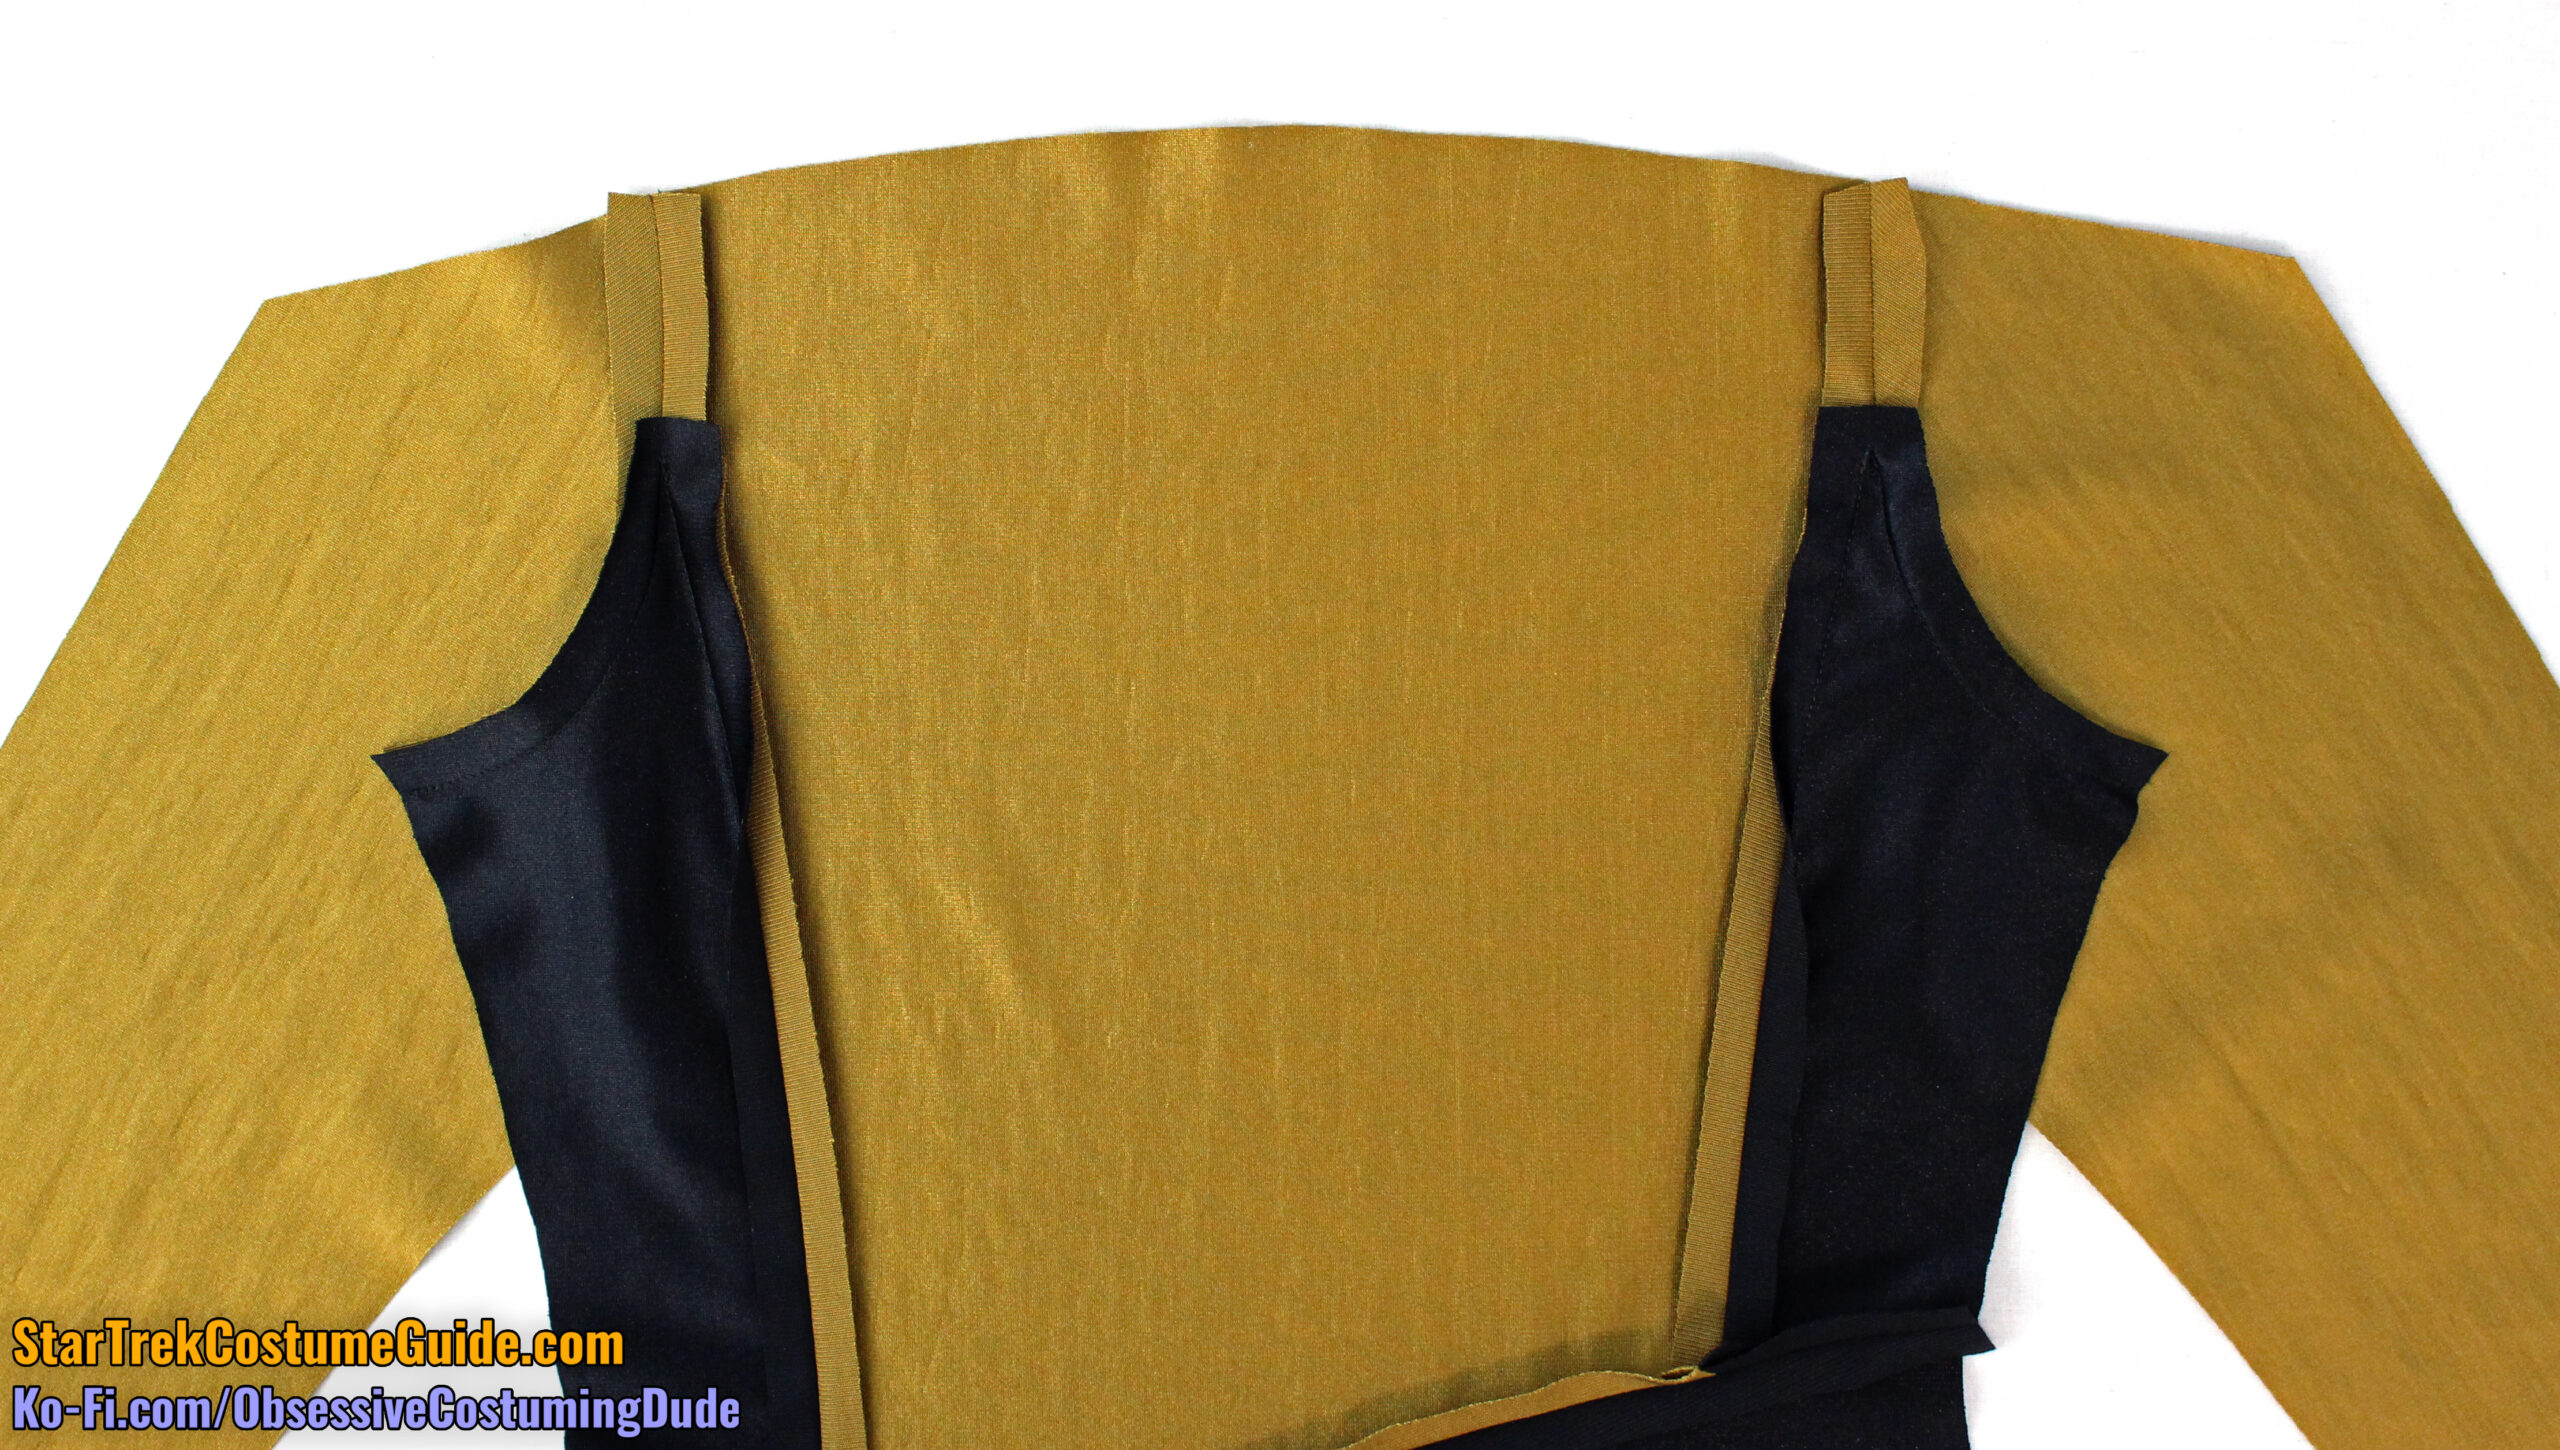
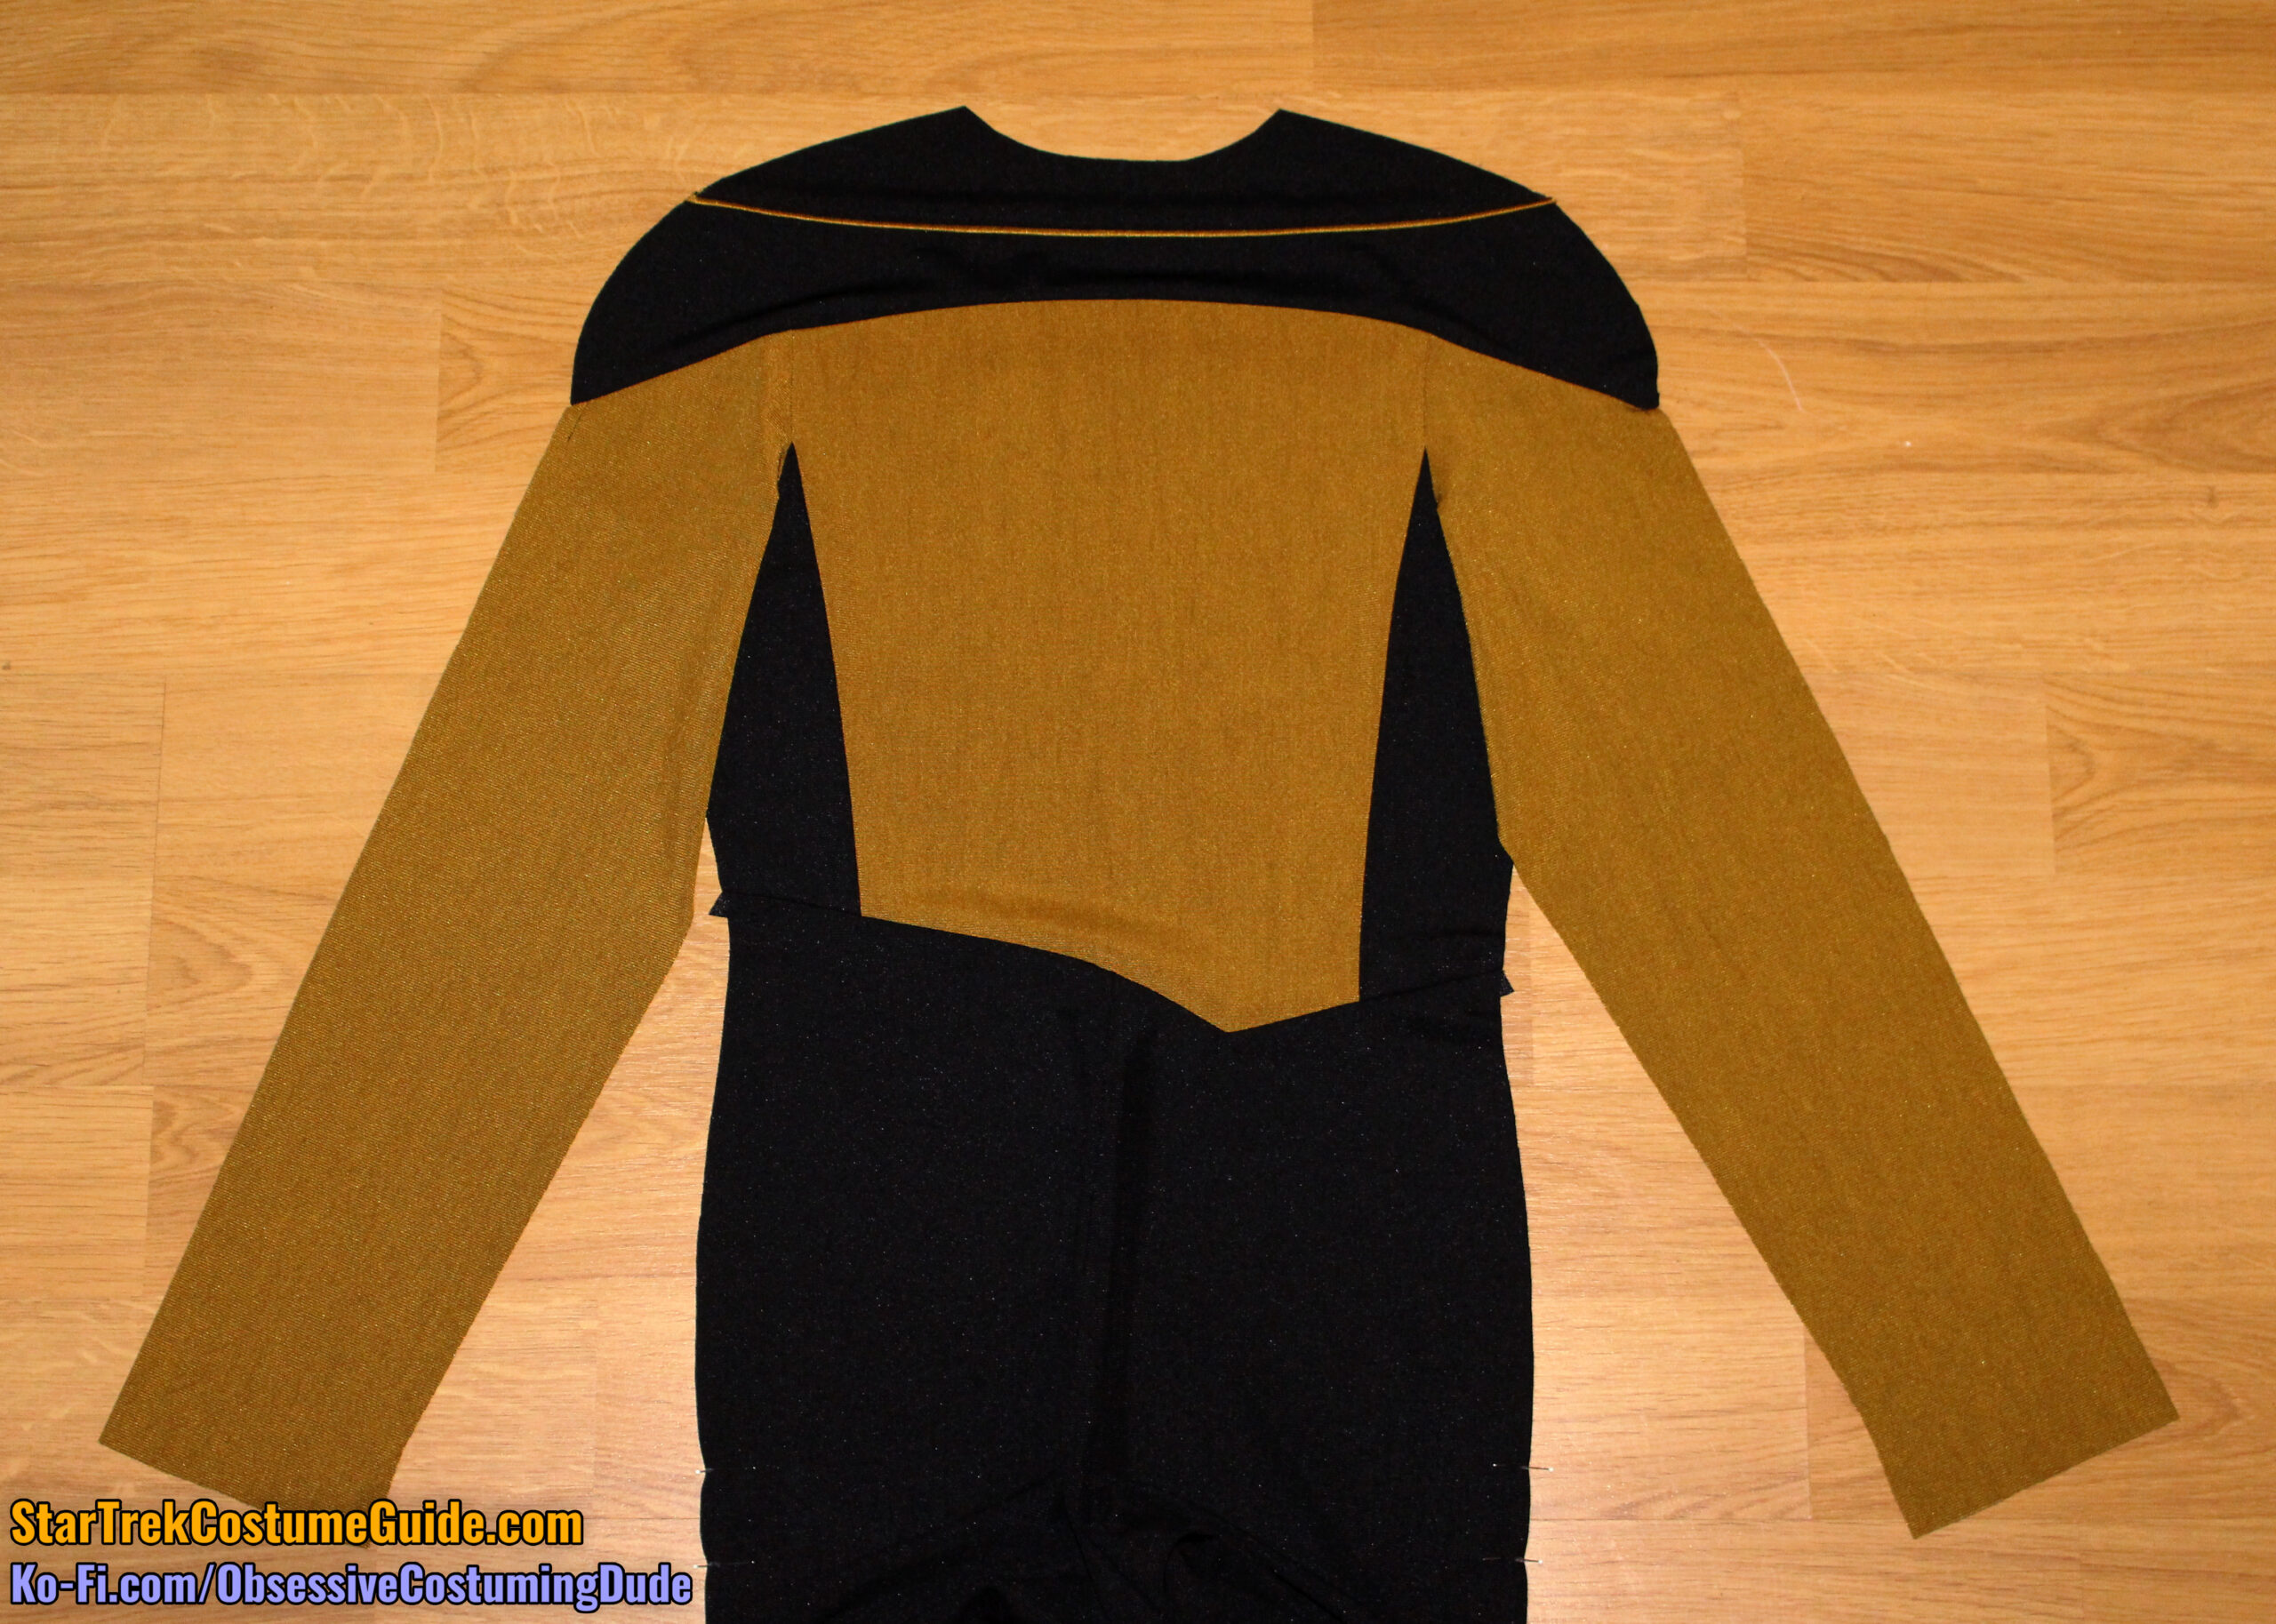
Your jumpsuit back assembly is complete for now and should look something like this:
FINISHING
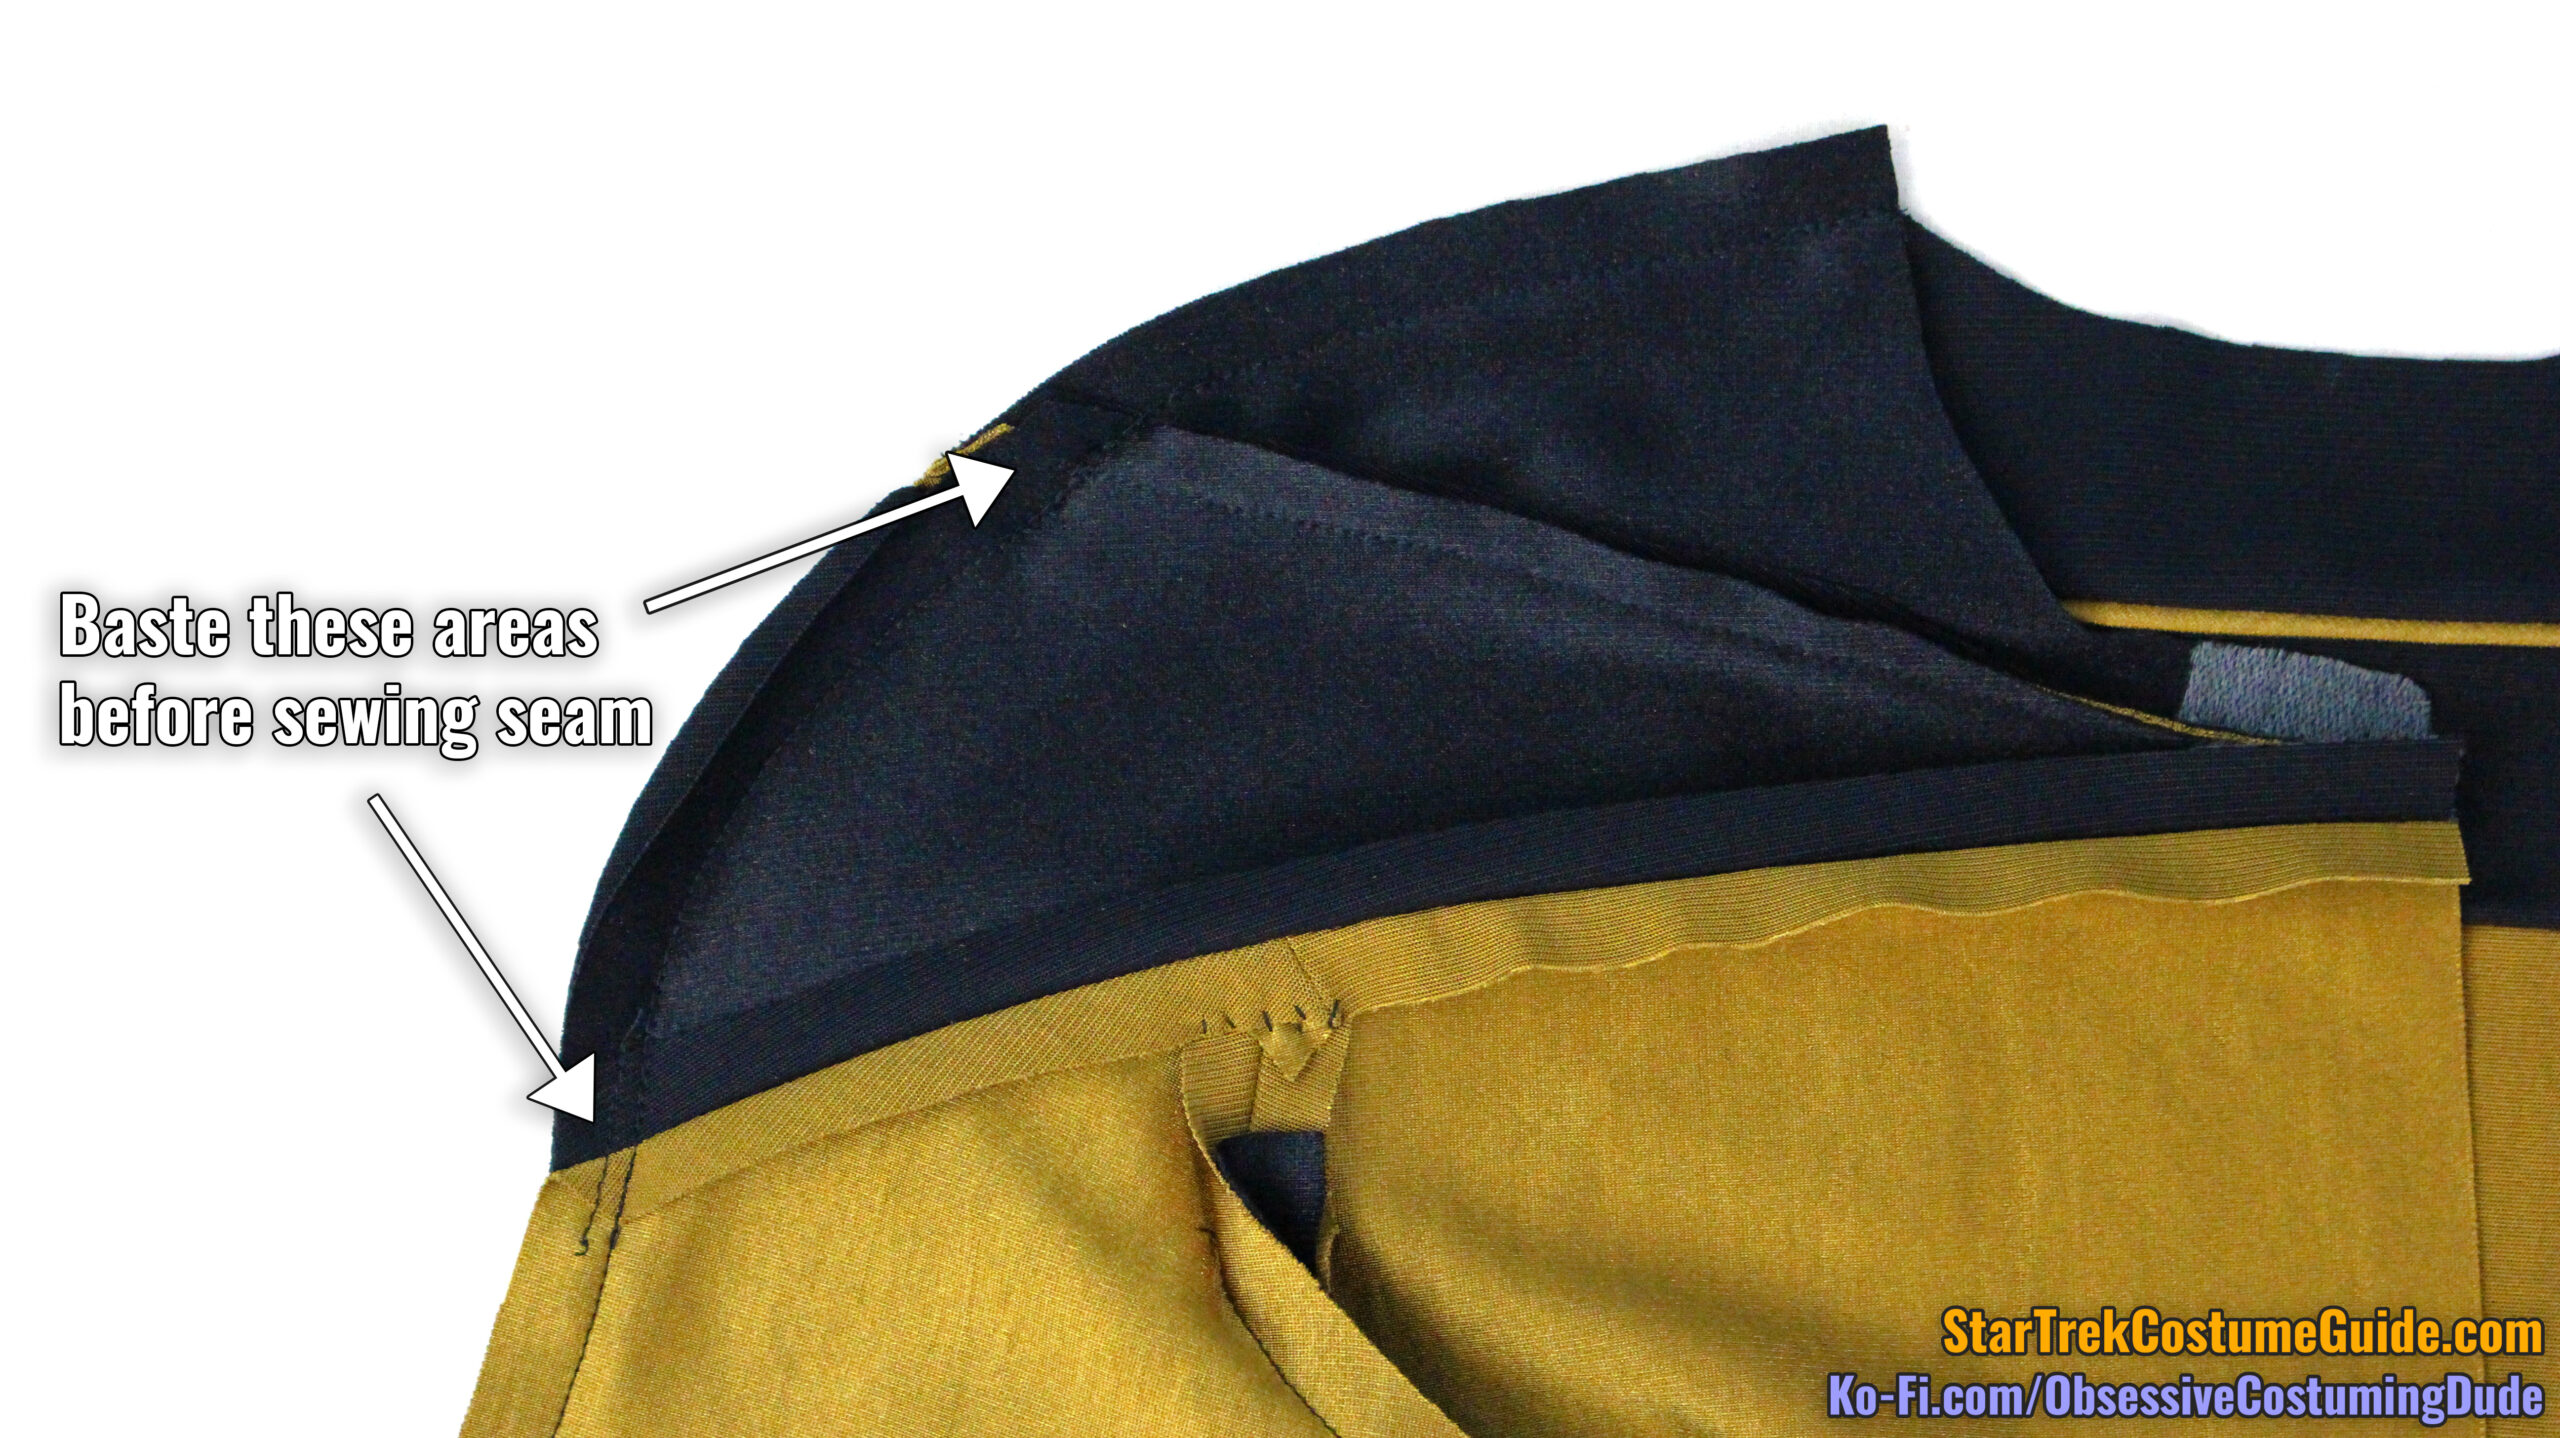
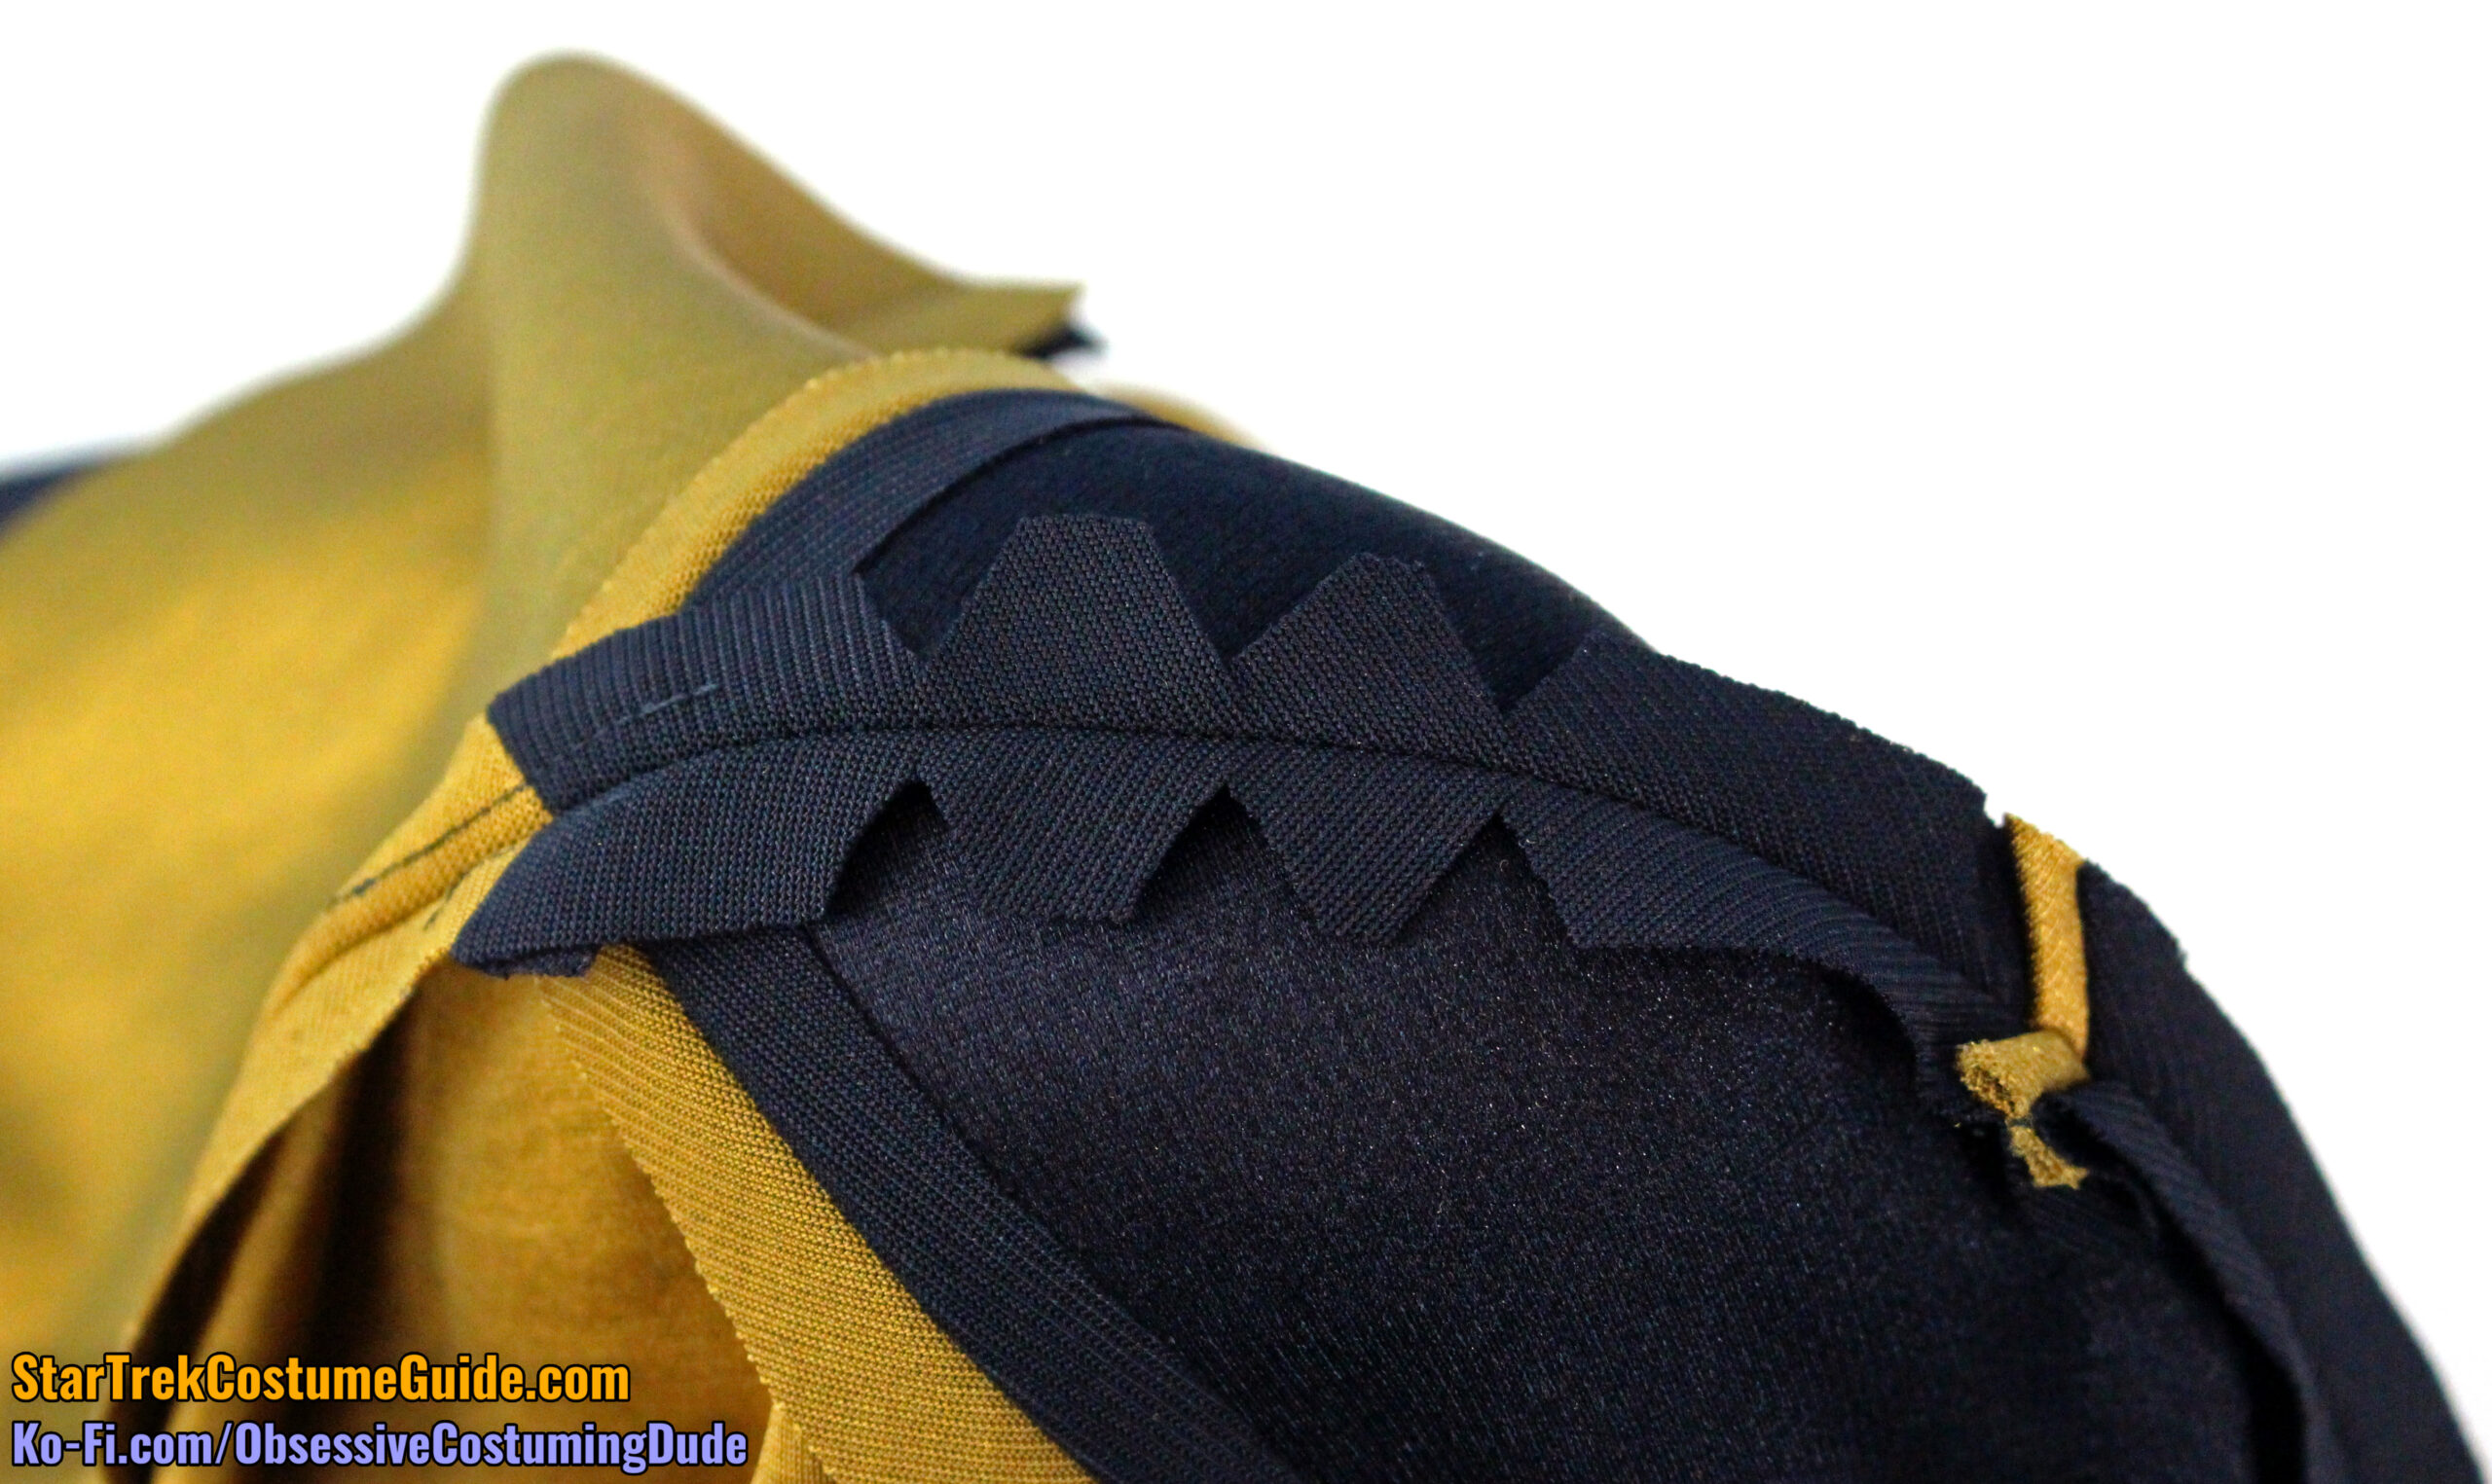
Sew the right front assembly to the back assembly along the shoulders and outer sleeve, right sides together with ½” seam allowance, matching yoke piping on the early uniform style and outer yoke corners on both styles.
I recommend basting the aforementioned areas and ensuring they properly align before sewing the entire seam.
Press the seam allowances open.
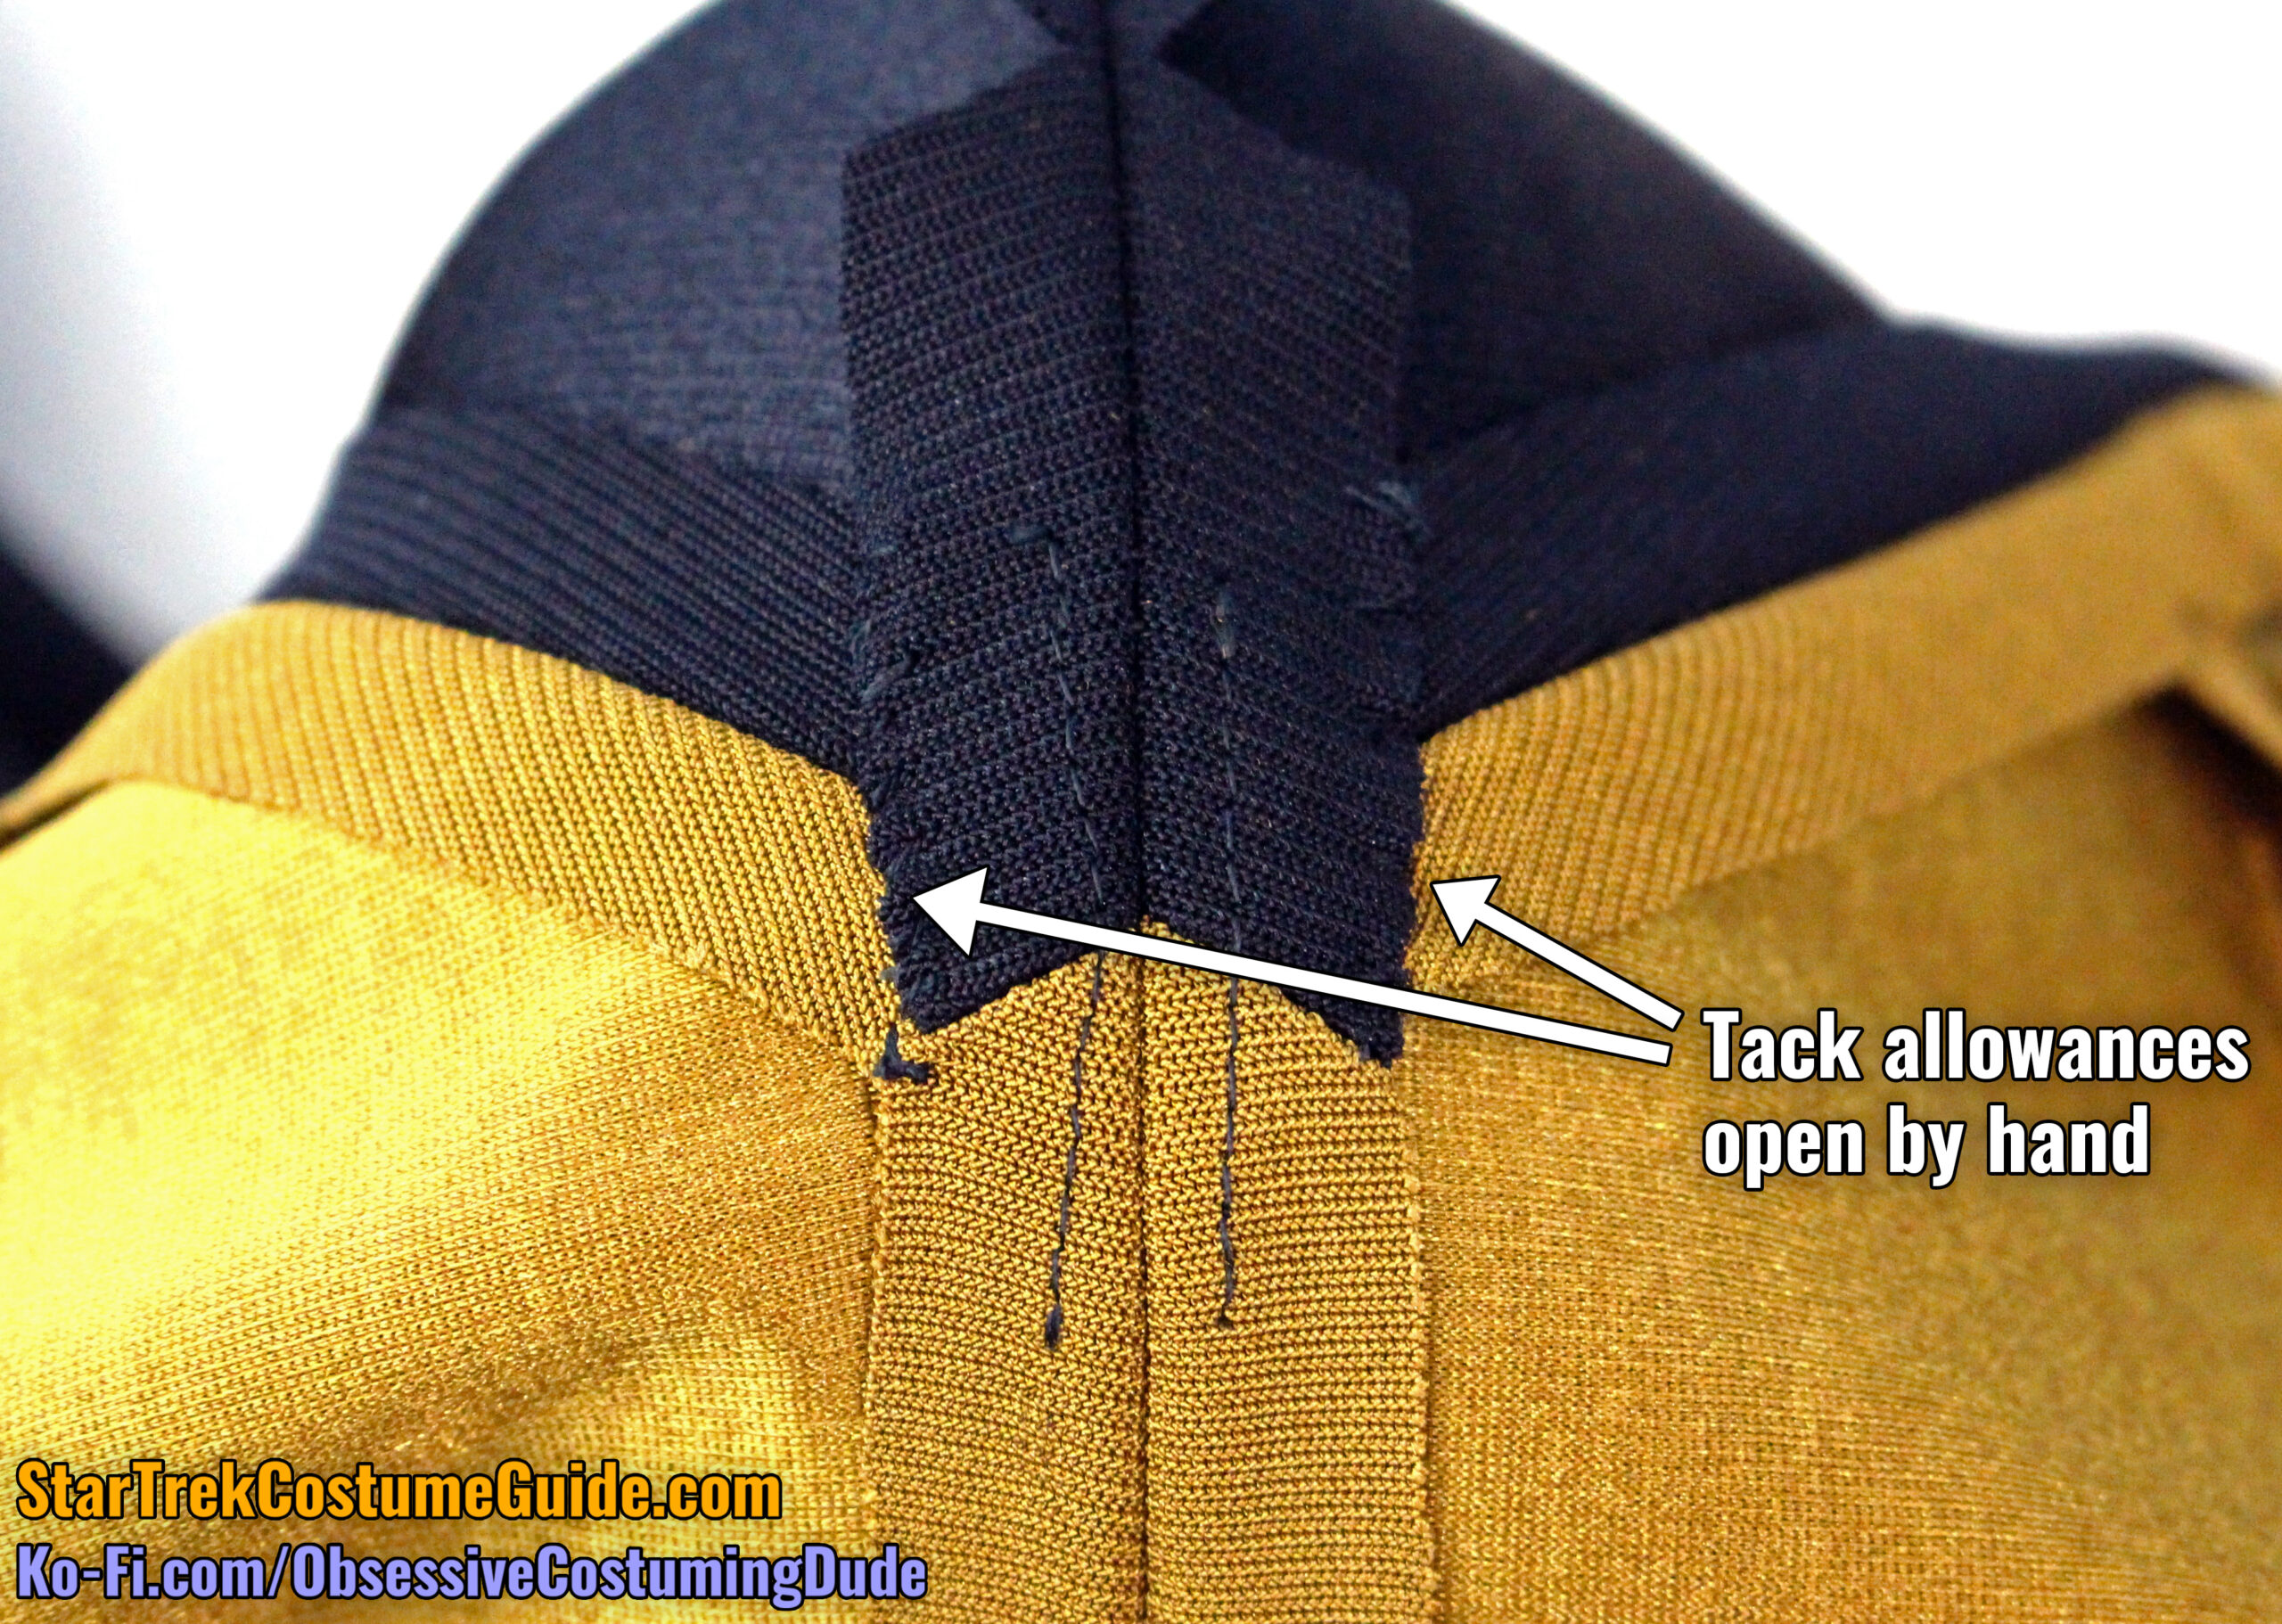
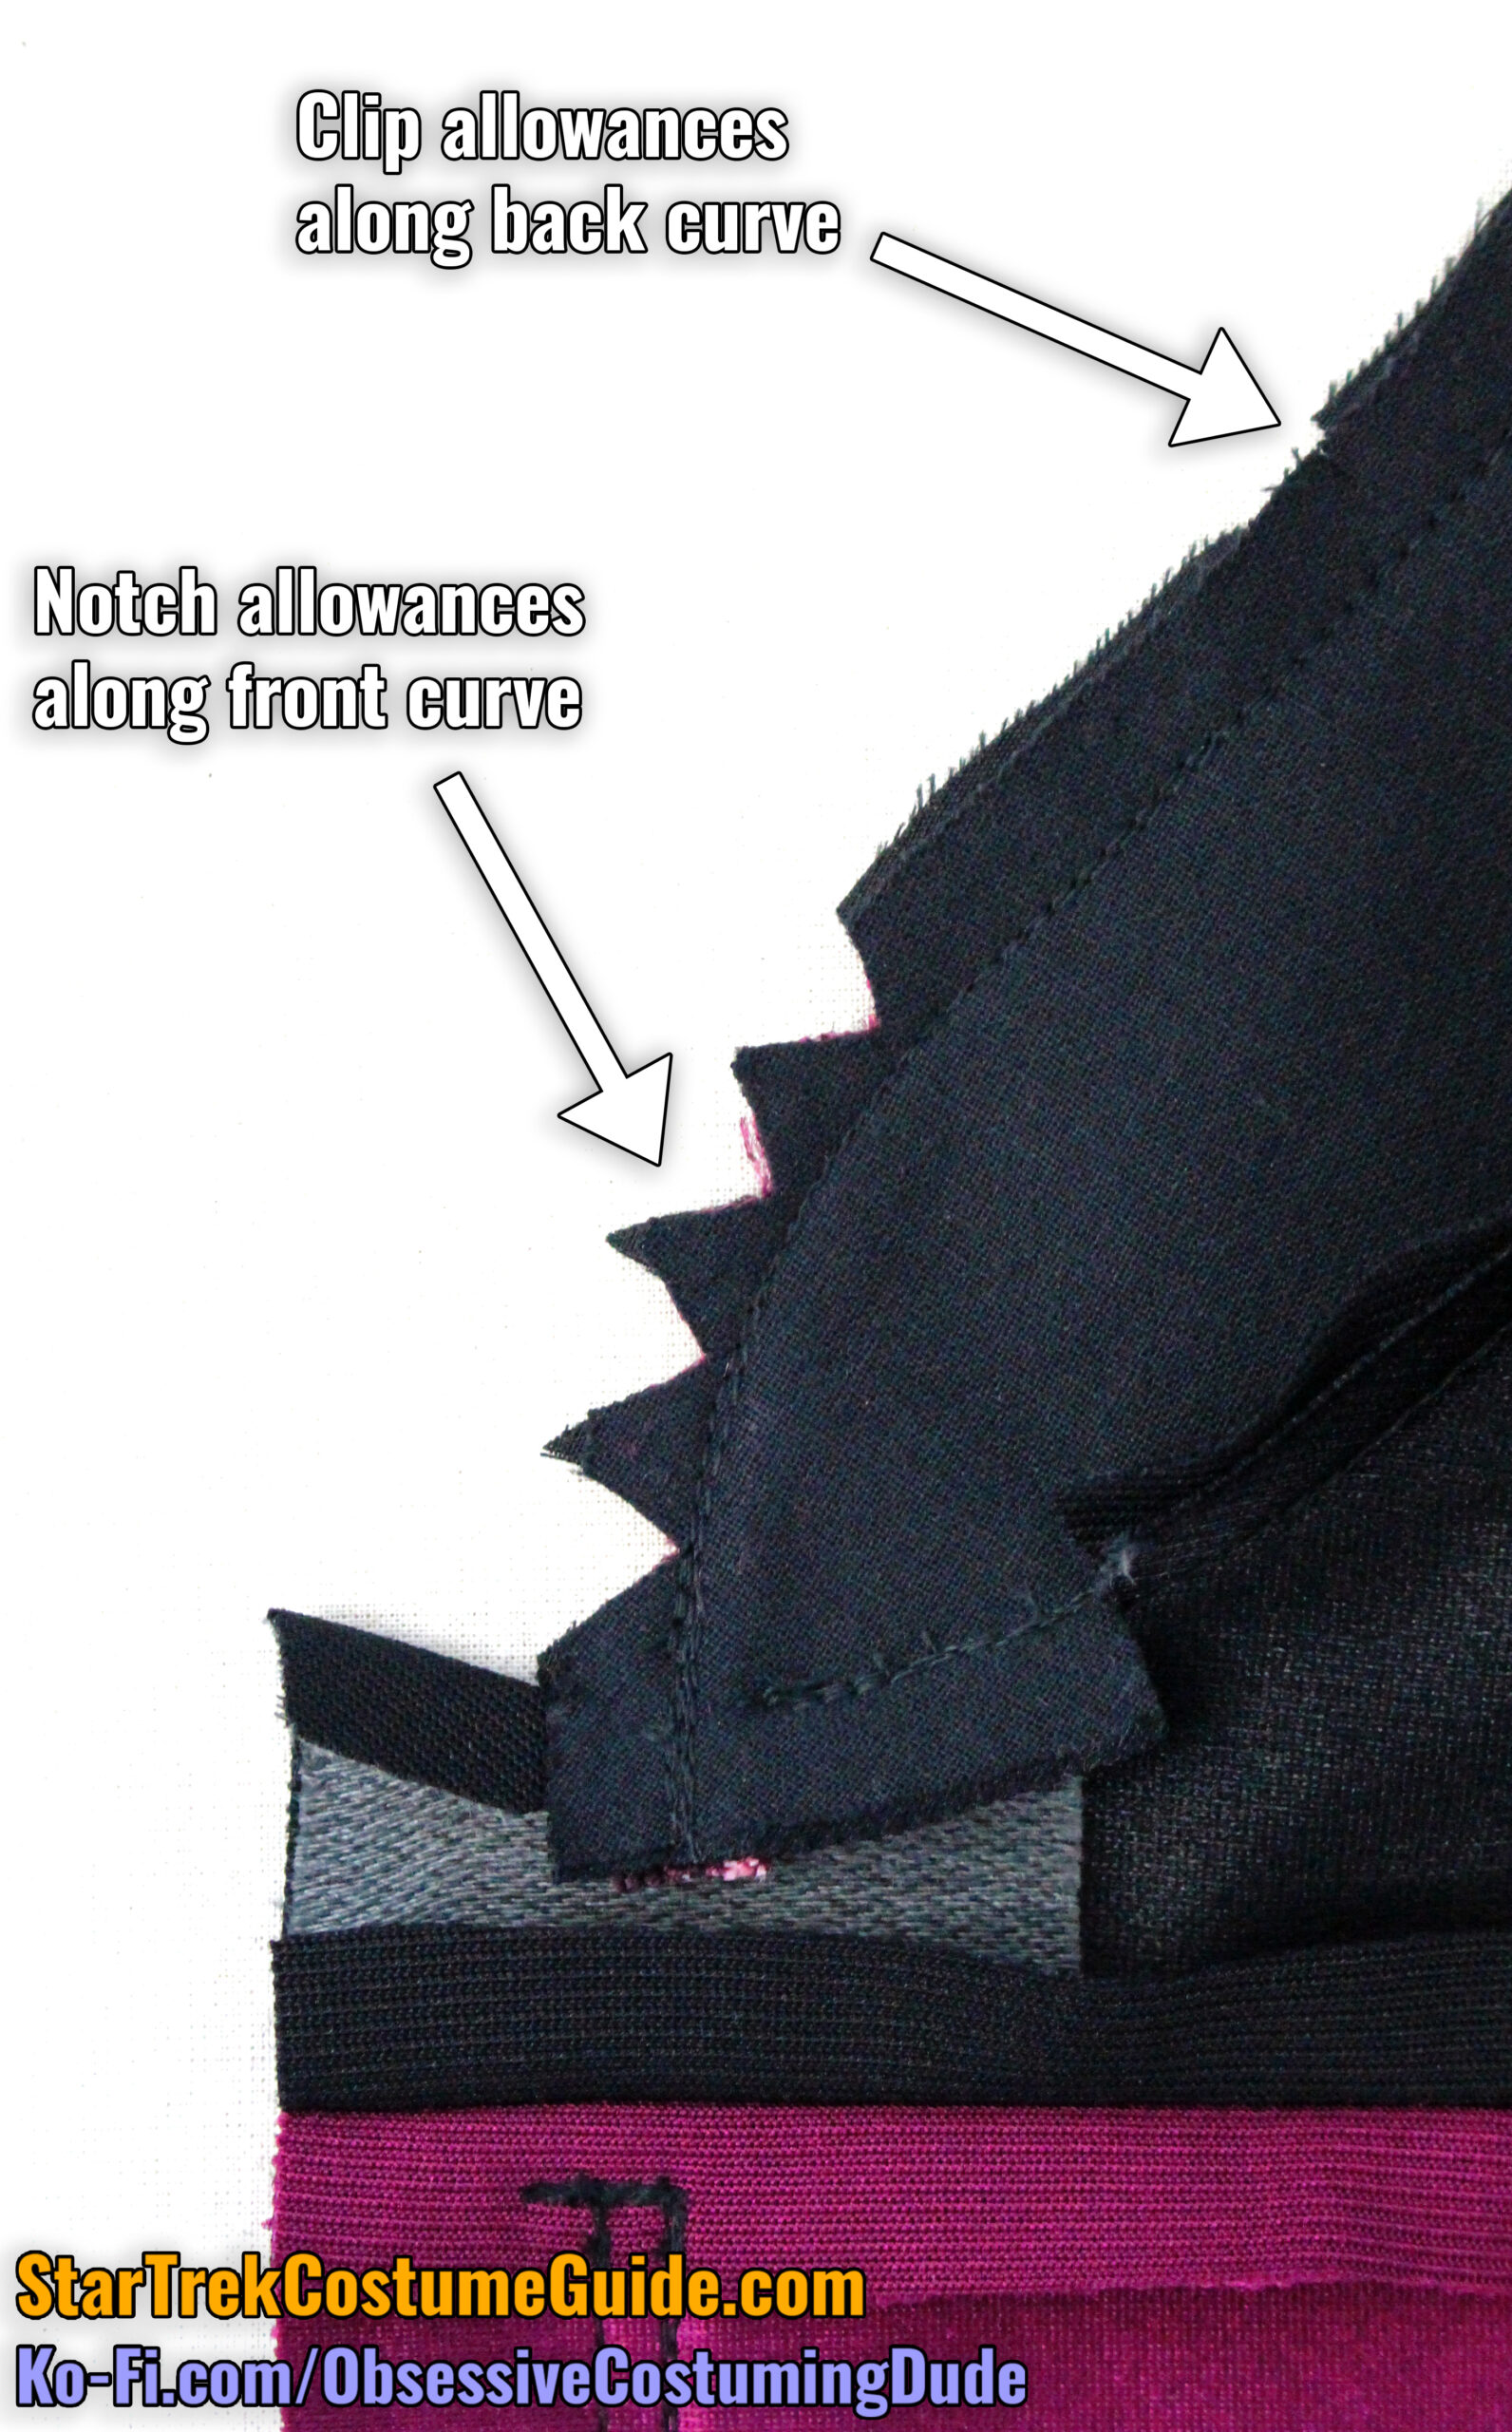
I also suggest notching the outer shoulder allowances along the curve, to help them remain open.
Furthermore, I recommend tacking the allowances open by hand along the lower, outer area of the yoke – taking care to only stitch through the yoke/body allowances (and not onto the outside of the jumpsuit), of course.
Repeat for the other side of the jumpsuit.
For the early jumpsuit style, we need to attach the neckline trim.
There’s a pattern piece for the neckline trim (piece R), but it’s just a strip of bias-cut fabric 1 ⅛” wide.
For the season 1 neckline trim, start by pressing your fabric strip in half, lengthwise.
If you’re “cheating” and using the same jumbo spandex as the body panels, remember to fold the matte/“dull” sides together so the trim is shiny-sides-out.
I suggest basting the length of trim closed along the seam line, ⅜” from the raw edges. (I also recommend using a quilting/walking foot for this, to help prevent the bias trim from stretching as you go.)
Pin the neckline trim to the outside of the jumpsuit neckline, so the raw edges are flush with the edge of the neckline. (Again, the trim will probably be longer than the neckline, but that’s fine – better too much than not enough.)
Using a quilting/walking foot, sew the trim to the jumpsuit neckline with ⅜” seam allowance, stitching exactly over the previous stitch line.
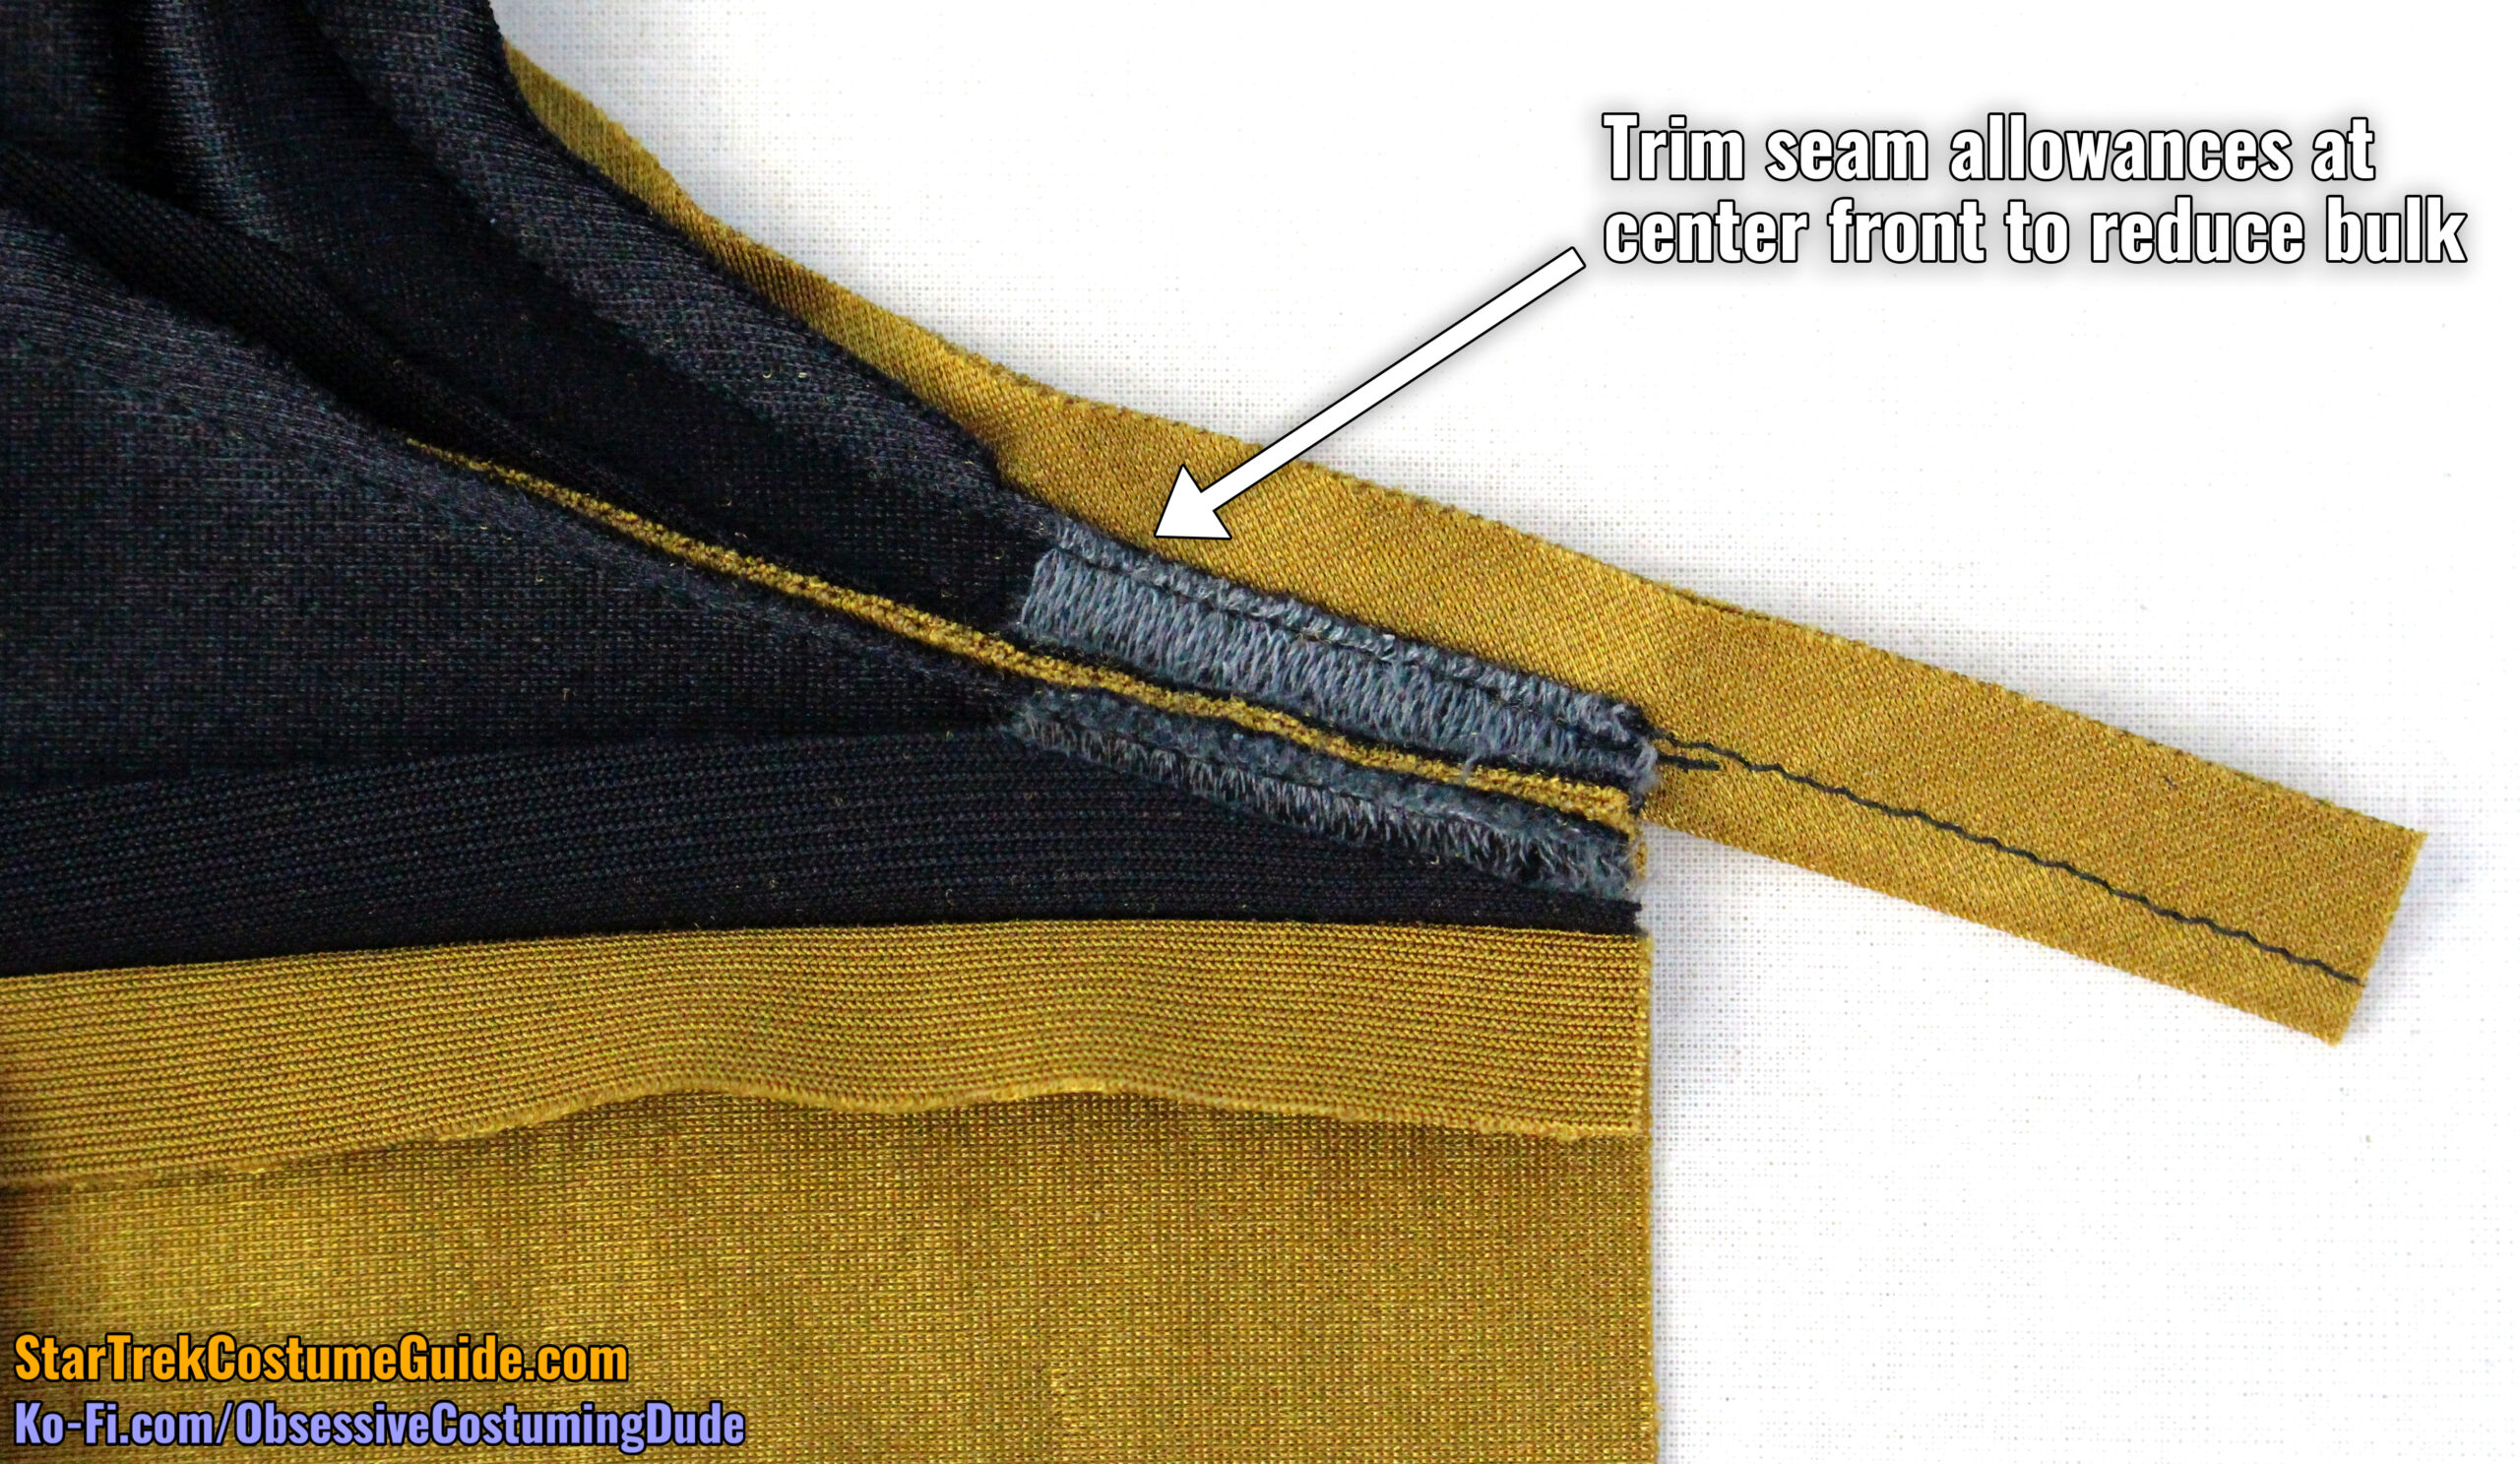
Trim the jumpsuit’s neckline allowance along the centermost few inches to reduce bulk.
I also suggest trimming the second (middle) layer of trim down to ⅛” around the entire neckline, especially if you’re using the same jumbo spandex as the rest of the jumpsuit.
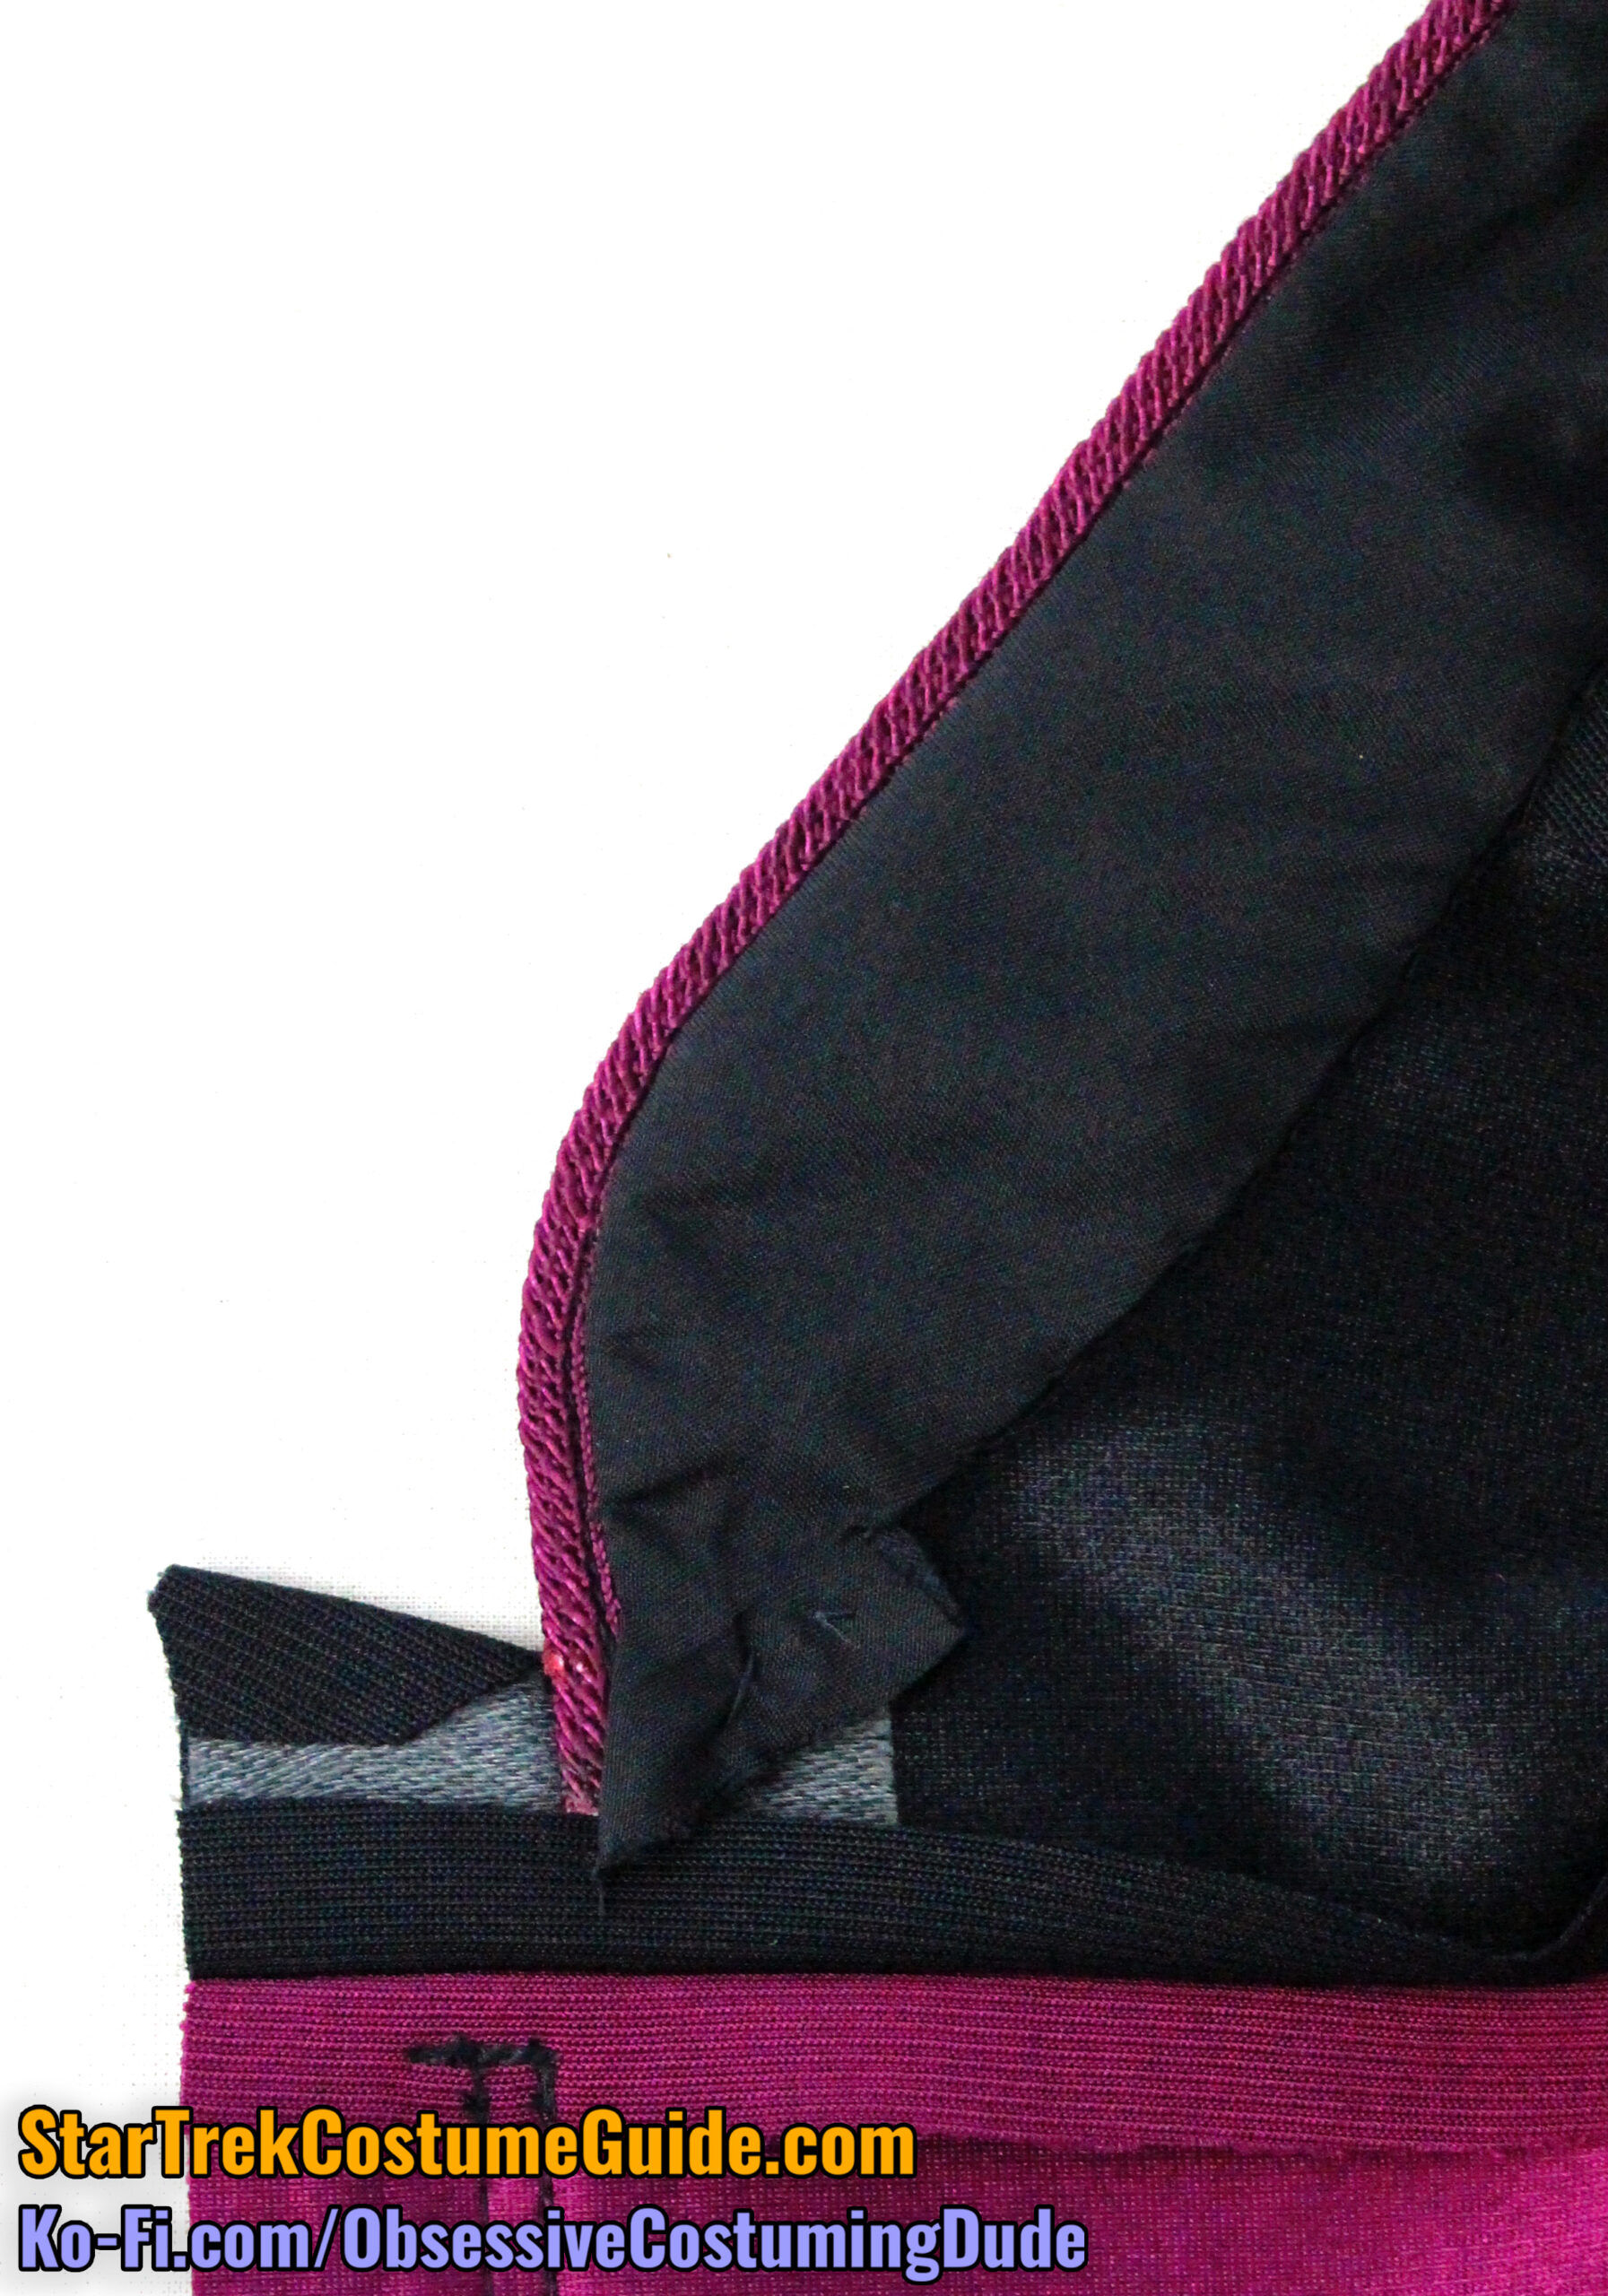
Press the allowances under, and press the trim outward toward the neckline.
Cut away the excess trim from the front edges.
Using black thread, catch-stitch the neckline allowance to the underside of the yoke, taking care to only stitch through a single thread of the yoke fabric each time so your stitches won’t be visible on the outside of the finished jumpsuit.
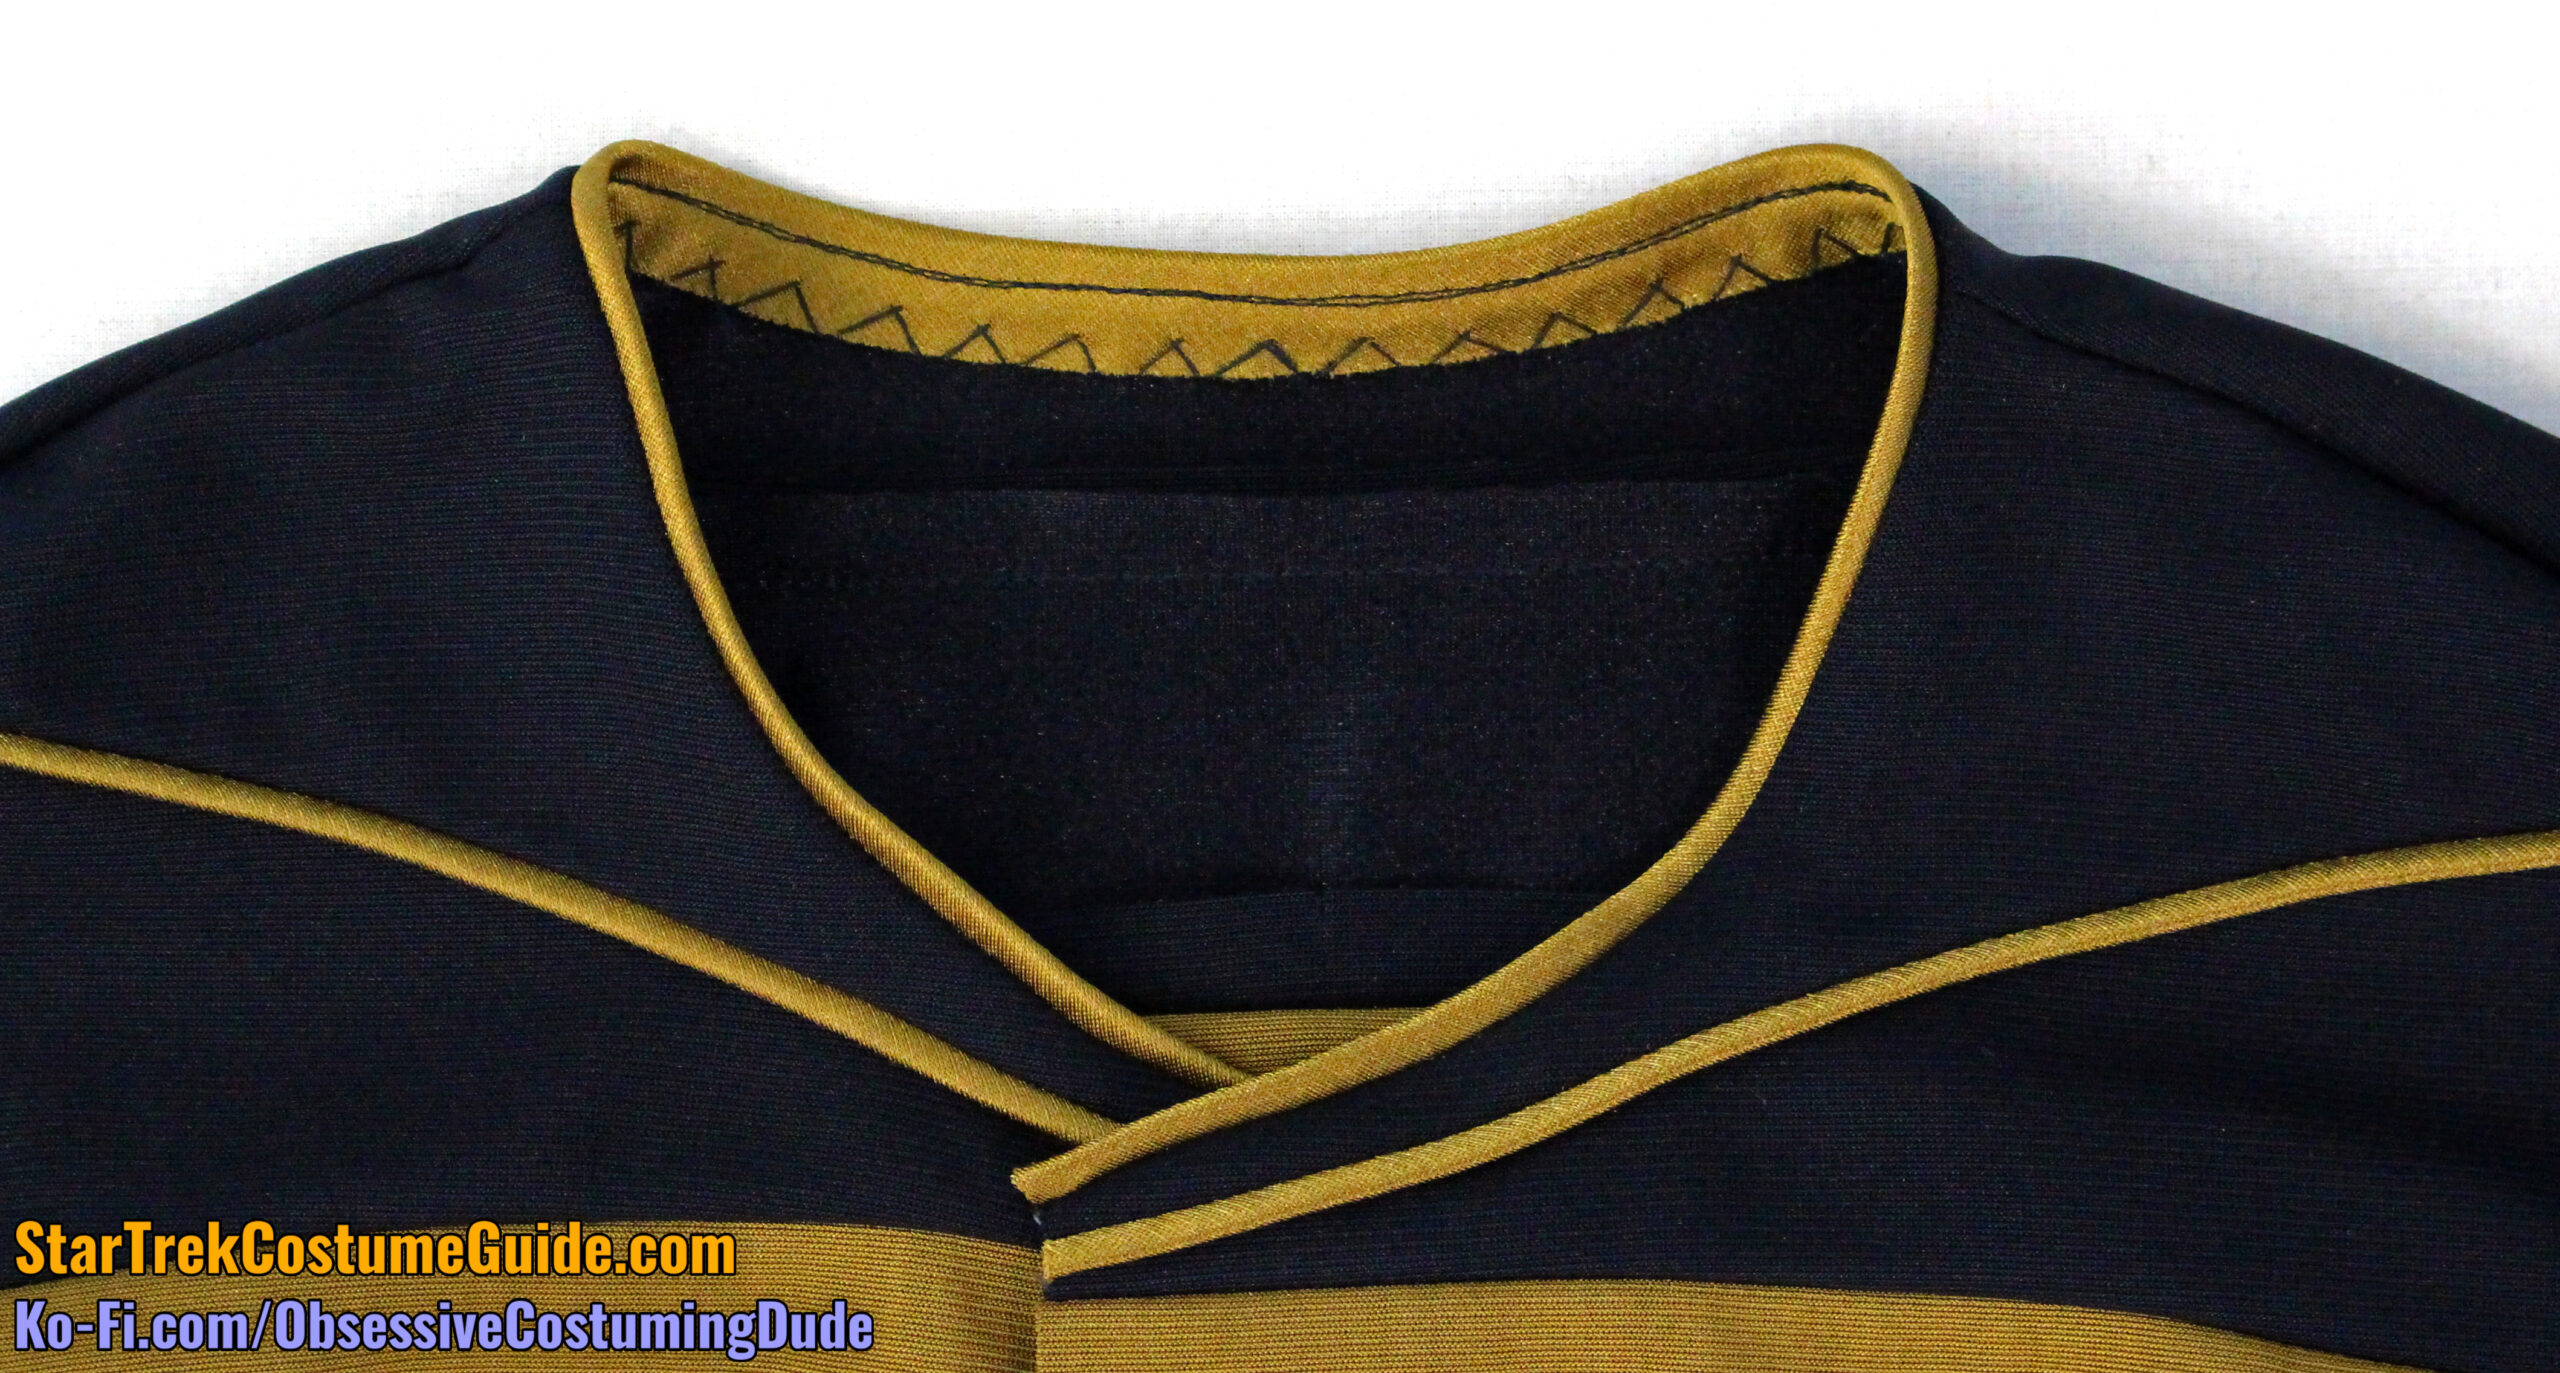
The season 2 neckline had a similar look, but it was produced in a different manner; the edge of the neckline was bound with the neckline trim (instead of the trim extending outward from underneath).
To replicate this technique, first trim away 3/16” from both the jumpsuit neckline and trim strip (piece R).
Pin your neckline trim to the jumpsuit neckline, edges flush. (Do not press and/or baste the trim in half like for the season 1 method.)
Sew your neckline trim to the yoke approximately 3/16” from the edge.
Wrap the neckline trim snugly around the edge and pin the underside of the trim into place.
Again using black thread, “stitch-in-the-ditch” along the lower edge of the neckline trim.
Catch-stitch the seam allowances to the underside of the yoke, catching only a thread of the garment fabric so your stitches won’t show on the right side.
Alternatively, you can simply cut away the excess neckline trim close to the neckline, as evidenced by this screen-used Commander Riker TNG jumpsuit:
Now it’s time for my least-favorite part of the entire process … attaching the zipper.
Ordinarily invisible zippers don’t bother me, but in this case there are compounding issues … specifically that it’s on spandex (that stretches in the direction of the zipper, because of course) and the multiple points – both symmetrical and asymmetrical – at which the seam lines need to properly align across the zipper.
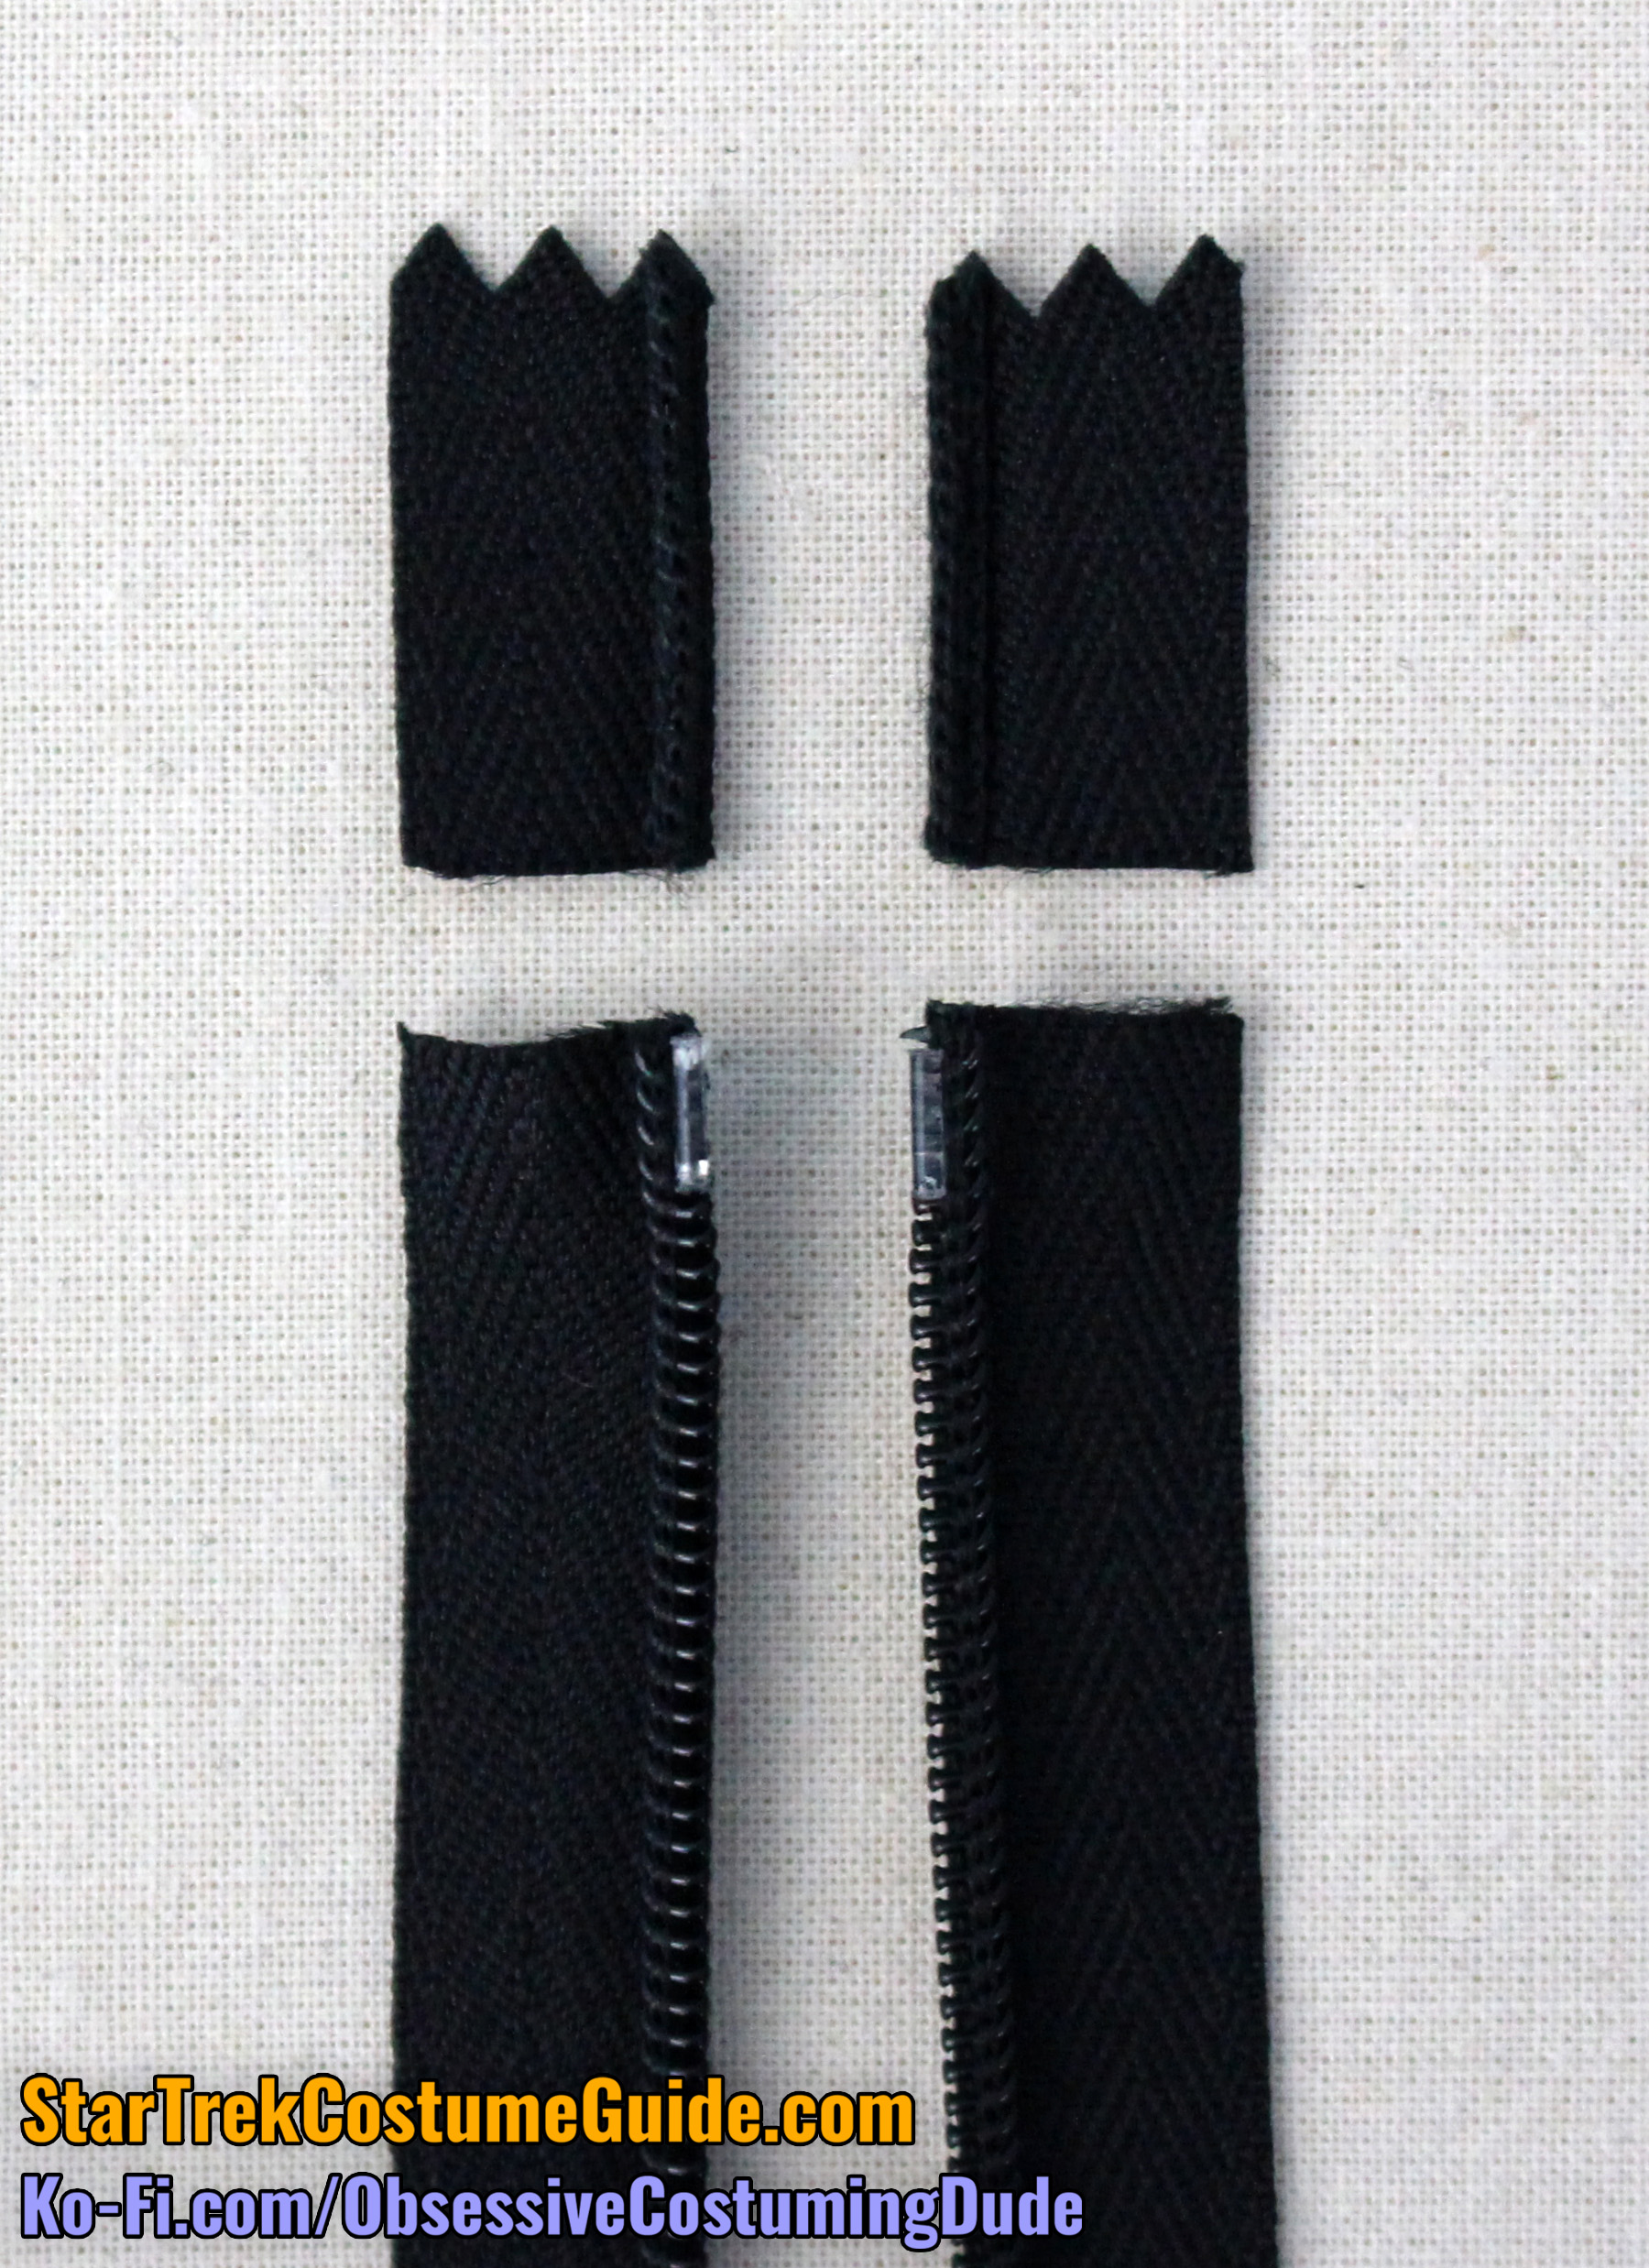
To begin, either turn the excess zipper tape at the top of the zipper under and stitch it down, or trim it away just above the zipper stop and apply some liquid fray preventer. (I prefer the latter.)
Fortunately for us all (I suppose), I’ve made enough of these uniforms – and thus installed enough of these cursed zippers – that I’ve established a process to make it as relatively painless as possible.
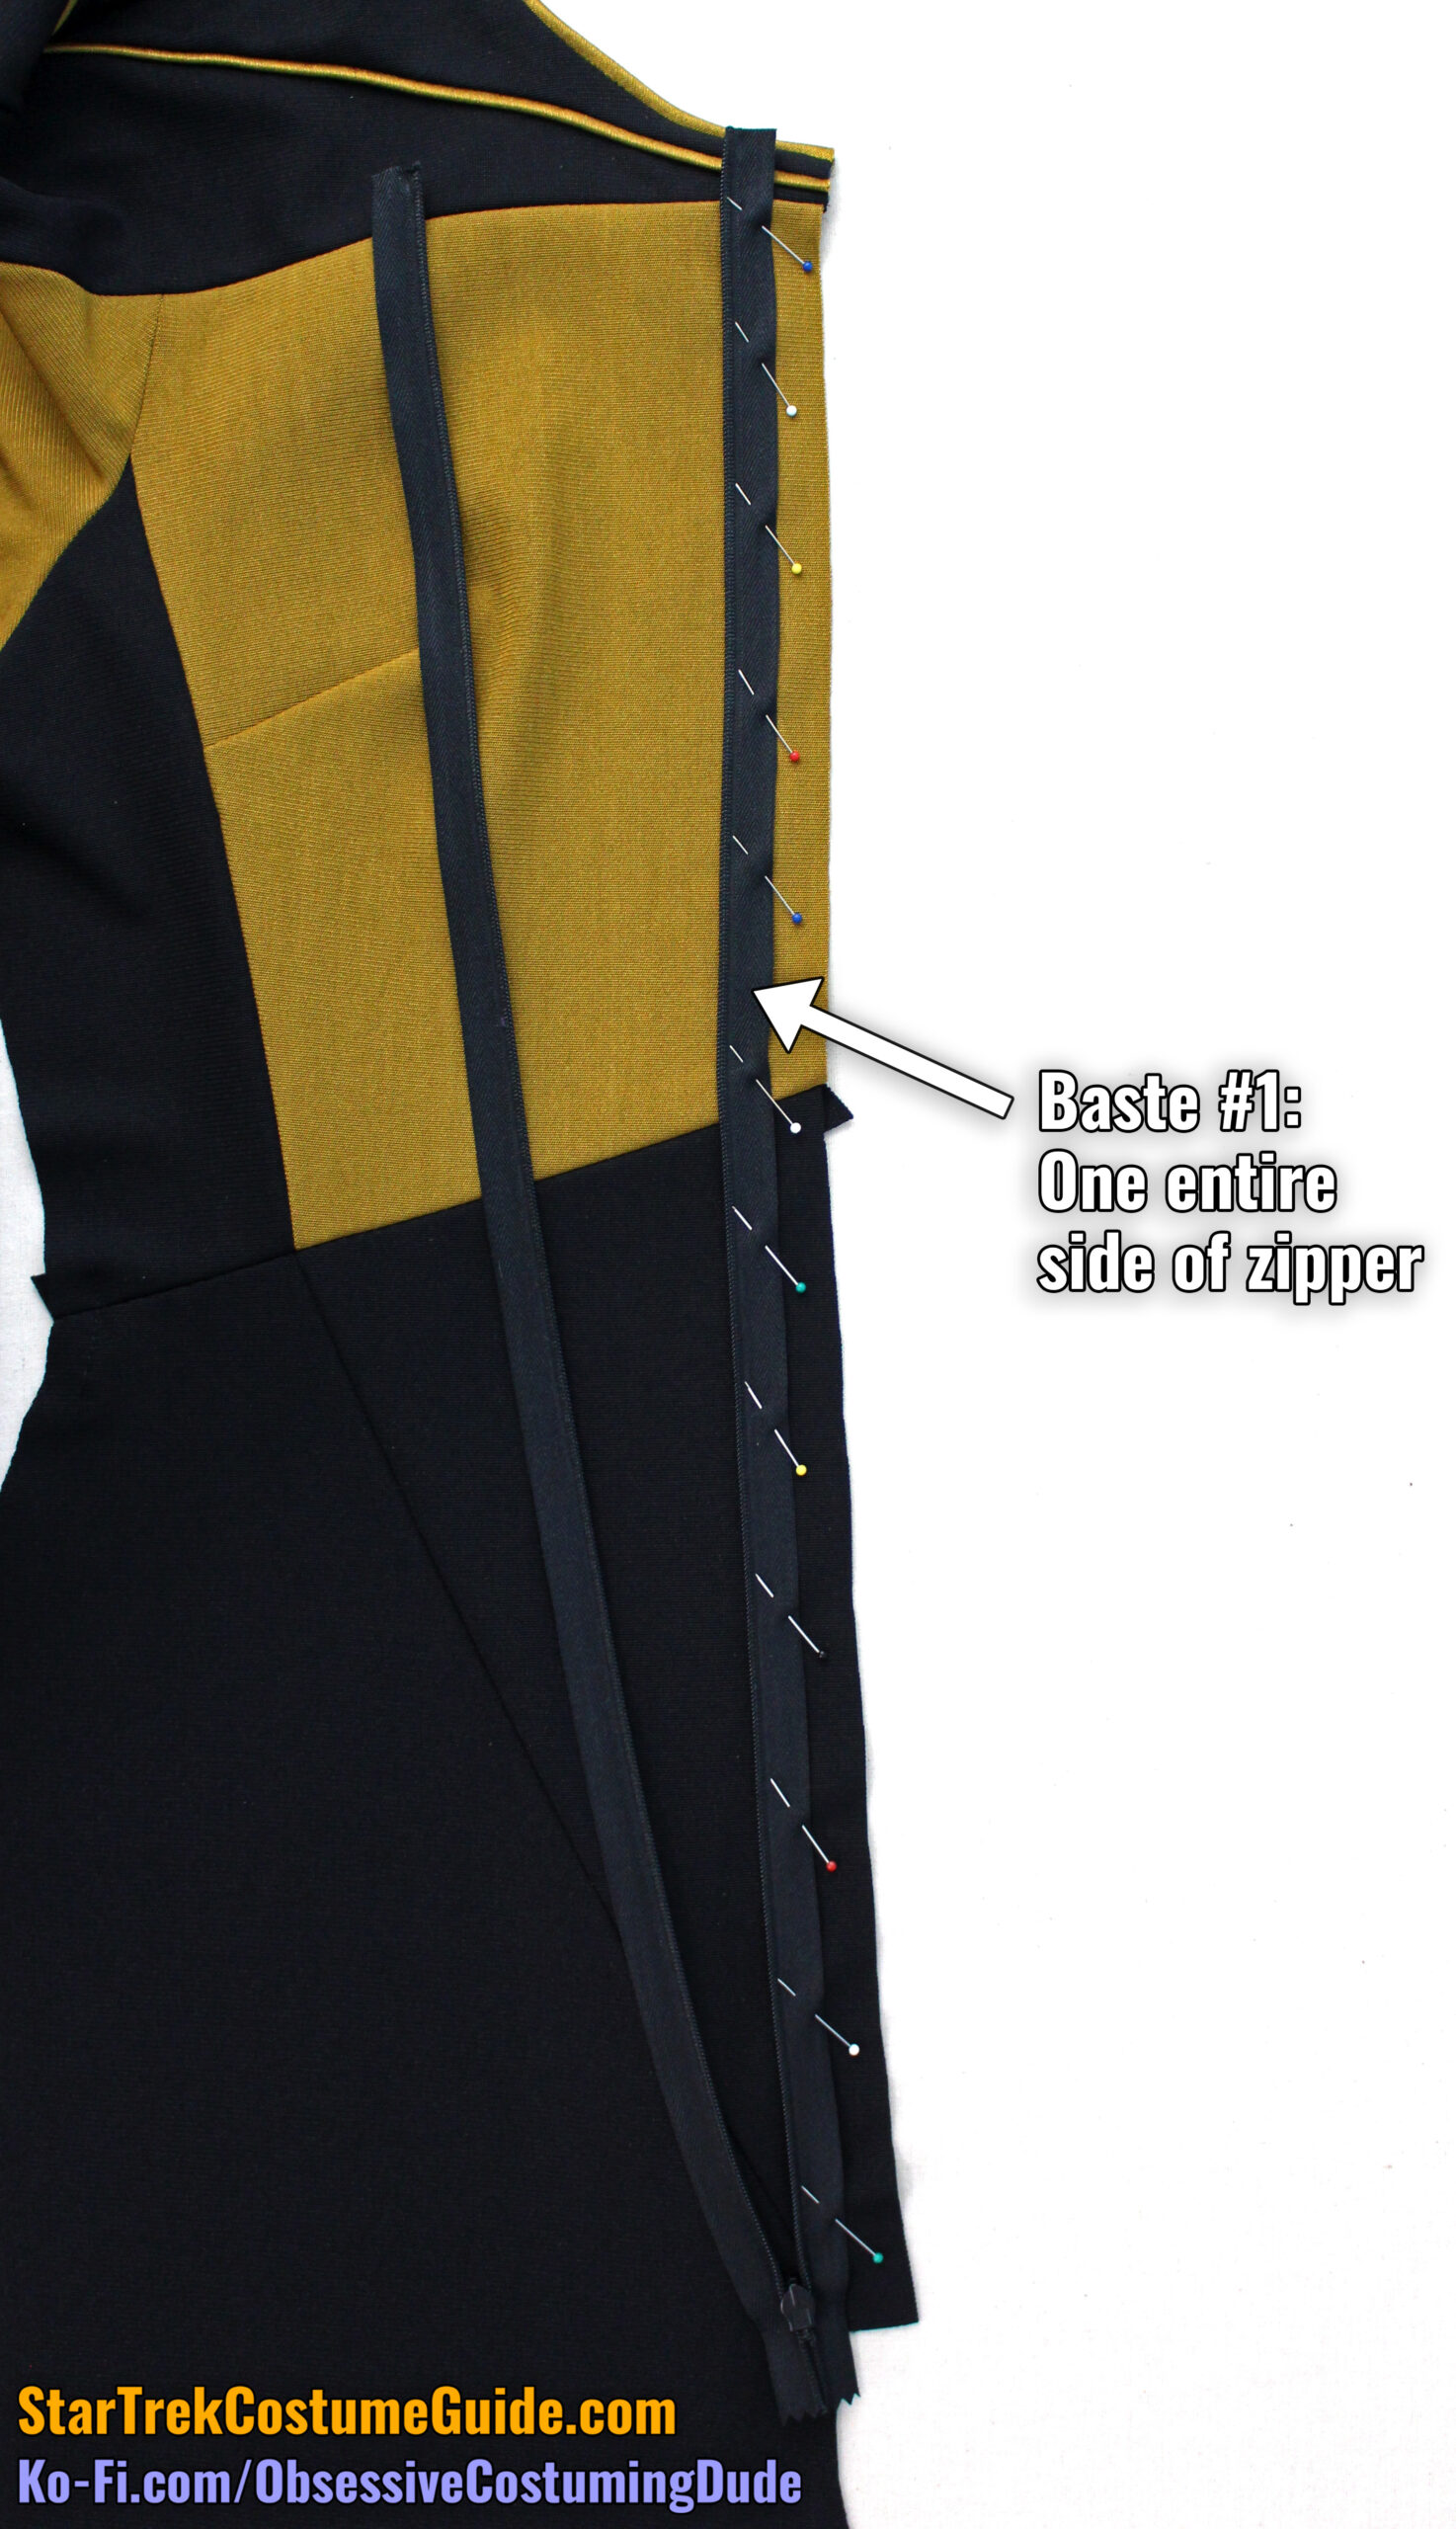
After prepping your invisible zipper, carefully pin it to one side of the jumpsuit as flatly as possible, making sure no part of the jumpsuit fabric is stretched.
I like to position the zipper to the new top edge is flush with the lower edge of the neckline trim at the center front.
Also remember that the center front/zipper allowance is a full inch.
Baste the zipper to the jumpsuit all the way from top to bottom. (I baste the top of the zipper as well, even though it will be left hanging free once it’s installed.)
Carefully pin the other side of the zipper to the opposite side of the jumpsuit, starting at the top and keeping everything as flat as possible.
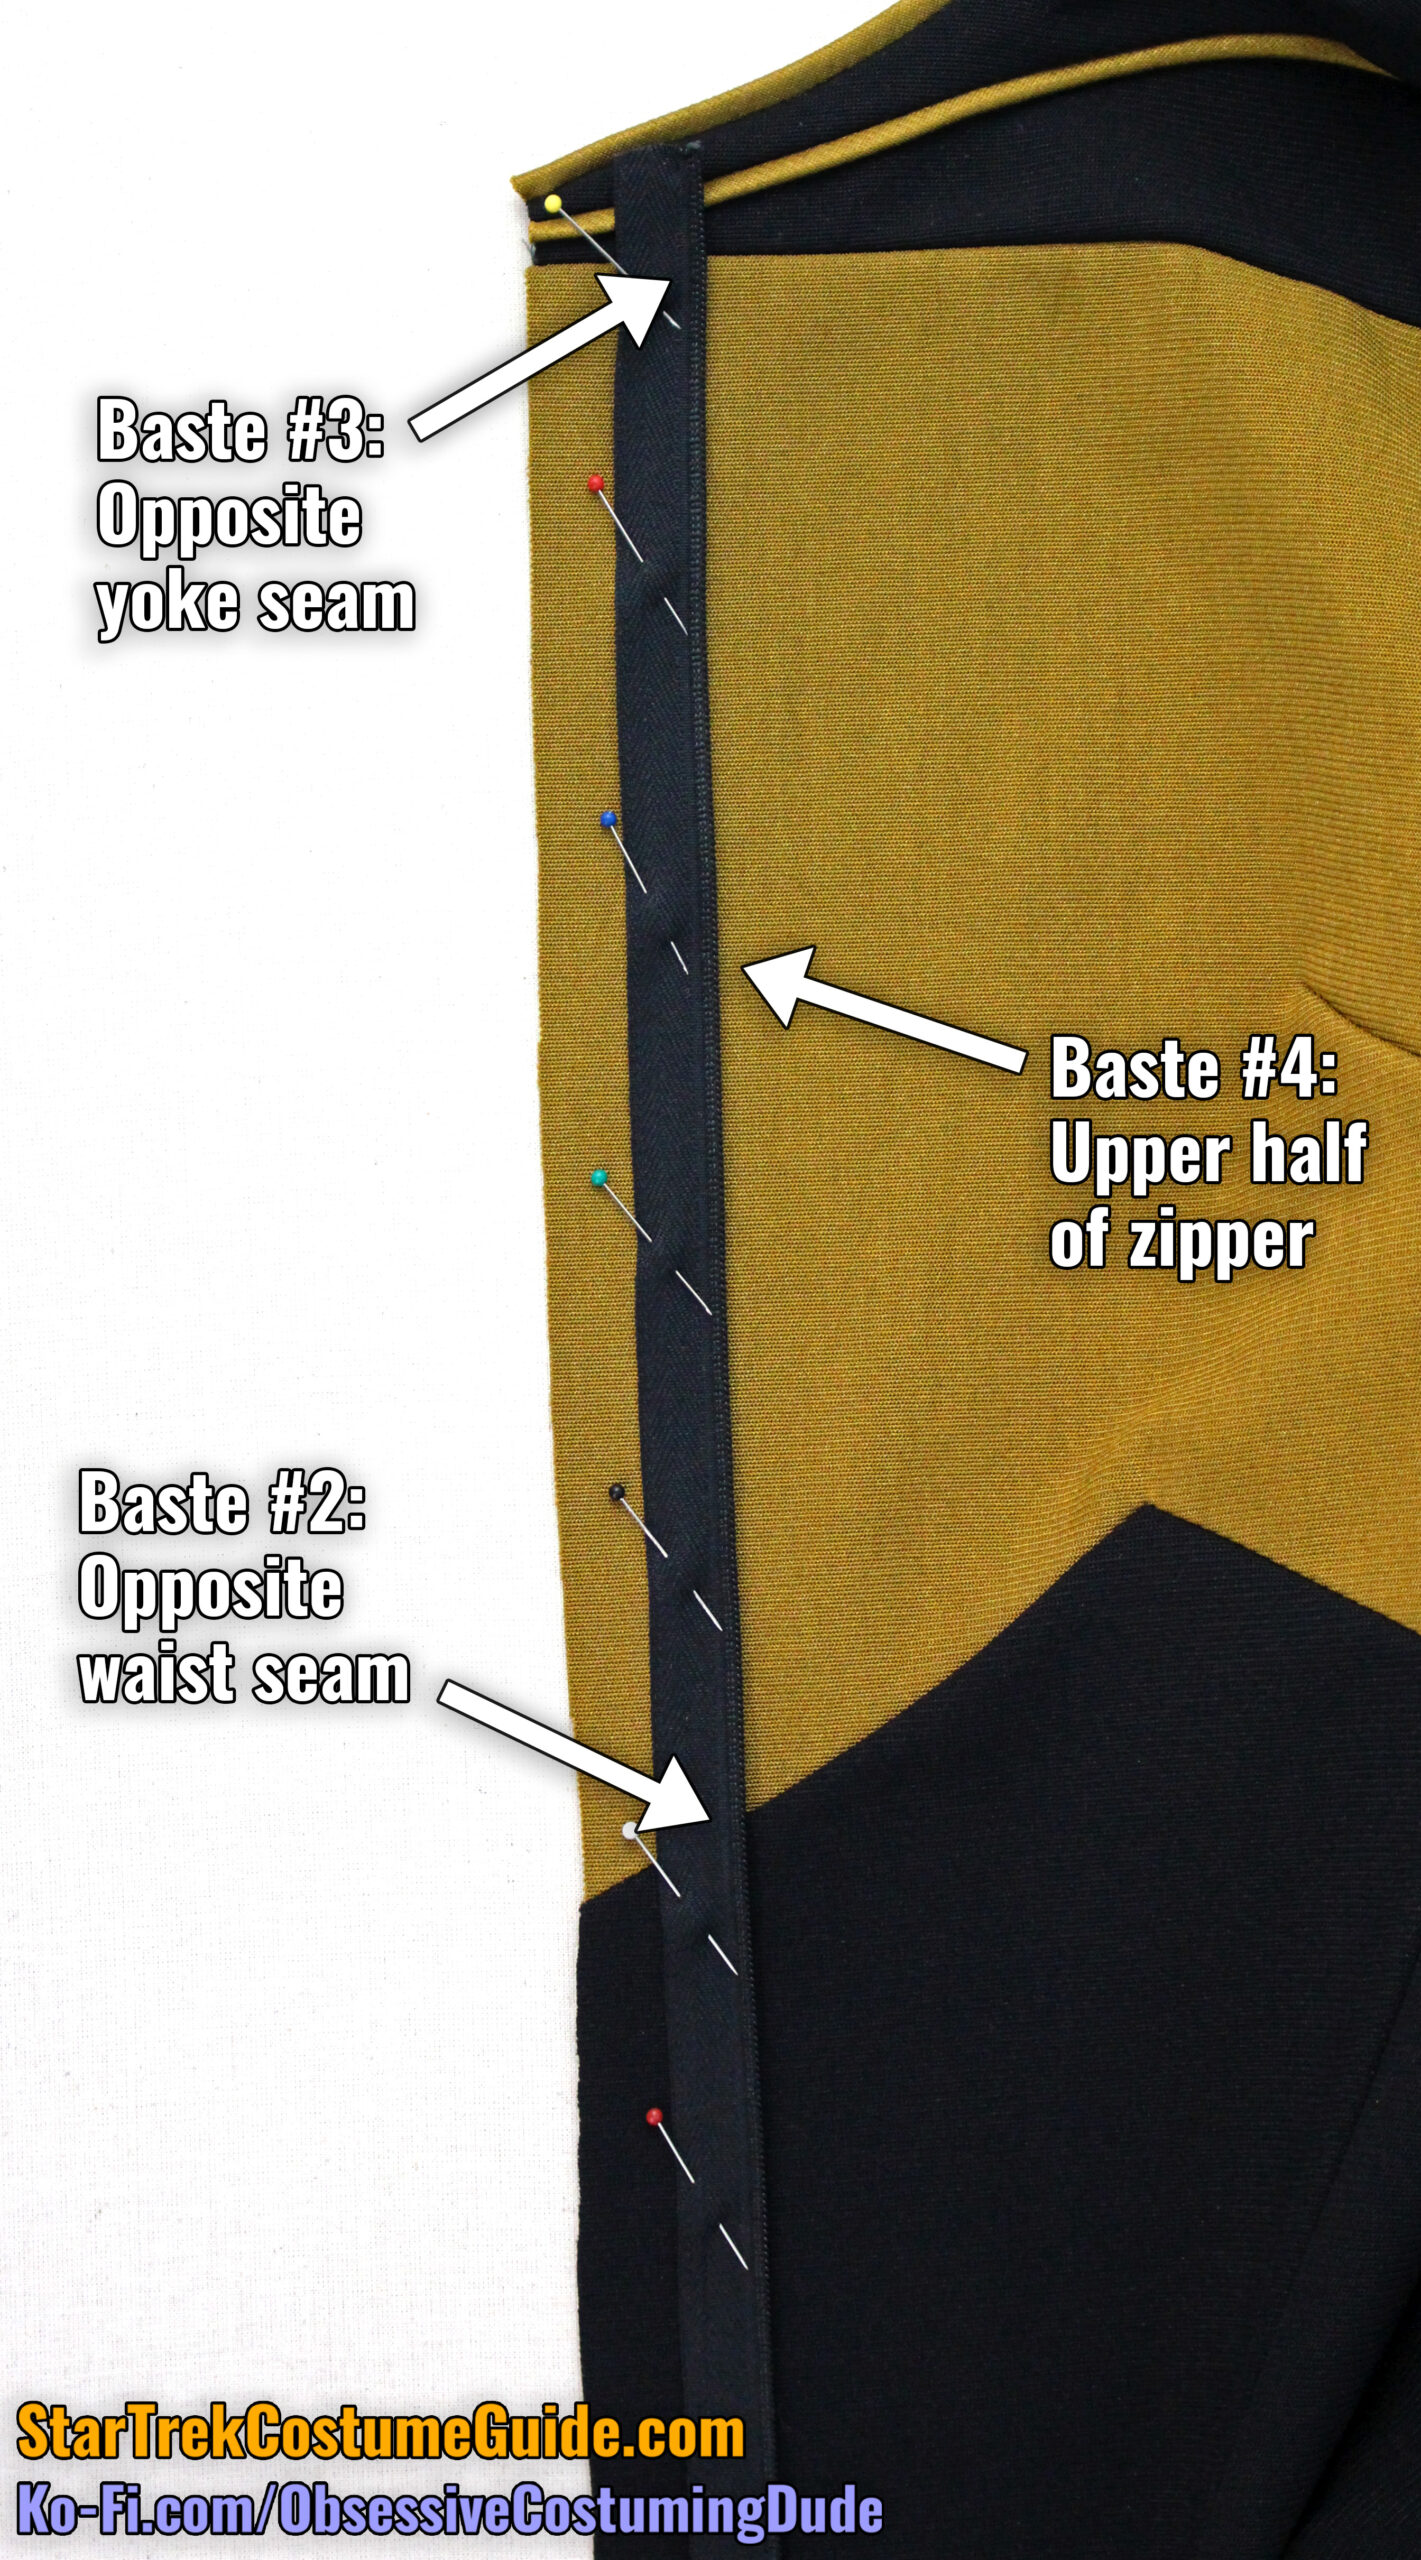
Baste the zipper into place over the asymmetrical waist seam (an inch or so above and below it should work fine).
Remove the lower pins and close the zipper up to just past the waist.
Ideally the asymmetrical waist seam will perfectly match across the zipper on your first try, but realistically, it may take a few tries. (Just accept it.)
Remove and adjust the basting stitch in that area as-needed.
Once you’re satisfied that the waist seam is properly aligned, do the same for the opposite yoke seam. (Again, this may take you a few tries.)
With those points anchored, baste the upper half of the zipper (from the waist seam up to the top).
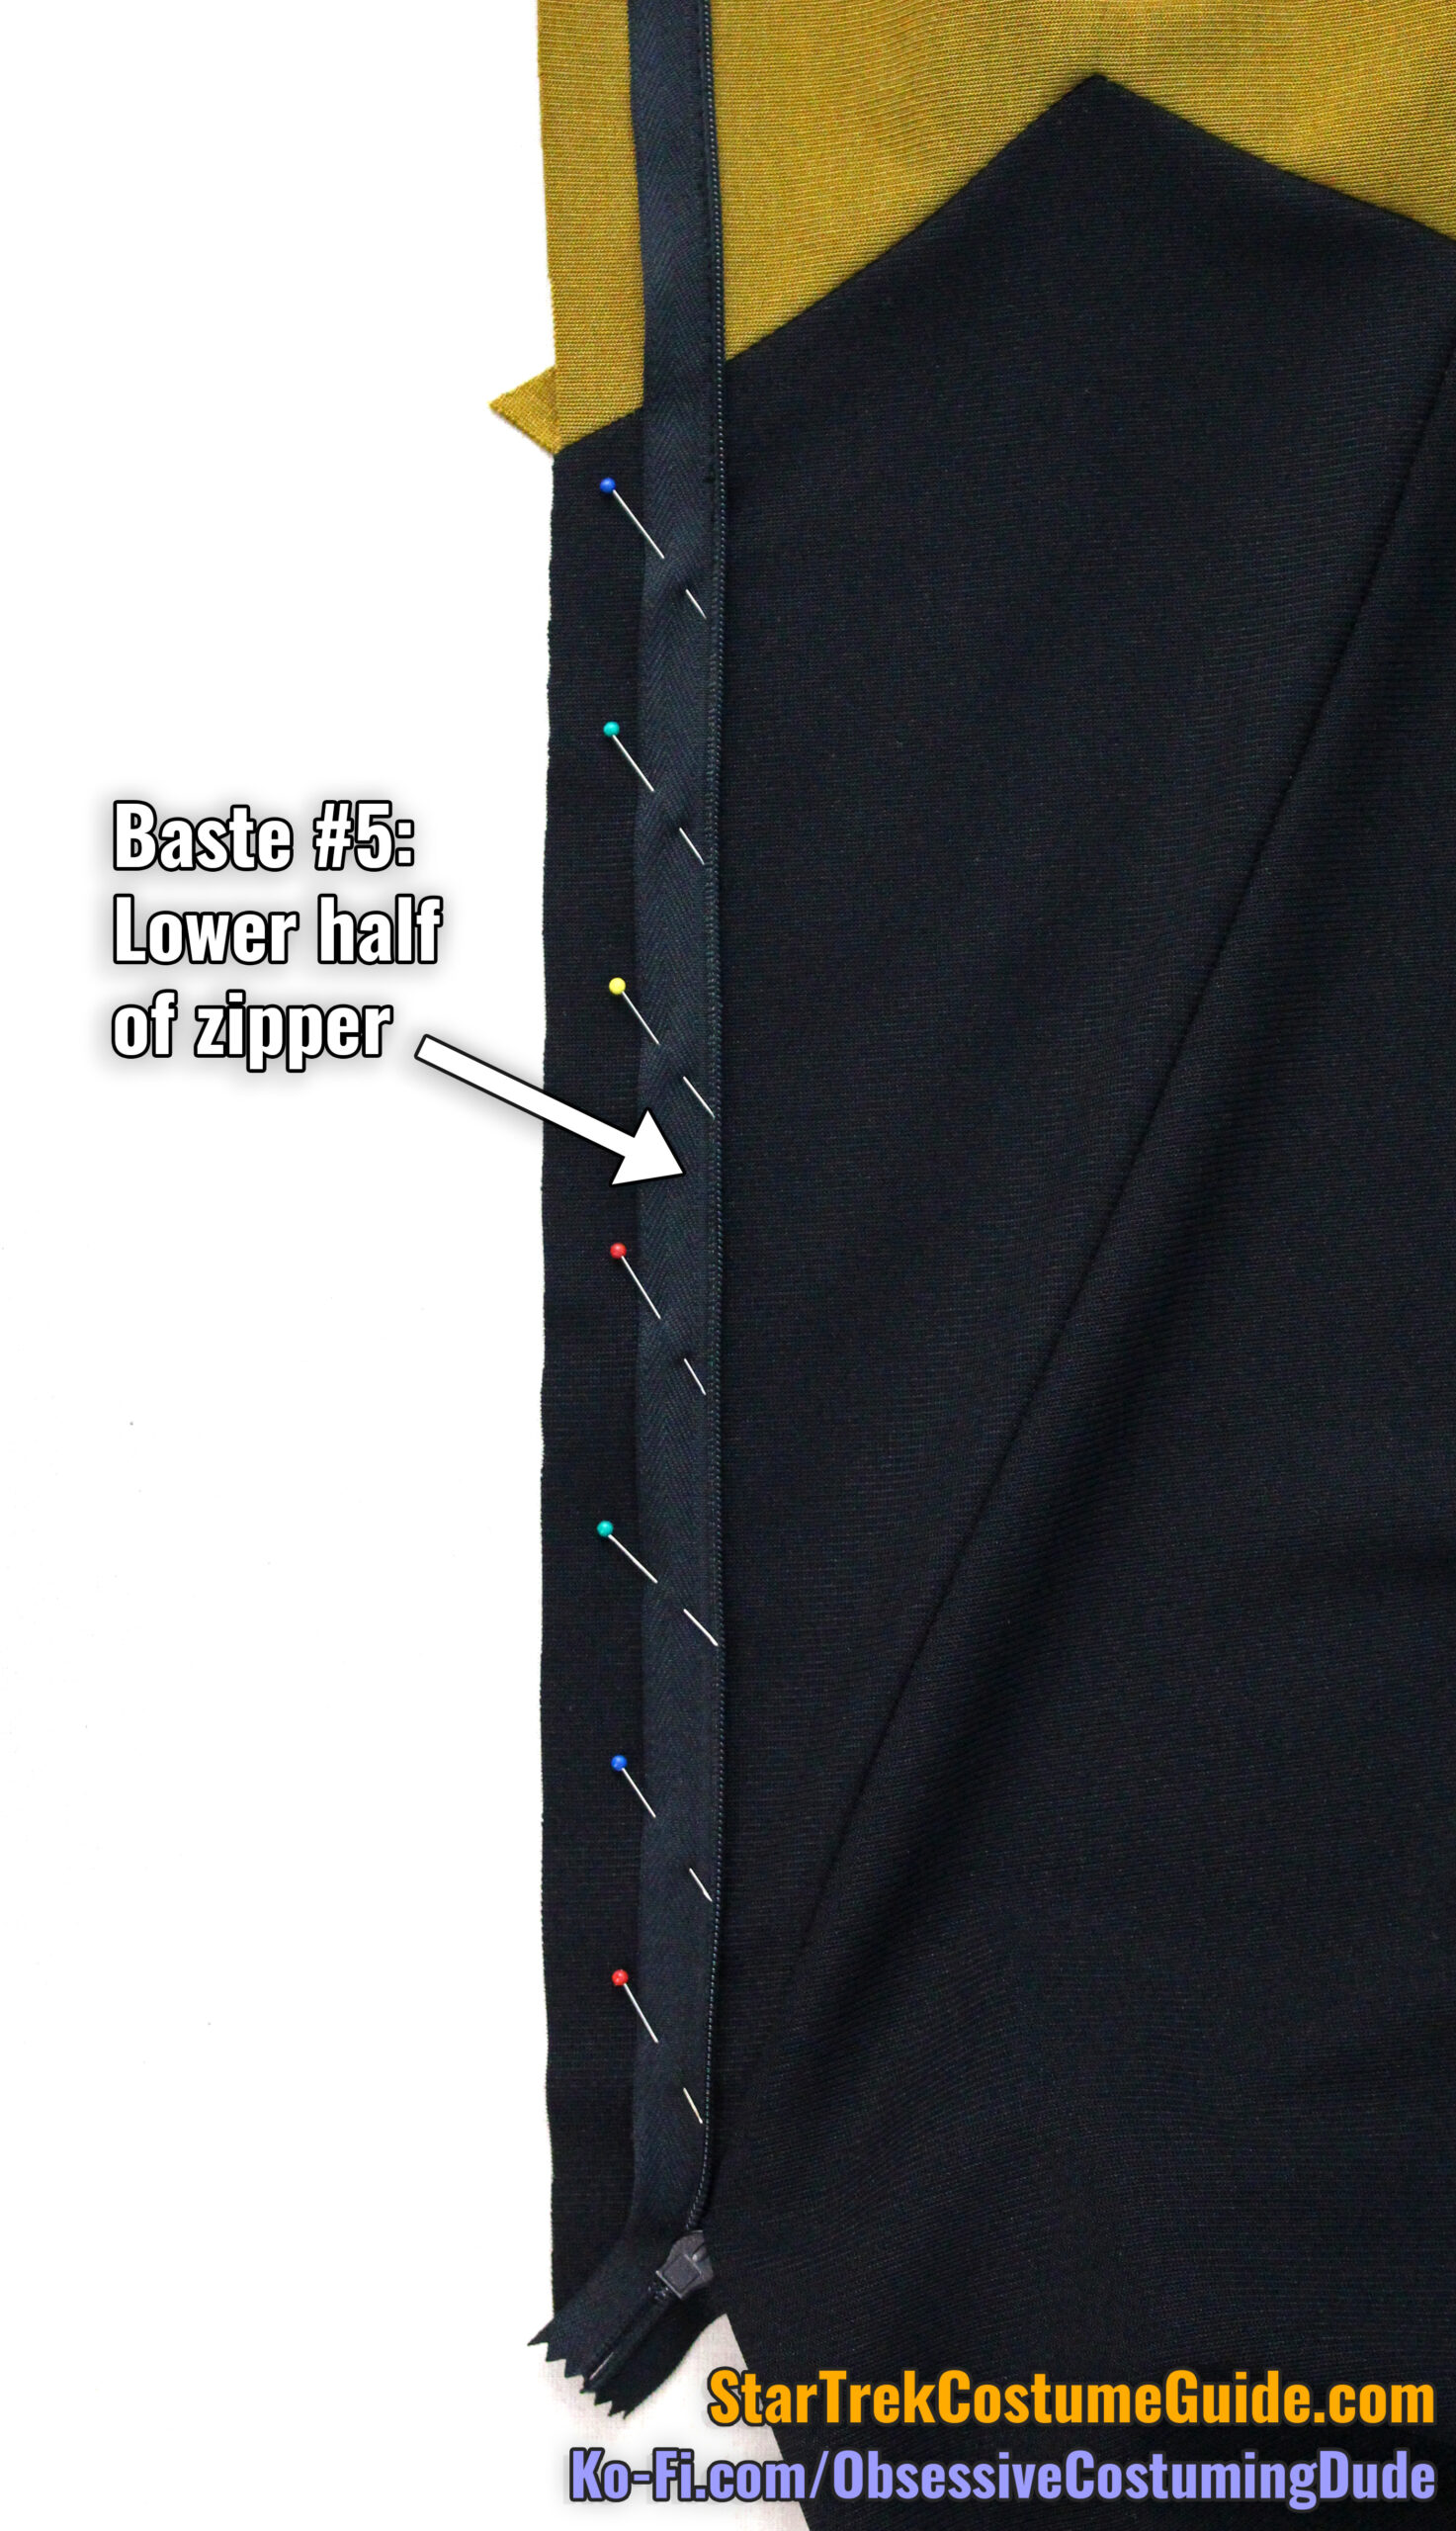
And finally, baste the lower half of the zipper into place, from the bottom up to the waist.
With both sides of the zipper basted and every area theoretically aligned, close the entire zipper to confirm everything is correct.
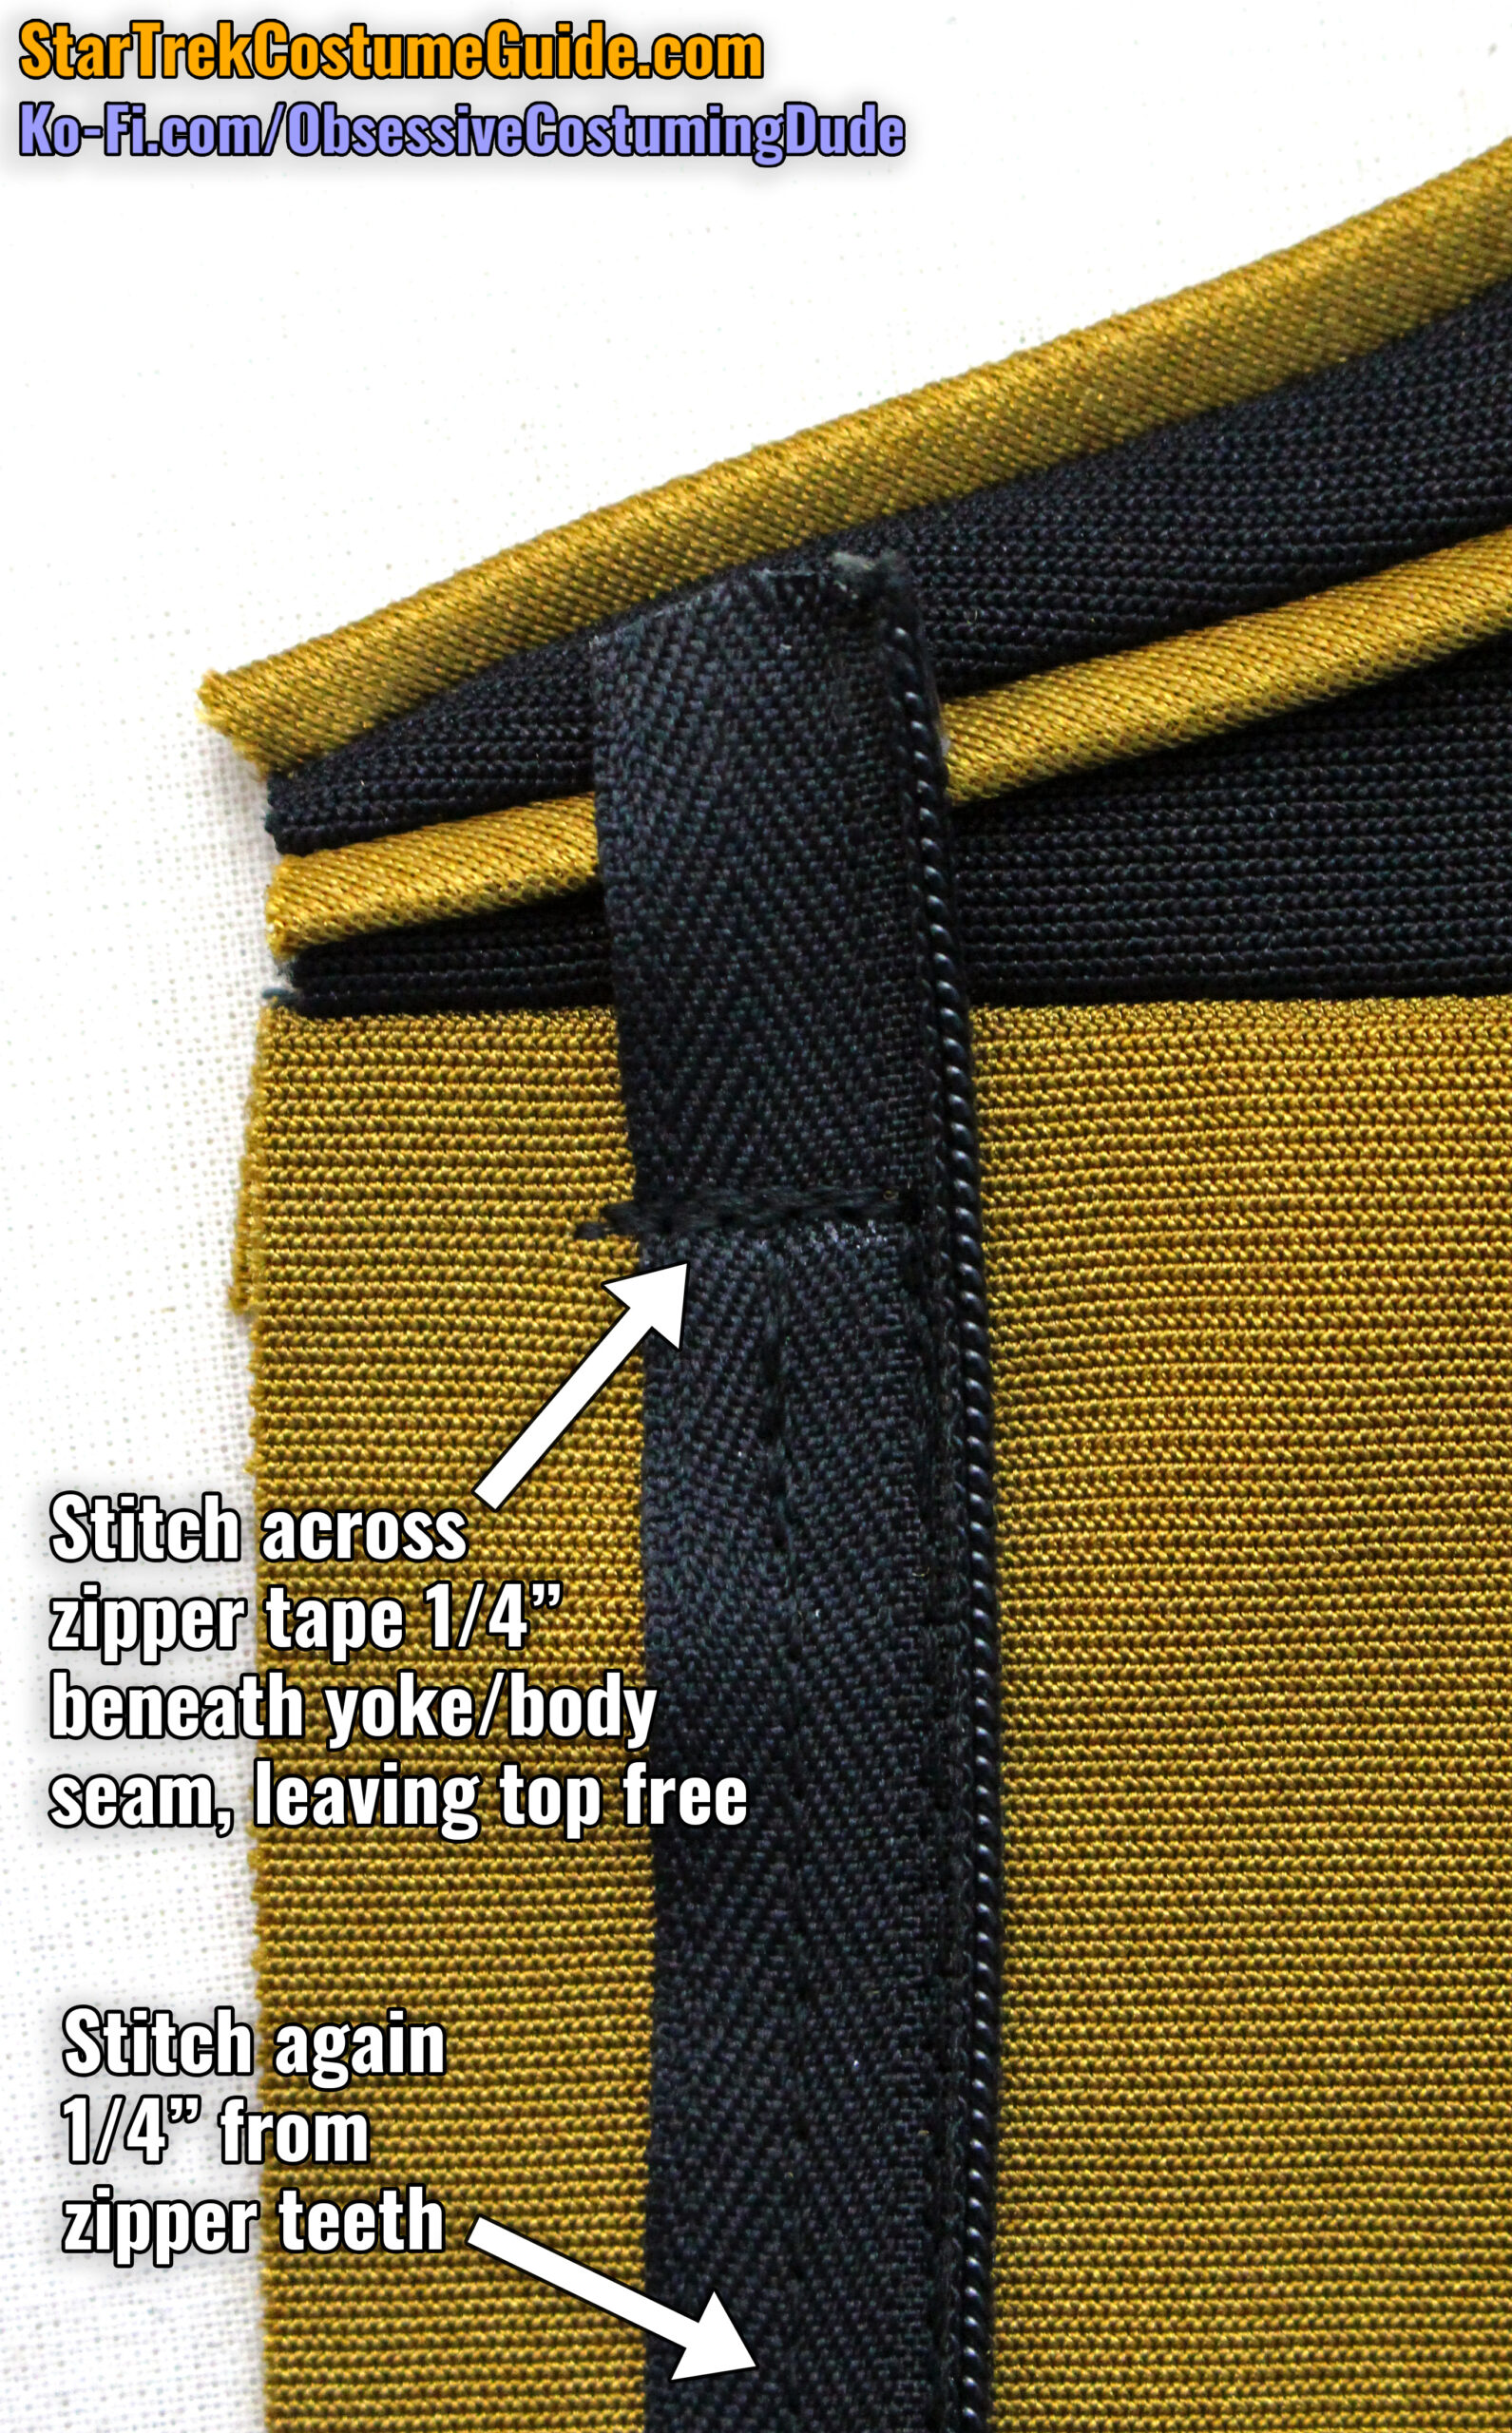
If so, sew both sides of the zipper to the jumpsuit, leaving the top inch of the zipper hanging free. (If you positioned your zipper the way I recommended, start/stop your stitching ¼” beneath the yoke/body seam.)
Reinforce your stitching several times at the bottom and 1” from the top of the zipper.
Using a regular presser foot, stitch again ¼” from the zipper teeth to further secure the zipper tape, again reinforcing your stitching at the bottom and 1” from the top of the zipper.
Horizontally stitch across the zipper tape ¼” beneath the yoke/body seam.
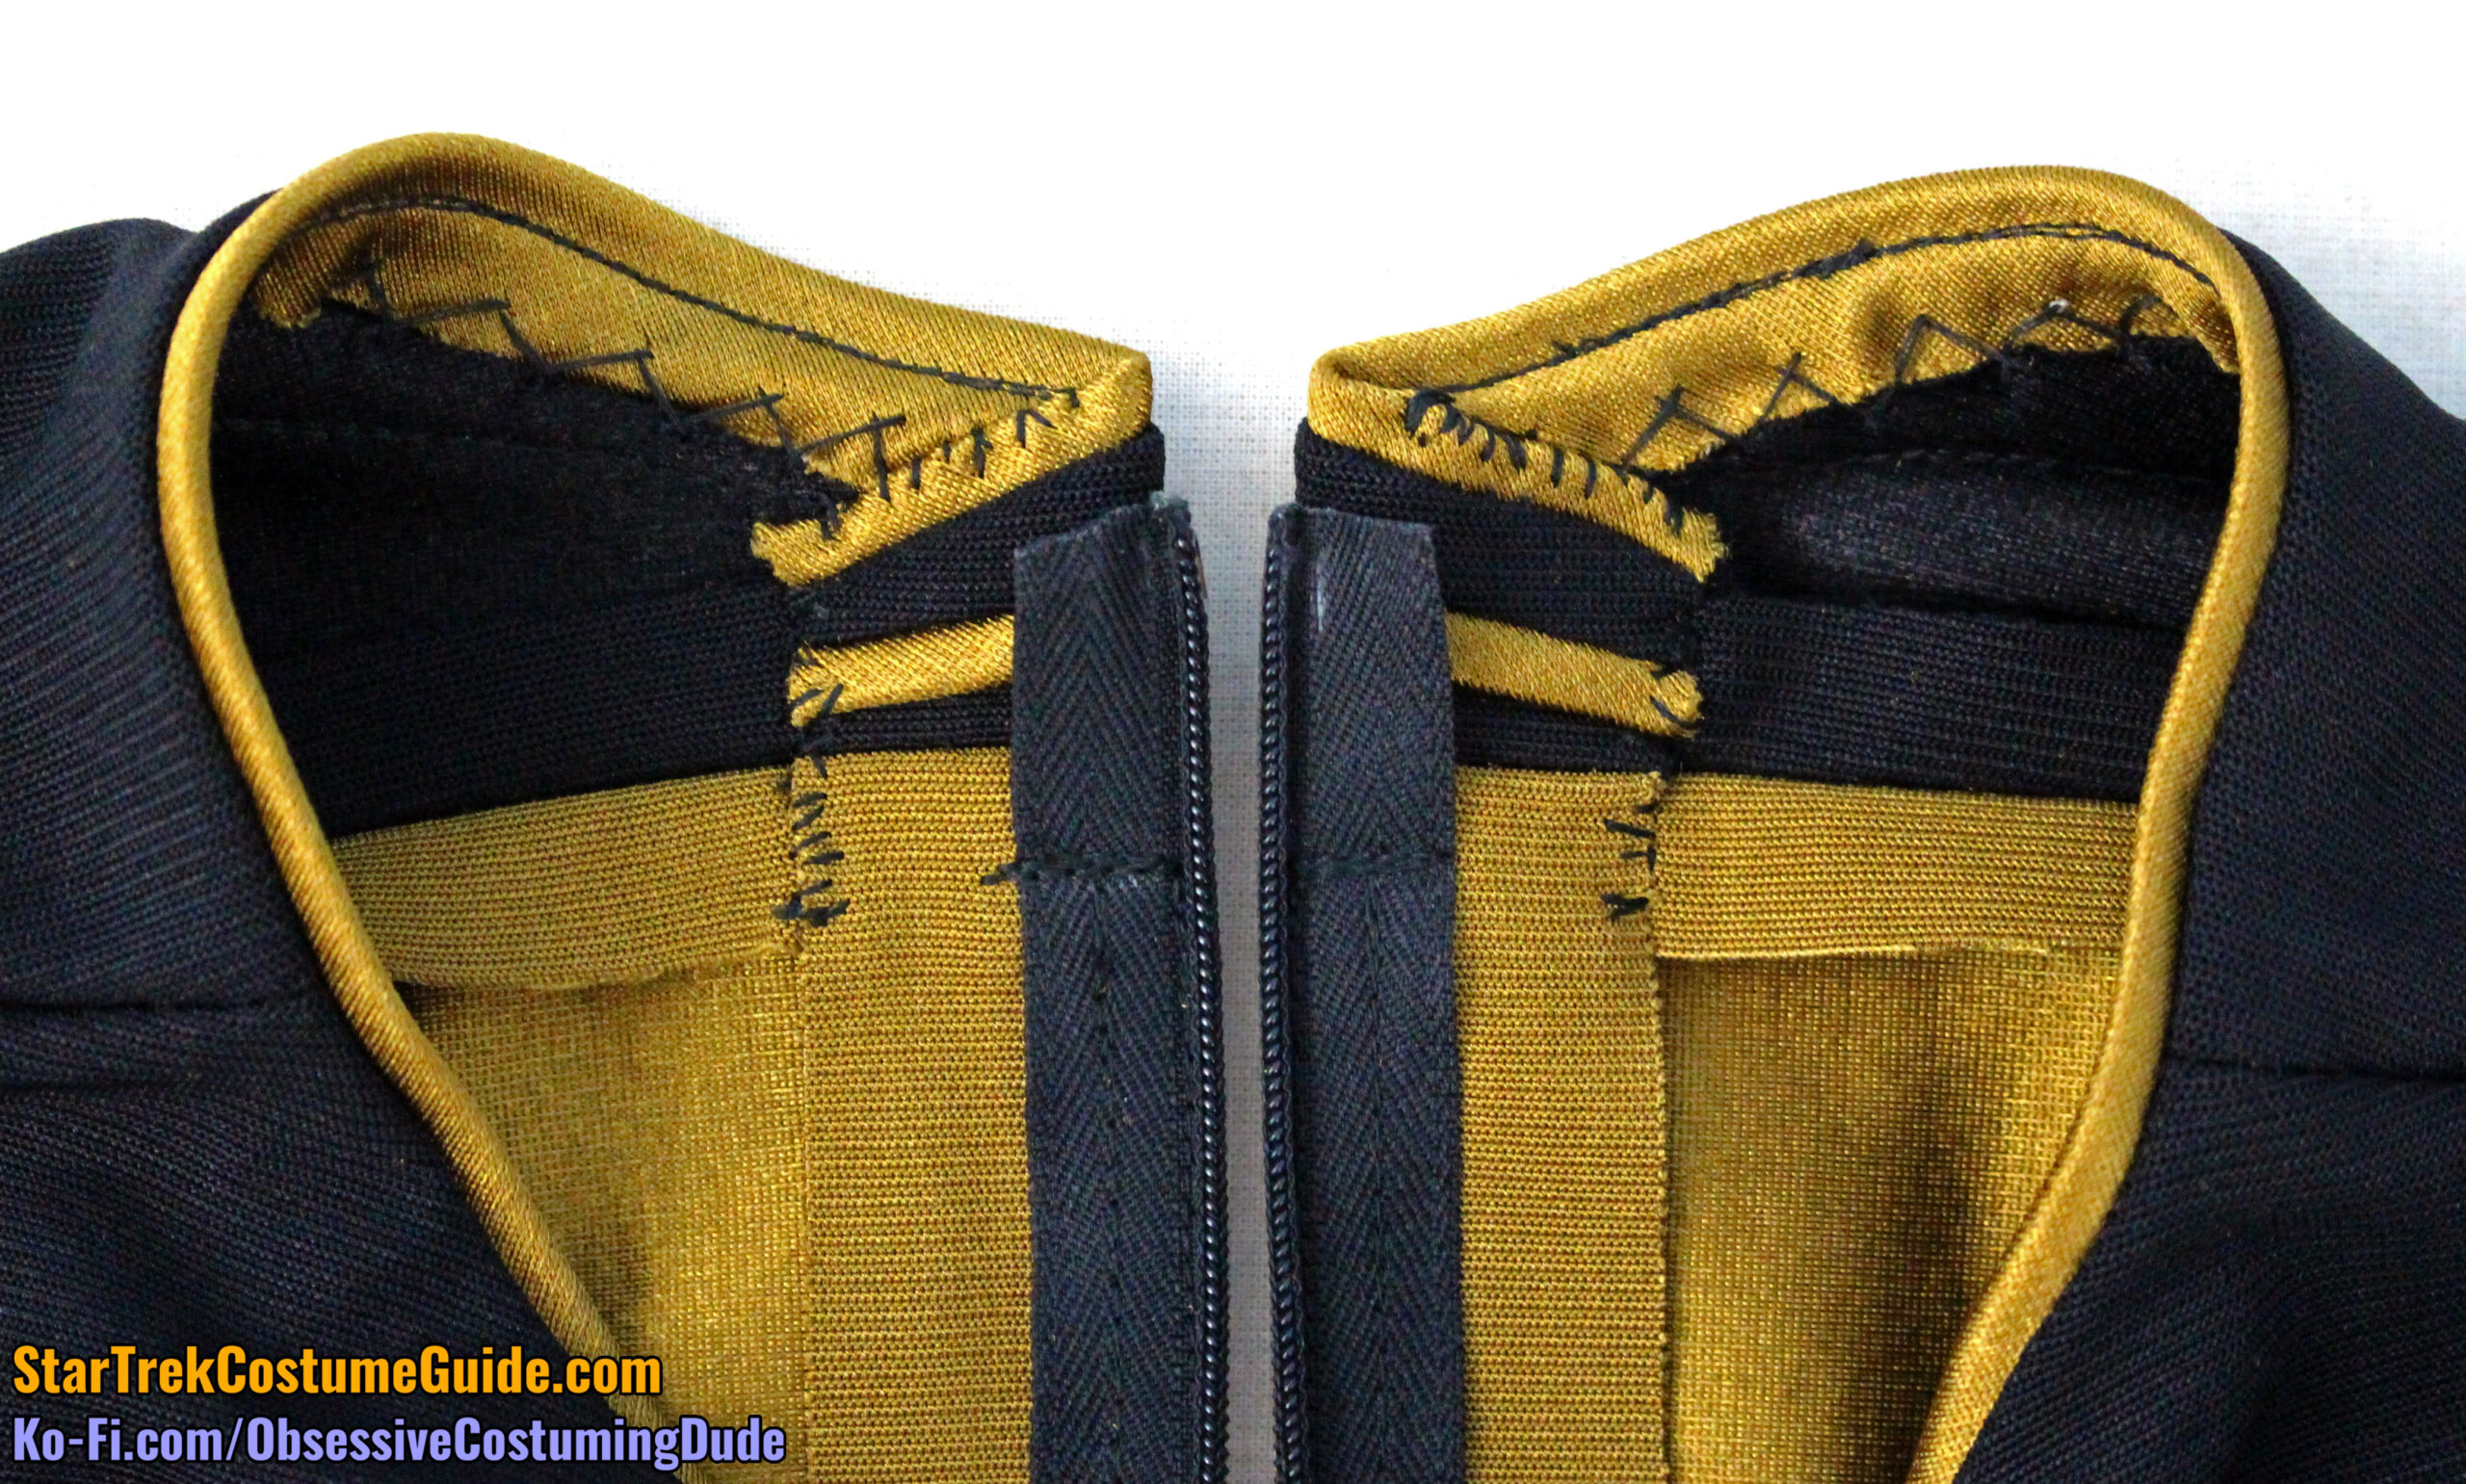
Remove the basting stitching from the top inch of the zipper, leaving the top of the zipper hanging free.
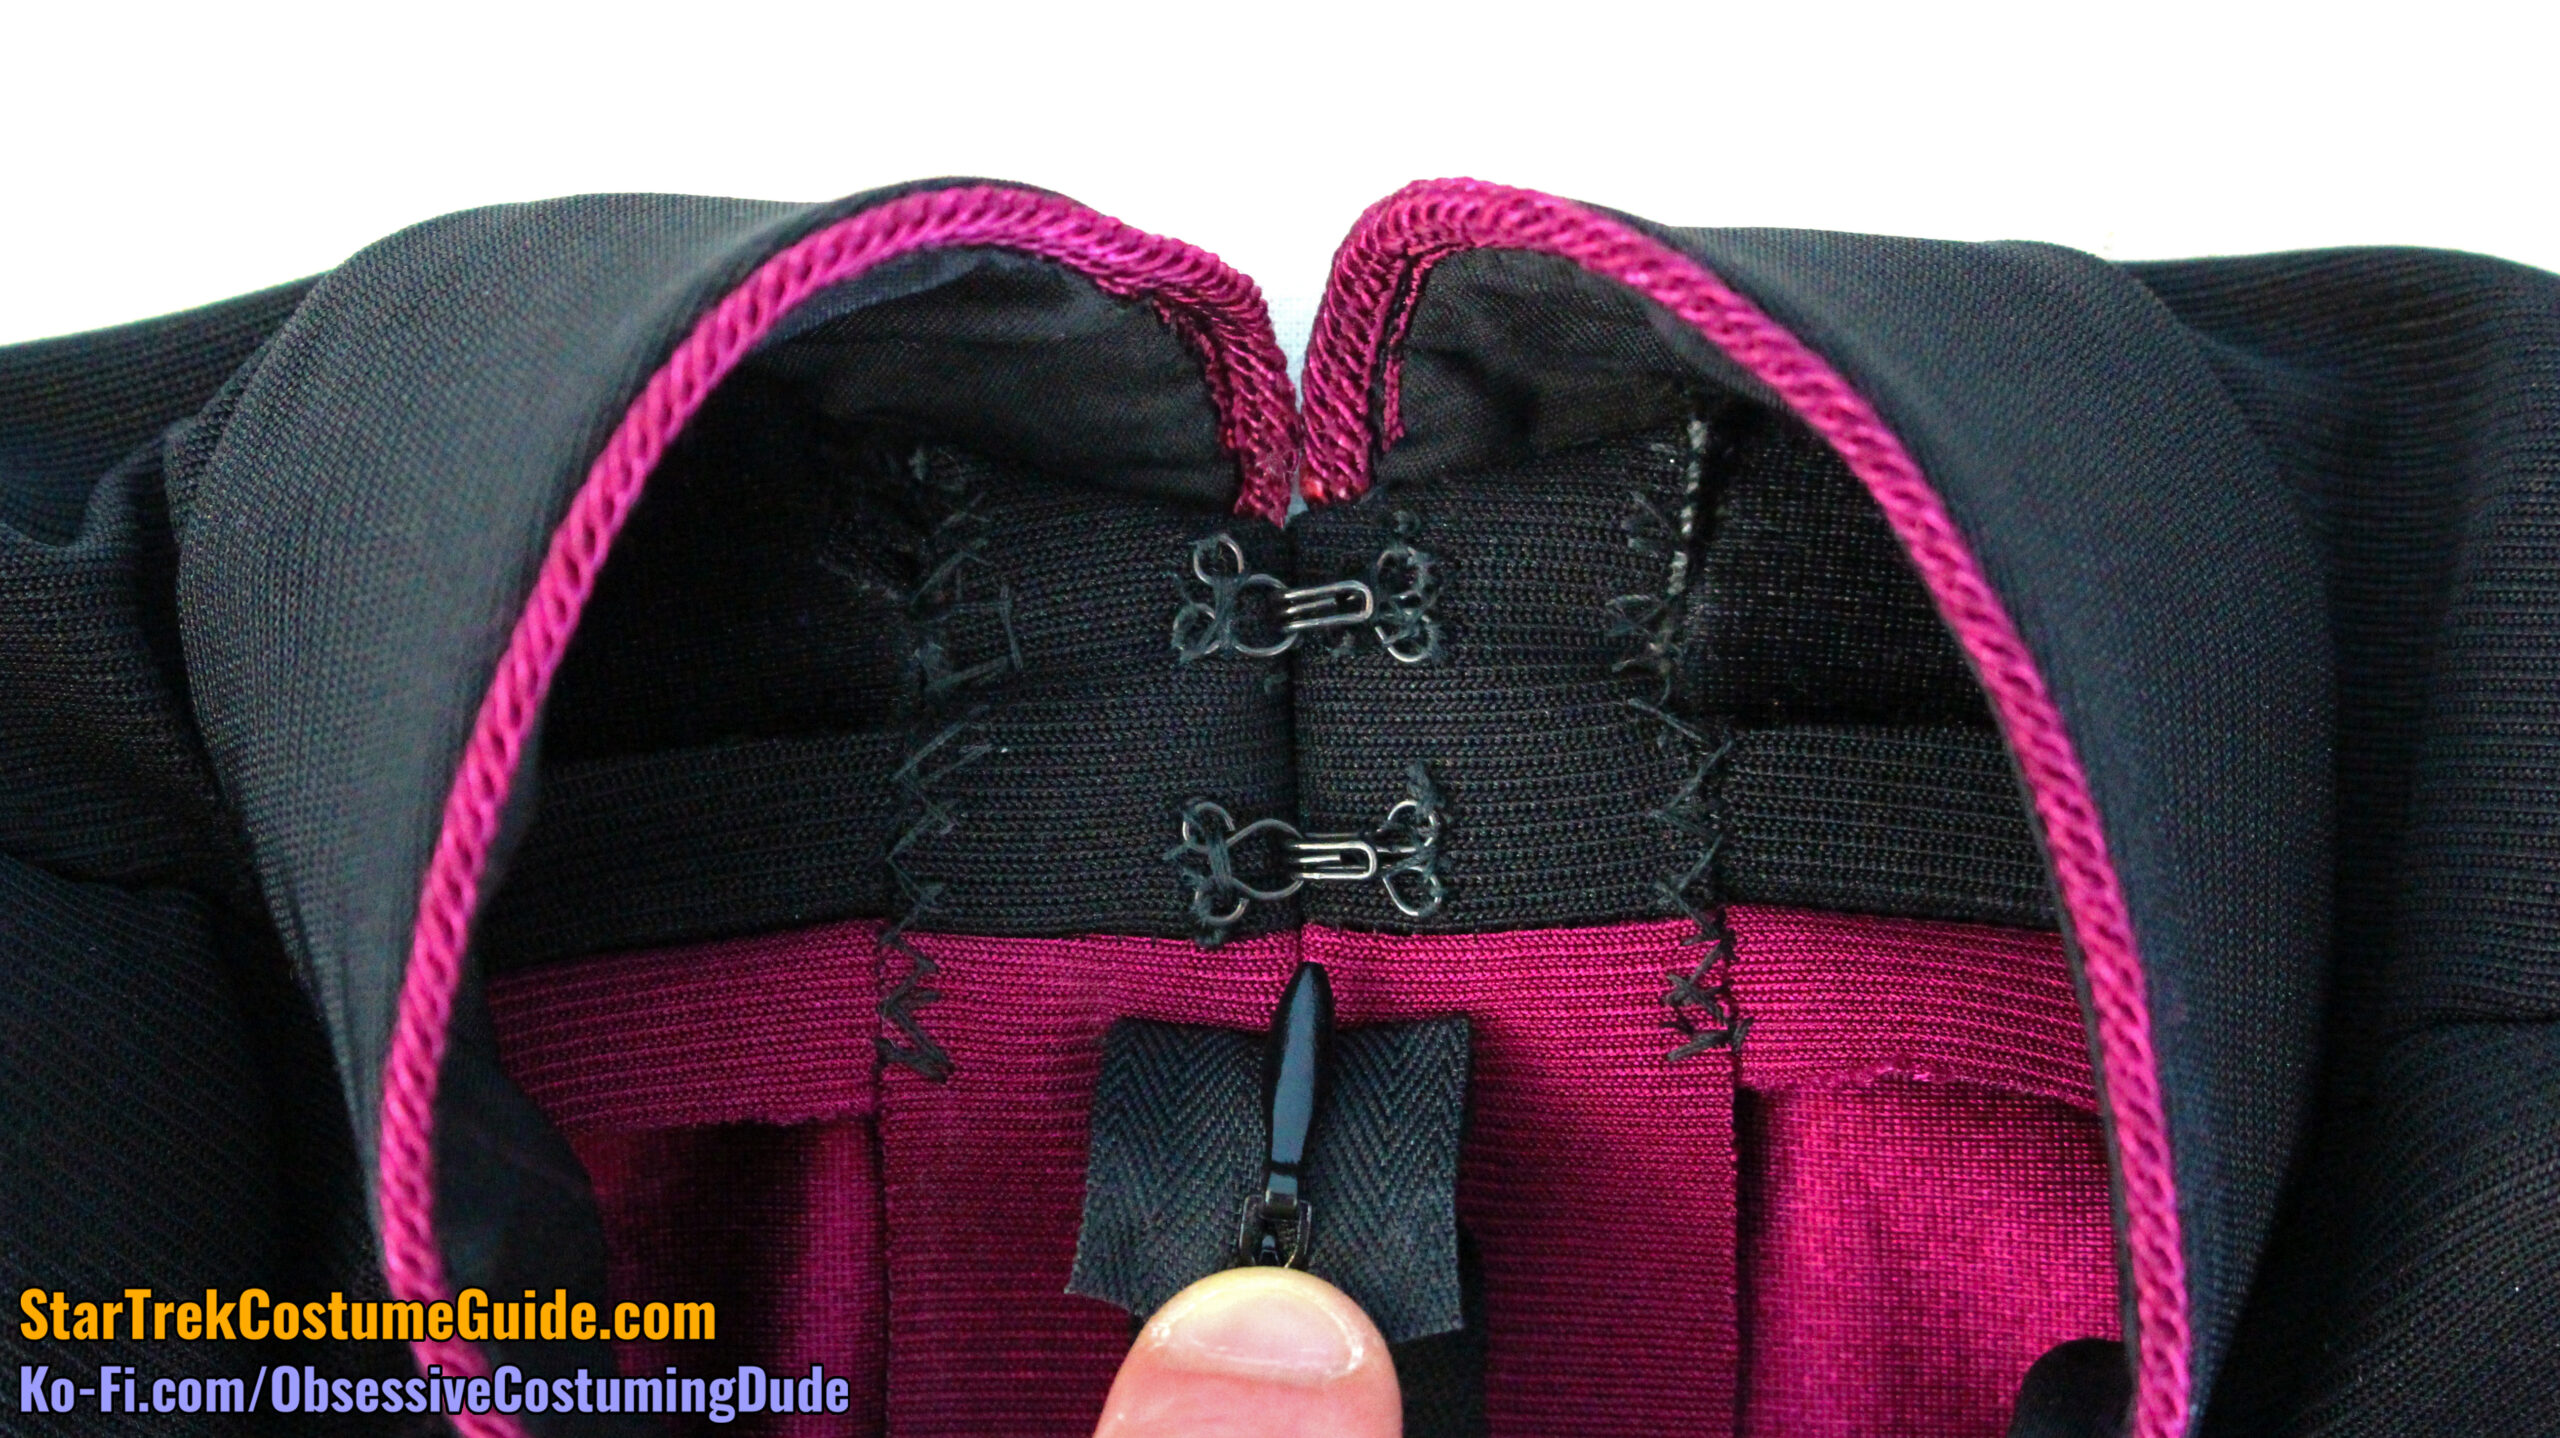
Tack the upper front allowances under by hand, taking care to only stitch through the available allowances so your stitches won’t be visible on the outside of the jumpsuit.
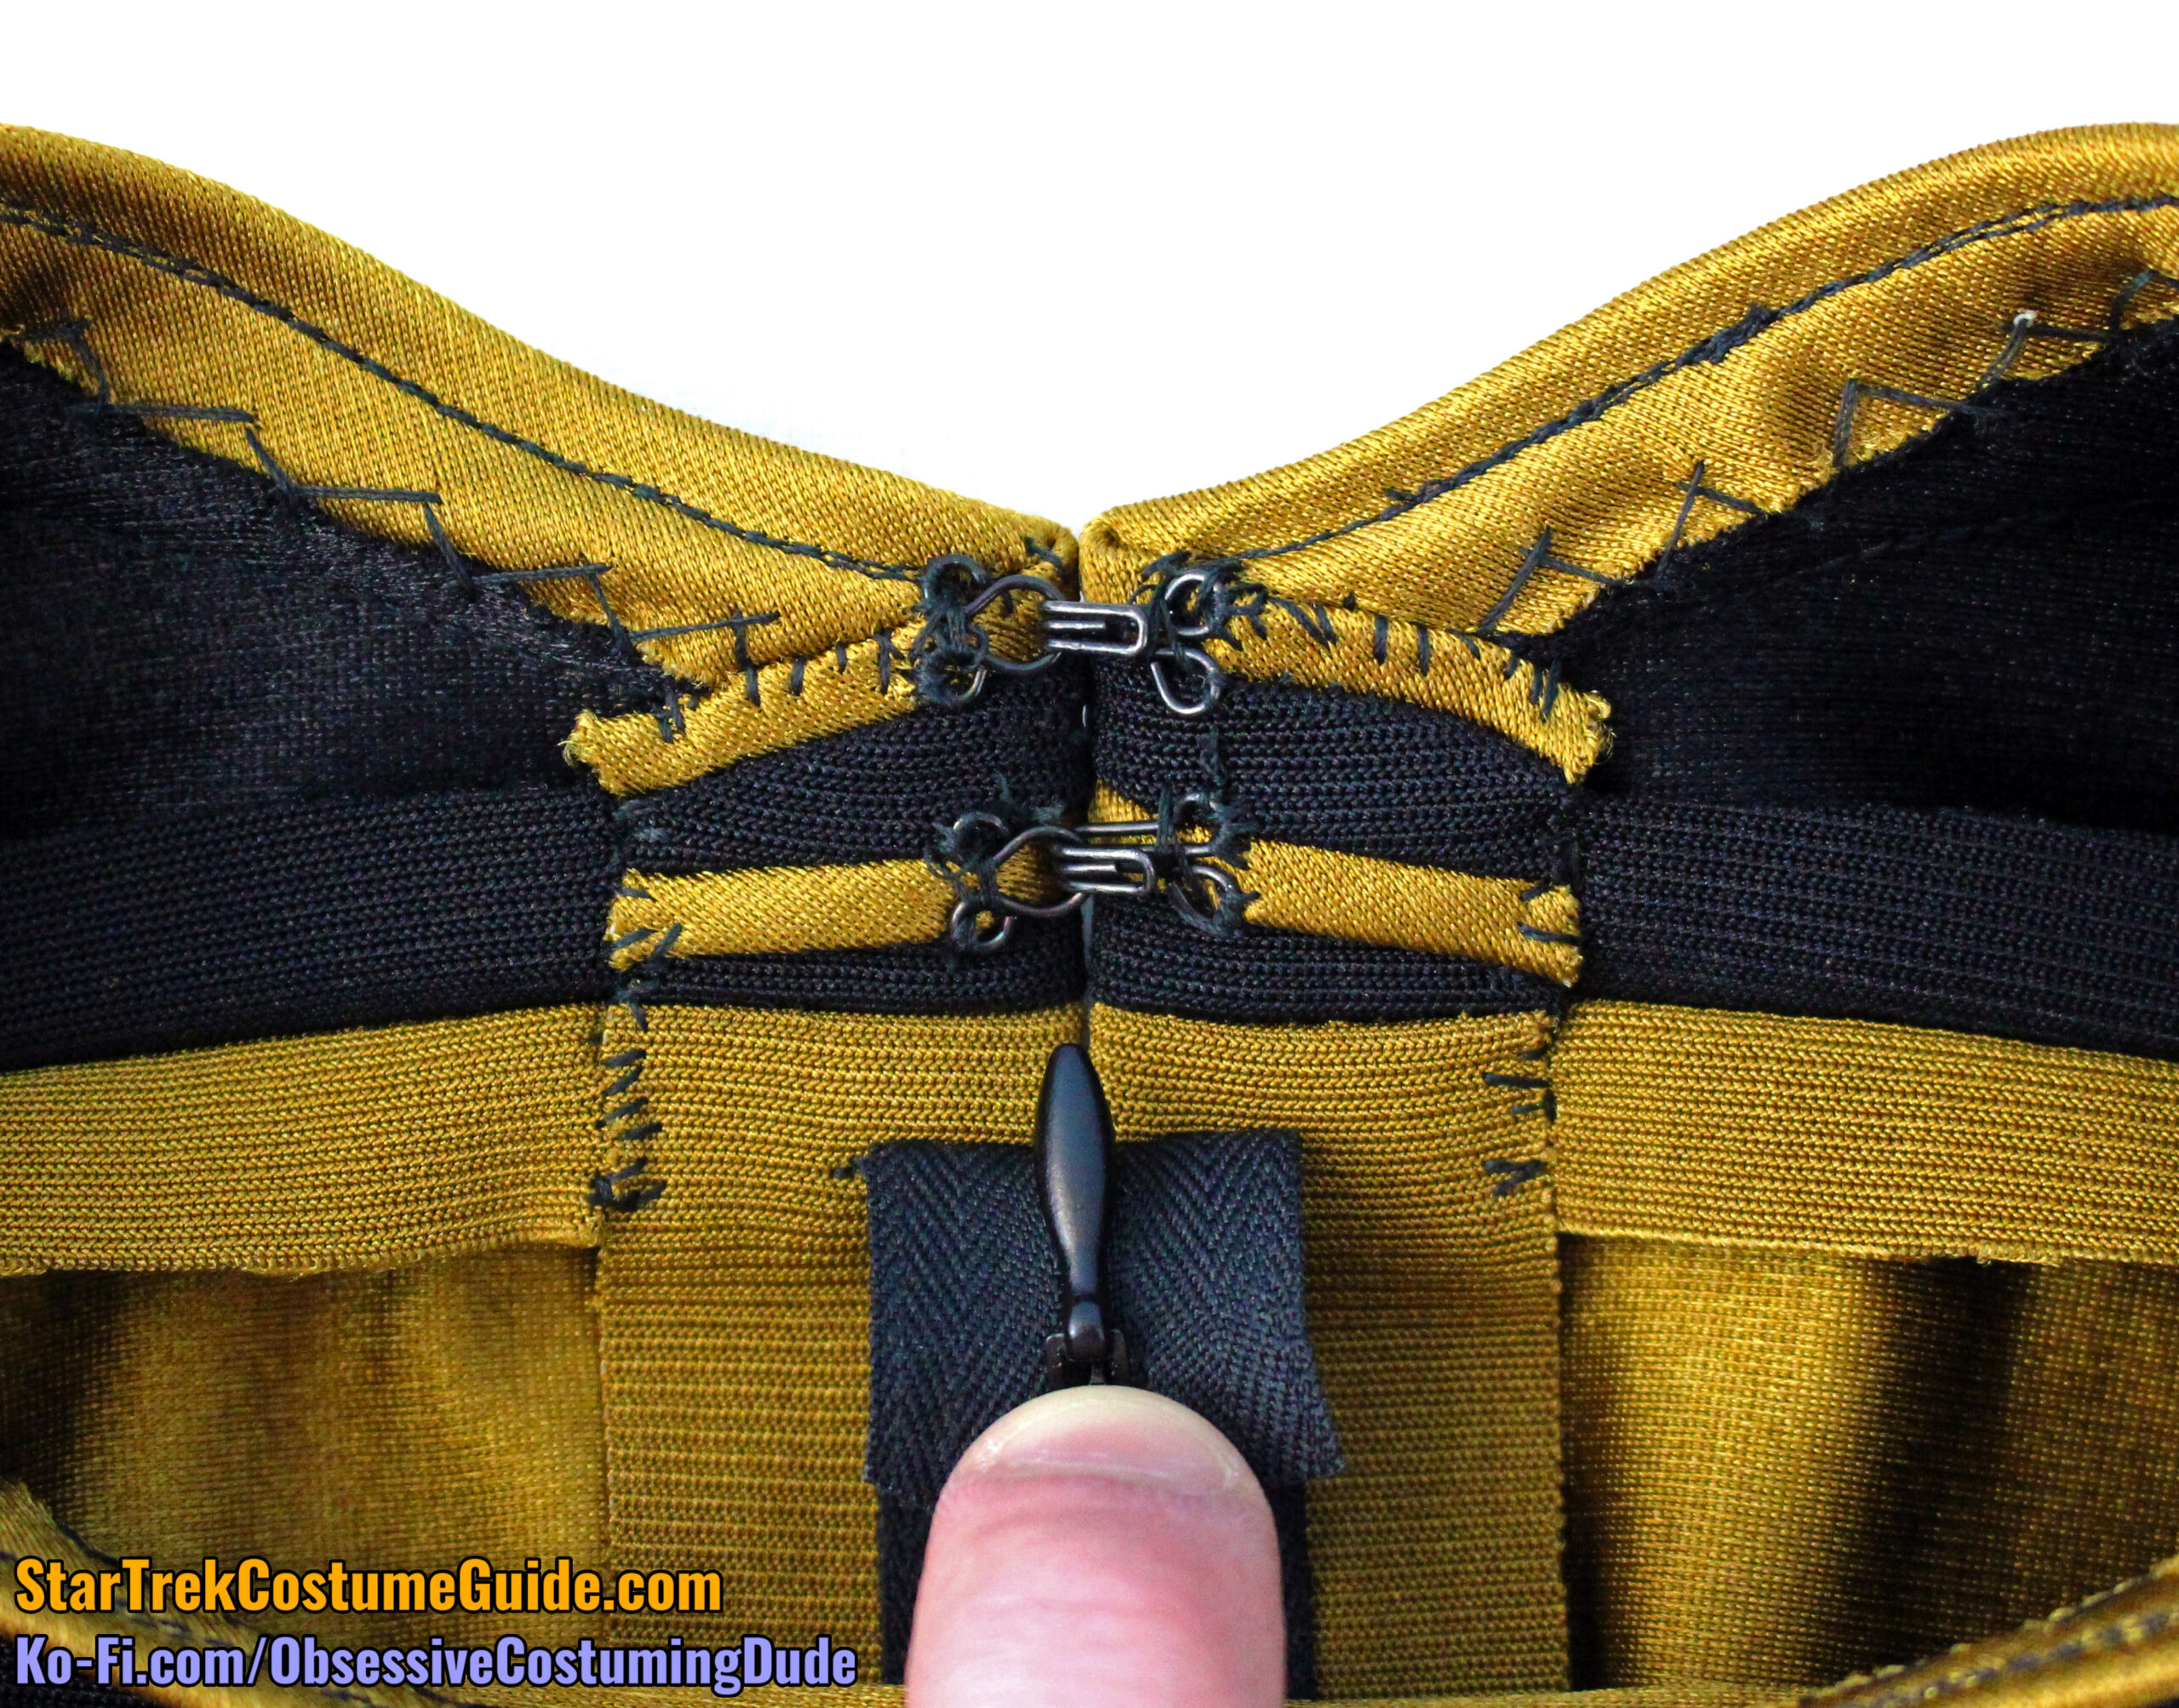
Hand-sew two hook-and-eye closures to the upper front, above the zipper.
For the front-zipping later jumpsuit style, the zipper is attached the same way; I suggest positioning it so it extends upward ¾” above the yoke/body seam at the center front.
However, don’t tack the allowances under or attach the hook-and-eye closures yet; we need to make and attach the collar first.
Sew the lower front crotch closed up to the bottom of the zipper, right sides together with ½” seam allowance. (Note that the seam allowance increases to a full inch at the lower front panels.)
Press the seam allowances open.
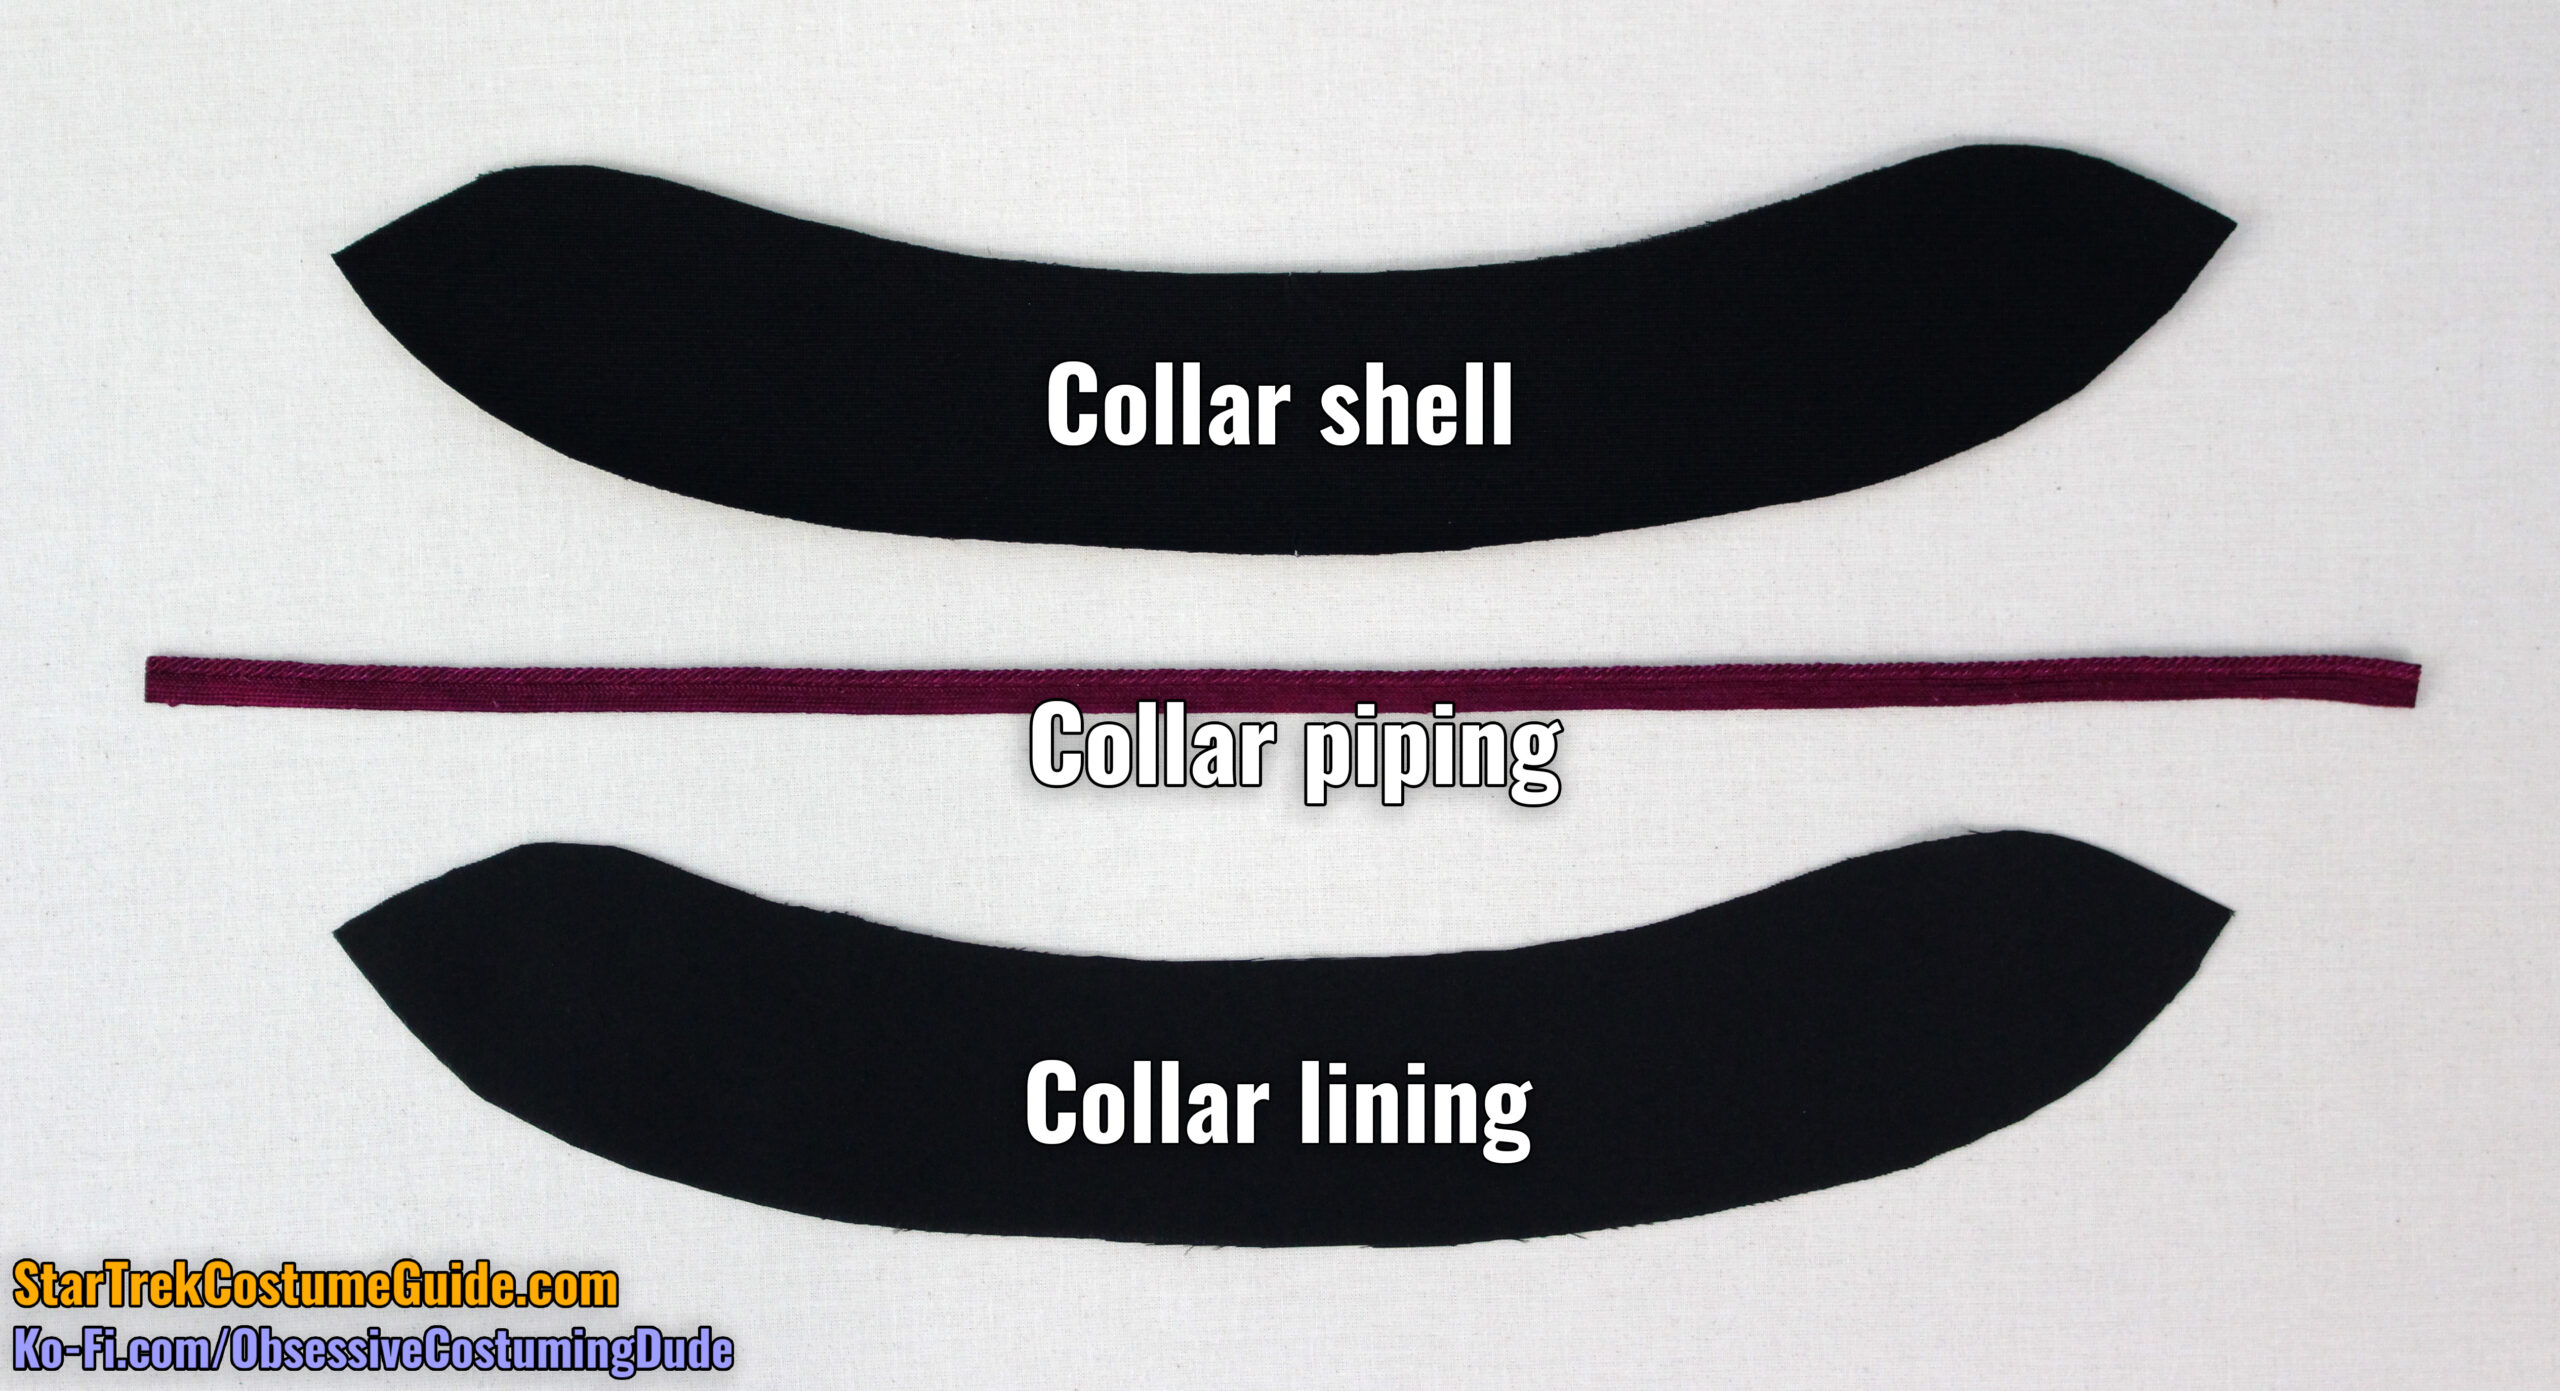
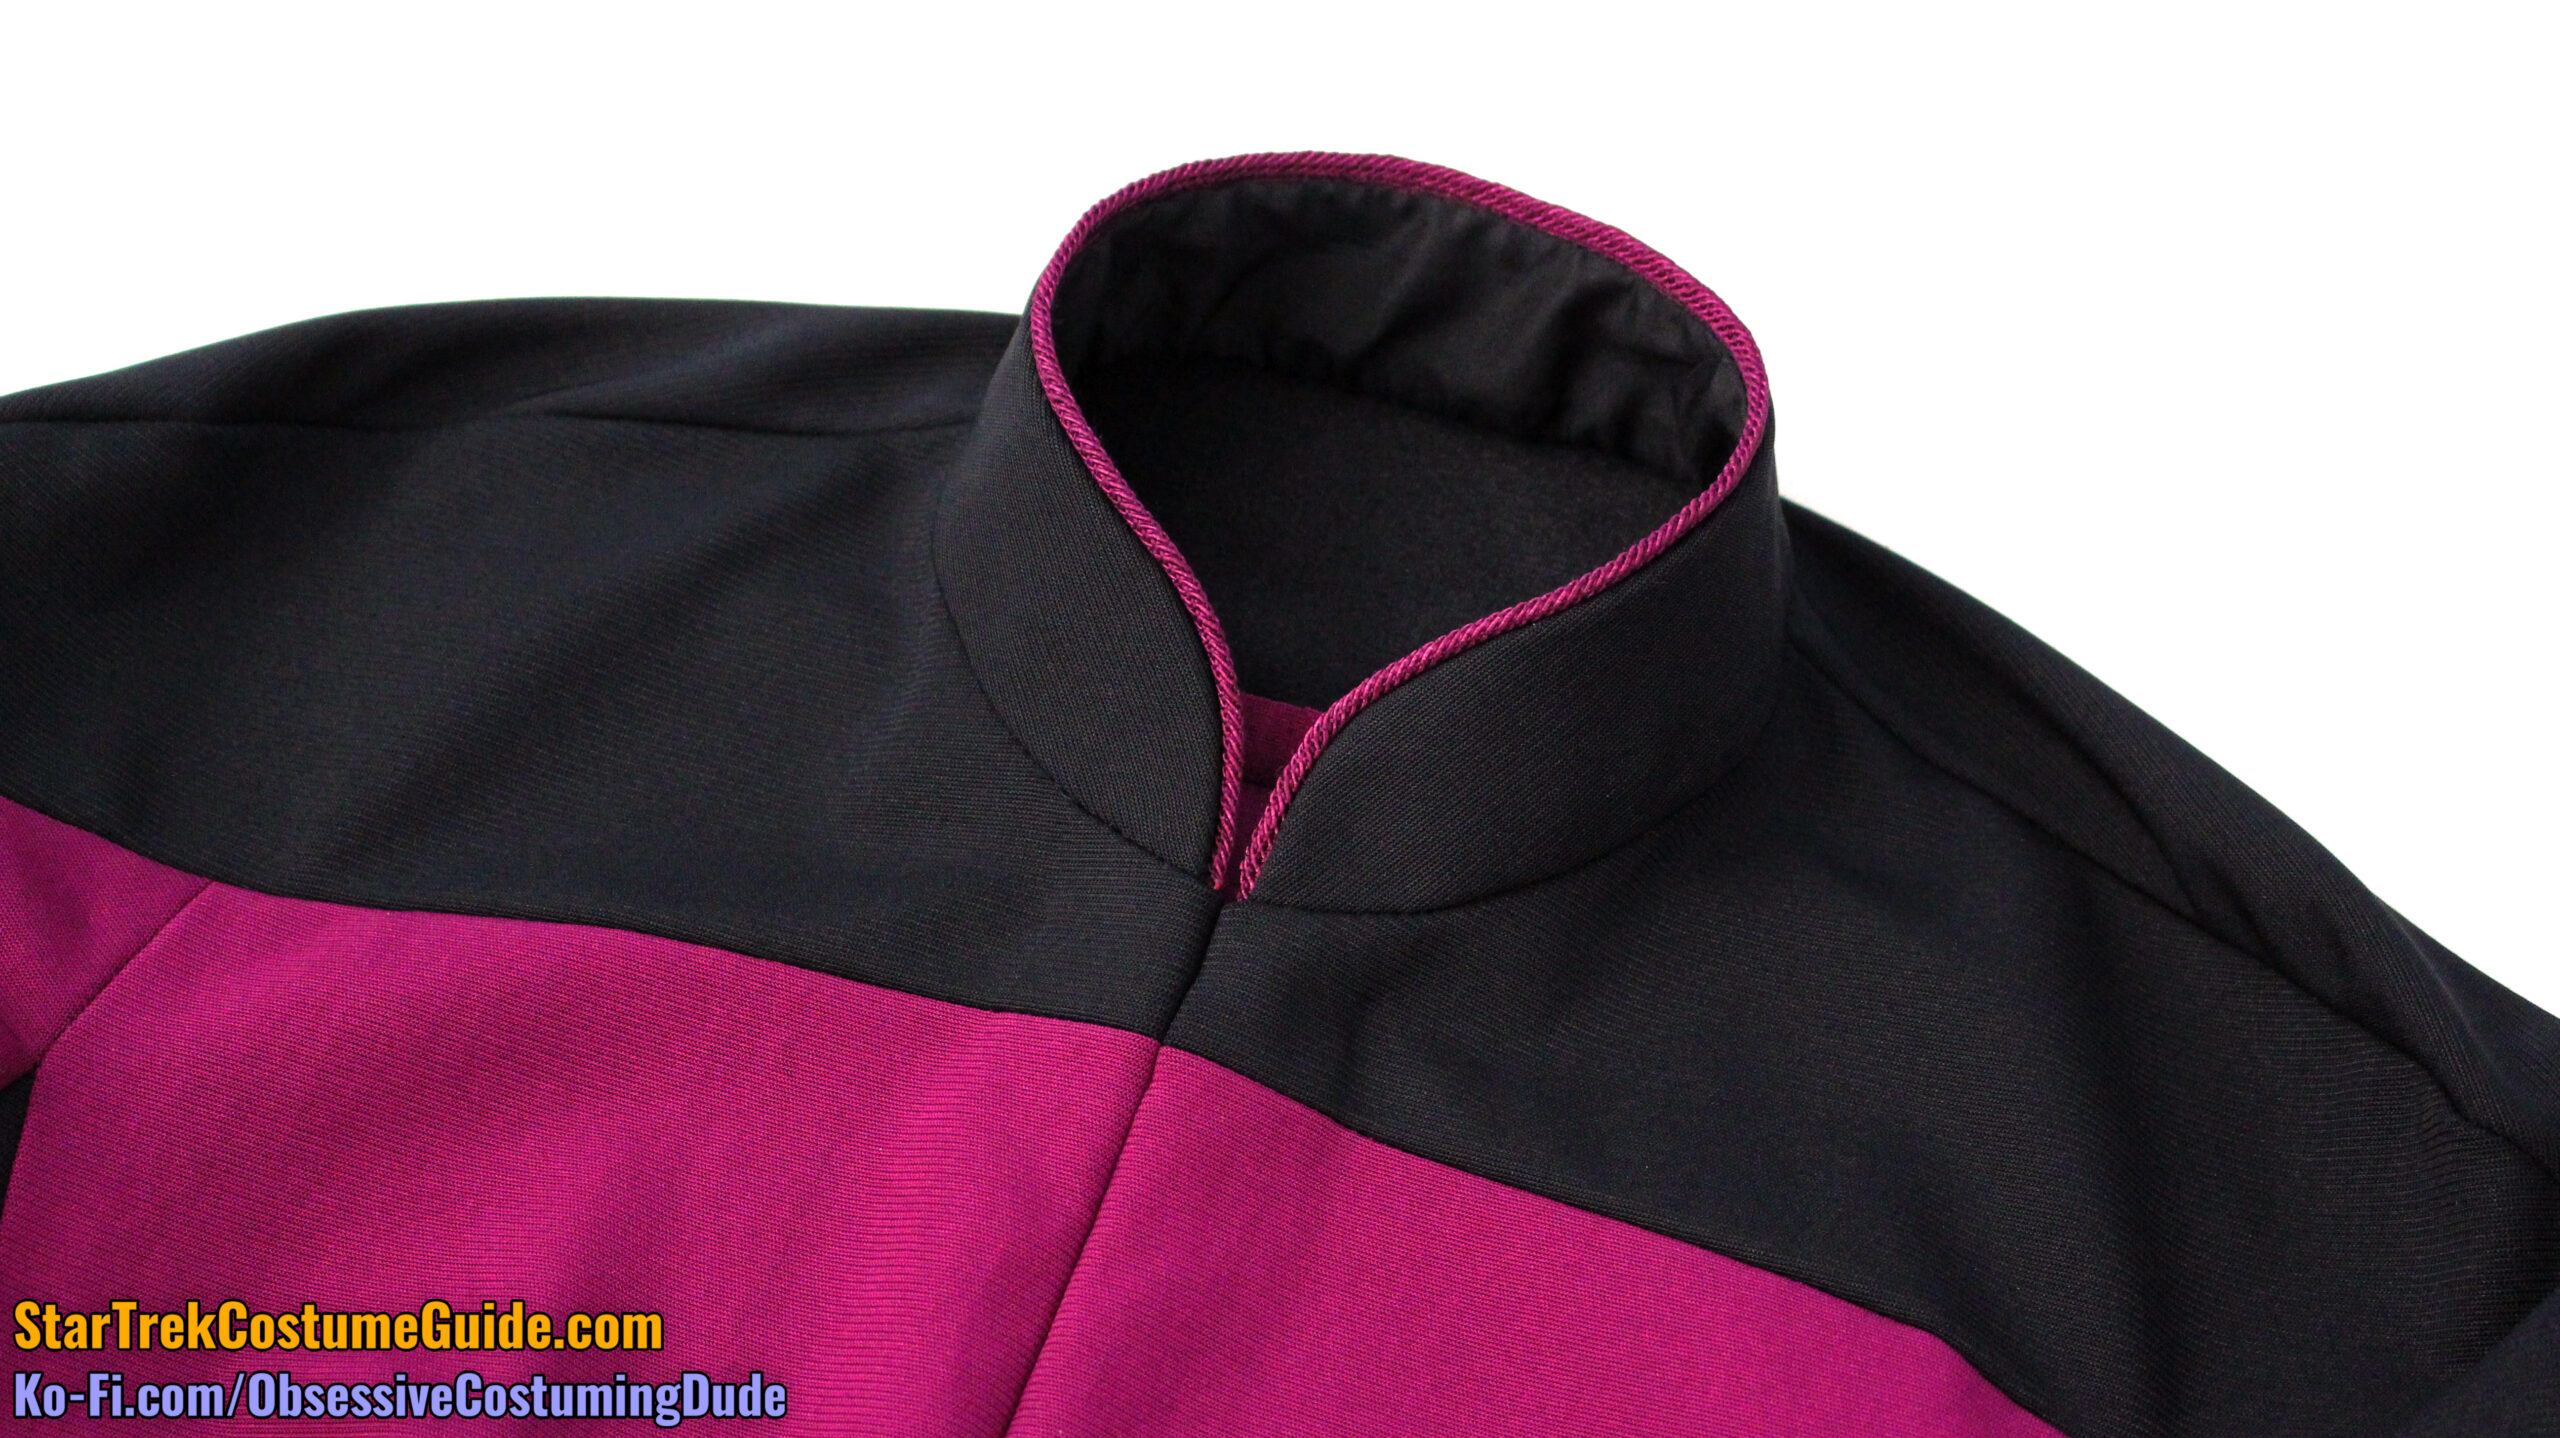
Here’s a YouTube video on how to make a front-zipping TNG jumpsuit collar:
In this case, the TNG jumpsuit collar is comprised of three layers: the collar shell (piece A1), the collar lining (also piece A1), and the division-colored collar piping.
Apply a midweight or heavyweight fusible interfacing to the underside of your collar.
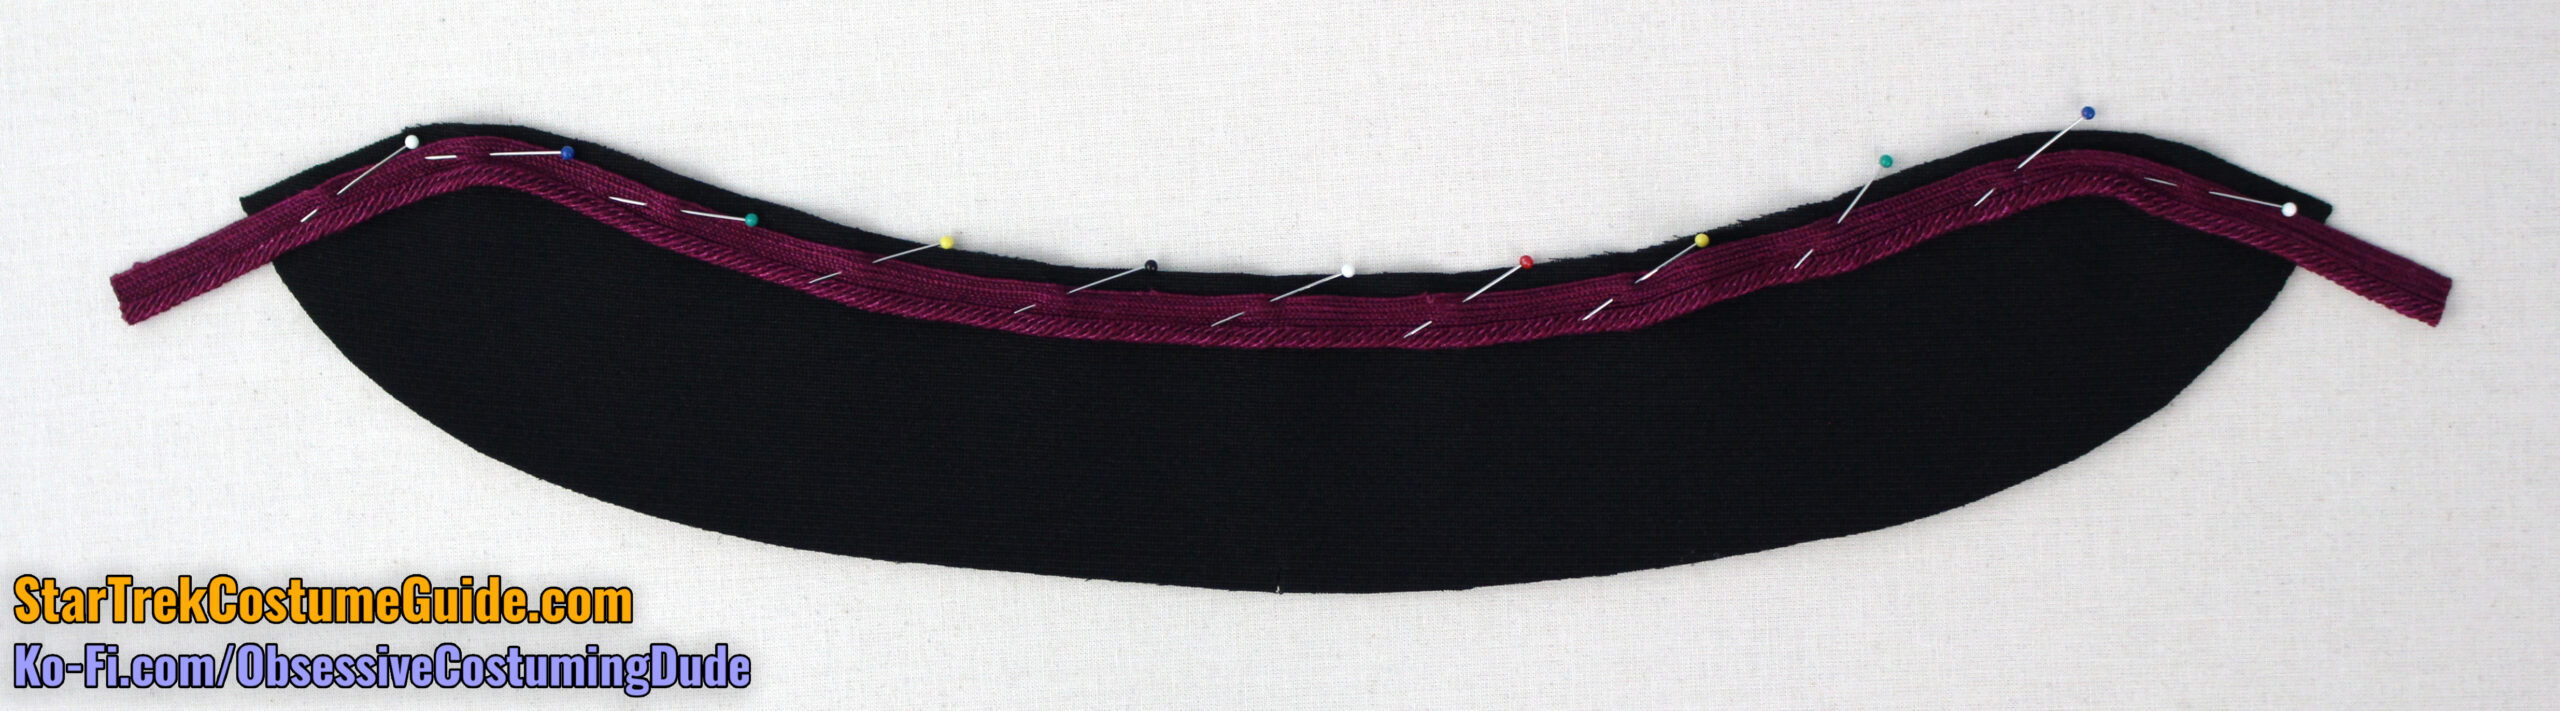
Pin the collar piping into place along the upper edge of your collar. (I suggest cutting at least a couple inches more than you’ll actually need.)
Note that the upper edge of the collar has ⅜” seam allowance, so if your piping lip is smaller than that (most piping like this has ¼” lip), the piping will be need to be inset a bit so the edge of the cord is exactly along the seam line.
Using a zipper/piping foot, sew the piping to the upper edge of the collar with ⅜” seam allowance.
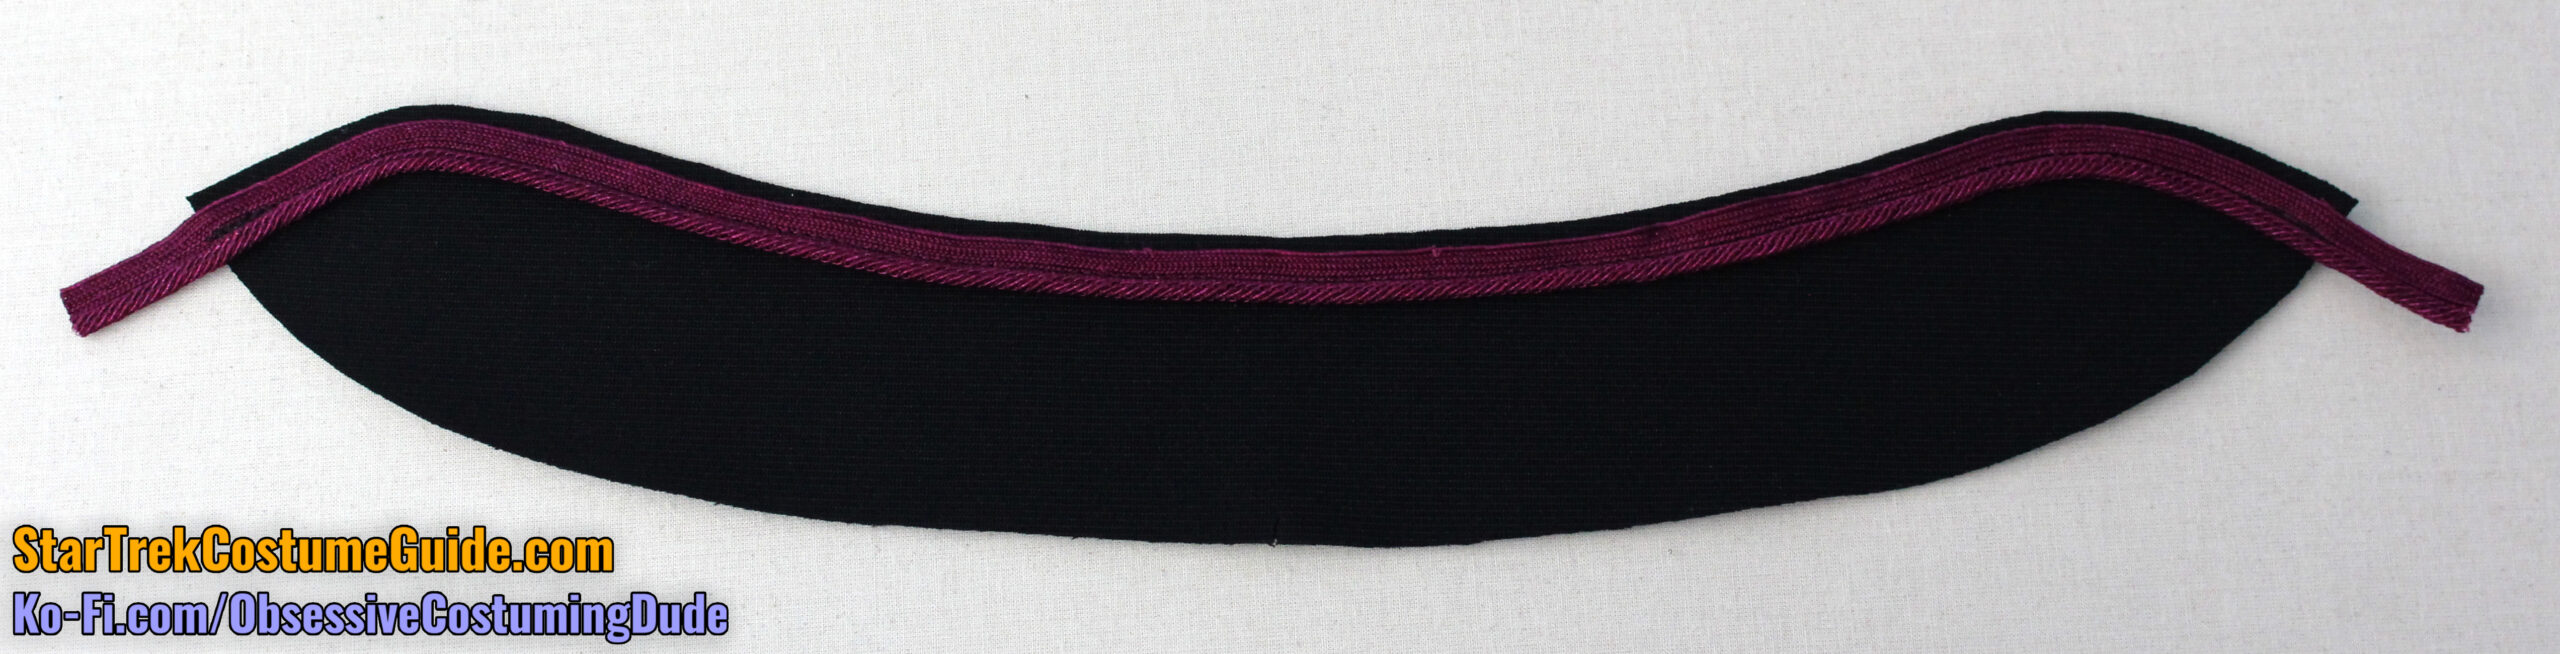
Trim away the excess length at the front edges and carefully apply some liquid fray preventer. (You don’t want to use so much that it seeps up the piping past the lower seam line.)
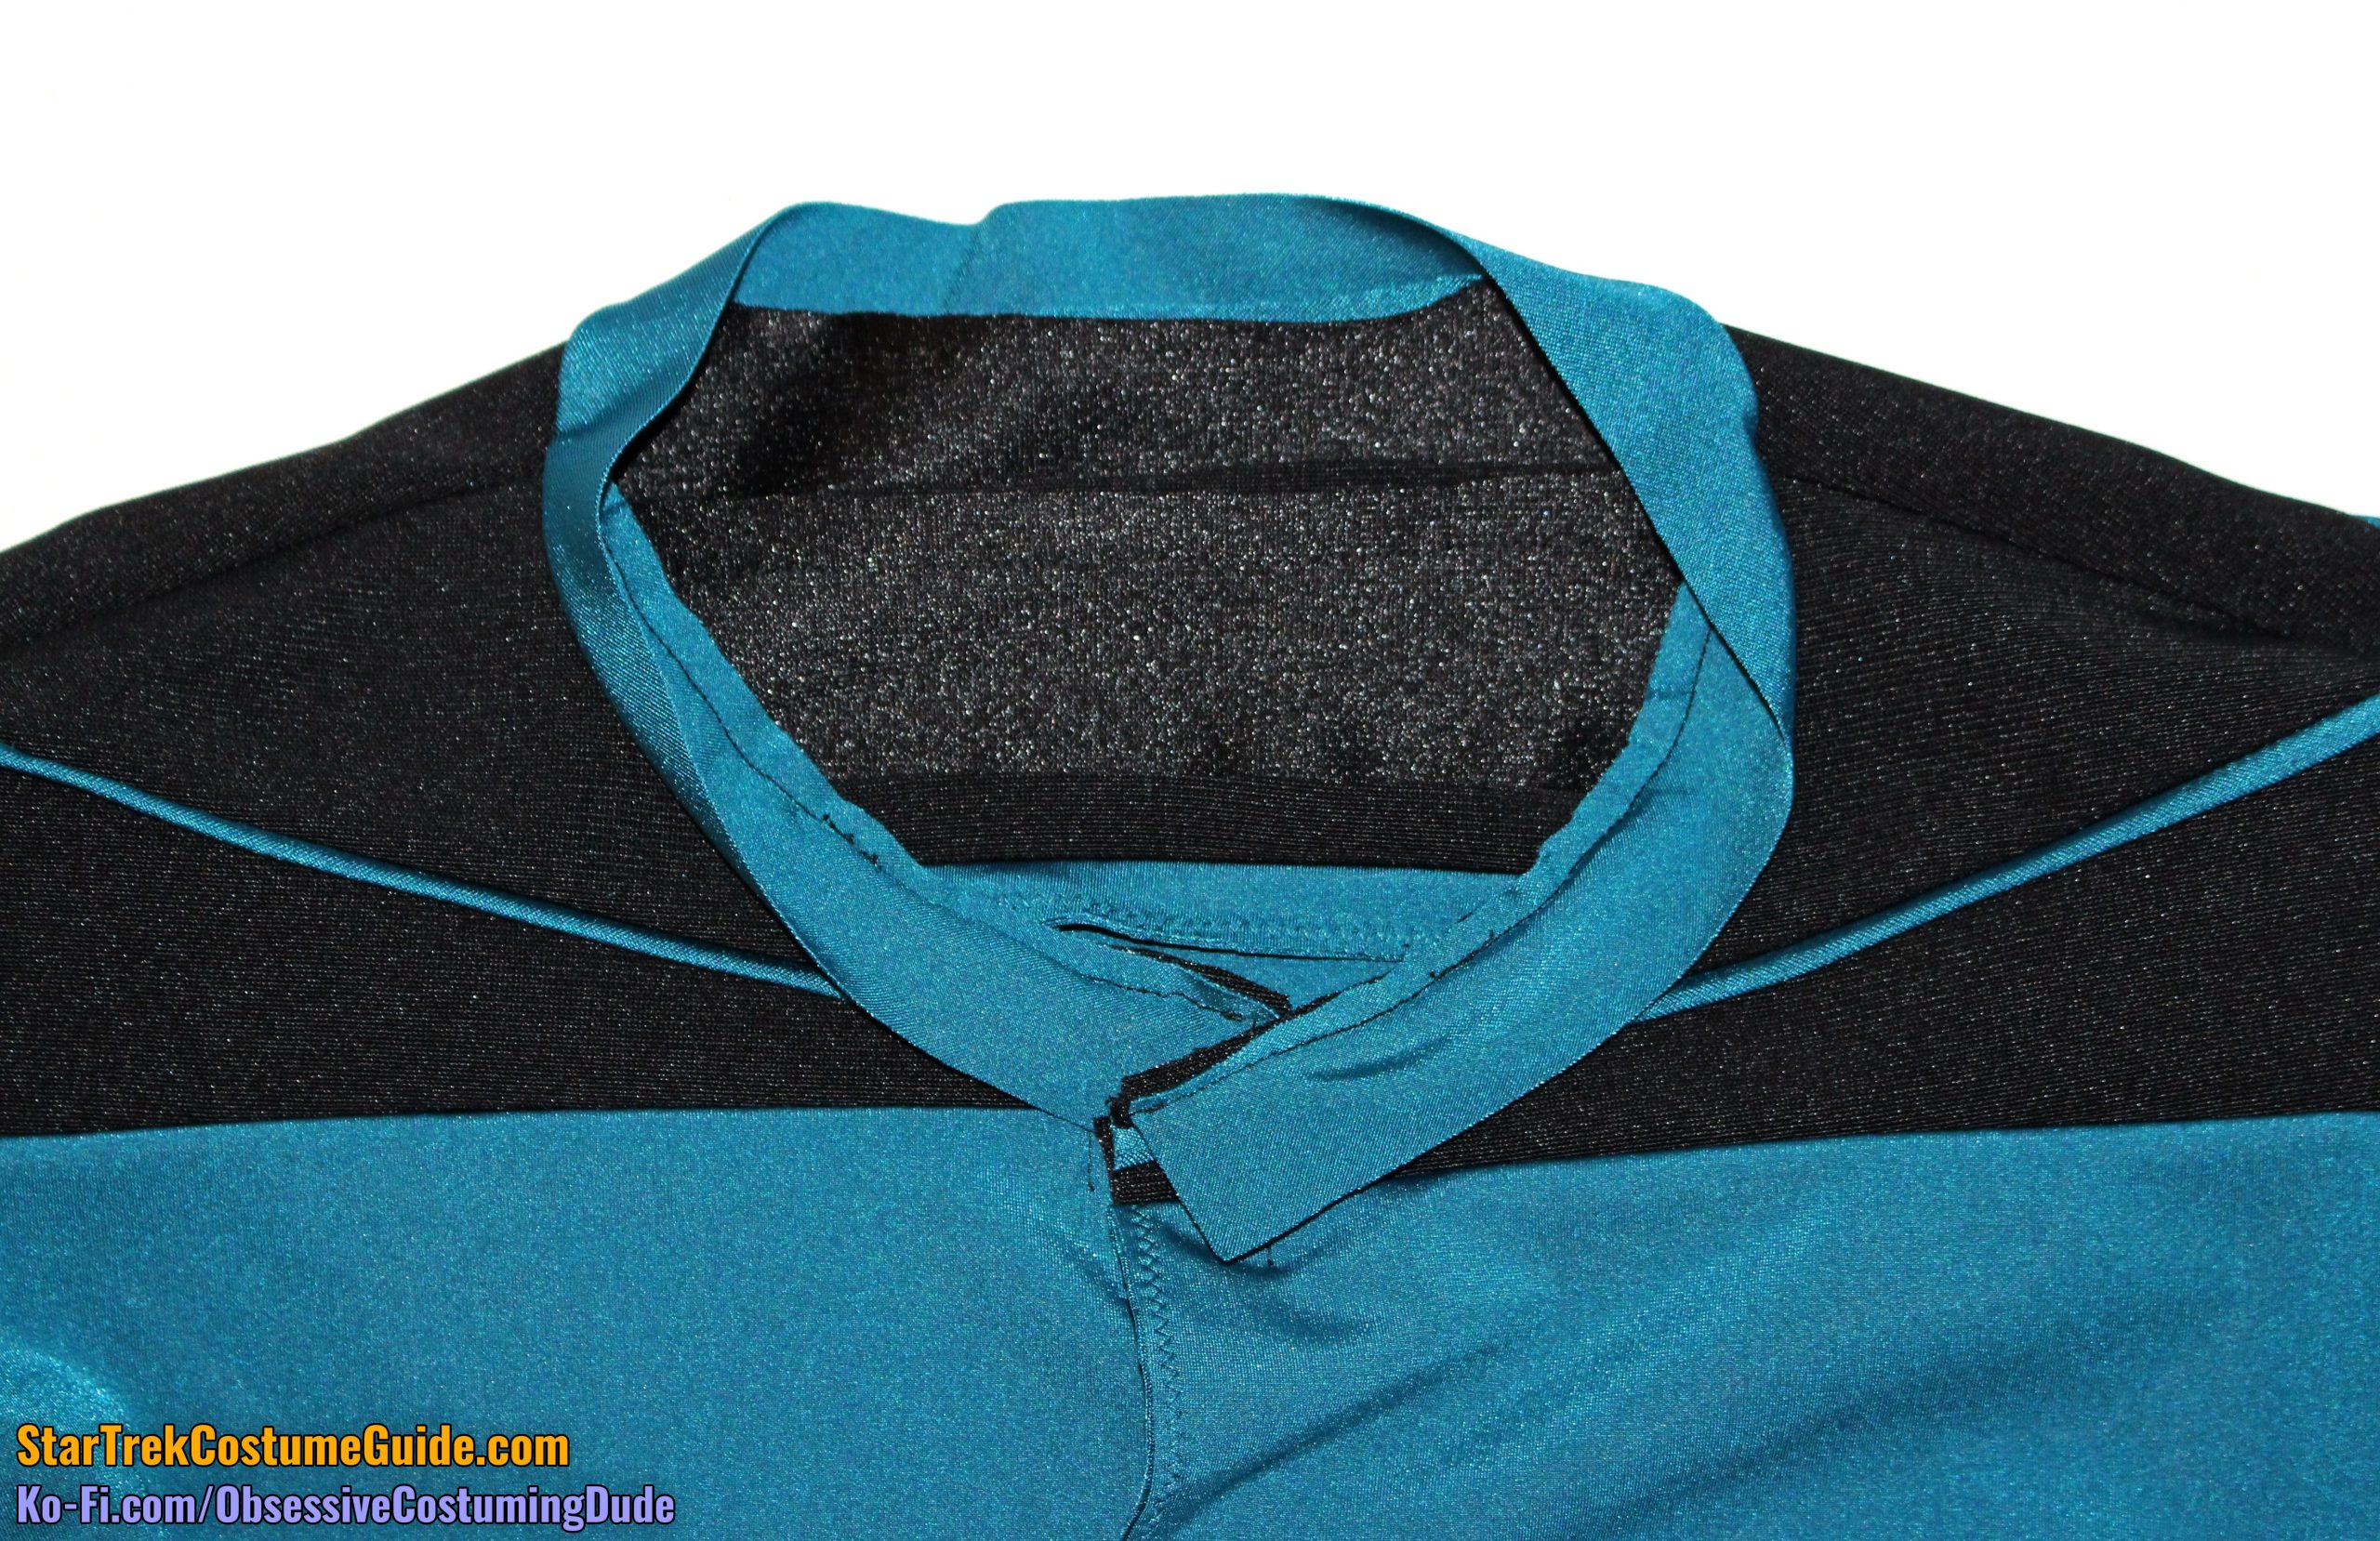
Stay-stitch the jumpsuit neckline ¼” from the edge.
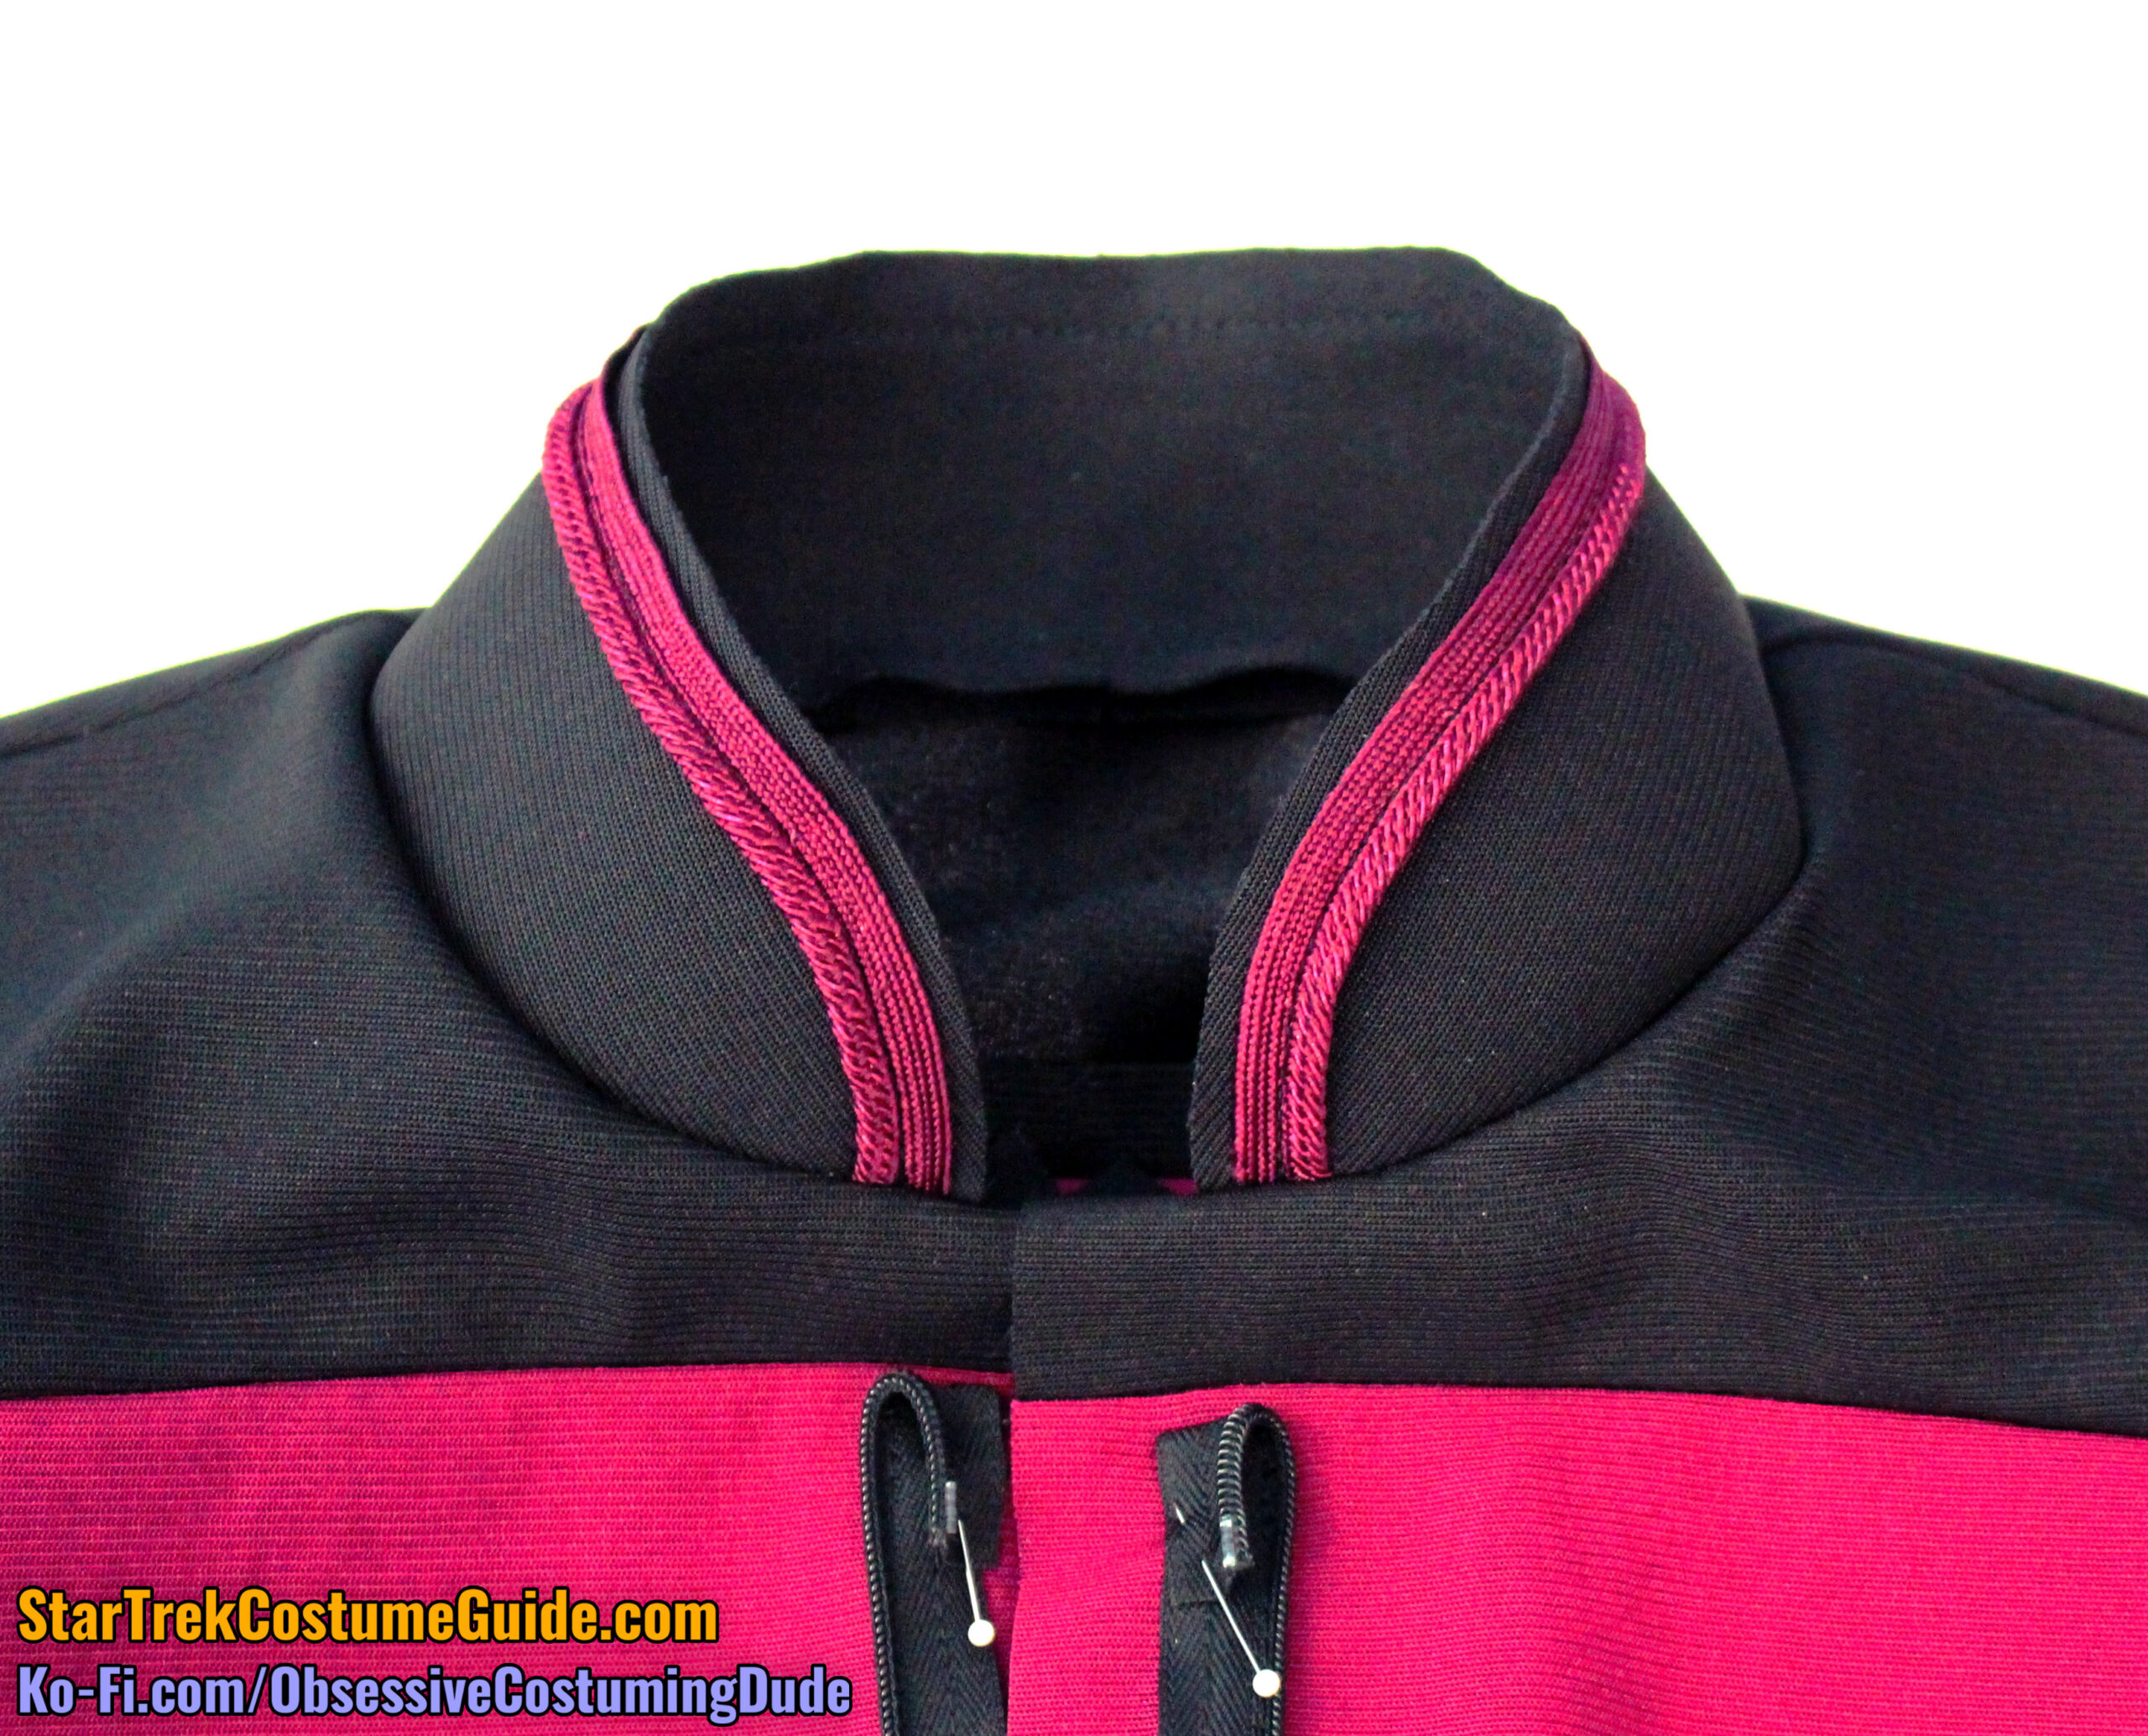
Position the collar onto the jumpsuit neckline, matching center backs and shoulders, and with the piping cord just outside the center front (so the piping stitch line is 1” from the center front).
Pin the collar into place as described.
Baste the collar to the jumpsuit neckline with ⅜” seam allowance.
Check to make sure the collar is properly basted, with no pleats, tucks, pulls, etc.
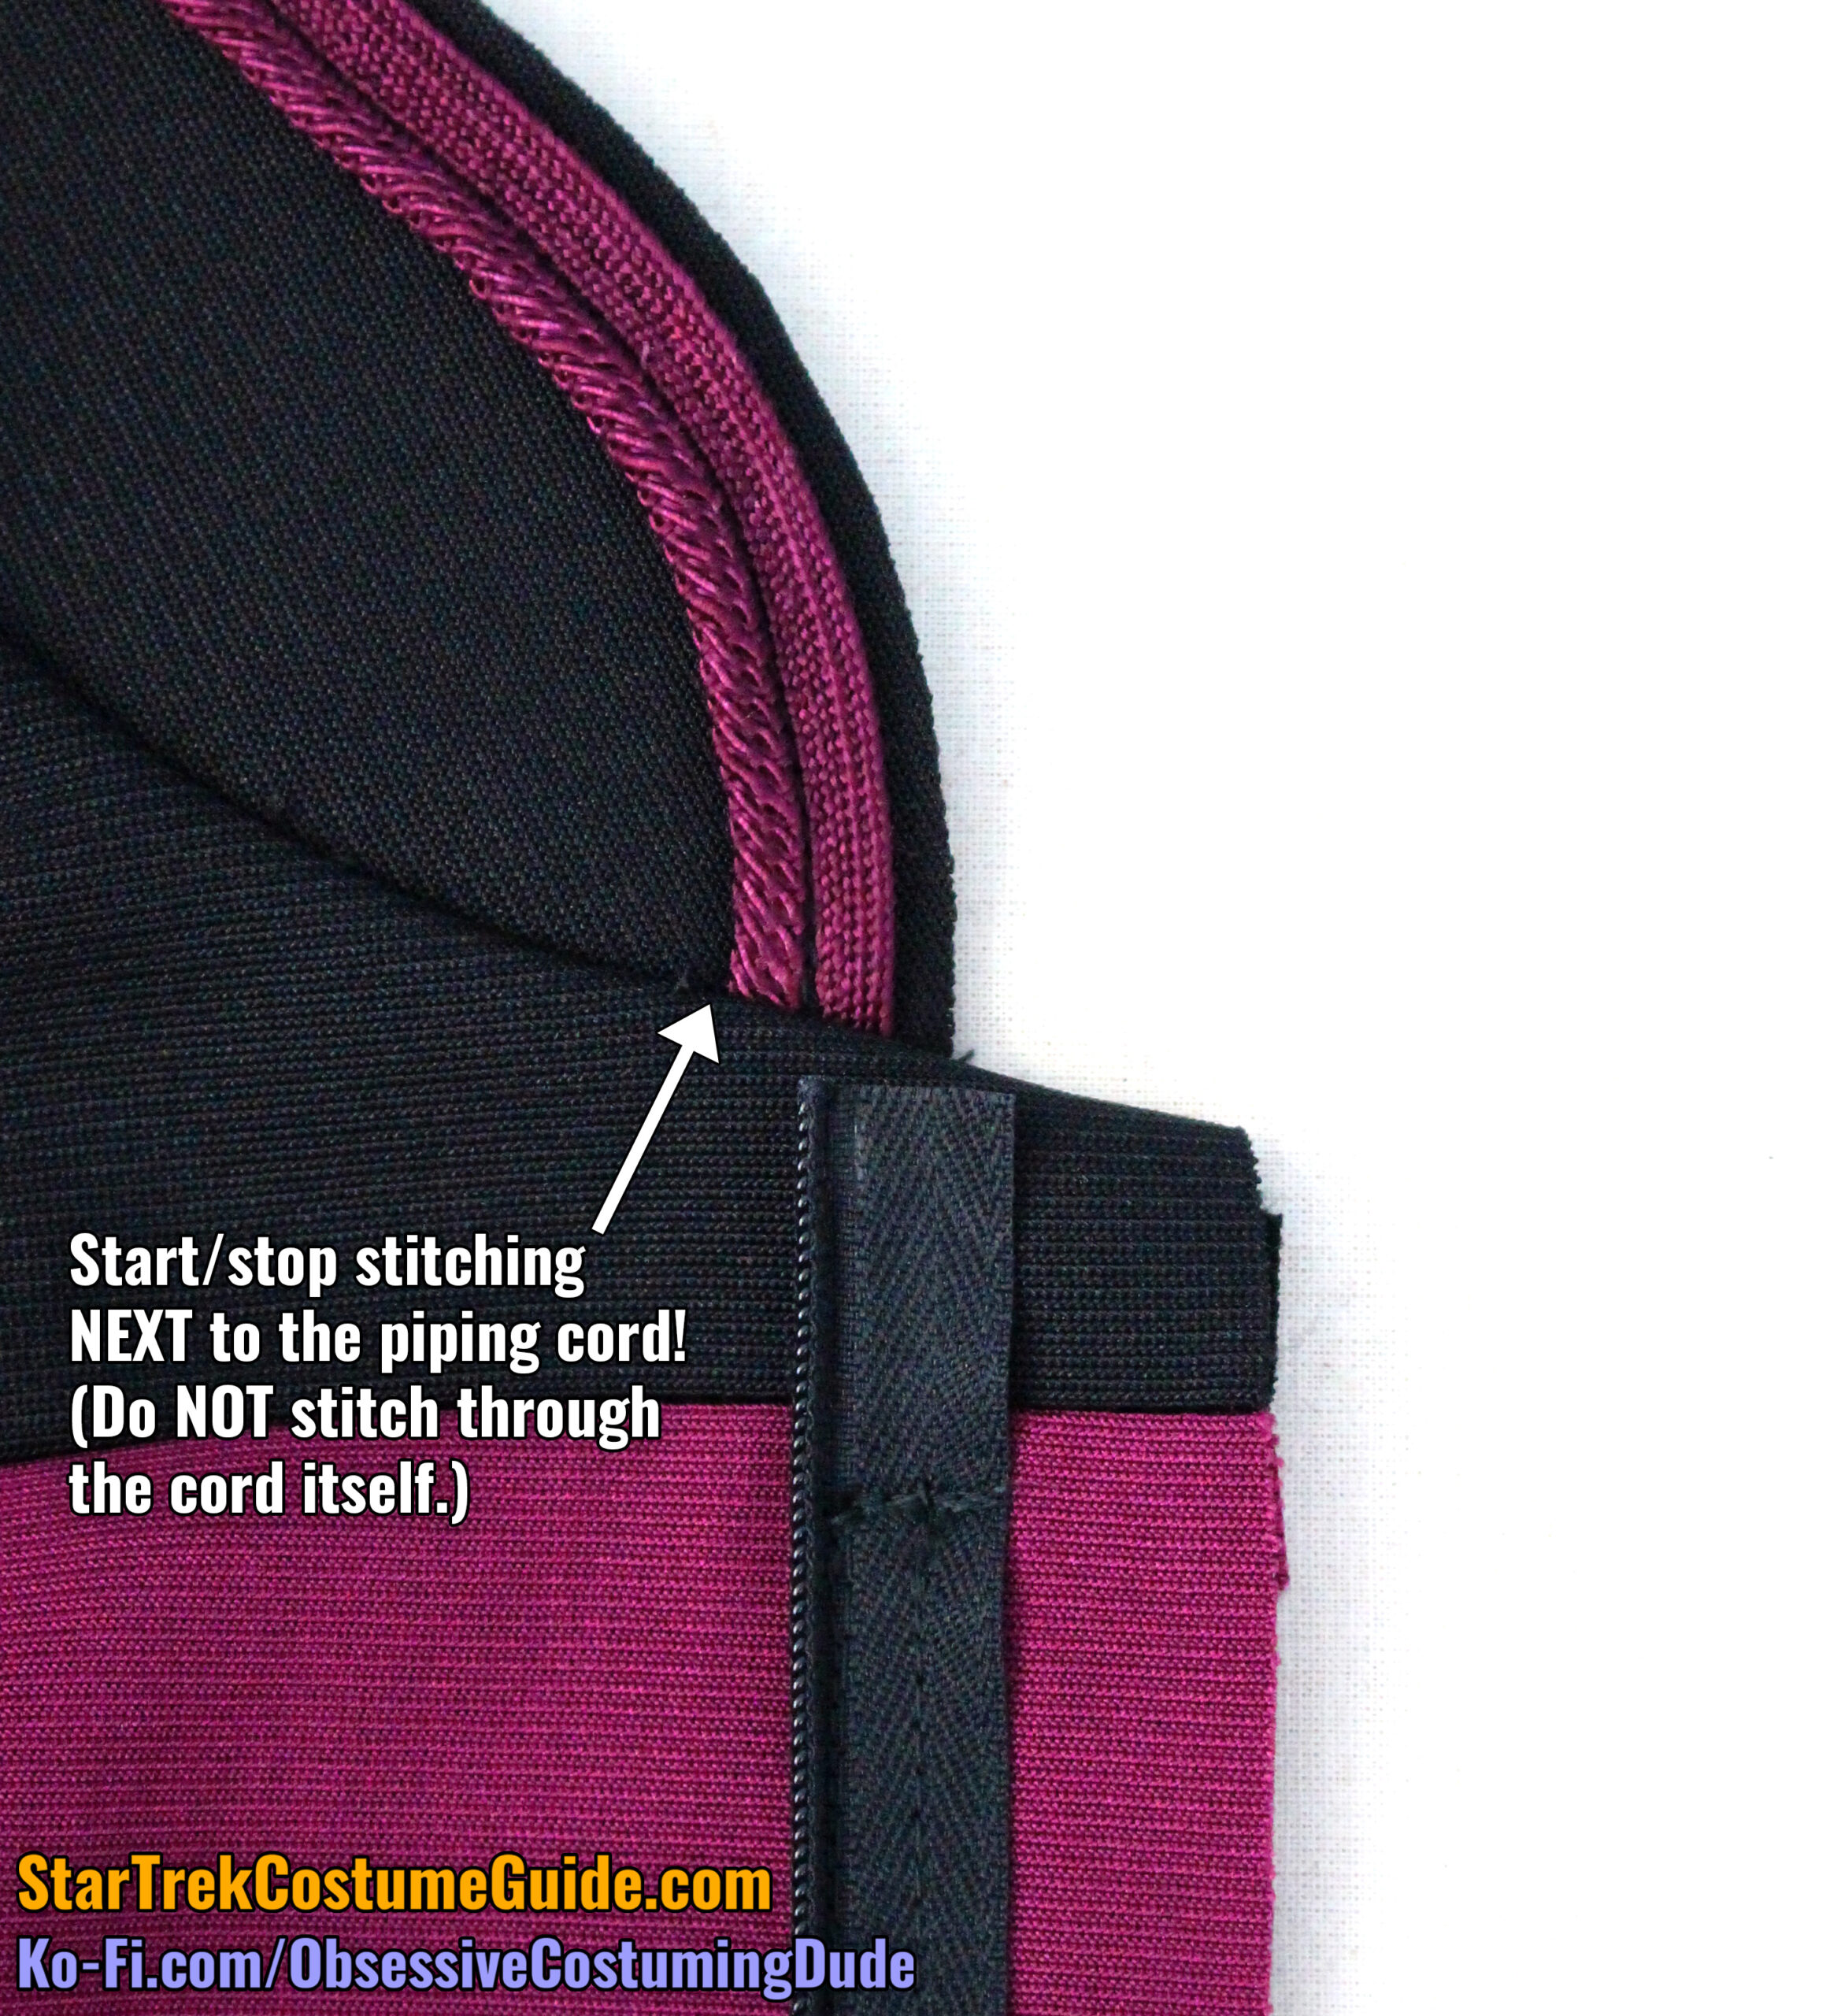
Once satisfied with the collar’s state, sew the collar to the jumpsuit with ⅜” seam allowance, beginning and ending your stitching next to the piping cord (but not stitching through the cord itself).
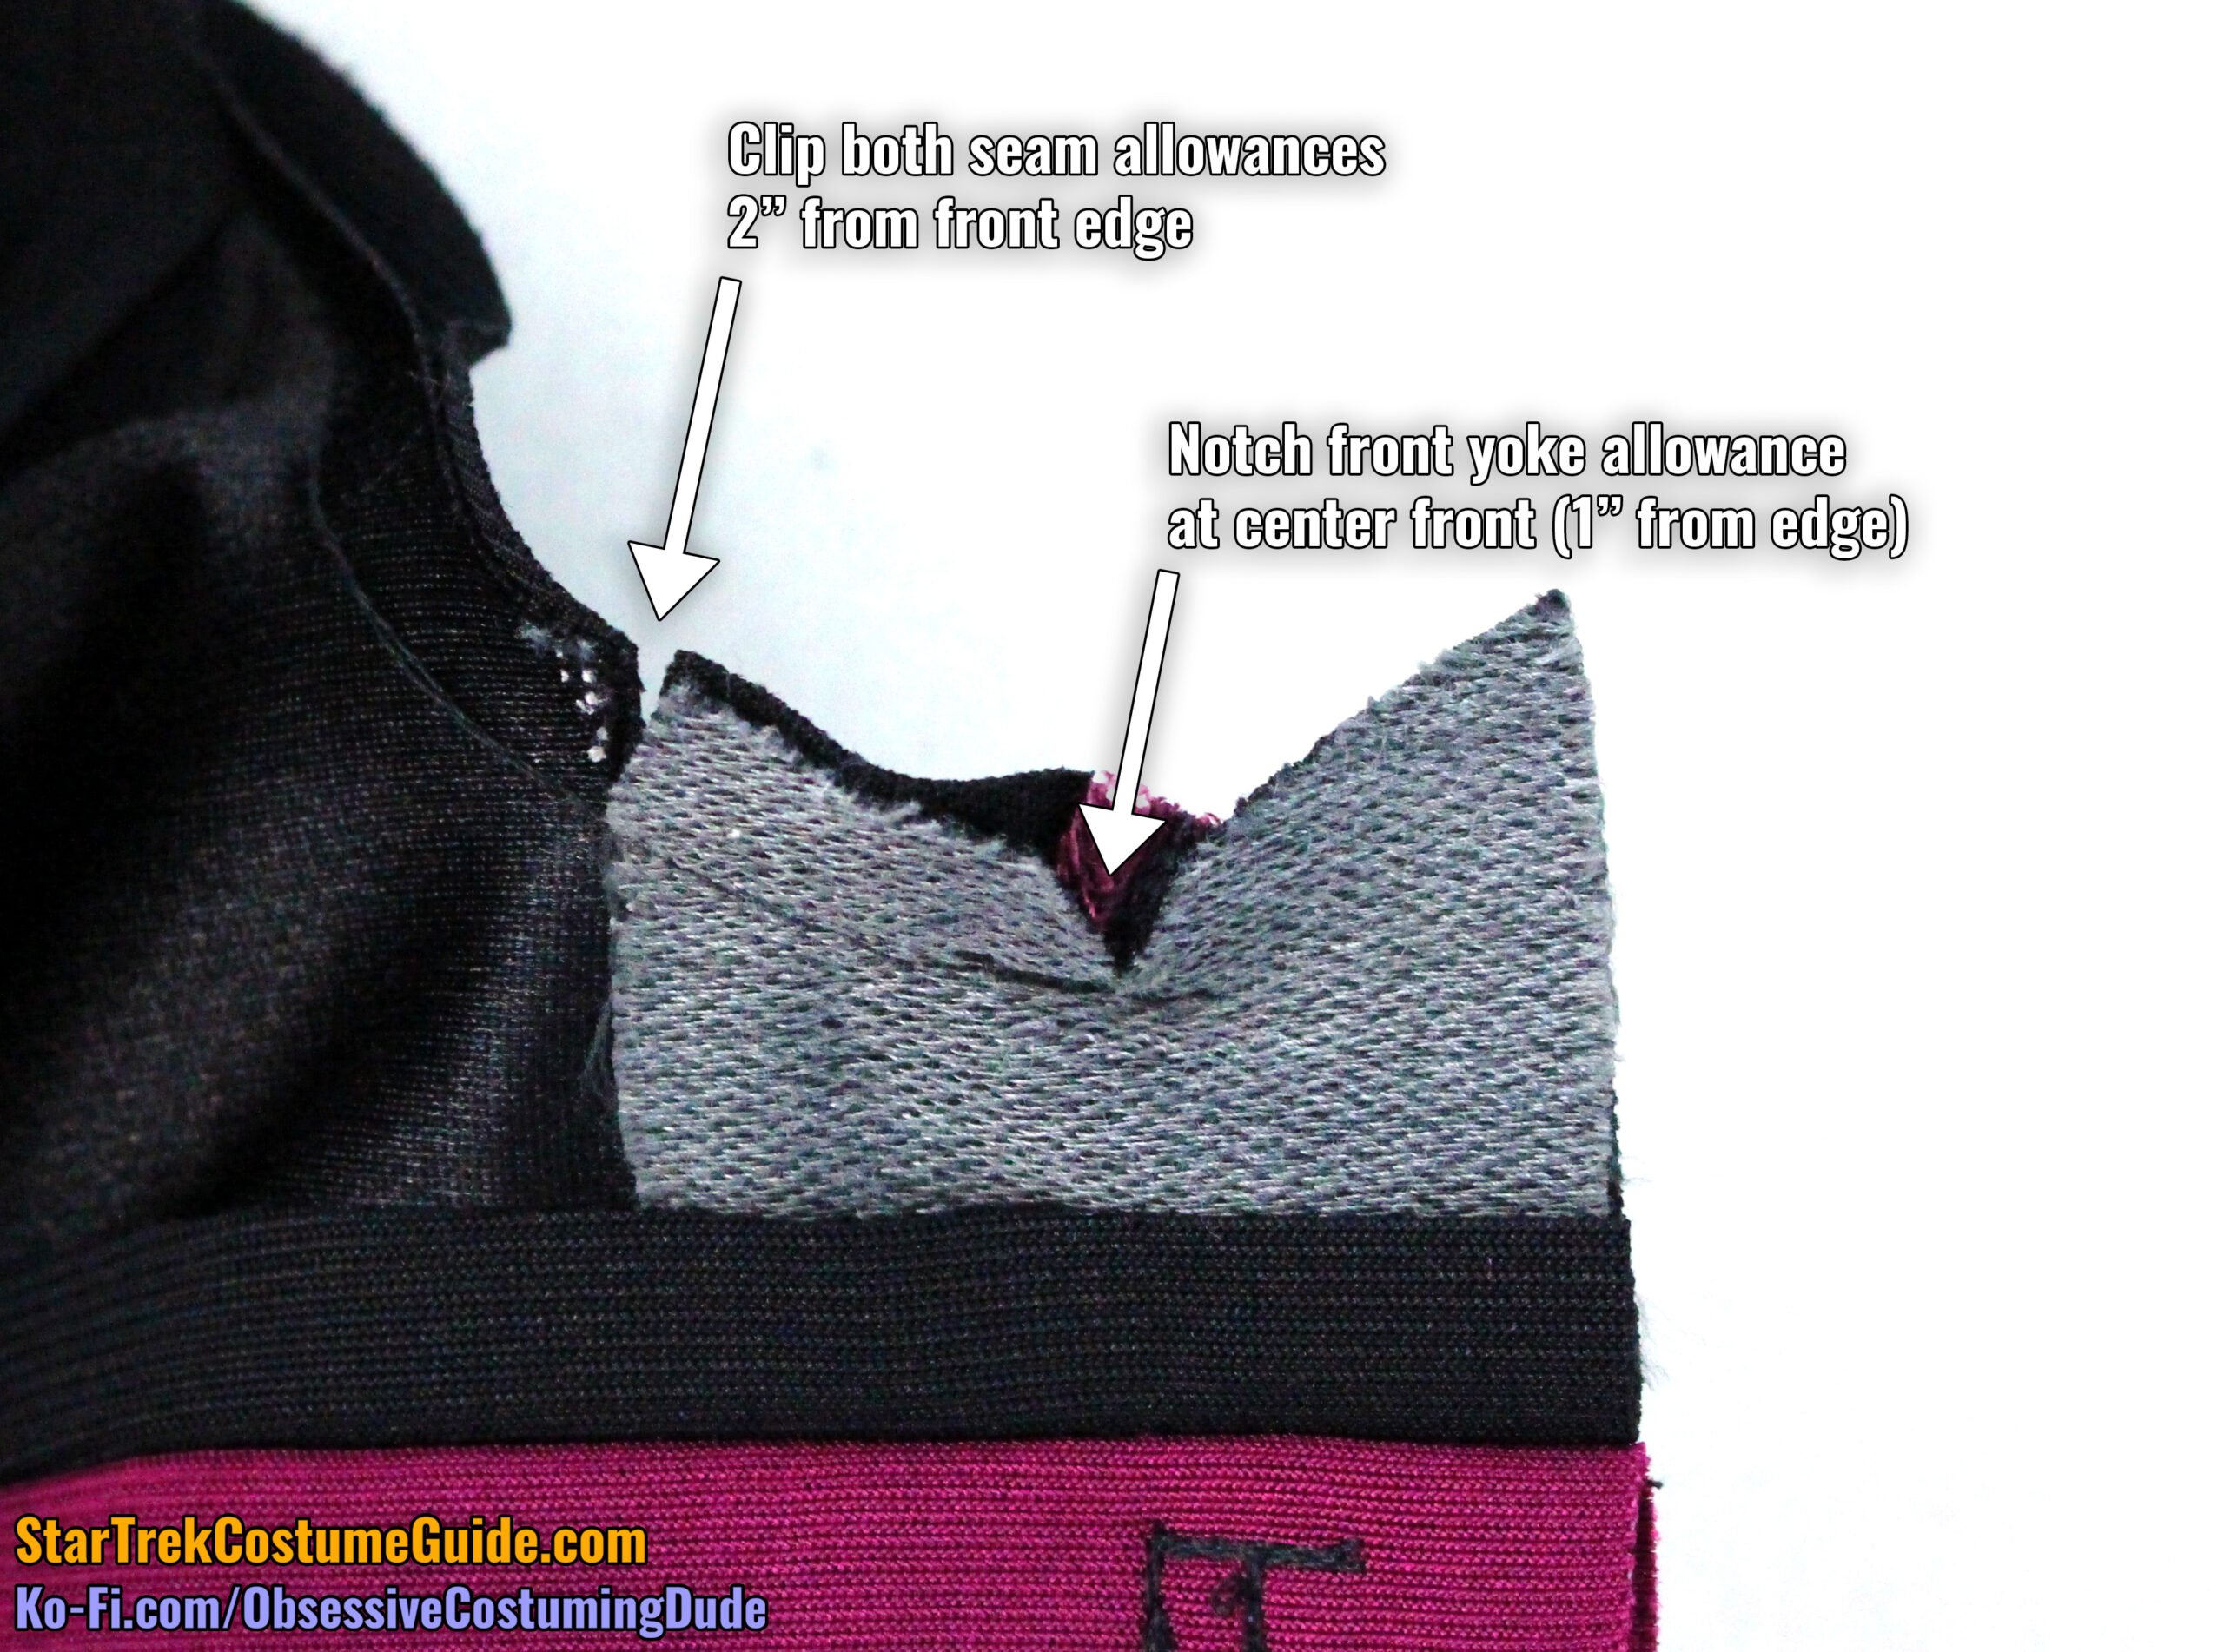
Notch the front yoke allowance at the center front (1” from the edge).
Clip both the front yoke and collar seam allowances 2” from the front edge.
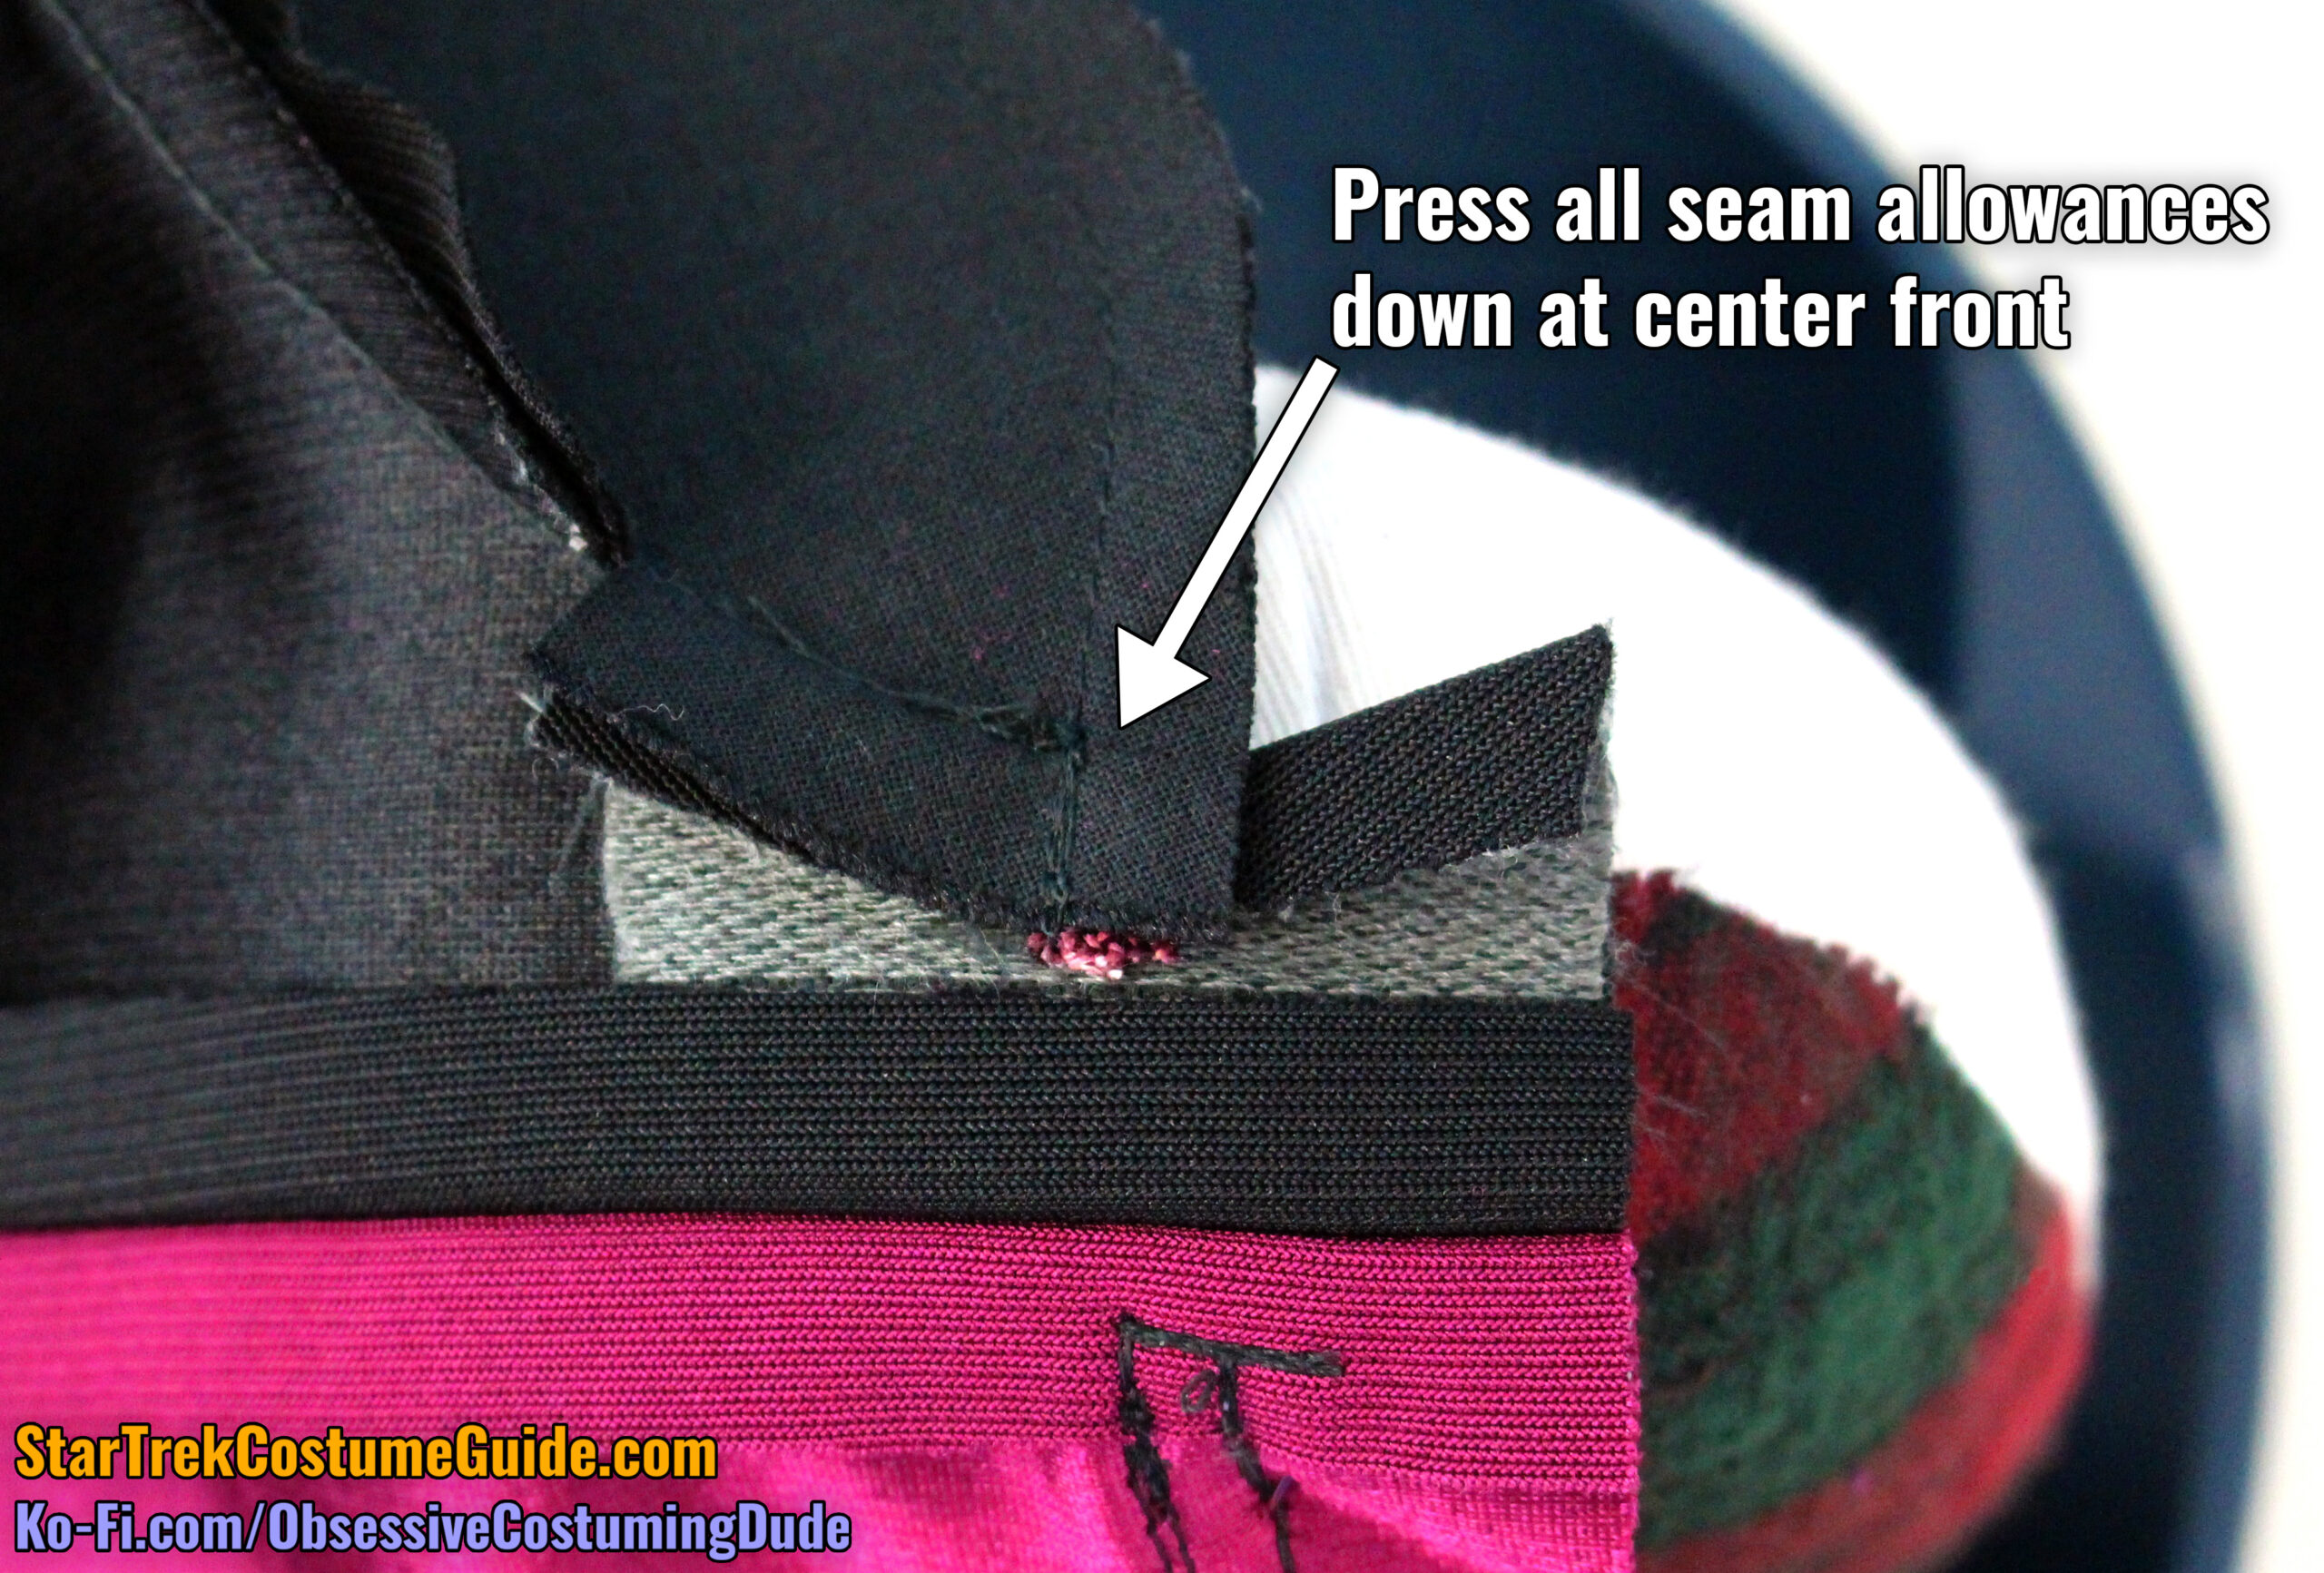
Press all seam allowances downward (toward the yoke) at the center front, then press the allowances upward (into the collar) around the remainder of the neckline.
Press the ⅜” lower (neckline) allowances upward on your collar lining.
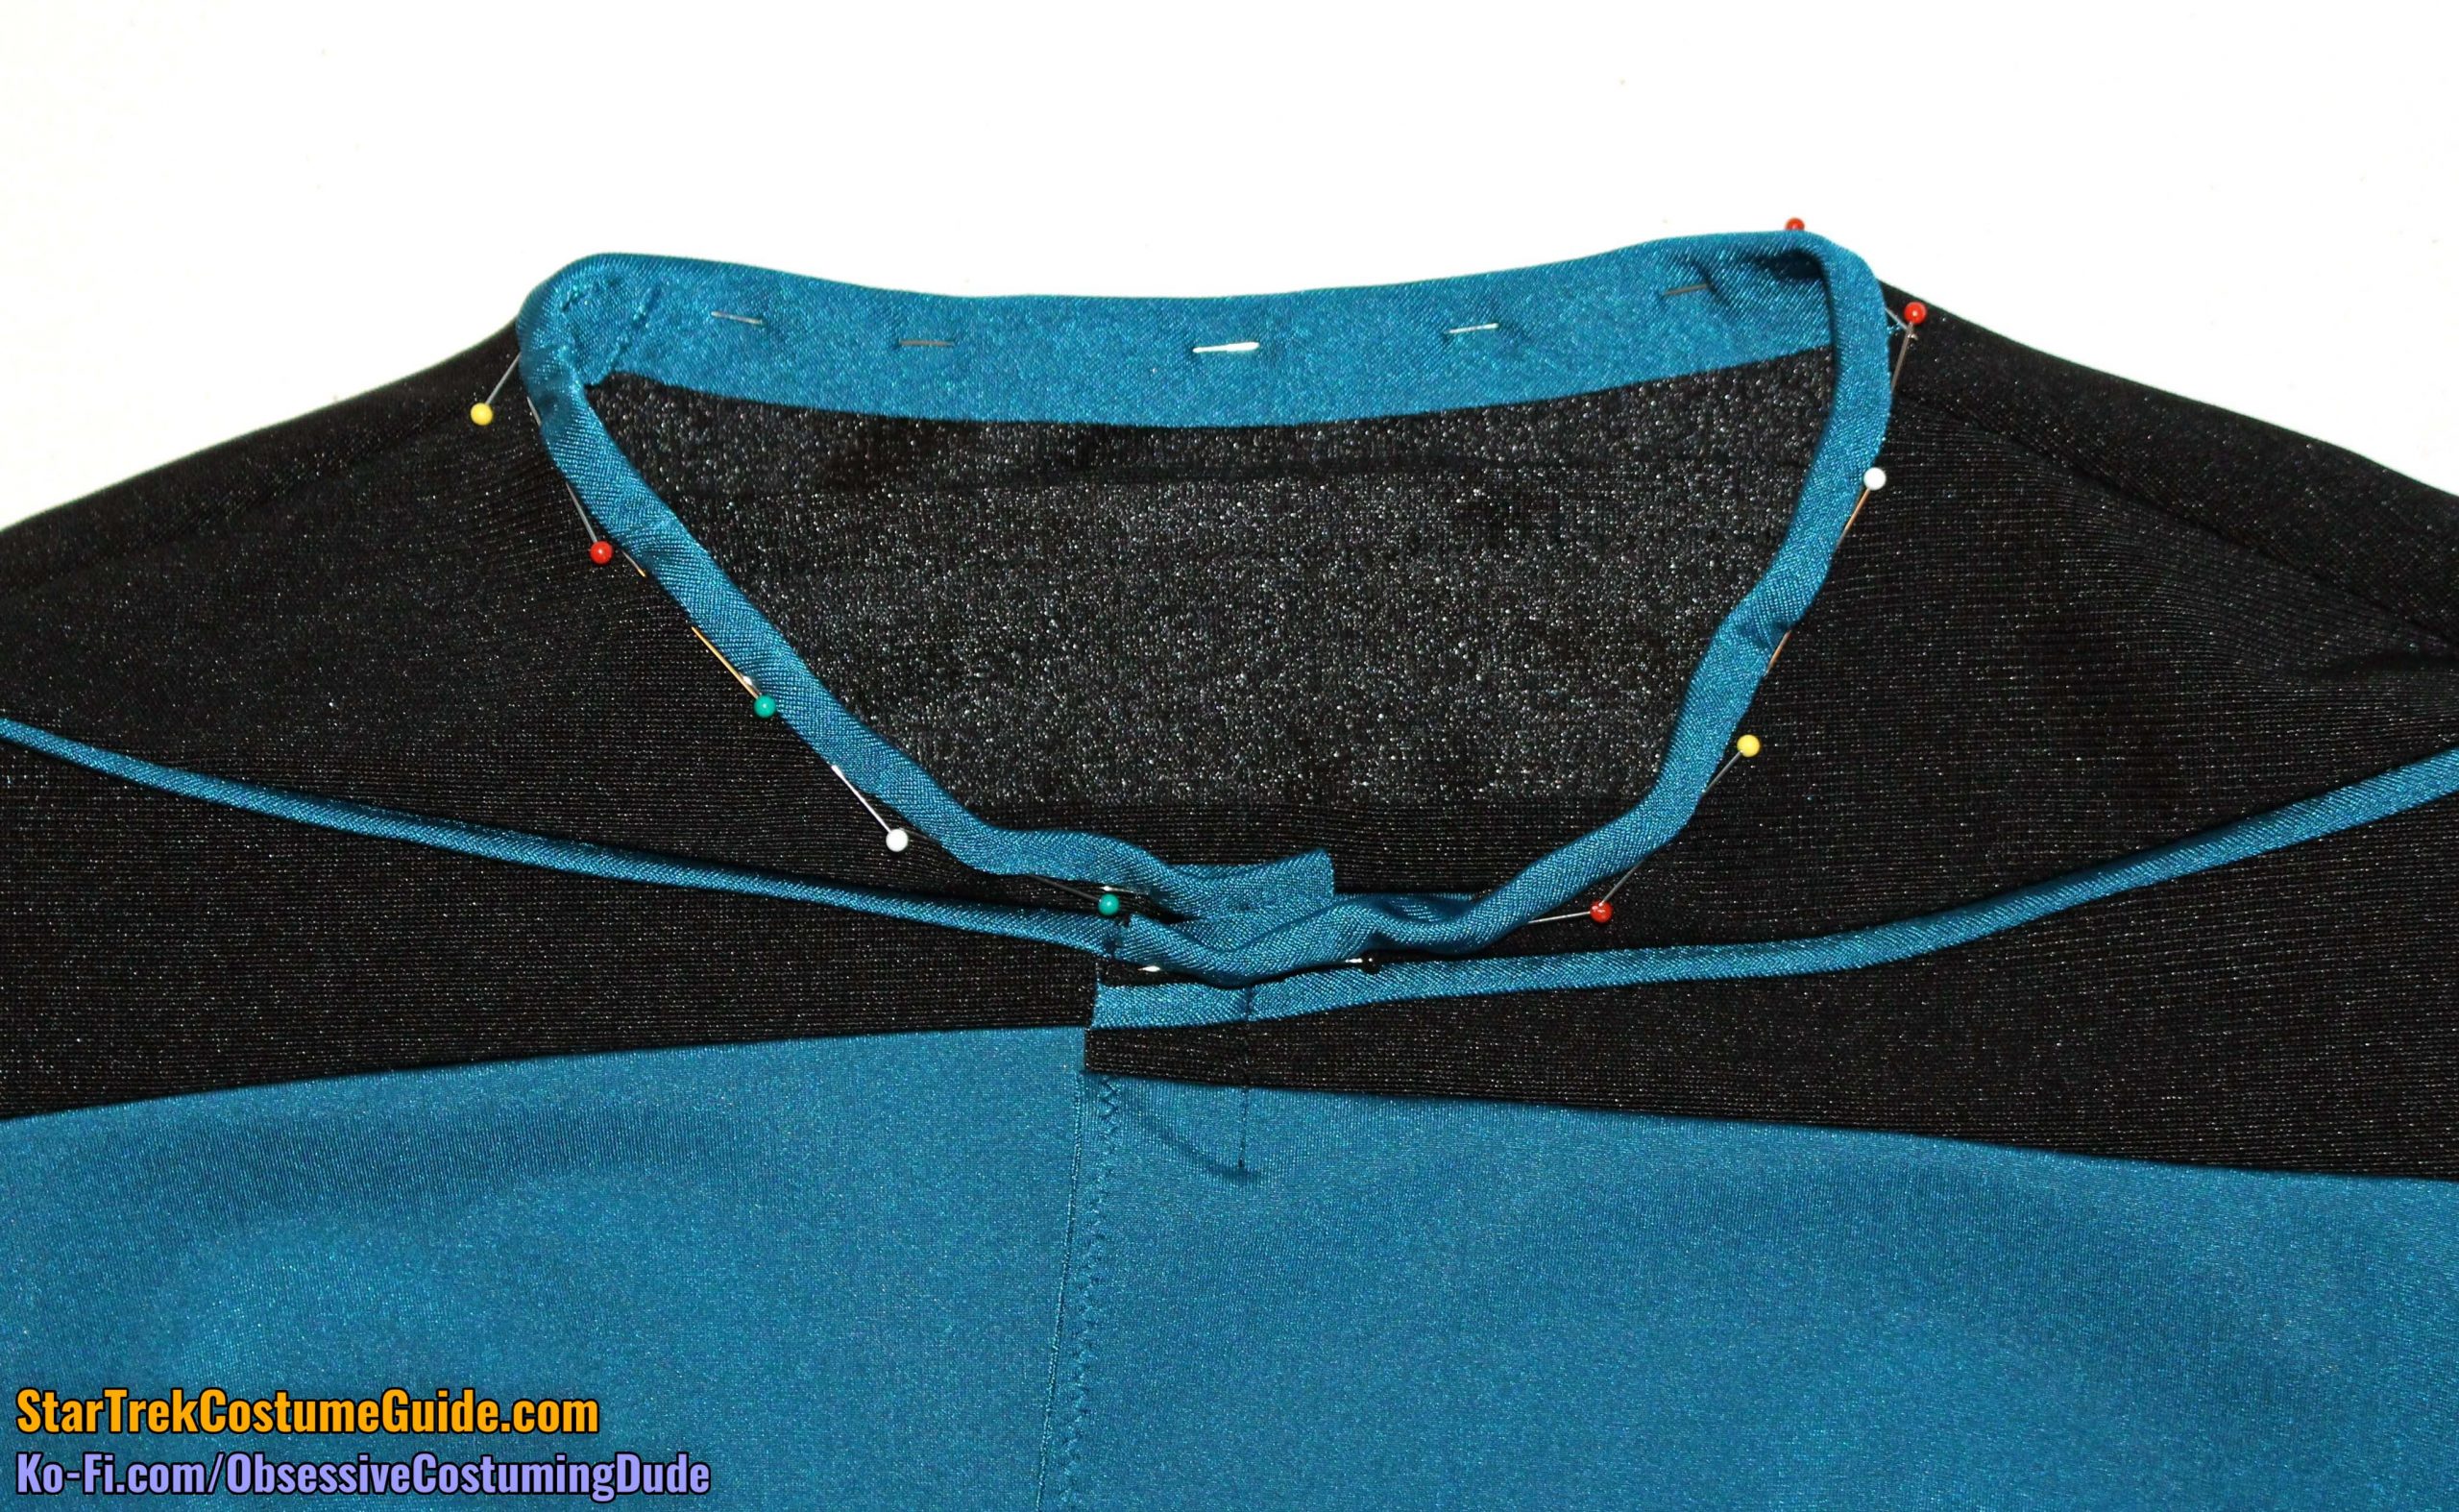
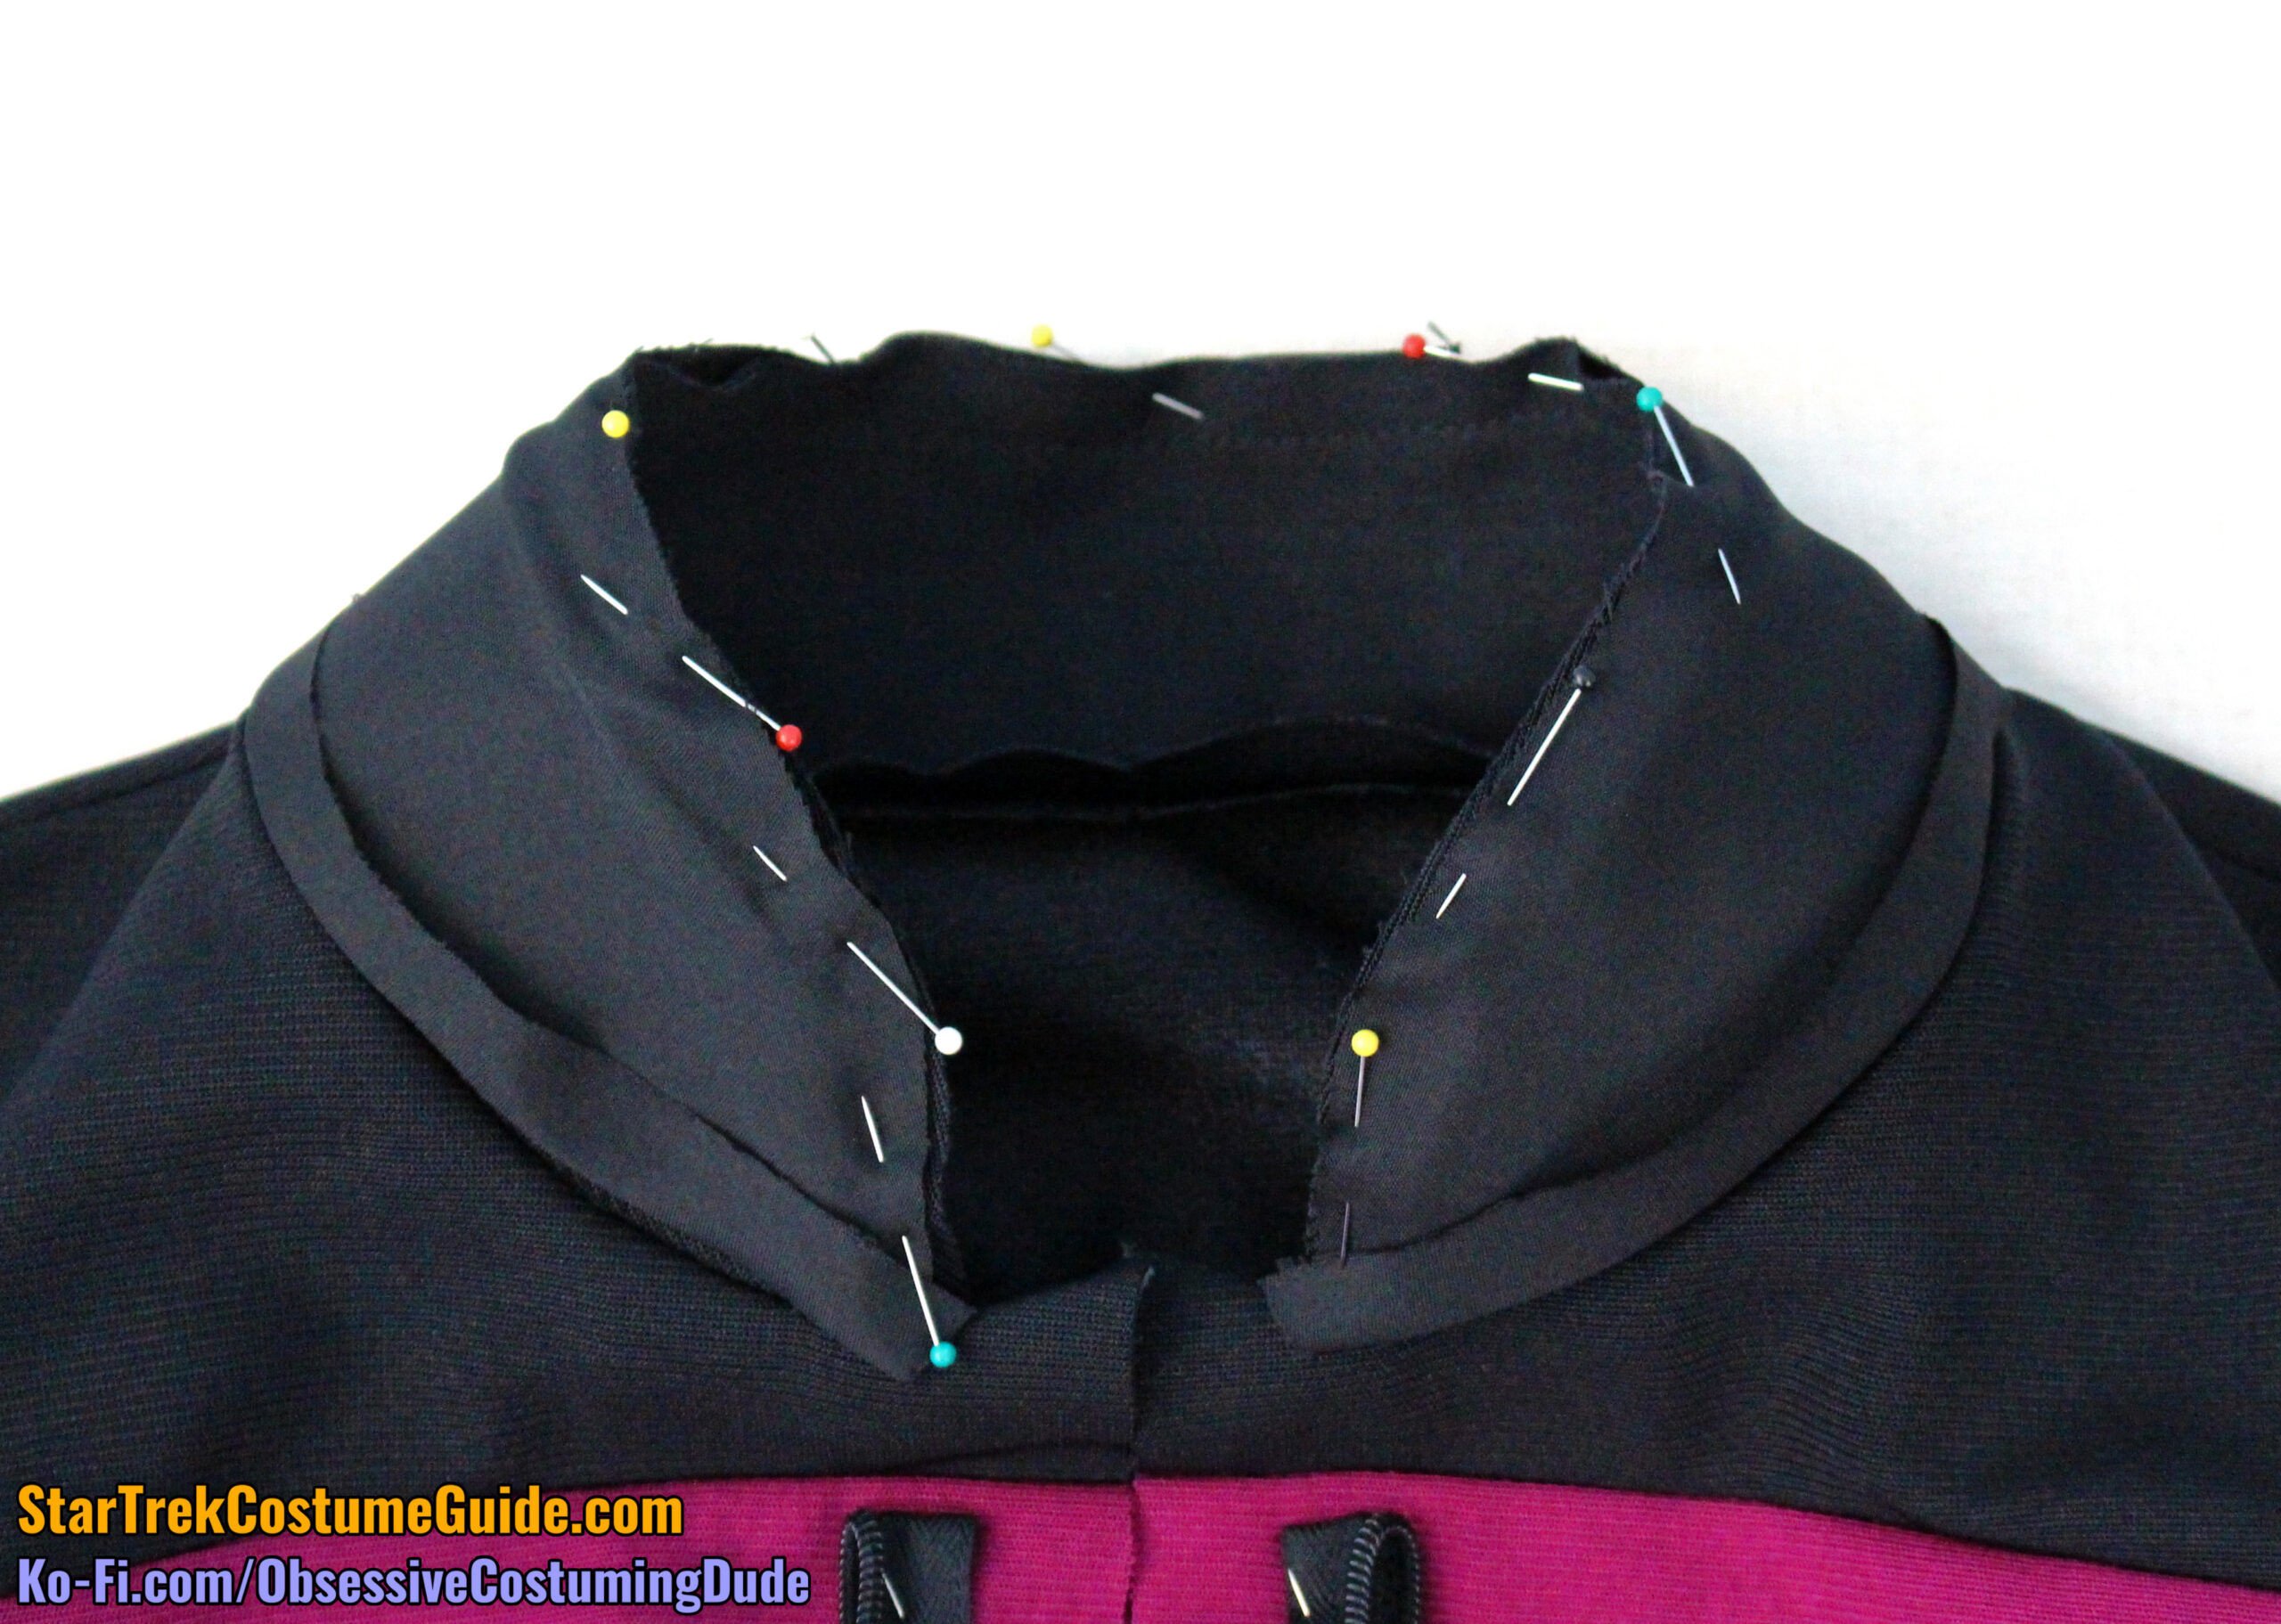
Pin the collar lining to the collar along the upper edges, right sides together.
Again using a zipper/piping foot, sew the collar lining to the collar along the upper edge with ⅜” seam allowance.
Notch the seam allowances along the front curve, and clip the allowances along the remainder of the upper seam.
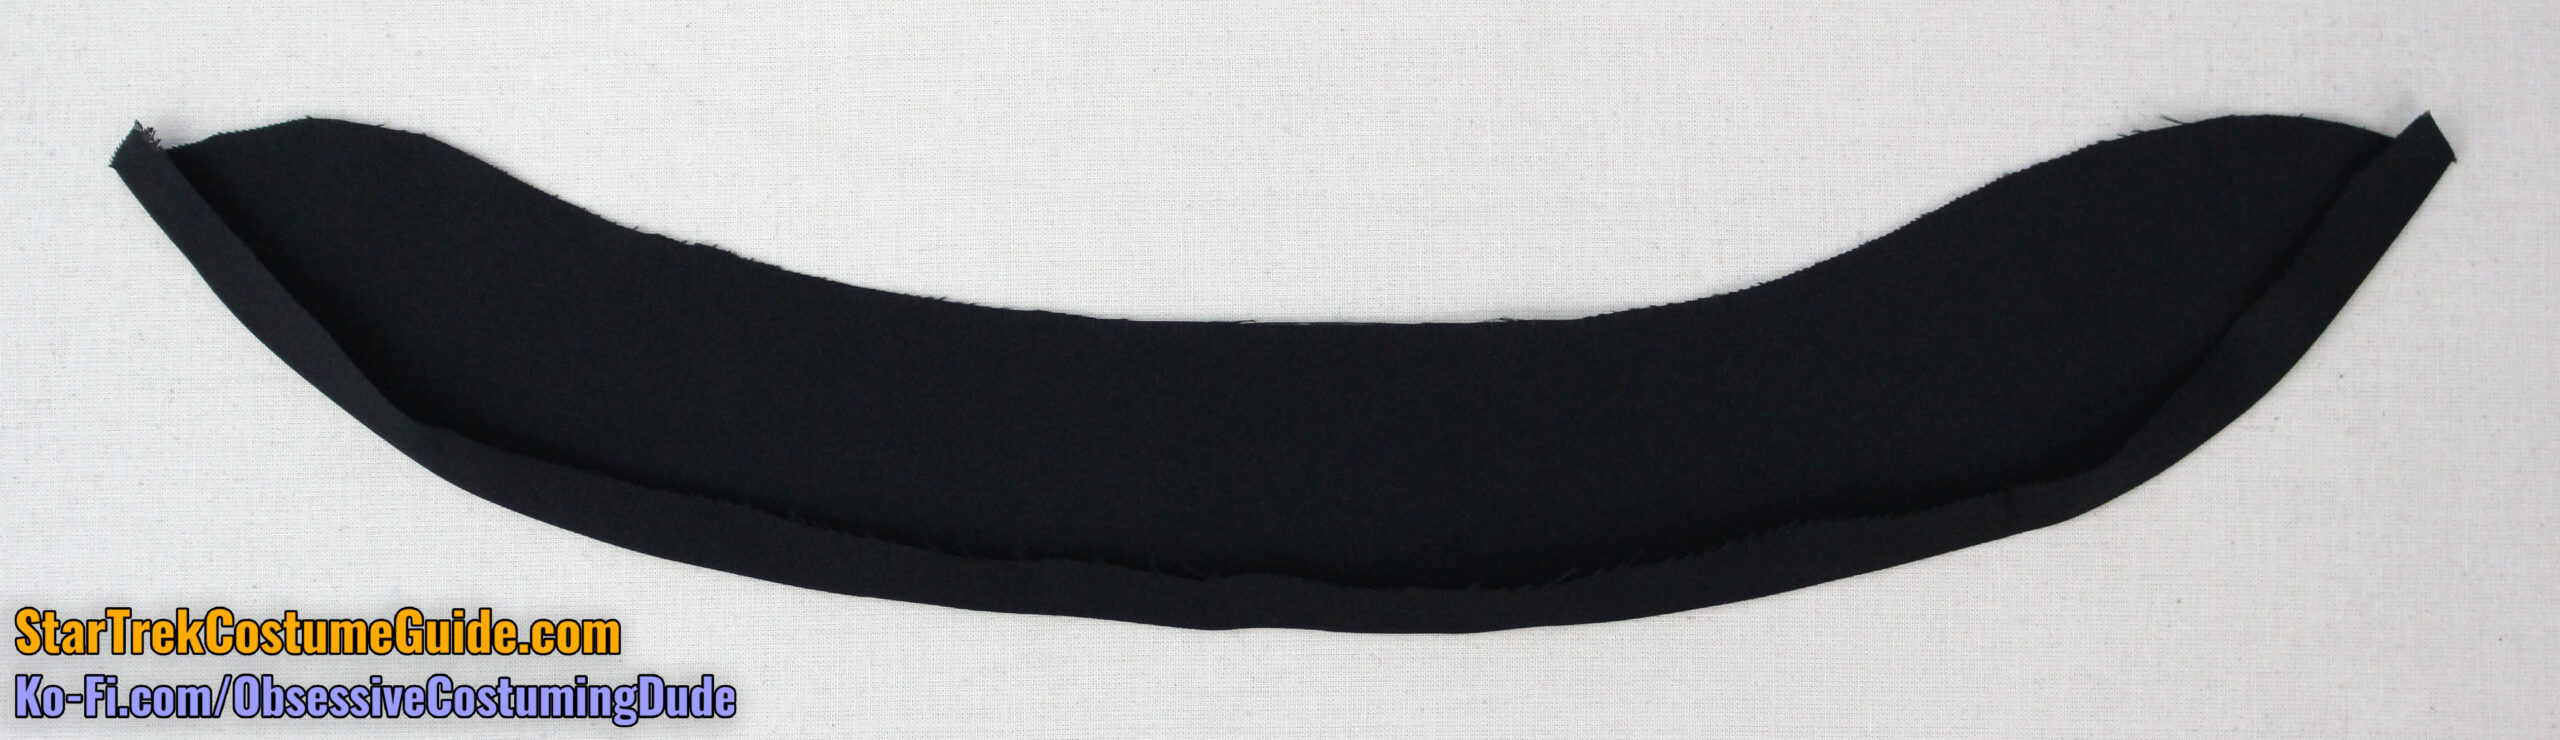
Turn the collar lining under and press.
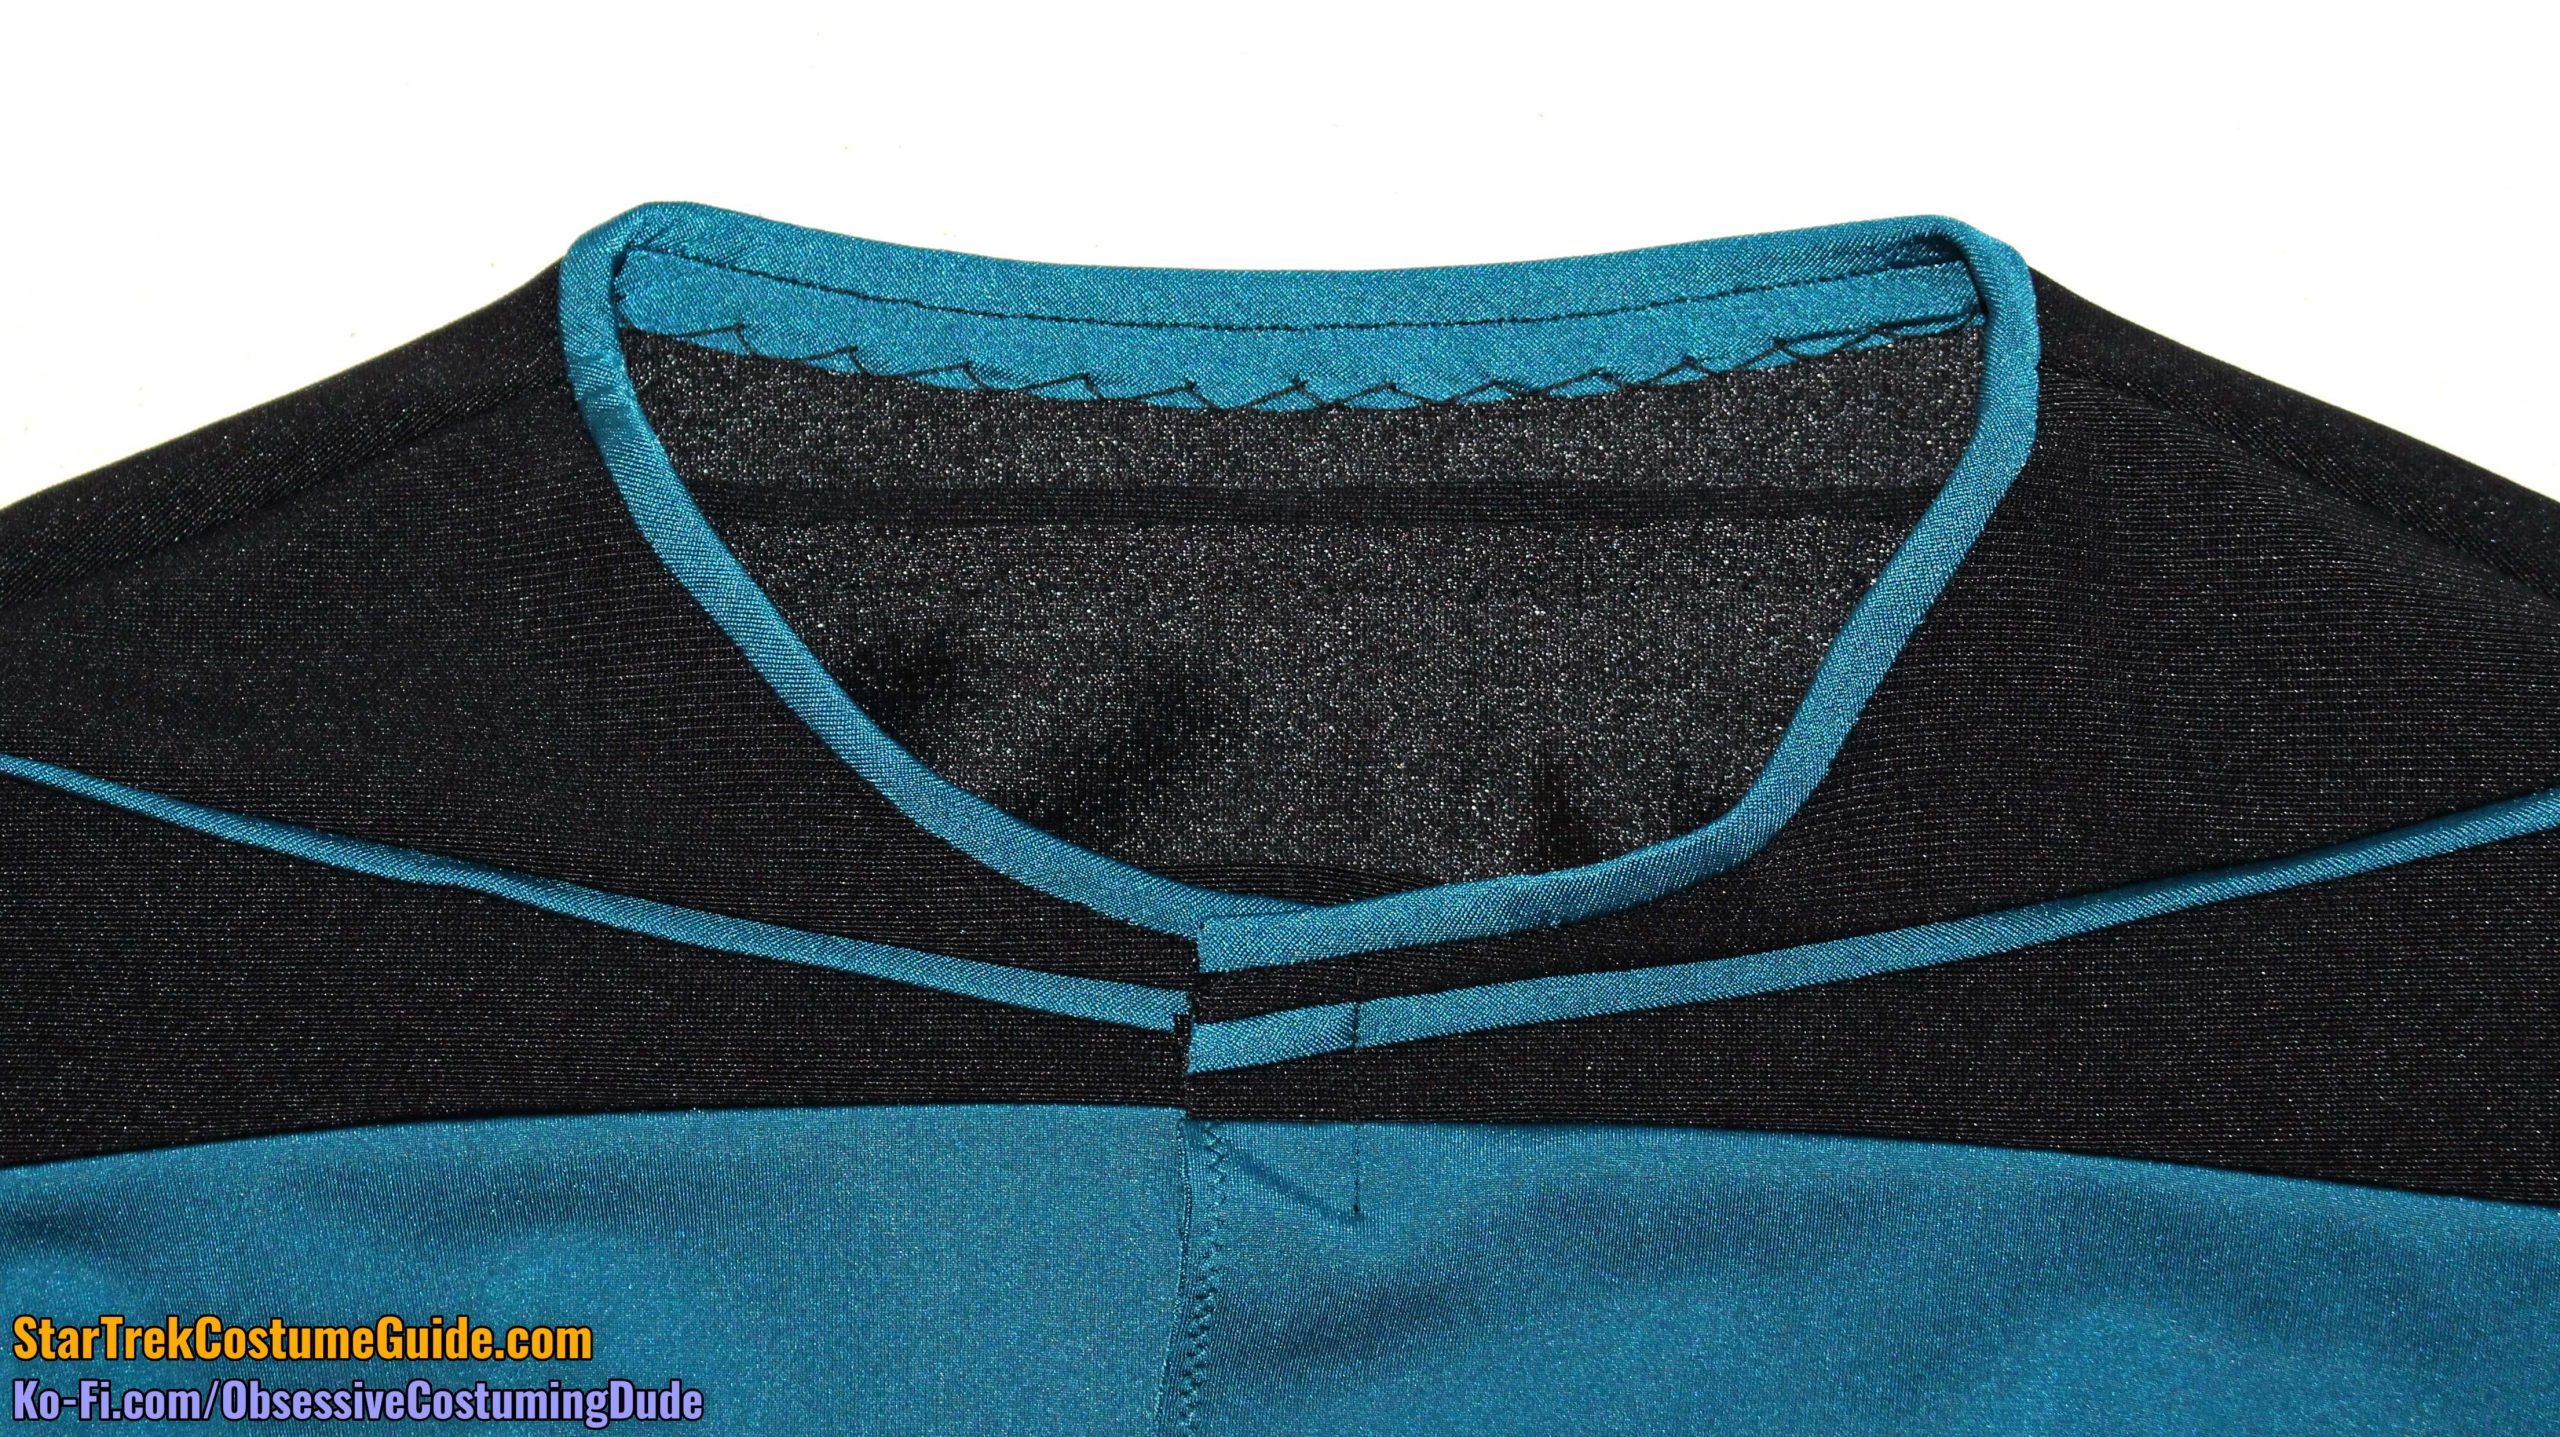
Clip the lining’s neckline allowance as done previously with the jumpsuit neckline/collar (1” from the front edge of the collar) and tack the layers together by hand.
Hand-sew the lower, folded edge of the collar lining to the jumpsuit neckline, just inside the neckline/collar stitching. (A whip-stitch, fell-stitch, or slip-stitch will all work great for this.)
Tack the upper front allowances under, taking care to only catch a tiny thread of the yoke fabric above the yoke/body seam allowances so your stitching will (hopefully) not be seen on the outside of the finished jumpsuit.
Hand-sew two hook-and-eye closures to the upper front allowances, above the zipper.
Sew the jumpsuit sides closed, right sides together, all the way from the bottom of the pant leg to the bottom of the sleeve, matching waist and underarm seams. The lengthen/shorten lines on the printed pattern also serve as balance points.
Note that the seam allowance is ⅝” on the jumpsuit sides but only ½” on the sleeve.
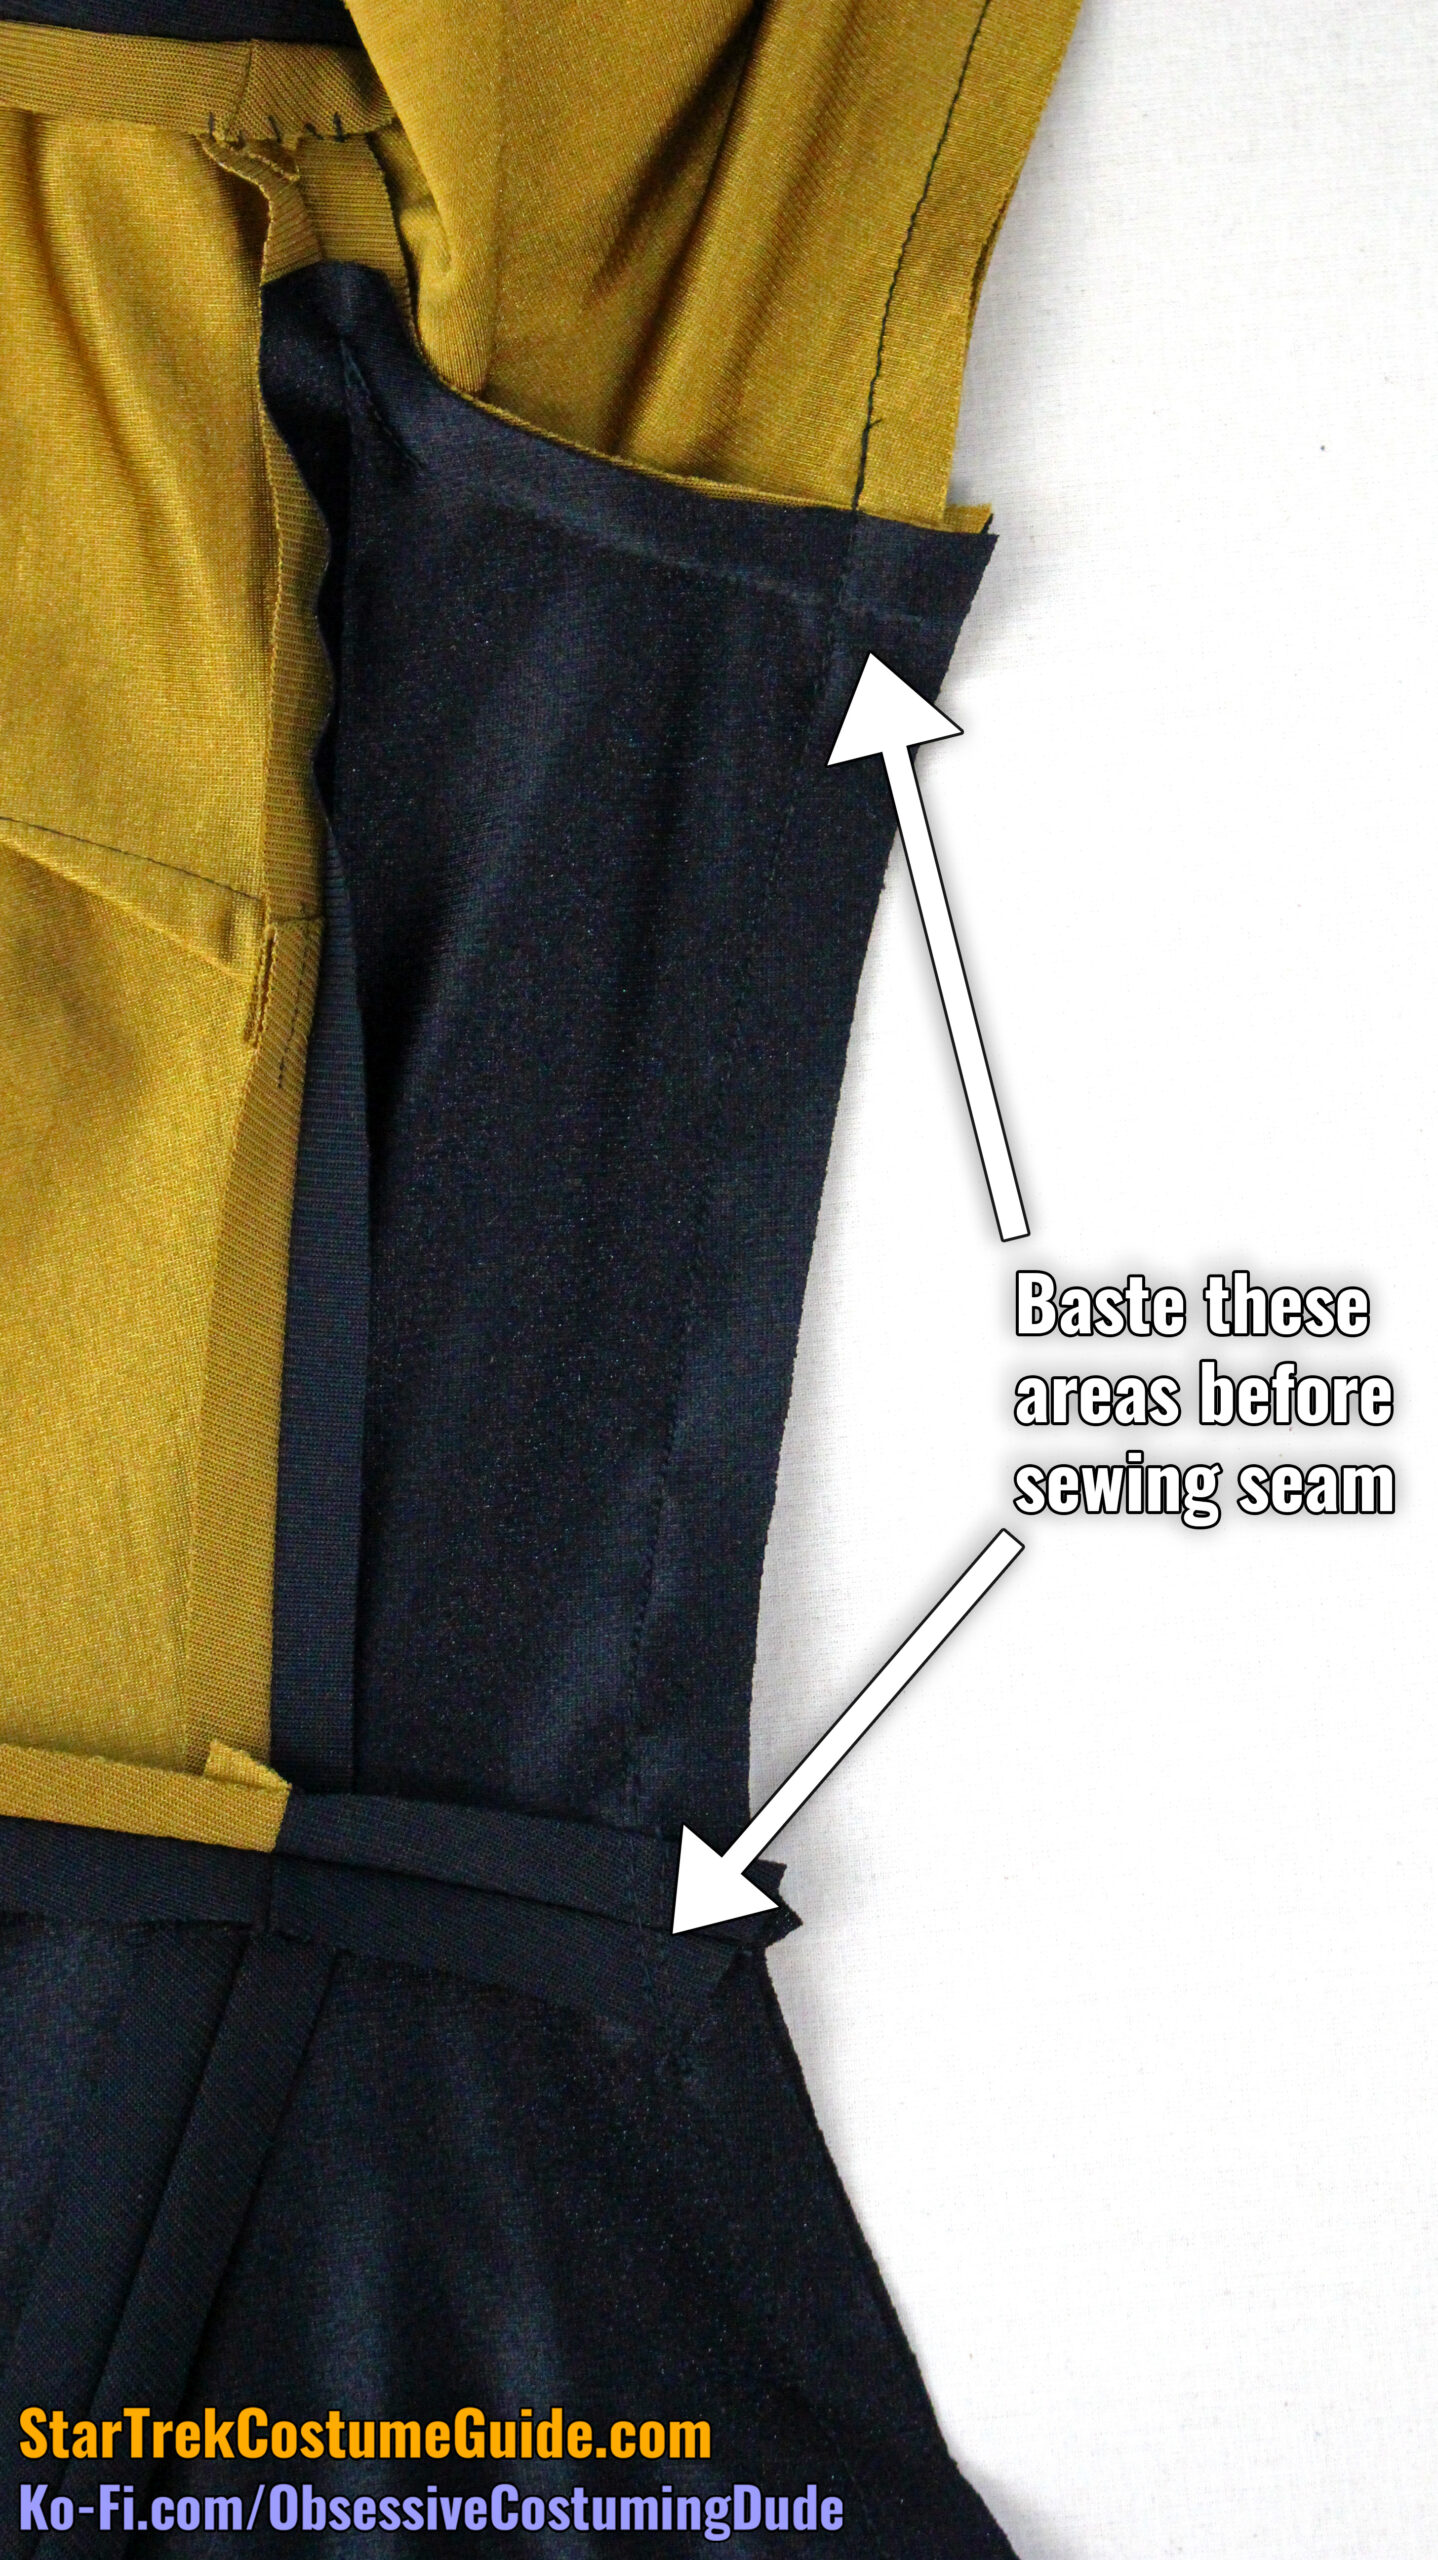
I recommend basting across the waist and underarm seams and confirming they properly align before sewing the entire seam.
Press the seam allowances open.
Repeat for the other side of the jumpsuit.
Sew the inseam closed, right sides together with ⅝” seam allowance, matching crotch seams and balance points.
Press the seam allowances open.
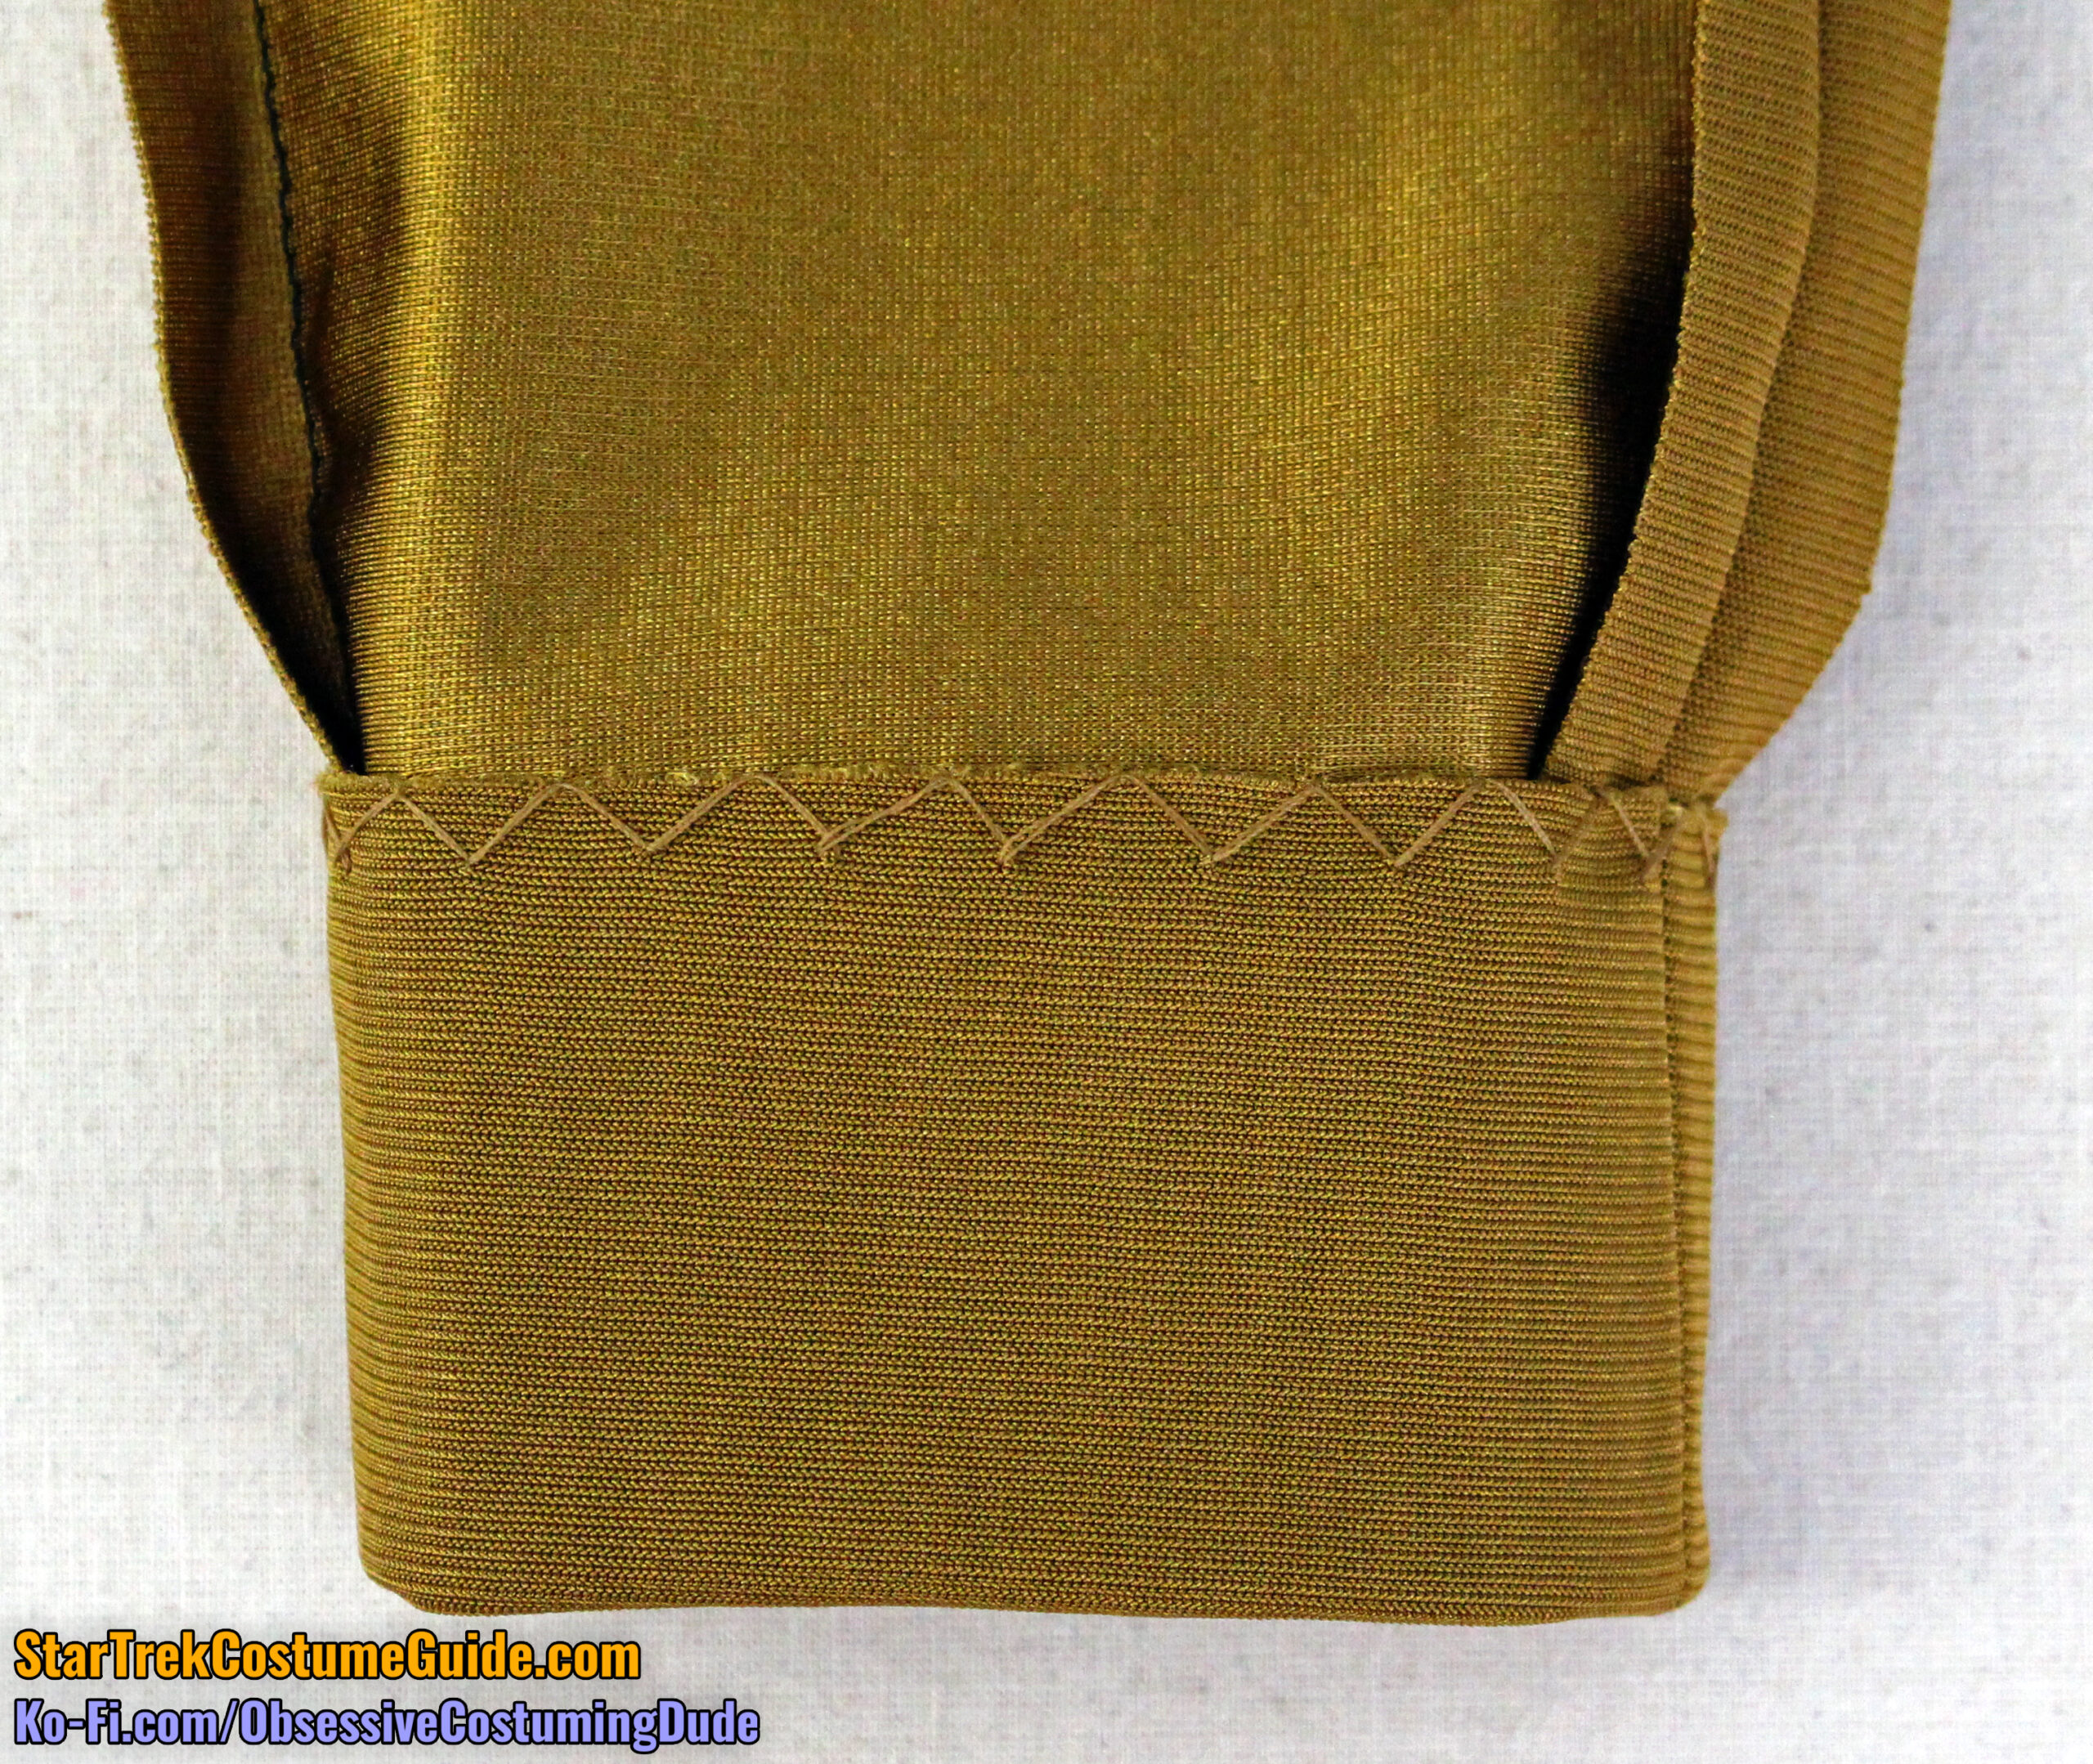
Press the pant leg 2” hem allowance upward and hand-sew it into place, taking care to only catch a tiny thread of the body fabric so your stitches won’t be visible on the outside of the pant leg.
Press the lower pant leg facing back into place and hand-sew it to the underside of the pant leg as well.
Repeat for the other pant leg.
Press the sleeve’s 2” hem allowance upward and hand-sew it into place using division-colored thread, again taking care to only catch a tiny thread of the body fabric so your stitches won’t be visible on the outside of the sleeve.
Repeat for the other sleeve.
Although the TNG-era uniforms had raglan-style shoulder padding, unfortunately modern retail raglan shoulder pads aren’t large enough and don’t cover nearly enough surface area to establish the “idealized” silhouettes of the original costumes.
(I believe the original TNG-era shoulder pads to have been custom-made for production, but some attest that they were retail shoulder pads from the 80s that are no longer available. In either case the situation is the same: modern retail shoulder pads are too small.)
To replicate the fit and silhouette of the screen-used TNG jumpsuits, it’s best to make your own replica shoulder pads to go with your uniform.
As you might recall from my various screen-used TNG uniform examinations, there were at least two different styles of shoulder pads used – generally speaking, one style for the early uniforms and another for the later ones – and the men’s pads were slightly larger than the women’s.
Here’s a YouTube video on how to make the shoulder pads for many of the TNG-era uniforms, including the TNG jumpsuits:
The early-style shoulder pads are easier to make; you’ll need piece U1 from the women’s pattern, and piece U for the men’s pattern.
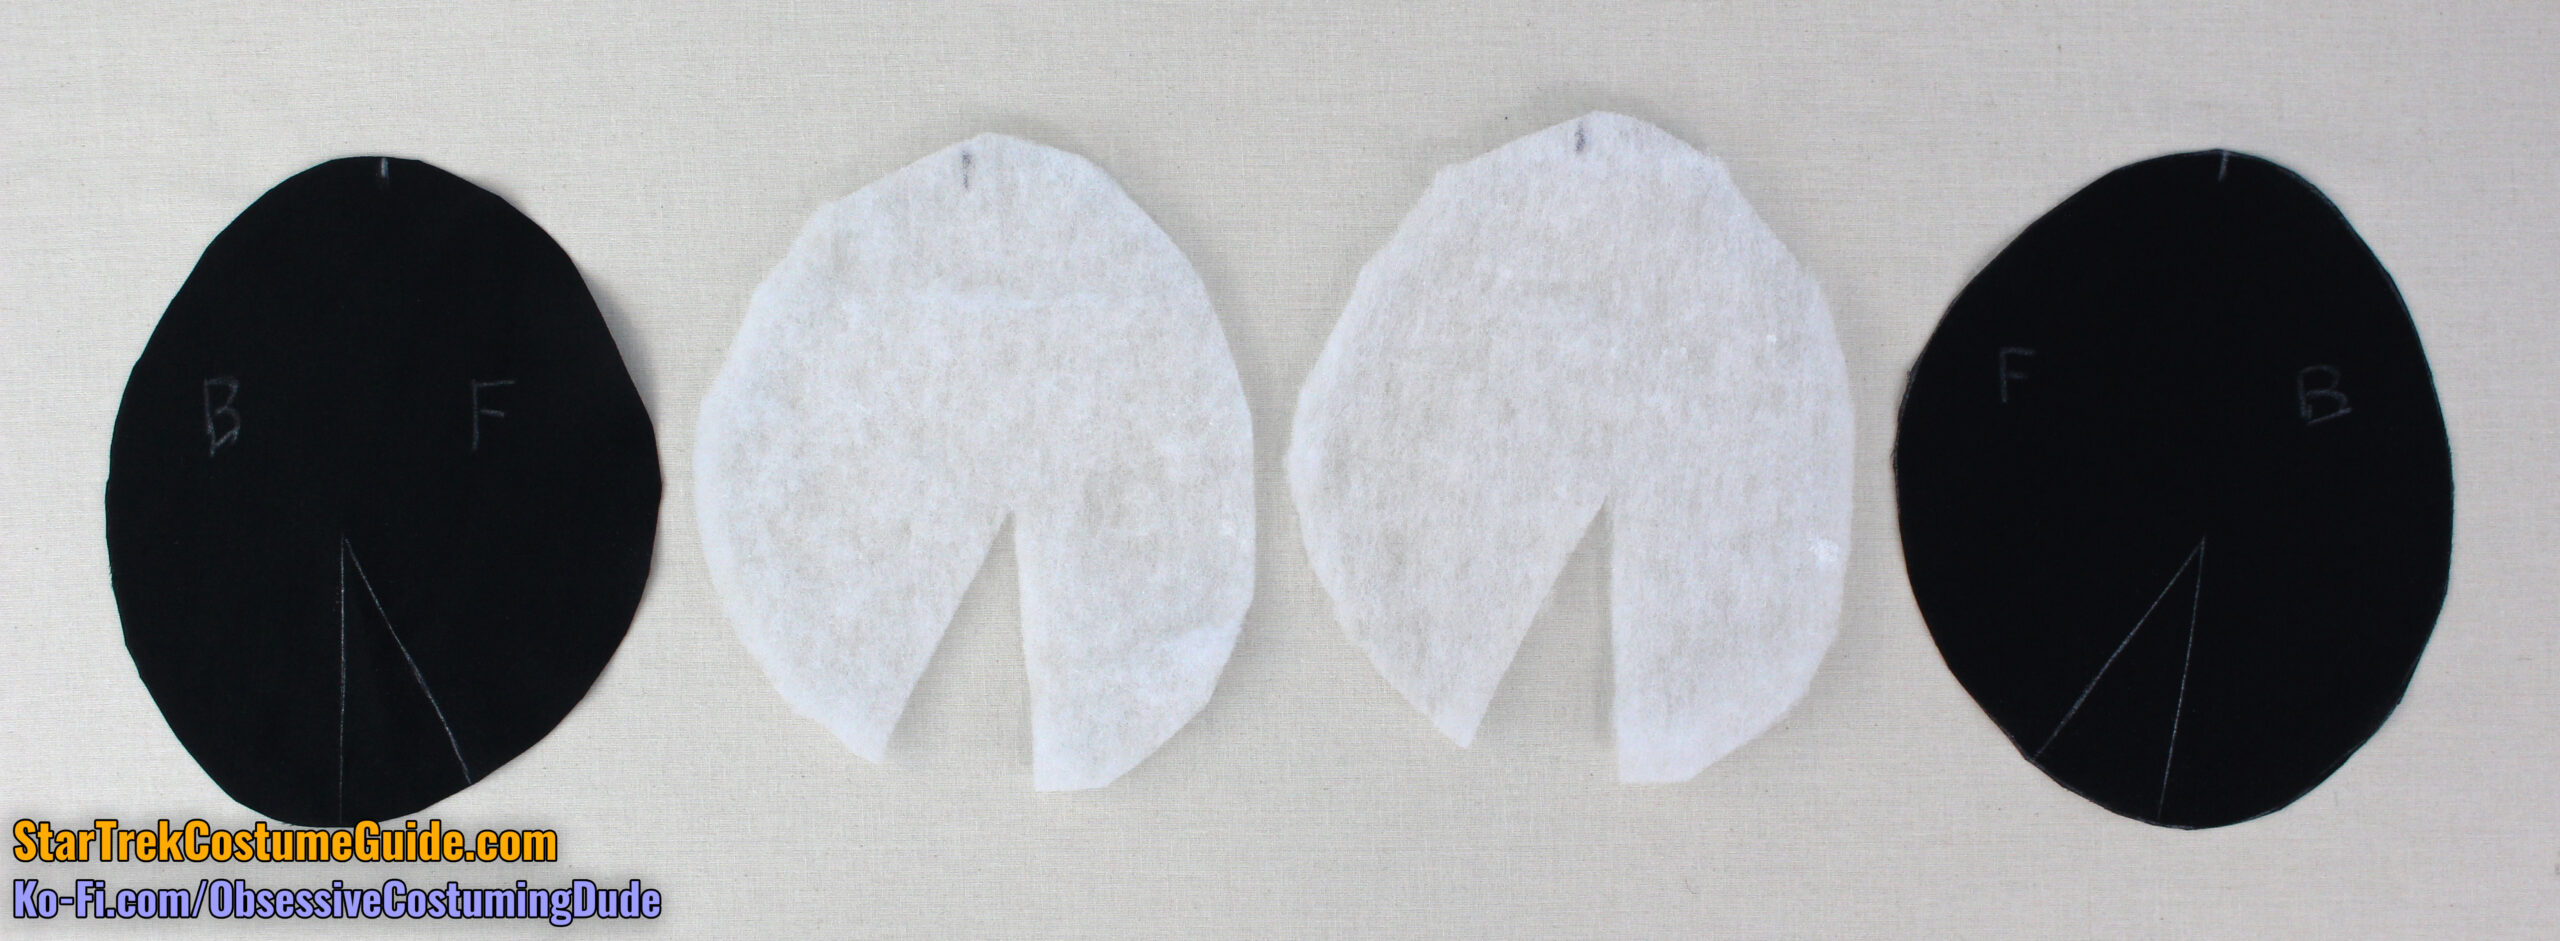
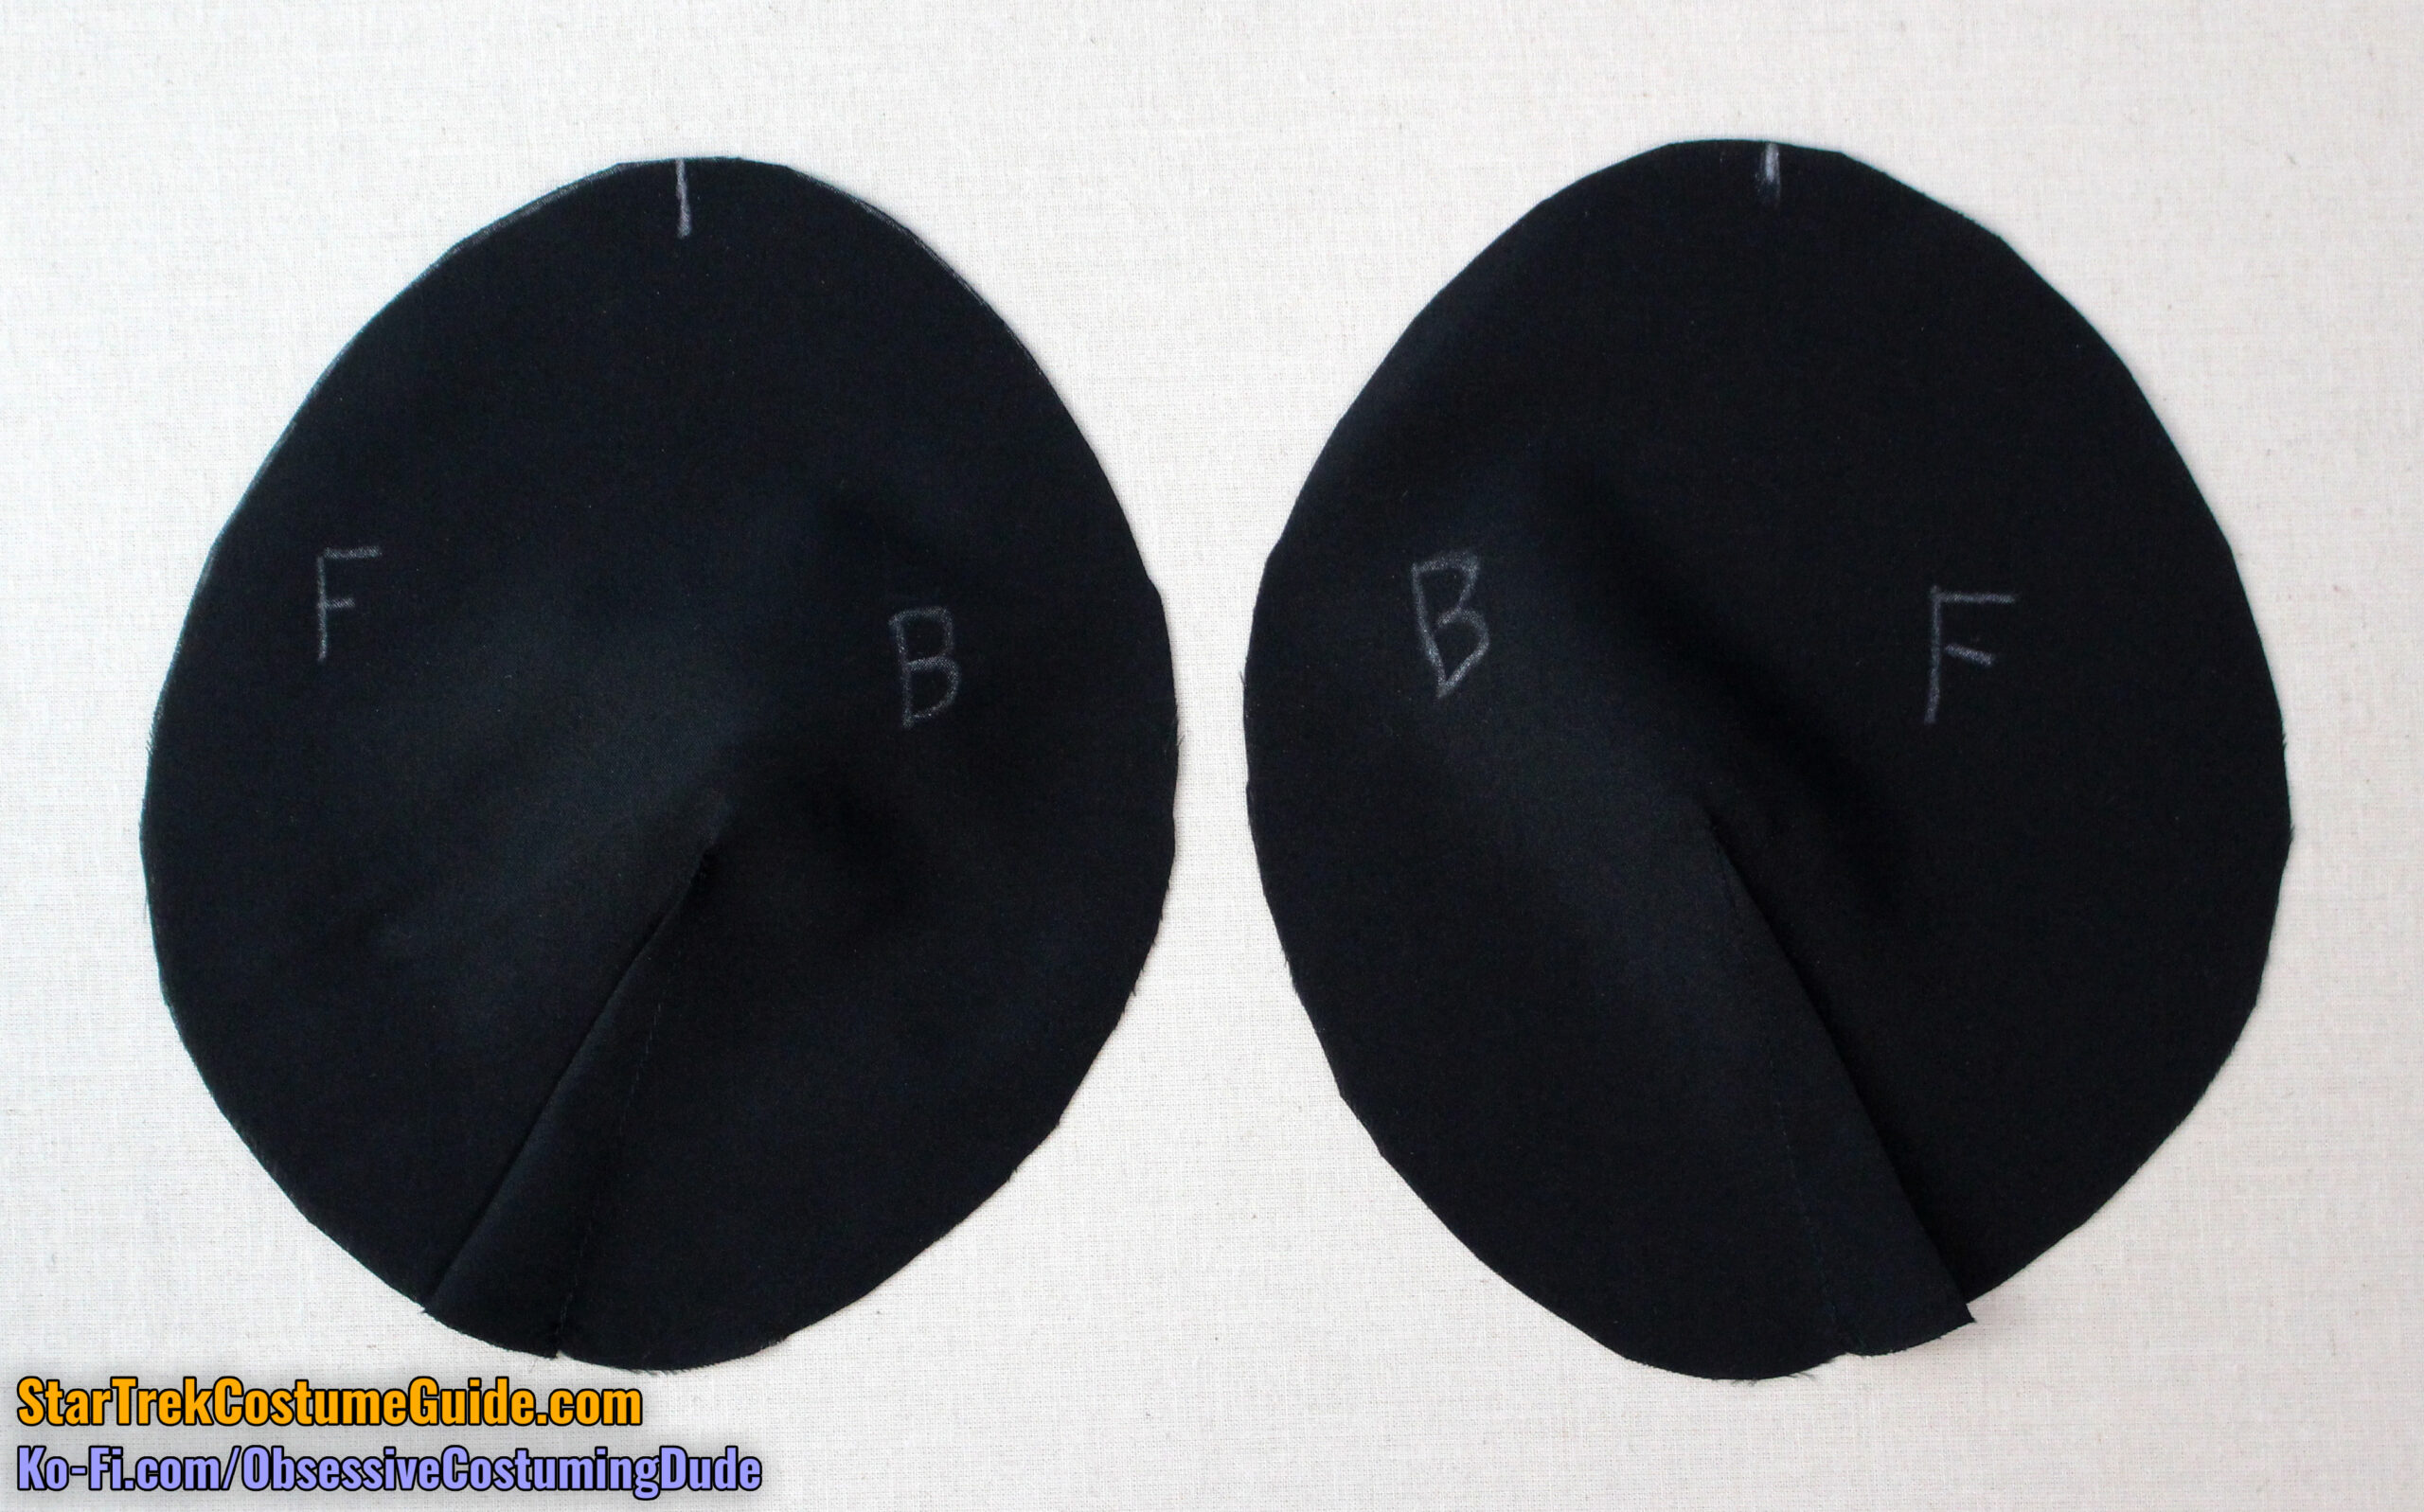
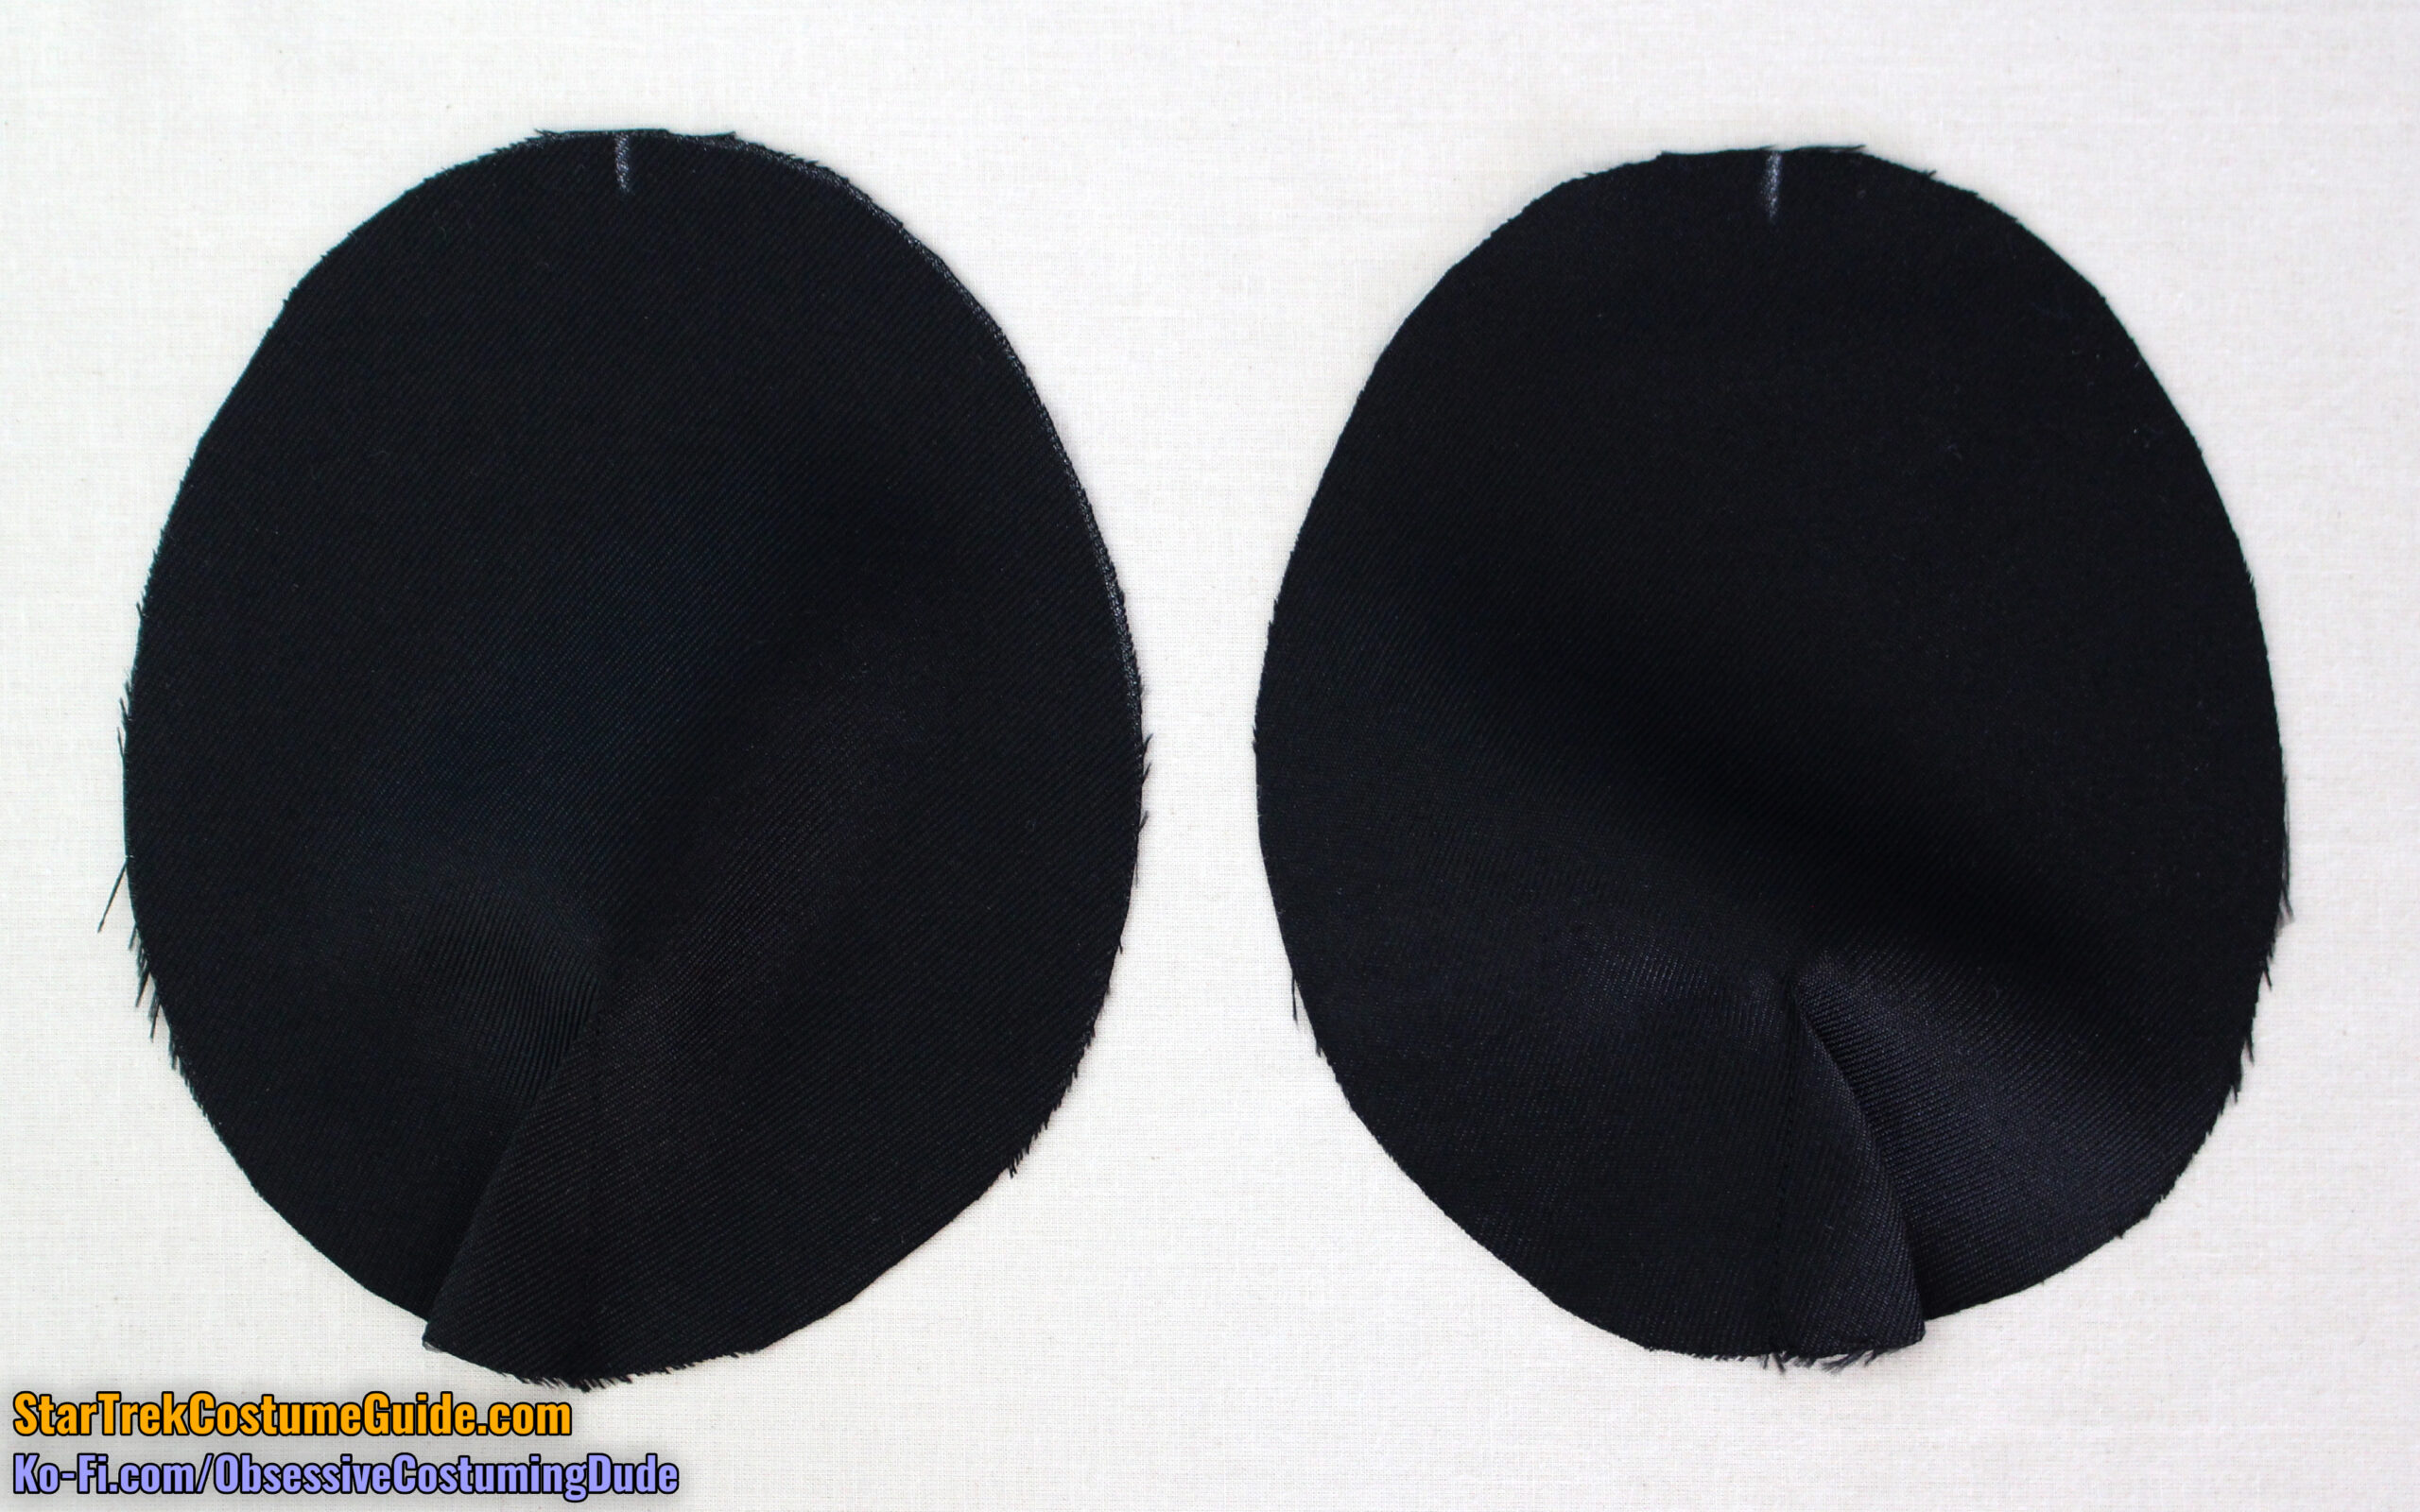
For the women’s early shoulder pad, you’ll need two cuts of lining and two layers of low-loft batting.
I suggest tracing the dart onto the lining layers, marking the shoulder seam, and marking the front/back of the pad with disappearing tailor’s chalk.
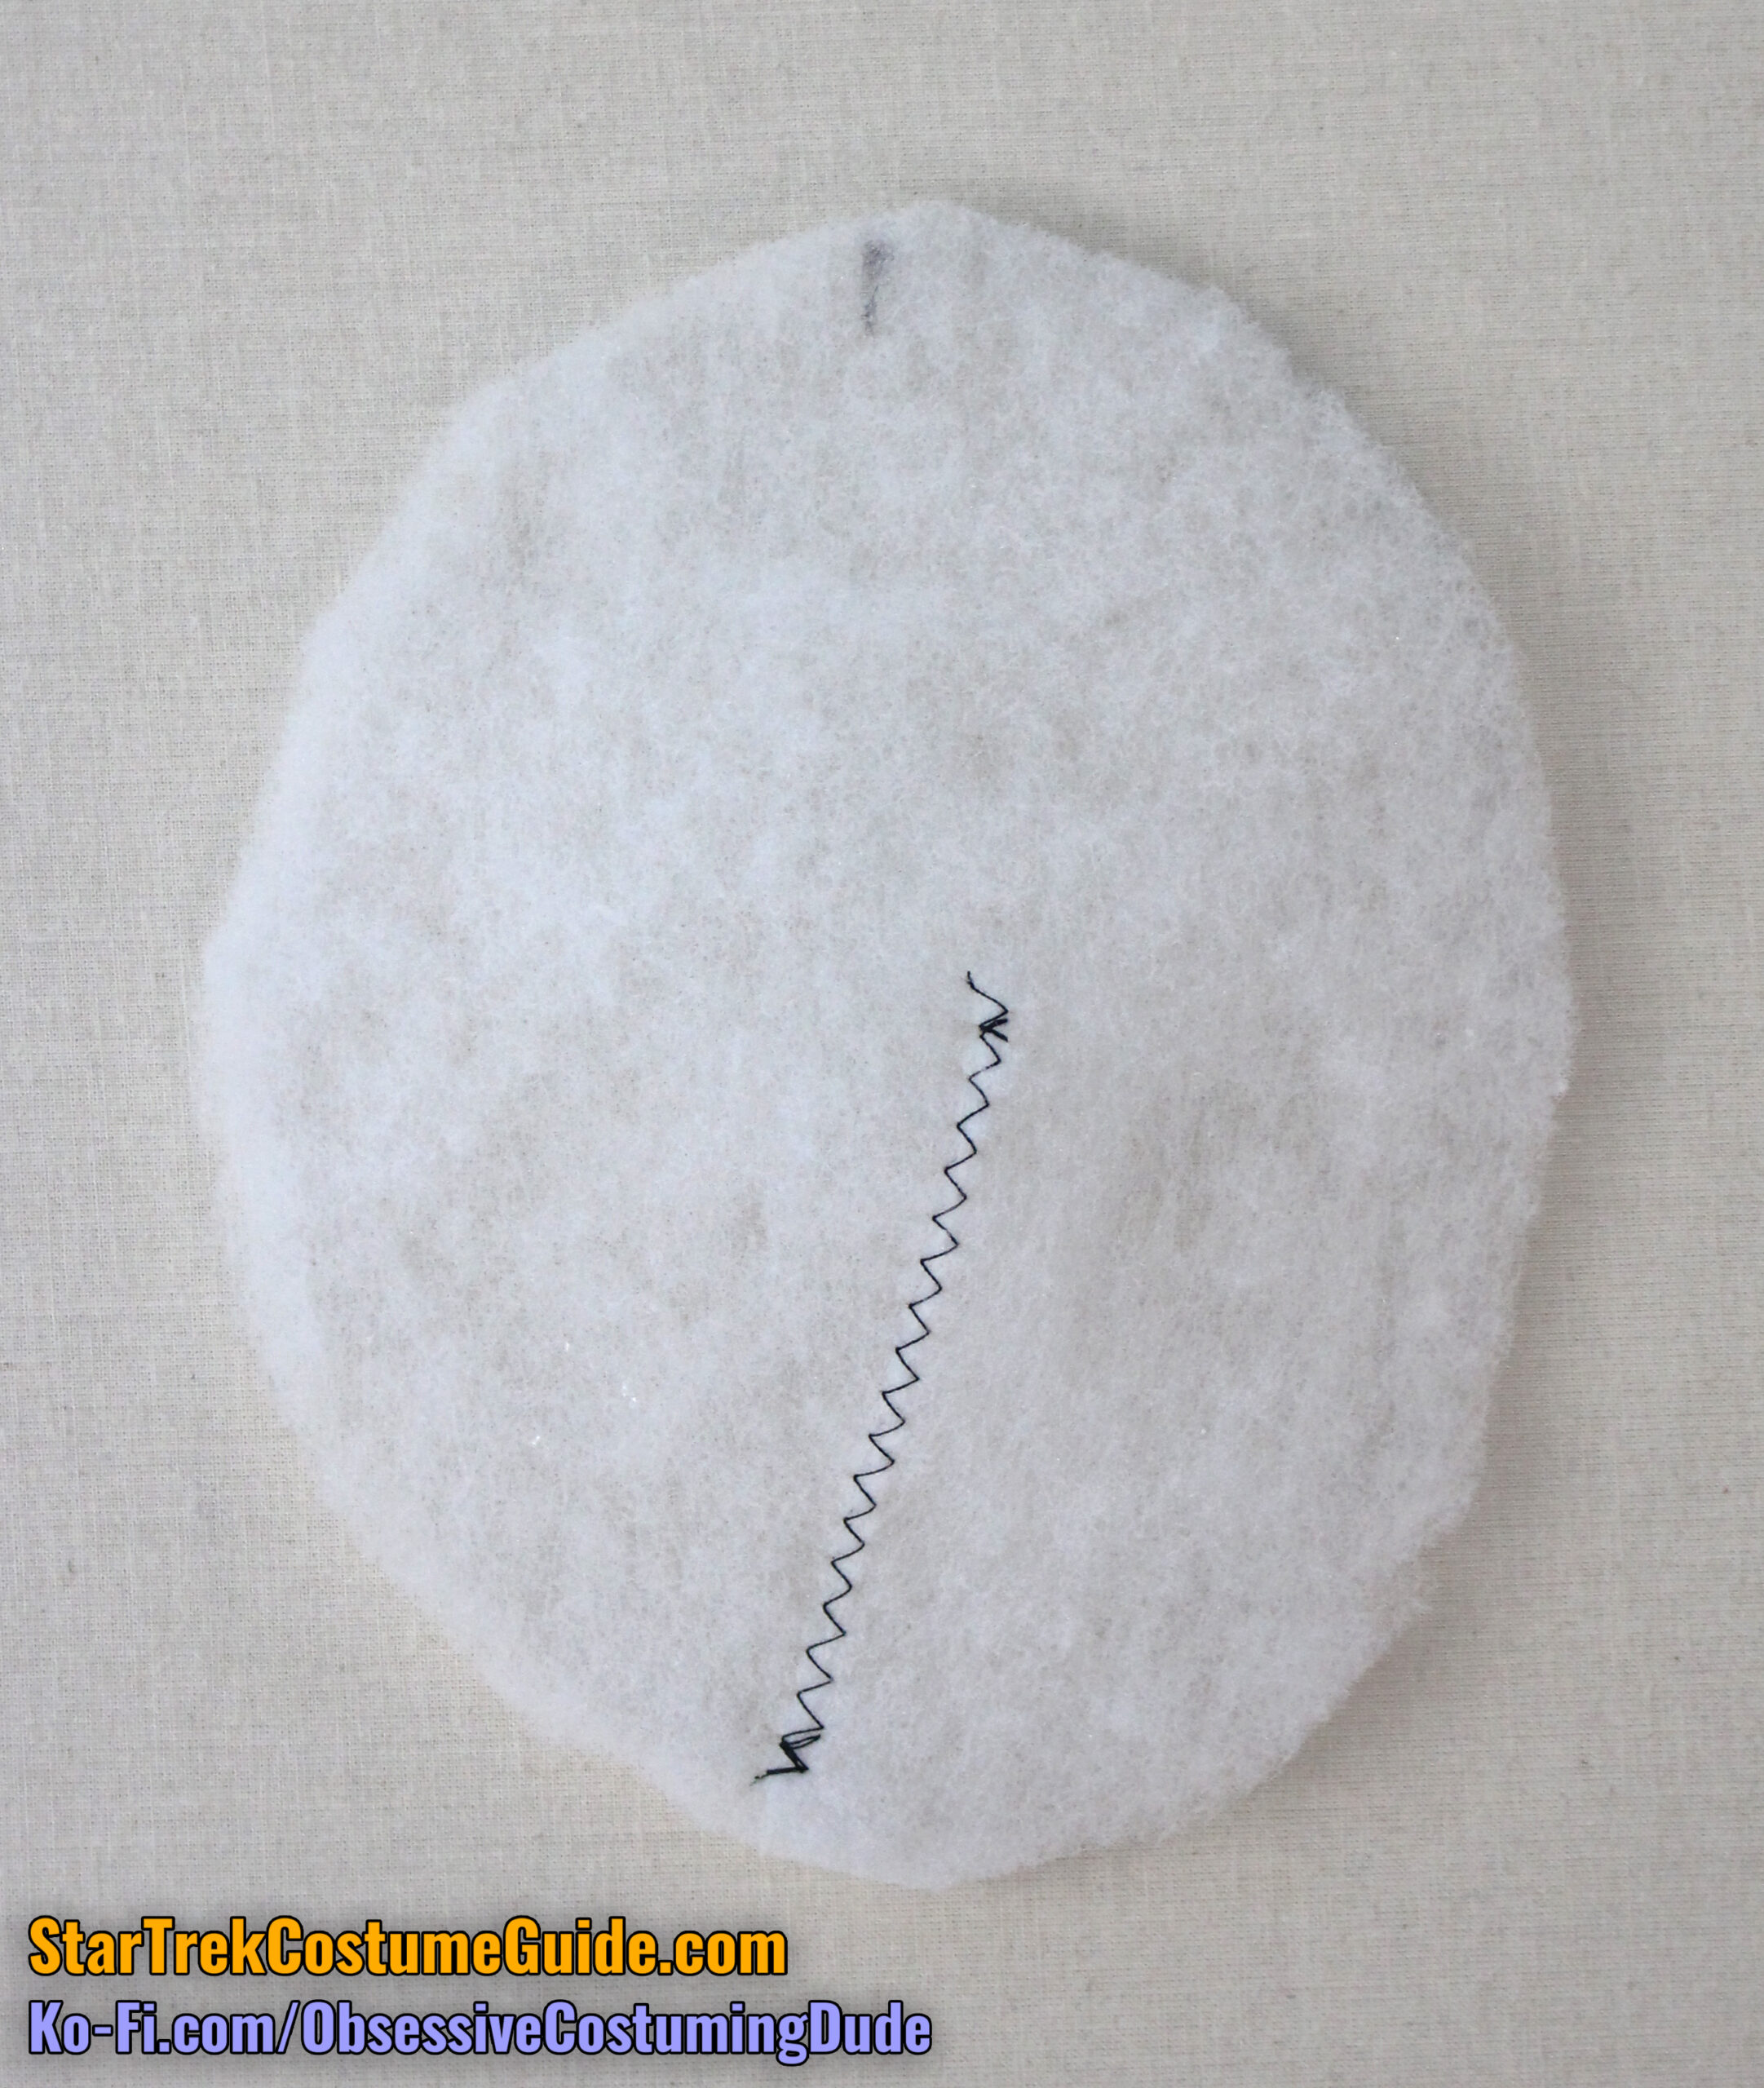
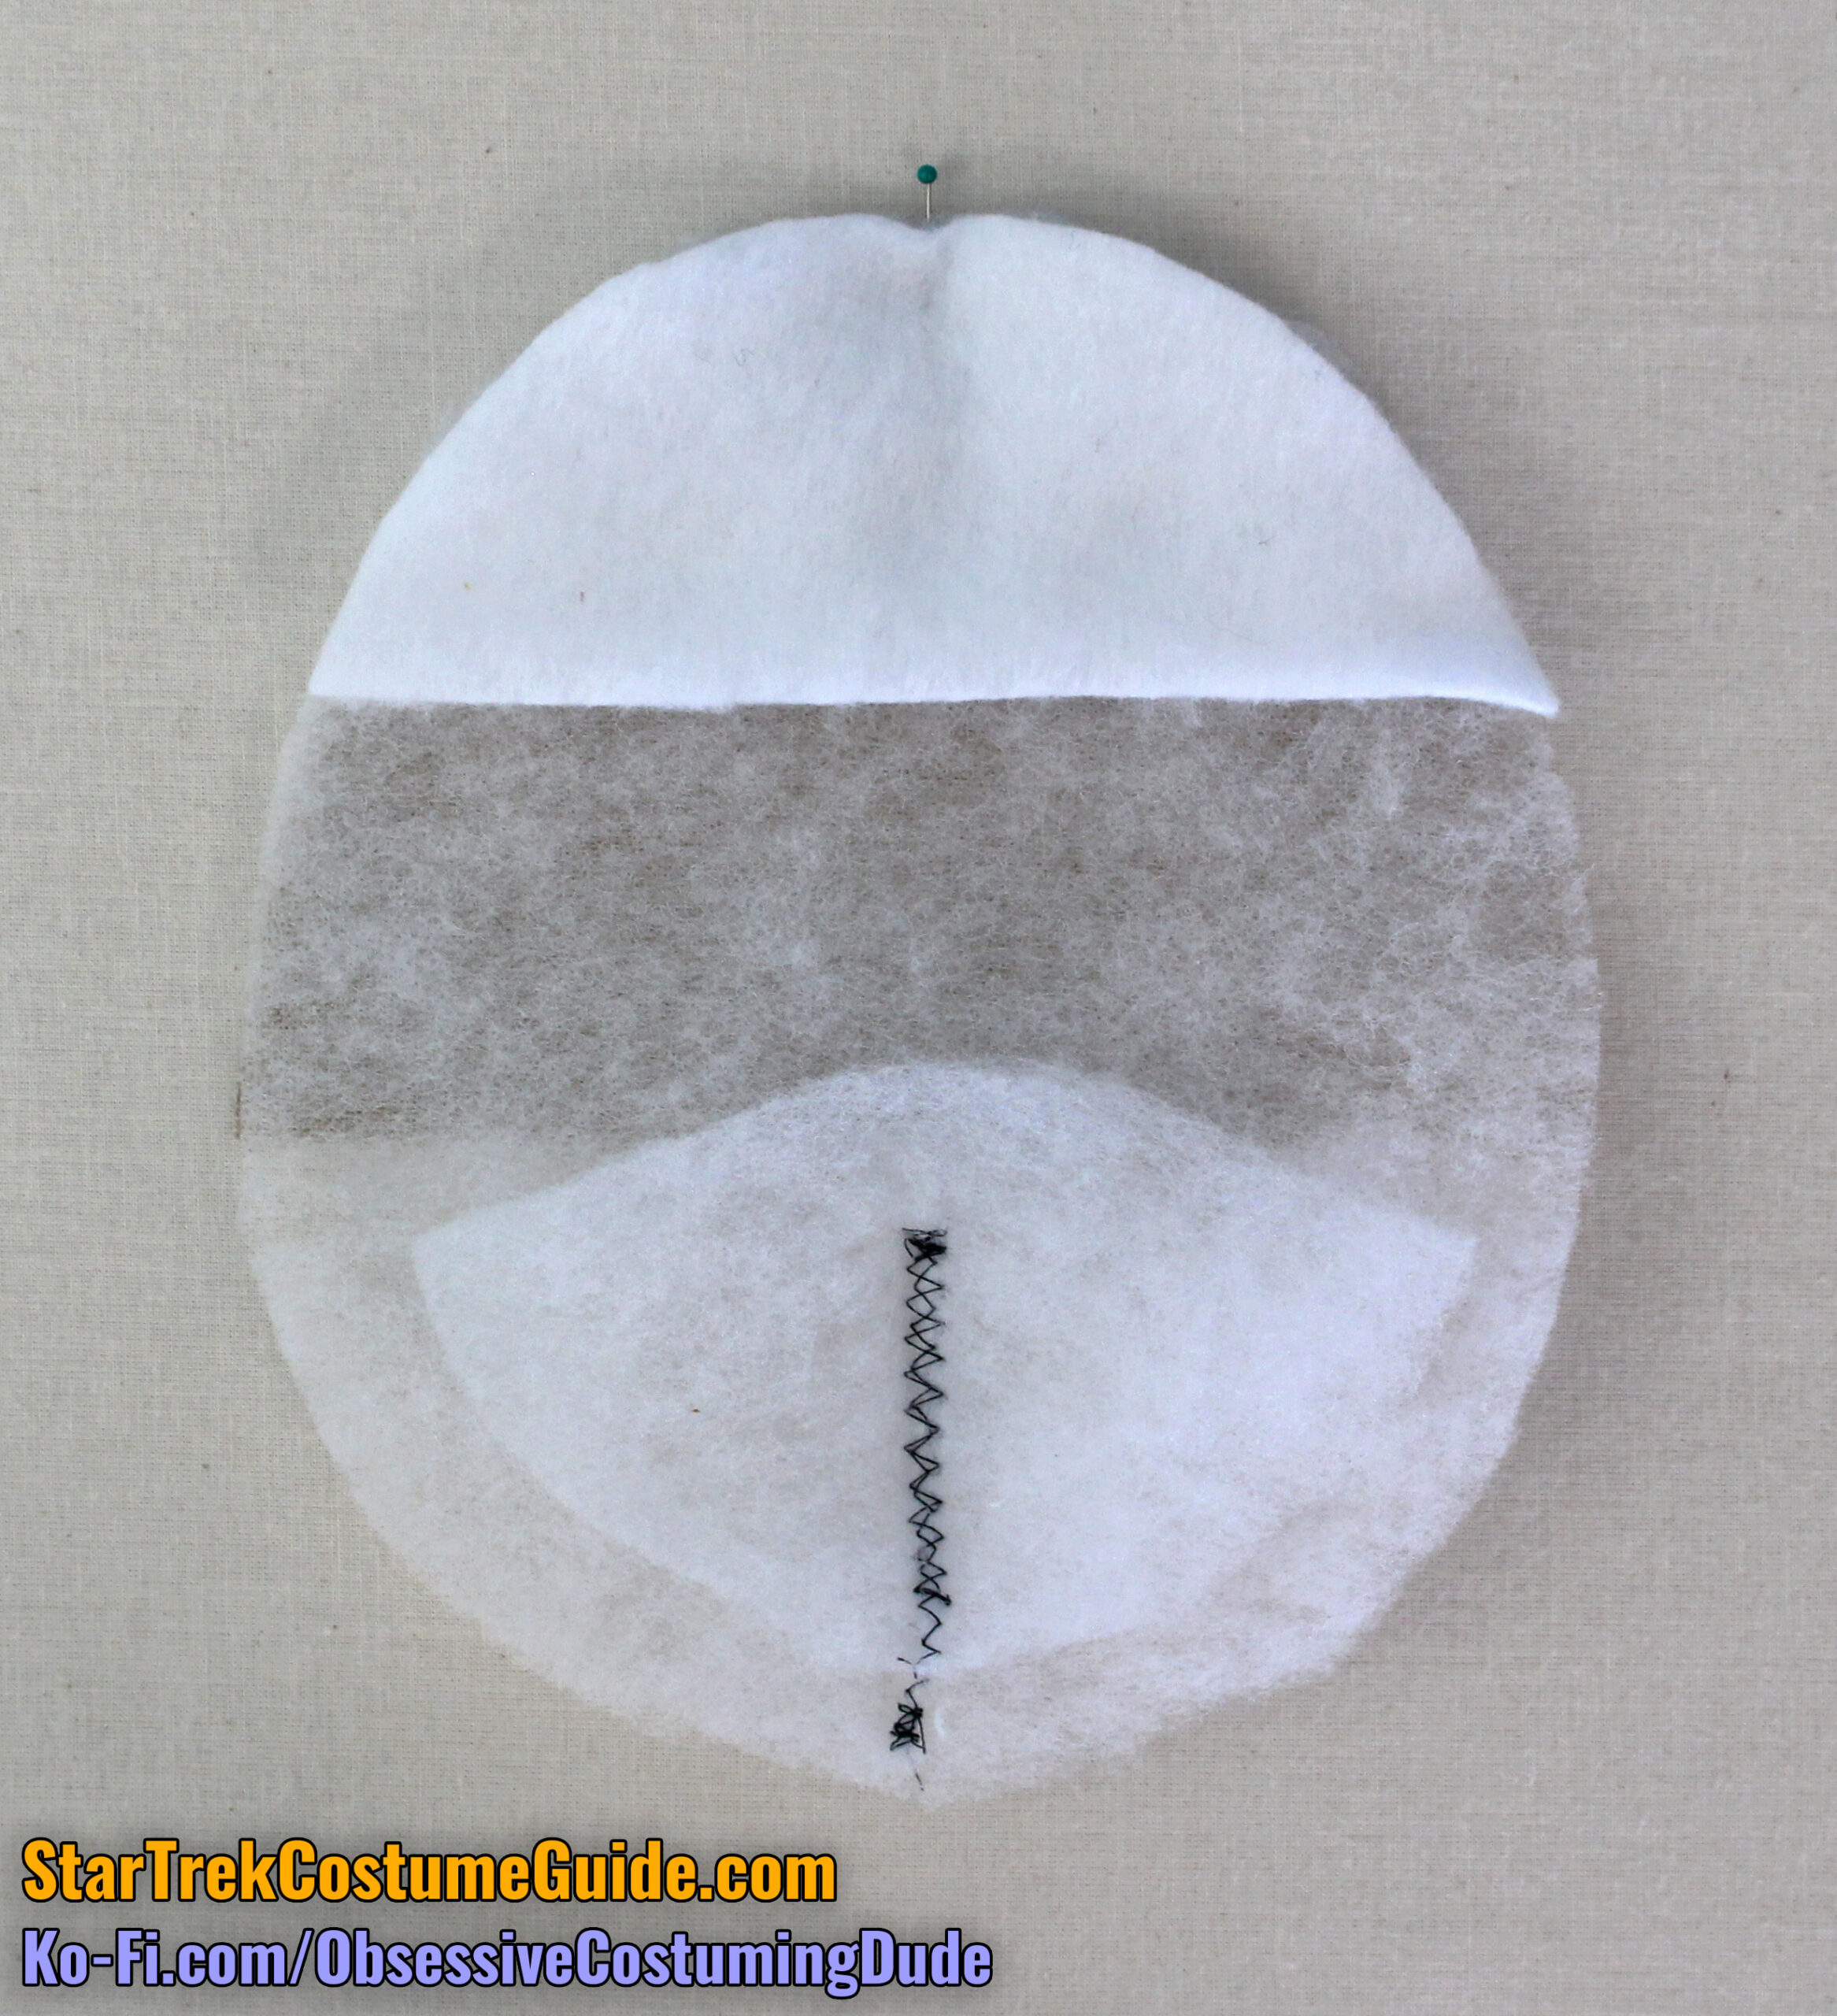
Trim the dart out of the batting layers.
Sew the darts closed in the lining layers, and press the darts toward the front.
Pull the edges of the dart together on the batting and zig-zag stitch them together.
Pull the edges of the dart together on the batting and zig-zag stitch them together.
Repeat for the other layer of batting.
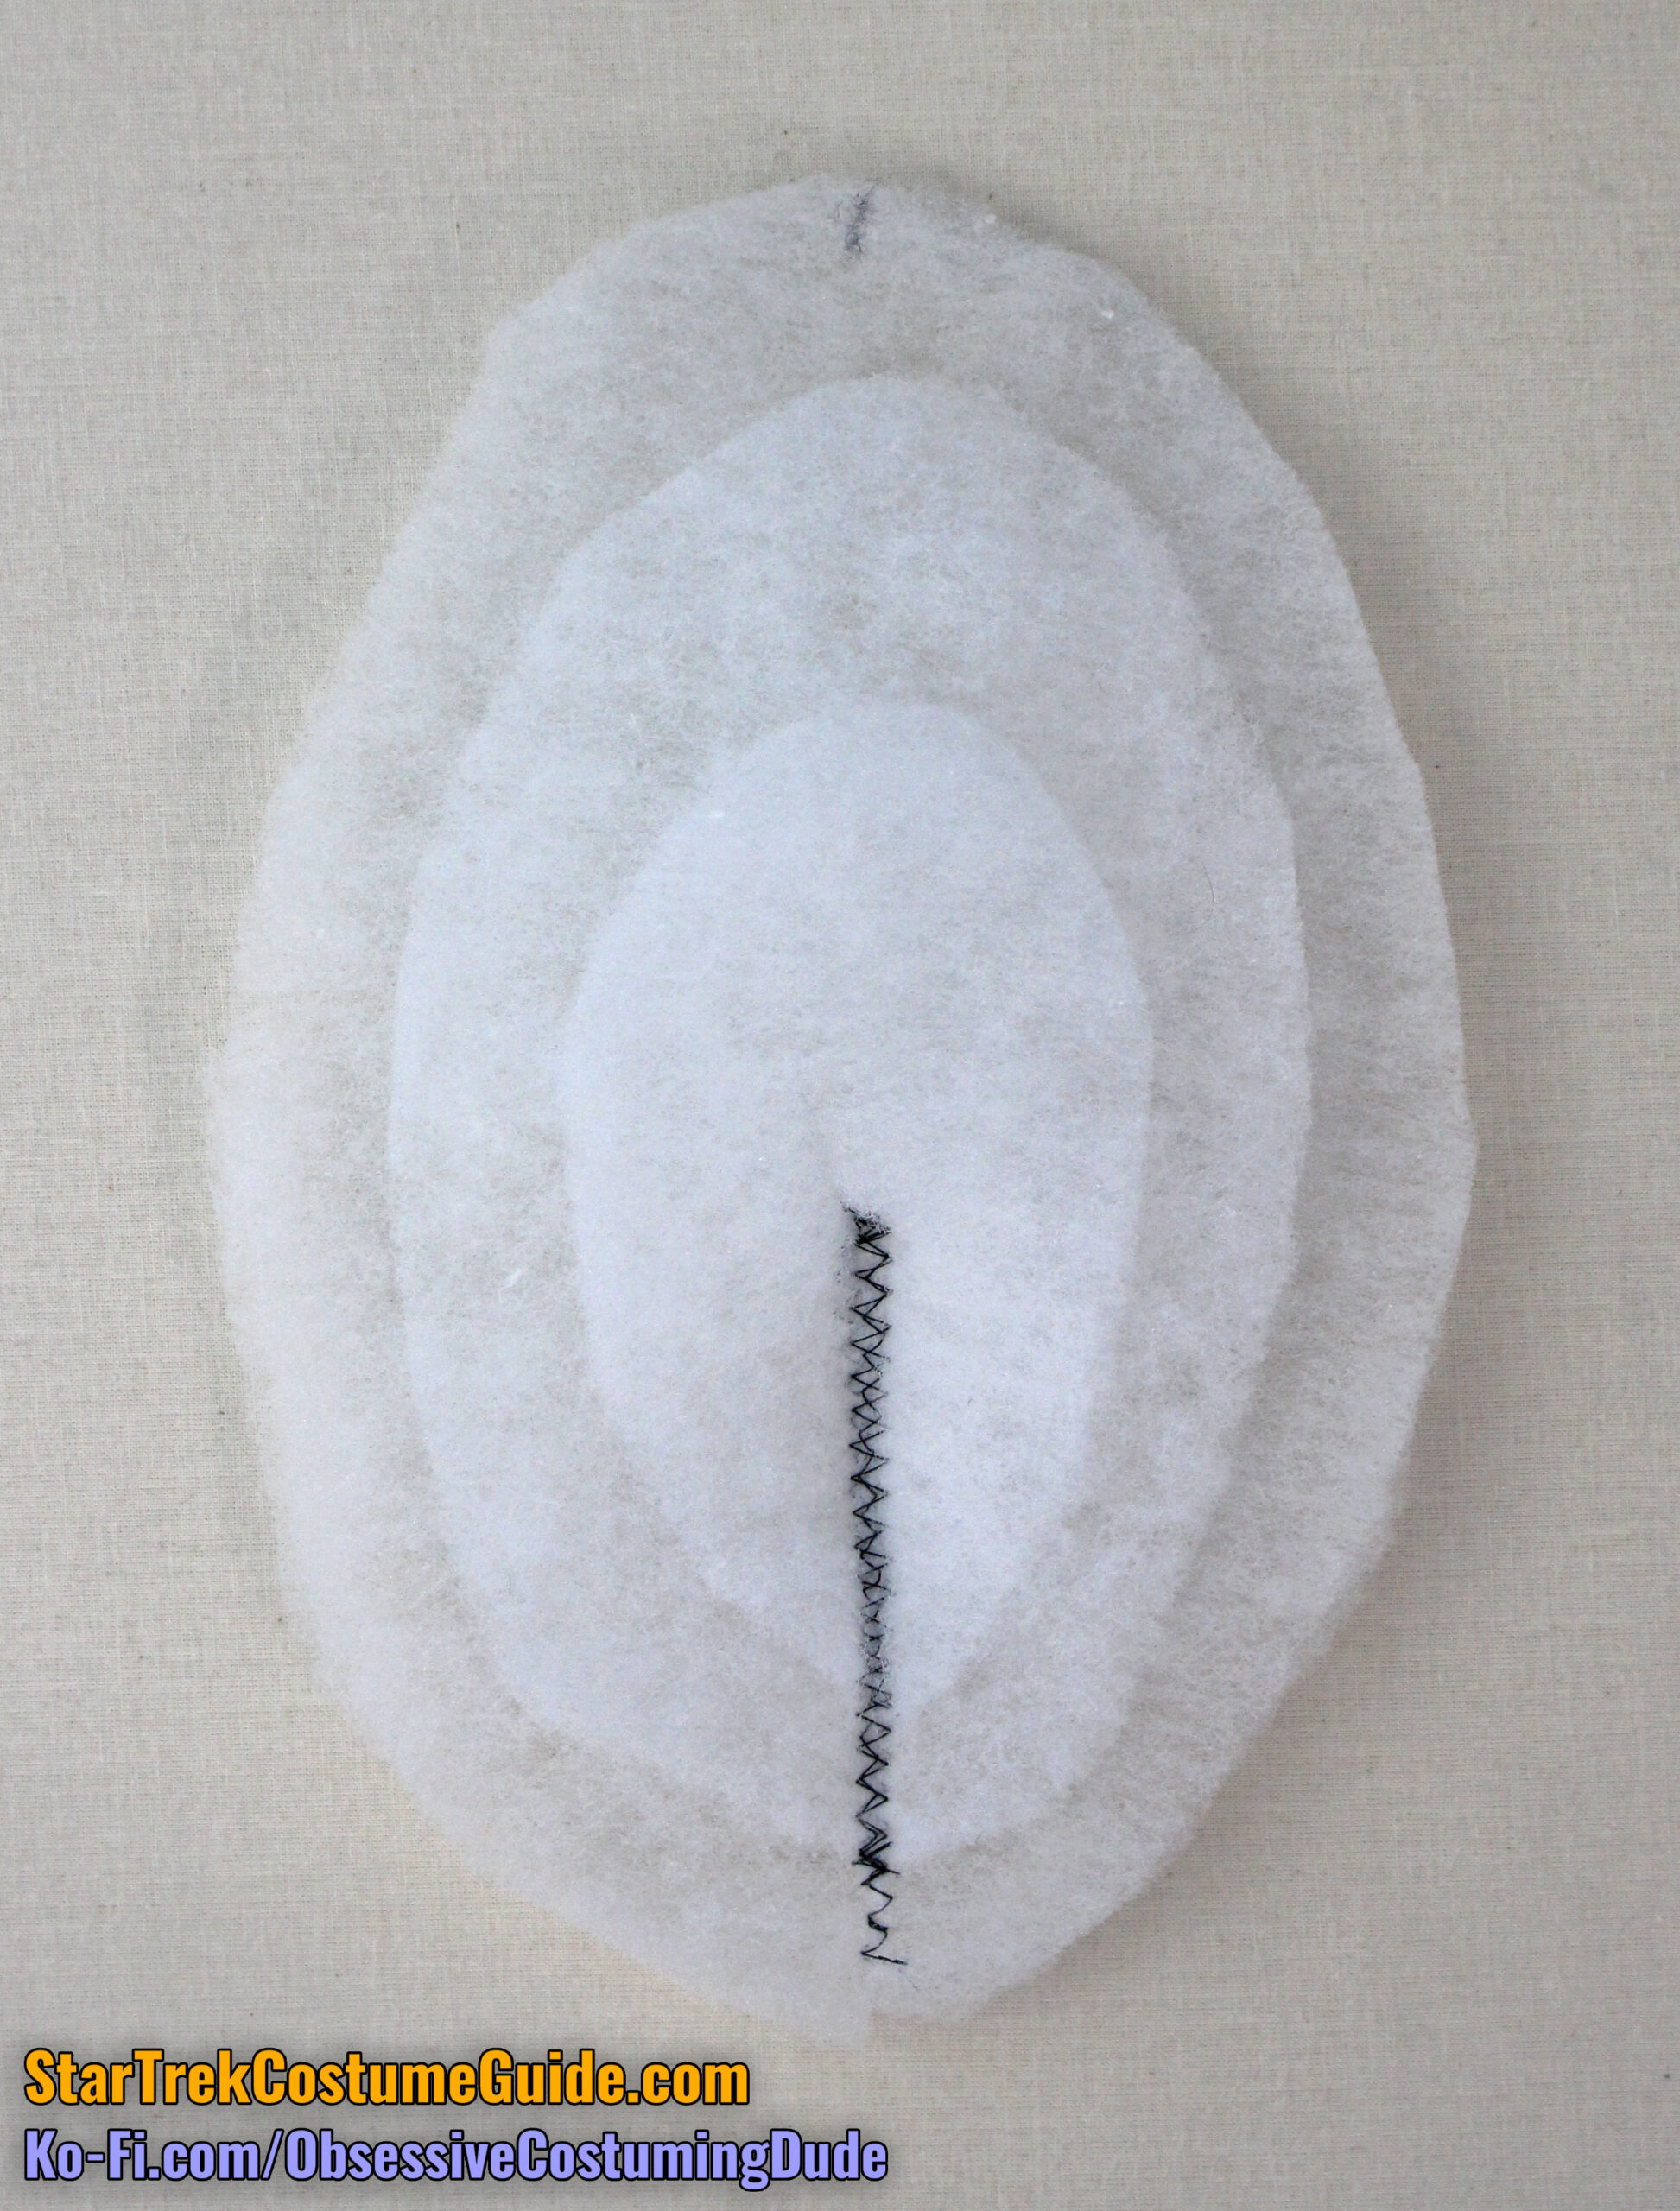
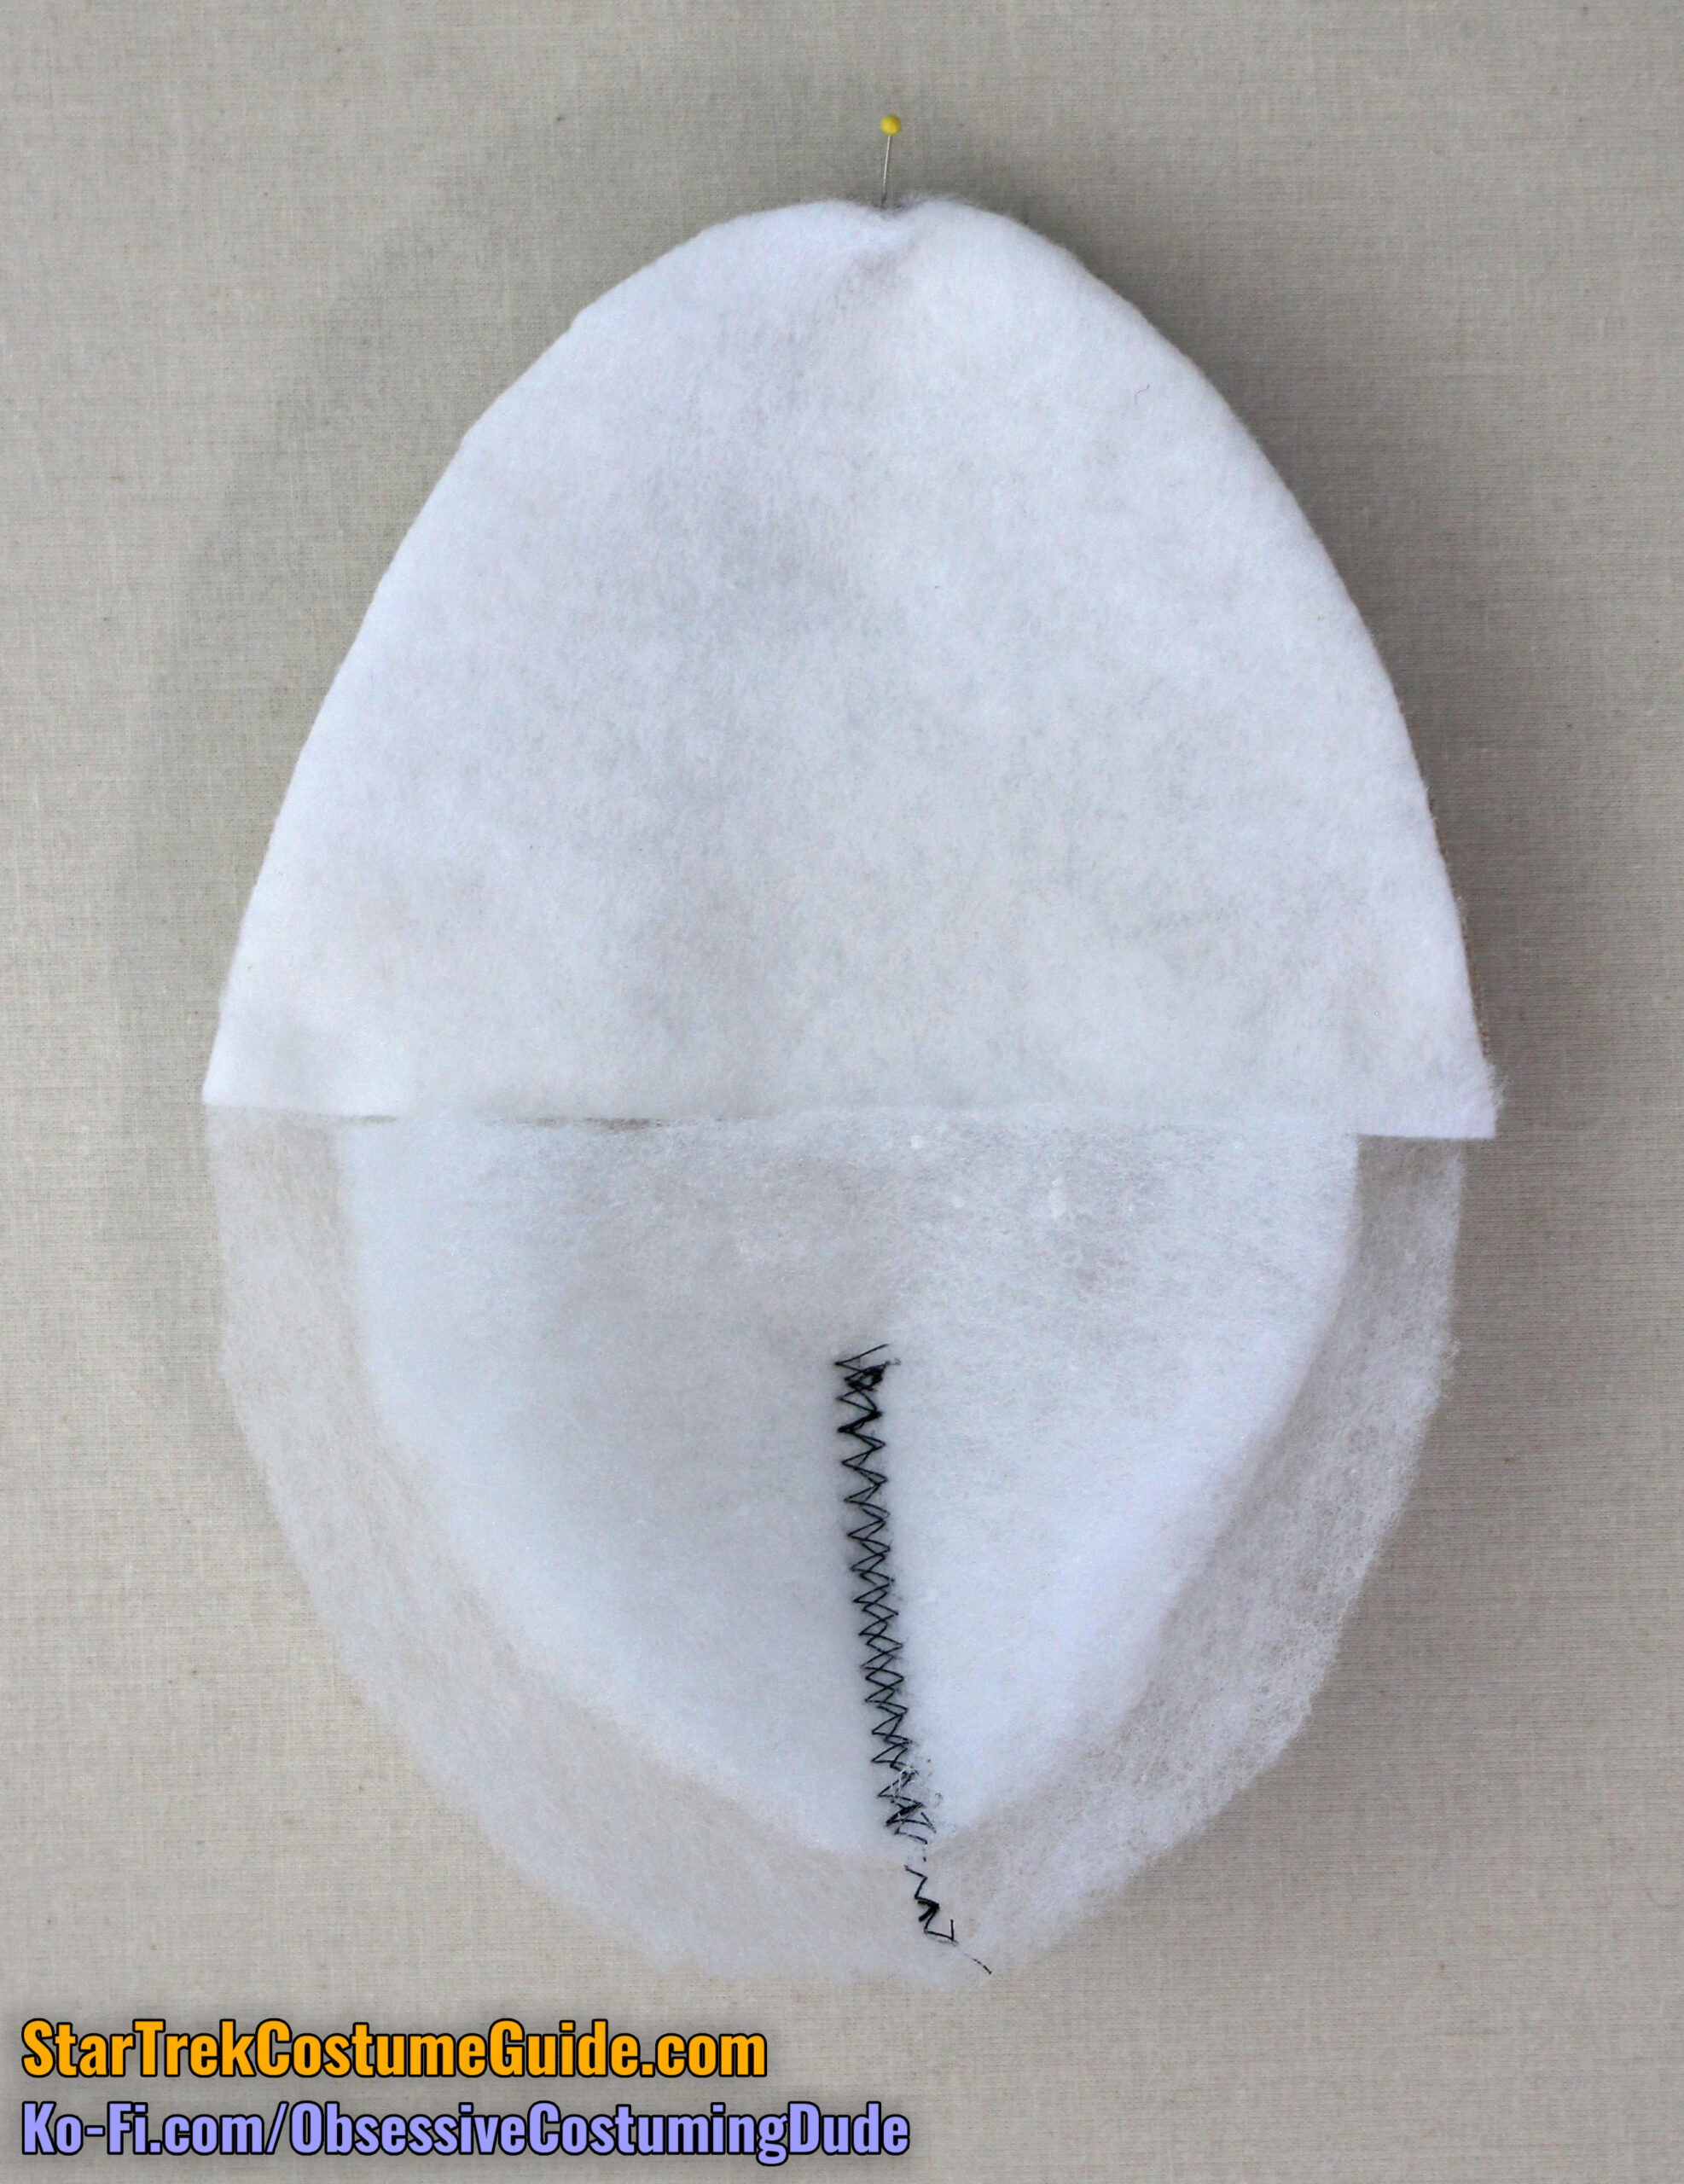
Place the two layers of batting together, matching darts and shoulder seams.
Trim away about ¾” from the second layer of batting.
Anchor the two layers of batting together over the dart with another zig-zag stitch.
For the men’s shoulder pad the process is the same, but I suggest using three layers of batting and grading them in larger increments toward the shoulder seam.
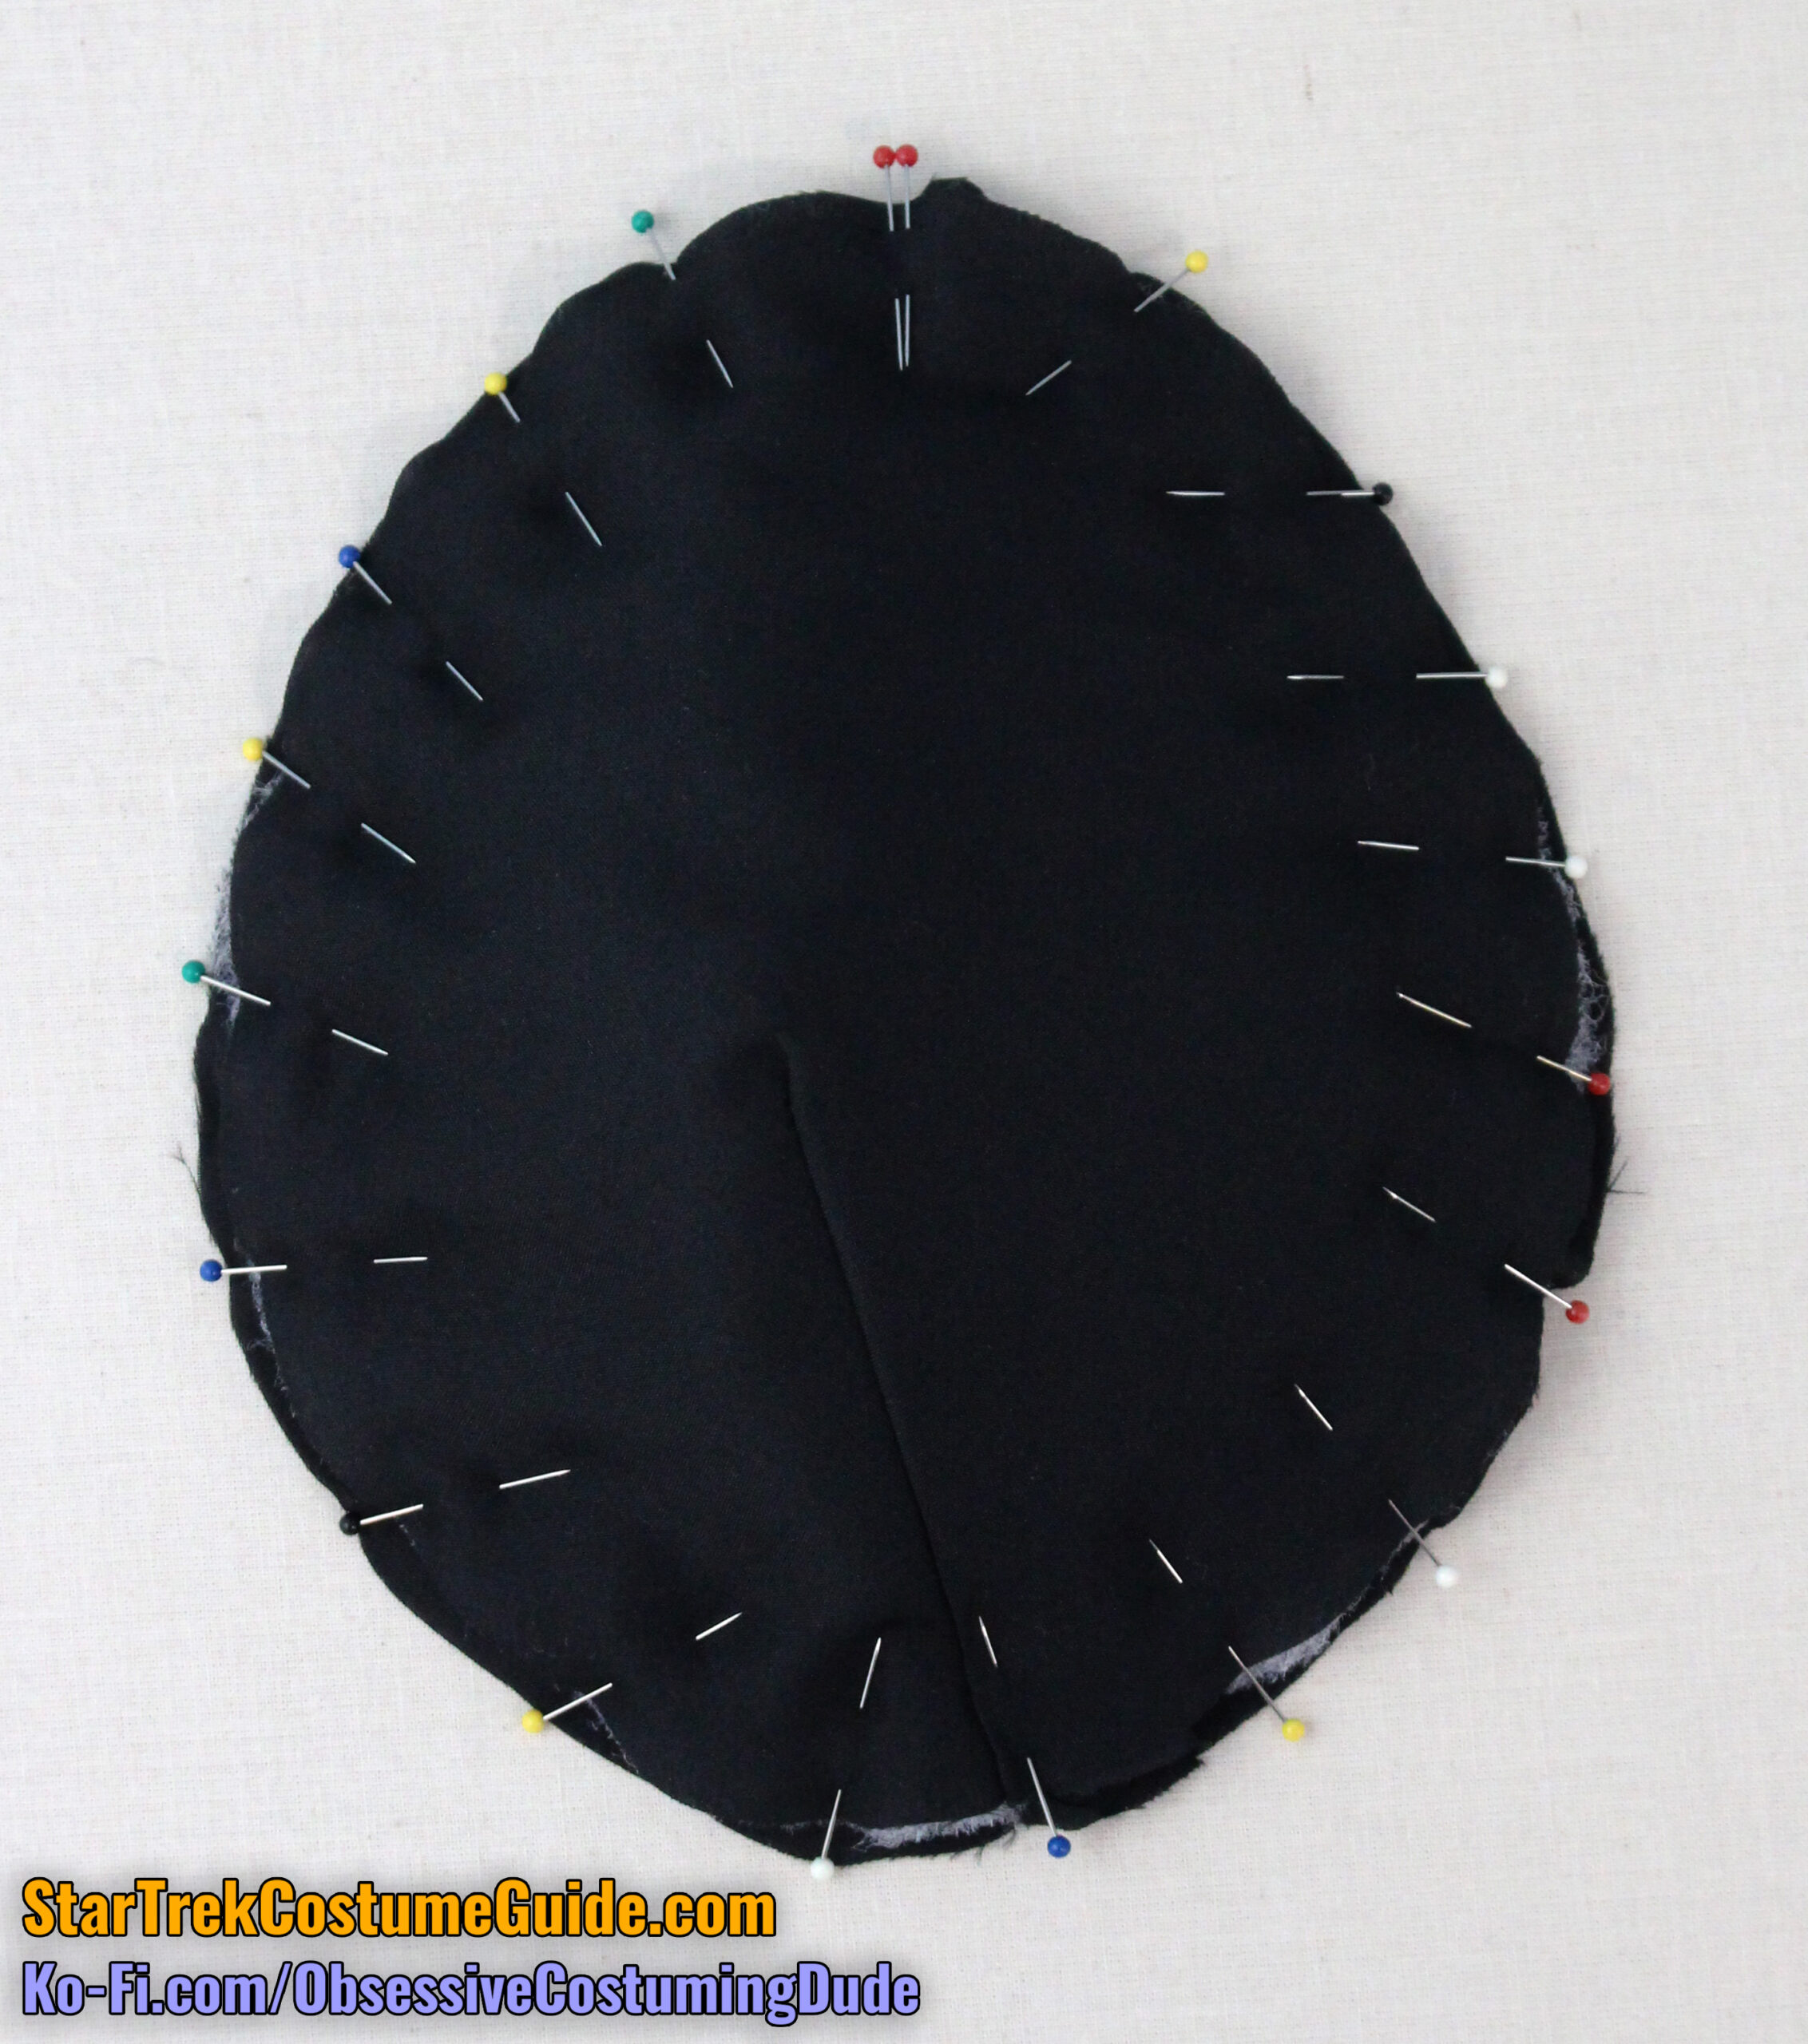
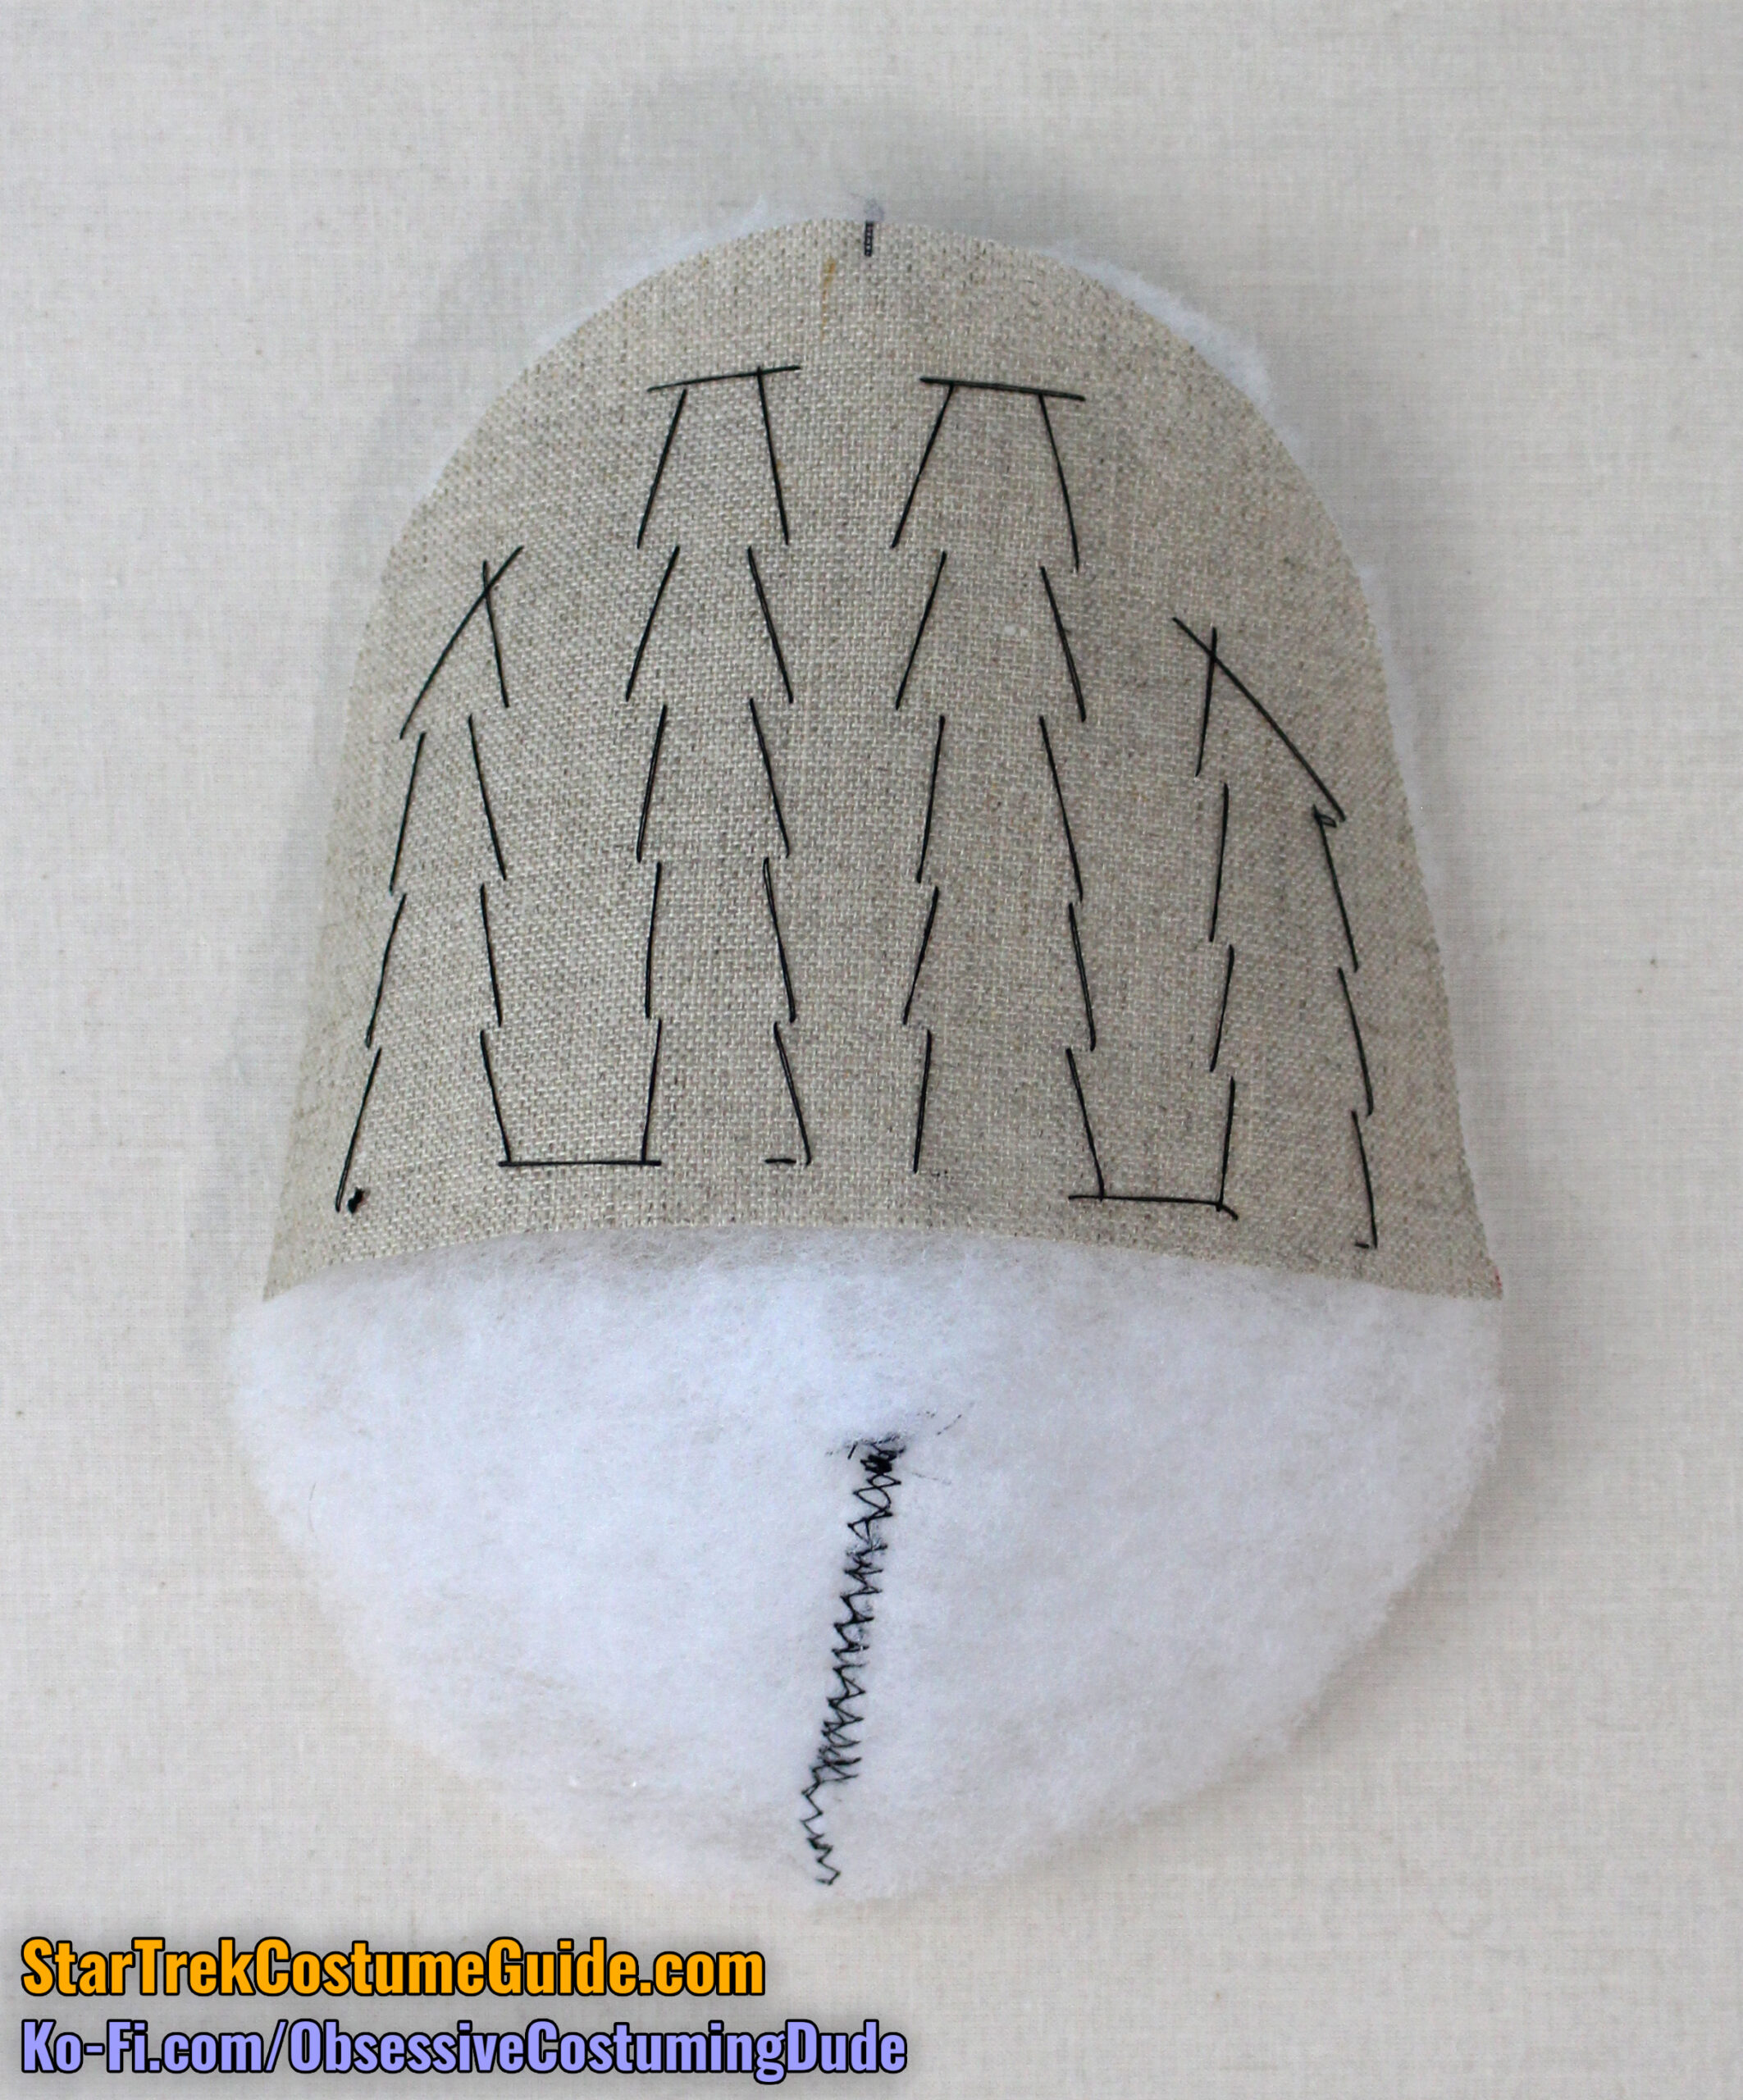
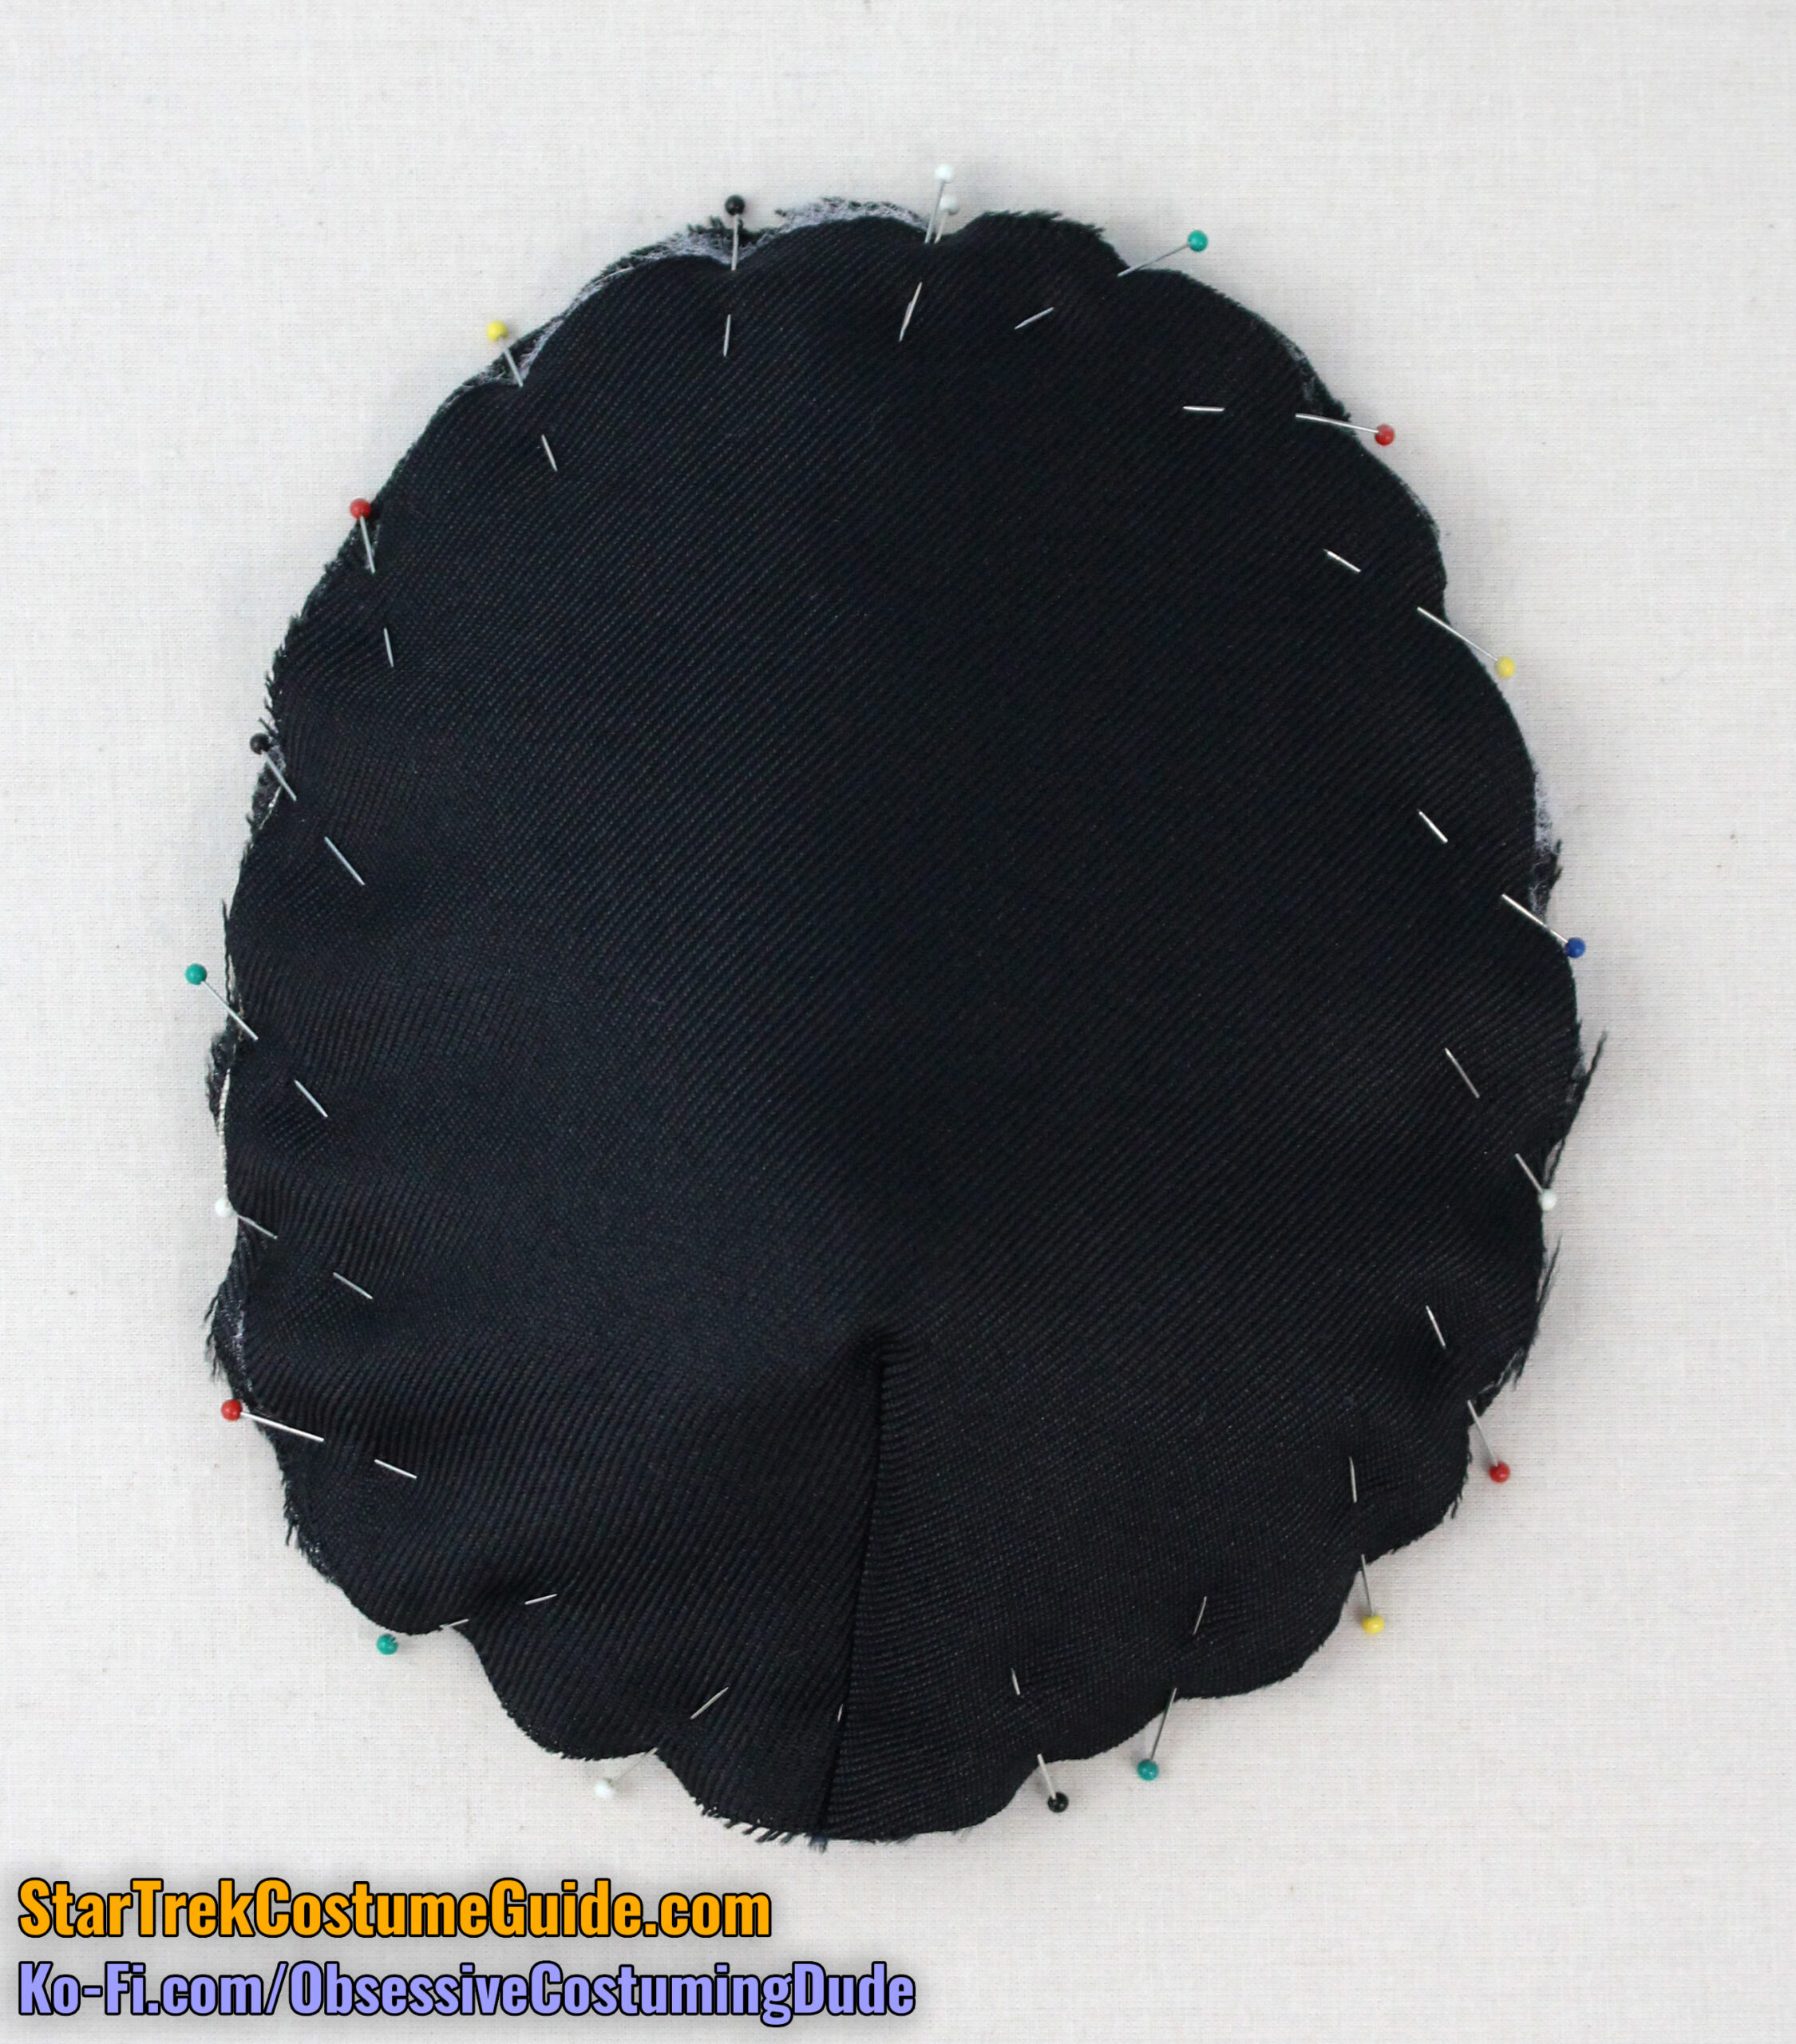
“Sandwich” the batting assembly between the two layers of lining, matching darts and shoulder seams.
Pin the layers together along the entire perimeter.
I recommend pulling the bottom layer of lining slightly tighter to help pull the pad into shape. (The edges won’t quite line up, but that’s fine.)
Using a quilting/walking foot, sew the shoulder pad closed ⅜” from the edge.
Stitch again ⅛” outside the first row of stitching, ¼” from the edge of the pad.
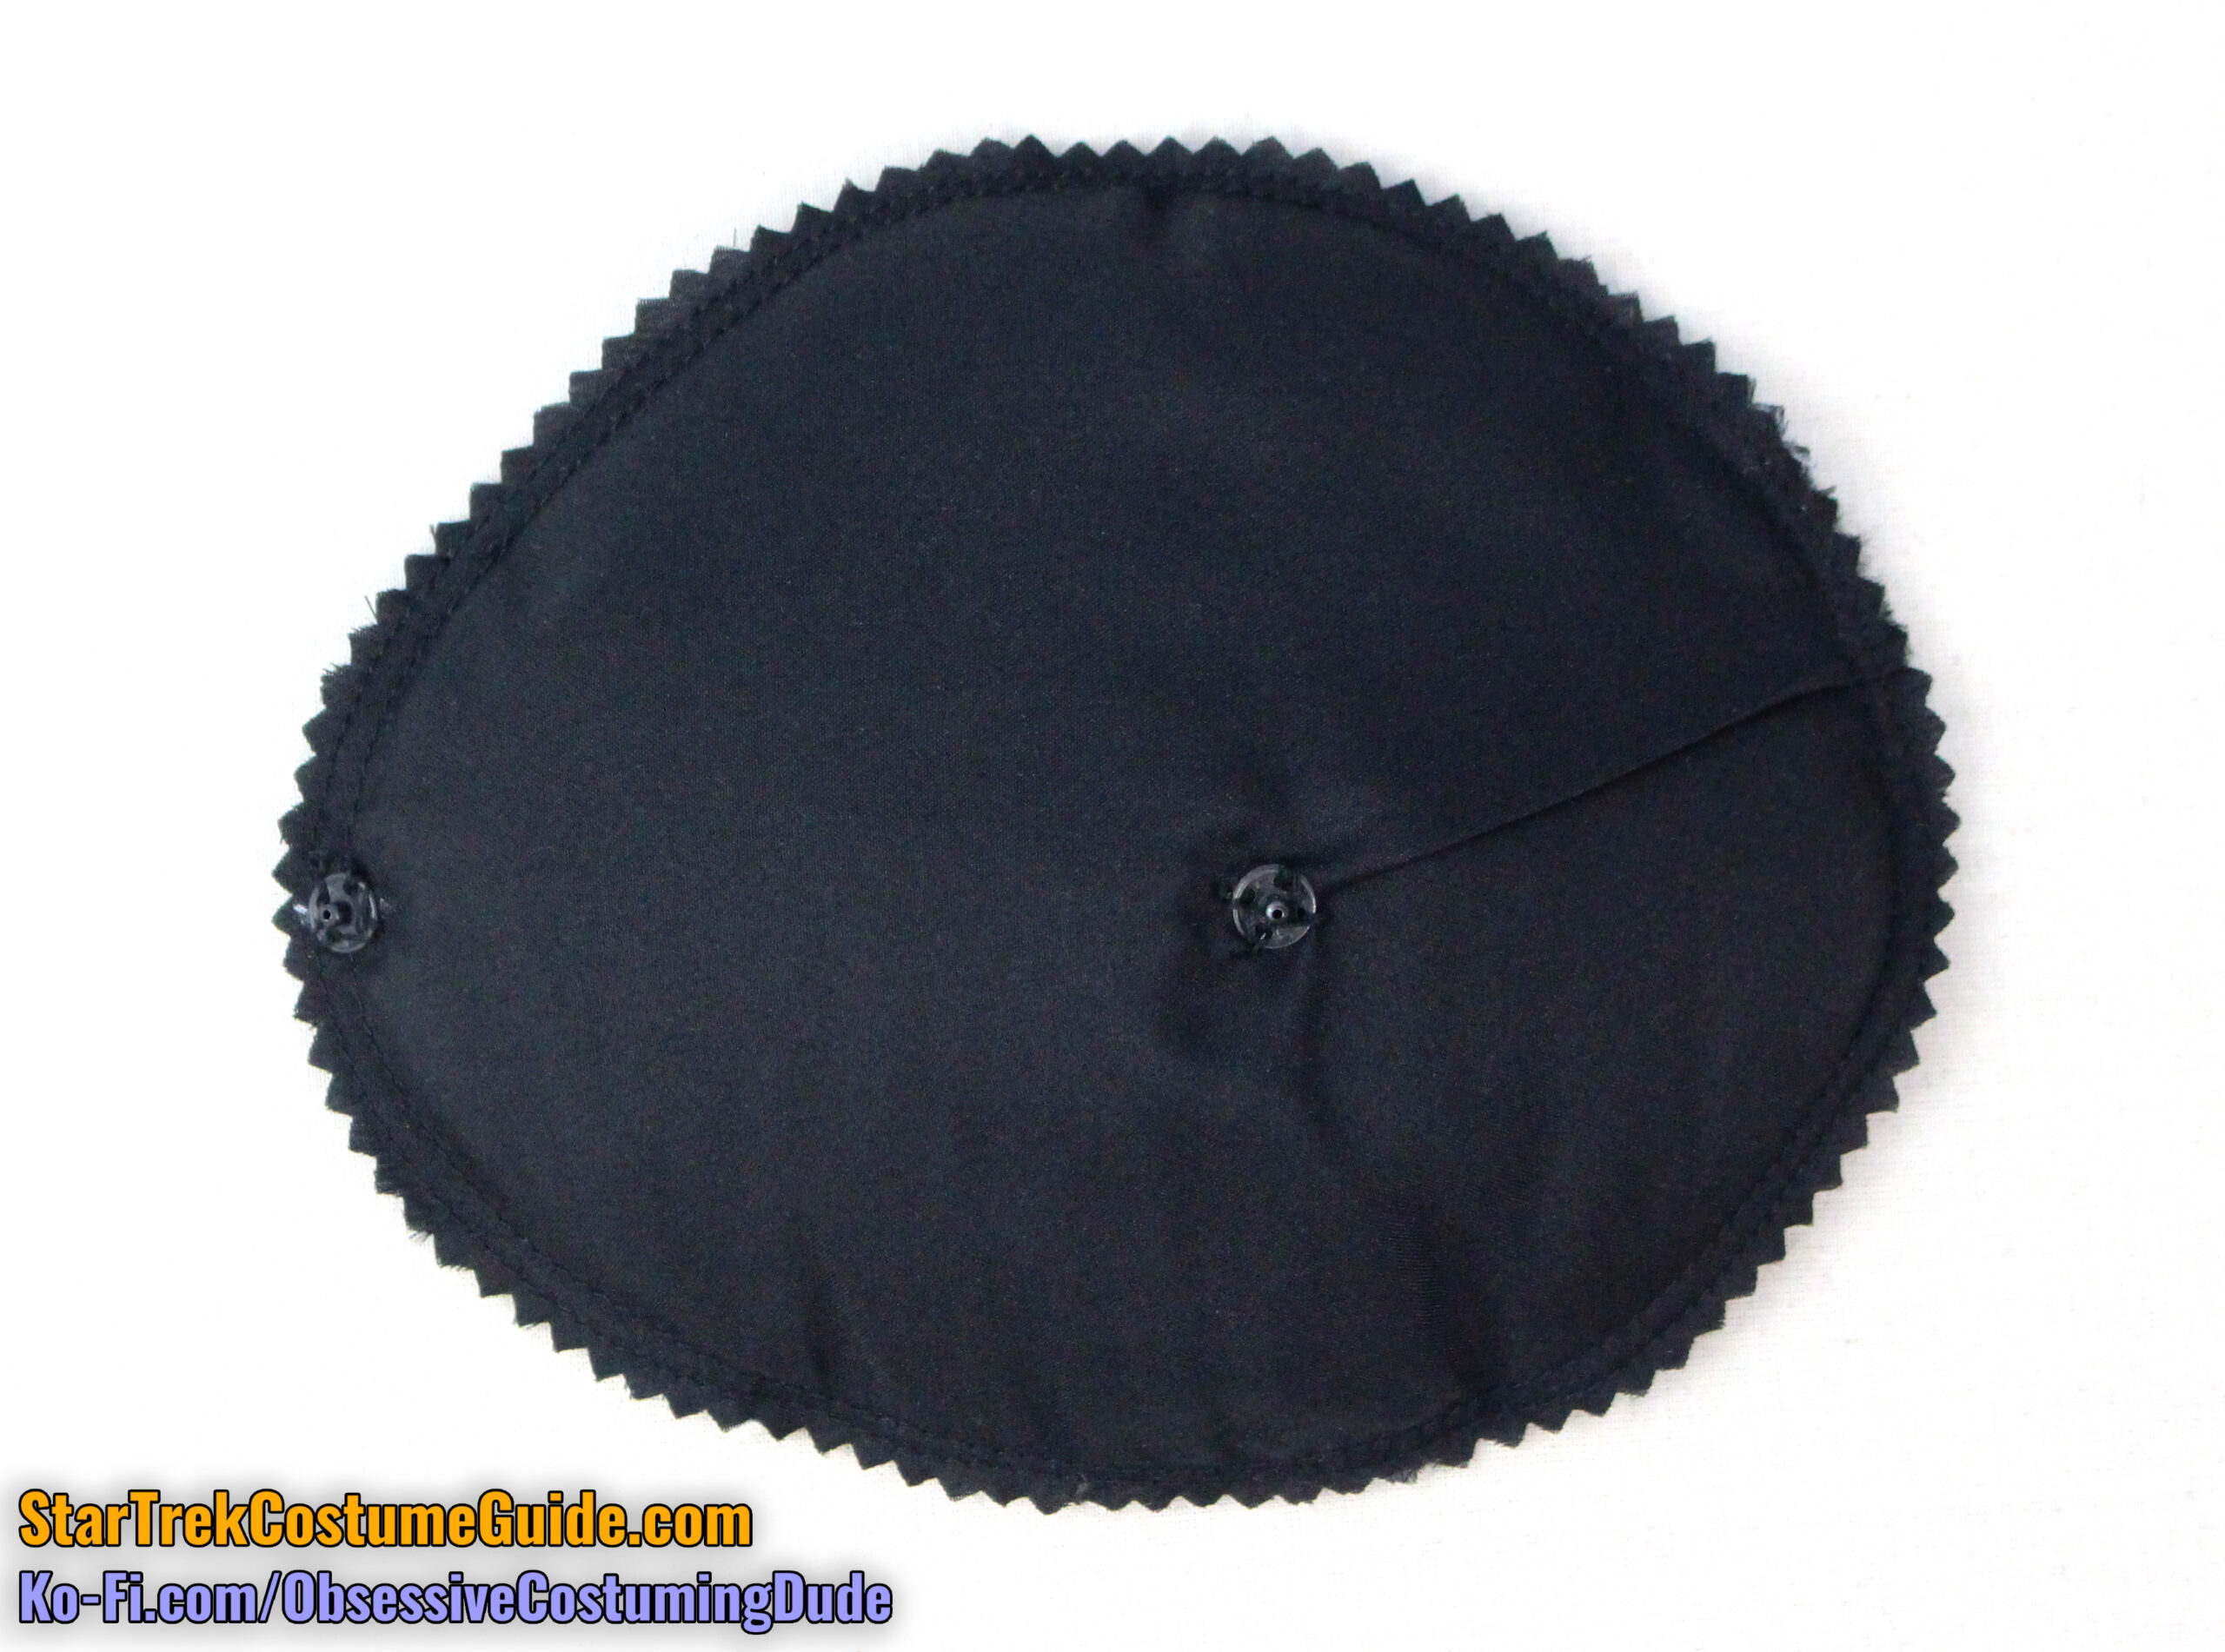
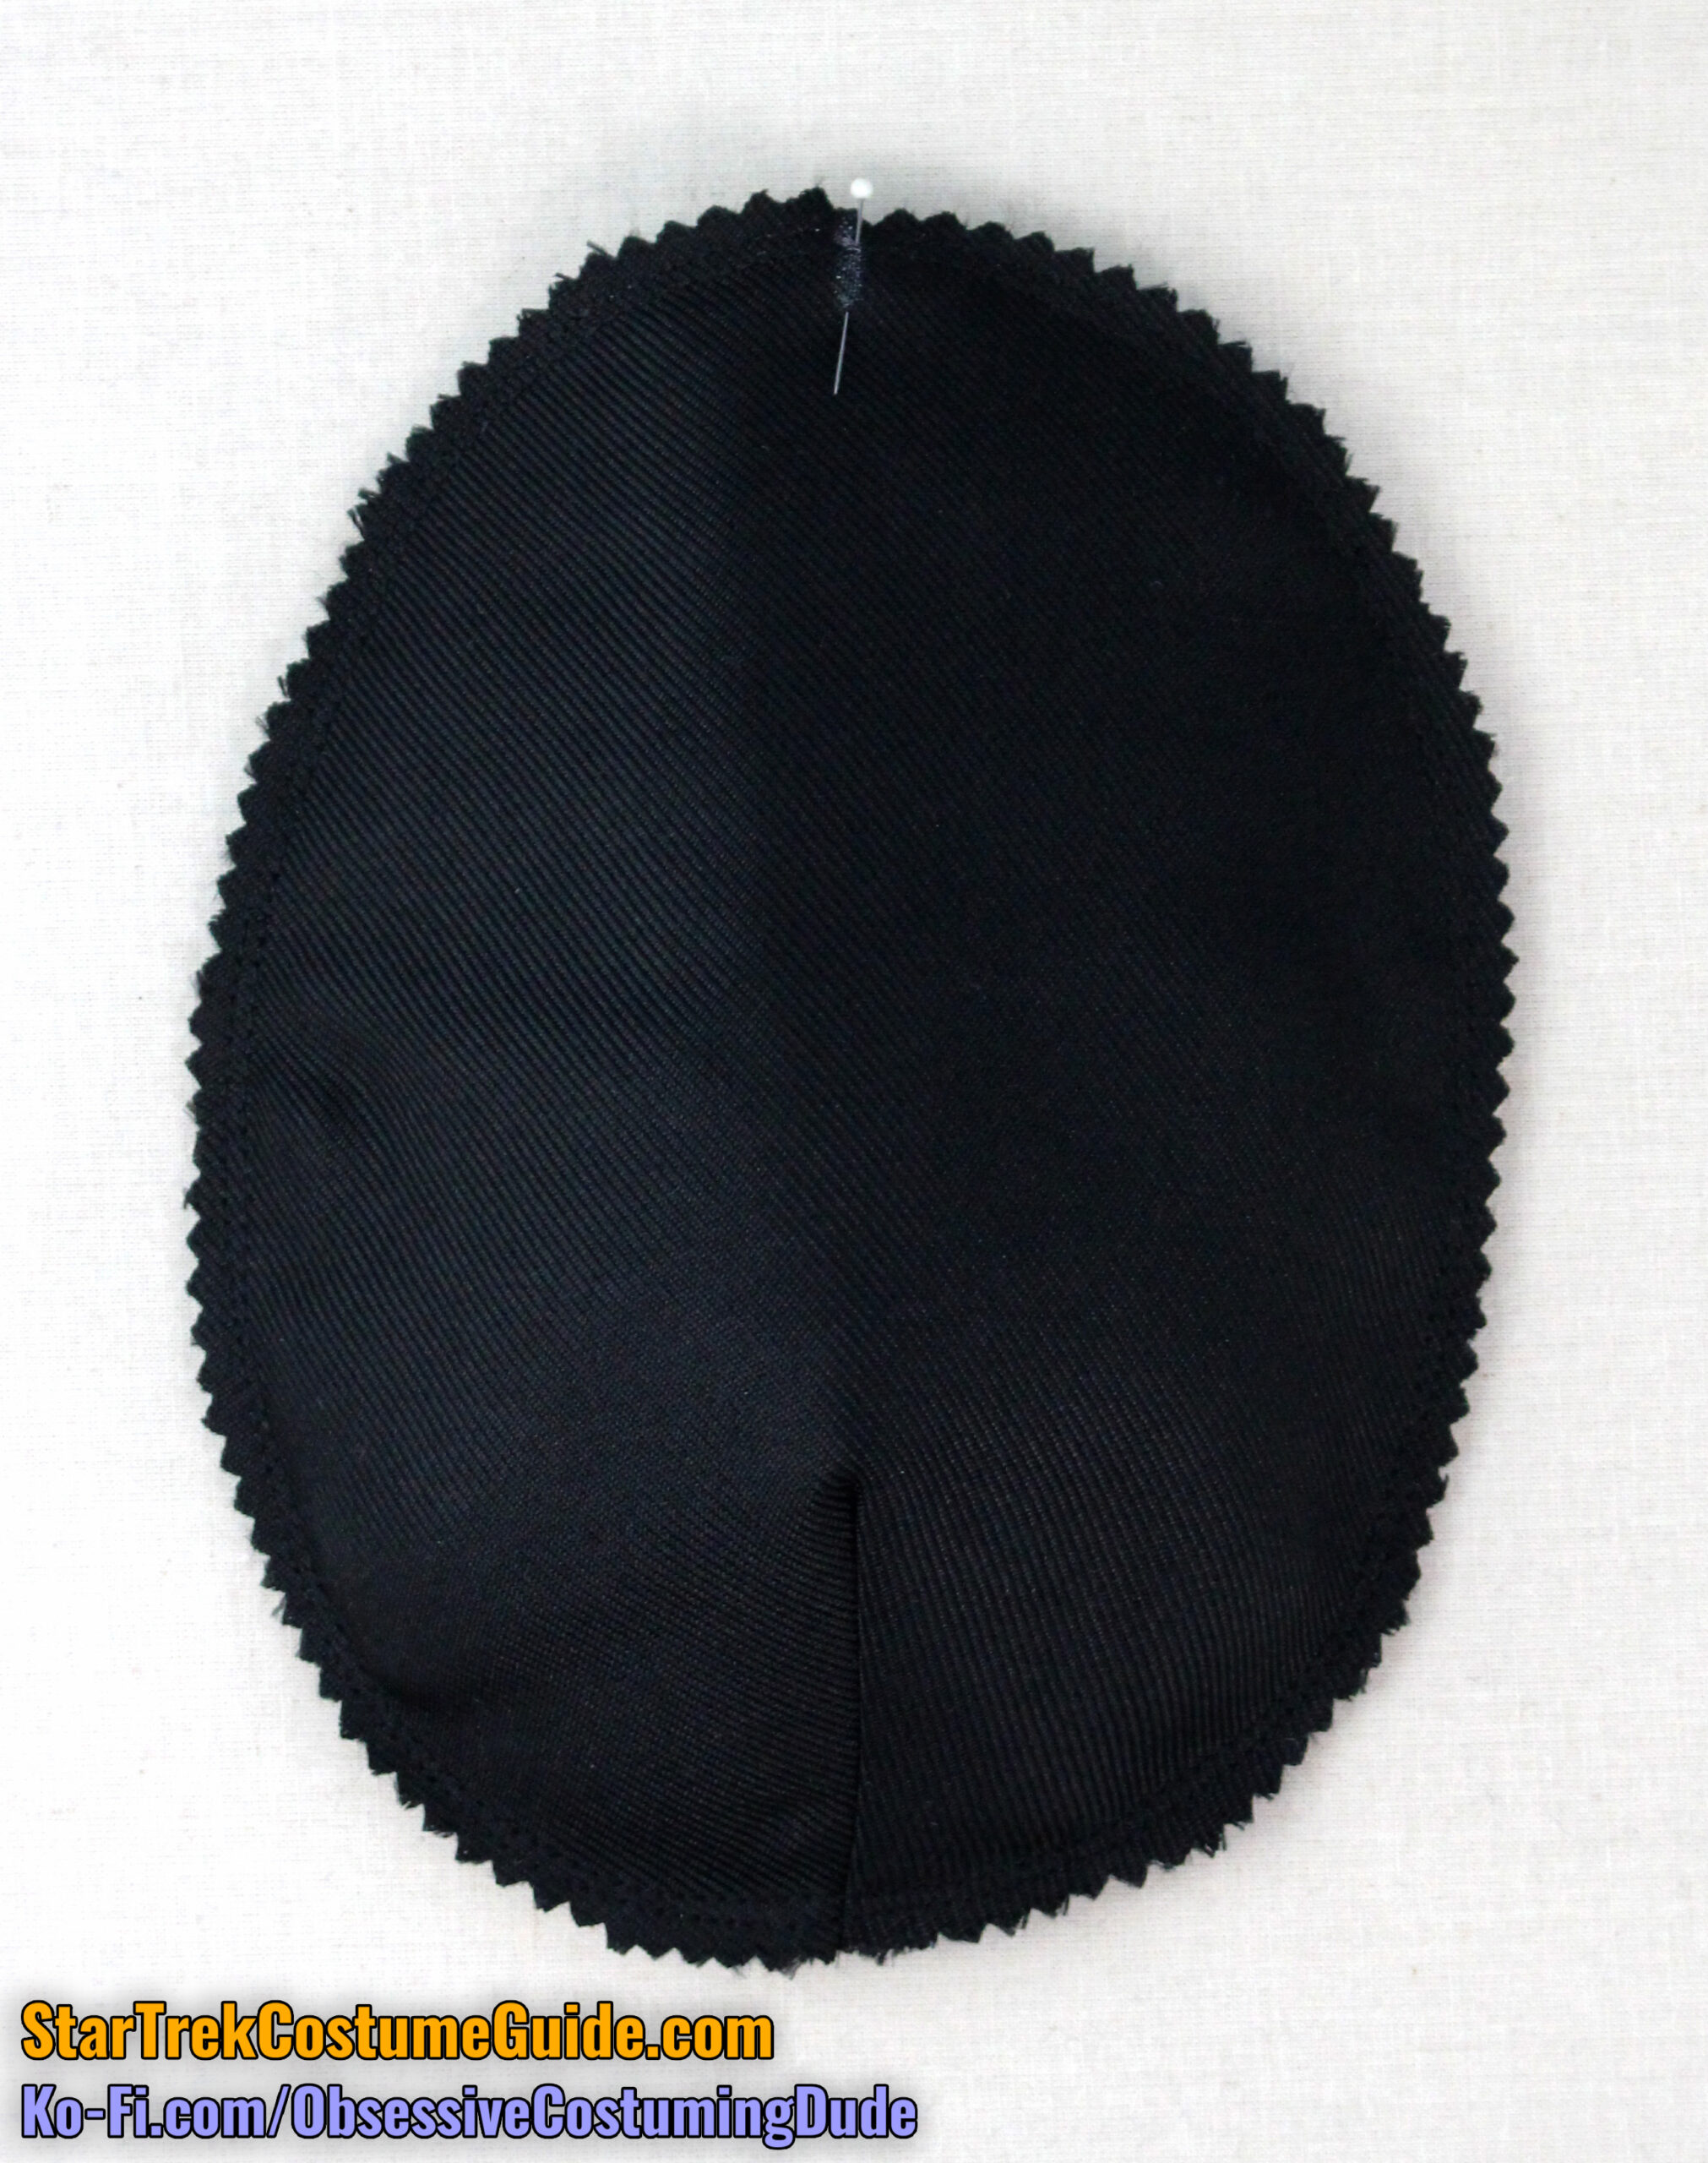
Trim the edge of the pad with pinking shears.
Steam the shoulder pad into shape over a tailor’s ham.
Hand-sew a pair of snaps to the pad – one close to the edge at the shoulder seam, and another at the tip of the dart. (The “male” end goes on the pad, and the “female” end goes inside the uniform.)
Repeat for the other shoulder pad.
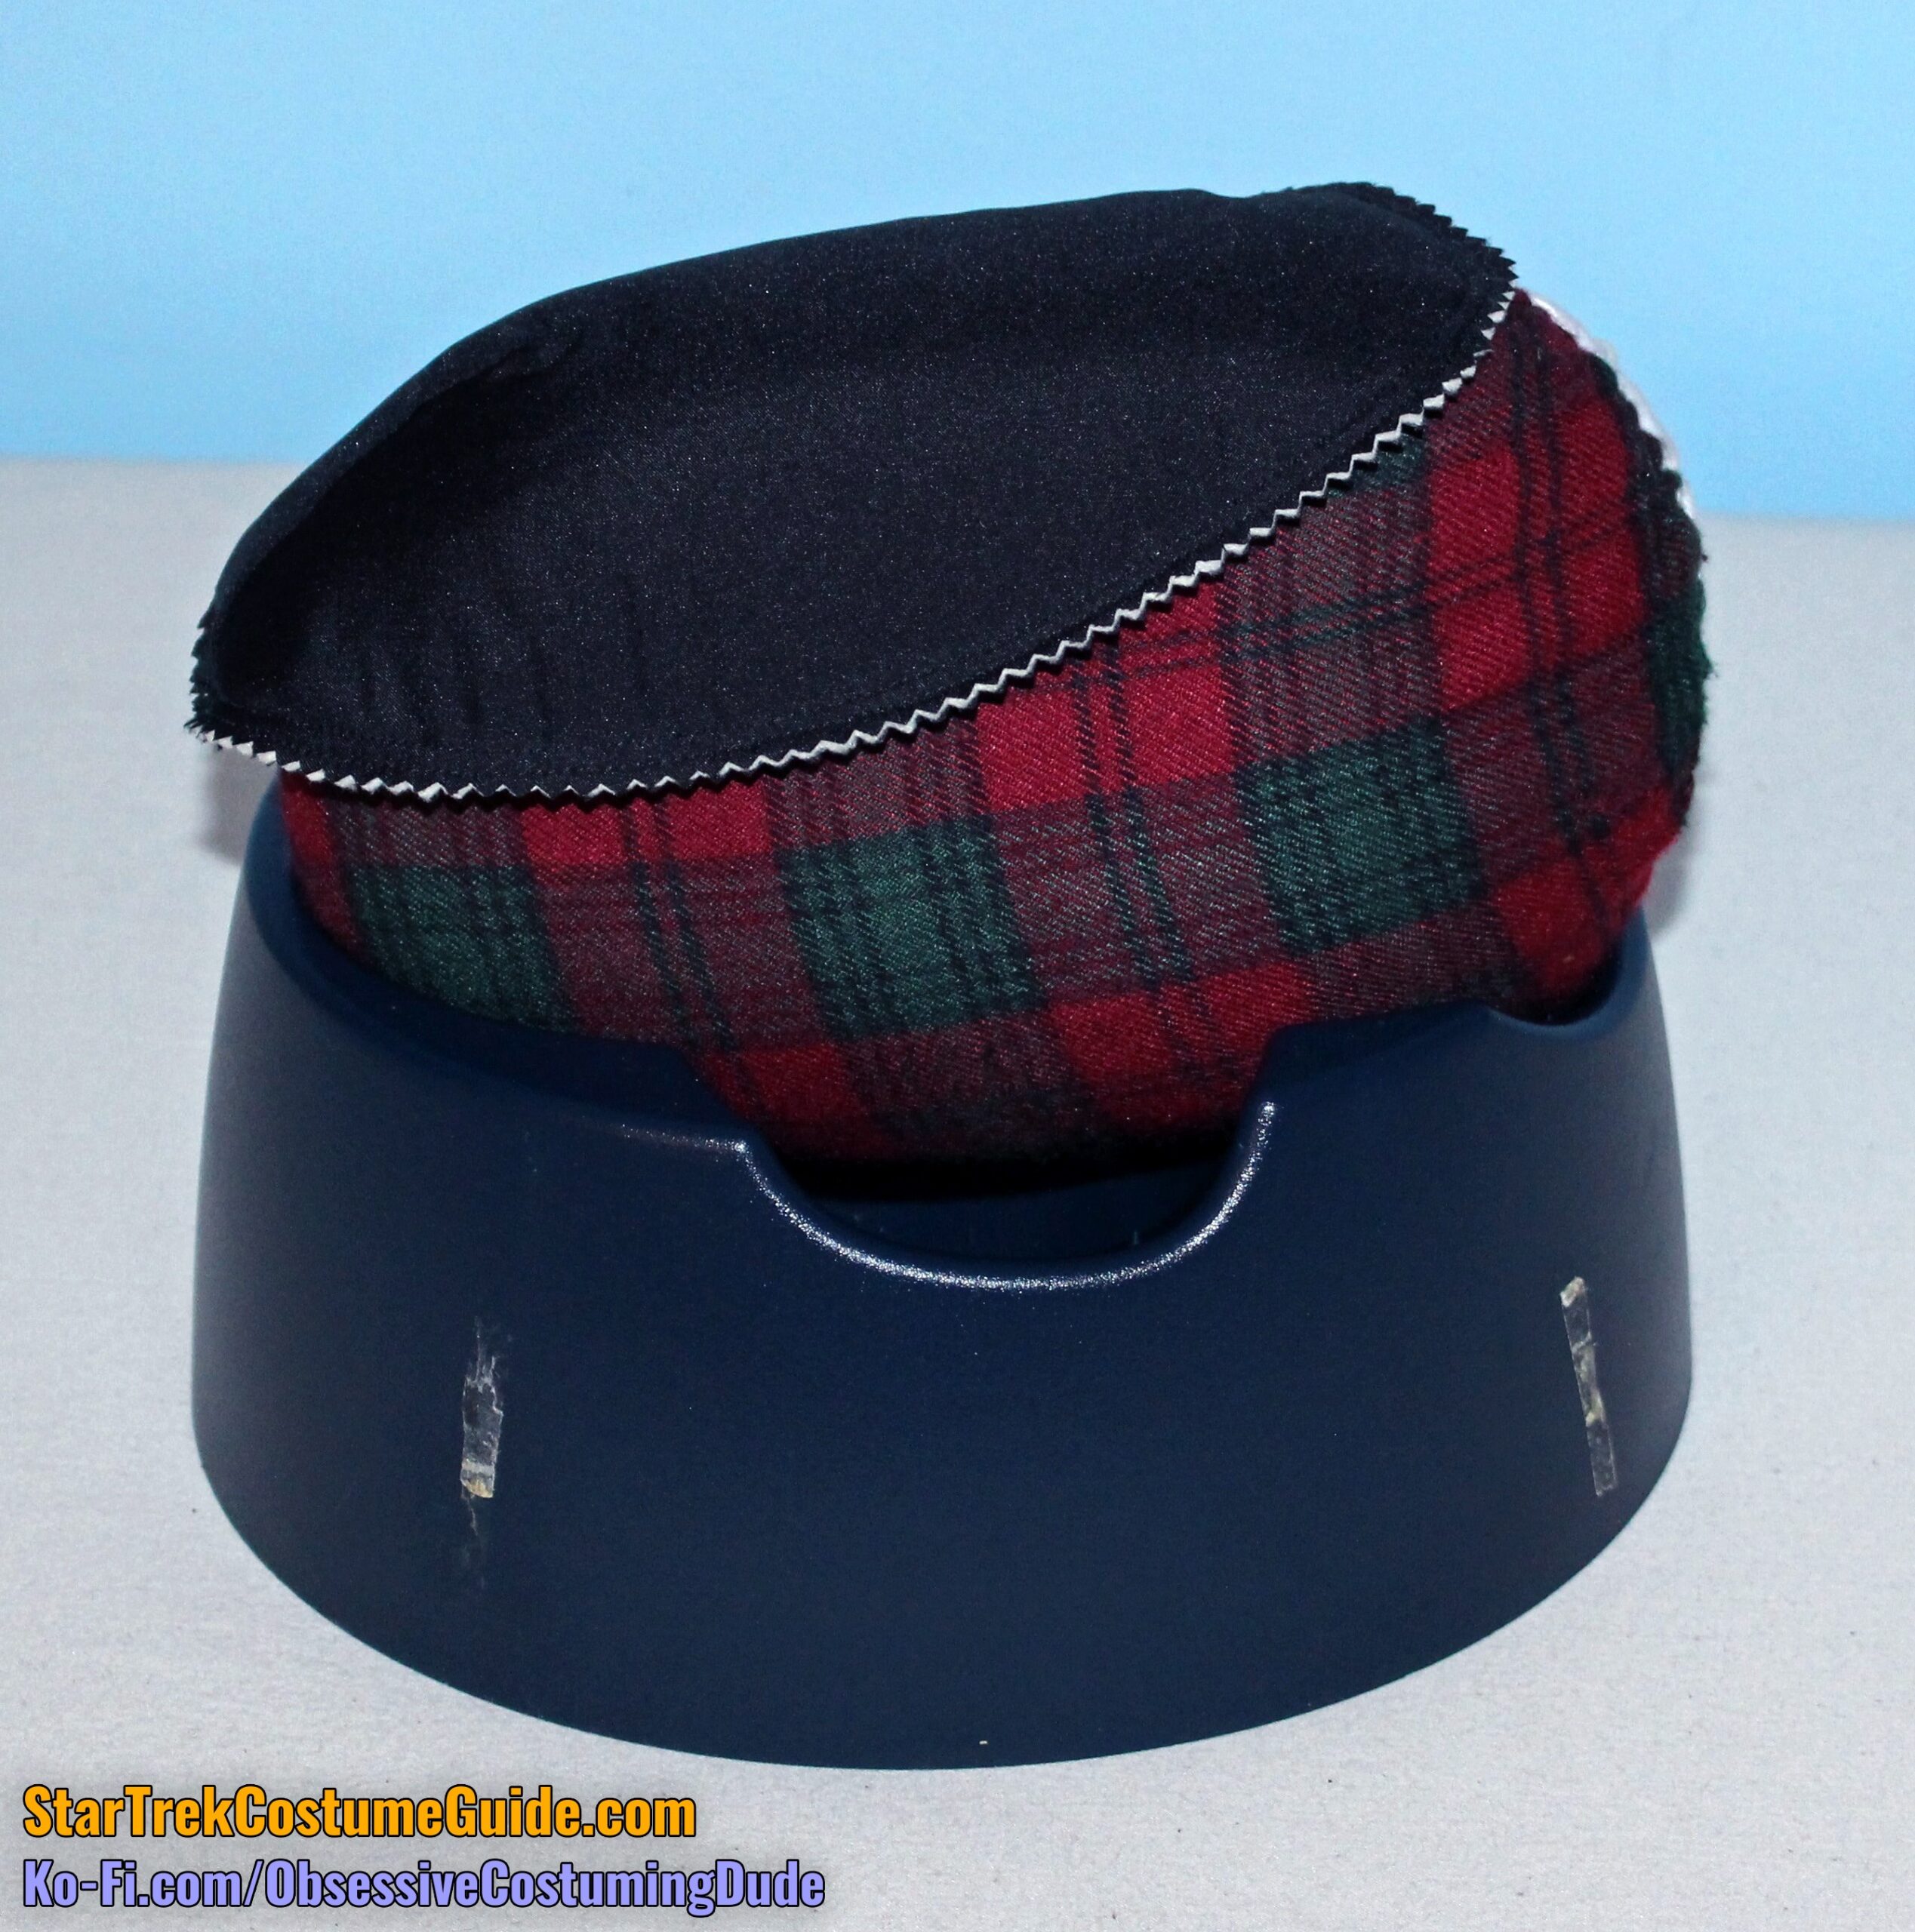
The later-style shoulder pads are a bit more involved … and to be honest, even after studying a few pairs in-person, I’m not entirely sure how they were made, or with what materials.
But the process I describe here will produce a convincing facsimile.
Use pattern piece U2 for the women’s version, and use the same piece U for the men’s.
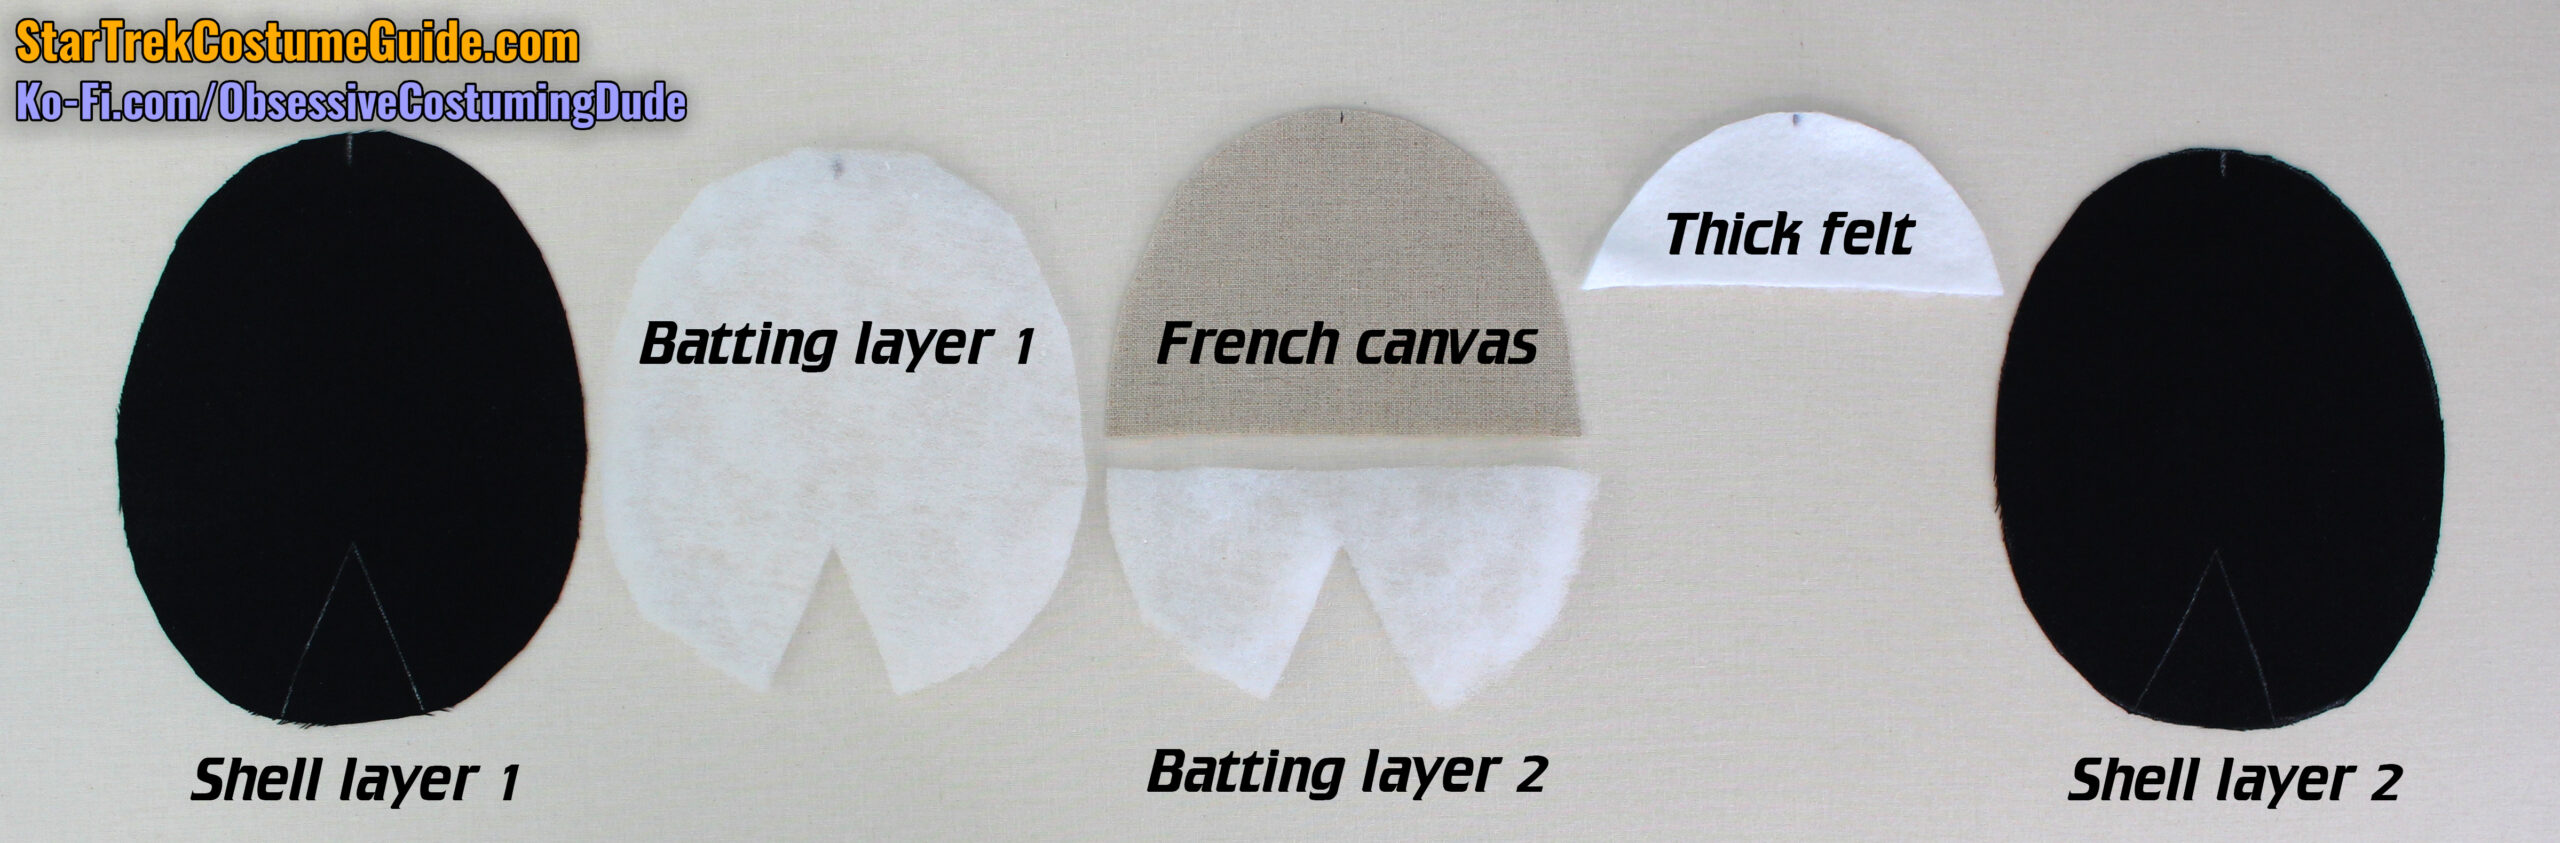
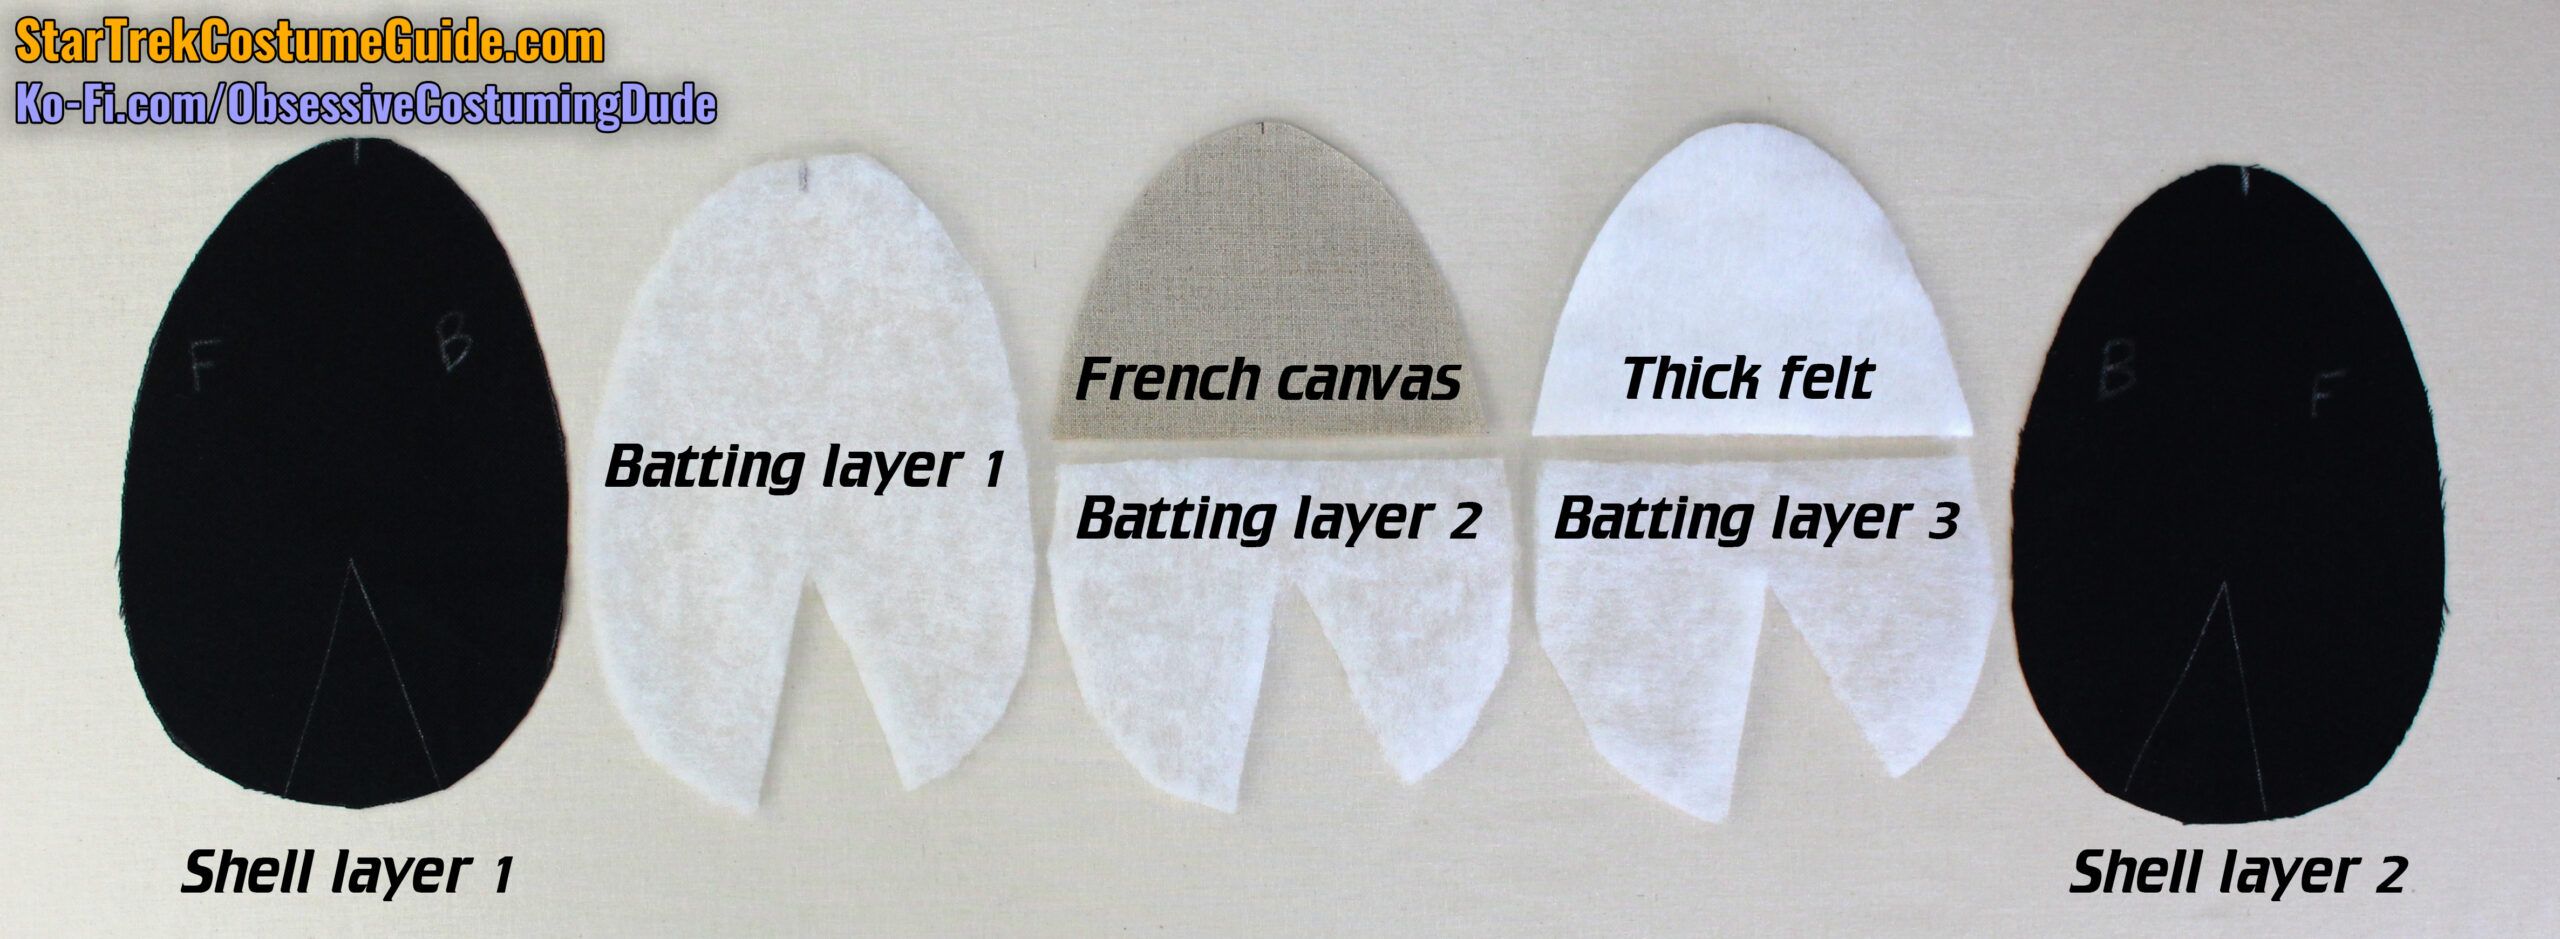
For the women’s pad you’ll need two shell layers, a layer of low-loft batting the size of the entire pad, a layer of heavy French canvas roughly two-thirds the size of the pad, a second layer of low-loft batting for the outside of the pad, and a small cut of thick felt for the opposite area.
The men’s pad is similar, but the proportions are slightly different, and you’ll probably want a third layer of low-loft batting for the outer area of the pad.
You can use black lining for the shell fabric, but the screen-used shoulder pads I studied were made out of a more durable fabric akin to polyester gabardine, so I recommend using that.
Sew the darts closed in the shell layers, and press the darts toward the front.
(The women’s later-style shoulder pads are symmetrical, so either direction can be the “front.”)
Close the batting darts and join the batting layers as described previously for the early shoulder pad.
“Sandwich” the batting assembly between the heavy French canvas (on top) and the thick felt (on bottom).
Women's version
Men's version
From the top, padstitch the layers together over the French canvas, gently pulling the pad into its rounded shape.
Trim the French canvas and felt about ½” from the edges.
“Sandwich” the batting assembly between the two shell layers, matching darts and shoulder seams.
Pin the layers together along the entire perimeter.
I recommend pulling the bottom layer of lining slightly tighter to help pull the pad into shape. (The edges won’t quite line up, but that’s fine.)
Using a quilting/walking foot, sew the shoulder pad closed ⅜” from the edge.
Stitch again ⅛” outside the first row of stitching, ¼” from the edge of the pad.
Trim the edge of the pad with pinking shears.
Steam the shoulder pad into shape over a tailor’s ham.
Hand-sew a pair of snaps to the pad – one close to the edge at the shoulder seam, and another at the tip of the dart. (The “male” end goes on the pad, and the “female” end goes inside the uniform.)
Repeat for the other shoulder pad.
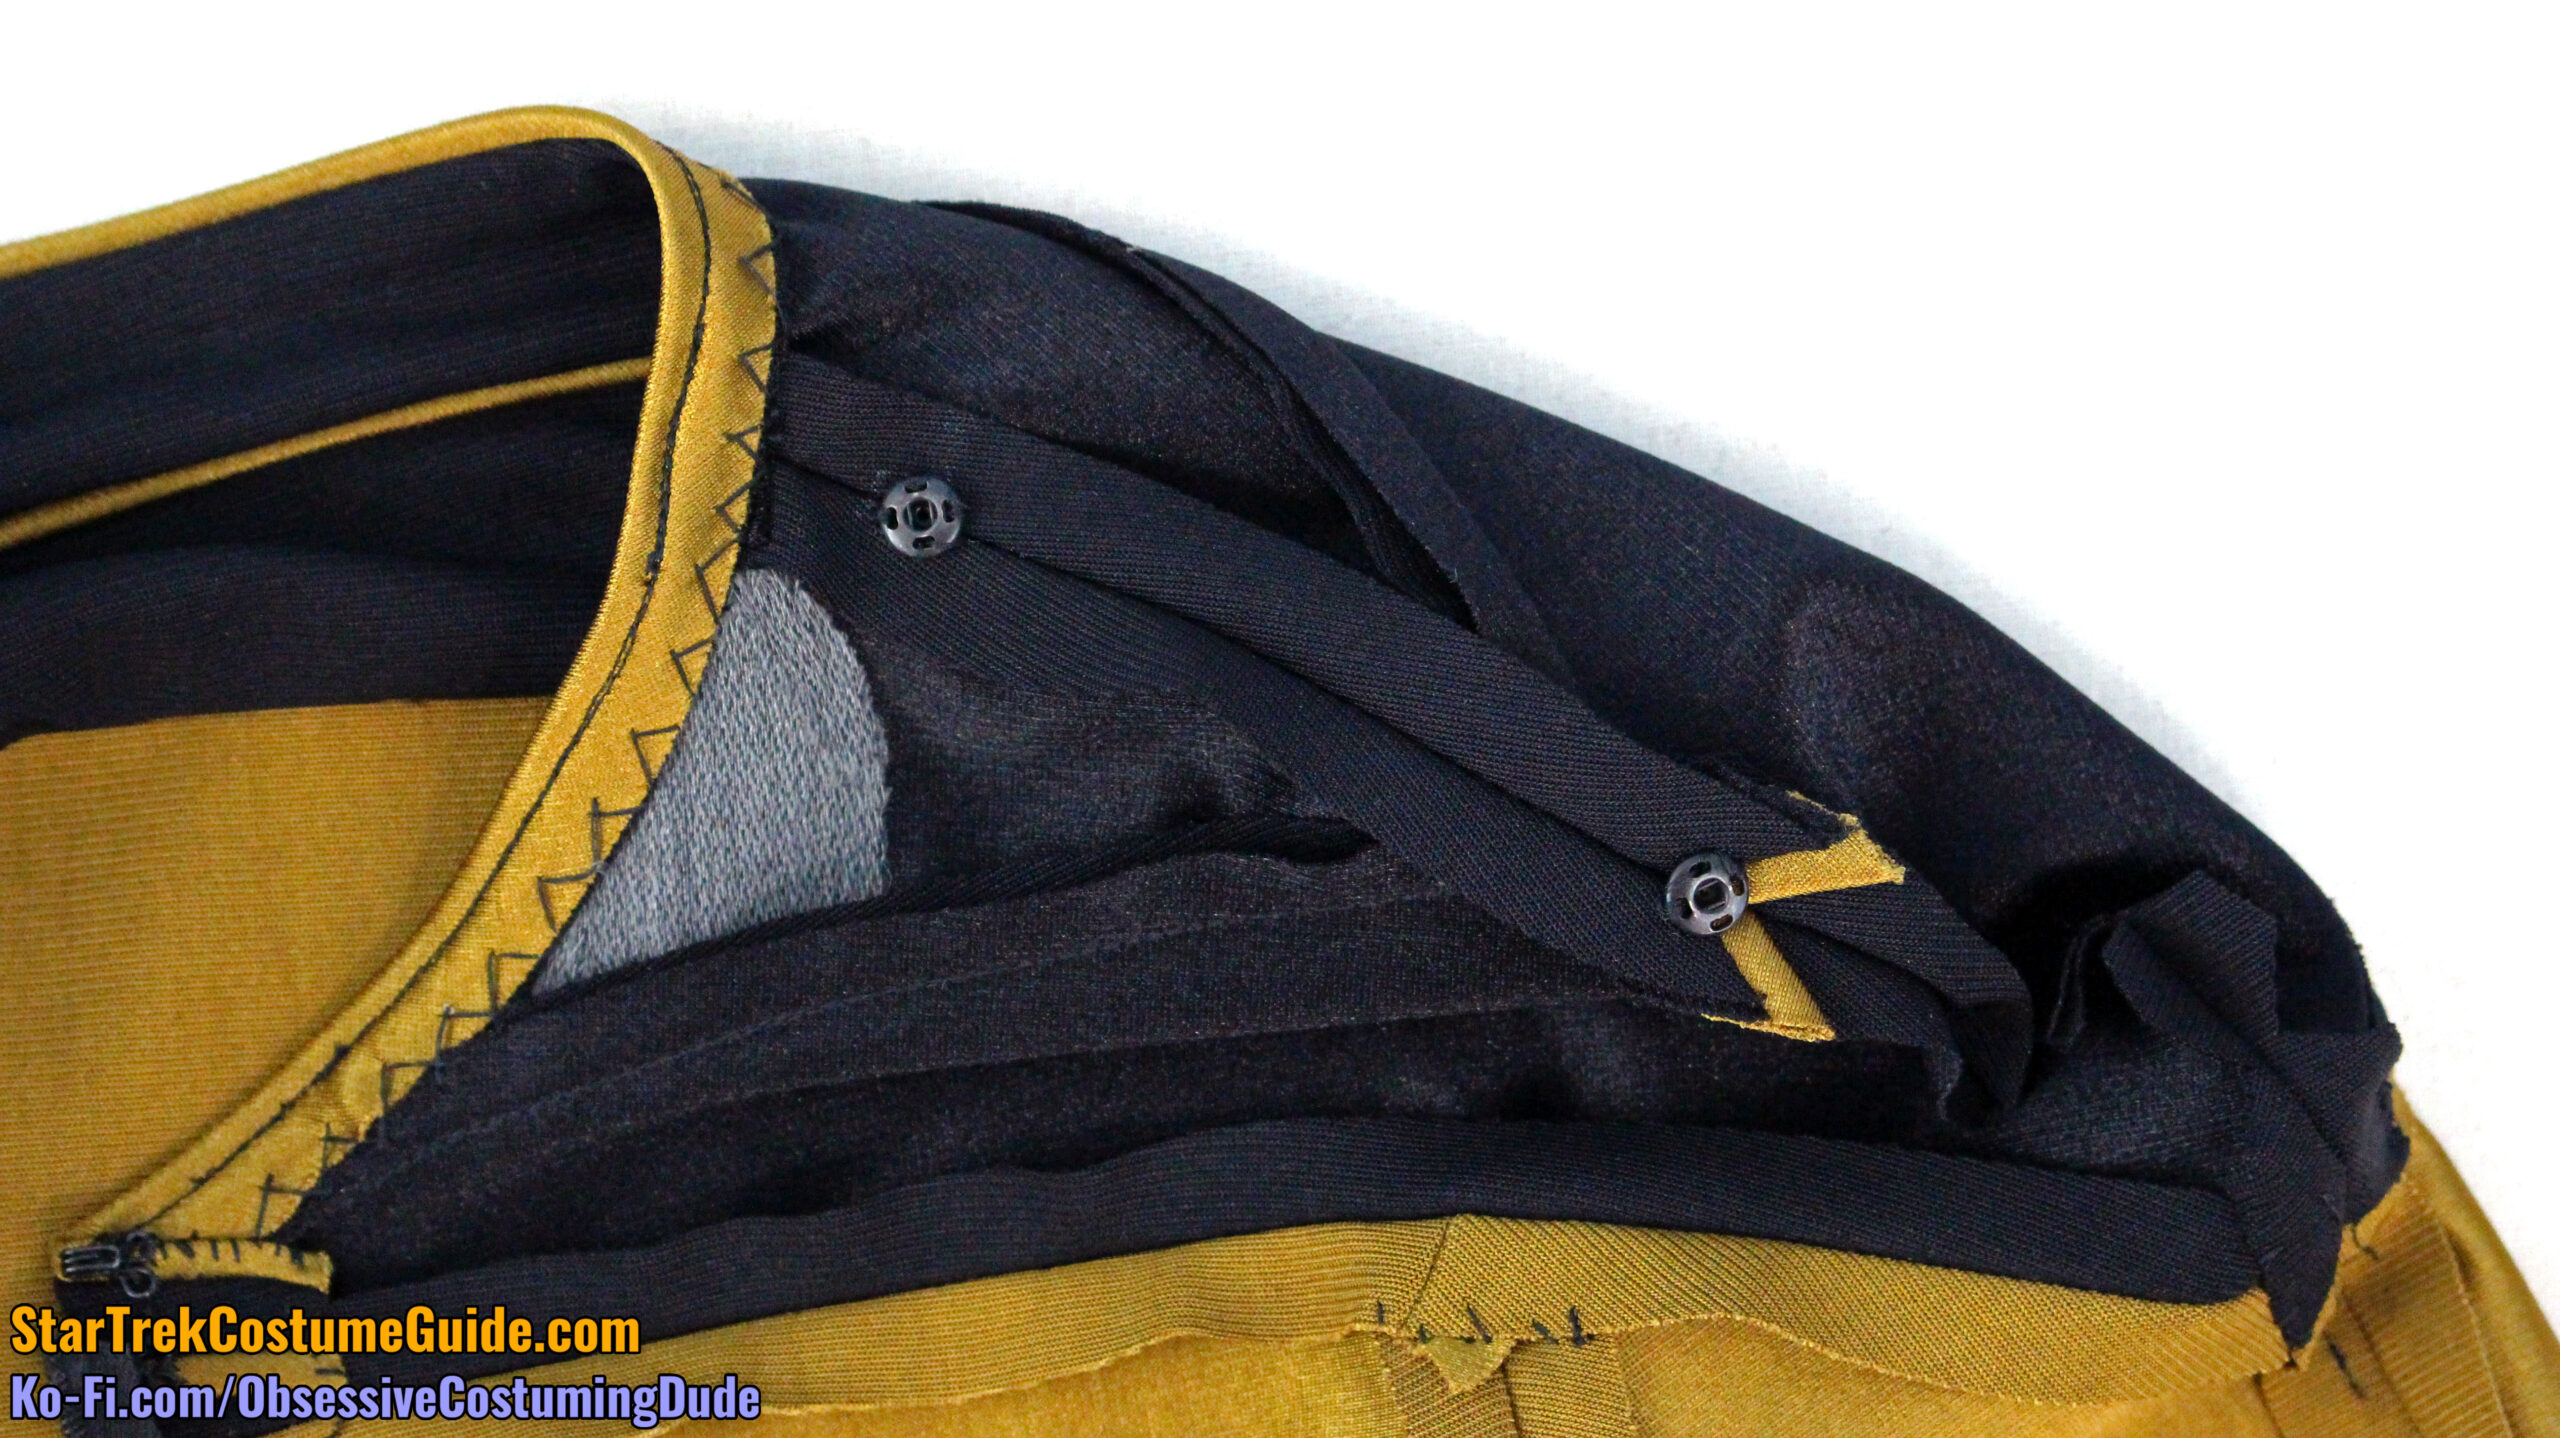
After you’ve made your shoulder pads, hand-sew a pair of corresponding snaps to the shoulder allowances of the jumpsuit.
Obviously the ideal positioning will depend on the wearer, but generally speaking, I suggest positioning both pad styles about an inch away from the neckline/trim or neckline/collar seam on the men’s version.
I recommend the same for the women’s early pad, but since the later pad is larger you’ll probably want to position it closer to the neckline/collar seam.
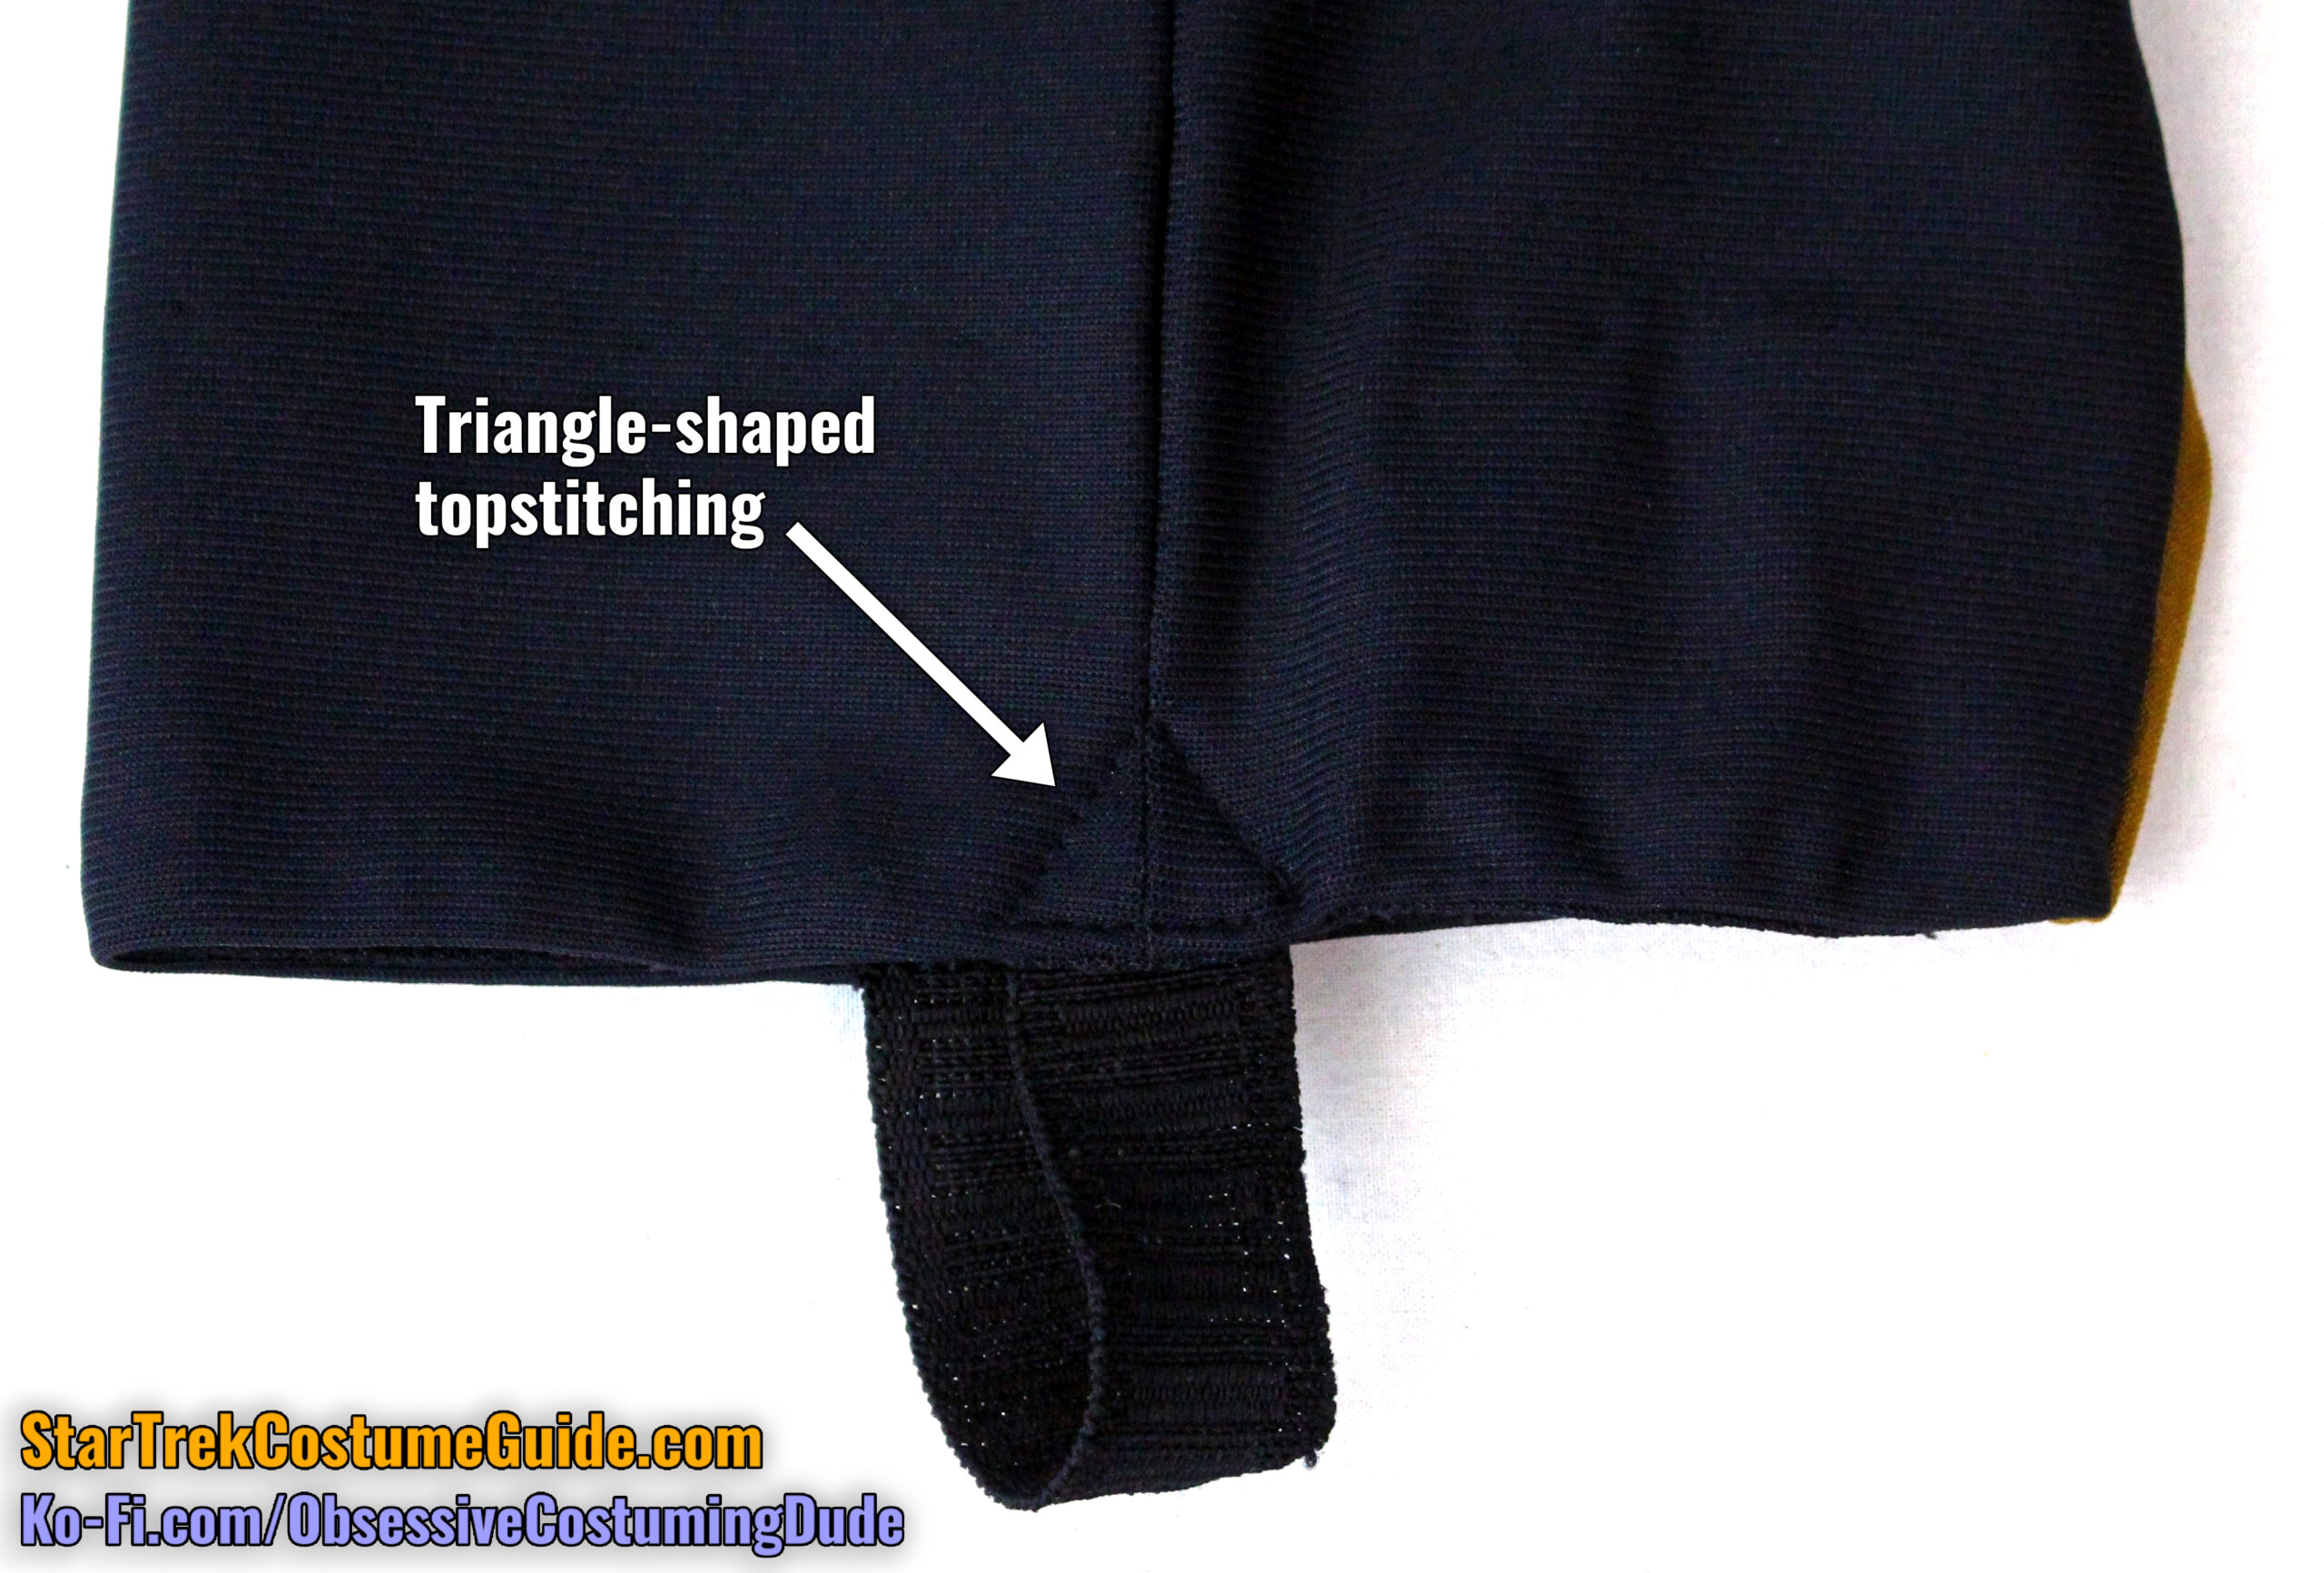
And finally, you’ll need to sew elastic “stirrups” to the bottom of the pant legs.
On all of the screen-used TNG jumpsuits I’ve seen, the stirrups were 1” black non-roll elastic, but feel free to make do with a different kind of elastic if you need to. (The most important characteristic is that it’s black.)
The exact length may vary a bit depending on the size of your boot and/or sole, but I generally suggest a length of 7” for the stirrup.
(That’s 5” for the stirrup itself and 1” allowance on each end.)
As you might recall from my multiple screen-used TNG jumpsuit examinations, these stirrups were attached several different ways. (I believe this may have been left up to the individual discretion of those in the wardrobe department.)
Screen-used Tasha Yar TNG jumpsuit
Screen-used Ensign Sito TNG jumpsuit
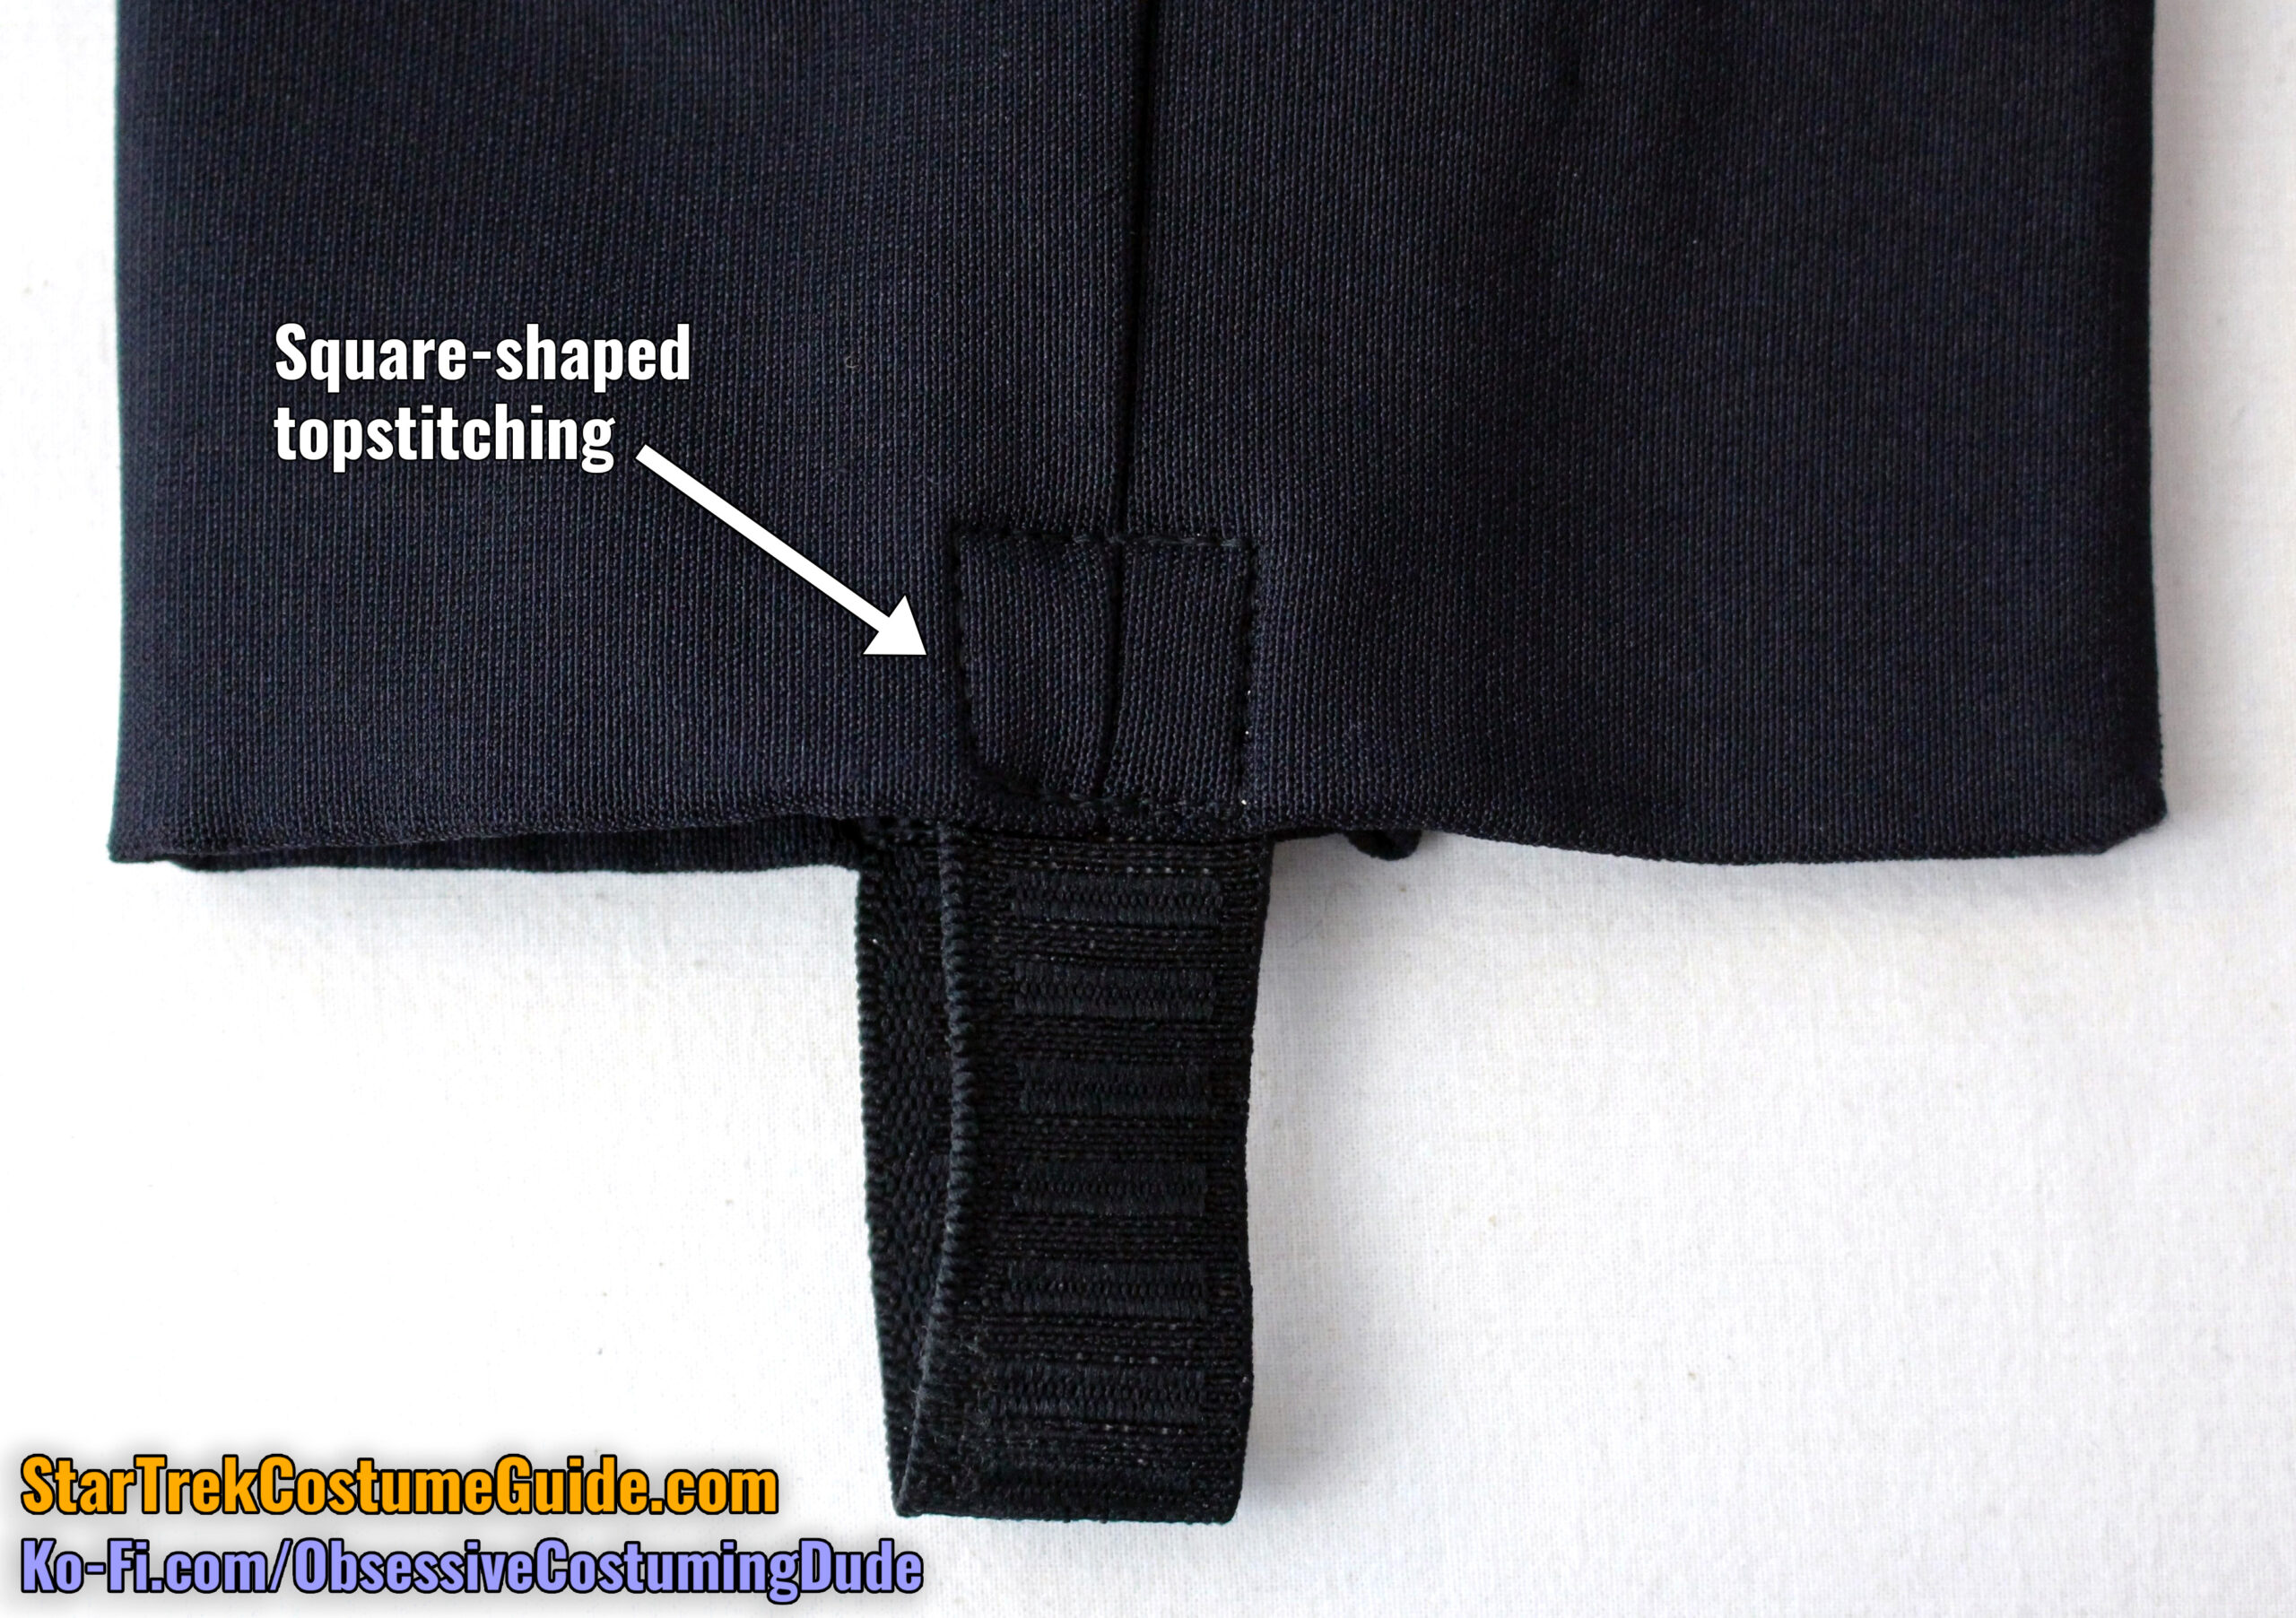
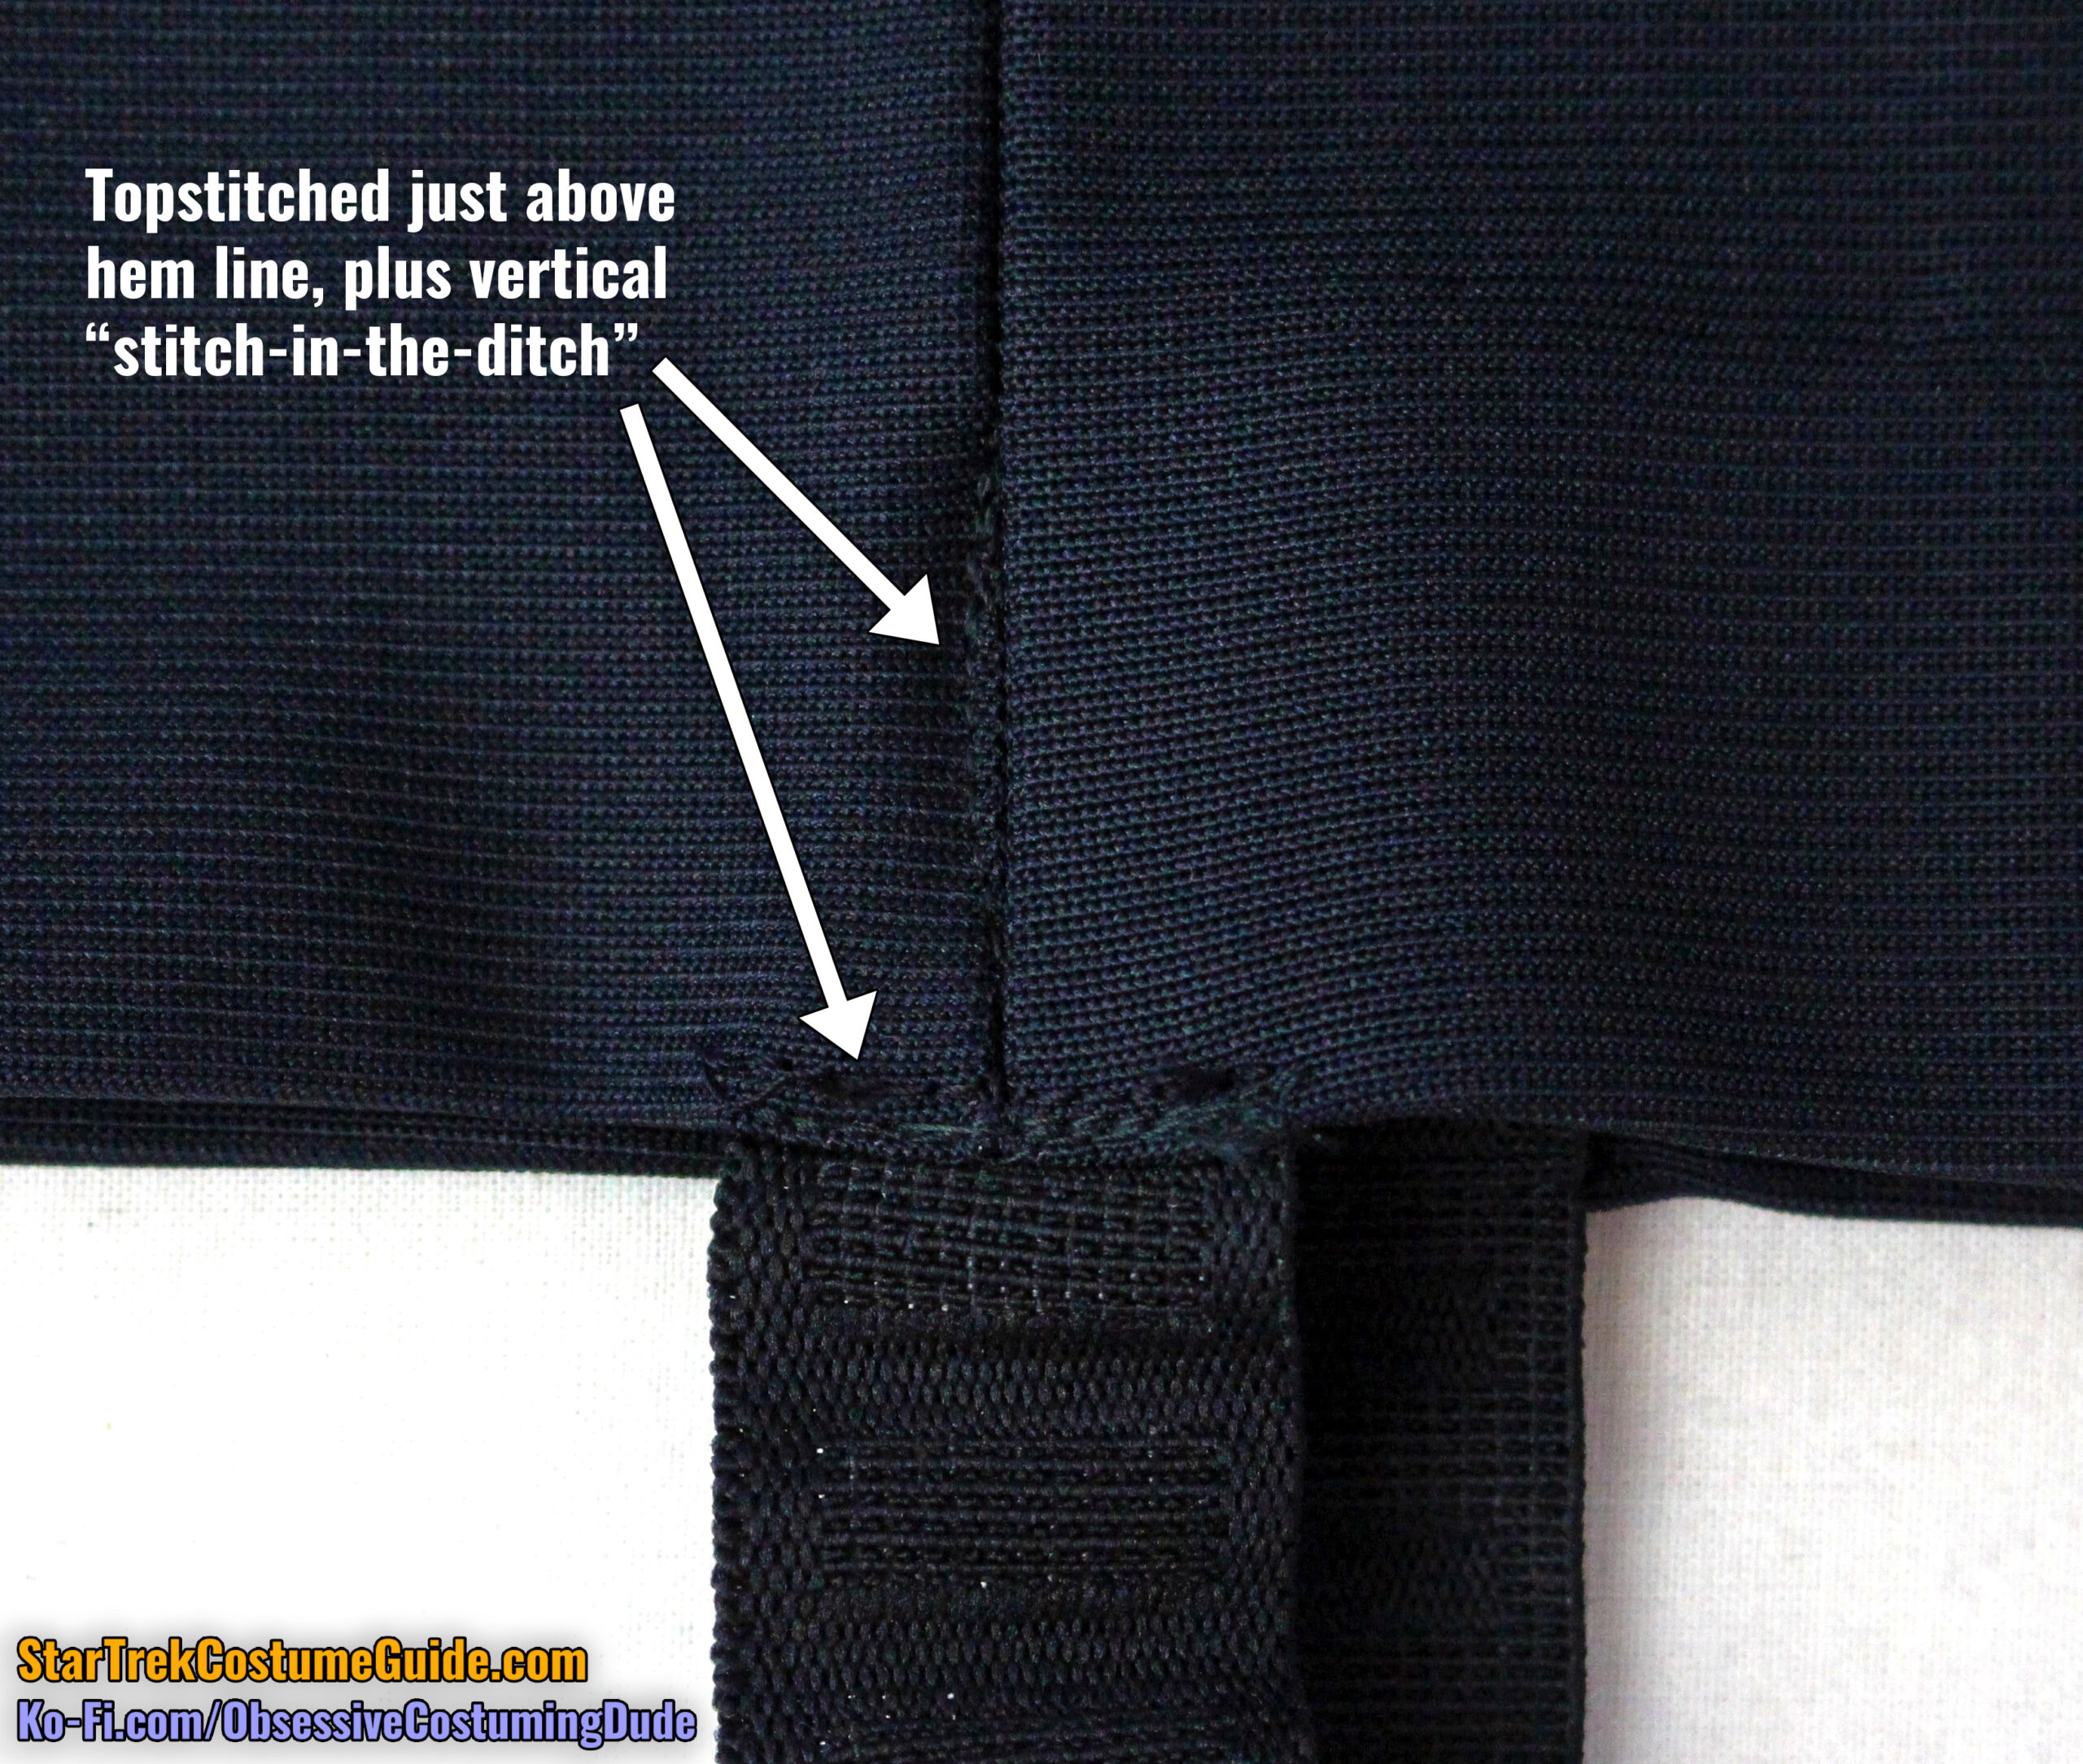
Personally, I prefer the method seen to the right – the elastic topstitched just above the hem line, and further secured with a vertical “stitch-in-the-ditch.”
Obviously, feel free to attach your elastic stirrups with whichever method you prefer. 🙂